A General Procedures

This chapter includes general procedures for the E5-APP-B.

Introduction

This chapter contains miscellaneous general procedures that are referred to within this manual.

Accessing the ELAP GUI Interface

ELAP employs a web-based user interface. It uses the typical client-server paradigm. The front end appears on an Internet browser. The back end operates on the platform. The front end is officially supported on Microsoft® Internet Explorer, versions 8.0 or 9.0, and on Mozilla® Firefox®, version 3.0.0 or later.:

CAUTION: The User Interface may not function correctly with the browser you are using.
Microsoft® Internet Explorer, versions 8.0 and 9.0, have been certified for this application

Use the following procedure to access the main screen of the ELAP GUI interface.

  1. Using the selected browser (Microsoft® Internet Explorer 8.0 or 9.0, or Mozilla® Firefox® 3.0.0 or later), type the IP address for your ELAP application into the URL field.

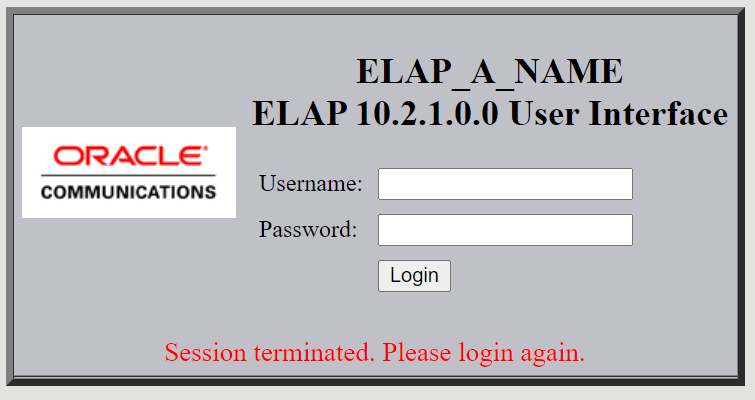
    The login screen shown in general-procedures1.html#GUID-60C278D8-DAEE-460B-A222-6F42FDD0B417__V5405805 appears.

    Figure A-1 ELAP User Interface Screen


    ELAP User Interface Screen

    If using Firefox®, the following message will be displayed when logging into the ELAP GUI:
    CAUTION: The User Interface may not function correctly with the browser you are using. 
    Microsoft® Internet Explorer, versions 8.0 and 9.0, have been certified for this application

    Note:

    general-procedures1.html#GUID-60C278D8-DAEE-460B-A222-6F42FDD0B417__V5405805 does not show the release number that appears on the ELAP User Interface Login window because this manual covers multiple ELAP releases.
  2. Enter the appropriate username and password.
    Specify a username that has permission to access the menu items indicated in the procedure to be performed. Table A-1 shows the default usernames. Additional usernames can be defined by selecting the User Administration menu item. For more information about assigning usernames, refer to ELAP Administration and LNP Feature Activation.

    Table A-1 Usernames

    ELAP UI Login Name Access Granted

    epapmaintelapmaint

    Maintenance menu and all sub menus

    epapdebugelapdebug

    Debug menu and all sub menus

    epapplatformelapplatform

    Platform menu and all sub menus

    uiadmin

    User Administration menu

    epapallelapall

    All of the menus in this Table

  3. Continue with the procedure that invoked this procedure.

Connecting to the Server Command Line

You can connect to the ELAP server command line for the following purposes:

It is possible to connect to the ELAP server command line in any of the following ways:

  • Use a secure shell (ssh) utility to connect to either server’s IP address. This connection will be made through the port that is identified as eth01 on the ELAP E5-APP-B Interconnect and is identified as eth91 by the software. For more information, see Using ssh to Connect to the Server Command Line.

  • Use a secure shell (ssh) utility to accessible ELAP server. Use command minicom mate to log on to the mate ELAP server's command line.
  • If access to the MPS server is not available through an IP network, connect to the E5-APP-B card via the serial port:

    For connecting the E5-APP-B A card, disconnect the console cable from the serial port on the E5-APP-B card's adapter. The cable should be disconnected at the point where it connects to the serial port labeled 'S1' on the E5-APP-B card's adapter and use it for serial access. Cable part numbers - 830-1220-xx.

  • Connect a cable, Part Number 830-0058-xx (xx represents the cable length), to serial port ttyS0 on either the A or B server (see Connecting a Local Access Terminal to Server’s Serial Port).

Using ssh to Connect to the Server Command Line

You can log into either ELAP server from any terminal using a ssh (Secure Shell) utility.

Note:

If your terminal does not already have ssh installed, PuTTY is a free ssh utility for Windows that you can download from the web.

Use the following procedure to ssh to the server command line.

  1. From a command-line prompt on your terminal, enter the following command to start a secure shell session with an ELAP server: ssh <username>@<server_IP_address>

    where <server_IP_address> is the IP address of the server and <username> is either of the following:

    • ELAPconfig—for accessing the ELAP text interface, enter the ELAPconfig username and the password provided by your system administrator. For more information about the ELAP text interface, see Accessing the ELAP Text Interface.

    • syscheck—for runing the syscheck utility, enter syscheck as the username and syscheck as the password. For more information about running syscheck from this interface, see Running syscheck Using the syscheck Login.

Connecting a Local Access Terminal to Server’s Serial Port

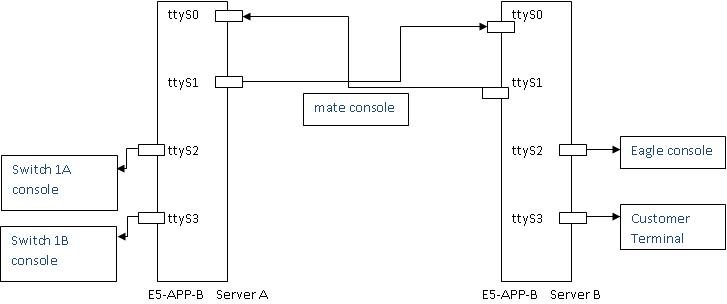
Port ttyS0 is the port used on both ELAP A and B servers to connect to the console.

  1. Connect the workstation you will use as the Local Access Terminal to Serial port ttyS0 on the server (see Figure A-2).

    Figure A-2 E5-APP-B on ELAP Console Connectivity


    img/elap_e5-app-b_console_connectivity.jpg
  2. Reconnect the original cables as shown in Figure A-2.
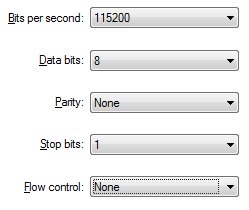
  3. If using a laptop, the refer to Figure A-3 for the correct settings needed for the local console connection to the ttyS0 port:

    Figure A-3 Laptop Connection Settings


    img/port_settings_elap_alarms.jpg
  4. When the prompt appears on the Local Access Terminal, enter either of the following usernames and associated passwords:
    • To access the ELAP text interface, enter the ELAPconfig username and the password provided by your system administrator. For more information about the ELAP text interface, see Accessing the ELAP Text Interface.
    • To run the syscheck utility, enter syscheck as the username and syscheck as the password. For more information about running syscheck from this interface, see Running syscheck Using the syscheck Login
    Once a server has been installed with ELAP application and cabling has been completed, the subsequent upgrades can be done via serial connectivity from the mate ELAP server.

Accessing the ELAP Text Interface

The ELAP text-based user interface is accessed through the Local Access Terminal. The text-based user interface is used for initial configuration of the ELAP application. Some errors described in this manual result from errors in the initial configuration, and recovery from them requires that you access the text interface.

For information about the initial configuration of the ELAP application, refer to ELAP Administration and LNP Feature Activation.

  1. Connect the Local Access Terminal to the server you need to access (see Connecting a Local Access Terminal to Server’s Serial Port).
  2. Log in with username elapconfig and the password provided by your system administrator.
  3. Continue with the procedure that invoked this procedure.

Saving Logs Using the ELAP GUI

During some corrective procedures, it may be necessary to provide Oracle with information about the ELAP for help in clearing an alarm. These log files are used to aid unresolvable-reference.html#GUID-A2C37E16-F0BA-4FB6-9D93-1D4A95A40DC7 when troubleshooting the ELAP.

Use the following procedure to save logs using menu selections from the ELAP GUI.

  1. Log in to the User Interface screen of the ELAP GUI (see Accessing the ELAP GUI Interface).
  2. Check the banner information above the menu to verify that you are logged into the problem ELAP indicated in the UAM.

    If it is necessary to switch to the problem ELAP, click the Select Mate menu item.

  3. From the menu, select Debug> Capture Log Files.
  4. Deselect (if necessary) the box labeled Check if you want to capture core files with the Logs, as shown in general-procedures1.html#GUID-4CD79440-8472-4F1C-9681-7CD54DC20A44__V886821.

    Note:

    Contact unresolvable-reference.html#GUID-A2C37E16-F0BA-4FB6-9D93-1D4A95A40DC7 for assistance before capturing core files with the log files.

    Figure A-4 Capture Logs File Screen


    Capture Logs File Screen

  5. Click the Capture Logs button to capture the log files.
    After completion, verify the following response:

    Figure A-5 Capture Logs Success


    Capture Logs Success

  6. Contact unresolvable-reference.html#GUID-A2C37E16-F0BA-4FB6-9D93-1D4A95A40DC7 to analyze and check the log files.
  7. When unresolvable-reference.html#GUID-A2C37E16-F0BA-4FB6-9D93-1D4A95A40DC7 has finished analyzing the logs files, delete them from the server by selecting Debug>Manage Logs Files and Backups to open the Manage Logs and Backups Screen.
  8. Click the checkboxes for the files you want to delete and then click the Delete Selected File(s) button.
    An example is shown in general-procedures1.html.

    Figure A-6 Deleting Captured Log Files


    img/capture_delete_logs_elap.jpg
    .
    When the log files have been deleted, the GUI displays confirmation, as shown in general-procedures1.html.

    Figure A-7 Delete Log Files Success


    img/t_savelogs_procedures_general_procedures_t1100mps_maintmanual-fig4.jpg

Restarting the ELAP Software

This procedure is used when referenced by one of the procedures in Platform and Application Alarms.

Caution:

Perform this procedure only when directed to by one of the procedures in Platform and Application Alarms. This is not a standalone procedure.

The PDBA items that appear in the screens in this procedure apply only to the EPAP application. These items will not appear for the ELAP application.
  1. Log in to the User Interface screen of the ELAPGUI (see Accessing the ELAP GUI Interface).
  2. Check the banner information above the menu to verify that you are logged into the problem ELAP indicated in the UAM.
    If it is necessary to switch to the problem ELAP, select Select Mate.
  3. From the elapmaint screen, select Process Control>Stop Software.
    The screen shown in Figure A-8 appears:

    Figure A-8 Stop Software Confirmation


    img/t_restarting_epap_software_general_procedures_t1000mps_maintmanual-fig1.jpg

    img/t_restarting_elap_software_general_procedures_t1100mps_maintmanual-fig1.jpg
  4. On the Stop ELAP Software screen, make sure the checkboxes are is checked as shown in Figure A-9.
  5. Click the Stop ELAP Software button to stop the software.
    The screen shown in Figure A-9 appears.

    Figure A-9 Stop Software Completion Screen


    img/t_restarting_elap_software_general_procedures_t1100mps_maintmanual-fig2.jpg
  6. Select Process Control> Start Software.
  7. From the Start ELAP Software screen, make sure the check boxes are checked as shown in Figure A-10:

    Figure A-10 Start ELAP Software


    img/t_restarting_elap_software_general_procedures_t1100mps_maintmanual-fig3.jpg
  8. Click the Start ELAP Software button to start the software.
    The screen shown in Figure A-11 confirms that the software has started:

    Figure A-11 Start Software Completion Screen


    img/t_restarting_elap_software_general_procedures_t1100mps_maintmanual-fig4.jpg

Rebooting the MPS

This procedure is used when referenced by one of the procedures in Platform and Application Alarms.

Caution:

Perform this procedure only when directed to by one of the procedures in Platform and Application Alarms. This is not a standalone procedure.

The PDBA items that appear in the screens in this procedure apply only to the EPAP application. These items will not appear for the ELAP application.
  1. Login to the User Interface screen of the ELAPGUI (see Accessing the ELAP GUI Interface).
  2. Check the banner information above the menu to verify that you are logged into the problem ELAP indicated in the UAM.
    Select Select Mate if necessary to switch to the problem ELAP.
  3. Select Platform> Reboot the MPS.
    The screen shown in Figure A-12 appears:

    Figure A-12 Request Reboot of the MPS


    img/t_rebooting_mps_general_procedures_t1100mps_maintmanual-fig1.jpg
  4. Click the Reboot the MPS button to restart the MPS.
    The screen shown in Figure A-13 is displayed.

    Figure A-13 Confirm Requested Reboot the MPS


    img/t_rebooting_mps_general_procedures_t1100mps_maintmanual-fig2.jpg
  5. Click the Continue button.
    The screen shown in Figure A-14 is displayed.

    Figure A-14 Reboot Information


    img/t_rebooting_mps_general_procedures_t1100mps_maintmanual-fig3.jpg
    This will reboot the ELAP and also start the ELAP software. The connection to the ELAP will be lost.
  6. At the EAGLE input terminal, enter the rept-stat-mps command to verify the status of the ELAP.
    Refer to Commands User's Guide to interpret the output.
  7. If the problem has not been resolved, contact unresolvable-reference.html#GUID-A2C37E16-F0BA-4FB6-9D93-1D4A95A40DC7 for assistance.
    Have the system health check data available.
  8. Return to the procedure that directed you to perform this procedure.