9 EMS, RTDB, and LSMS-Related Functions
- ELAP EMS Routing and Configuration
- Copying, Bulk Loading, Restoring, Verifying, and Distributing the Real Time Database (RTDB)
- Manually Verifying and Restarting the EAGLE Agents on the LSMS
9.1 EMS Routing
EMS routing information enables the LSMS to send subscription information to the proper network elements. The EMS routing function allows you to modify or view the routing info that you defined using the TN Filters and GTT Groups (see Chapter 4 of Database Administratior's Guide for LSMS).
9.2 Managing Bulk Load from the LSMS
This section describes how to perform a bulk load, view bulk load log files, and understand bulk load error messages.
9.2.1 Bulk Load Procedure
Use the following procedure to manage a bulk load from the LSMS user interface.
Note:
Before starting this procedure, contact Customer Care Center to be available for assistance if any problems are encountered while performing this procedure.- Ensure that the network element is prepared to receive a bulk load by doing the following:
- Log in with the user name and password for a user who is authorized to access the menu items shown in this procedure. The ELAP GUI is displayed, as shown in Figure 9-1.
Figure 9-1 ELAP Main Menu

- Select Maintenance > LSMS HS Bulk Download > Change Enabled. The window shown in Figure 9-2is displayed.
Figure 9-2 Enabling Change HS Bulk Download

- Log in with the user name and password for a user who is authorized to access the menu items shown in this procedure.
- Start the Bulk Load window using either of the following:
- Right-click the LSMS Console window’s EMS status icon that corresponds to the network element requiring the bulk load, and select . The Bulk Load window displays. An example of this window is shown in Figure 9-3.
Figure 9-3 Bulk Load Window

- Right-click the LSMS Console window’s EMS status icon that corresponds to the network element requiring the bulk load, and select .
- To initiate the bulk load, click the Start button. The Start button is replaced by the Abort button, and the View Log button becomes selectable. Progress is indicated by start time, elapsed time, numbers of successful and failed update commands, and status reported in the status field at the bottom of the window. When the bulk load phase completes (as indicated in the status field and by a value appearing in the End Date/Time field for the Bulk Load phase), the Re-sync phase begins and progress continues to be indicated in the same ways. All other buttons become non-selectable. Table 9-1 shows the meaning of each of the fields that appears in this window.
Table 9-1 Fields in Bulk Load Window
Field Description Possible Values Bulk Loaded
Total number of LNP commands that were successfully transmitted and applied to the NE’s LNP database during the initial download phase of the bulk load operation.
0 — 99,999,999
Resynced
Total number of LNP commands that were successfully transmitted and applied to the NE’s LNP database during the resynchronization phase of the bulk load operation.
0 — 99,999,999
Download Total
Total number of LNP commands that were successfully transmitted and applied to the NE’s LNP database during initial download and the resynchronization phases of the bulk load operation.
0 — 99,999,999
Errors
Total number of commands that were successfully transmitted but rejected by the NE during the initial download and the resynchronization phases of the bulk load operation.
0 — 99,999,999
Bulk Load Start Date/Time
Time at which the initial download phase of the bulk load operation was started by the user.
MM/DD hh:mm:ss1
Bulk Load End Date/Time
Time at which the initial download phase of the bulk load operation completed successfully or terminated abnormally.
MM/DD hh:mm:ss1
Bulk Load Elapsed Date/Time
Amount of time the initial download phase of the bulk load operation took to complete or the amount of time it ran before the user aborted it.
MM/DD hh:mm:ss1[A|F]2
Re-sync Start Date/Time
Time at which the resynchronization phase of the bulk load operation was started by the user.
MM/DD hh:mm:ss1
Re-sync End Date/Time
Time at which the resynchronization phase of the bulk load operation completed successfully (with or without command rejections at the NE) or terminated abnormally.
MM/DD hh:mm:ss1
Re-sync Elapsed Date/Time
Amount of time the resynchronization phase of the bulk load operation took to complete or the amount of time it ran before the user aborted it.
hh:mm:ss1[A|F]2
Status
Appears as text at the bottom left of the window to indicate the current status of the resynchronization operation.
Varies
1 MM indicates month, range 01—12
DD indicates day, range 01—31
hh indicates hour, range 00—23
mm indicates minute, range 00—59
ss indicates second, range 00—59
2 A is appended at the end of the time if the operation is aborted.
F is appended at the end of the time if the operation fails.
The time required to download a database from the LSMS to the network element varies depending on the number of records provisioned in the database and the quality of the transmission and connections. To view the bulk load log file, see Bulk Load Log File. To abort during either the bulk load phase or the resynchronization phase of an electronic bulk load is in progress, click the Abort button. A confirmation dialog displays, as shown in Figure 9-4.
Figure 9-4 Abort Bulk Load Operation Dialog

- When the bulk load operation completes, the information dialog shown in Figure 9-5appears. Click OK.
Figure 9-5 Bulk Load Complete Information Dialog

- When the bulk load operation completes or is aborted, the Abort and Close buttons are replaced by Commit and Discard buttons, as shown in Figure 9-6 .
Figure 9-6 Bulk Load Complete
 Commit before you click the Discard button, you can view the bulk load log file by clicking the View Log button (for more information about the file, including how to view it at other times, see Bulk Load Log File). To conclude the bulk load operation, you must click one of the following buttons:
- Click the Discard button to end the bulk load application (closing the Bulk Load window) and to send the NE a discard command that results in changes to the ELAP RTDB that cannot be undone. (For whatever reason you are performing this procedure, the ELAP RTDB is now in a state of requiring database maintenance, but the bulk load application is no longer running.)
Note:
On the active MPS, verify that the DB Status is Coherent and the RTDB Level is greater than zero before copying the newly downloaded database to the mated ELAP.
9.2.2 Support ELAP Reload Via Database Image Function
The Support ELAP Reload via Database Image (SERVDI) function performs bulk data downloads (BDD) that significantly reduces the time needed to reload an ELAP database.
The SERVDI function is executed on the LSMS system and creates an ELAP RTDB image file directly from the LSMS LNP databases. See Figure 9-7. The SERVDI download file must be transferred to the ELAP system backup directory. Once transferred, the file is activated by using the Restore RTDB on ELAP process in the ELAP GUI.
Figure 9-7 ELAP Reload Via DB Image Function

Note:
Although the SERVDI is run from the Active LSMS, the SERVDI backup is normally taken from the standby LSMS. If Standby LSMS is not available, the SERVDI takes the backup from the Active LSMS.9.2.2.1 SERVDI Bulk Download
Use the following procedure to perform an ELAP bulk download from the LSMS.
Note:
SERVDI is part of the optional LNP feature. Contact Customer Care Center for more information.Note:
The LSMS bulk download SERVDI creates the bulkload file, but cannot send it to the active ELAP unless the Secure Shell Keys (SSKs) have been exchanged. The procedure for exchanging the keys is part of the ELAP configuration procedure, and is illustrated in Copy RTDB from Remote. After the key exchange procedure is complete, the SERVDI bulk download can be sent from the LSMS to the active ELAP.- From the LSMS Console window, select where <CLLI> is the ELAP network element that requires the bulk download.
Figure 9-8 ELAP Reload Via DB Image

- Click Generate Image.
Figure 9-9 Generate Image

- The LSMS creates a database file of the ELAP database image. When the process completes, a confirmation dialog appears.
Figure 9-10 Database Image Completed

Click OK to continue.
Note:
If necessary, you can stop the bulk download process before the database image is complete. To stop the bulk download process, click Abort. A confirmation dialog appears. Click Yes to terminate the bulk download in progress. Click No to continue with the bulk download.Figure 9-11 Abort Bulk Download

Figure 9-12 Abort Confirmation

- Click Transfer Image to transfer the bulk download to the ELAP.
Figure 9-13 Transfer Database Image to ELAP
 When the transfer completes, a confirmation dialog appears. Click OK to continue.
Figure 9-14 Image Transfer Complete

9.2.3 Bulk Load Log File
This section describes the following topics:
Viewing the Bulk Load Log File
After a resynchronization has begun, you can view the electronic bulk load log file by clicking the View Log button. The browser window displays the log file LsmsBulkload.log.<MMDD>. The file is located in the directory /usr/local/LSMS/logs/<CLLI>. <CLLI> is the Common Language Location Identifier of the network element receiving the bulk load. < MMDD> is the timestamp that contains month and day that the file was created.
You can also use one of the following methods to open the window shown in Figure 9-15 to browse for this log:
-
Select Logs > Other... from the main menu of the LSMS Console window.
-
Click on the LSMS Console window’s EMS Status icon that corresponds to the network element receiving the bulk load so that the icon is highlighted. Right-click and select Logs > LNP Database Synchronization > Bulk Load.
The Open Log Files window displays.
Figure 9-15 Open Log Files Window

LsmsBulkload.log.<MMDD> that corresponds to the month and day you desire.
Note:
Log files are maintained for seven days and then automatically removed from the LSMS.Bulk Load Log File Contents
When a bulk load is started, the bulk load log file for that day is appended (if this is the first bulk load of the day, the file is created). For each bulk load performed on that day, the bulk load log file contains information similar to the information displayed on the Bulk Load main window, such as start and end times for the bulk load, and numbers of successes and failures in various LNP categories.
The bulk load log file contains the following sections:
-
Header Section
-
Bulk Load Section
-
Resynchronization Section
-
Summary Section
-
Download Commit/Discard Section
Refer to Appendix C of LNP Database Synchronization User's Guide for more information on these sections.
Figure 9-16 shows an example of a bulk load log file.
Figure 9-16 Example Bulk Load Log File


9.3 Copying One RTDB from Another RTDB
For more information about when to perform each method, refer to the "Choosing a Database Maintenance Procedure" section in LNP Database Synchronization User's Guide.
Restore the RTDB from the Mated ELAP
ELAP uses a Distributed Replicated Block Device (DRBD) to replicate the database. The DRBD replicates the database by using a snapshot image of the database. The Support ELAP Reload Via Database Image function, or SERVDI, is executed on the LSMS for the bulk download, and the process is completed with the procedure to restore the RTDB. See Restore RTDB on ELAP for the detailed procedure.
For more information on the SERVDI function, see SERVDI Bulk Download.
Copy RTDB from Remote ELAP
ELAP uses a snapshot image of the database to replicate the database. The Copy RTDB from Remote procedure is used to copy the RTDB from the remote ELAP.
After completing the copy procedure, the database must be restored to make the transferred file the active RTDB. See Restore RTDB on ELAP for the procedure to restore the RTDB.
9.4 Verifying RTDB Status
9.4.1 Verifying RTDB Status at the EAGLE Terminal
To verify the status of the ELAP RTDBs at the EAGLE terminal, enter the rept-stat-db:db=mps command.
The command output displays the database timestamp (DBTS) of both ELAP RTDBs in the RTDB-EAGLE field, as shown in bold in the following example. The DBTS indicates the last time an update was received by this RTDB from the LSMS. If the two DBTS values are not the same, the RTDB with the lower DBTS may need database maintenance.
    tekelecstp 02-10-29 08:55:54 NZST EAGLE 39.0.0

                     ELAP A  ( ACTV )
                     C  BIRTHDATE               LEVEL     EXCEPTION
                     -  -------------------   --------  --------------
    RTDB             Y  02-10-29 08:20:04       12345        -
    RTDB-EAGLE 02-10-29 08:20:04 12345 -
                                                                                -
                     ELAP B ( STDBY )
                     C  BIRTHDATE               LEVEL      EXCEPTION
                     -  -------------------  ---------- --------------
    RTDB             Y  02-10-29 08:20:04       12345        -
    RTDB-EAGLE 02-10-29 08:20:04 12345 -
;
9.4.2 Verifying RTDB Status at the ELAP User Interface
To verify the status of ELAP RTDBs at the ELAP Graphic User Interface (view the status of the databases), perform the following procedure.
- Log into the ELAP GUI with the user name and password for a user who is authorized to access the menu items shown in this procedure.The ELAP GUI is displayed, as shown in Figure 9-17.
Figure 9-17 ELAP Main Screen

- From the Main Menu, select RTDB > View RTDB Status.The ELAP GUI workspace displays the RTDB status, as shown in Figure 9-18.Note the values displayed for DB Level and DB Birthday for both the local RTDB and the mate RTDB.
Figure 9-18 ELAP RTDB Status

9.5 Restore RTDB on ELAP
Follow these steps to restore the RTDB from a backup file after performing a bulk download.
- From the ELAP GUI menu, select to ensure that no other updates are occurring. The screen shown in Figure 9-19 displays. Click the Stop ELAP Software button.
Figure 9-19 Stopping Software on the ELAP GUI
 After the software on the selected ELAP has stopped, the screen shown in Figure 9-20 is displayed.
Figure 9-20 Stop ELAP Software - Success

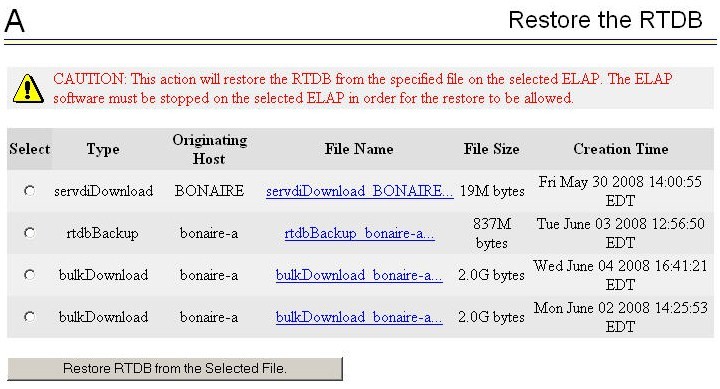
- Select .
The Restore the RTDB screen displays, Figure 9-21.
Figure 9-21 Restore the RTDB
- To confirm restoring the file, click the Confirm RTDB Restore button on the confirmation dialog, Figure 9-22.
Figure 9-22 Confirm RTDB Restore

- After the file is successfully restored, the screen shown in Figure 9-23 displays.
Figure 9-23 Successful RTDB Restoration

9.6 Copy RTDB from Remote
Note:
The software does not have to be stopped before performing this procedure.Restore the RTDB to make the transferred file the active RTDB.
Follow these steps to copy the RTDB from a remote ELAP to the local ELAP.
- From the ELAP GUI menu, select .
The Figure 9-24 screen is displayed.
Figure 9-24 Copy RTDB from Remote Screen

- Select the appropriate source from the screen that is displayed, as shown in Figure 9-25. Then, click the Copy the selected remote RTDB backup button.
Figure 9-25 Copy RTDB from Remote Selection
 After the copy is complete, a confirmation message is displayed.
To reload the RTDB, follow the procedure as shown in Restore RTDB on ELAP.
9.7 Distributing the LNP Database after LSMS-Based Operation or RTDB Copy
The network element has multiple copies of the LNP database. Synchronization operations are performed on one database. After an RTDB copy or a synchronization operation initiated from the LSMS GUI, the remaining NE LNP databases must be synchronized with the newly synchronized NE database in one of the following ways:
-
Automatic Data Distribution
After the following LNP database synchronization operations, data is distributed automatically from the network element’s newly synchronized LNP database to all other LNP databases at the network element:
-
Automatic resynchronization (see “Automatic Resynchronization Process” in LNP Database Synchronization User's Guide
-
Reconcile (see “Audit and Reconcile Overview” in LNP Database Synchronization User's Guide)
-
-
Network Element Database is not Required after Copying an RTDB from its Mate ELAP
If network element’s database synchronization is accomplished only by copying an RTDB from its mate ELAP’s RTDB, but not when copying from the mate RTDB is performed after copying an RTDB from the remote mated network element or after a bulk load from the LSMS, it is not necessary to distribute the data to the Service Module cards because they are already synchronized with the RTDB that was used to restore from. Therefore, after the copy, the Service Module cards are now synchronized with both RTDBs.
-
Other Network Element Database Distribution
After other LNP database synchronization operations, the network element main LNP database must be distributed by operator intervention to other LNP databases within the network element (both the mate RTDB and the Service Module cards). See Distributing an RTDB to Service Module Cards.
9.7.1 Distributing an RTDB to Service Module Cards
This section describes how to distribute the data from the ELAP RTDB to the Service Module cards after the RTDB has been updated by one of the following actions:
-
Copied from an RTDB on the mated network element (see Copying One RTDB from Another RTDB)
-
Updated by one of the following operations sent from the LSMS:
-
Bulk loaded from the LSMS (see Managing Bulk Load from the LSMS)
-
Support ELAP Reload Via Database Image (SERVDI) bulk download from the LSMS (see SERVDI Bulk Download.)
-
9.7.2 Disabling Bulk Load
If you have distributed a restored the RTDB LNP data to the Service Module cards (as described in Distributing an RTDB to Service Module Cards) after an LSMS-initiated procedure, perform the following procedure.
- Select .
The Change LSMS HS Bulk Download Enabled dialog opens, Figure 9-26.
Figure 9-26 Change LSMS HS Bulk Download Enabled Dialog

The information field should show that the LSMS Bulk Download for this ELAP is currently enabled.
9.8 Manually Verifying and Restarting the Eagle Agents on the LSMS
This procedure explains how to verify that an Eagle agent has started on the LSMS. It also explains how to stop and start the agent, using the eagle command.
The Eagle Agent application (eagleagent) is responsible for:
-
Subscribing to the broadcast channels to receive all NPAC and local data updates
-
Connecting with a single EAGLE node using the HSOP (High Speed Operations Protocol) protocol and forwarding LNP updates to the EAGLE
-
Filtering LNP data based on the provisioned filter information before forwarding it to the EAGLE (for more information, refer to EMS Routing)
-
Performing automatic resynchronization with an EAGLE node upon connection establishment (for more information, refer to LNP Database Synchronization User's Guide)
One instance of the eagleagent process exists for each supported EAGLE node.