5 LSMS Reports

This chapter contains procedures for generating, viewing, and printing LSMS reports in a predefined format. It also contains information about the Report Generator, which enables you to create customized LSMS reports.

Introduction

This chapter provides general information about viewing reports in a browser window. It also provides specific, step-by-step procedures for creating, viewing, and deleting the following types of pre-formatted LSMS reports.

Note:

You can generate up to ten reports at a time using the Reports menu item.

  • Service Provider Administrative Data

  • Service Provider Network Data

  • EMS Configuration Data

  • Default GTT Data

  • Override GTT Data

  • NPA Split Data

  • LSMS Subscriptions by LRN Data

  • LSMS Subscriptions by Service Provider Data

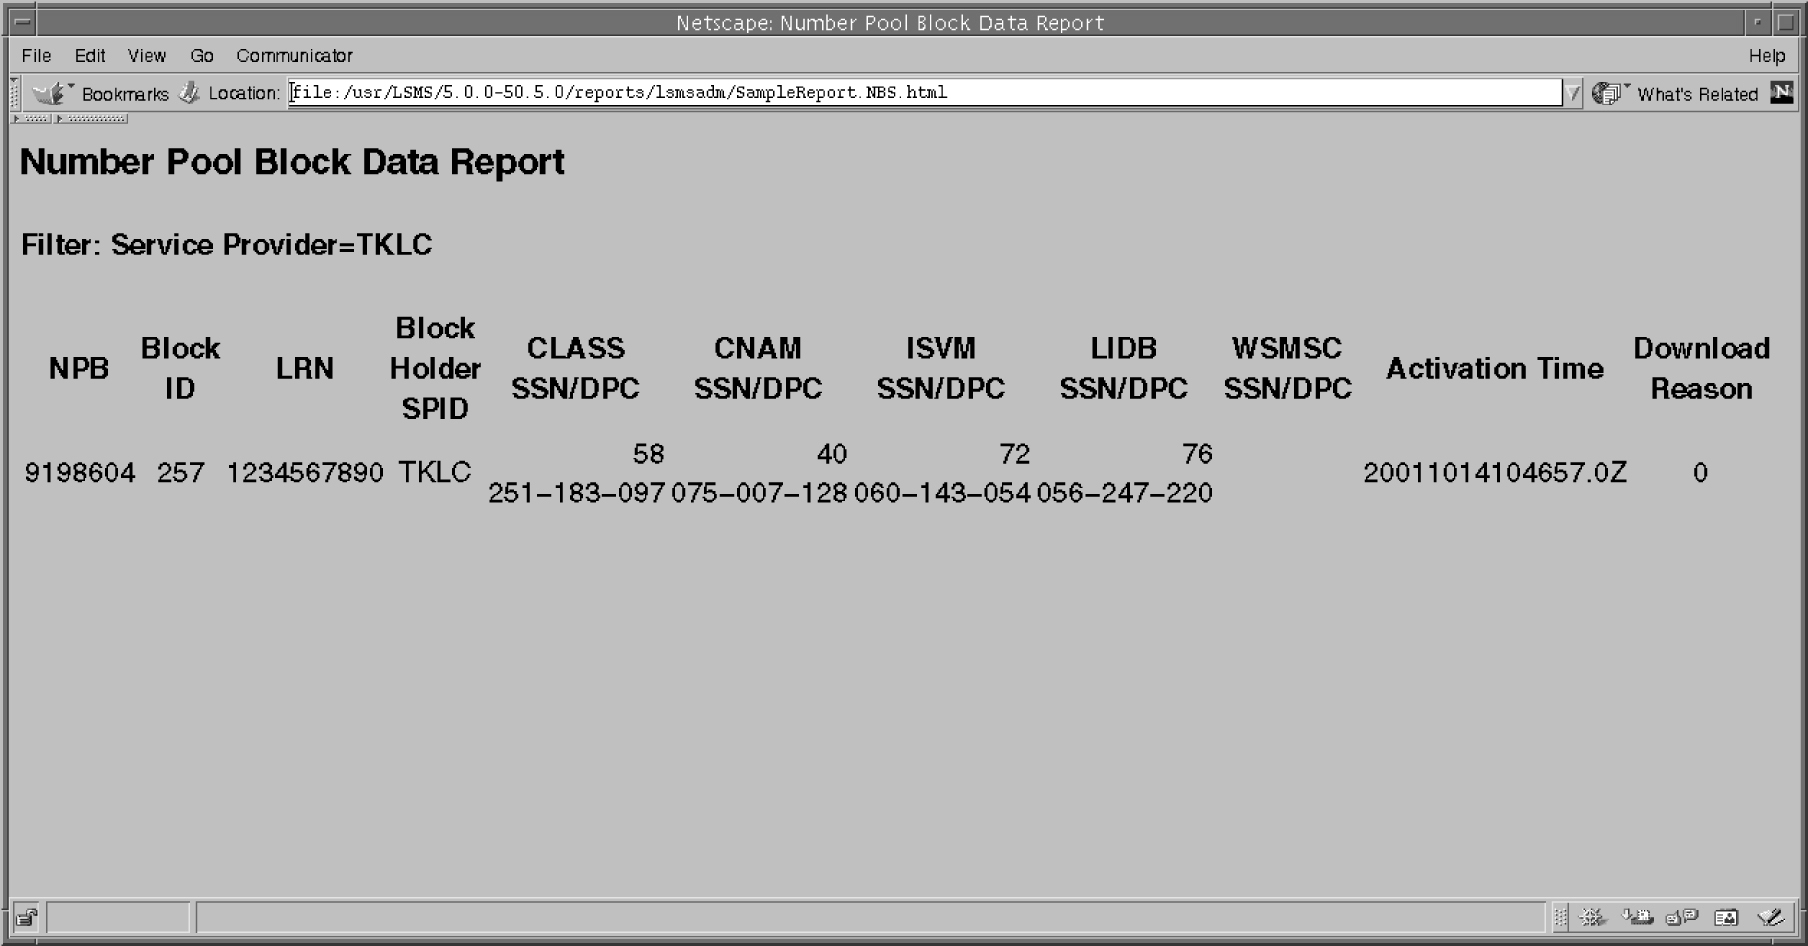
  • LSMS Number Pool Blocks by LRN Data

  • LSMS Number Pool Blocks by Service Provider Data

  • Service Provider Data

  • Permission Group Data

Procedures to help you create, view, and delete each type of report follow this introductory section, beginning with “Service Provider Administrative Data Reports”.

This chapter also provides information about the Report Generator, which enables you to customize your own reports.

Viewing Reports

The browser from which you launched the GUI is used to display the reports.

A new browser window opens for the first report that you view, and is reused for viewing all subsequent reports.

Use the browser file functions to perform desired tasks, such as printing, searching, and exiting.

Service Provider Administrative Data Reports

The following procedures explain how to create, view, and delete Service Provider Administrative Data reports.

Creating a Service Provider Administrative Data Report

To create a Service Provider Administrative Data report:

  1. Log in to LSMS as a member of the permission group that is authorized to perform this operation.
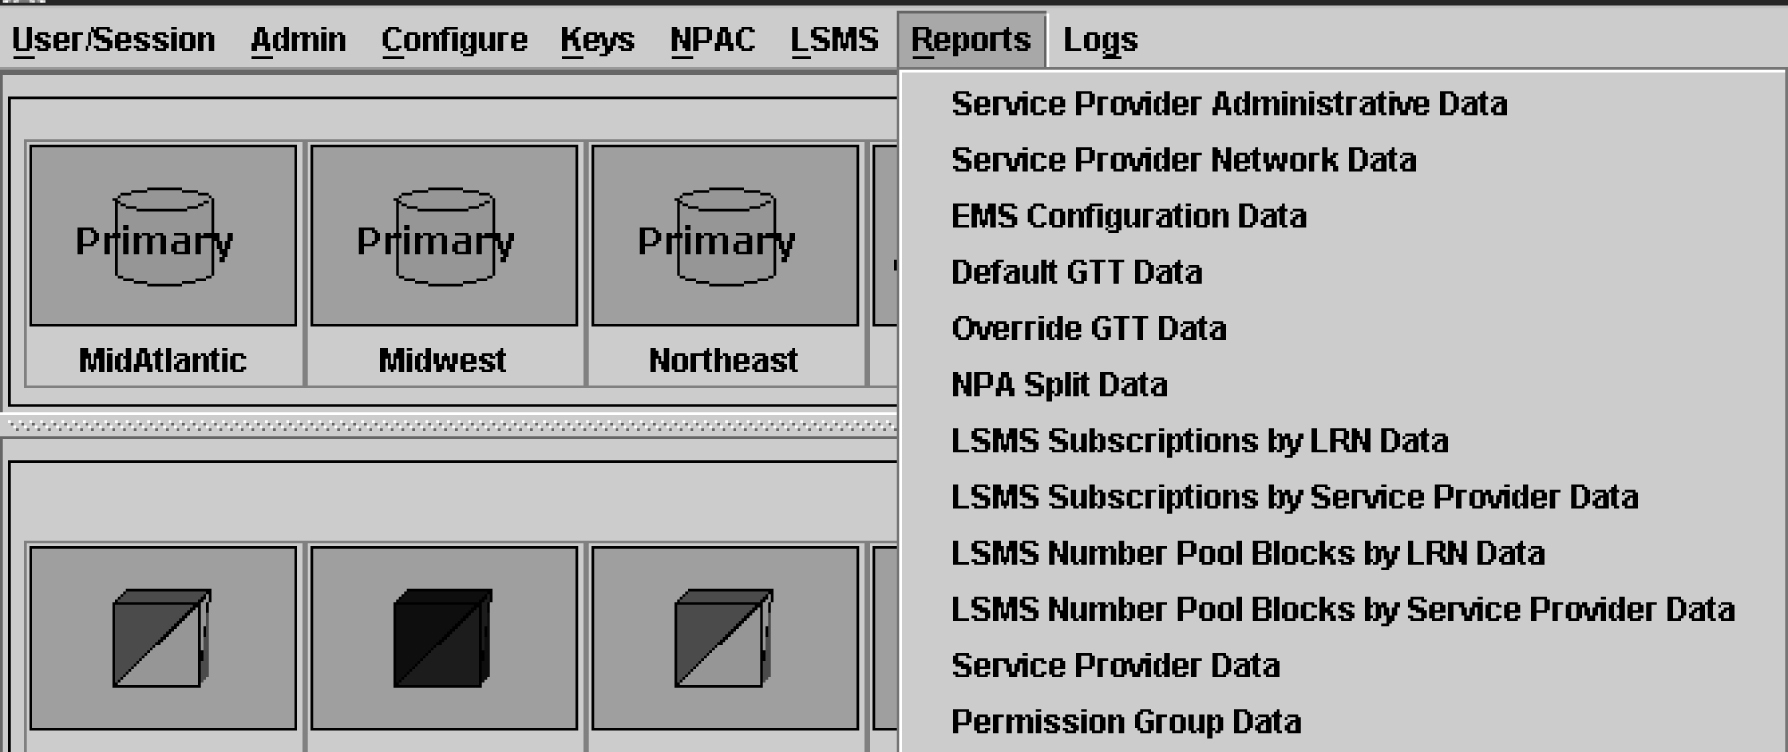
  2. From the LSMS Console window, select Reports, and then Service Provider Administrative Data .

    Figure 5-1 Reports Pull-Down List


    img/t_service_provider_administrative_data_reports_dam-fig1.jpg
    The Service Provider Administrative Data Report Create window appears.
  3. In the File field, enter a file name for the report to be generated.
    Click OK or Apply. The report automatically runs in background mode and does not interfere with LSMS processing tasks such as NPAC traffic processing.
  4. An Update Successful message window appears.
  5. Click OK to view the report.

Viewing a Service Provider Administrative Data Report

To view a Service Provider Administrative Data report:

  1. Log in to LSMS as a member of the permission group that is authorized to perform this operation.
  2. From the LSMS Console window, select Reports, and then Service Provider Administrative Data .
    The Service Provider Administrative Data Report Create window appears.
  3. Select the View tab.
    The Service Provider Administrative Data Report View window appears.
  4. In the File field, enter the name of the report to be viewed or click the Browse button to select a report.
    Click OK or Apply.
  5. The report output window displays.

Deleting a Service Provider Administrative Data Report

To delete a Service Provider Administrative Data report:

  1. Log in to LSMS as a member of the permission group that is authorized to perform this operation.
  2. From the LSMS Console window, select Reports, and then Service Provider Administrative Data).
    The Service Provider Administrative Data Report Create window appears.
  3. Select the Delete tab.
    The Service Provider Administrative Data Report Delete window appears.
  4. In the File field, enter the name of the report to be deleted or click the Browse button to select a report.
    Click OK or Apply.
  5. A Confirm Delete message window appears.

    Figure 5-2 Confirm Delete Message Window

    img/t_deleting_a_service_provider_administrative_data_report_dam-fig2.jpg
  6. Click Yes or No.
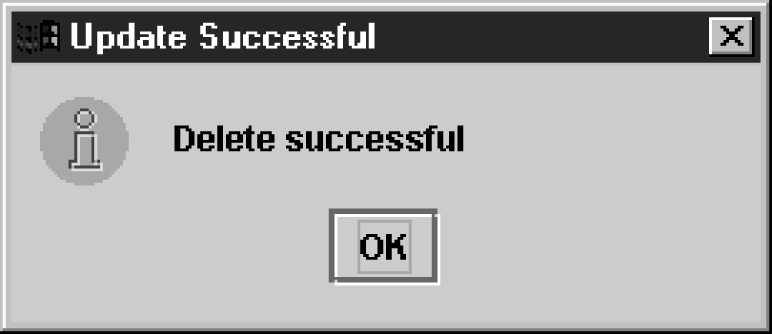
    If you click Yes, an Update Successful message window appears. Click OK to return to the Service Provider Administrative Data Report Delete window.

    Figure 5-3 Update Successful Message Window

    img/t_deleting_a_service_provider_administrative_data_report_dam-fig3.jpg
  7. If you click No, you return to the Service Provider Administrative Data Report Delete window.

Service Provider Network Data Reports

The following procedures explain how to create, view, and delete Service Provider Network Data reports.

Creating a Service Provider Network Data Report

To create a Service Provider Network Data report:

  1. Log in to LSMS as a member of the permission group that is authorized to perform this operation.
  2. From the LSMS Console window, select Reports, and then Service Provider Network Data .
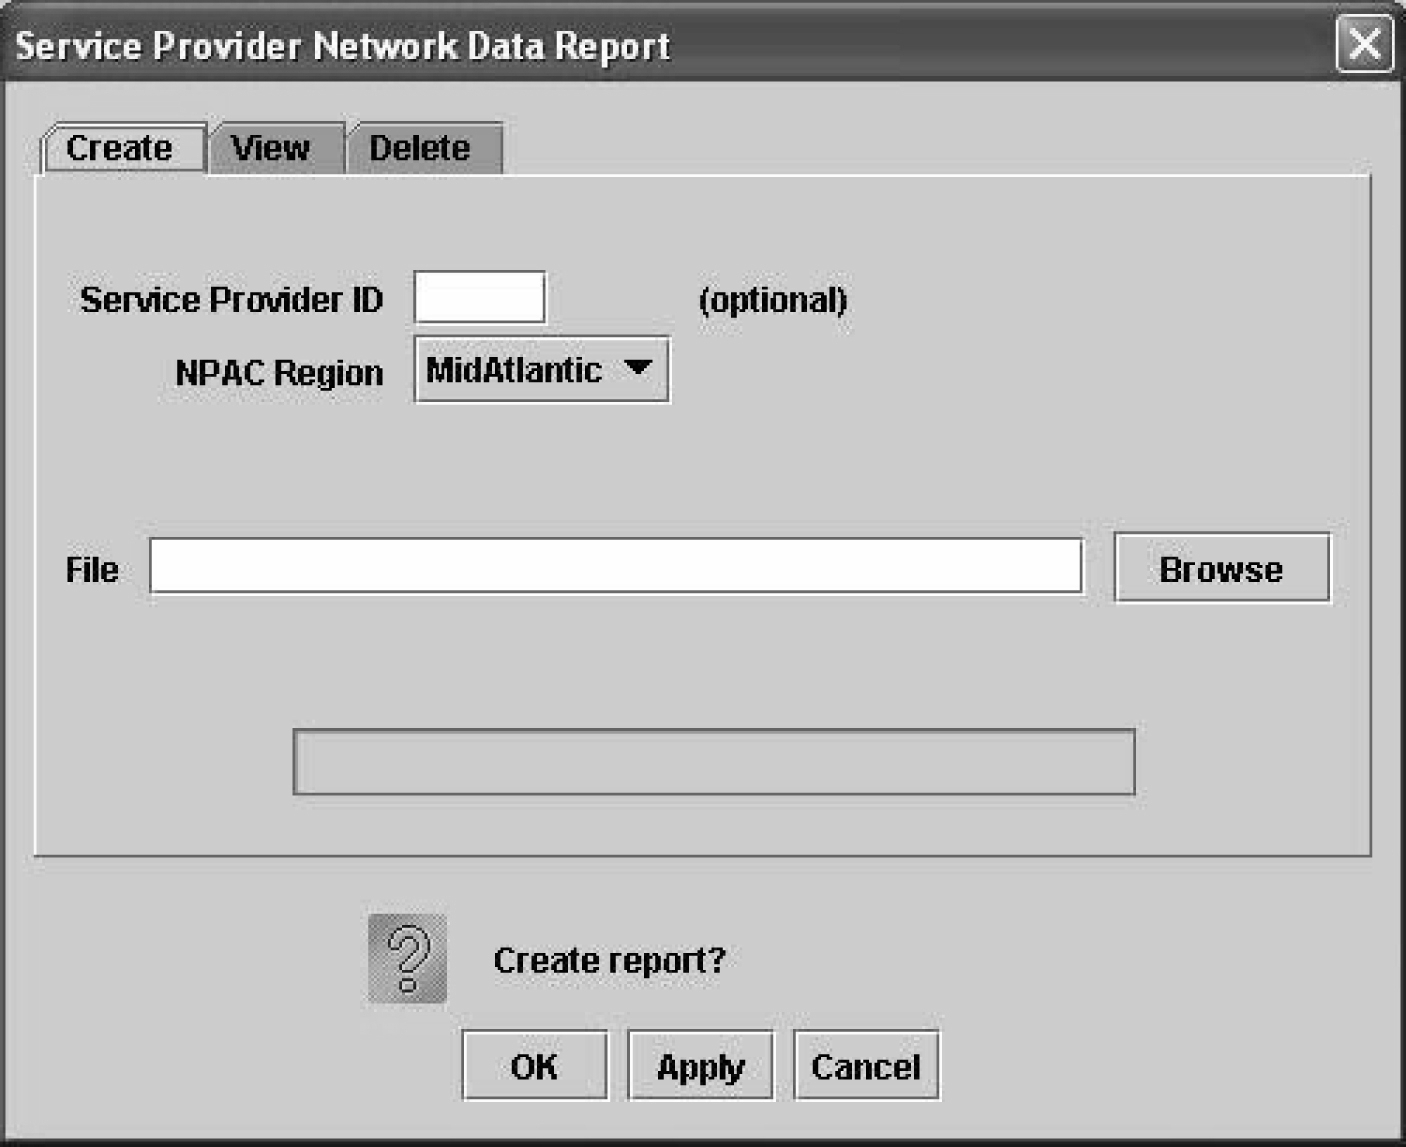
    The Service Provider Network Data Report Create window appears.

    Figure 5-4 Service Provider Network Data Report Create Window


    img/t_service_provider_network_data_reports_dam-fig1.jpg
  3. In the Service Provider ID field, enter the Service Provider ID (SPID), if desired (this field is optional).

    Note:

    See Creating a Permission Group Data Report for the report contents that are selected and displayed depending upon whether you specify a value for the optional SPID parameter.

    Table 5-1 Using the Optional SPID Parameter (Service Provider Network Data Report)

    SPID Value Specified? Report Contents Displayed

    N

    All LRN, NPA-NXX, and NPA-NXX-X records

    Y

    LRN, NPA-NXX, and NPA-NXX-X records containing specified SPID value only

  4. In the File field, enter a file name for the report to be generated.
    Click OK or Apply. The report automatically runs in background mode and does not interfere with LSMS processing tasks such as NPAC traffic processing.
  5. An Update Successful message window appears.
  6. Click OK to view an example of the report.

    Note:

    A Service Provider ID value of UNKN indicates that the Service Provider information for the particular object could not be found because of an object relationship mismatch. If this occurs, call the My Oracle Support (MOS).

    Figure 5-5 Service Provider Network Data Report Example


    img/t_service_provider_network_data_reports_dam-fig2.jpg

Viewing a Service Provider Network Data Report

To view a Service Provider Network Data report:

  1. Log in to LSMS as a member of the permission group that is authorized to perform this operation.
  2. From the LSMS Console window, select Reports, and then Service Provider Network Data .
    The Service Provider Network Data Report Create window appears.
  3. Select the View tab.
    The Service Provider Network Data Report View window appears.
  4. In the File field, enter the name of the report to be viewed or click the Browse button to select a report.
    Click OK or Apply.
  5. The report output window displays.

Deleting a Service Provider Network Data Report

To delete a Service Provider Network Data report:

  1. Log in to LSMS as a member of the permission group that is authorized to perform this operation.
  2. From the LSMS Console window, select Reports, and then Service Provider Network Data .
    The Service Provider Network Data Report Create window appears.
  3. Select the Delete tab.
    The Service Provider Network Data Report Delete window appears.
  4. In the File field, enter the name of the report to be deleted or click the Browse button to select a report.
    Click OK or Apply.
  5. A Confirm Delete message window appears.
  6. Click Yes or No.
    If you click Yes, an Update Successful message window appears. Click OK to return to the Service Provider Network Data Report Delete window.
  7. If you click No, you return to the Service Provider Network Data Report Delete window.

EMS Configuration Data Reports

The following procedures explain how to create, view, and delete EMS Configuration Data reports.

Creating an EMS Configuration Data Report

To create an Element Management System Configuration Data report:

  1. Log in to LSMS as a member of the permission group that is authorized to perform this operation.
  2. From the LSMS Console window, select Reports, and then EMS Configuration Data.
    The EMS Configuration Data Report Create window appears.
  3. In the File field, enter a file name for the report to be generated.
    Click OKor Apply. The report automatically runs in background mode and does not interfere with LSMS processing tasks such as NPAC traffic processing.
  4. An Update Successful message window appears.
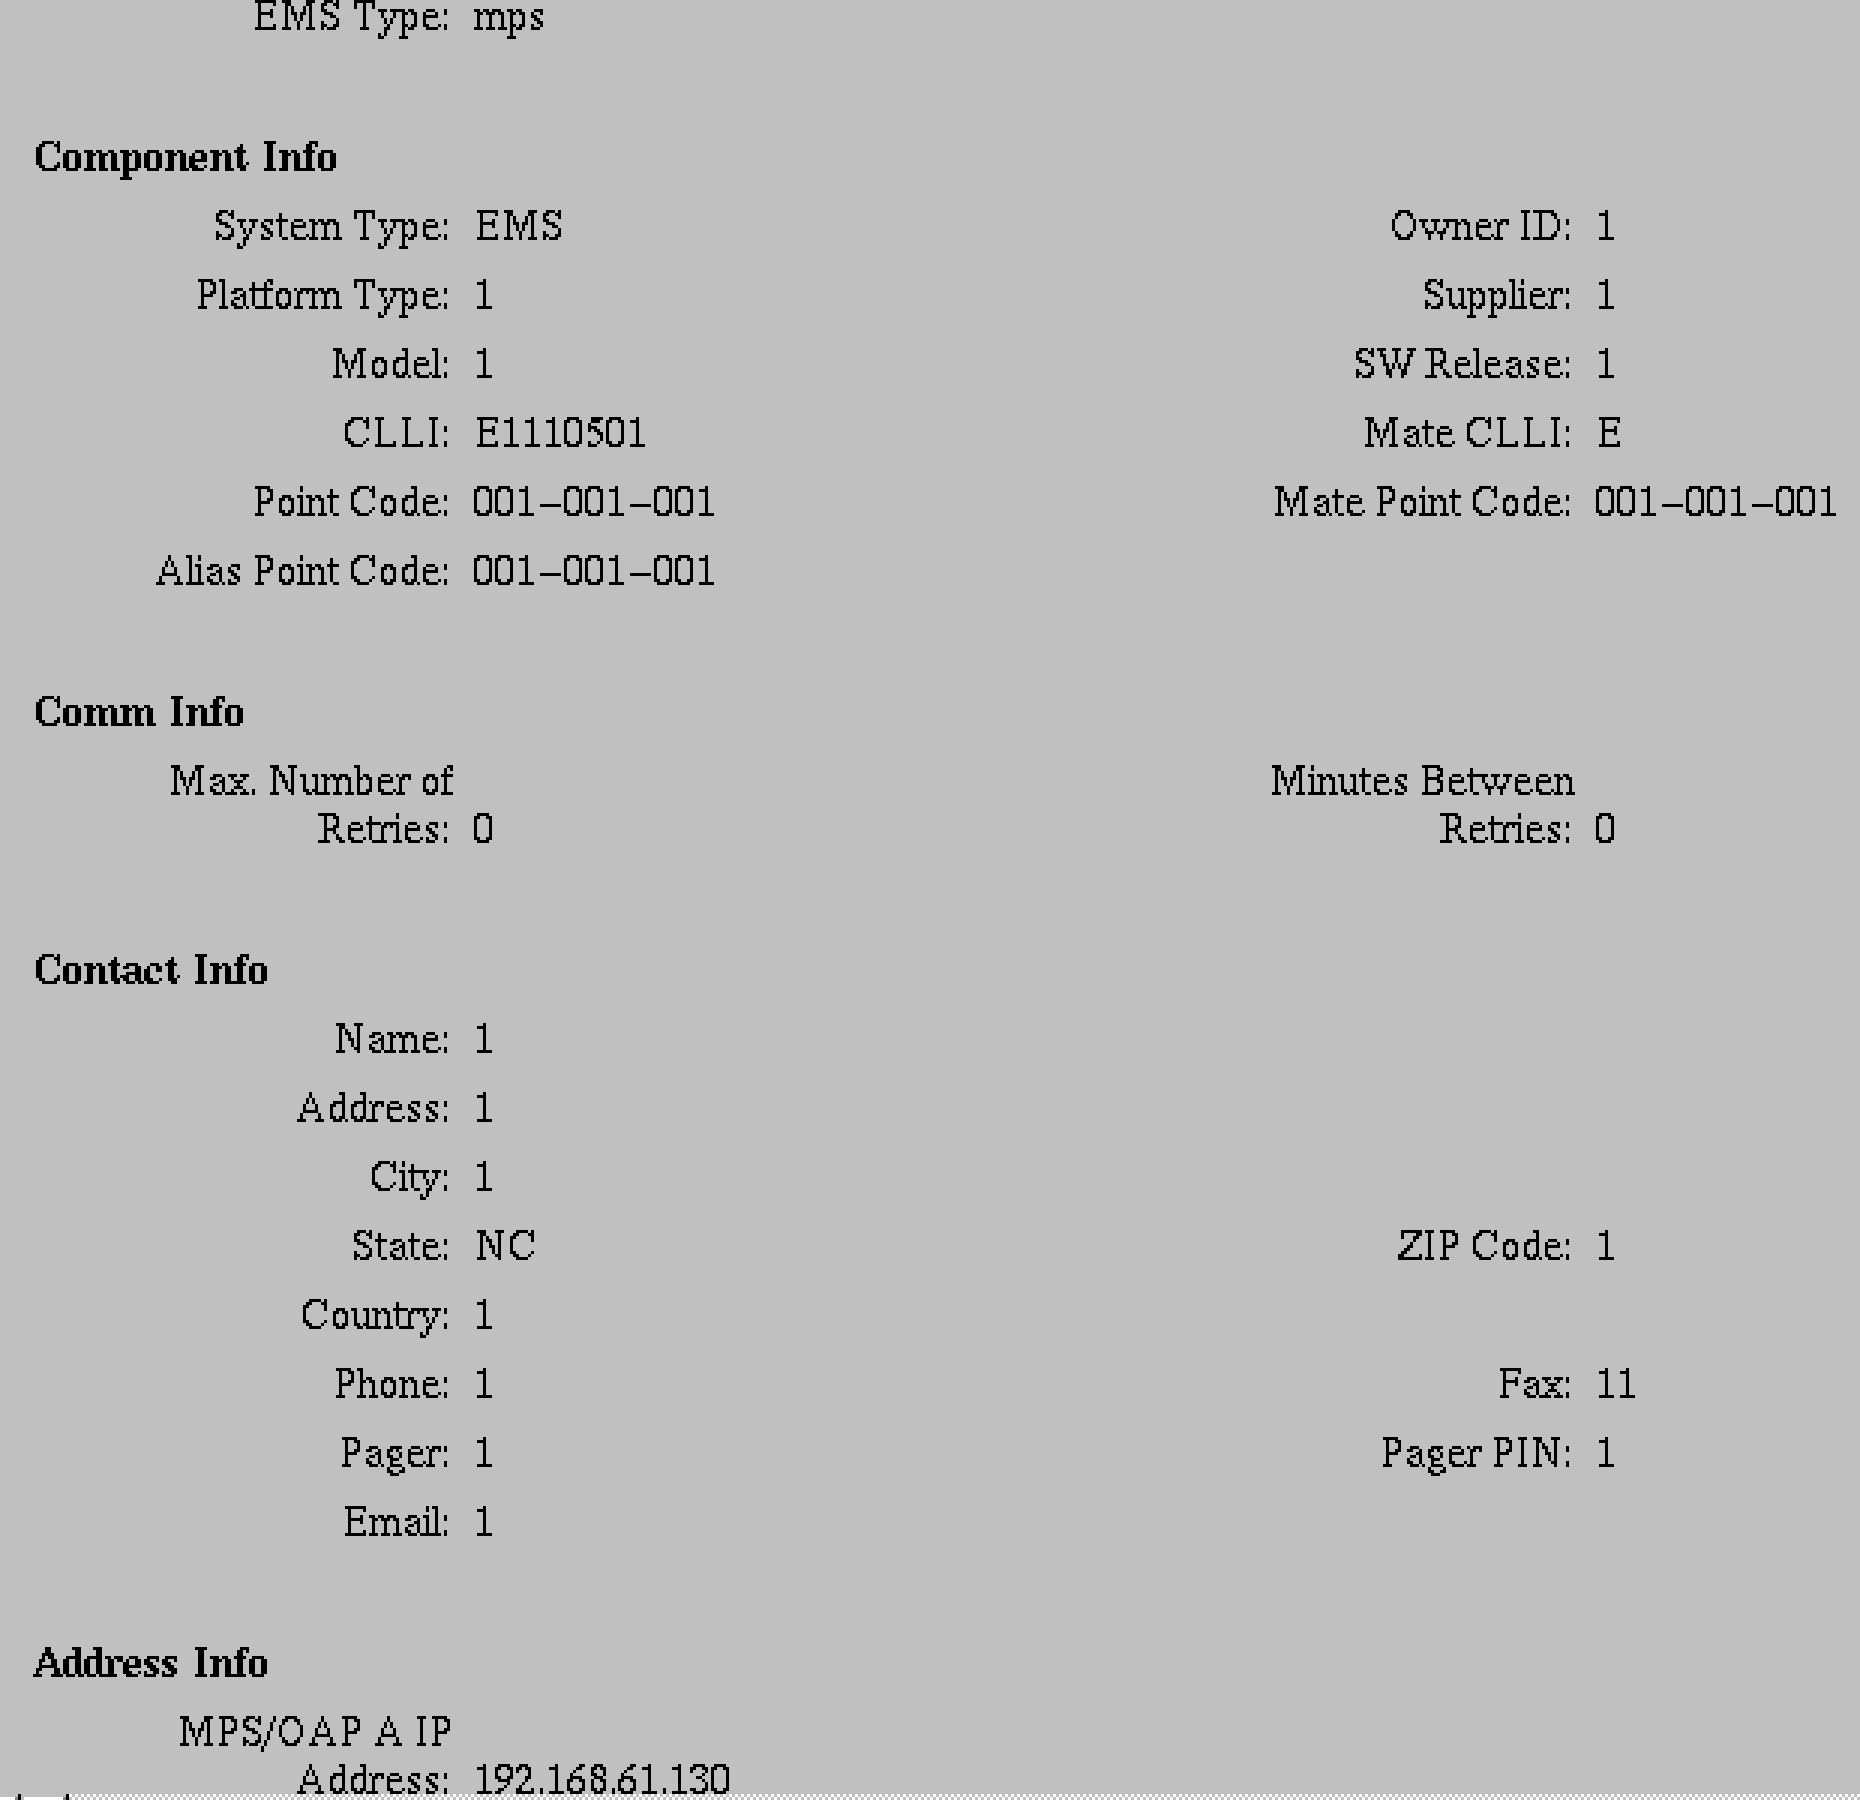
  5. Click OK to view an example of the report.

    Figure 5-6 EMS Configuration Data Report Example


    img/t_creating_an_ems_configuration_data_report_dam-fig3.jpg

Viewing an EMS Configuration Data Report

To view an EMS Configuration Data report:

  1. Log in to LSMS as a member of the permission group that is authorized to perform this operation.
  2. From the LSMS Console window, select Reports, and then EMS Configuration Data .
    The EMS Configuration Data Report Create window appears.
  3. Select the View tab.
    The EMS Configuration Data Report View window appears.
  4. In the File field, enter the name of the report to be viewed or click the Browse button to select a report.
    Click OKor Apply.
  5. The report output window displays.

Deleting an EMS Configuration Data Report

To delete an EMS Configuration Data report:

  1. Log in to LSMS as a member of the permission group that is authorized to perform this operation.
  2. From the LSMS Console window, select Reports, and then EMS Configuration Data.
    The EMS Configuration Data Report Create window appears.
  3. Select the Delete tab.
    The EMS Configuration Data Report Delete window appears.
  4. In the File field, enter the name of the report to be deleted or click the Browse button to select a report.
    Click OKor Apply.
  5. A Confirm Delete message window appears.
  6. Click Yes or No.
    If you click Yes, an Update Successful message window appears. Click OK to return to the EMS Configuration Data Report Delete window.
  7. If you click No, you return to the EMS Configuration Data Report Delete window.

Default GTT Data Reports

This section contains information about Query GTT by DPC, which enables you to retrieve certain global title translation (GTT) information for a specific destination point code (DPC). This section also includes procedures that explain how to create, view, and delete Default GTT Data reports.

Query GTT by DPC

Query GTT by DPC enables you to retrieve the following global title translation (GTT) information for a specific destination point code (DPC).

  • Numbering Plan Area-Number Exchange (NPA-NXX) default data

  • Location Routing Number (LRN) override data

The report contains all the fields included in reports generated by prior releases of LSMS, but includes only those entries for NPA-NXX translations associated with the specified DPC.

You can use this information to verify the accuracy of locally provisioned global title data and to determine impacted translations for various network changes.

Creating a Default GTT Data Report

To create a Default GTT Data report:

  1. Log in to LSMS as a member of the permission group that is authorized to perform this operation.
  2. From the LSMS Console window, select Reports, and then Default GTT.
    The Default GTT Data Report Create window appears.
  3. Make a selection from the Service Provider ID listbox.
    In the DPC (Destination Point Code) field, enter a specific destination point code, if desired (this field is optional). See Table 5-2 for the report contents that are selected and displayed depending upon whether you specify a value for the optional DPC parameter.

    Table 5-2 Using the Optional DPC Parameter (Default GTT Report)

    DPC Value Specified? Report Contents Displayed

    N

    Default Translation records containing specified SPID value only

    Y

    Default Translation records containing specified SPID and DPC values only

  4. In the File field, enter a file name for the report to be generated.
    Click OKor Apply. The report automatically runs in background mode and does not interfere with LSMS processing tasks such as NPAC traffic processing.
  5. An Update Successful message window appears.
  6. Click OK to view an example of the report.

    Note:

    A value of UNKN in the SPID column indicates that information for the particular object could not be found because of an object relationship mismatch. If this occurs, call the My Oracle Support (MOS).

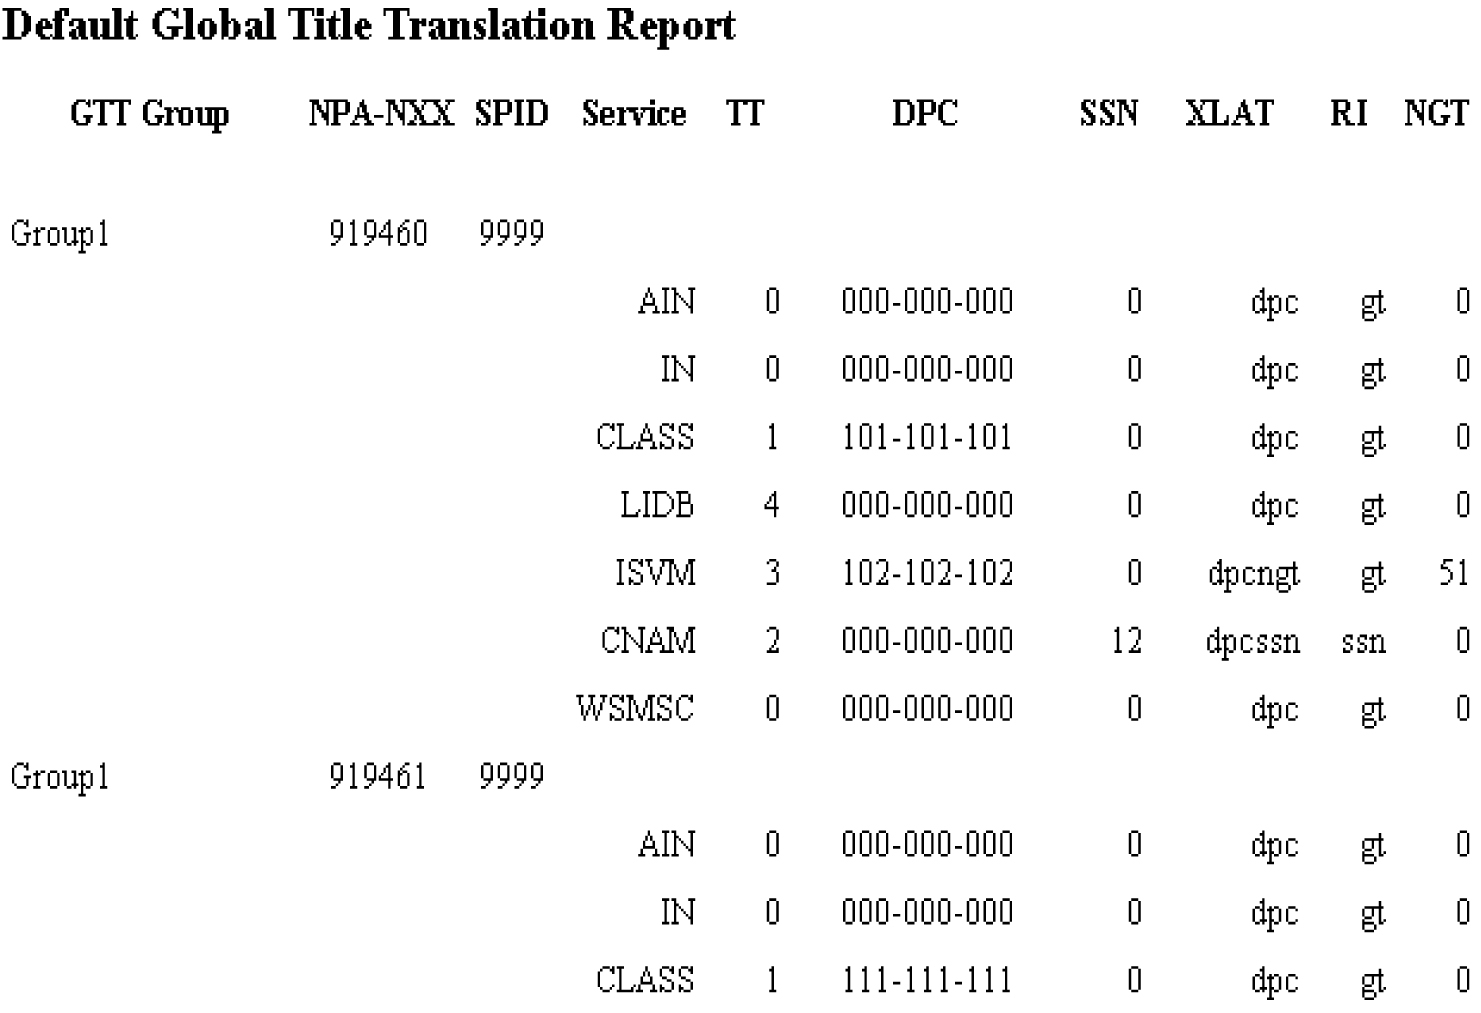
    Figure 5-7 Default GTT Report Example


    img/t_creating_a_default_gtt_data_report_dam-fig2.jpg

Viewing a Default GTT Data Report

To view a Default GTT Data report:

  1. Log in to LSMS as a member of the permission group that is authorized to perform this operation.
  2. From the LSMS Console window, select Reports, and then Default GTT.
    The Default GTT Data Report Create window appears.
  3. Select the View tab.
    The Default GTT Data Report View window appears.
  4. In the File field, enter the name of the report to be viewed or click the Browse button to select a report.
    Click OK or Apply.
  5. The report output window appears.

Deleting a Default GTT Data Report

To delete a Default GTT Data report:

  1. Log in to LSMS as a member of the permission group that is authorized to perform this operation.
  2. From the LSMS Console window, select Reports, and then Default GTT.
    The Default GTT Data Report Create window appears.
  3. Select the Delete tab.
    The Default GTT Data Report Delete window appears.
  4. In the File field, enter the name of the report to be deleted or click the Browse button to select a report.
    Click OK or Apply.
  5. A Confirm Delete message window appears.
  6. Click Yes or No.
    If you click Yes, an Update Successful message window appears. Click OK to return to the Default GTT Data Report Delete window.
  7. If you click No, you return to the Default GTT Data Report Delete window.

Override GTT Data Reports

This section contains information about Query GTT by DPC, which enables you to retrieve certain global title translation (GTT) information for a specific destination point code (DPC). This section also includes procedures that explain how to create, view, and delete Override GTT Data reports.

Query GTT by DPC

Query GTT by DPC enables you to retrieve the following global title translation (GTT) information for a specific destination point code (DPC).

  • Numbering Plan Area-Number Exchange (NPA-NXX) default data

  • Location Routing Number (LRN) override data

The report contains all the fields included in reports generated by prior releases of LSMS, but includes only those entries for NPA-NXX translations associated with the specified DPC.

You can use this information to verify the accuracy of locally provisioned global title data and to determine impacted translations for various network changes.

Creating an Override GTT Data Report

To create an Override GTT Data report:

  1. Log in to LSMS as a member of the permission group that is authorized to perform this operation.
  2. From the LSMS Console window, select Reports, and then Override GTT.
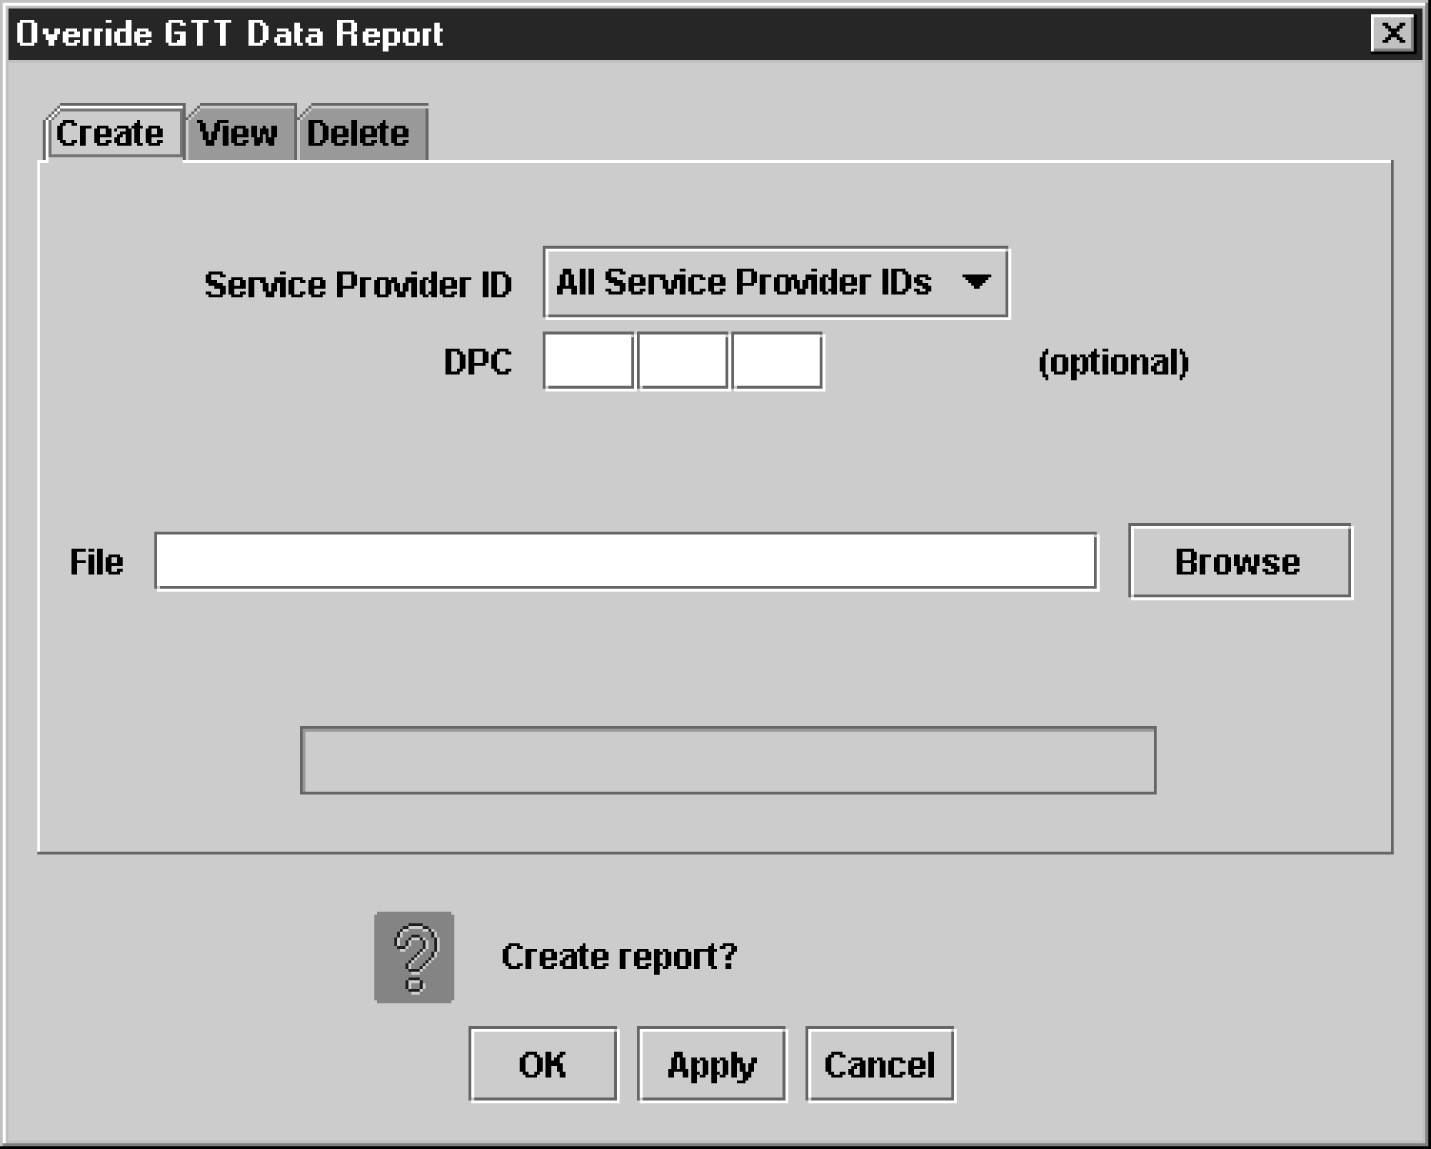
    The Override GTT Data Report Create window appears.

    Figure 5-8 Override GTT Data Report Create Window


    img/t_creating_an_override_gtt_data_report_dam-fig1.jpg
  3. Make a selection from the Service Provider ID listbox.
    In the DPC (Destination Point Code) field, enter a specific destination point code, if desired (this field is optional). See Table 5-3 for the report contents that are selected and displayed depending upon whether you specify a value for the optional DPC parameter.

    Table 5-3 Using the Optional DPC Parameter (Override GTT Report)

    DPC Value Specified? Report Contents Displayed

    N

    Override Translation records containing specified SPID value only

    Y

    Override Translation records containing specified SPID and DPC values only

  4. In the File field, enter a file name for the report to be generated.
    Click OK or Apply. The report automatically runs in background mode and does not interfere with LSMS processing tasks such as NPAC traffic processing.
  5. An Update Successful message window appears.
  6. Click OK to view an example of the report.

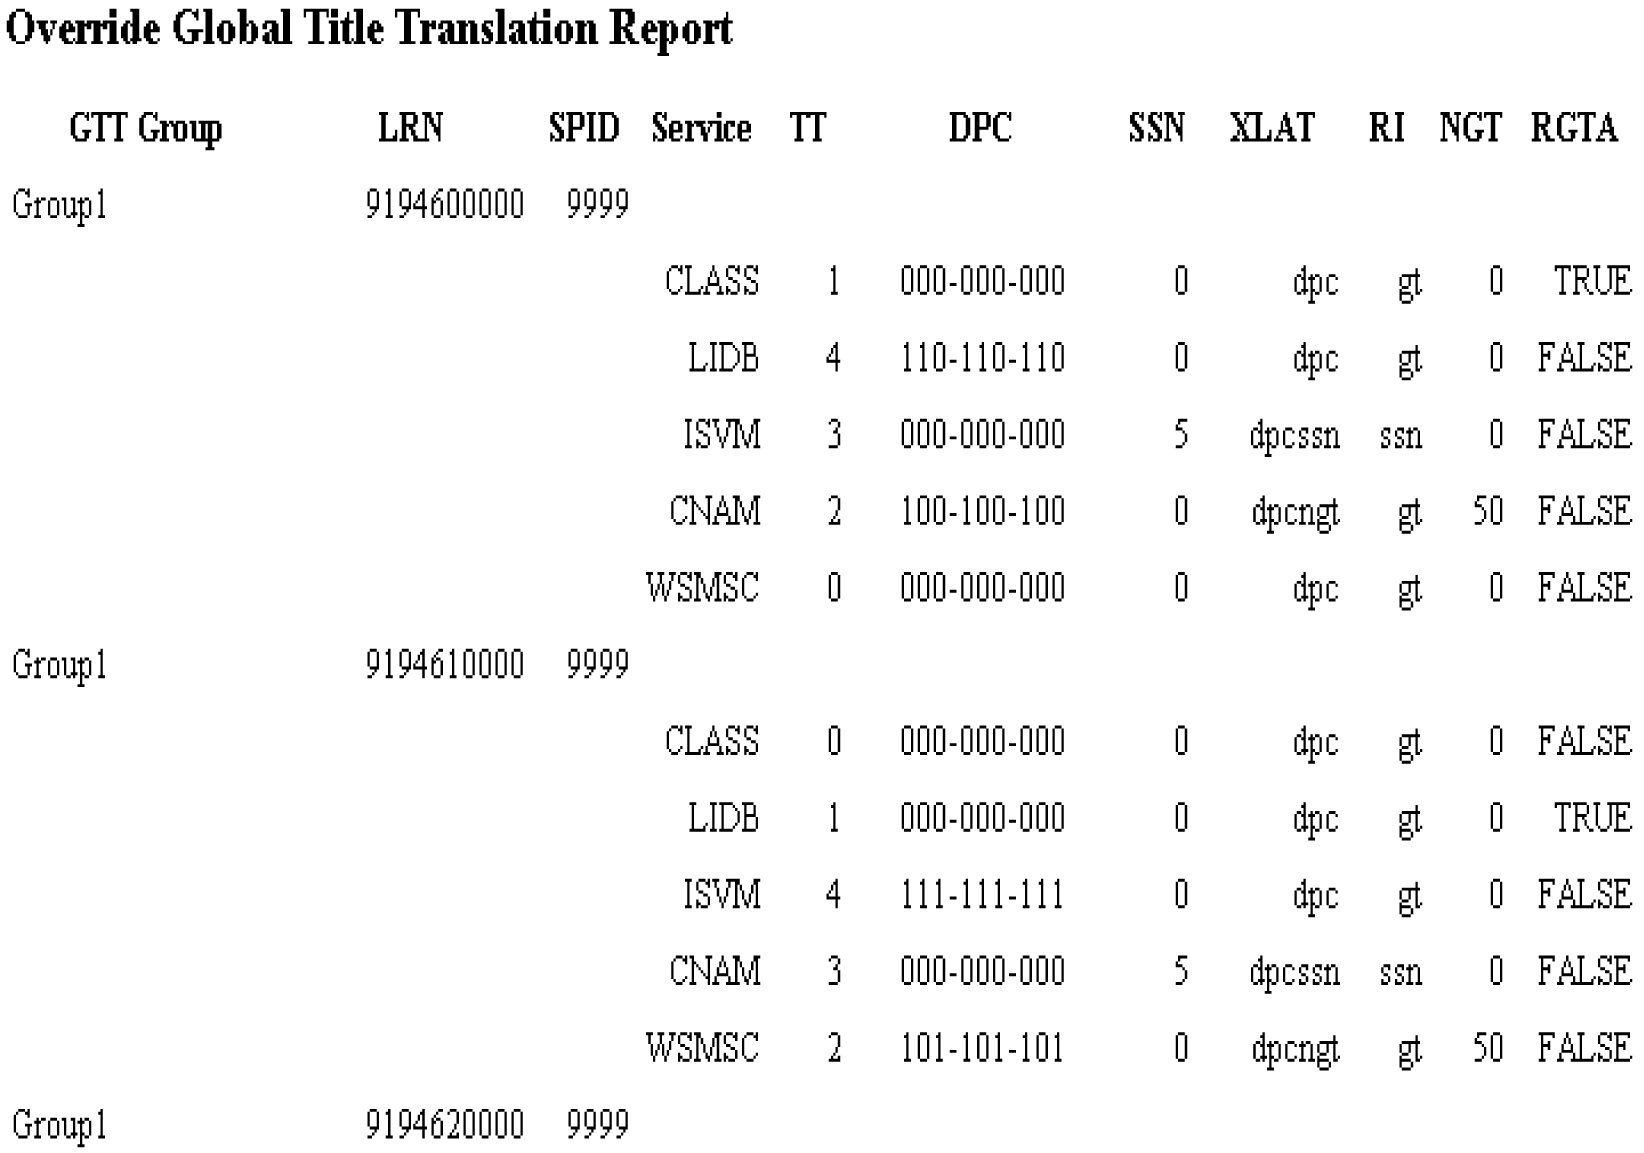
    Figure 5-9 Override GTT Report Example


    img/t_creating_an_override_gtt_data_report_dam-fig3.jpg

Viewing an Override GTT Data Report

To view an Override GTT Data report:

  1. Log in to LSMS as a member of the permission group that is authorized to perform this operation.
  2. From the LSMS Console window, select Reports, and then Override GTT
    The Override GTT Data Report Create window appears.
  3. Select the View tab.
    The Override GTT Data Report View window appears.
  4. In the File field, enter the name of the report to be viewed or click the Browse button to select a report.
    Click OK or Apply.
  5. The report output window displays.

Deleting an Override GTT Data Report

To delete an Override GTT Data report:

  1. Log in to LSMS as a member of the permission group that is authorized to perform this operation.
  2. From the LSMS Console window, select Reports, and then Override GTT
    The Override GTT Data Report Create window appears.
  3. Select the Delete tab.
    The Override GTT Data Report Delete window appears.
  4. In the File field, enter the name of the report to be deleted or click the Browse button to select a report.
    Click OK or Apply.
  5. A Confirm Delete message window appears.
  6. Click Yes or No.
    If you click Yes, an Update Successful message window appears. Click OK to return to the Override GTT Data Report Delete window.
  7. If you click No, you return to the Override GTT Data Report Delete window.

NPA Split Data Reports

The following procedures explain how to create, view, and delete NPA Split Data reports.

Creating NPA Split Data Reports

To create an NPA Split Data report:

  1. Log in to LSMS as a member of the permission group that is authorized to perform this operation.
  2. From the LSMS Console window, select Reports, and then NPA Split Data, and then select Create.
    The NPA Split Data Report Create window appears.
  3. In the Status field, select the appropriate status.
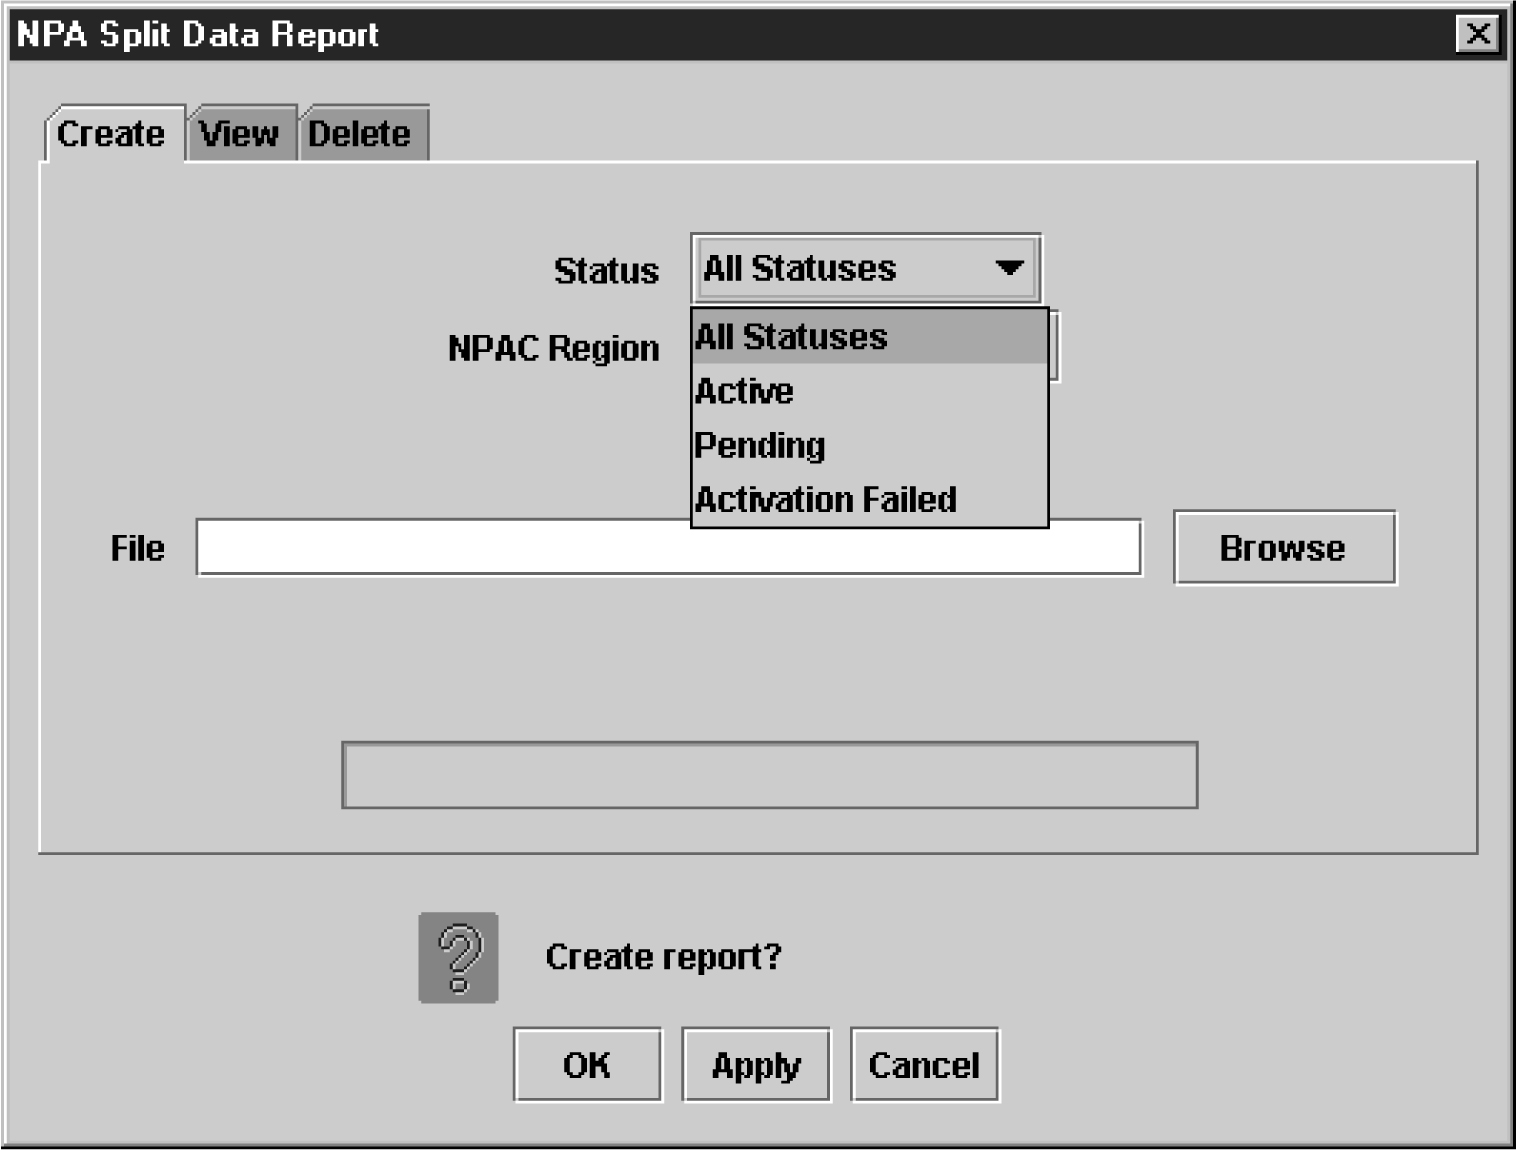
    The options available are All Statuses, Active, Pending, and Activation Failed.

    Figure 5-10 NPA Split Data Report Statuses


    img/t_creating_npa_split_data_reports_dam-fig2.jpg
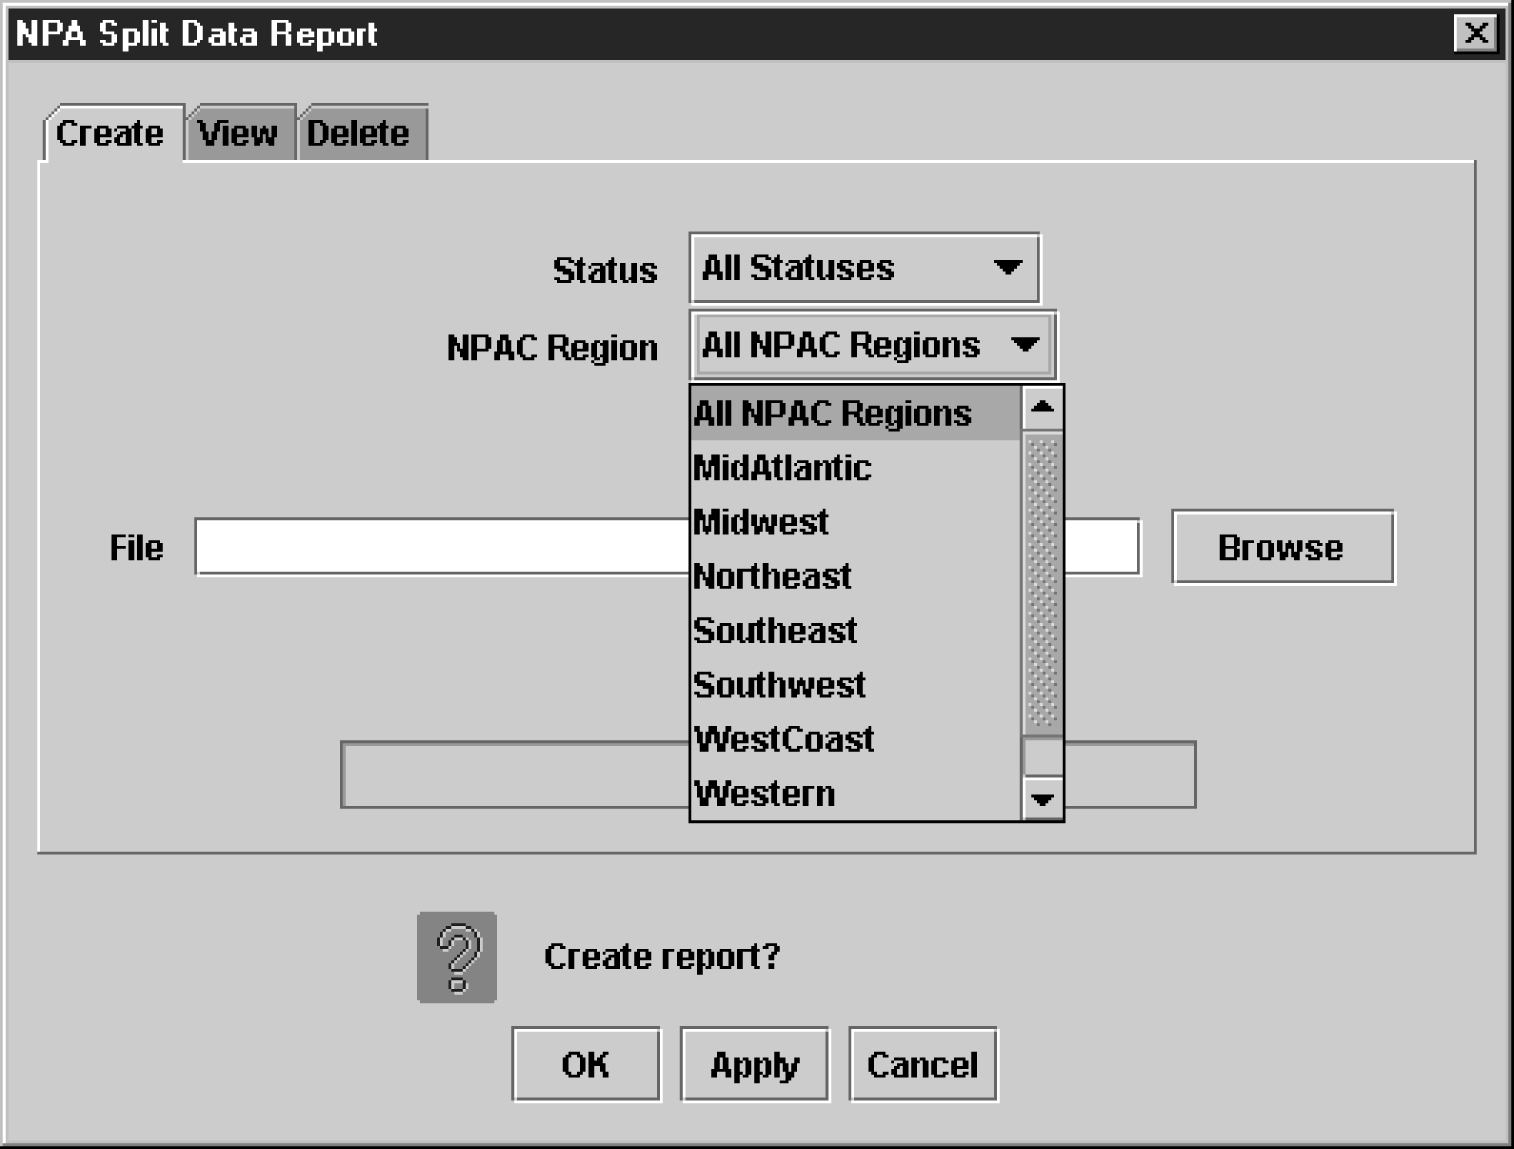
  4. In the NPAC Region field, select the desired region (or All NPAC Regions) for which you require information.

    Figure 5-11 NPA Split Data NPAC Regions


    img/t_creating_npa_split_data_reports_dam-fig3.jpg
  5. In the File field, enter a file name for the report to be generated.
    Click OK or Apply. The report automatically runs in background mode and does not interfere with LSMS processing tasks such as NPAC traffic processing.
  6. An Update Successful message window appears.
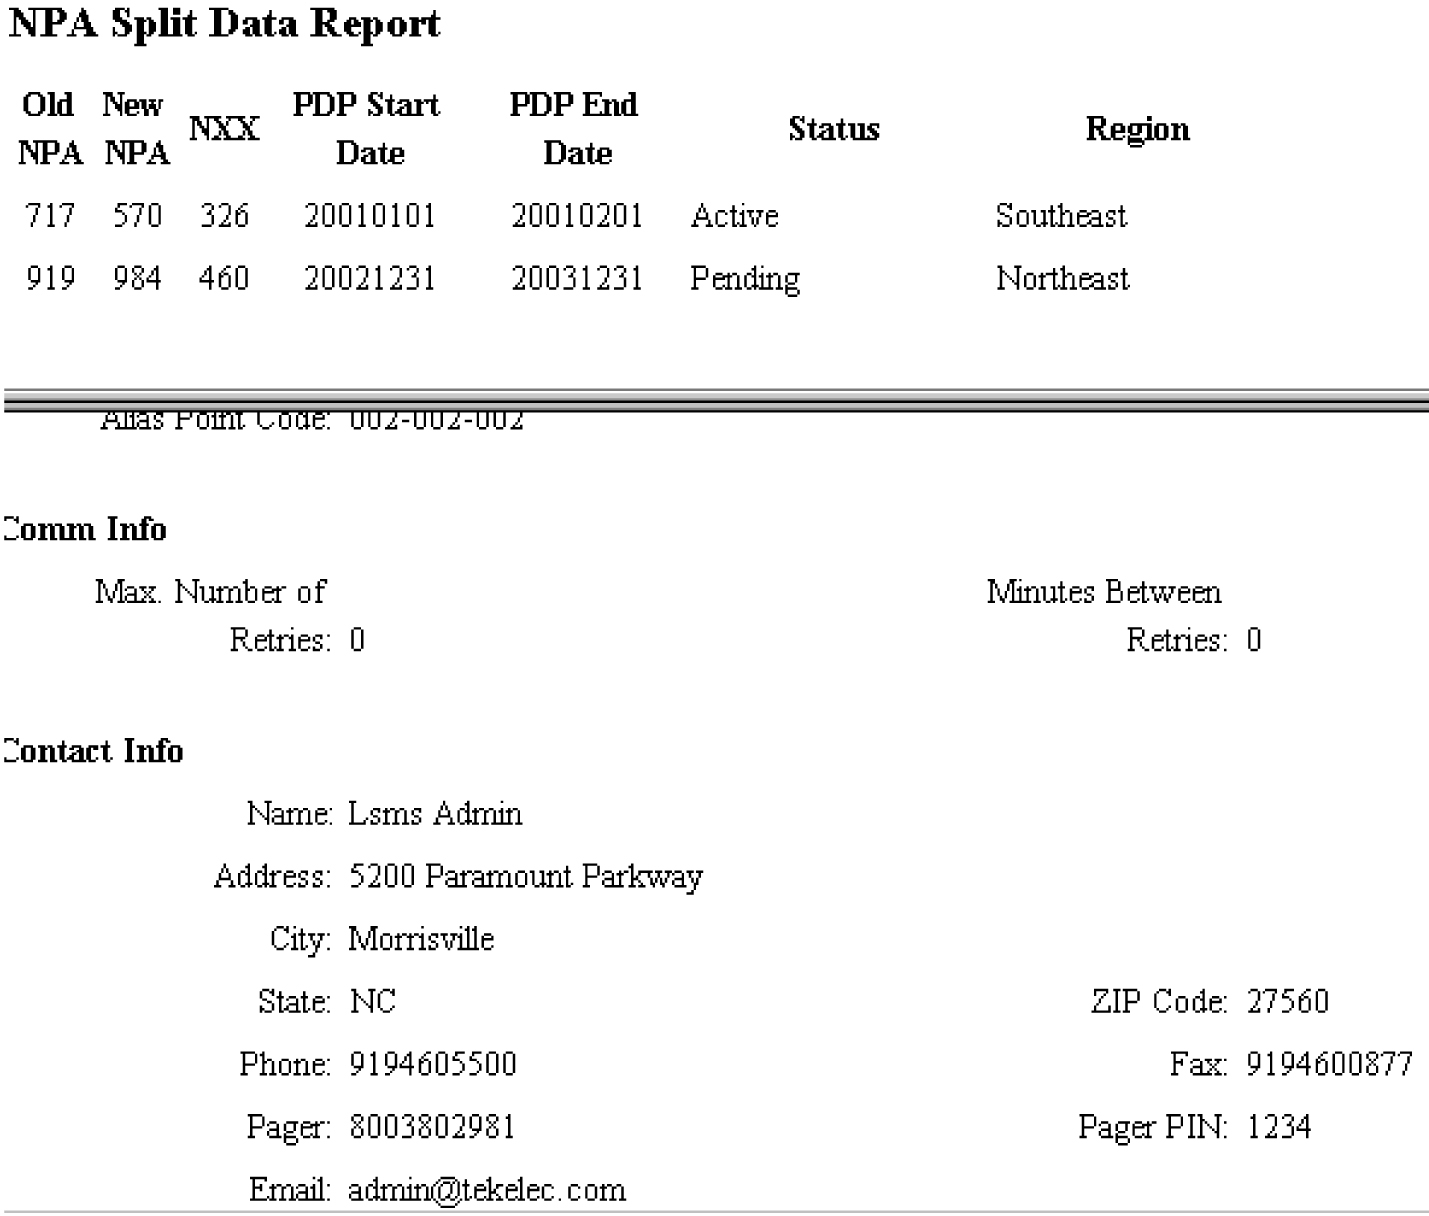
  7. Click OK to view an example of the report.

    Figure 5-12 NPA Split Data Report Example


    img/t_creating_npa_split_data_reports_dam-fig5.jpg

Viewing NPA Split Data Reports

To view an NPA Split Data report:

  1. Log in to LSMS as a member of the permission group that is authorized to perform this operation.
  2. From the LSMS Console window, select Reports, and then NPA Split Data, and then select View.
    The NPA Split Data Report View window appears.
  3. In the File field, enter the name of the report to be viewed or click the Browse button to select a report.
    Click OK or Apply.
  4. The report output window displays.

Deleting NPA Split Data Reports

To delete an NPA Split Data report:

  1. Log in to LSMS as a member of the permission group that is authorized to perform this operation.
  2. From the LSMS Console window, select Reports, and then NPA Split Data, and then select Delete.
    The NPA Split Data Report Delete window appears.
  3. In the File field, enter the name of the report to be deleted or click the Browse button to select a report.
    Click OK or Apply.
  4. A Confirm Delete message window appears.
  5. Click Yes or No.
    If you click Yes, an Update Successful message window appears. Click OK to return to the NPA Split Data Report Delete window.
  6. If you click No, you return to the NPA Split Data Report Delete window.

NPAC Audit Report

The iconectiv NPAC configuration options/features for each region include:

$ lsmsdb -c features | grep ICONECTIV
              N  CANADA_ICONECTIV
              N  MIDATLANTIC_ICONECTIV
              N  MIDWEST_ICONECTIV
              N  NORTHEAST_ICONECTIV
              N  SOUTHEAST_ICONECTIV
              N  SOUTHWEST_ICONECTIV
              N  WESTCOAST_ICONECTIV
              N  WESTERN_ICONECTIV

The value of these features can be changed using the dbcfginternal utility.

The audit script identifies the enabled NPAC regions and the corresponding NPAC and logs them:

$ auditnpac
Audit is started
Audit complete. Check /var/TKLC/lsms/logs/trace/npacAudit.log.1001 for results

$ cat /var/TKLC/lsms/logs/trace/npacAudit.log.1001
********** NPAC Audit Started **********

Total number of NPAC regions connected : 7

Npacagent MidAtlantic is running
Npacagent MidAtlantic is connected to Neustar

Npacagent Northeast is running
Npacagent Northeast is connected to iconectiv

Npacagent Southeast is running
Npacagent Southeast is connected to Neustar

Npacagent Southwest is running
Npacagent Southwest is connected to Neustar

Npacagent Western is running
Npacagent Western is connected to Neustar

Npacagent WestCoast is running
Npacagent WestCoast is connected to Neustar

Npacagent Midwest is running
Npacagent Midwest is connected to iconectiv

Total 2 regions are connected to iconectiv and 5 are connected to Neustar.

********** NPAC Audit Is Complete **********

LSMS Subscriptions by LRN Reports

The following procedures explain how to create, view, and delete LSMS Subscriptions by LRN reports.

Creating an LSMS Subscription by LRN Report

To create an LSMS Subscription by LRN report:

  1. Log in to LSMS as a member of the permission group that is authorized to perform this operation.
  2. From the LSMS Console window, select Reports, and then LSMS Subscriptions by LRN Data.
    The LSMS Subscriptions by LRN Report Create window appears.
  3. In the Local Routing Number field, if desired, enter the LRN of the subscriptions to be reported.
    This is an optional field.
  4. In the TN Range field, if desired, enter the TN range.
    This is an optional field.
    1. If no TN range is specified, then all Subscription Version records that satisfy the LRN filter are displayed, regardless of its TN.
    2. If only the Start TN is specified, then all Subscription Version records with a TN equal to the Start TN, and that satisfy the LRN filter (if any), are displayed.
    3. If both the Start TN and End TN are specified, then all Subscription Version records with a TN between the Start TN and the End TN, and that satisfy the LRN filter (if any), are displayed.
  5. In the File field, enter a file name for the report to be generated.
    Click OK or Apply. The report automatically runs in background mode and does not interfere with LSMS processing tasks such as NPAC traffic processing.
  6. An Update Successful message window appears.
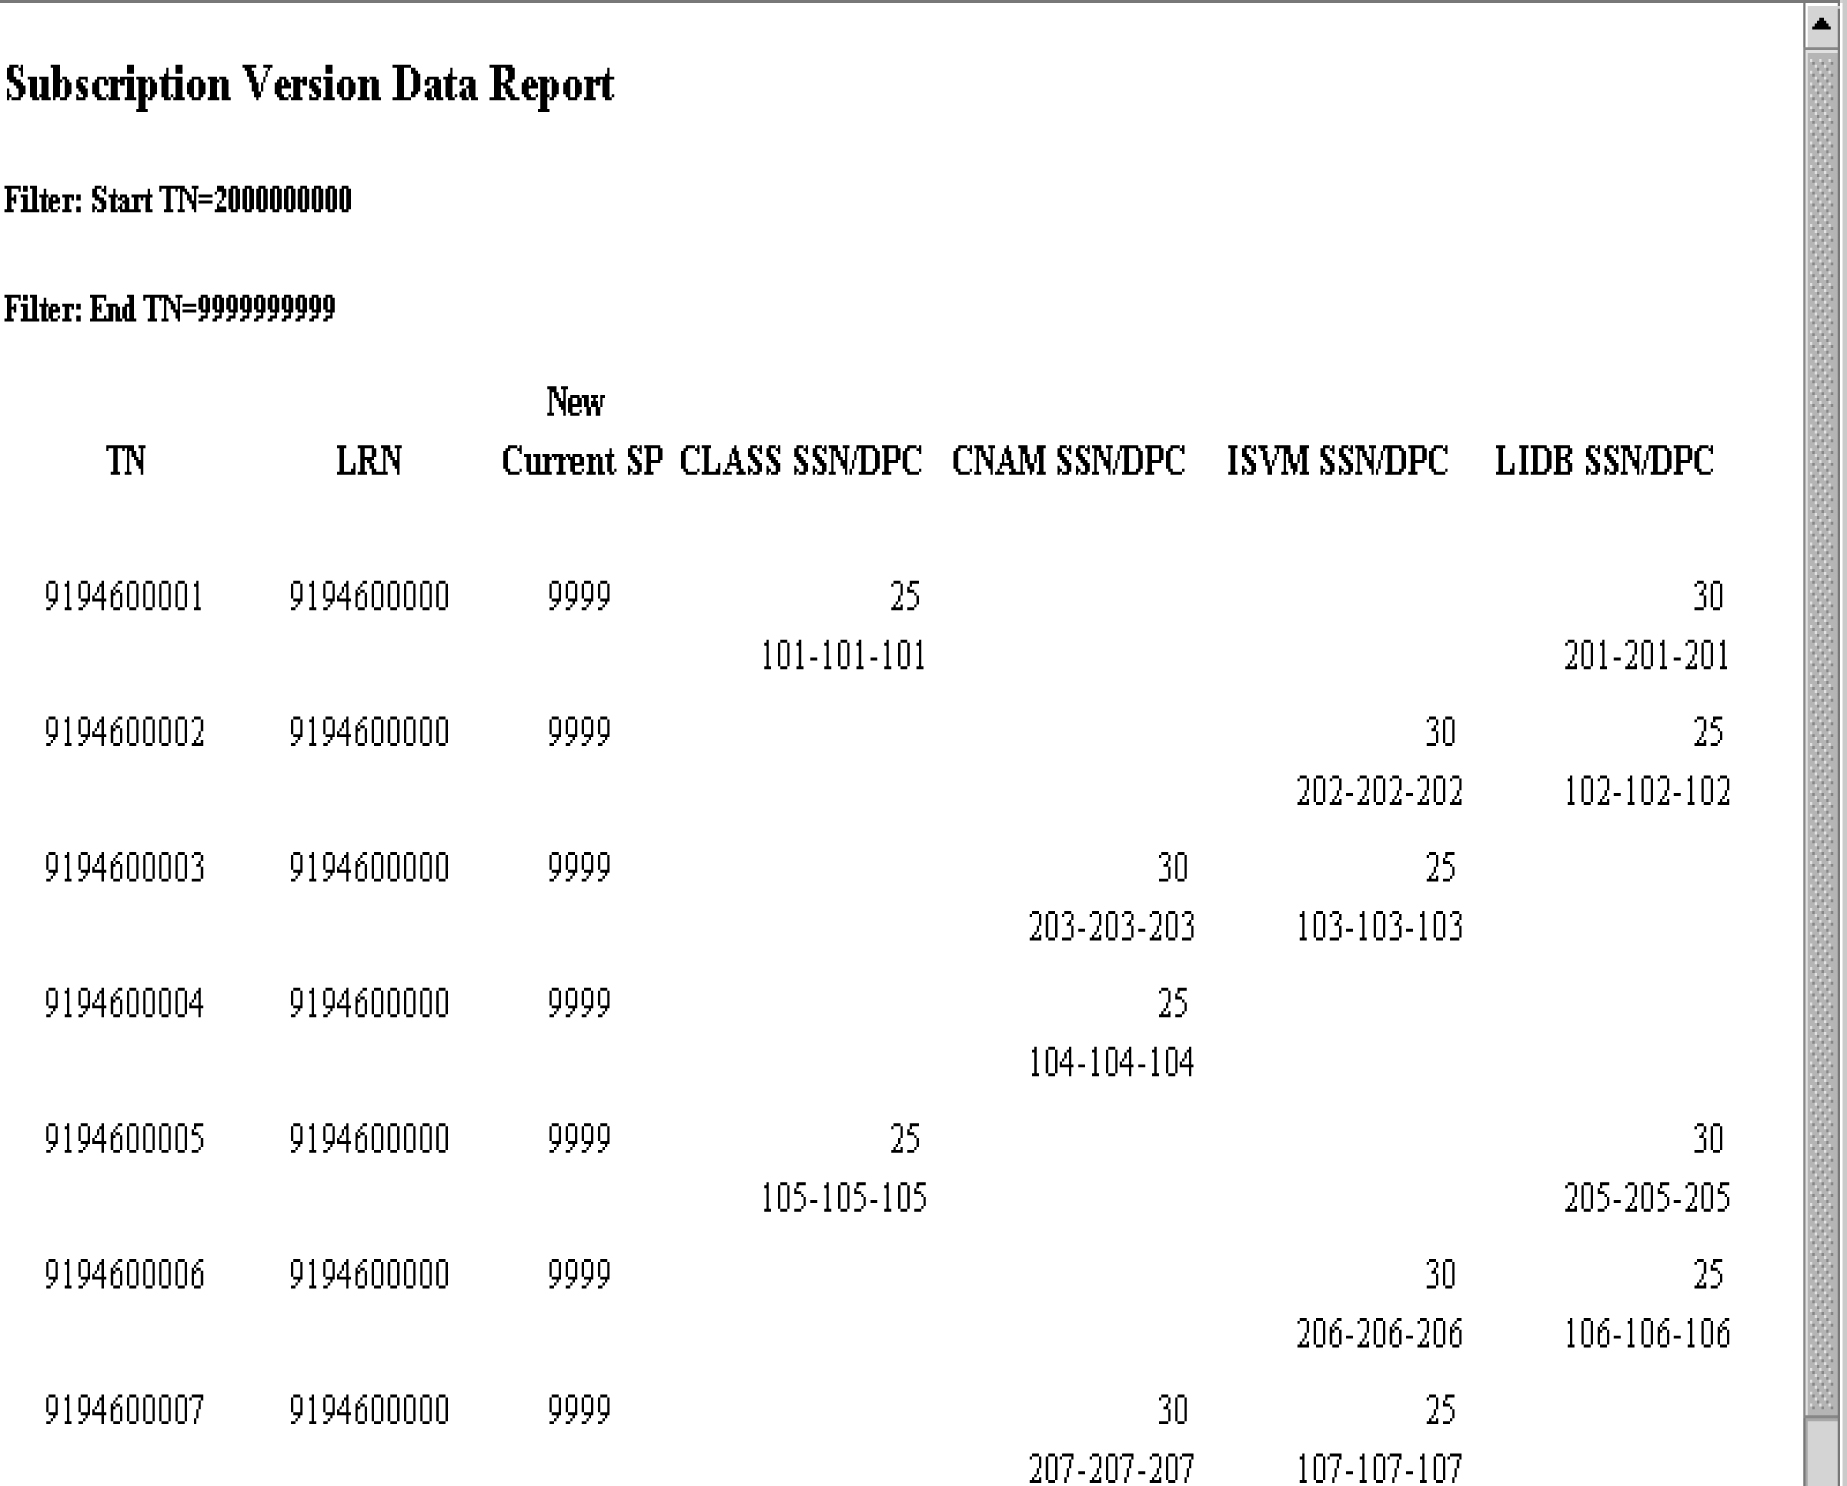
  7. Click OK to view an example of the report.

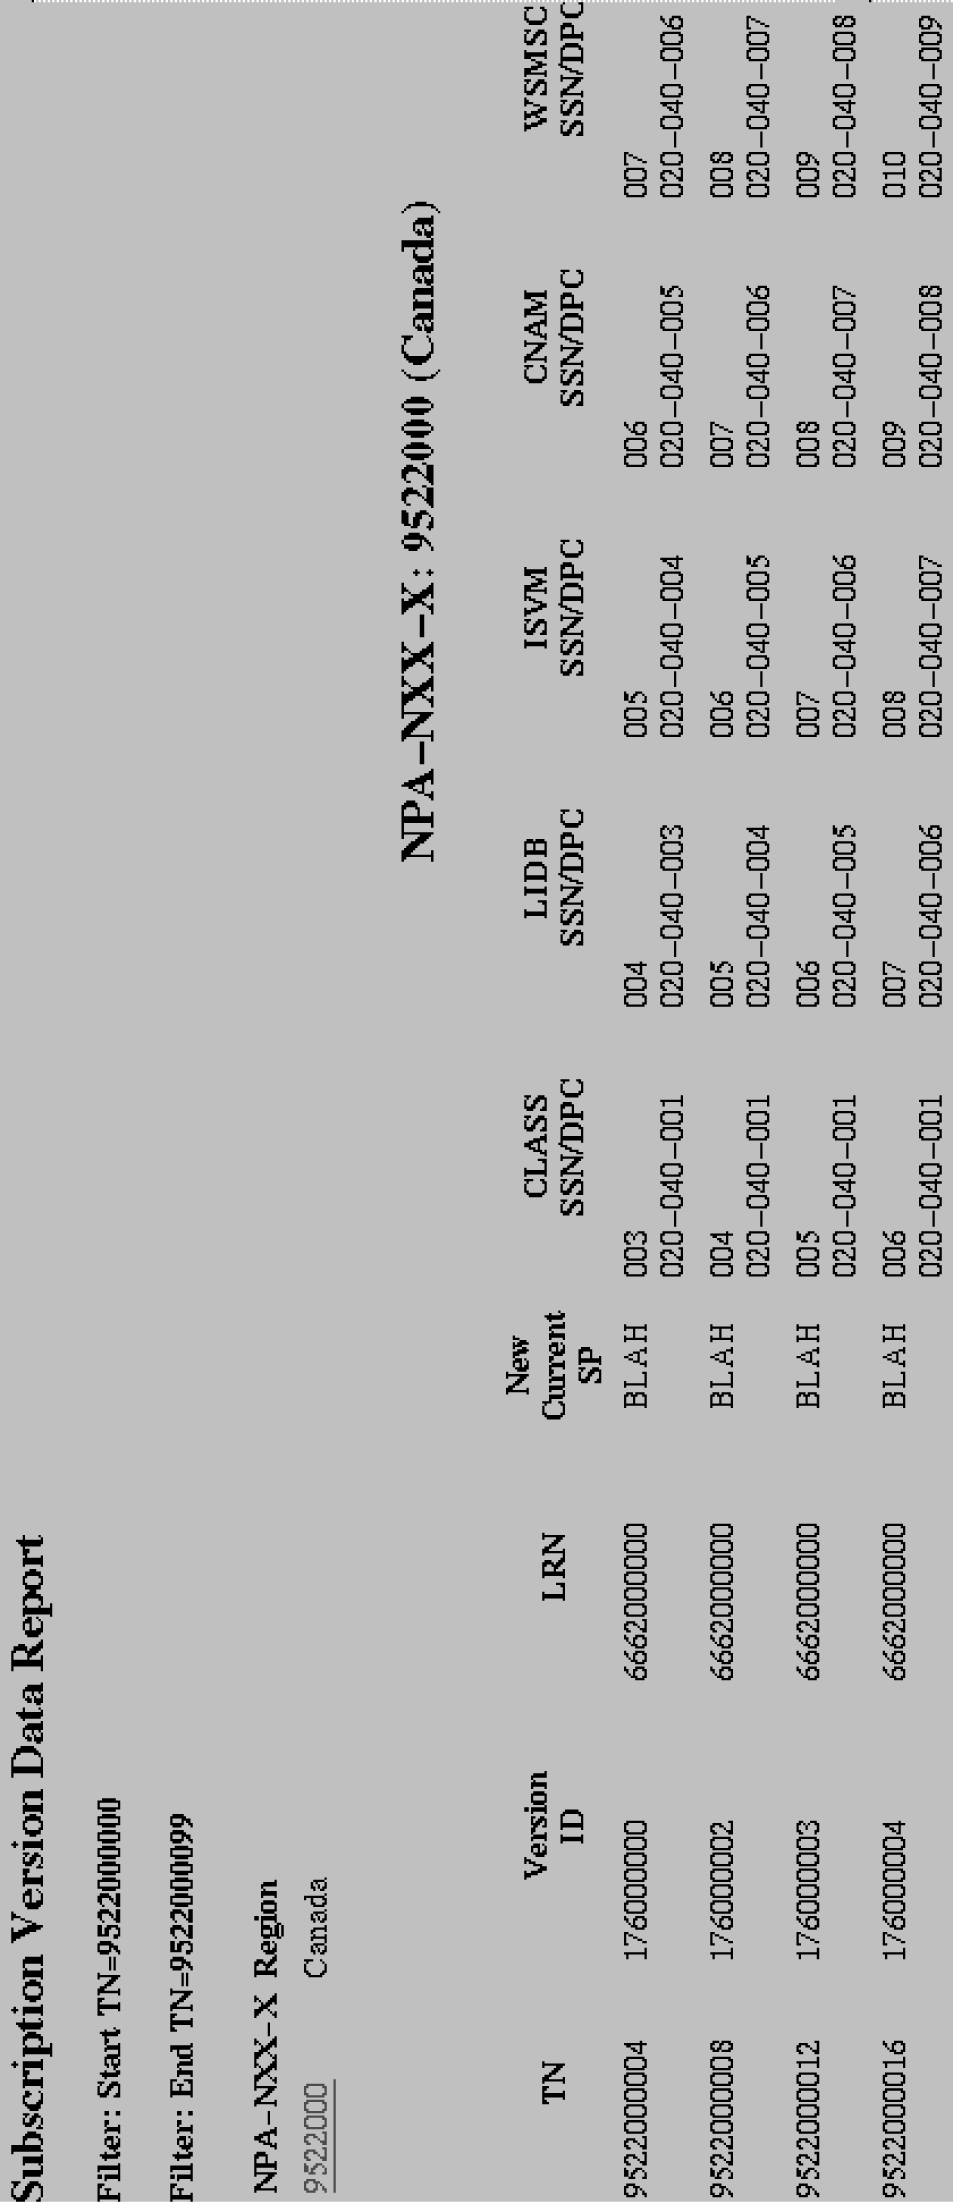
    Figure 5-13 LSMS Subscriptions by LRN Report Example


    img/t_creating_an_lsms_subscriptions_by_lrn_reports_dam-fig2.jpg

Viewing an LSMS Subscription by LRN Report

To view an LSMS Subscription by LRN report:

  1. Log in to LSMS as a member of the permission group that is authorized to perform this operation.
  2. From the LSMS Console window, select Reports, and then LSMS Subscriptions by LRN Data.
    The LSMS Subscriptions by LRN Report Create window appears.
  3. Select the View tab.
    The LSMS Subscriptions by LRN Report View window appears.
  4. In the File field, enter the name of the report to be viewed or click the Browse button to select a report.
    Click OK or Apply.
  5. The report output window displays.

Deleting an LSMS Subscription by LRN Report

To delete an LSMS Subscription by LRN report:

  1. Log in to LSMS as a member of the permission group that is authorized to perform this operation.
  2. From the LSMS Console window, select Reports, and then LSMS Subscriptions by LRN Data.
    The LSMS Subscriptions by LRN Report Create window appears.
  3. Select the Delete tab.
    The LSMS Subscriptions by LRN Report Delete window appears.
  4. In the File field, enter the name of the report to be deleted or click the Browse button to select a report.
    Click OK or Apply.
  5. A Confirm Delete message window appears.
  6. Click Yes or No.
    If you click Yes, an Update Successful message window appears. Click OK to return to the LSMS Subscriptions by LRN Report Delete window.
  7. If you click No, you return to the LSMS Subscriptions by LRN Report Delete window.

LSMS Subscriptions by Service Provider Data Reports

The following procedures explain how to create, view, and delete LSMS Subscriptions by Service Provider Data reports.

Creating an LSMS Subscription by Service Provider Data Report

To create an LSMS Subscription by Service Provider Data report:

  1. Log in to LSMS as a member of the permission group that is authorized to perform this operation.
  2. From the LSMS Console window, select Reports, and then LSMS Subscriptions by Service Provider Data.
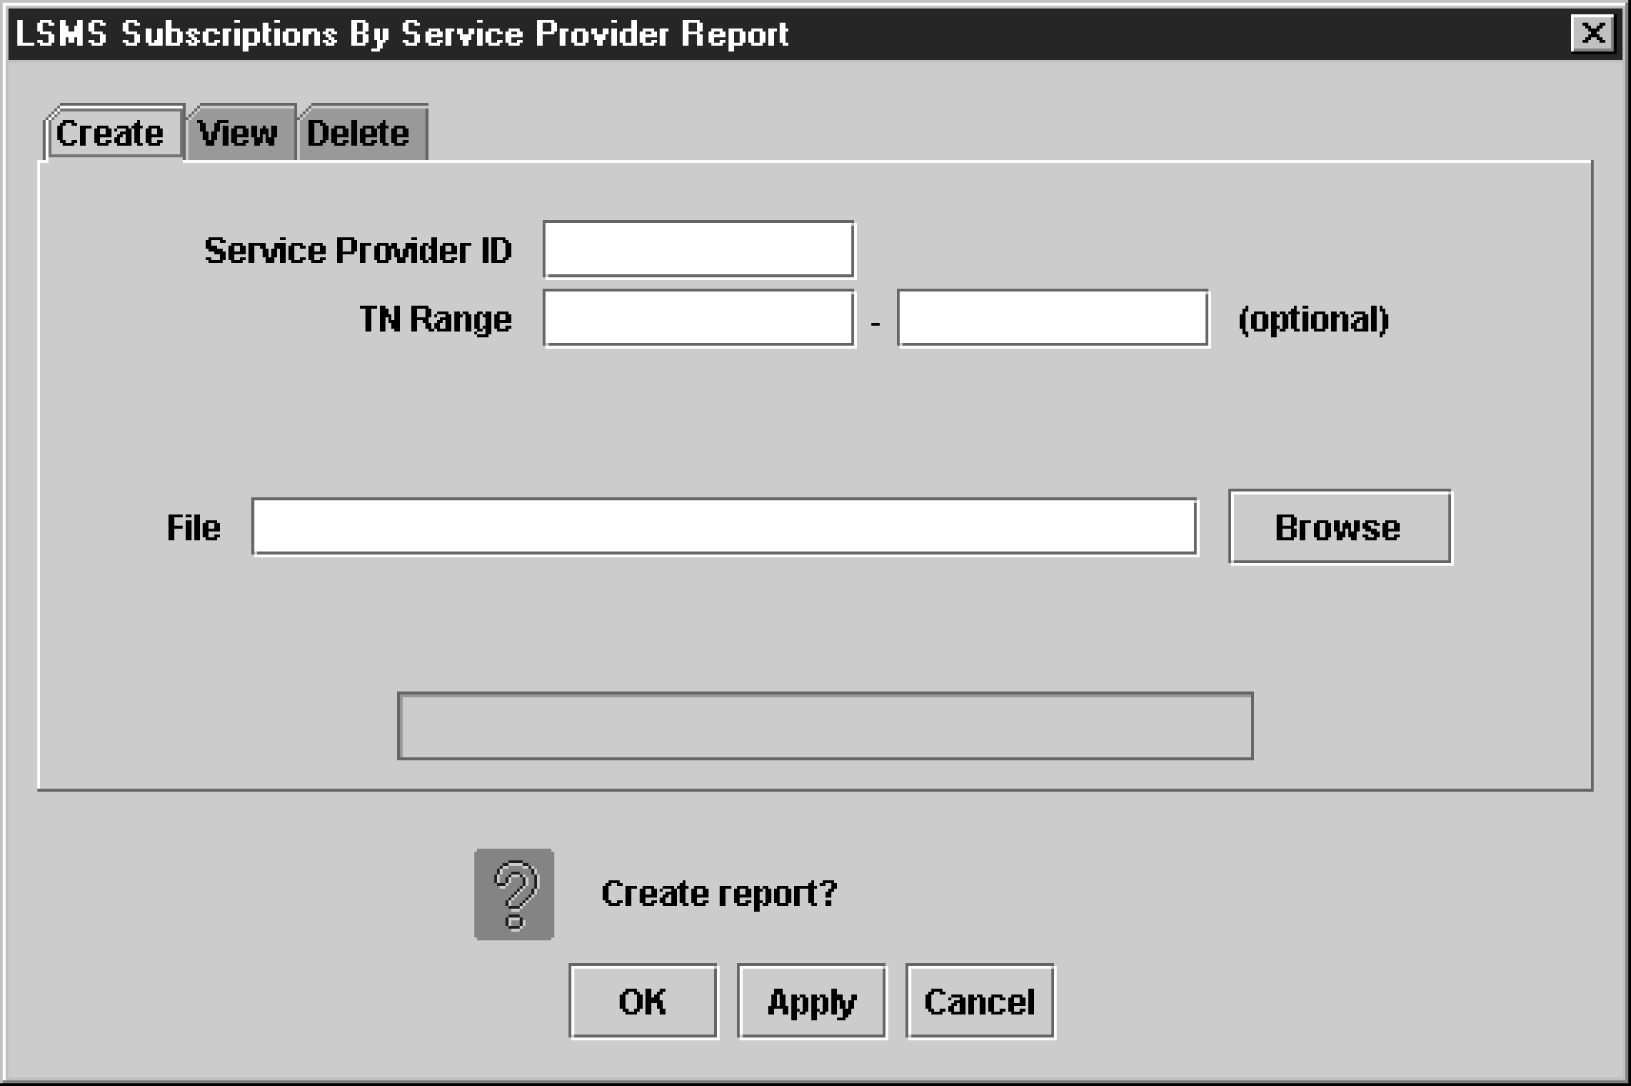
    The LSMS Subscriptions by Service Provider Report Create window appears.

    Figure 5-14 LSMS Subscriptions by Service Provider Report Create Window


    img/t_creating_an_lsms_subscriptions_by_service_provider_data_reports_dam-fig1.jpg
  3. In the Service Provider ID field, enter the desired SPID.
  4. In the TN Range field, enter the desired TN range.
    This is an optional field.
    1. If no TN range is specified, then all Subscription Version records that satisfy the Service Provider filter are displayed, regardless of its TN.
    2. If only the Start TN is specified, then all Subscription Version records with a TN equal to the Start TN, and that satisfy the Service Provider filter (if any), are displayed.
    3. If both the Start TN and End TN are specified, then all Subscription Version records with a TN between the Start TN and the End TN, and that satisfy the Service Provider filter (if any), are displayed.
  5. In the File field, enter a file name for the report to be generated.
    Click OK or Apply. The report automatically runs in background mode and does not interfere with LSMS processing tasks such as NPAC traffic processing.
  6. An Update Successful message window appears.
  7. Click OK to view an example of the report.

    Figure 5-15 LSMS Subscriptions by Service Provider Data Report Example


    img/t_creating_an_lsms_subscriptions_by_service_provider_data_reports_dam-fig2.jpg

Viewing an LSMS Subscription by Service Provider Data Report

To view an LSMS Subscription by Service Provider Data report:

  1. Log in to LSMS as a member of the permission group that is authorized to perform this operation.
  2. From the LSMS Console window, select Reports, and then LSMS Subscriptions by Service Provider Data.
    The LSMS Subscriptions by Service Provider Report Create window appears.
  3. Select the View tab.
    The LSMS Subscriptions by Service Provider Report View window appears.
  4. In the File field, enter the name of the report to be viewed or click the Browse button to select a report.
    Click OK or Apply.
  5. The report output window displays.

Deleting an LSMS Subscription by Service Provider Data Report

To delete an LSMS Subscription by Service Provider Data report:

  1. Log in to LSMS as a member of the permission group that is authorized to perform this operation.
  2. From the LSMS Console window, select Reports, and then LSMS Subscriptions by Service Provider Data.
    The LSMS Subscriptions by Service Provider Report Create window appears.
  3. Select the Delete tab.
    The LSMS Subscriptions by Service Provider Report Delete window appears.
  4. In the File field, enter the name of the report to be deleted or click the Browse button to select a report.
    Click OK or Apply.
  5. A Confirm Delete message window appears.
  6. Click Yes or No.
    If you click Yes, an Update Successful message window appears. Click OK to return to the LSMS Subscriptions by Service Provider Report Delete window.
  7. If you click No, you return to the LSMS Subscriptions by Service Provider Report Delete window.

LSMS Number Pool Blocks by LRN Data Reports

The following procedures explain how to create, view, and delete LSMS Number Pool Blocks by LRN Data reports.

Creating an LSMS Number Pool Block by LRN Data Report

To create an LSMS Number Pool Block by LRN Data report:

  1. Log in to LSMS as a member of the permission group that is authorized to perform this operation.
  2. From the LSMS Console window, select Reports, and then LSMS Number Pool Blocks by LRN Data.
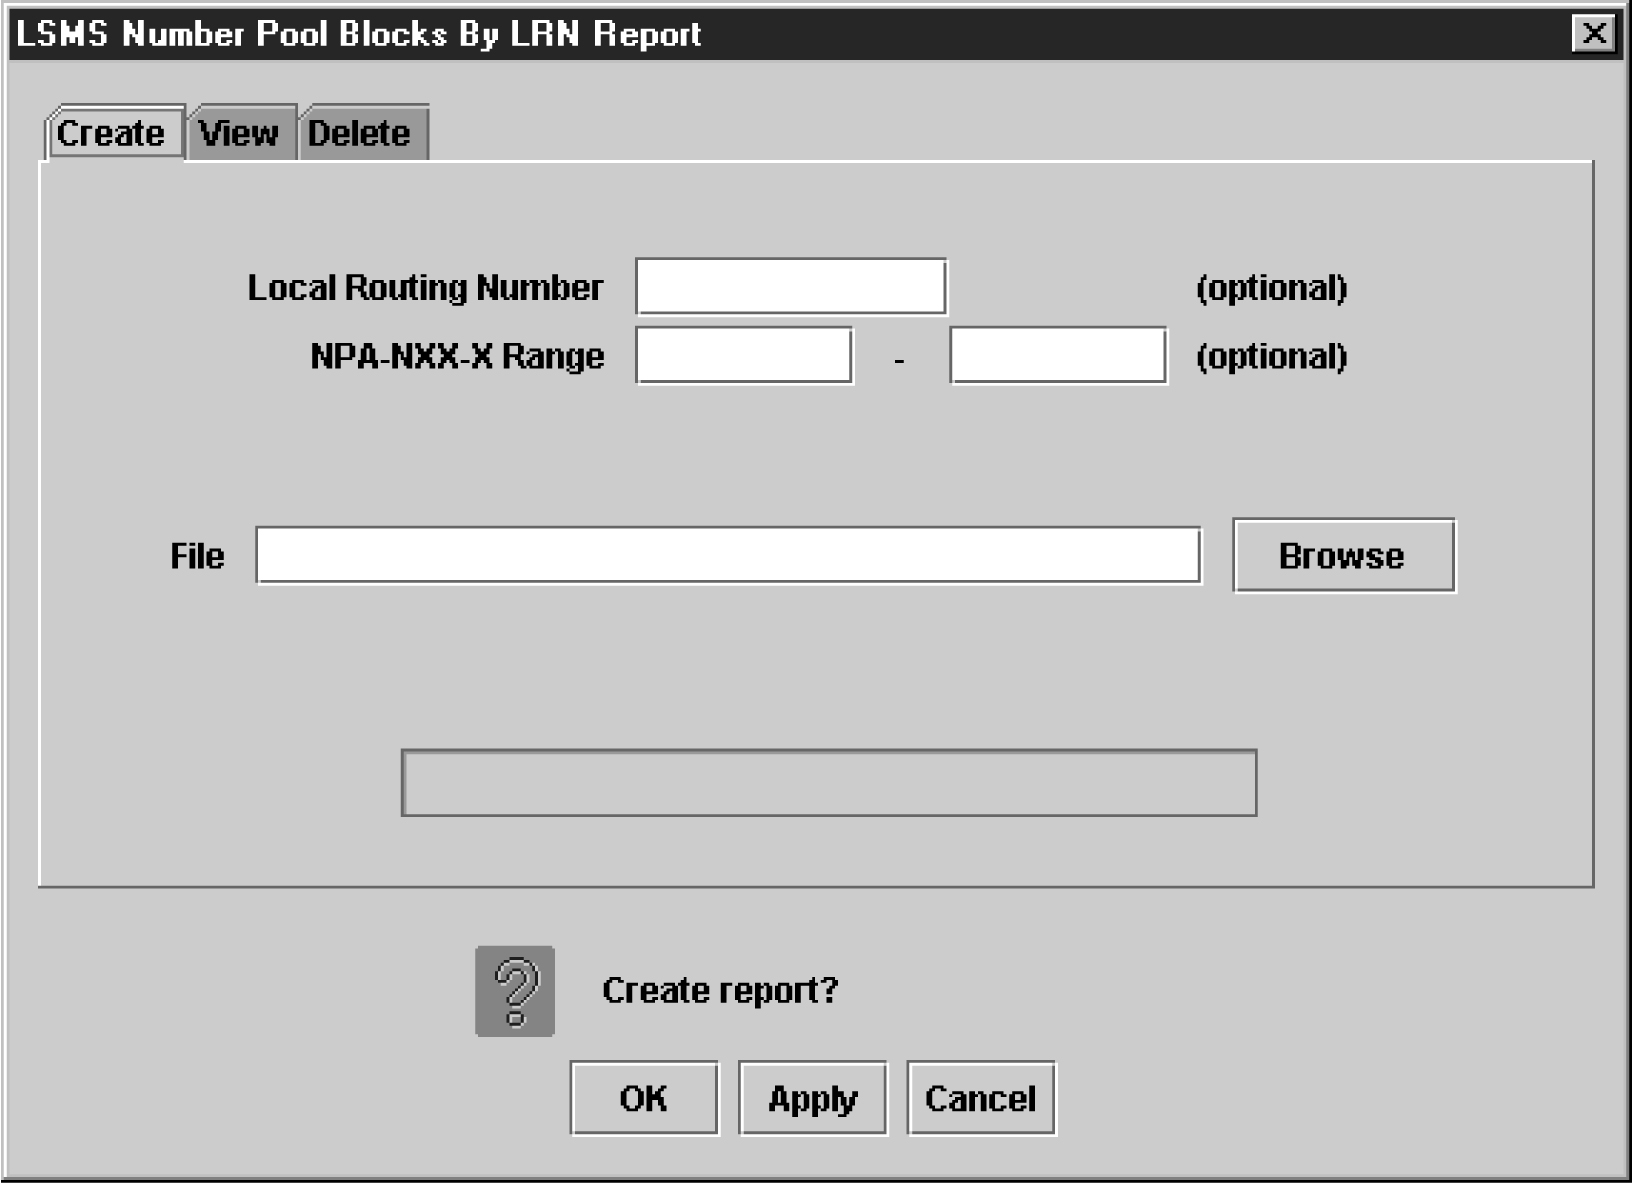
    The LSMS Number Pool Blocks by LRN Report Create window appears.

    Figure 5-16 LSMS Number Pool Blocks by LRN Report Create Window


    img/t_creating_an_lsms_number_pool_blocks_by_lrn_data_reports_dam-fig1.jpg
  3. In the Local Routing Number field, if desired, enter the LRN of the subscriptions to be reported.
    This is an optional field.
  4. In the NPA-NXX-X Range field, enter the appropriate information.
    The NPA-NXX-X Range field is optional.
    1. If no NPA-NXX-X range is specified, then all Number Pool Block records that satisfy the LRN filter are displayed, regardless of its NPA-NXX-X.
    2. If only the Start NPA-NXX-X is specified, then all Number Pool Block records with a NPA-NXX-X equal to the Start NPA-NXX-X, and that satisfy the LRN filter (if any), are displayed.
    3. If both the Start NPA-NXX-X and End NPA-NXX-X are specified, then all Number Pool Block records with a NPA-NXX-X between the Start NPA-NXX-X and the End NPA-NXX-X, and that satisfy the LRN filter (if any), are displayed.
  5. In the File field, enter a file name for the report to be generated.
    Click OK or Apply. The report automatically runs in background mode and does not interfere with LSMS processing tasks such as NPAC traffic processing.
  6. An Update Successful message window appears.
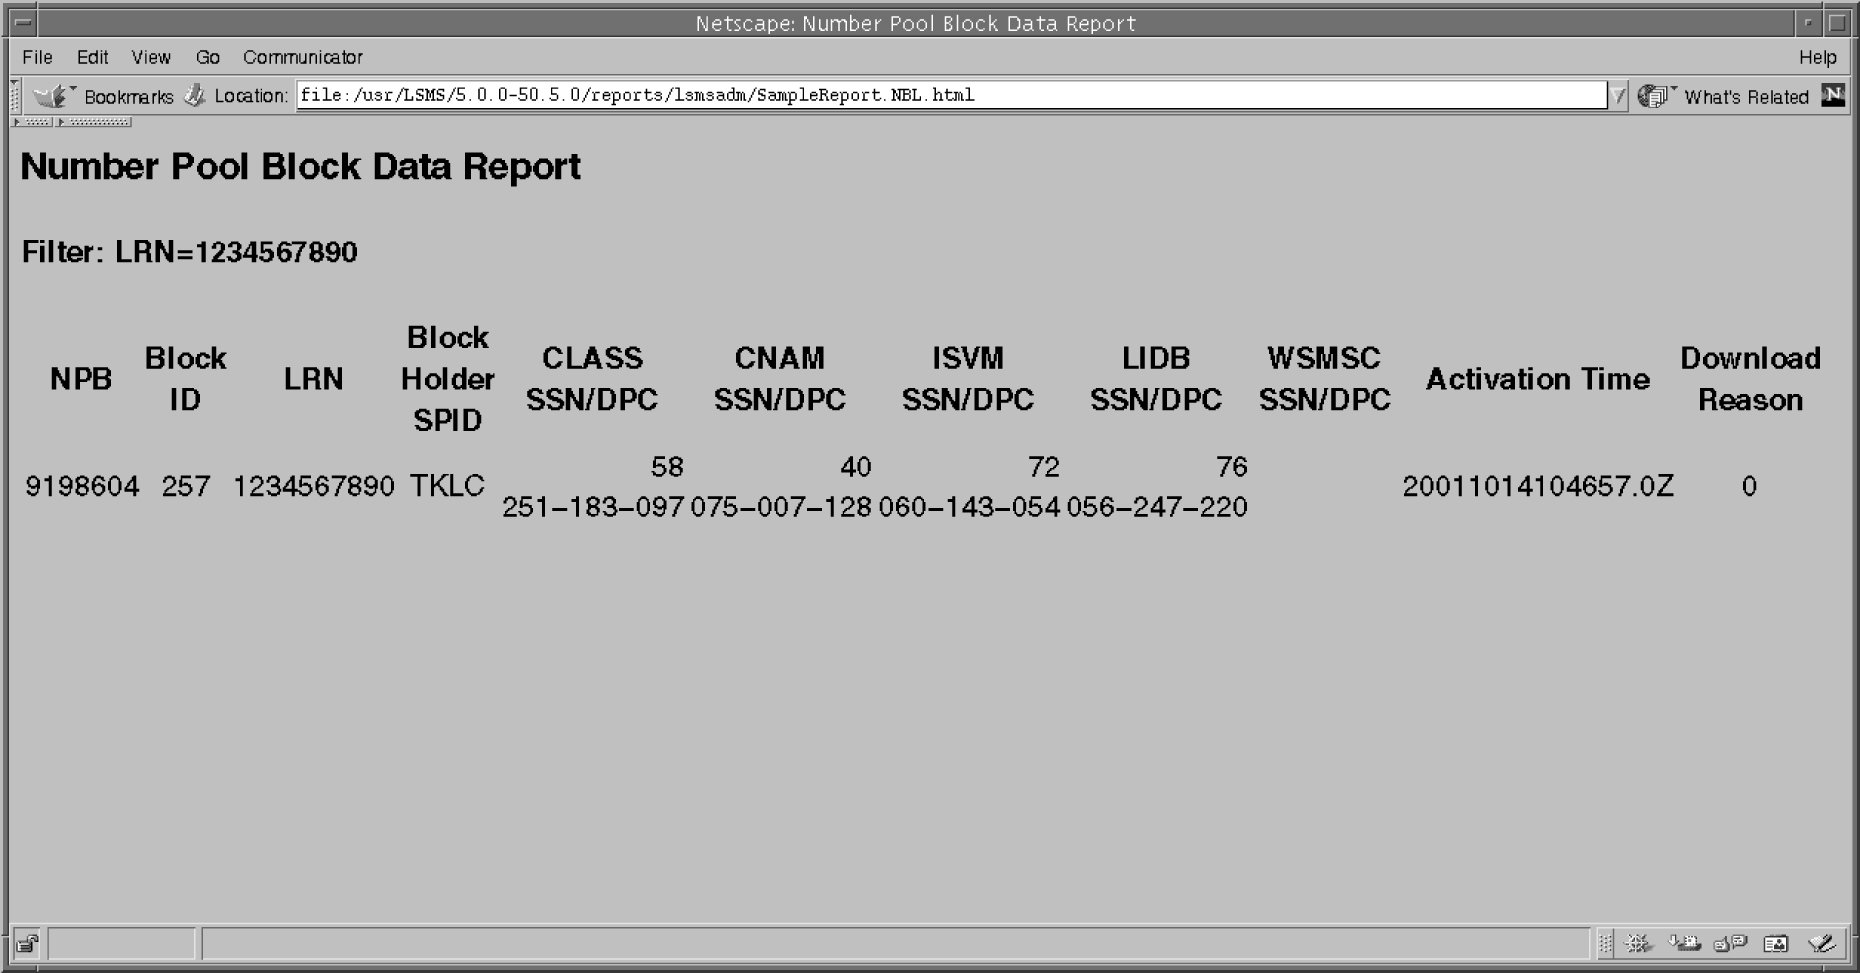
  7. Click OK to view an example of the report.

    Figure 5-17 LSMS Number Pool Blocks by LRN Report Window


    img/t_creating_an_lsms_number_pool_blocks_by_lrn_data_reports_dam-fig2.jpg

Viewing an LSMS Number Pool Block by LRN Data Report

To view an LSMS Number Pool Block by LRN Data report:

  1. Log in to LSMS as a member of the permission group that is authorized to perform this operation.
  2. From the LSMS Console window, select Reports, and then LSMS Number Pool Blocks by LRN Data.
    The LSMS Number Pool Blocks by LRN Report Create window appears.
  3. Select the View tab.
    The LSMS Number Pool Blocks by LRN Report View window appears.
  4. In the File field, enter the name of the report to be viewed or click the Browse button to select a report.
    Click OK or Apply.
  5. The report output window displays.

Deleting an LSMS Number Pool Block by LRN Data Report

To delete an LSMS Number Pool Block by LRN Data report:

  1. Log in to LSMS as a member of the permission group that is authorized to perform this operation.
  2. From the LSMS Console window, select Reports, and then LSMS Number Pool Blocks by LRN Data.
    The LSMS Number Pool Blocks by LRN Report Create window appears.
  3. Select the Delete tab.
    The LSMS Number Pool Blocks by LRN Report Delete window appears.
  4. In the File field, enter the name of the report to be deleted or click the Browse button to select a report.
    Click OK or Apply.
  5. A Confirm Delete message window appears.
  6. Click Yes or No.
    If you click Yes, an Update Successful message window appears. Click OK to return to the LSMS Number Pool Blocks by LRN Report Delete window.
  7. If you click No, you return to the LSMS Number Pool Blocks by LRN Report Delete window.

LSMS Number Pool Blocks by Service Provider Data Reports

The following procedures explain how to create, view, and delete LSMS Number Pool Blocks by Service Provider Data reports.

Creating an LSMS Number Pool Block by Service Provider Data Report

To create an LSMS Number Pool Block by Service Provider Data report:

  1. Log in to LSMS as a member of the permission group that is authorized to perform this operation.
  2. From the LSMS Console window, select Reports, and then LSMS Number Pool Blocks by Service Provider Data.
    The LSMS Number Pool Blocks by Service Provider Report Create window appears.

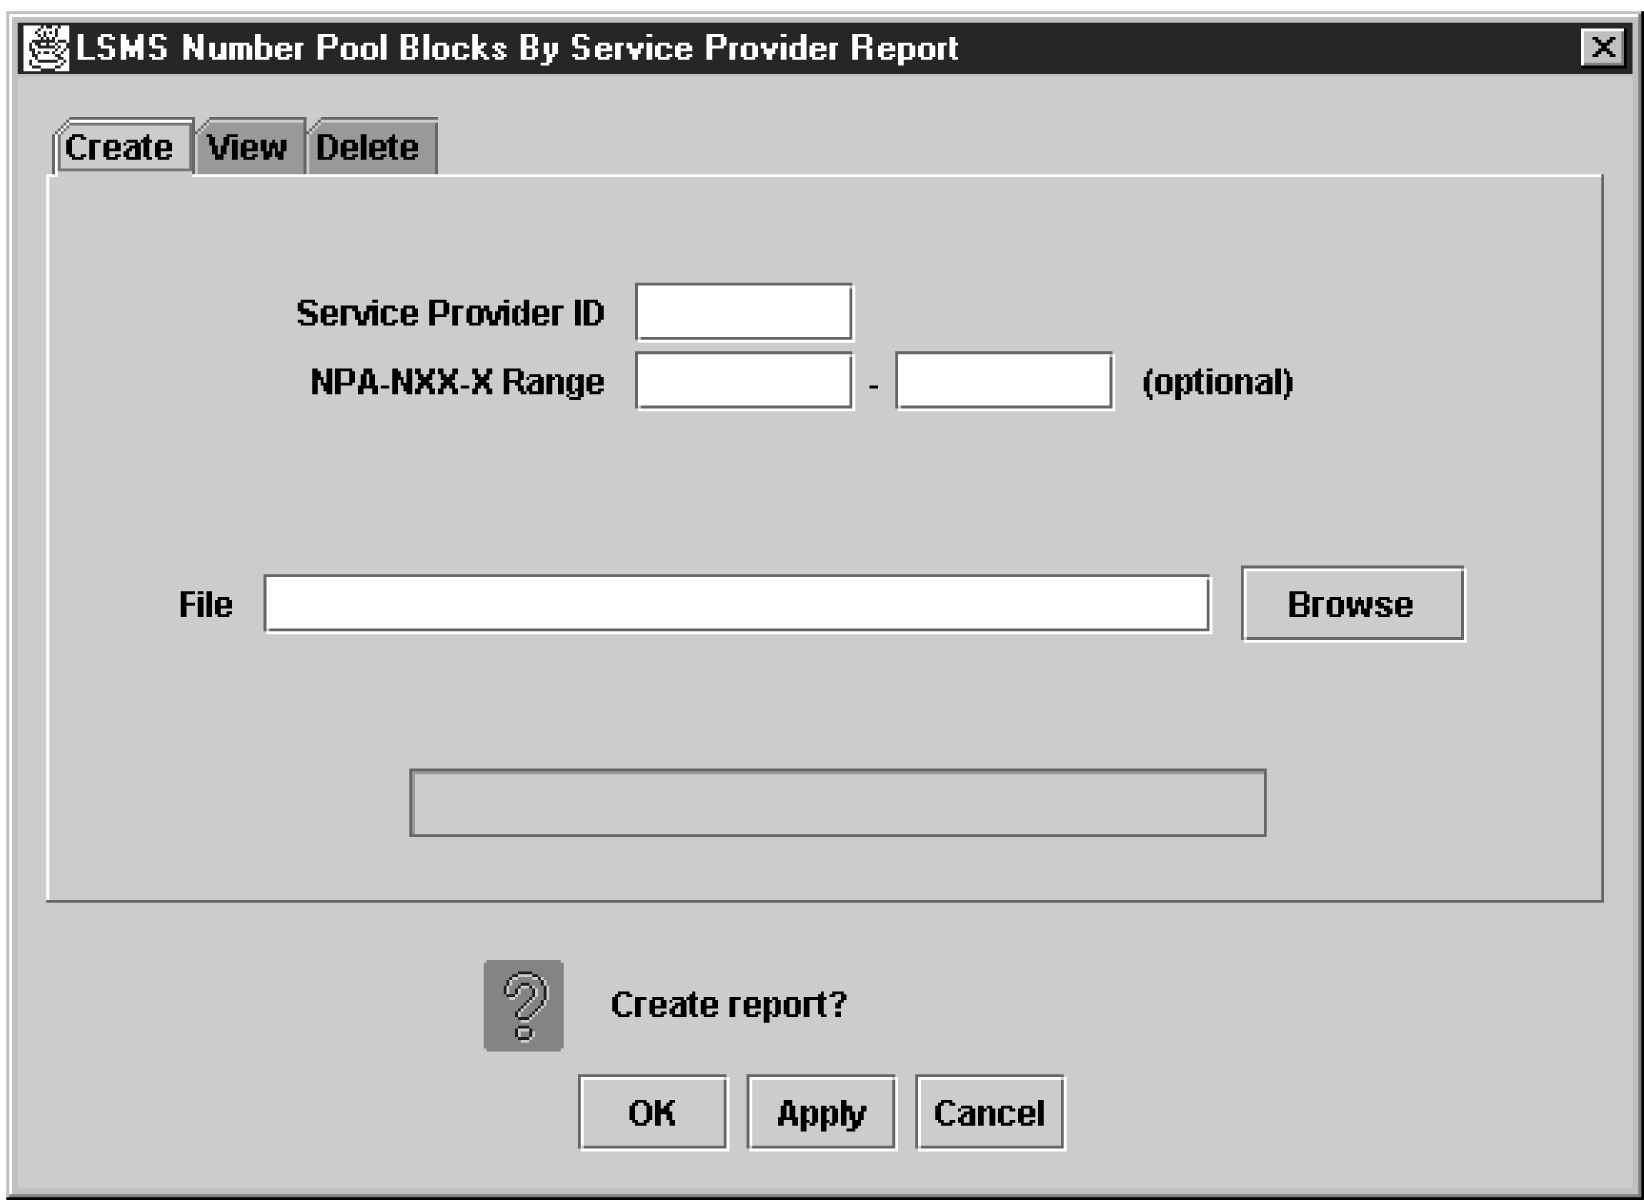
    Figure 5-18 LSMS Number Pool Blocks by Service Provider Report Create Window


    img/t_creating_an_lsms_number_pool_blocks_by_service_provider_data_report_dam-fig1.jpg
  3. In the Service Provider ID field, enter the desired SPID.
  4. In the NPA-NXX-X Range field, enter the appropriate information.
    The NPA-NXX-X Range field is optional.
    1. If no NPA-NXX-X range is specified, then all Number Pool Block records that satisfy the Service Provider filter are displayed, regardless of its NPA-NXX-X.
    2. If only the Start NPA-NXX-X is specified, then all Number Pool Block records with a NPA-NXX-X equal to the Start NPA-NXX-X, and that satisfy the Service Provider filter (if any), are displayed.
    3. If both the Start NPA-NXX-X and End NPA-NXX-X are specified, then all Number Pool Block records with a NPA-NXX-X between the Start NPA-NXX-X and the End NPA-NXX-X, and that satisfy the Service Provider filter (if any), are displayed.
  5. In the File field, enter a file name for the report to be generated.
    Click OK or Apply. The report automatically runs in background mode and does not interfere with LSMS processing tasks such as NPAC traffic processing.
  6. An Update Successful message window appears.
  7. Click OK to view an example of the report.

    Figure 5-19 LSMS Number Pool Blocks by Service Provider Data Window


    img/t_creating_an_lsms_number_pool_blocks_by_service_provider_data_report_dam-fig2.jpg

Viewing an LSMS Number Pool Block by Service Provider Data Report

To view an LSMS Number Pool Block by Service Provider Data report:

  1. Log in to LSMS as a member of the permission group that is authorized to perform this operation.
  2. From the LSMS Console window, select Reports, and then LSMS Number Pool Blocks by Service Provider Data.
    The LSMS Number Pool Blocks by Service Provider Report Create window appears.
  3. Select the View tab.
    The LSMS Number Pool Blocks by Service Provider Report View window appears.
  4. In the File field, enter the name of the report to be viewed or click the Browse button to select a report.
    Click OK or Apply.
  5. The report output window displays.

Deleting an LSMS Number Pool Block by Service Provider Data Report

To delete an LSMS Number Pool Block by Service Provider Data report:

  1. Log in to LSMS as a member of the permission group that is authorized to perform this operation.
  2. From the LSMS Console window, select Reports, and then LSMS Number Pool Blocks by Service Provider Data.
    The LSMS Number Pool Blocks by Service Provider Report Create window appears.
  3. Select the Delete tab.
    The LSMS Number Pool Blocks by Service Provider Report Delete window appears.
  4. In the File field, enter the name of the report to be deleted or click the Browse button to select a report.
    Click OK or Apply.
  5. A Confirm Delete message window appears.
  6. Click Yes or No.
    If you click Yes, an Update Successful message window appears. Click OK to return to the LSMS Number Pool Blocks by Service Provider Report Delete window.
  7. If you click No, you return to the LSMS Number Pool Blocks by Service Provider Report Delete window.

Service Provider Data Reports

The following procedures explain how to create, view, and delete Service Provider Data reports.

Creating a Service Provider Data Report

To create a Service Provider Data report:

  1. Log in to LSMS as a member of the permission group that is authorized to perform this operation.
  2. From the LSMS Console window, select Reports, and then Service Provider Data.
    The Service Provider Data Report Create window appears.

    Figure 5-20 Service Provider Data Report Create Window


    img/t_creating_a_service_provider_data_report_dam-fig1.jpg
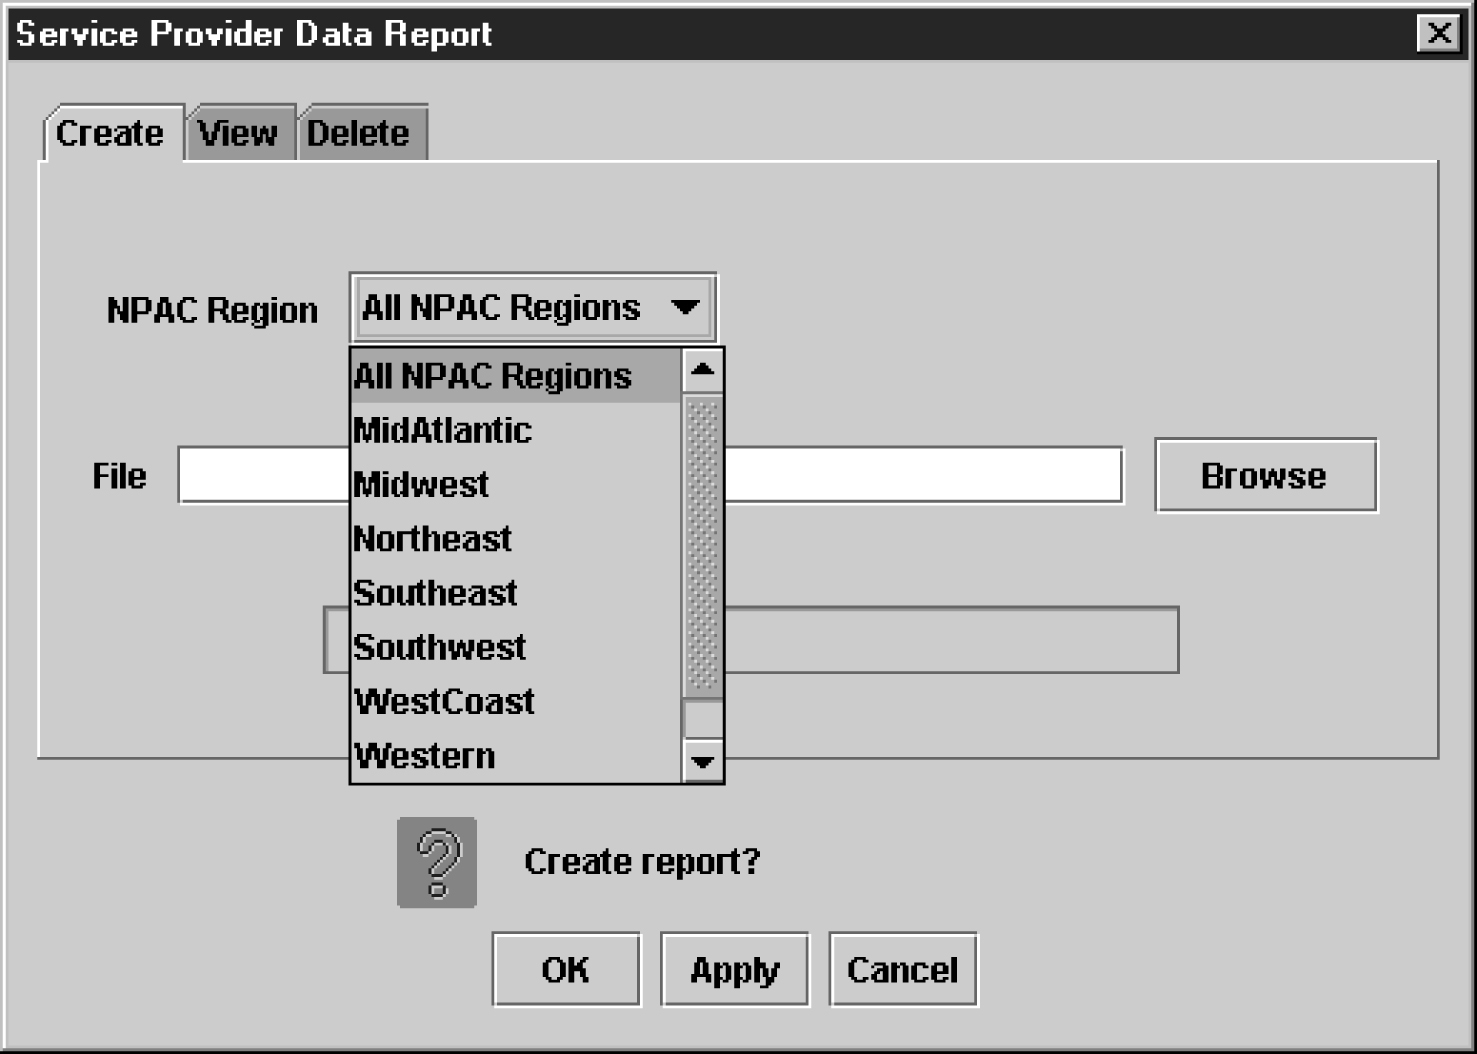
  3. In the NPAC Region field, select the desired region (or All NPAC Regions) for which you require information.

    Figure 5-21 Service Provider Data Report NPAC Regions


    img/t_creating_a_service_provider_data_report_dam-fig2.jpg
  4. In the File field, enter a file name for the report to be generated.
    Click OK or Apply. The report automatically runs in background mode and does not interfere with LSMS processing tasks such as NPAC traffic processing.
  5. An Update Successful message window appears.
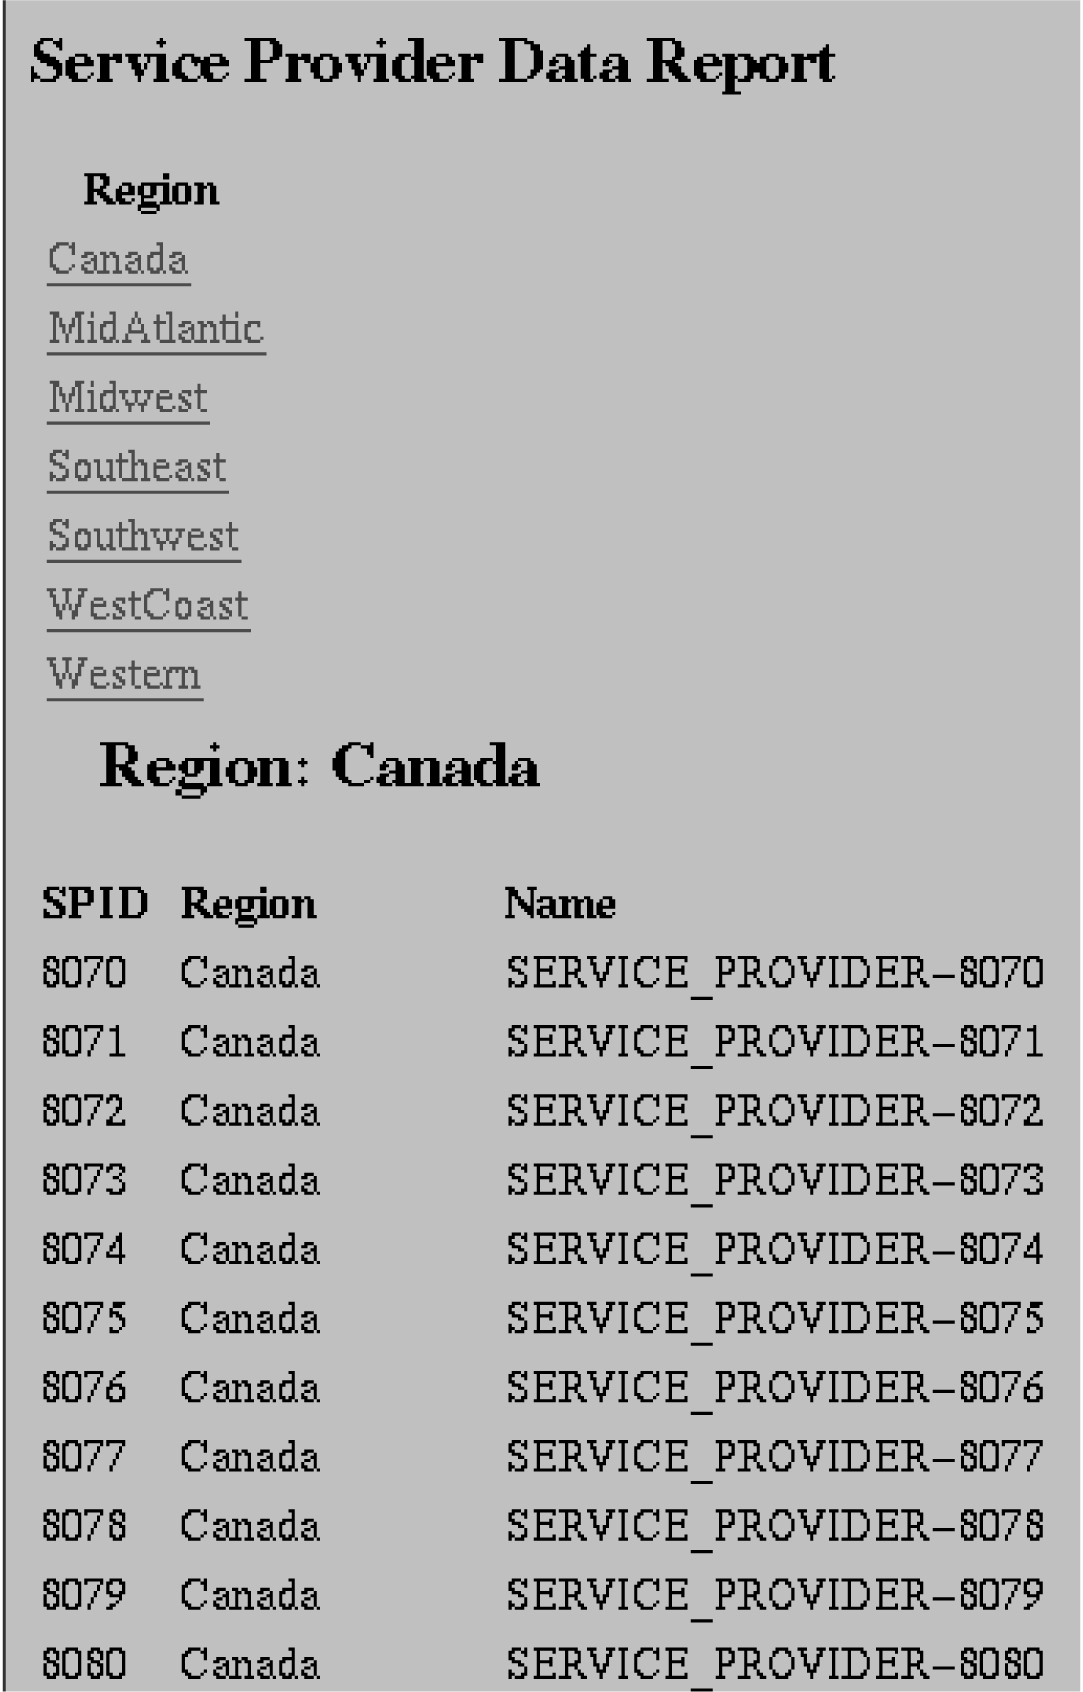
  6. Click OK to view an example of the report.

    Figure 5-22 Service Provider Data Report Window


    img/t_creating_a_service_provider_data_report_dam-fig3.jpg

Viewing a Service Provider Data Report

To view a Service Provider Data report:

  1. Log in to LSMS as a member of the permission group that is authorized to perform this operation.
  2. From the LSMS Console window, select Reports, and then Service Provider Data .
    The Service Provider Data Report Create window appears.
  3. Select the View tab.
    The Service Provider Data Report View window appears.
  4. In the File field, enter the name of the report to be viewed or click the Browse button to select a report.
    Click OK or Apply.
  5. The report output window displays.

Deleting Service Provider Data Report

To delete a Service Provider Data report:

  1. Log in to LSMS as a member of the permission group that is authorized to perform this operation.
  2. From the LSMS Console window, select Reports, and then Service Provider Data .
    The Service Provider Data Report Create window appears.
  3. Select the Delete tab.
    The Service Provider Data Report Delete window appears.
  4. In the File field, enter the name of the report to be deleted or click the Browse button to select a report.
    Click OK or Apply.
  5. A Confirm Delete message window appears.
  6. Click Yes or No.
    If you click Yes, an Update Successful message window appears. Click OK to return to the Service Provider Data Report Delete window.
  7. If you click No, you return to the Service Provider Data Report Delete window.

Permission Group Data Report

The "Permission Group Data" report provides a listing of all permission groups, commands authorized for each permission group, and users assigned to each permission group.

Creating a Permission Group Data Report

To create a Permission Group Data report:

  1. Log in to LSMS as a member of the permission group that is authorized to perform this operation.
  2. From the LSMS Console window, select Reports, and then Permission Group Data.
    The Permission Group Data Report window appears.
  3. From the Permission Group selection box, select All Permission Groups or a group from the list provided.
  4. See Table 5-4 and Table 5-5 for information about field constraints and field descriptions.

    Table 5-4 Permission Group Data Report Dialog - Field Constraints

    Field Type Modifiable? Constraints

    Permission Group

    Combo Box

    Yes

    Value restricted to be one of the default permission groups, configurable permission groups, or "All Permission Groups.”

    File

    Text

    Yes

    Must be a valid filename.

    Report Progress

    Progress Bar

    No

    Range 0-100%.

    Table 5-5 Permission Group Data Report Dialog - Field Descriptions

    Field Description

    Permission Group

    Restrict the report to only include data for this permission group.

    File

    Save the report results under this file name. The file will be created on the LSMS.

    Report Progress

    The percentage of the report already created.

  5. In the File field, enter a file name for the report to be generated, or hit the Browse button to select a file.
    Click OK or Apply. The report automatically runs in background mode and does not interfere with LSMS processing tasks such as NPAC traffic processing.
  6. An Update Successful message window appears.
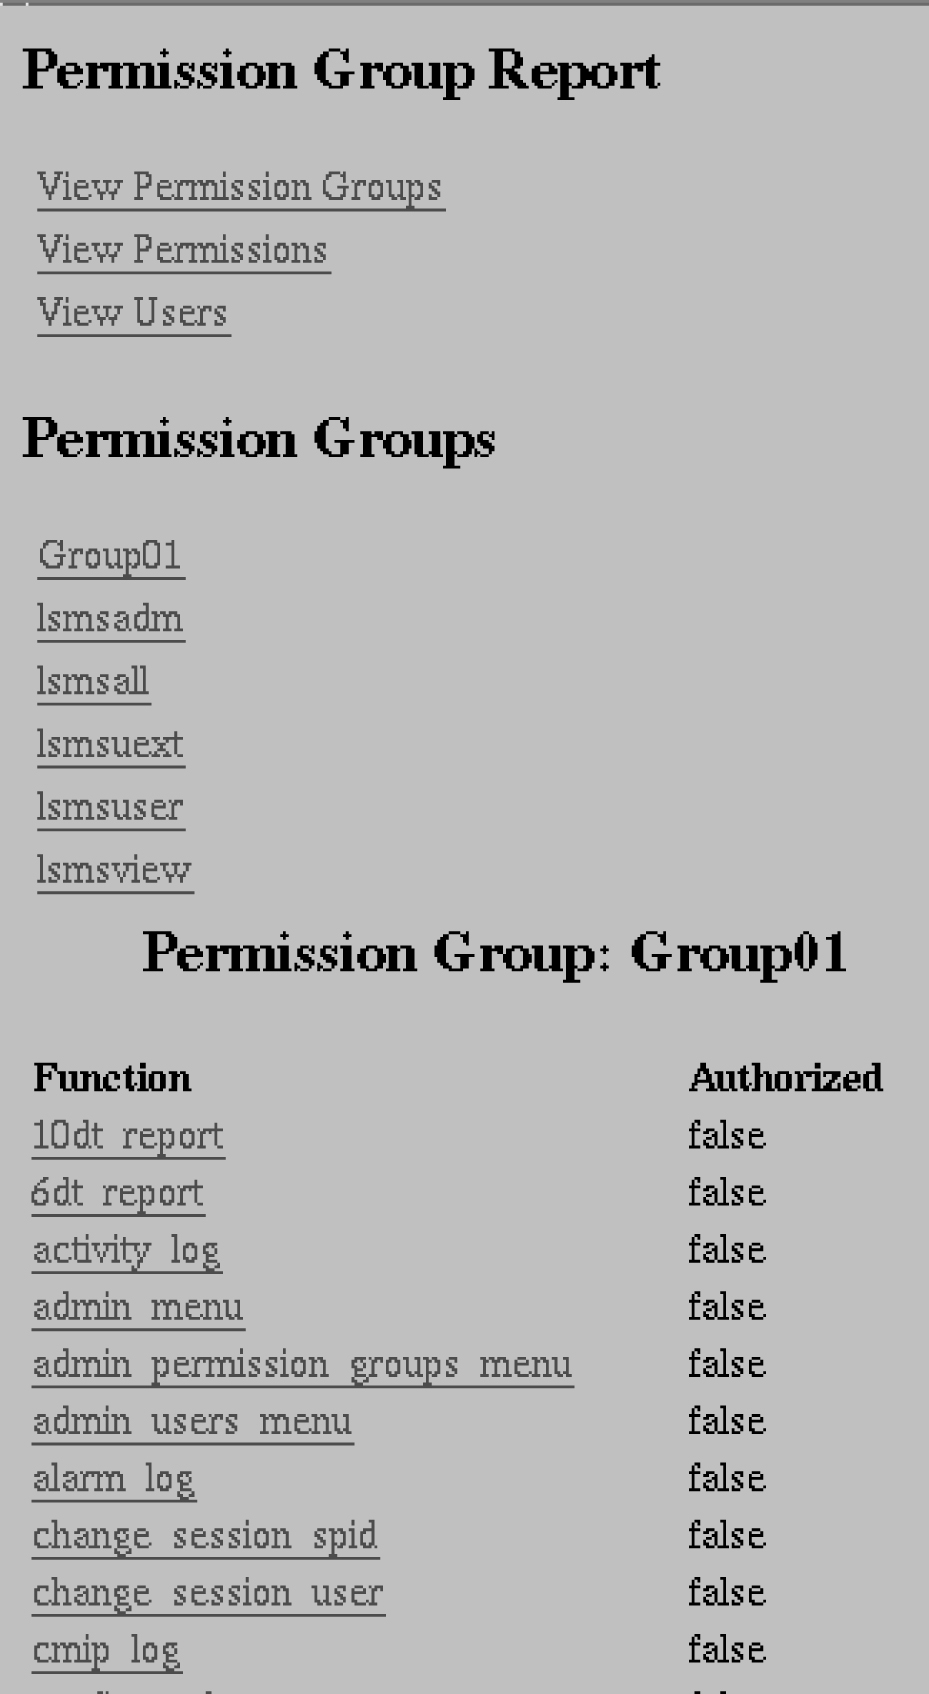
  7. Click OK to view an example of the report.

    Figure 5-23 Permission Group Data Report Window


    img/t_creating_a_permission_group_data_report_dam-fig3.jpg

Viewing a Permission Group Data Report

To view a Permission Group Data report:

  1. Log in to LSMS as a member of the permission group that is authorized to perform this operation.
  2. From the LSMS Console window, select Reports, and then Permission Group Data.
    The Permission Group Report window appears.
  3. Select the View tab.
  4. In the File field, enter a file name for the report to be generated, or hit the Browse button to select a file.
    Click OK or Apply.

Deleting a Permission Group Data Report

To delete a Permission Group Data report:

  1. Log in to LSMS as a member of the permission group that is authorized to perform this operation.
  2. From the LSMS Console window, select Reports, and then Permission Group Data.
    The Permission Group Report window appears.
  3. Select the Delete tab.
  4. In the File field, enter a file name for the report to be generated, or hit the Browse button to select a file.
    Click OK or Apply.

Report Generator

This optional feature is activated by Oracle customer service using secure activation procedures.

Beginning with LSMS Release 5.0, LSMS offered as an optional feature a report generator that uses a new LSMS Query Language (LQL) to enable the user to create reports that are not already available through the Reports menu item on the LSMS GUI. This feature supports queries against the following data types:

  • Subscription versions (SVs)

  • Number pool blocks (NPBs)

  • Default Global Title Translation (GTT)

  • Override GTT

  • Numbering Plan Area (NPA) splits

LQL can be run only on the command line on the active server.

Note:

This feature is intended for specific queries on indexed fields that return small result sets (less than 10,000 records). Queries of non-indexed fields or overly general queries use extensive memory resources, result in extremely long response times, and may impact LSMS system performance. For information about indexed fields, see SV Table, NPB Table, DGTT Table, OGTT Table, and SPLIT Table. For more information about avoiding poor performance, see Avoiding Overly General Queries.

Invoking LQL

After the feature has been activated, the user can invoke LQL in either of the following ways:

  • Interactively by entering the command lql without a filename. The command-line prompt changes to LQL> and the user can enter any of the supported commands (see LQL Commands).

  • In batch mode by entering the command lql with a file name. LQL processes each line in the file as an LQL command (see LQL Commands). Batch processing is terminated when any invalid command or an EXIT command is encountered in the file The batch file can contain comment lines, which must begin with the # character.

Multiple LQL processes can be active, but only one LQL process at a time can perform a query (issue the SELECT command). For more information, see SELECT <column> FROM <table> WHERE <expression>;.

LQL Commands

The LQL command set is a restricted subset of the American National Standards Institute (ANSI) Structured Query Language-92 (SQL-92) and uses the SQL syntax, except where noted. For more information about SQL, refer to:


http://www.w3schools.com/sql/default.asp

Each LQL command is terminated with a semicolon. Therefore, in interactive mode, a command can span multiple lines. However, in batch mode, each command must appear all on one line of the file.

The following commands are included in the LQL command set (although LQL commands are shown in uppercase in this document, the commands are not case-sensitive):

USING REGION <database>;

Use this command for SV or NPB queries to specify the regional database that is to be queried. The following values can be specified for <database>:
  • ALL_REGIONS

  • CANADA

  • MIDATLANTIC

  • MIDWEST

  • NORTHEAST

  • SOUTHEAST

  • WOUTHWEST

  • WESTCOAST

  • WESTERN

The regional database specified is the one queried for all subsequent queries for SVs and NPBs until this command is issued again with another value for <database>. For examples of this command, see LQL Examples.

This command is not used for queries of locally provisioned data (for example, queries of default GTTs or NPA splits).

Note:

This command is not part of the SQL standard.

SELECT <column> FROM <table> WHERE <expression>;

Use this command to select rows from a table (using the WHERE keyword) and to display columns from the matched rows, where:
In order to minimize the performance impact that LQL has on the LSMS system, only one LQL process at a time can issue a SELECT command. If an LQL process issues a SELECT command when another SELECT command is already in progress:
  • In interactive mode, an error message is displayed and the command fails
  • In batch mode, the entire batch file is aborted

For examples of this command, see LQL Examples.

LQL Table Names

Specify one of the values shown in the first column of this table for the <table> parameter in the SELECT command.

Table 5-6 LQL Table Names

LQL Table Name (<table>) Data Type For Column Names, See:

SV

Subscription version

SV Table

NPB

Number pool block

NPB Table

DGTT

Default GTT

DGTT Table

OGTT

Override GTT

Override GTT

SPLIT

NPA split

SPLIT Table

WHERE Expressions

Specify the WHERE expression as <column> <operator> <value>, where:
  • <column> is a column name within the relevant table as shown in SV Table, NPB Table, DGTT Table, OGTT Table, and SPLIT Table.
  • <operator> is one of the following:
    WHERE Operator (<operator>) Means

    +

    Plus

    -

    Minus

    >

    Greater than

    <

    Less than

    >=

    Greater than or equal to

    <=

    Less than or equal to

    =

    Equal to

    !=

    Not equal to

    LIKE

    Pattern match (Note)

    NOT LIKE

    Inverse pattern match (Note)

    Note:

    For possible performance impact of using this operator, see “Avoiding Overly General Queries”.
  • <value> is a valid value for the field that appears in the type of column specified by <column name>; for more information about the fields and syntax rules that apply to them, refer to the Alarms and Maintenance Guide
In addition, you can use the following logical operators to negate an expression or to combine two or more expressions:
  • NOT negates the expression
  • AND requires that both of two expressions must be true for the statement to be true
  • OR requires that only one of two expressions must be true for the statement to be true

SQL Data Types

This table describes the SQL data types that appear in the following LQL tables:
  • SV (Subscription Version)
  • NPB (Number Pool Block)
  • DGTT (Default GTT)
  • OGTT (Override GTT)
  • Split (NPA Split)

    Table 5-7 SQL Data Types and Descriptions

    SQL Data Type Description

    CHAR[n]

    A fixed length character array. A column of type CHAR will always have a value n characters long. As part of a WHERE clause, a CHAR field must be compared against a character string (e.g. TN = '9194600000', not TN=9194600000).

    VARCHAR[n]

    A variable length character array. A column of type VARCHAR will have a value between 0 and n characters long. As part of a WHERE clause, a VARCHAR field must be compared against a character string (e.g. TN = '9194600000', not TN=9194600000).

    BYTE

    An 8-bit integer field. As part of a WHERE clause, a BYTE field must be compared against a number (e.g. CLASS_SSN > 0, not CLASS_SSN > '0').

    SHORT

    A 32-bit integer field. As part of a WHERE clause, a BYTE field must be compared against a number (e.g. VERSION_ID > 0, not VERSION_ID > '0').

SV Table

The following values can be used for the first <column> parameter in a SELECT command to select both the DPC and SSN values for the respective service, or for all services:
  • CLASS
  • CNAM
  • LIDB
  • ISVM
  • WSMSC
  • ALL_SERVICES

Note:

These values cannot be used in a WHERE expression. For more information about these values, refer to the Alarms and Maintenance Guide.

This table describes the values that can be specified for any <column> parameter (including in a WHERE expression) in a SELECT command where the value of <table> is SV. This table also describes which columns are indexed, as well as the width of each output column. For descriptions of the data types, see SQL Data Types .

Table 5-8 SV Table Column Names

Column Name Indexed? Output Width Data Type

VERSION_ID

YES

10

SHORT

TN

YES

10

CHAR[10]

LRN

NO

10

CHAR[10]

NEW_CURRENT_SP

NO

10

CHAR[4]

ACTIVATION_TIME

NO

14

CHAR[24]

EUL_VALUE

NO

5

CHAR[4]

EUL_TYPE

NO

4

CHAR[4]

BILLING_ID

NO

7

CHAR[4]

LNP_TYPE

NO

4

CHAR[1]

DOWNLOAD_REASON

NO

8

CHAR[1]

CLASS_SSN

NO

5

BYTE

CLASS_DPC

NO

5

CHAR[11]

CNAM_SSN

NO

4

BYTE

CNAM_DPC

NO

4

CHAR[11]

LIDB_SSN

NO

4

BYTE

LIDB_DPC

NO

4

CHAR[11]

ISVM_SSN

NO

4

BYTE

ISVM_DPC

NO

4

CHAR[11]

WSMSC_SSN

NO

5

BYTE

WSMSC_DPC

NO

5

CHAR[11]

Maximum possible output width

126


NPB Table

The following values can be used for the first <column> parameter in a SELECT command to select both the DPC and SSN values for the respective service or for all services; these values cannot used in a WHERE expression:
  • CLASS
  • CNAM
  • LIDB
  • ISVM
  • WSMSC
  • ALL_SERVICES

This table displays the values that can be specified for any <column> parameter (including in a WHERE expression) in a SELECT command where the value of <table> is NPB. It also displays which columns are indexed and shows the width of each output column. For descriptions of the data types, see SQL Data Types.

Table 5-9 NPB Table Column Names Used in WHERE Expressions

Column Name Indexed? Output Width Data Type

BLOCK_ID

YES

10

SHORT

NPA_NXX_X

YES

6

CHAR[7]

LRN

NO

10

CHAR[10]

BLOCK_HOLDER_SPID

NO

11

CHAR[4]

ACTIVATION_TIME

NO

14

CHAR[24]

DOWNLOAD_REASON

NO

8

CHAR[1]

CLASS_SSN

NO

5

BYTE

CLASS_DPC

NO

5

CHAR[11]

CNAM_SSN

NO

4

BYTE

CNAM_DPC

NO

4

CHAR[11]

LIDB_SSN

NO

4

BYTE

LIDB_DPC

NO

4

CHAR[11]

ISVM_SSN

NO

4

BYTE

ISVM_DPC

NO

4

CHAR[11]

WSMSC_SSN

NO

5

BYTE

WSMSC_DPC

NO

5

CHAR[11]

Maximum possible output width

103


DGTT Table

The following values can be used for the first <column> parameter in a SELECT command to select the TT, DPC, SSN, XLAT, RI, and NGT values for the respective service or for all services; these values cannot used in a WHERE expression:
  • CLASS
  • CNAM
  • LIDB
  • ISVM
  • WSMSC
  • ALL_SERVICES

This table displays the values that can be specified for any <column> parameter (including in a WHERE expression) in a SELECT command where the value of <table> is DGTT. It also displays which columns are indexed and shows the width of each output column. For descriptions of the data types, see SQL Data Types.

Table 5-10 DGTT Table Column Names Used in WHERE Expressions

Column Name Indexed? Output Width Data Type

GTT_GROUP

NO

40

VARCHAR[40]

NPA_NXX

NO

6

CHAR[6]

SPID

NO

4

CHAR[4]

AIN_ENABLED

NO

7

BYTE

IN_ENABLED

NO

7

BYTE

CLASS_TT

NO

5

BYTE

CLASS_DPC

NO

11

CHAR[11]

CLASS_SSN

NO

5

BYTE

CLASS_XLAT

NO

5

BYTE

CLASS_RI

NO

5

BYTE

CLASS_NGT

NO

5

BYTE

CNAM_TT

NO

4

BYTE

CNAM_DPC

NO

11

CHAR[11]

CNAM_SSN

NO

4

BYTE

CNAM_XLAT

NO

4

BYTE

CNAM_RI

NO

4

BYTE

CNAM_NGT

NO

4

BYTE

LIDB_TT

NO

4

BYTE

LIDB_DPC

NO

11

CHAR[11]

LIDB_SSN

NO

4

BYTE

LIDB_XLAT

NO

4

BYTE

LIDB_RI

NO

4

BYTE

LIDB_NGT

NO

4

BYTE

ISVM_TT

NO

4

BYTE

ISVM_DPC

NO

11

CHAR[11]

ISVM_SSN

NO

4

BYTE

ISVM_XLAT

NO

4

BYTE

ISVM_RI

NO

4

BYTE

ISVM_NGT

NO

4

BYTE

WSMSC_TT

NO

5

BYTE

WSMSC_DPC

NO

11

CHAR[11]

WSMSC_SSN

NO

5

BYTE

WSMSC_XLAT

NO

5

BYTE

WSMSC_RI

NO

5

BYTE

WSMSC_NGT

NO

5

BYTE

Maximum possible output width

223


OGTT Table

The following values can be used for the first <column> parameter in a SELECT command to select the TT, DPC, SSN, XLAT, RI, NGT, and RGTA values for the respective service or for all services; these values cannot used in a WHERE expression:
  • CLASS

  • CNAM

  • LIDB

  • ISVM

  • WSMSC

  • ALL_SERVICES

This table displays the values that can be specified for any <column> parameter (including in a WHERE expression) in a SELECT command where the value of <table> is OGTT. It also displays which columns are indexed and shows the width of each output column. For descriptions of the data types, see SQL Data Types.

Table 5-11 OGTT Table Column Names Used in WHERE Expressions

Column Name Indexed? Output Width Data Type

GTT_GROUP

NO

40

VARCHAR[40]

LRN

NO

10

CHAR[10]

SPID

NO

4

CHAR[4]

CLASS_TT

NO

5

BYTE

CLASS_DPC

NO

11

CHAR[11]

CLASS_SSN

NO

5

BYTE

CLASS_XLAT

NO

5

BYTE

CLASS_RI

NO

5

BYTE

CLASS_NGT

NO

5

BYTE

CLASS_RGTA

NO

5

BYTE

CNAM_TT

NO

4

BYTE

CNAM_DPC

NO

11

CHAR[11]

CNAM_SSN

NO

4

BYTE

CNAM_XLAT

NO

4

BYTE

CNAM_RI

NO

4

BYTE

CNAM_NGT

NO

4

BYTE

CNAM_RGTA

NO

4

BYTE

LIDB_TT

NO

4

BYTE

LIDB_DPC

NO

11

CHAR[11]

LIDB_SSN

NO

4

BYTE

LIDB_XLAT

NO

4

BYTE

LIDB_RI

NO

4

BYTE

LIDB_NGT

NO

4

BYTE

LIDB_RGTA

NO

4

BYTE

ISVM_TT

NO

4

BYTE

ISVM_DPC

NO

11

CHAR[11]

ISVM_SSN

NO

4

BYTE

ISVM_XLAT

NO

4

BYTE

ISVM_RI

NO

4

BYTE

ISVM_NGT

NO

4

BYTE

ISVM_RGTA

NO

4

BYTE

WSMSC_TT

NO

5

BYTE

WSMSC_DPC

NO

11

CHAR[11]

WSMSC_SSN

NO

5

BYTE

WSMSC_XLAT

NO

5

BYTE

WSMSC_RI

NO

5

BYTE

WSMSC_NGT

NO

5

BYTE

WSMSC_RGTA

NO

5

BYTE

Maximum possible output width

249


SPLIT Table

This table displays the values that can be specified for any <column> parameter (including in a WHERE expression) in a SELECT command where the value of <table> is SPLIT. It also displays which columns are indexed and shows the width of each output column. For descriptions of the data types, see SQL Data Types.

Table 5-12 SPLIT Table Column Names Used in WHERE Expressions

Column Name Indexed? Output Width Data Type

OLD_NPA

YES

3

CHAR[3]

NEW_NPA

YES

3

CHAR[3]

NXX

YES

3

CHAR[3]

REGION

YES

8

BYTE

PDP_START

YES

8

SHORT

PDP_END

YES

6

SHORT

STATUS

YES

6

BYTE

Maximum possible output width

37


Avoiding Overly General Queries

Queries should not be made against columns that are not indexed (as indicated in SV Table, NPB Table, DGTT Table, OGTT Table, and SPLIT Table ). In addition, avoid overly general queries which can result from using:

  • The * wildcard character with the LIKE operator anywhere except at the end of the search value For example:

    • SELECT * FROM SV WHERE TN LIKE ‘919*’ uses the TN index and completes quickly

    • SELECT * FROM SV WHERE TN LIKE ‘*919’ does not use the TN index and exhibits the same poor performance as a query on a non-indexed column

  • The NOT_LIKE operator for indexed columns. For example:

    • SELECT * FROM SV WHERE TN NOT_LIKE ‘919*’ does not use the TN index and exhibits the same poor performance as a query on a non-indexed column

Table 5-13 provides some example performance times, assuming an SV table that contains 1,000,005 records.

Table 5-13 Query Performance Examples

Query Search Using Index? Number of Records Searched Number of Records Matched Time to Complete Query

SELECT TN FROM SV;

YES

1,000,005

1,000,005

75 seconds

SELECT TN FROM SV WHERE TN >= '2191209000' AND TN < '2191210000';

YES

1,000,005

1,000

< 1 second

SELECT TN FROM SV WHERE TN >= '2191200000' AND TN < '2191210000';

YES

1,000,005

10,000

1 second

SELECT TN FROM SV WHERE TN >= '2191200000' AND TN < '2191300000';

YES

1,000,005

100,000

8 seconds

SELECT TN FROM SV WHERE TN >= '2190000000' AND TN < '2200000000';

YES

1,000,005

1,000,005

75 seconds

SELECT TN FROM SV WHERE TN >= '9190000000' AND TN < '9200000000';

YES

1,000,005

0

< 1 second

SELECT TN FROM SV WHERE TN LIKE '219*';

YES

1,000,005

1,000,005

90 seconds

SELECT TN FROM SV WHERE TN LIKE '919*';

YES

1,000,005

0

< 1 second

SELECT TN FROM SV WHERE TN NOT_LIKE '919*';

YES

1,000,005

0

< 1 second

SELECT TN FROM SV WHERE TN NOT_LIKE '219*';

NO

1,000,005

1,000,005

75 seconds

SELECT TN FROM SV WHERE CLASS_SSN = 30;

NO

1,000,005

0

25 seconds

SELECT TN FROM SV WHERE CLASS_SSN = 1;

NO

1,000,005

1,000,005

75 seconds

SELECT TN FROM SV WHERE TN >= ’2191209000’ AND TN < ‘2191210000’

NO

1,000,005

0

25 seconds

Relationship to SQL

The following keywords, which are part of the SQL standard, are not supported by LQL:

  • BETWEEN operator

  • ORDER BY

  • DISTINCT

  • All SQL Functions

  • GROUP BY

  • HAVING

  • ALIAS

  • All multiple-table SELECTs

  • All JOINs

  • AGGREGATE

  • UNION

  • INTERSECTION

DISPLAY <RECORDS|COUNTS>;

Use this command to specify how output is to be displayed:

  • To display the full query results, use DISPLAY RECORDS

  • To display only the number of records resulting from the query, use DISPLAY COUNTS

The setting remains in effect until another DISPLAY command is entered. For examples of this command, see LQL Examples.

Relationship to SQL

This command is not part of the SQL standard.

SAVE <COMMANDS|RESULTS> <IN <filename>|OFF>;

Use this command to specify that either all commands issued or all results of a query are to be stored in the indicated file, or to stop saving commands or results. If a filename is provided, the filename is given an extension of .lql and is saved in the user’s reports directory.

To save both commands and results, enter the command twice. If the same filename is used for both SAVE commands, the commands and results are interleaved in the output file. For examples of this command, see Using the SAVE Command.

Relationship to SQL

This command is not part of the SQL standard.

STATUS;

Use this command to display the current settings as set by the following commands:

  • USING REGION

  • DISPLAY

  • SAVE

For examples of this command, see Using the STATUS Command.

Relationship to SQL

This command is part of the SQL standard.

HELP;

Use this command to display the list of supported commands.

Relationship to SQL

This command is not part of the SQL standard.

EXIT;

Use this command to exit the LQL executable. For examples of this command, see LQL Examples”.

Relationship to SQL

This command is not part of the SQL standard.

LQL Output

LQL displays its results as a set of space-padded values. Before writing the first record, LQL writes a header line that contains the name of each column; if the column name contains an underscore, the name LQL writes the column name on two lines.

LQL writes each row returned from the query as one line of output. An empty or missing column appears as only spaces.

LQL Errors

All LQL errors are written to stderr. LQL generates the following types of errors:

  • Errors generated by the LQL software—Most errors will be of this type. These errors are plain text messages that indicate the user’s error and often indicate a corrective course of action.

  • Errors generated by the underlying database—This type of error generally occurs for an incorrect SELECT statement, which cannot be detected until the command is submitted to the database for execution. These errors usually generate a database error message, such as:

    
    E4343:OM_PSR_SYNTAX_ERROR: VQL PARSE ERR: parse error: on/near token...
    

LQL Examples

Simple SELECT

Here is an example of a simple SELECT operation:

# lql
LQL> USING REGION SOUTHEAST;
LQL> DISPLAY RECORDS;
LQL> SELECT LRN FROM SV WHERE TN = '9194605500'; 
LRN
9194600000
LQL> EXIT;

Using AND in a WHERE Expression

Here is an example of using AND in a WHERE expression:


# lql
LQL> DISPLAY RECORDS;
LQL> SELECT CLASS,CNAM FROM OGTT WHERE GTT_GROUP = 'Group1' AND AIN_ENABLED != 0;

CLASS CLASS               CLASS CLASS CLASS CLASS CLASS CNAM CNAM        
CNAM CNAM CNAM CNAM CNAM 
TT    DPC                 SSN   XLAT  RI    NGT   RGTA  TT    DPC         
SSN  XLAT RI   NGT  RGTA 
1     100-200-100         0     0     0     0     0
LQL> EXIT;

In this example, only the CLASS service is defined for the GTT in this example; therefore, no entries display for the CNAM columns.

Using OR in a WHERE Expression

Here is an example of using OR in a WHERE expression:


# lql
LQL> DISPLAY RECORDS;
LQL> SELECT SPID, NPA_NXX FROM DGTT WHERE CLASS_SSN = 121 OR CNAM_SSN = 121; 

SPID NPA
         NXX
1234 717323
1234 717326
LQL> EXIT

Using NOT in a WHERE Expression

Here is an example of using NOT in a WHERE expression:


# lql
LQL> DISPLAY RECORDS;
LQL> SELECT * FROM SPLIT WHERE NOT (REGION = 3);

OLD NEW NXX START    END      REGION STATUS
NPA NPA     PDP      PDP
919 864 227 20010801 20020301 4      2
LQL> EXIT

Using LIKE in a WHERE Expression

Here is an example of using LIKE in a WHERE expression (the first query in this example does not follow the guidelines recommended in “Avoiding Overly General Queries”):


# lql
LQL> USING REGION SOUTHEAST;
LQL>DISPLAY COUNTS;
LQL>SELECT TN FROM SV WHERE TN LIKE ‘*0000’; 

Query returned 0 rows.
LQL> DISPLAY COUNTS;LQL>SELECT TN FROM SV WHERE TN LIKE ‘919460*’;

Query returned 936 rows.
LQL> EXIT

Using NOT_LIKE in a WHERE Expression

Here is an example of using NOT_LIKE in a WHERE expression (this example does not follow the guidelines recommended in “Avoiding Overly General Queries”):

# lql
LQL> USING REGION CANADA; 
LQL>DISPLAY COUNTS;
LQL>SELECT TN FROM SV WHERE TN NOT_LIKE ‘1*’; 

Query returned 945 rows.
LQL> EXIT

Using the SAVE Command

Here is an example of using the SAVE command to save results to a file:


# lql
LQL> USING REGION CANADA;
LQL> DISPLAY COUNTS;
LQL> SELECT * FROM SV WHERE LRN = '9194600000' OR LRN = '9194610000'; 

Query returned 215 rows.
LQL> DISPLAY RECORDS; LQL>SAVE RESULTS IN NpaNxx919460; LQL> SELECT * FROM SV WHERE LRN = '9194600000' OR LRN = '9194610000'; LQL> SELECT * FROM SV WHERE TN LIKE '919460*' ;LQL> SAVE RESULTS OFF; LQL> EXIT

The results will be stored in the file /var/TKLC/lsms/free/data/reports/lsmsadm/.

Using the STATUS Command

Here is an example of using the STATUS command:


# lql
LQL> USING REGION CANADA;
LQL>DISPLAY COUNTS;
LQL STATUS; 

Queries will use region: SOUTHEAST
Query results will show the number of rows found.
Commands will not be saved.
Query results will not be saved.
LQL> EXIT