4 Managing Locally Provisioned Data
This chapter contains information about Element Management System (EMS) routing, custom TN filters, GTT groups, default and override global title translation (GTT), Numbering Plan Area (NPA) Splits, and input data by file.
Introduction
This chapter provides detailed information about EMS routing, TN filters, GTT groups, default and override GTTs, NPA splits, input data by file, and error codes. (For information about LSMS database synchronization, refer to the LNP Database Synchronization User's Guide.)
Entering Locally Provisioned Data on a Shadow LSMS
When you log in to manually enter any locally provisioned data, always use the same service provider ID (SPID) at both the main LSMS and shadow LSMS.
Note:
Locally provisioned data is correlated with an SPID. For the data to be the same at the main LSMS and shadow LSMS, it must be entered with the same SPID at both.Figure 4-1 LSMS Menu

EMS Routing
EMS routing information enables the LSMS to send subscription information to the proper network elements. The EMS routing function allows you to modify or view the routing info that you defined using the TN Filters and GTT Groups (see Managing Locally Provisioned Data).
Modify EMS Routing
To modify the TN filters and GTT group assignments for the selected EMS (you can change the EMS being modified by selecting a new value from the EMS combo box):
Note:
After you update the TN filter, run an audit for the EMSs utilizing that TN filter. Use the NE Audit with Reconcile procedure (refer to the LNP Database Synchronization User's Guide) for each NPA-NXX added or changed and on each affected EMS to update the databases.However, depending on the number of NPA-NXXs, the number of EMSs affected, and the physical distance between the LSMS and the network element, a bulk download to each affected EMS/network element may be more efficient. For more information, refer to the LNP Database Synchronization User's Guide.
- From the LSMS Console window, select . The Modify EMS Routing window appears.The NPAC Region(s) list contains the eight predefined NPAC region filters. The Custom Filter list contains all custom TN filters that have been created and named.
Figure 4-2 Modify EMS Routing
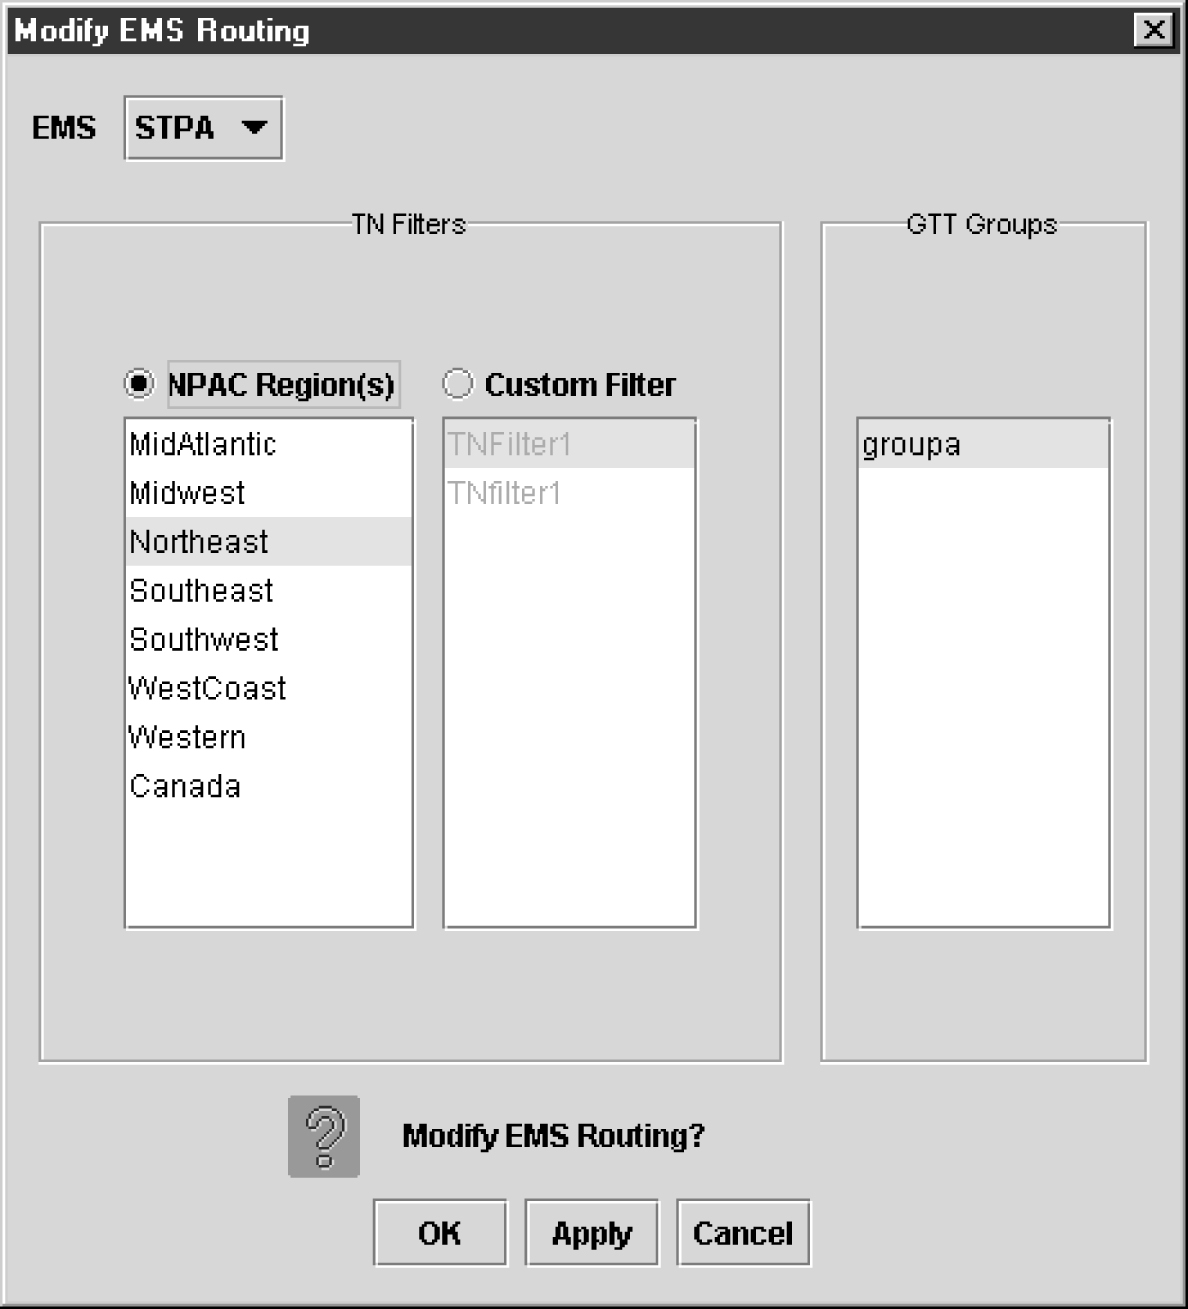
- Apply GTT groups, if desired - Default and override GTT translations are determined by the set of all override and default GTT records belonging to this GTT group.
Note:
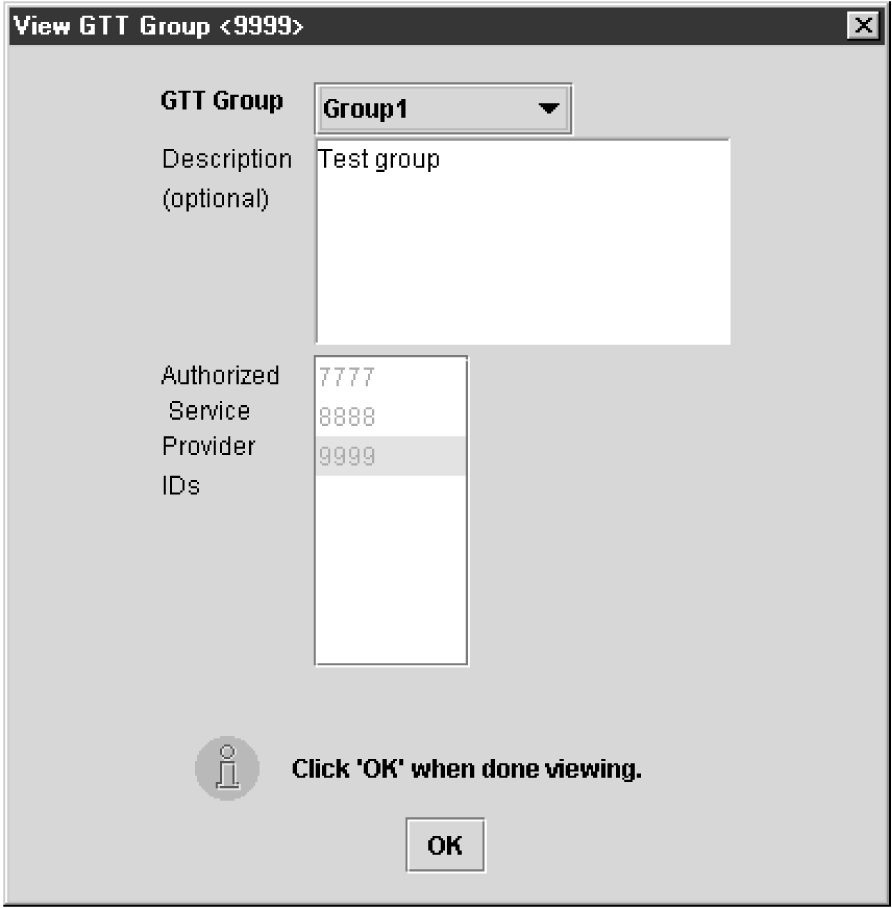
All named GTT groups are displayed in the GTT Groups panel. You may assign a single group to the selected EMS by clicking on it to select it. You can view a GTT group by selecting it, and then right-clicking it. A popup menu displays. Upon selection of a group, the View GTT Group.Figure 4-3 View GTT Group
Custom TN Filters
You can specify one or more Custom TN filters and then associate the Custom TN filter with one or more EMSs.
Note:
After you update the TN filter, run an audit for the EMSs that utilize the TN filter. To update the databases, use the NE Audit with Reconcile procedure for each NPA-NXX added or changed, as well as on each affected EMS. However, depending on the number of NPA-NXXs, the number of EMSs affected, and the physical distance between the LSMS and the network element, a bulk download to each affected EMS/network element may be more efficient. For more information, refer to the LNP Database Synchronization User's Guide.Custom TN Filter Attributes
- Has a unique name.
- Contains one or more NPAs and/or one or more ranges of non-overlapping NPA-NXXs.
- Is one of the following types:
- Inclusion filter—all NPA-NXXs that belong to the NPAs or to the NPA-NXX ranges specified in the filter are sent to the EMSs with which this filter is associated.
- Exclusion filter—all NPA-NXXs except those belonging to the NPAs or to the NPA-NXX ranges specified in the filter are sent to the EMSs with which this filter is associated.
Figure 4-4 Create Custom Custom TN Filter
Create Custom TN Filters Dialog Overview
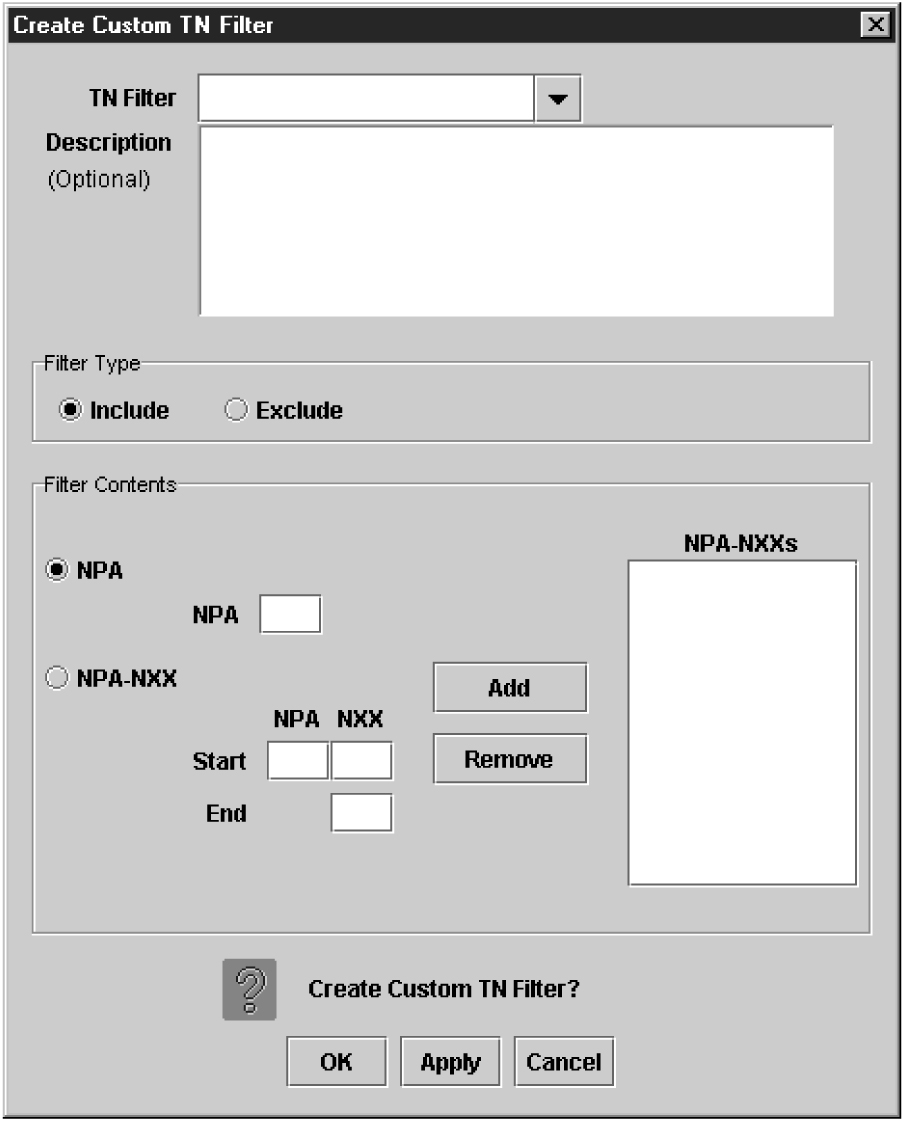
The Creat Custom TN Filter dialog is used to manage custom filters.
To include the NPA(s) and NPA-NXX(s) in the list of TNs processed by the selected EMS, click the Include radio button. To exclude the NPA(s) and NPA-NXX(s) from the list of TNs processed by the selected EMS, click the Exclude radio button. A TN filter can only include or exclude (not both) the NPA(s) and NPA-NXX(s) from the list of TNs processed by the selected EMS.
You may specify a single NPA or NPA-NXX or a range of NPA-NXXs within a single NPA to add to the filter. To add an NPA to the filter, click the NPA radio button, enter an NPA in the text field, and click the Add button. To add an NPA-NXX to the filter, click the NPA-NXX radio button, enter an NPA and NXX in the text fields, and click the Add button.
Optionally, you may specify an ending NXX value; all NPA-NXXs between the start NXX and end NXX are added to the filter. To remove a filter, click on an item in the list (to select it) and click the Remove button.
Create a Custom TN Filter
This dialog allows you to create a new custom TN filter.
To create a custom TN filter:
- From the LSMS Console window, select . The Create Custom TN Filter dialog appears.
Figure 4-5 Create Custom TN Filter Dialog

Modify a Custom TN Filter
This dialog allows you to modify an existing custom TN filter.
To modify a custom TN filter:
View a Custom TN Filter
This dialog allows you to view an existing custom TN filter. All data entry fields, except for the TN Filter combo box, are disabled.
To view a custom TN filter:
Delete a Custom TN Filter
Use this dialog to delete an existing TN filter. All data entry fields, except for the TN Filter combo box, are disabled. The user may delete another filter by selecting it from the TN Filter combo box, and clicking OK or Apply. If the filter being deleted is currently to an EMS via EMS Routing, an error dialog will be displayed, and the operation will fail.
To view a custom TN filter:
GTT Groups
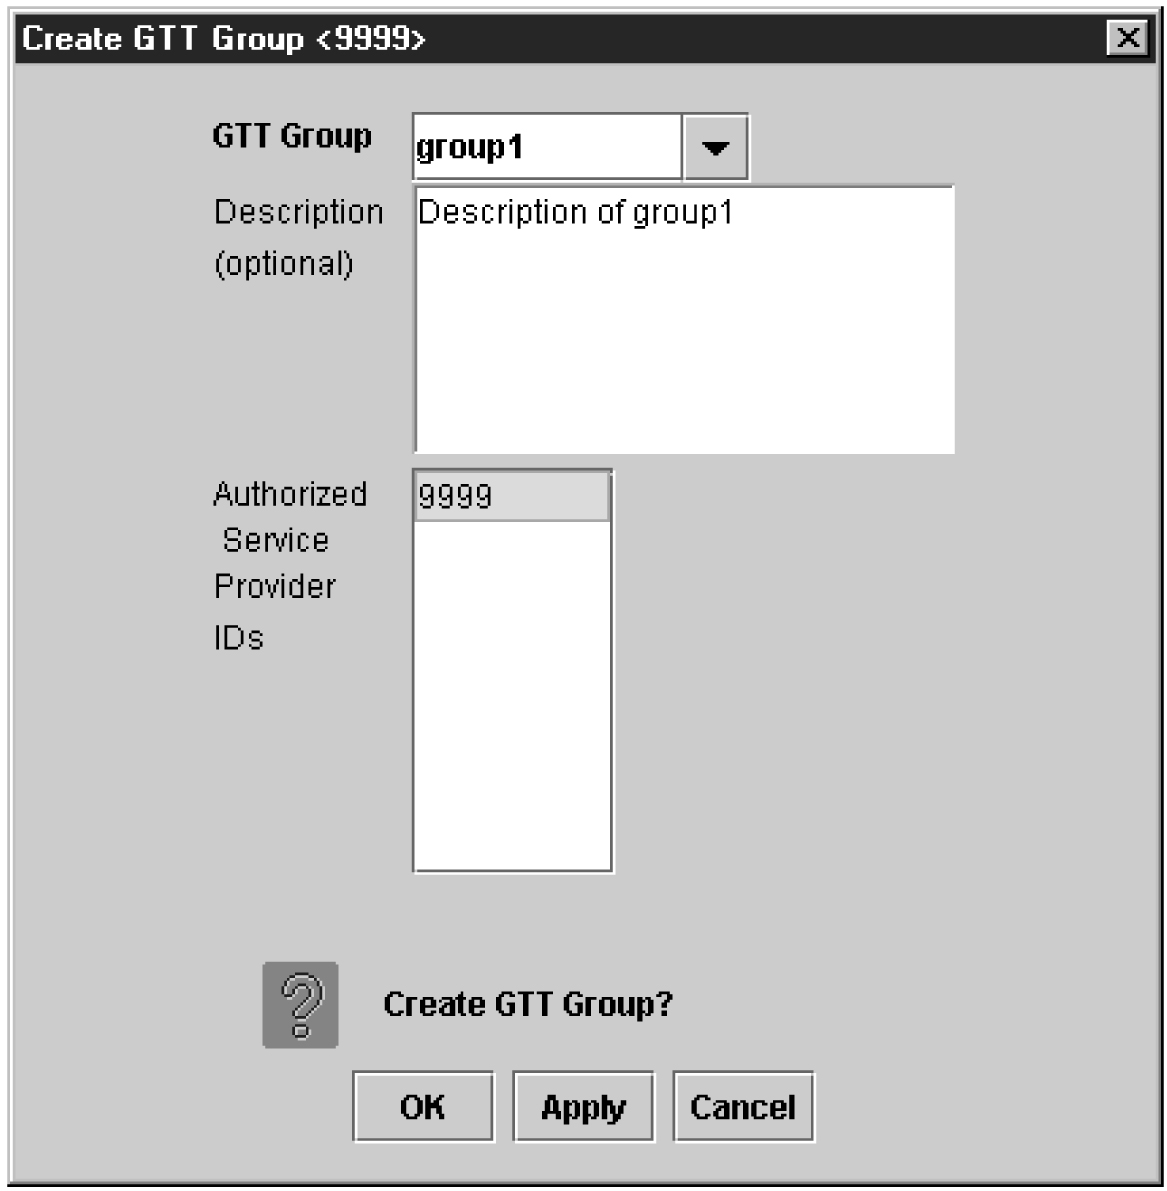
The Create GTT Group dialog is used to manage GTT groups. GTT groups are used to group multiple default and override GTT (see Default GTT and Override GTT) records which are then assigned to one or more EMSs.
Create GTT Group
The Create GTT Group dialog allows you to create a new GTT group. To create a new GTT group:
- From the LSMS Console window, select . The Create GTT Group dialog appears.
Figure 4-6 Create GTT Group Dialog
Modify GTT Group
The Modify GTT Group dialog allows you to modify an existing GTT group. To modify a GTT group:
Default GTT
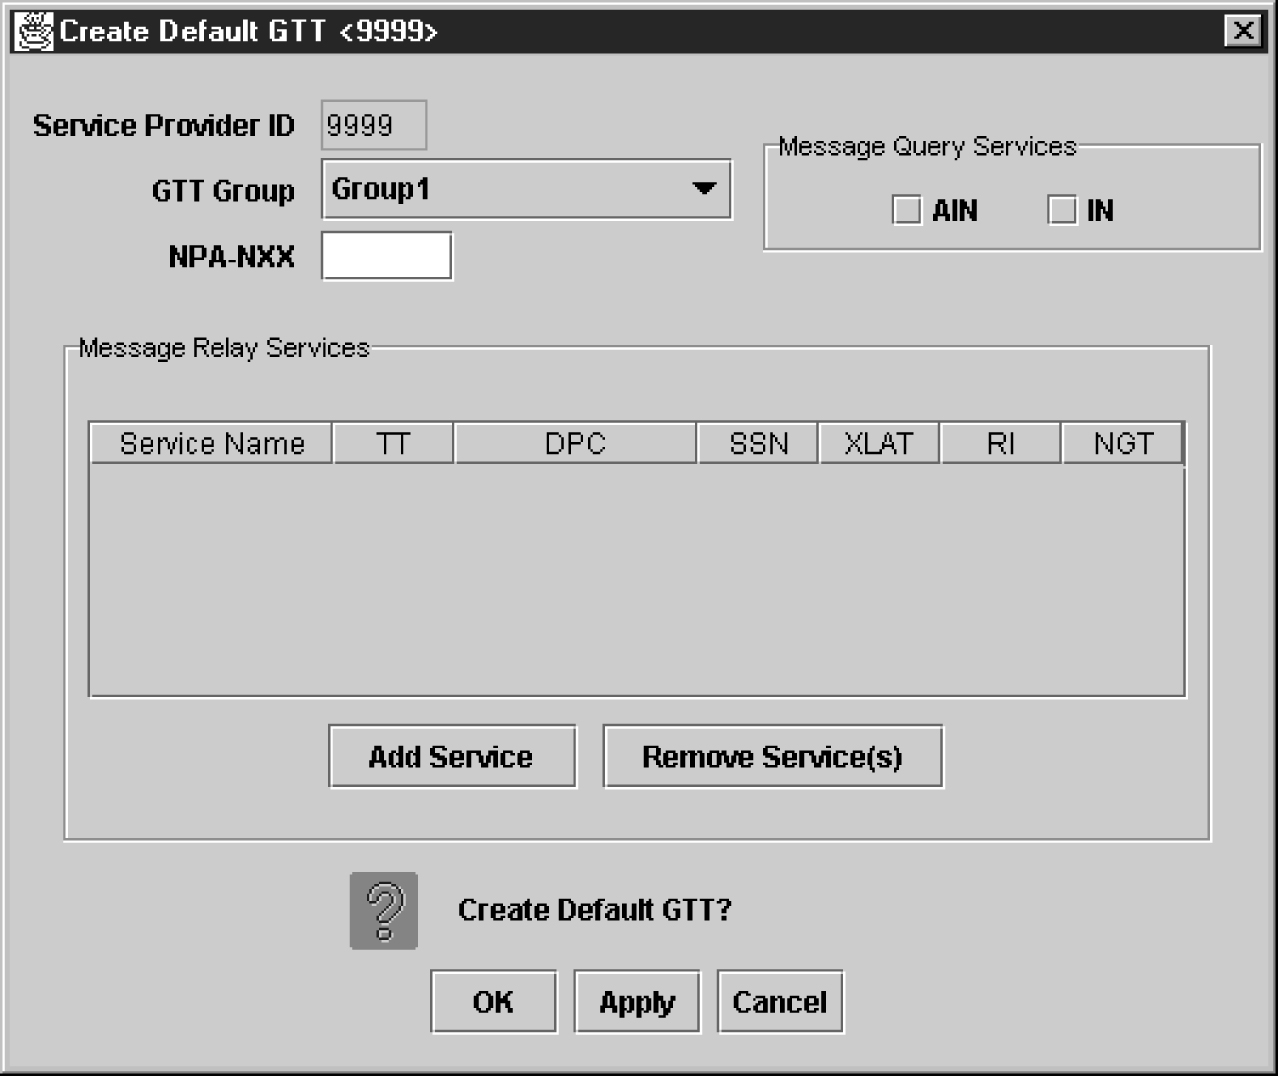
The Create Default GTT dialog is used to manage default GTT records.
The Add Service button adds an empty row to the table. The Remove Service(s) button removes the selected row(s) from the table.
You may change the GTT group that a default GTT record belongs to by selecting a new value from the GTT Group combo box. When creating or modifying default GTTs, select a cell in the Message Relay Services table (by clicking on it or navigating to it using the keyboard), and modify the entry. The entry is entered into the cell when you select another cell or press Return. When you change the value in the Service Name field, only the TT value of that row is populated with the default value for that service, overwriting any existing values.
When you click OK or Apply to create a default GTT, the GTT data is checked to ensure that the NPA-NXX is not yet defined for this group. If the NPA-NXX is already defined, the operation will fail, and an error dialog will be displayed.
After clicking Apply, you may retrieve default GTT values for another NPA-NXX. If you try to retrieve GTT values for a new NPA-NXX without first saving the changes to the GTT values for the current NPA-NXX, a confirmation dialog is displayed asking you to save the changes.
Create Default GTT
The Create Default GTT dialog is used to create new default GTT records.
To create a new default GTT record:
- From the LSMS Console window, select . The Create Default GTT dialog appears.
Figure 4-7 Create Default GTT Dialog
Modify a Default GTT
The Modify Default GTT dialog allows you to modify existing default GTT records.
To modify a default GTT:
Override GTT
The Create Override GTT dialog is used to manage override GTT records.
You may change the GTT group that an override GTT record belongs to by selecting a new value from the GTT Group combo box. When creating or modifying override GTTs, select a cell in the table (by clicking on it or navigating to it using the keyboard), and modify the entry. The entry is entered into the cell when you select another cell or press Return. When you change the value in the Service Name field, only the TT value of that row will be populated with the default value for that service, overwriting any existing values.
When you click OK or Apply to create or modify an override GTT, the GTT data is checked to ensure that the LRN is not yet defined for this group. If the LRN is already defined, the operation will fail, and an error dialog will be displayed.
After clicking Apply, you may create override GTT values for another LRN. If you attempt to create GTT values for a new LRN while there are unsaved changes to the GTT values for the current LRN, a confirmation dialog is displayed asking you to save the changes.
Create an Override GTT
The Create Override GTT dialog is used to create new Override GTT records.
To create a new override GTT record:
Modify an Override GTT
The Modify Override GTT dialog allows you to modify existing override GTT records.
To modify an override GTT:
TN/NPB Query
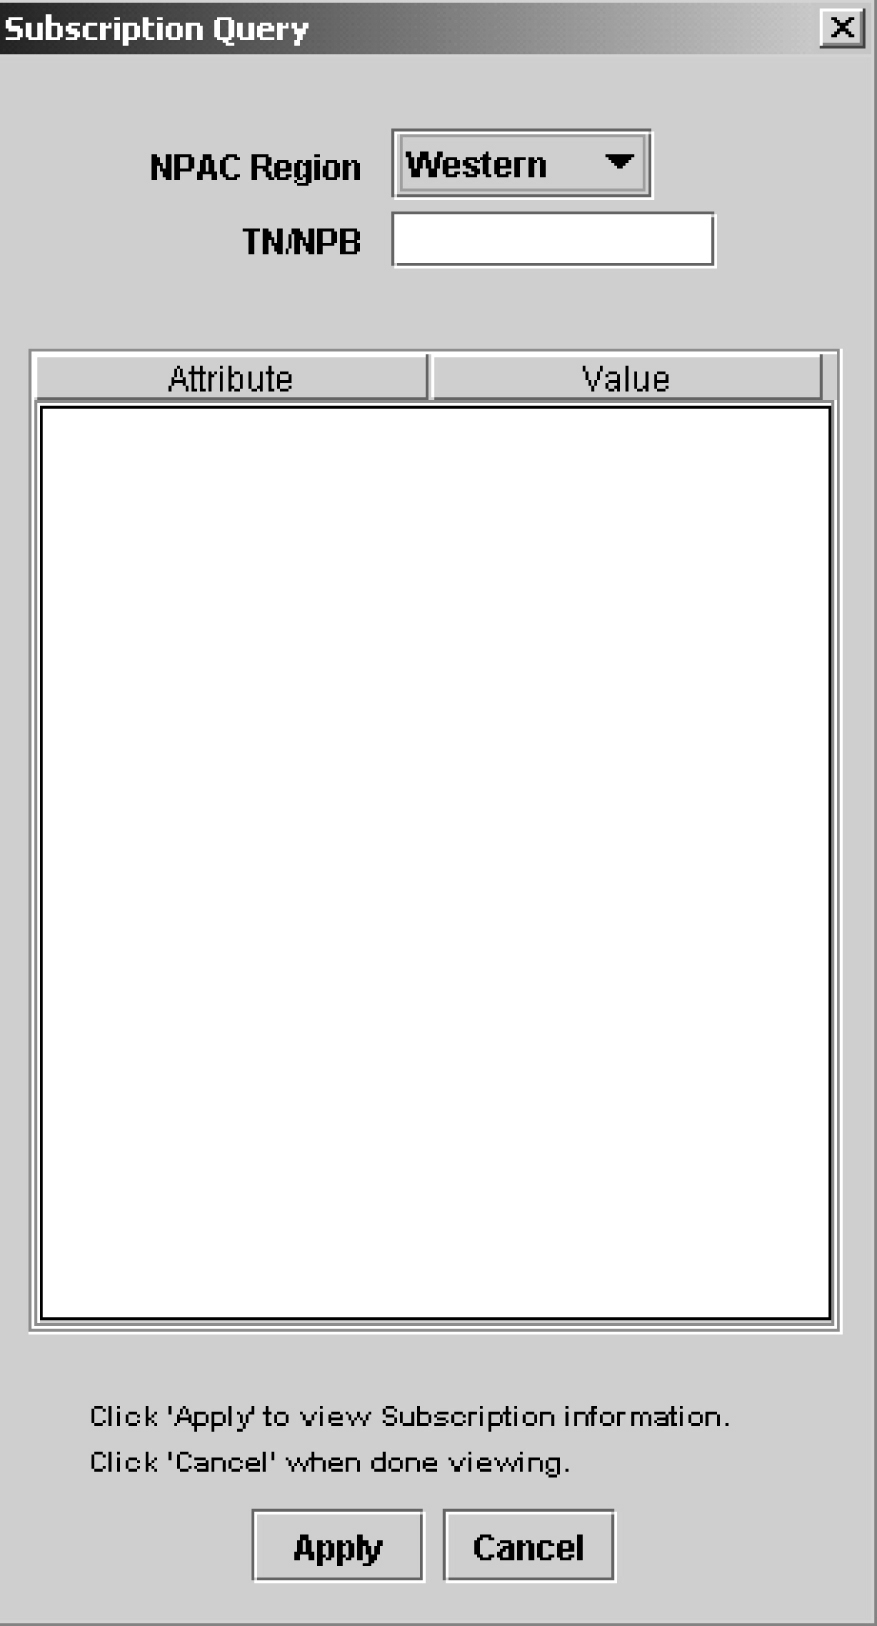
The Subscription Query dialog enables you to query the local database for telephone number and number pool block subscription version records.
By default, users belonging to any of the five default permission groups have access to this view function.
Figure 4-8 Subscription Query Dialog
TN Query
To query the local database for a TN, type in the 10 digits, select the region, and click Apply.
Figure 4-9 Query Successful Dialog.
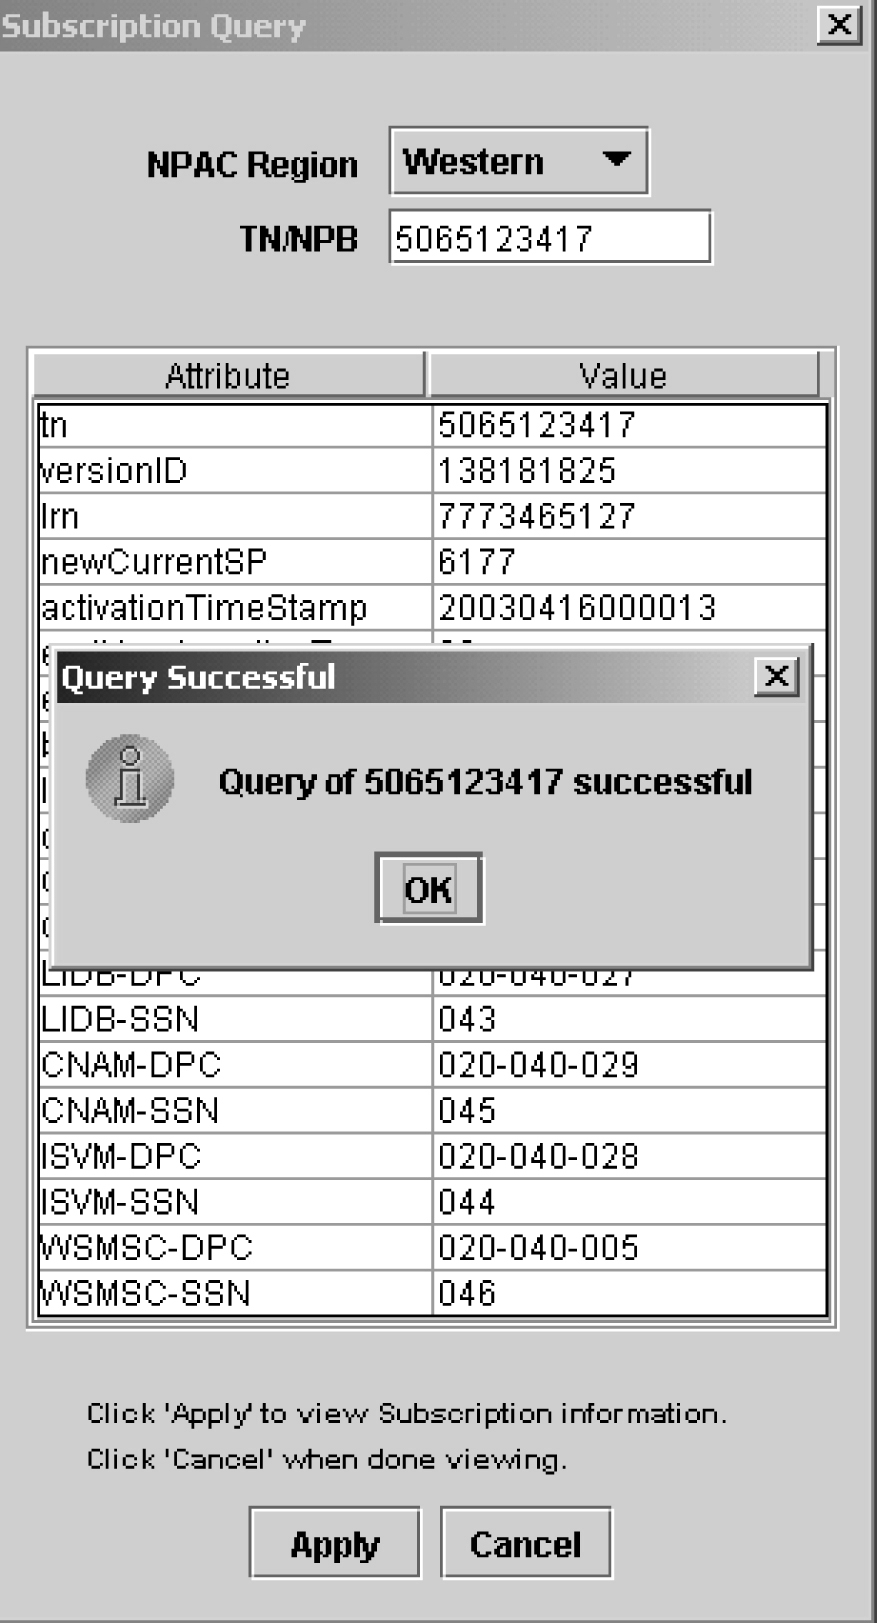
If the TN is not found in the region, it will be checked—automatically—to see if it is part of an NPB. If it is then found as part of an NPB in the region, then the subscription version data table for the NPB will be populated and a Query Successful dialog is displayed with the message than the TN is part of an NPB.
Note:
See Table 4-4 for a description of the TN fields that display in the Subscription Query window when the query is successful.If neither object can be found in the database, then an error dialog appears stating that the TN was not found in the specified regional database.
TN Field Descriptions
Table 4-4 describes the fields that display when a TN query is successful.
Table 4-4 TN Subscription Query Data - Field Descriptions
| Field | Description |
|---|---|
|
tn |
The 10 digit telephone number |
|
versionID |
The version ID |
|
lrn |
The associated LRN |
|
newCurrentSP |
The new current service provider ID |
|
activationTimeStamp |
The time stamp of activation |
|
endUserLocationType |
The end user location type |
|
endUserLocationValue |
The end user location value |
|
billingId |
The billing ID |
|
lnpType |
The LNP Type |
|
downLoadReason |
The down load reason |
|
CLASS-DPC |
The CLASS destination point code |
|
CLASS-SSN |
The CLASS sub system number |
|
CNAM-DPC |
The CNAM destination point code |
|
CNAM-SSN |
The CNAM sub system number |
|
ISVM-DPC |
The ISVM destination point code |
|
ISVM-SSN |
The ISVM sub system number |
|
LIDB-DPC |
The LIDB destination point code |
|
LIDB-SSN |
The LIDB sub system number |
|
WSMSC-DPC |
The WSMSC destination point code |
|
WSMSC-SSN |
The WSMSC sub system number |
NPB Query
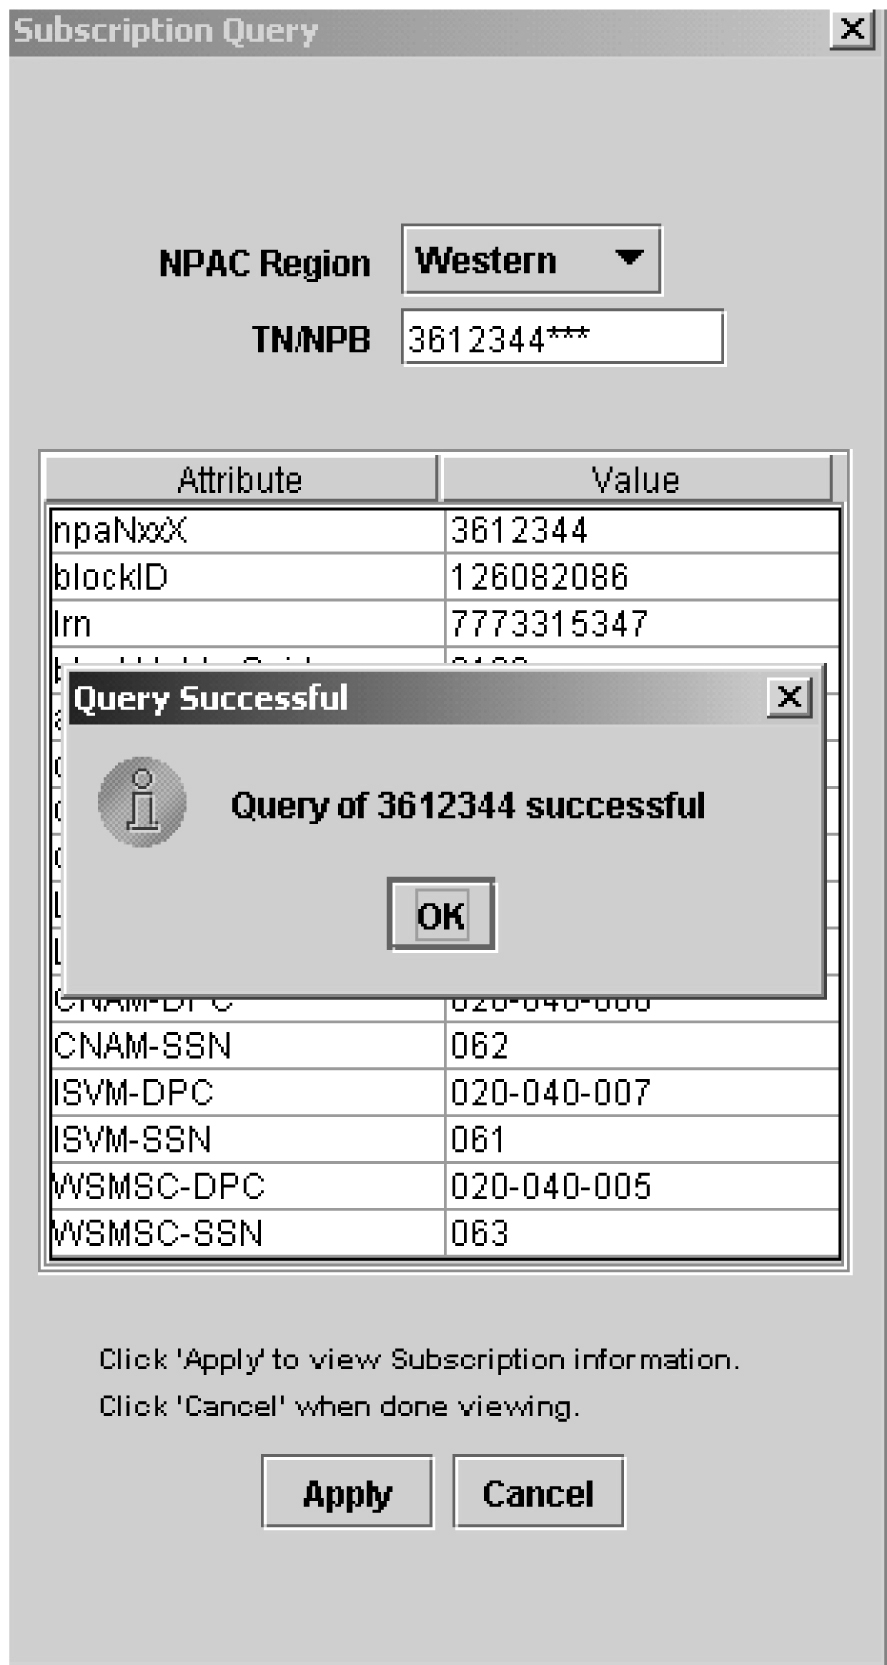
To query a number pool block (NPB) , type in the first seven digits followed by ***, select the region, and click Apply . If the query is successful, the subscription version data table for the NPB will be populated and a Query Successful dialog is displayed.
Note:
See Table 4-5 for a description of the NPB fields that display in the Subscription Query window when the query is successful.Figure 4-10 Query Successful Dialog
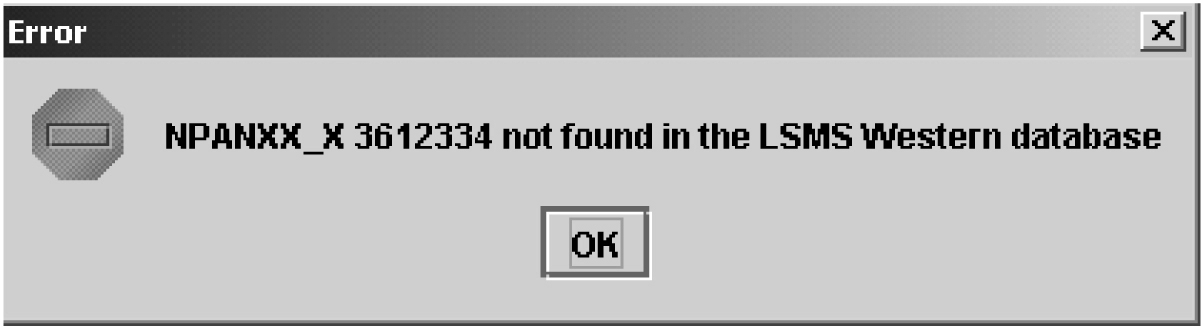
If the NPB object cannot be found in the database, then an Error dialog will appear stating that the NPB was not found in the specified regional database.
Figure 4-11 Error Dialog
When you are finished querying the local database, click Cancel to close the dialog.
NPB Field Descriptions
This table describes the fields that display when an NPB query is successful.
Table 4-5 NPB Subscription Query Data - Field Descriptions
| Field | Description |
|---|---|
|
npaNxxX |
The 7 digit number pool block |
|
blockID |
The block ID |
|
lrn |
The associated LRN |
|
blockHolderSpid |
The block holder service provider ID |
|
activationTimeStamp |
The time stamp of activation |
|
downLoadReason |
The down load reason |
|
CLASS-DPC |
The CLASS destination point code |
|
CLASS-SSN |
The CLASS sub system number |
|
CNAM-DPC |
The CNAM destination point code |
|
CNAM-SSN |
The CNAM sub system number |
|
ISVM-DPC |
The ISVM destination point code |
|
ISVM-SSN |
The ISVM sub system number |
|
LIDB-DPC |
The LIDB destination point code |
|
LIDB-SSN |
The LIDB sub system number |
|
WSMSC-DPC |
The WSMSC destination point code |
|
WSMSC-SSN |
The WSMSC sub system number |
NPA Splits
Users belonging to the lsmsuser or lsmsall permission group are authorized to create and delete NPA Splits. Users belonging to the lsmsadm, lsmsview, and lsmsuext permission groups are only authorized to view NPA Split information.
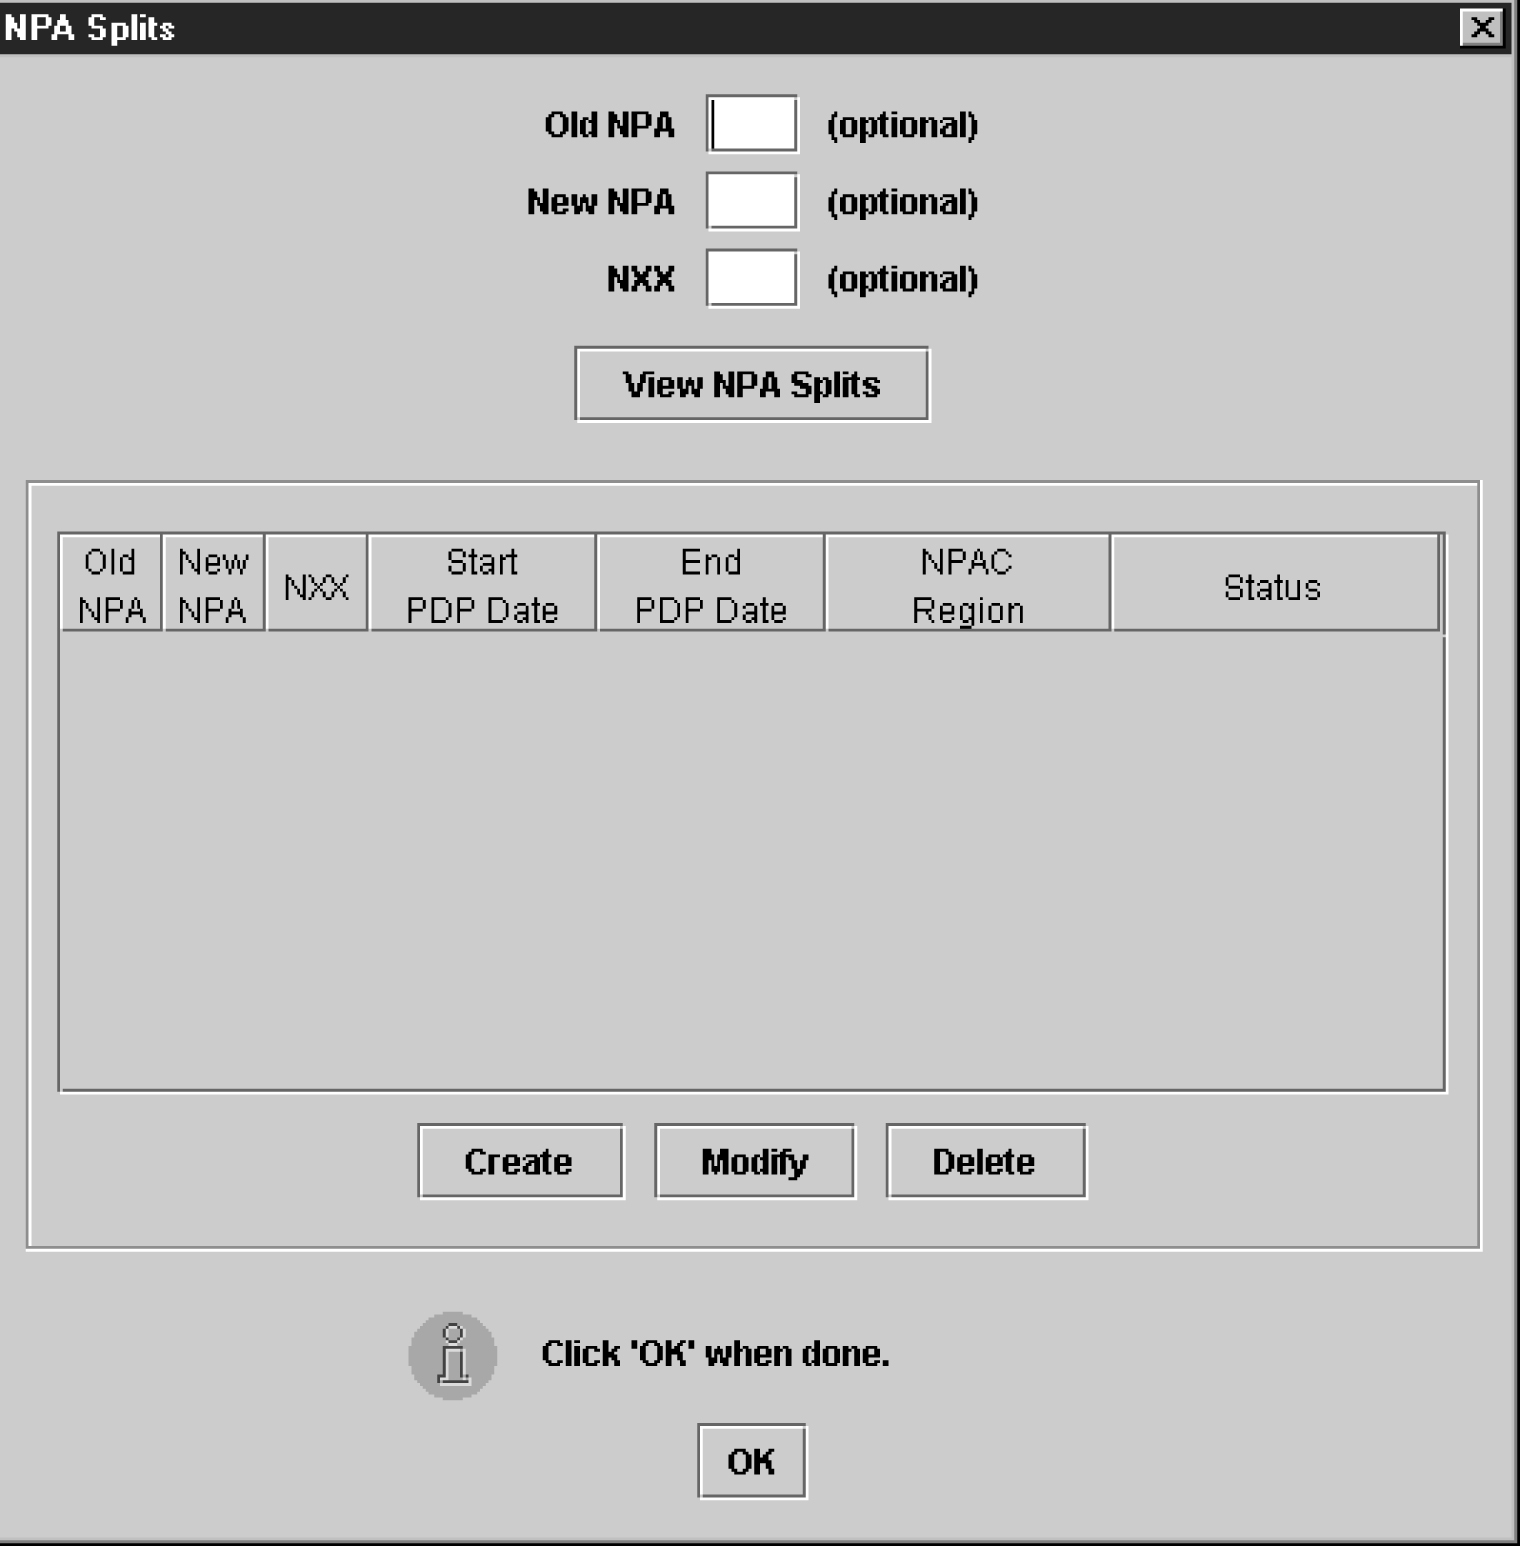
NPA Splits are managed from the NPA Splits dialog. You may view splits based on the old NPA, new NPA, both, or neither (view the entire list). To retrieve the first 500 records and display them in the table, click the View NPA Splits button. To view more than 500 splits, create an NPA Split report.
Create NPA Split
To create an NPA split:
- From the LSMS Console window, select . The NPA Splits dialog appears.
Figure 4-12 NPA Splits Dialog
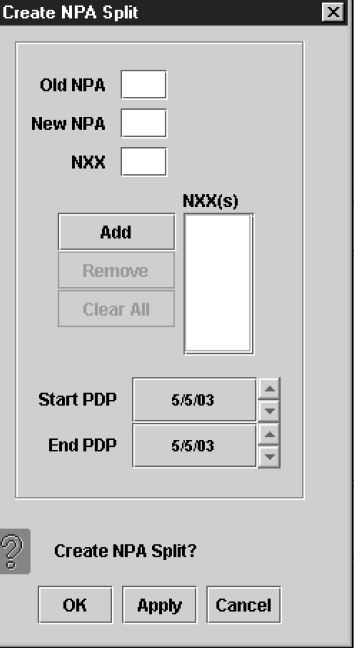
- Select
Create.The Create NPA Split dialog appears.Figure 4-13 Create NPA Split Dialog
Modify NPA Split
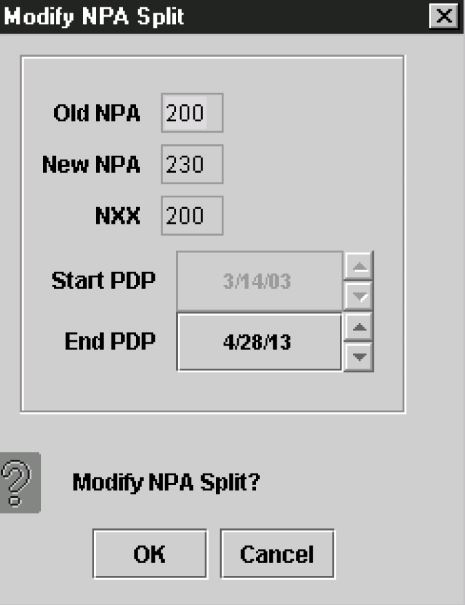
This dialog allows the user to modify the start and/or end Permissive Dialing Period (PDP) dates of an existing NPA split. Both the start and ending PDP dates can be modified for pending splits. Only the ending PDP date can be modified for active splits. The Old NPA, New NPA, and NXX fields can only be viewed.
To modify an NPA split:
- Select the row in the table you want to modify, and then click the Modify button. The Modify NPA Split dialog appears.
Figure 4-14 Modify NPA Split Dialog
Reversing (Correcting) an NPA Split Entry Made in Error
Note:
Before you start this procedure, it is recommended that you contact the My Oracle Support (MOS).To correct an NPA split entry made in error, the steps you perform depend upon whether the split is in Active status.
Use the following procedure to correct an NPA split. This procedure uses an example in which an NPA-NXX split moves all SVs and NPBs from 909-860 to 123-860 instead of 124-860.
Input Data By File
Introduction
Input data by file provides an alternate method of provisioning default GTT, override GTT, NPA-NXX split entries, and custom TN filters. The data entries are input from a properly formatted file to the LSMS. If a particular data entry already exists in the LSMS, the data in the file is used to modify the entire existing entry.
The new default GTT and override GTT entries are automatically validated and forwarded to the network elements without user intervention. The NPA-NXX split and custom TN filter entries are automatically validated and added to the LSMS NPA-NXX split table or custom TN Filter table without user intervention (they are not forwarded to the network element).
A GUI is provided that allows users to specify the input file name and receive feedback on the processing of each of the file entries.
File processing is divided into the following phases:
-
File Validation Phase
-
Input Processing Phase
File Validation Phase
In this phase, the input data file is obtained from the client machine running the GUI. The input data file is parsed and the file format and data items are validated. As the file is being processed, the Input Data by File dialog displays the following information:
-
The number of items validated (this is an incremental count starting at zero).
-
The number of errors (this is an incremental count starting at zero).
-
The first 100 erroneous data items are displayed in the dialog's scrolled list.
The entire input data file is validated and both successful and erroneous data items are written to a result file. If errors are encountered the next phase is never started, and a warning dialog is displayed to the user. The warning dialog tells the user that the input data file has errors and to check the result file for specific error messages. The result file is stored at the client machine running the GUI.
Input Processing Phase
This phase is only performed when the input data file has no File Validation phase errors. In this phase a check is made to determine if a previous File Validation phase result file exists. If so, it is deleted.
During this phase, the input data file entries are merged with the data in the LSMS database. As the file is being processed, the Input Data by File dialog displays the following information:
-
The number of items processed (this is an incremental count starting at zero).
-
The number of errors (this is an incremental count starting at zero).
-
The first 100 erroneous data items display in the dialog's scrolled list.
As each entry is processed and merged with the existing data, the operation results (OK or FAILED) are written to a result file. A failed operation indicates that an error has occurred on the specific entry.
When both of these phases are completed, a message dialog displays indicating that the entire processing of the file has completed.
Default GTT Input File
The default GTT input file enables you to create, modify, or delete a default GTT.
Each data entry in the default GTT input file is checked to ensure that the format corresponds to the input file specification. The data values are validated using the same rules that are presently used when entering a single default GTT via the LSMS GUI. The entire input data file is validated, successful entries and errors encountered are written to the result file, and the processing of the next data entry continues.
Only if no errors are encountered is further processing allowed by this feature, at which time the data entries are added to the LSMS database default GTT
The user-specified filename must have an extension of .DGT to be a valid input data filename for default GTT.
The default GTT input file should be located at the client machine that is running the LSMS GUI. You can use a file selection dialog box to select the input file.
The NPANXX value of each default GTT data entry in the file is used to check if the default GTT object instance exists in the supported database. If the default GTT object instance is not present a new instance is created. However, if the default GTT instance is present in the supported database, then the entire default GTT object instance data is overwritten with the input file data for that instance. For deletions, if the default GTT object exists, it is deleted. If the default GTT object does not exist, however, the delete request is logged as a success, not a failure, in the default GTT result file.
The default GTT input block contains one record for each database entry. Individual fields are pipe delimited, with a new line (0x0A) after each GTT recorded. Each entry should begin at the beginning of the line.
Table 4-6 Default GTT Input Block Contents
| Field Number | Field Name |
|---|---|
|
1 |
SPID |
|
2 |
GTT Group Name |
|
3 |
NPANXX Value |
|
4 |
AIN |
|
5 |
IN |
|
6–12 |
Service # 1 |
|
13–19 |
Service # 2 |
|
20–26 |
Service # 3 |
|
27–33 |
Service # 4 |
|
34–40 |
Service # 5 |
Note:
It is necessary to have at least 4 Services (Service # 1–Service # 4) filled with data. If WSMSC feature is enabled, it is necessary to fill Service # 5. Any unused Services must be represented by unpopulated fields, because the data is positional.Default GTT Input File
Figure 4-15 is an example of a default GTT input file with one entry. See Table 4-7 for an explanation of the fields.Figure 4-15 Example Default GTT Input File
TKLC|GTTGroup|919420|AIN|IN|CLASS|016|001001001|003|DPCSSN|SSN|0|CNAM|100|
002002002|005|DPCSSN|SSN|0|ISVM|134|003003003|006|DPCSSN|SSN|0|LIDB|125|
004004004|007|DPCSSN|SSN|0|WSMSC|127|004004004|007|DPCSSN|SSN|0
Table 4-7 Explanation of the Fields in the Default Input File
| Field Number | Field Name | Value in Example | Range of Values |
|---|---|---|---|
|
1 |
SPID |
TKLC |
[A-Z, a-z, 0-9] {4 alphanumeric} |
|
2 |
GTT Group Name |
GTTGroup |
[A-Z, a-z, 0-9] {64 alphanumeric} |
|
3 |
NPANXX Value |
919420 |
[0-9]{6 digits} |
|
4 |
AIN |
AIN |
AIN or empty pipe to indicate no AIN |
|
5 |
IN |
IN |
IN or empty pipe to indicate no IN |
|
6 |
S1-Service Name |
CLASS |
Character {up to 8 characters} |
|
7 |
S1-Translation Type |
016 |
[000…255] |
|
8 |
S1-DPC |
001001001 |
[001…255][000…255] [000…255] {9 characters} |
|
9 |
S1-SSN |
003 |
[000…255] |
|
10 |
S1-XLAT |
DPCSSN |
[DPC, DPCSSN, DPCNGT] |
|
11 |
S1-RI |
SSN |
[GT, SSN] |
|
12 |
S1-NGT |
0 |
[0…255] |
|
13 |
S2-Service Name |
CNAM |
Character {up to 8 characters} |
|
14 |
S2-Translation Type |
100 |
[000…255] |
|
15 |
S2-DPC |
002002002 |
[001…255][000…255] [000…255] {9 characters} |
|
16 |
S2-SSN |
005 |
[000…255] |
|
17 |
S2-XLAT |
DPCSSN |
[DPC, DPCSSN, DPCNGT] |
|
18 |
S2-RI |
SSN |
[GT, SSN] |
|
19 |
S2-NGT |
0 |
[0…255] |
|
20 |
S3-Service Name |
ISVM |
Character {up to 8 characters} |
|
21 |
S3-Translation Type |
124 |
[000…255] |
|
22 |
S3-DPC |
003003003 |
[001…255][000…255] [000…255] {9 characters} |
|
23 |
S3-SSN |
006 |
[000…255] |
|
24 |
S3-XLAT |
DPCSSN |
[DPC, DPCSSN, DPCNGT] |
|
25 |
S3-RI |
SSN |
[GT, SSN] |
|
26 |
S3-NGT |
0 |
[0…255] |
|
27 |
S4-Service Name |
LIDB |
Character {up to 8 characters} |
|
28 |
S4-Translation Type |
125 |
[000…255] |
|
29 |
S4-DPC |
004004004 |
[001…255][000…255] [000…255] {9 characters} |
|
30 |
S4-SSN |
007 |
[000…255] |
|
31 |
S4-XLAT |
DPCSSN |
[DPC, DPCSSN, DPCNGT] |
|
32 |
S4-RI |
SSN |
[GT, SSN] |
|
33 |
S4-NGT |
0 |
[0…255] |
|
34 |
S5-Service Name |
LIDB |
Character {up to 8 characters} |
|
35 |
S5-Translation Type |
125 |
[000…255] |
|
36 |
S5-DPC |
004004004 |
[001…255][000…255] [000…255] {9 characters} |
|
37 |
S5-SSN |
007 |
[000…255] |
|
38 |
S5-XLAT |
DPCSSN |
[DPC, DPCSSN, DPCNGT] |
|
39 |
S5-RI |
SSN |
[GT, SSN] |
|
40 |
S5-NGT |
0 |
[0…255] |
|
41 |
Block Termination |
See 1 | |
| 1The block termination field value is a new line character, which is generated by pressing the Enter key on the keyboard. | |||
Default GTT Input File - Delete Record
Example Default GTT Delete Record File
The default GTT delete record contains one record for each database entry. Individual fields are pipe delimited with a new line (0x0A) after each GTT recorded. Each entry should begin at the beginning of the line.DELETE|GTTGroup|919469Table 4-8 Explanation of the Fields in the Default GTT Delete Record
| Field Number | Field Name | Range of Values | Values in Example |
|---|---|---|---|
| 1 | Delete record recognition string | Characters {6 characters} | DELETE1 |
| 2 | Group name | [A-Z, a-z, 0-9] {64 alphanumeric} | GTTGroup |
| 3 | NPANXX | [0-9]{6 digits} | 919469 |
| 1This is the fixed string to be used for all delete records. An entry that does not begin with DELETE, or one in which DELETE is misspelled, will be treated like a create or modify entry. | |||
Default GTT Result File
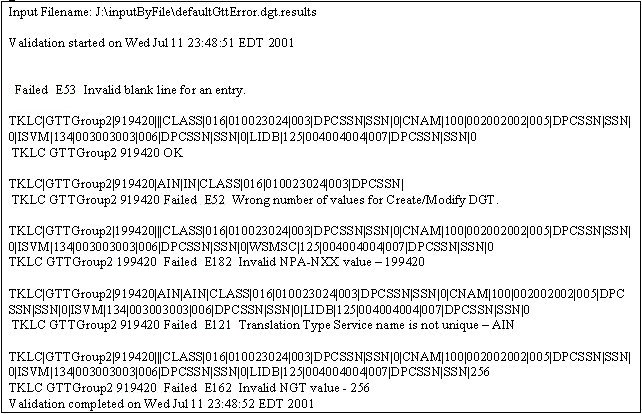
The Default GTT result file (which is located in the same directory as the input data file) stores useful information about the processing of each of the Default GTT data items read from the input data file while executing the file validation phase. A result file with the format shown below is produced during file validation or input processing phase.
For each correct data item read from the input file, a single line appears in the result file:
SPID|GROUP|NPA-NXX Operation_Status
For each erroneous data item read from the input file, a single line appears in the result file:
SPID|GROUP|NPA-NXX Operation_Status [Error_Number] [Error_Message]
where:
SPID = SPID value read from input data file
GROUP = GTT Group
NPA-NXX = The six digits value input from file for each data item.
Operation_Status = OK to indicate a successful operation; FAILED to indicate an error in processing.
Error_Number = An "E" followed by up to 3 numeric digits (this is an optional field, it appears only if operation status is FAILED).
Error_Message = Text indicating the first processing error found in the data entry (this is an optional field, it appears only if operation status is FAILED).
Example Default GTT Result File
Figure 4-16 shows a picture of a Default GTT result file.
Figure 4-16 Example Default GTT Result File.
Default GTT Error Codes
See Error Codes.
Override GTT Input File
The override GTT input file enables you to create, modify, or delete an override GTT.
Each data entry in the override GTT input file is checked to ensure that the format corresponds to the input file specification. The data values are validated using the same rules that are presently used when entering a single override GTT via the LSMS GUI. The entire input data file is validated, successful entries and errors encountered are written to the result file, and the processing of the next data entry continues.
Only if no errors are encountered is further processing allowed by this feature, at which time the data entries are added to the LSMS database override GTT table.
The user-specified filename must have an extension of .OGT to be a valid input data filename for override GTT.
The override GTT input file should be located at the client machine that is running the LSMS GUI. You can use a file selection dialog box to select the input file.
The LRN value of each override GTT data entry in the file is used to check if the override GTT object instance exists in the supported database. If the override GTT object instance is not present a new instance is created. However, if the override GTT instance is present in the supported database, then the entire override GTT object instance data is overwritten with the input file data for that instance. For deletions, if the override GTT object exists, it is deleted. If the override GTT object does not exist, however, the delete request is logged as a success, not a failure, in the override GTT result file.
The override GTT input block contains one record for each database entry. Individual fields are pipe delimited, with a new line (0x0A) after each GTT recorded. Each entry should begin at the beginning of the line.
Table 4-9 Override GTT Input Block Contents
| Field Number | Field Name |
|---|---|
|
1 |
SPID |
|
2 |
GTT Group Name |
|
3 |
LRN |
|
4–11 |
Service # 1 |
|
12–19 |
Service # 2 |
|
20–27 |
Service # 3 |
|
28–35 |
Service # 4 |
|
36–43 |
Service # 5 |
Note:
It is necessary to have at least 4 Services (Service # 1–Service # 4) filled with data. If WSMSC feature is enabled, it is necessary to fill Service # 5. Any unused Services must be represented by unpopulated fields, because the data is positional.Override GTT Input File
Figure 4-17 is an example of an override GTT input file with one entry. See Table 4-10 for an explanation of the fields.
Figure 4-17 Example Override GTT Input File
TKLC|GTTGroup|9194200000|CLASS|016|001001001|003|DPCSSN|SSN|0|YES|CNAM|100|002002002|005|DPCSSN|
SSN|0|NO|ISVM|134|003003003|006|DPCSSN|SSN|0|YES|LIDB|125|004004004|007|DPCSSN|SSN|0|NO|WSMSC|126|
004004004|007|DPCSSN|SSN|0|NO
Table 4-10 Explanation of the Fields in the Override GTT Input File
| Field Number | Field Name | Value in Example | Range of Values |
|---|---|---|---|
|
1 |
SPID |
TKLC |
[A-Z, a-z, 0-9] {4 alphanumeric} |
|
2 |
GTT Group Name |
GTTGroup |
[A-Z, a-z, 0-9] {64 alphanumeric} |
|
3 |
LRN |
3002000000 |
[0-9]{10 digits} |
|
4 |
S1-Service Name |
CNAM |
Character {up to 8 characters} |
|
5 |
S1-Translation Type |
078 |
[000…255] |
|
6 |
S1-DPC |
233233233 |
[001…255][000…255] [000…255] {9 characters} |
|
7 |
S1-SSN |
000 |
[000…255] |
|
8 |
S1-XLAT |
DPC |
[DPC, DPCSSN, DPCNGT] |
|
9 |
S1-RI |
GT |
[GT, SSN] |
|
10 |
S1-NGT |
0 |
[0…255] |
|
11 |
S1-RGTA |
NO |
[YES, NO] |
|
12 |
S2-Service Name |
CLASS |
Character {up to 8 characters} |
|
13 |
S2-Translation Type |
079 |
[000…255] |
|
14 |
S2-DPC |
122122122 |
[001…255][000…255] [000…255] {9 characters} |
|
15 |
S2-SSN |
000 |
[000…255] |
|
16 |
S2-XLAT |
DPC |
[DPC, DPCSSN, DPCNGT] |
|
17 |
S2-RI |
GT |
[GT, SSN] |
|
18 |
S2-NGT |
0 |
[0…255] |
|
19 |
S2-RGTA |
NO |
[YES, NO] |
|
20 |
S3-Service Name |
ISVM |
Character {up to 8 characters} |
|
21 |
S3-Translation Type |
080 |
[000…255] |
|
22 |
S3-DPC |
011011011 |
[001…255][000…255] [000…255] {9 characters} |
|
23 |
S3-SSN |
000 |
[000…255] |
|
24 |
S3-XLAT |
DPC |
[DPC, DPCSSN, DPCNGT] |
|
25 |
S3-RI |
GT |
[GT, SSN] |
|
26 |
S3-NGT |
0 |
[0…255] |
|
27 |
S3-RGTA |
NO |
[YES, NO] |
|
28 |
S4-ServiceName |
LIBD |
Character {up to 8 characters} |
|
29 |
S4-Translation Type |
081 |
[000…255] |
|
30 |
S4-DPC |
100100100 |
[001…255][000…255] [000…255] {9 characters} |
|
31 |
S4-SSN |
000 |
[000…255] |
|
32 |
S4-XLAT |
DPC |
[DPC, DPCSSN, DPCNGT] |
|
33 |
S4-RI |
GT |
[GT, SSN] |
|
34 |
S4-NGT |
0 |
[0…255] |
|
35 |
S4-RGTA |
NO |
[YES, NO] |
|
36 |
S5-ServiceName |
LIBD |
Character {up to 8 characters} |
|
37 |
S5-Translation Type |
081 |
[000…255] |
|
38 |
S5-DPC |
100100100 |
[001…255][000…255] [000…255] {9 characters} |
|
39 |
S5-SSN |
000 |
[000…255] |
|
40 |
S5-XLAT |
DPC |
[DPC, DPCSSN, DPCNGT] |
|
41 |
S5-RI |
GT |
[GT, SSN] |
|
42 |
S5-NGT |
0 |
[0…255] |
|
43 |
S5-RGTA |
NO |
[YES, NO] |
|
44 |
Block Termination |
See1 |
|
| 1The block termination field value is a new line character, which is generated by pressing the Enter key on the keyboard. | |||
Override GTT Input File - Delete Record
Example Override GTT Delete Record File
The override GTT delete record contains one record for each database entry. Individual fields are pipe delimited with a new line (0x0A) after each GTT recorded. Each entry should begin at the beginning of the line.DELETE|GTTGroup|9194690000Table 4-11 Explanation of the Fields in the Override GTT Delete Record
| Field Number | Field Name | Range of Values | Values in Example |
|---|---|---|---|
| 1 | Delete record recognition string | Characters {6 characters} | DELETE1 |
| 2 | Group name | [A-Z, a-z, 0-9] {64 alphanumeric} | GTTGroup |
| 3 | LRN | [0-9]{10 digits} | 9194690000 |
| 1This is the fixed string to be used for all delete records. An entry that does not begin with DELETE, or one in which DELETE is misspelled, will be treated like a create or modify entry. | |||
Override GTT Result File
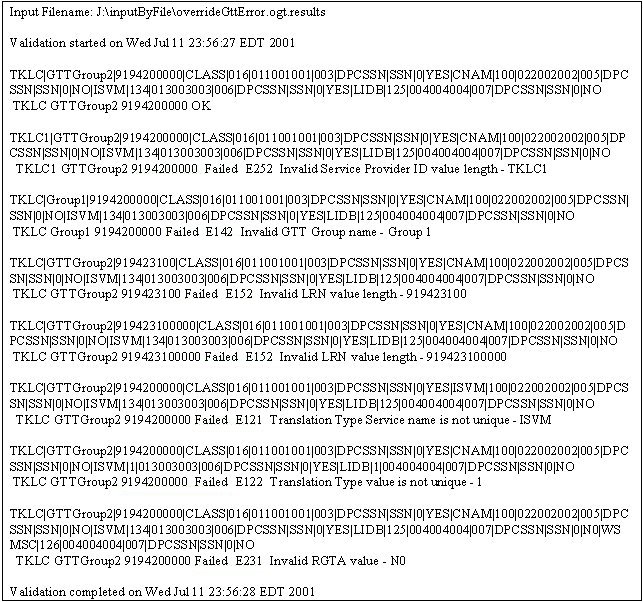
The Override GTT result file (which is located in the same directory as the input data file) stores useful information about the processing of each of the Override GTT data items read from the input data file while executing the file validation phase. A result file with the format shown below is produced during file validation or input processing phase.
For each correct data item read from the input file, a single line appears in the result file:
SPID|GROUP|LRN Operation_Status
For each erroneous data item read from the input file, a single line appears in the result file:
SPID|GROUP|LRN Operation_Status [Error_Number] [Error_Message]
where:
SPID = SPID value read from input data file
GROUP = GTT Group
LRN = The ten digits value input from file for each data item.
Operation_Status = OK to indicate a successful operation; FAILED to indicate an error in processing.
Error_Number = An "E" followed by up to 3 numeric digits (this is an optional field, it appears only if operation status is FAILED).
Error_Message = Text indicating the first processing error found in the data entry (this is an optional field, it appears only if operation status is FAILED).
Example Override GTT Result File
Figure 4-18 shows a picture of an override GTT result file.
Figure 4-18 Example Override GTT Result File.
Override GTT Error Codes
See Error Codes.
NPA-NXX Split Input File
The NPA-NXX split input file enables you to create or delete an NPA-NXX split.
Each data entry in the input file is checked to ensure that its format corresponds to the input file specification. The data values will be validated using the same rules that are presently used when entering a single NPA-NXX split via the LSMS GUI. Each entry in the input data file is validate, successful entries and errors encountered are written to the result file, and the validation of the next data entry continues. For deletions, if the NPA-NXX split exists, it is deleted. If the NPA-NXX split object does not exist, however, the delete request is logged as a success, not a failure, in the NPA-NXX split result file.
Only if no errors are found in the entire input file will further processing continue. If no errors are found, the data entries are added to the NpaSplit table of the LSMS supplemental database.
The user-specified filename must have an extension of .NPA to be a valid input data filename for NPA-NXX splits.
The NPA Split input file should be located at the client machine that is running LSMS GUI. You can use a file selection dialog box to select the input file.
The file contains the data used to create new NPA-NXX instances.
The NPA-NXX Split input block contains one record for each database entry; individual fields are pipe delimited, with a new line (0x0A) after each split record. Each entry should begin at the beginning of the line.
Note:
To create a successful NPA-NXX split, all the data fields must be filled in.NPA-NXX Split Input File Example
Figure 4-19 is an example of an NPA-NXX Split input file with one entry. See Table 4-12 for an explanation of the fields.
Figure 4-19 Example NPA-NXX Split Input File
312|910|666|1|12|2007|5|17|2007Table 4-12 NPA-NXX Split Input File Fields and Their Values
|
Field Number |
Field Name |
Range of Values |
Value in Example |
|
1 |
Old NPA |
[2-9][0-9][0-9] {3 digits} |
312 |
|
2 |
New NPA |
[2-9][0-9][0-9] {3 digits} |
910 |
|
3 |
NXX Value |
[0-9][0-9][0-9] {3 digits} |
666 |
|
4 |
Start Date Month |
[1-12] {2 digits maximum} |
1 |
|
5 |
Start Date Day |
[1-31] {2 digits maximum} |
12 |
|
6 |
Start Date Year |
[0-9] {4 digits} |
2007 |
|
7 |
End Date Month |
[1-12] {2 digits maximum} |
5 |
|
8 |
End Date Day |
[1-31] {2 digits maximum} |
17 |
|
9 |
End Date Year |
[0-9] {4 digits} |
2007 |
|
10 |
Block Termination |
New Line (press Enter key) |
0x0A |
Note:
The New NPA value cannot begin with a “0” or “1”, and cannot end in “11”.NPA-NXX Split Input File - Delete Record
Example NPA-NXX Split Delete Record File
The NPA-NXX split delete record contains one record for each database entry. Individual fields are pipe delimited with a new line (0x0A) after each NPA-NXX split recorded. Each entry should begin at the beginning of the line.DELETE|312|919|666Table 4-13 Explanation of the Fields in the NPA-NXX Split Delete Record
| Field Number | Field Name | Range of Values | Values in Example |
|---|---|---|---|
| 1 | Delete record recognition string | Characters {6 characters} | DELETE1 |
| 2 | Old NPA | [2-9][0-9][0-9] {3 digits} | 312 |
| 3 | New NPA | [2-9][0-9][0-9] {3 digits} | 919 |
| 4 | NXX Value | [0-9][0-9][0-9] {3 digits} | 666 |
| 1This is the fixed string to be used for all delete records. An entry that does not begin with DELETE, or one in which DELETE is misspelled, will be treated like a create or modify entry. | |||
NPA-NXX Split Result File
The NPA-NXX split result file (which is located in the same directory as the input data file) stores useful information about the processing of each of the NPA-NXX split data items read from the input data file while in the file validation or input phase. A result file with the format shown below is produced during file validation or input processing phase.
For each correct data item read from the input file, a single line appears in the result file:
Old_NPA|New_NPA|NXX Start_Date|End_Date Operation_Status
For each erroneous data item read from the input file, a single line appears in the result file:
Old_NPA|New_NPA|NXX Start_Date|End_Date Operation_Status Error_Number Error_Message
where:
Old_NPA = The three-digit value input from file for each data item.
New_NPA = The three-digit value input from file for each data item.
NXX = The three-digit value input from file for each data item.
Start_Date = The 10-digit Start Date of the Permissive Dialing Period.
End_Date = The 10-digit End Date of the Permissive Dialing Period.
Operation_Status = OK to indicate a successful operation; FAILED to indicate an error in processing.
Error_Number = "E" followed by up to 3 numeric digits (this is an optional field, it appears only if operation status is FAILED).
Error_Message = Text indicating the first processing error found in the data entry (this is an optional field, it appears only if operation status is FAILED).
Example NPA-NXX Split Result File
Figure 4-20 shows a picture of an NPA-NXX split result file.
Figure 4-20 Example NPA-NXX Split Result File

NPA-NXX Split Error Codes
See Error Codes.
Custom TN Filter Input File
The Custom TN Filter input file enables you to create, modify, or delete a Custom TN Filter.
Each data entry in the input file is checked to ensure that the format corresponds to the input file specification. The data values are validated using the same rules that are presently used when entering a single Custom TN Filter via the LSMS GUI. The entire input data file is validated, successful entries and errors encountered are written to the result file, and the processing of the next data entry continues.
Only if no errors are encountered is further processing allowed by this feature, at which time the data entries are added to the LSMS database Custom TN Filter table.
The user specified filename must have an extension of .TNF to be a valid Custom TN Filter.
The NPA and/or the NPANXX value of each Custom TN Filter data entry in the file is used to check if the Custom TN Filter object instance exists in the supported database. If the Custom TN Filter object instance is not present, a new instance is created. If the Custom TN Filter instance is present in the supported database, then the entire Custom TN Filter object instance data is overwritten with the input file data for that instance. For deletions, if the Custom TN Filter object exists, it is deleted. If the Custom TN Filter object does not exist, however, the delete request is logged as a success, not a failure, in the Custom TN Filter result file.
The Custom TN Filter input block contains one record for each database entry; individual fields are pipe delimited, with a new line (0x0A) after each custom TN filter record. Each entry should begin at the beginning of the line.
Table 4-14 Custom TN Filter Input Block Contents
|
Field Number |
Field Name |
|
1 |
Custom TN Filter name |
|
2 |
Filter description |
|
3 |
Filter type |
|
4 onward |
NPA and/or NPANXX values (optional values) |
Custom TN Filter Input File Example
Figure 4-21 is an example of a Custom TN Filter input file with two entries. See Table 4-15 for an explanation of the fields.
Figure 4-21 Sample Custom TN Filter Input File
TNFilterName1|Filter 1 description|include|910|867|999
TNFilterName2|Filter 2 description|exclude|919|000|999
Table 4-15 Explanation of the Fields in the Custom TN Filter Input File
| Field Number | Field Name | Value in Example | Range of Values |
|---|---|---|---|
|
1 |
Custom TN Filter name |
TNFilterName1 |
Max 64 alphanumeric characters |
|
2 |
Filter description |
Filter 1 description |
Any ASCII text string |
|
3 |
Filter type |
include |
[ exclude | include ] |
|
4 onward |
NPA and/or NPANXX values |
910 867 999 |
[0-9]{3 or 6 digits} Optional field |
|
last |
Block Termination |
The block termination field value is a new line character; it is generated by pressing the Enter key on the keyboard. |
Custom TN Filter Input File - Delete Record
Example Custom TN Filter Delete Record File
The Custom TN Filter delete record contains one record for each database entry. Individual fields are pipe delimited with a new line (0x0A) after each Custom TN Filter recorded. Each entry should begin at the beginning of the line.DELETE|TNFilterName1Table 4-16 Explanation of the Fields in the Override GTT Delete Record
| Field Number | Field Name | Range of Values | Values in Example |
|---|---|---|---|
| 1 | Delete record recognition string | Characters {6 characters} | DELETE1 |
| 2 | Custom TN Filter name | [A-Z, a-z, 0-9] {64 alphanumeric} | TNFilterName1 |
| 1This is the fixed string to be used for all delete records. An entry that does not begin with DELETE, or one in which DELETE is misspelled, will be treated like a create or modify entry. | |||
Creating or Modifying the Input File
To create a custom TN filter input file:
Note:
After you update the TN filter, run an audit for the EMSs utilizing that TN filter. Use the NE Audit with Reconcile procedure (refer to the LNP Database Synchronization User's Guide) for each NPA-NXX added or changed and on each affected EMS to update the databases. However, depending on the number of NPA-NXXs, the number of EMSs affected, and the physical distance between the LSMS and the network element, a bulk download to each affected EMS/network element may be more efficient. For more information, refer to the LNP Database Synchronization User's Guide.Note:
After making any changes to the custom TN filter, you must restart the EAGLE agent for the changes to take effect.Custom TN Filter Result File
The Custom TN Filter result file (which is located in the same directory as the input data file) stores useful information about the processing of each of the Custom TN Filter data items read from the input data file while executing the file validation or input phase. A result file with the format shown below is produced during file validation or input processing phase.
For each correct data item read from the input file, a single line appears in the result file:
Name|Operation_Status
For each erroneous data item read from the input file, a single line appears in the result file:
Name|Operation_Status|Error_Number|Error_Message
where:
Name = Custom TN Filter Name.
Operation_Status = OK to indicate a successful operation; FAILED to indicate an error in processing.
Error_Number = "E" followed by up to 3 numeric digits (this is an optional field, it appears only if operation status is FAILED).
Error_Message = Text indicating the first processing error found in the data entry (this is an optional field, it appears only if operation status is FAILED).
Example Custom TN Filter Result File
Figure 4-22 shows a picture of a custom TN filter result file.
Figure 4-22 Example Custom TN Filter Result from File Validation Phase
Custom TN Filter Error Codes
See Error Codes.
Error Codes
Table 4-17 lists the error codes, messages, and causes that apply to the Input Data by File processes for Default GTT, Override GTT, NPA-NXX Split, and Custom TN Filters.
Table 4-17 Input Data by File Error Codes
| Error Number | Error Text | Cause |
|---|---|---|
| 0 |
Note: Errors generated by thesupman process will be logged with Error Number 0. Some examples include:
|
Internal processing error |
|
52 |
Wrong number of values for OPERATION|DATA TYPE where OPERATION = create/modify or delete and DATA TYPE = DGT or OGT or NPA Split or TN Filter |
The specific data entry has either too many or not enough pipe delimited data fields for a valid entry. |
|
53 |
Invalid blank line for an entry |
A blank line was be inserted into the file. Check the input file for any blank lines. Check the last entry in the input file to make sure was NOT a blank line. |
|
100 |
Non-numeric date field value |
The date field value in the input data entry is not numeric. Check for illegal characters. |
|
101 |
Year value is required |
Year field value is empty. |
|
102 |
Non-numeric year value |
The year field value in the input data entry is not numeric. Check for illegal characters. |
|
103 |
Invalid year value |
Year date field value must be between 1979 and 9999. |
|
104 |
Month value is required |
Month field value is empty. |
|
105 |
Non-numeric month value |
The month field value in the input data entry is not numeric. Check for illegal characters. |
|
106 |
Invalid month value |
Month field value must be between 1 and 12. |
|
107 |
Day value is required |
Day field value is empty. |
|
108 |
Non-numeric day value |
The day field value in the input data entry is not numeric. Check for illegal characters. |
|
109 |
Invalid day value |
Day field value must be between 1979 and 9999. |
|
120 |
Invalid GTT type |
GTT type field must be include or exclude. |
|
121 |
Translation Type Service name is not unique |
Translation type service names must be unique among all services. |
|
122 |
Translation Type value is not unique |
Translation type values must be unique among all services. |
|
130 |
Service #: XLAT, RI, SSN and NGT mismatch |
The entry has a parameter inconsistency in service number (1-4). Note: The block termination field value is a new line character, which is generated by pressing the Enter key on the keyboard. |
|
140 |
GTT Group name is required |
GTT Group field value is empty. |
|
141 |
Invalid GTT Group name length |
The GTT Group name is greater than 40 characters. |
|
142 |
Invalid GTT Group name |
The GTT Group name must be composed of alphanumeric characters. |
|
150 |
LRN value is required |
The LRN field value is empty. |
|
151 |
Non-numeric LRN value |
The LRN field value in the input data entry is not numeric. Check for illegal characters. |
|
152 |
Invalid LRN value length |
The LRN value in the input data file is not the required 10 digits length. |
|
160 |
Service #: NGT value is required |
The NGT field value is empty. |
|
161 |
Service #: Non-numeric NGT value |
The NGT field value in the input data entry is not numeric. Check for illegal characters. |
|
162 |
Service #: Invalid NGT value |
The NGT field values are illegal for service number (1-4). |
|
170 |
NPA value is required |
The NPA field value is empty. |
|
171 |
Non-numeric NPA value |
The NPA field value in the input data entry is not numeric. Check for illegal characters. |
|
172 |
Invalid NPA value |
The NPA field value is not between 200 and 999. |
|
180 |
NPA-NXX value is required |
The NPA-NXX field value is empty. |
|
181 |
Non-numeric NPA-NXX value |
The NPA-NXX field value in the input data entry is not numeric. Check for illegal characters. |
|
182 |
Invalid NPA-NXX value |
The NPA-NXX field value is not between 200000 and 999999. |
|
190 |
NPA-NXX-X value is required |
The NPA-NXX-X field value is empty. |
|
191 |
Non-numeric NPA-NXX-X value |
The NPA-NXX-X field value in the input data entry is not numeric. Check for illegal characters. |
|
192 |
Invalid NPA-NXX-X value |
The NPA-NXX-X field value is not between 200000 and 999999. |
|
200 |
Old and New NPA values cannot be identical |
The NPA-NXX split input data entry contains an Old NPA value that equals the New NPA Value (this is not allowed). |
|
201 |
Start date must be equal to or after current date |
The start date precedes the current date. |
|
202 |
End date must be after start date |
The end date precedes or equals the start date. |
|
203 |
End date must be after the current date |
The end date precedes or equals the current date. |
|
210 |
NXX value is required |
The NXX field value is empty. |
|
211 |
Non-numeric NXX value |
The NXX field value in the input data entry is not numeric. Check for illegal characters. |
|
212 |
Invalid NXX value |
The NXX field value is not between 0 and 999. |
|
221 |
Service #: Non-ANSI conforming point code value |
The entry read from the input file DPC value has one of the following errors: 1-DPC value of 000-XXX-XXX which is invalid. 2- DPC value of 001-000-XXX through 005-000-XXX 3- DPC field must be composed of only the digits 0-9 with a maximum value of 255-255-255. For service number (1-4). |
|
222 |
Service #: Point code: <component> component is invalid. |
The point code component field value is not between 0 and 255. |
|
230 |
Service #: RGTA value is required |
RGTA field value is empty. |
|
231 |
Service #: Invalid RGTA value |
The RGTA field value is not YES or NO . |
|
240 |
Service #: RI value is required |
RI field value is empty. |
|
241 |
Service #: Invalid RI value |
The RI field value is not GT or SSN . |
|
250 |
Service provider ID is required |
SPID field value is empty. |
|
251 |
Invalid Service Provider ID value length |
SPID must be 4 alphanumerical characters. |
| 252 | Invalid Service Provider ID value length | SPID field value is not the required 4 alphanumerical length. |
|
260 |
Service #: SSN value is required |
The SSN field value is empty. |
|
261 |
Service #: Non-numeric SSN value |
The SSN field value in the input data entry is not numeric. Check for illegal characters. |
|
262 |
Service #: Invalid SSN value |
The SSN field value is not 0 or between 2 and 255. |
|
270 |
TN value is required |
The TN field value is empty. |
|
271 |
Non-numeric TN value |
The TN field value in the input data entry is not numeric. Check for illegal characters. |
|
272 |
Invalid TN value length |
The TN value in the input data file is not the required 10 digits length. |
|
280 |
TN filter name is required |
TN Filter Name field value is empty. |
|
281 |
Invalid TN filter name length |
TN Filter Name field value must be 40 or less alphanumeric characters. |
|
282 |
Invalid TN filter name |
TN Filter Name field value must be 40 or less alphanumeric characters. |
|
283 |
Invalid TN filter description length |
TN Filter Description field value must be 255 or less alphanumeric characters. |
|
284 |
Invalid TN filter type |
TN Filter Type field value must be include or exclude. |
|
286 |
Overlapping TN filter data |
TN filter NPA and NPA-NXX ranges cannot overlap. |
|
287 |
Duplicate TN filter data |
TN Filter NPANXX field values already exist. |
|
300 |
Service #: TT value is required |
The TT field value is empty. |
|
301 |
Service #: Non-numeric TT value |
The TT field value in the input data entry is not numeric. Check for illegal characters. |
|
302 |
Service #: Invalid TT value |
The TT field value is not between 1 and 255. |
|
310 |
Service #: TT Service Name is required |
TT Service Name field value is empty. |
|
311 |
Service #: Invalid TT services name value |
The TT Service Name field value is not CLASS , CNAM , LIDB , ISVM , or WSMSC . |
|
312 |
Invalid Message Relay TT service Name - WSMSC, WSMSC feature is not activated |
WSMSC Message Relay TT service is only valid when the WSMSC feature is activated. |
|
313 |
Either AIN or IN or at least one service must be populated |
A valid default GTT entry must have either one of the services fully populated or AIN or IN field entry. |
|
314 |
At least one service must be populated |
A valid override GTT entry must have at least one of the services fully populated. |
|
320 |
Service #: Translation Type name is not unique |
The data entry contains two or more of the translation types that are not unique. Note: The block termination field value is a new line character, which is generated by pressing the Enter key on the keyboard. |
|
321 |
Service #: Translation Type value not unique |
The data entry contains two or more of the translation type values that are not unique. |
|
330 |
Service #: XLAT value is required |
XLAT field value is empty. |
|
331 |
Service #: Invalid XLAT value |
The XLAT field value is not DPC , DPCSSN , or DPCNGT . |