16.2.1 Group Corporate Profiling - Create

Using this option, Bank Administrator can configure Group Corporate Profiling for a specific Group Corporate ID.

To setup a Group Corporate Profiling:

  1. Navigate to one of the above paths.
    The Group Corporate Profiling screen appears.
  2. In the Search By field, select the appropriate option to search the Group Corporate.
    1. If you select the Group Corporate option;
      1. In the Group Corporate ID field, enter the Group Corporate ID whose Group Corporate Details you wish to view.

        OR

        In the Group Corporate Name field, enter the name of the Group Corporate whose Group Corporate Details you want to view.

    2. If you select the Party option;
      1. In the Party ID field, enter the party ID mapped to Group Corporate you wish to view.

        The Search Party popup appears.

      2. From the Entity ID list, select the entity from which party to be searched.
      3. In the Party ID field, enter the party ID to be searched.

        OR

        In the Party Name field, enter the name of the party to be searched.

      4. Click Search to search the party mapped to the Group Corporate.

        OR

        Click Cancel to cancel the transaction.

        OR

        Click Clear to rest the entered details.

  3. Click Search.
    The Group Corporate summary screen appears with search results as per the searched criteria.
  4. Select Group Corporate ID, from Group Corporate summary details.

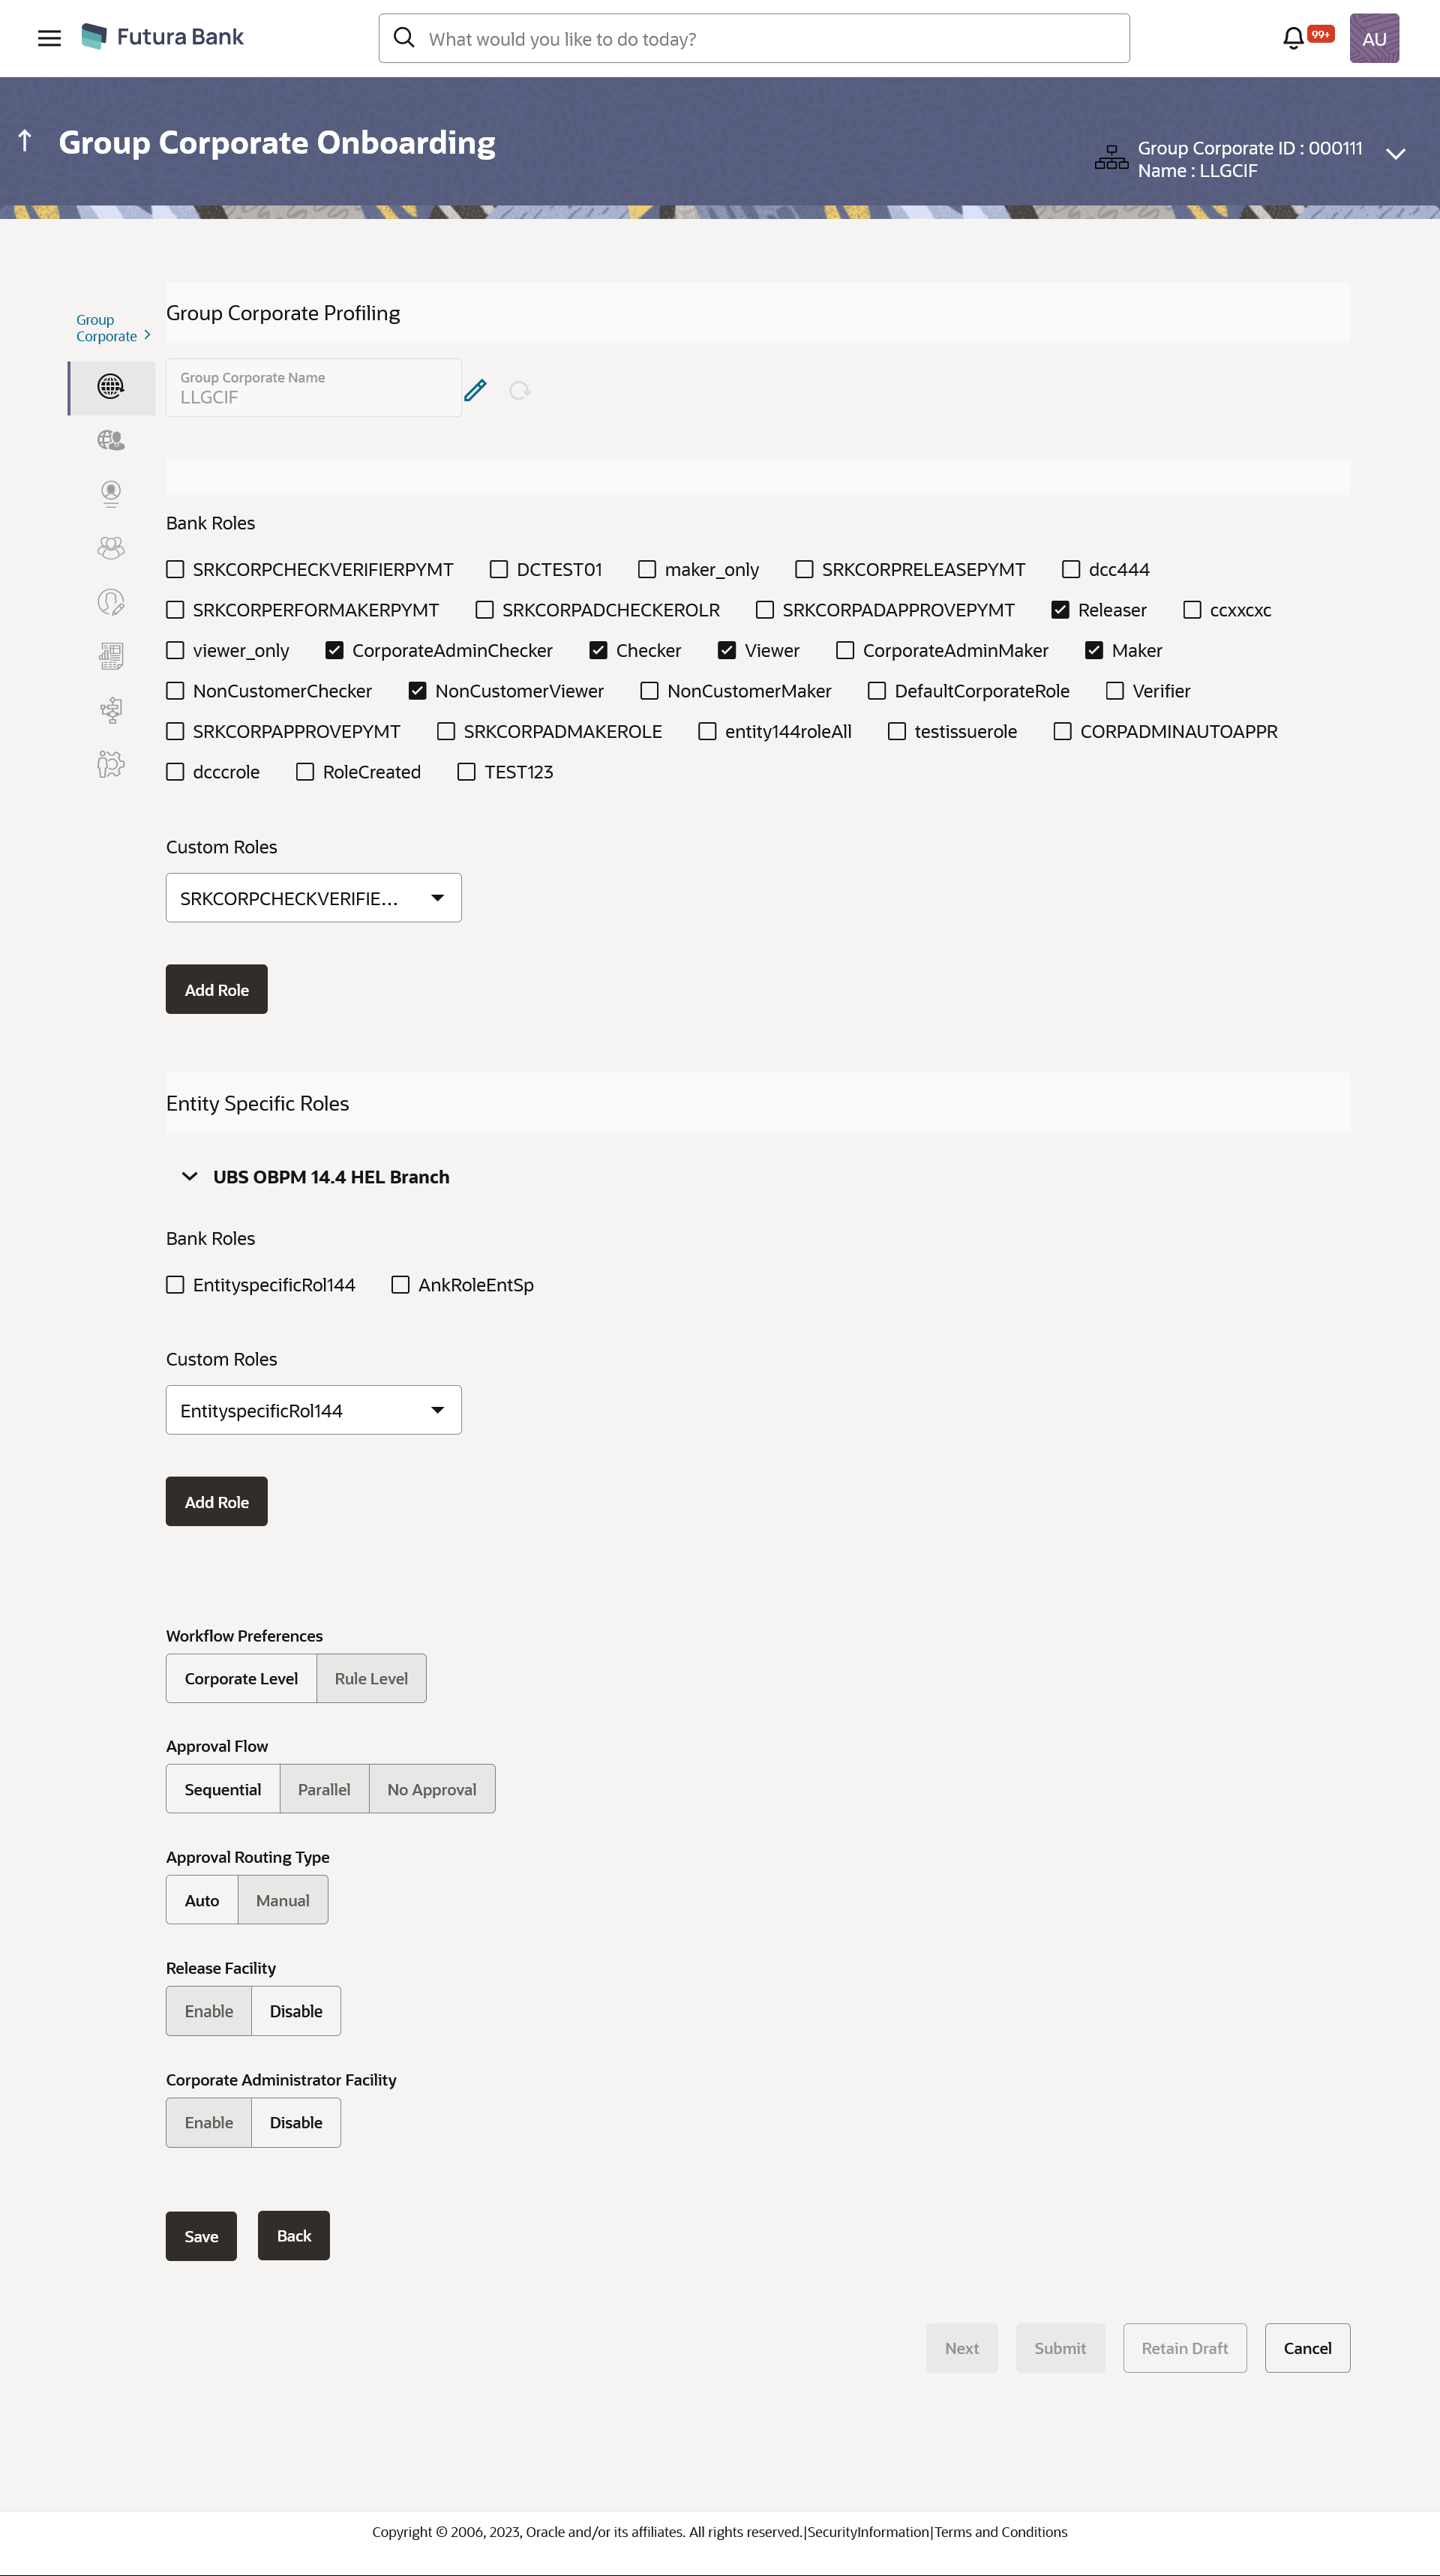
    Figure 16-11 Group Corporate Profiling – Create


    Table 16-3 Field Description

    Field Name Description
    Group Corporate Name Name of the group corporate.
    Global Role
    Bank Roles Display all the roles available at enterprise level.
    Entity Specific Roles The roles associated with different entities.
    Customer Role Create a custom role for the Group Corporate by cloning a role available at Group Corporate level.

    Note:

    Admin will be able to assign a mix of bank roles and custom roles to a Group Corporate
    Workflow Preferences The preference to implement the workflow. Possible value will be
    • Corporate Level
    • Rule Level
    Approval Flow Define the Approval workflow type. Possible value will be
    • Sequential
    • Parallel
    • No Approval

    This field is enabled if Corporate Level option is selected in Workflow Preferences field.

    Approval Routing Type Define the approval routing type. Possible value will be
    • Auto- System will resolve the rule and the transaction will be sent for approval as per the rule resolved by the system. A rule which is having amount slab closest to the transaction amount will be resolved. The user will not have an option to select the approval workflow if routing type is Auto
    • Manual- User will be able to select a workflow from the resolved rules as part of transaction initiation

    Note:

    1. In case system resolves multiple rules with different min-max slabs, then as per rule resolution logic, it will resolve the rule which has the nearest ‘max’ value in the defined slab.
      1. A Day 0 configuration is provided to define if weightage needs to be checked during rule evaluation (Auto-routing/Manual routing)
        • If the Day 0 configuration is yes, then the rules will be evaluated irrespective of the currency. However, the final rule which is resolved will be as per the calculated weightage
          • If the Day 0 configuration is yes, then the rules will be evaluated irrespective of the currency. However, the final rule which is resolved will be as per the calculated weightage
          • If the Day 0 configuration is no, then he rules will be evaluated irrespective of the currency. All the rules falling within the amount range (post currency conversion) will be resolved. Whichever approver picks the transaction first, that rule will be the final resolved rule
    Release Facility Specify whether the release functionality is enabled or disabled at the Group Corporate level.
    The options are:
    • Enable – It means the transaction release facility is enabled at Group Corporate level. If enabled, user can specify the workflow and rules for release functionality.
    • Disable – It means the transaction release facility is disabled at Group Corporate level. If disabled, user cannot specify the workflow and rules for release functionality
    Corporate Administrator Facility Set this flag if Corporate Admin facility is required for the Group Corporate.
    Accessible Roles for Corporate Administrator Select the Roles that should be available to Corporate admin for onboarding new users
  5. In the Bank Role Name field, select the checkbox (s) against the application roles and assign the Application Roles available at enterprise level (This Application roles are created using Role Transaction Mapping screen).
  6. From the Custom Role list, select the role if a custom role is required to be added for the Group Corporate.
  7. Click Add role to create application role.
    The Map Transaction overlay screen appears.
  8. The Application Role Creation screen to add transaction modules and touch points appears.
    OR

    Click Cancel to cancel the transaction.

Create Custom Role - Application Role Creation

Using this option, System Administrator can select and assign the roles available at enterprise level as is, or can create a custom role for the Group Corporate by cloning a role available at Group Corporate level and map transactions to it for the selected touch points.

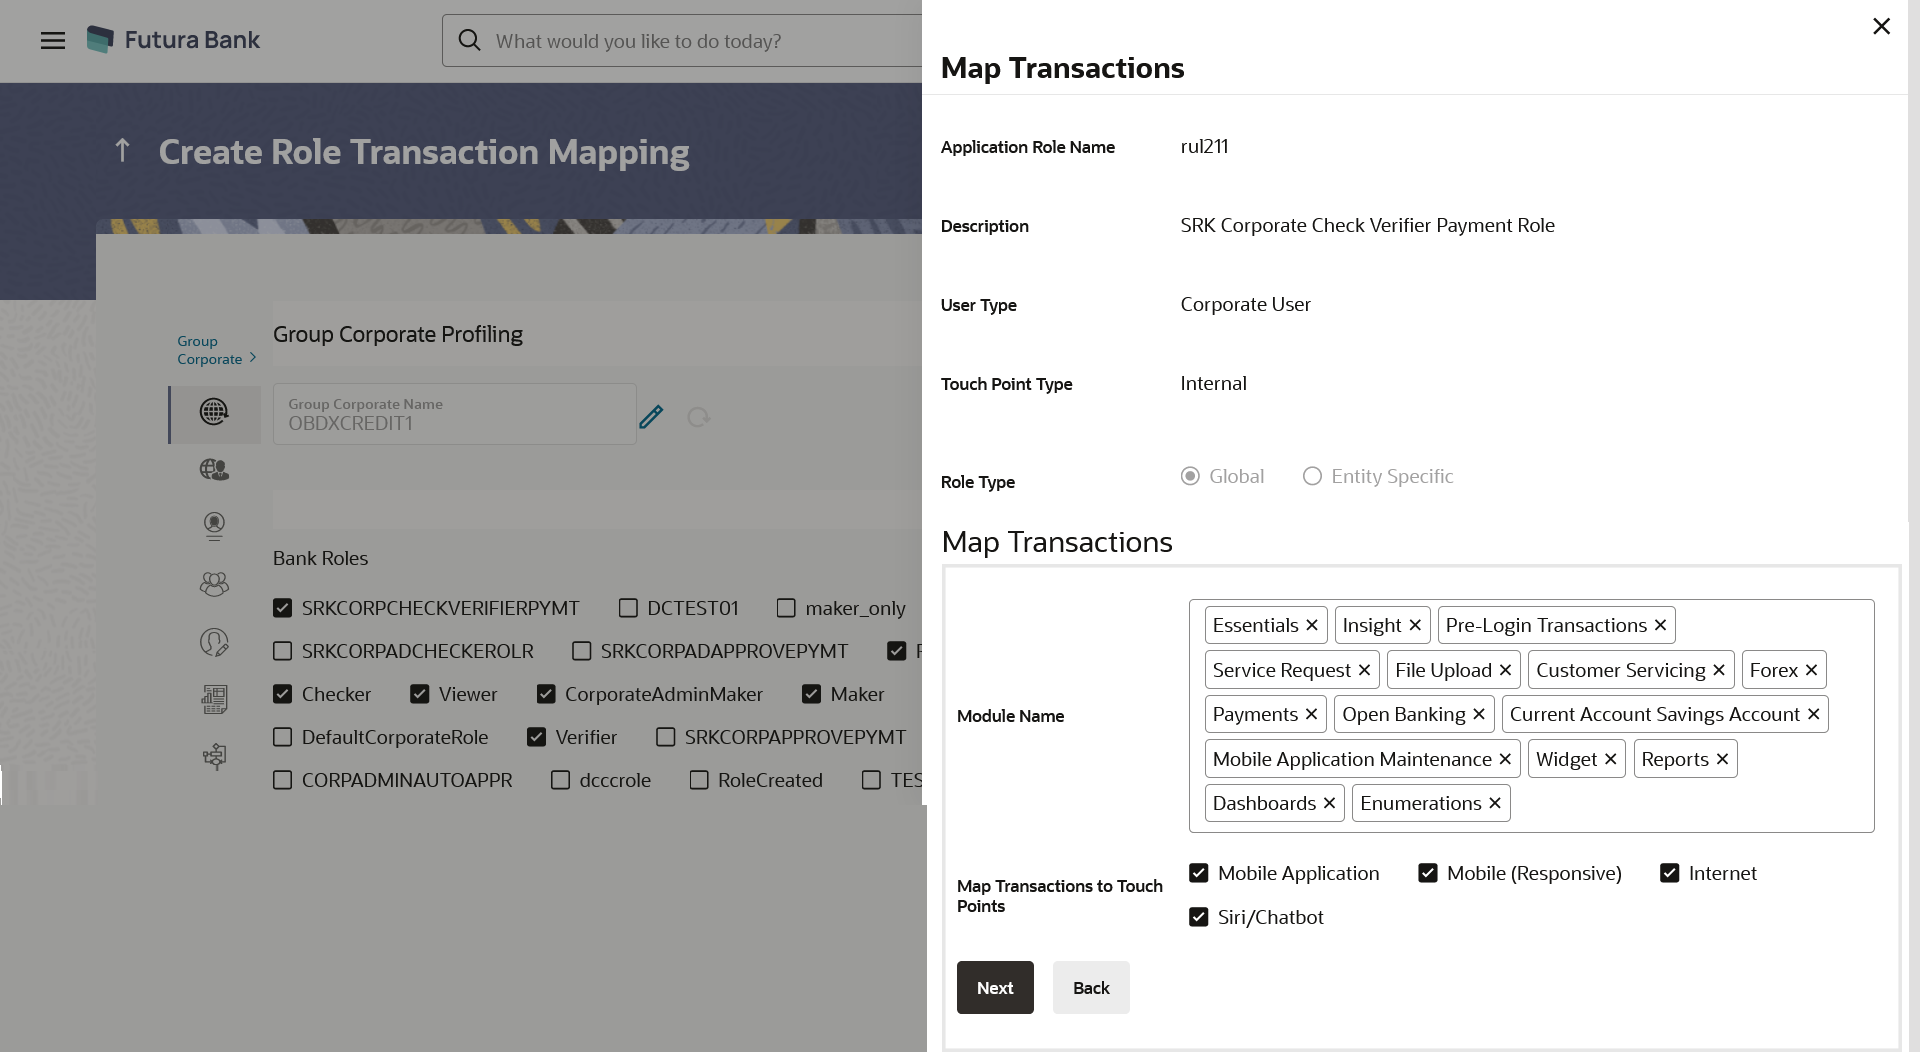
Figure 16-12 Application Role Creation


Table 16-4 Field Description

Field Name Description
Create Customer Role
Application Role Name Name of the application role.
Custom Application Role Name Name for the Custom Application role.
Description Displays the the description of the application role.
User Type Displays the user type for whom an application role is to be created.
Touch Point Type Displays the touch point type for whom an application role is to be created.
Role Type Displays the role type for whom an application role is to be created.
Map Transactions
Module Name The modules for which the transaction mapping is to be done. Transactions under the selected modules will get displayed for mapping
Map Transactions to Touch Points

The internal touch points for which the transaction mapping is done for application role.

All the internal touch point maintained in the system gets displayed here.

This field is displayed and enabled, only if you select the Internal option in the Touch Point Type field.

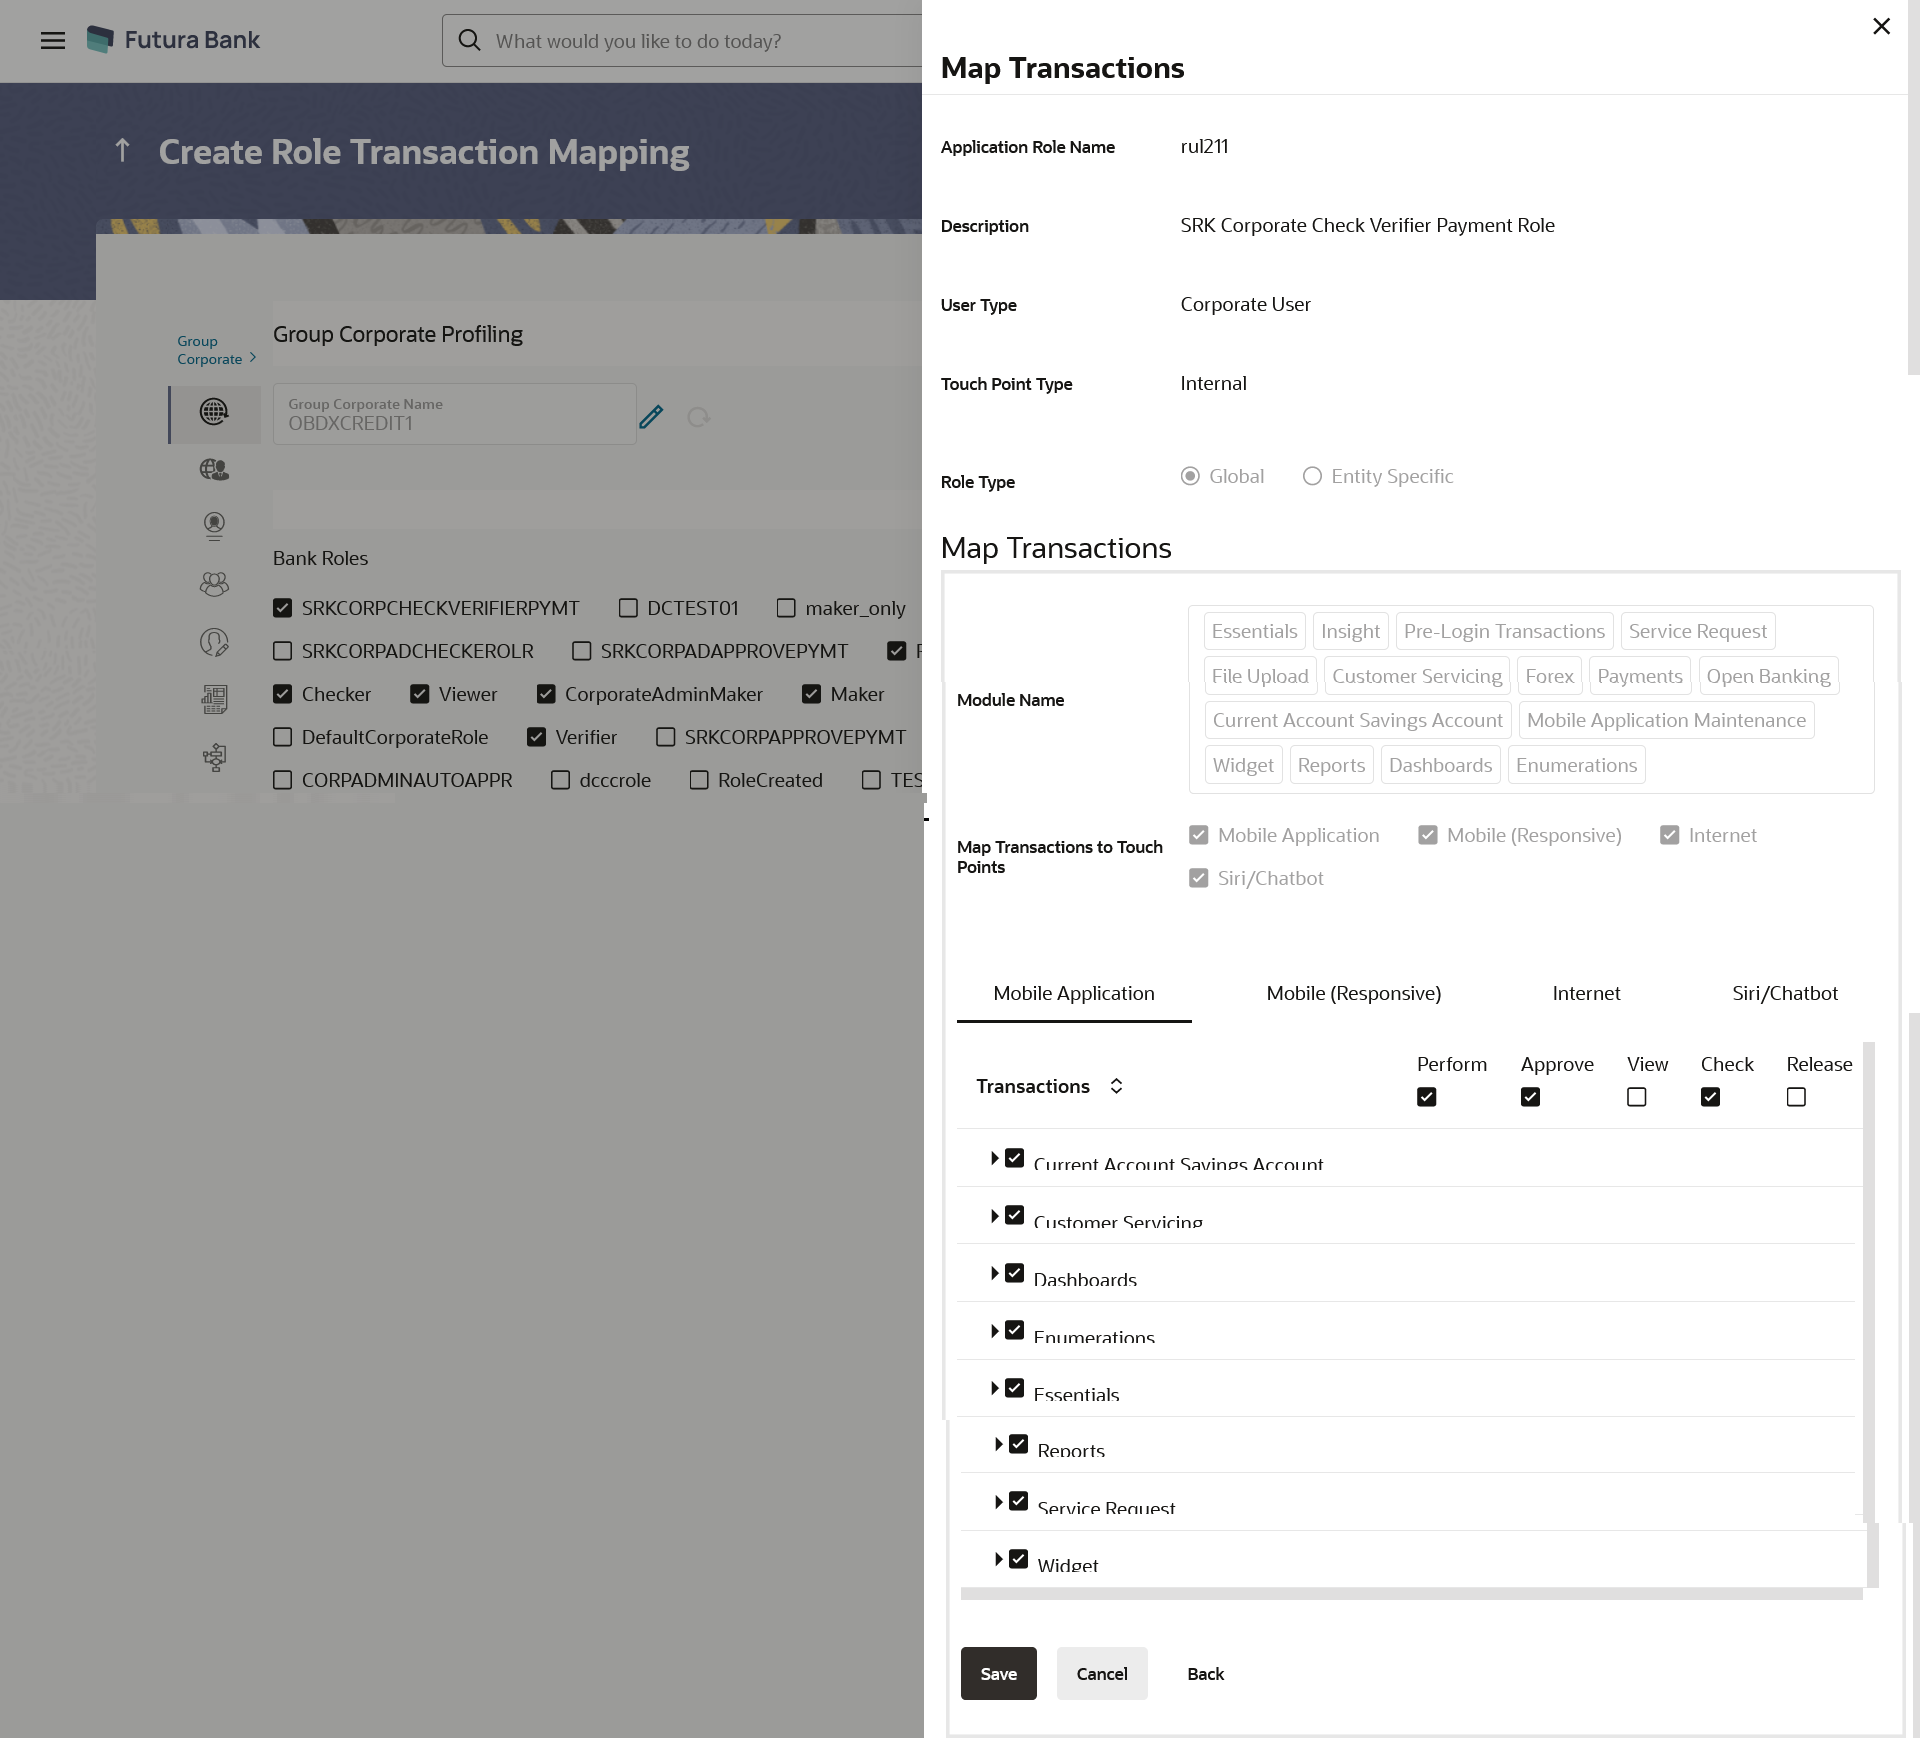
Transaction Name Name of transaction to be mapped to the application role.
Action Name of the action that can be performed for that transaction by the user to which this application role is assigned.
  • Perform- This action allows the user to perform or initiate that transaction and should be given to maker role.
  • Approve- This action allows the user to approve that transaction and should be provided to approval role
  • View- This action allows the user to view the initiated and approved transactions by other users and should be given to viewer role
  • Check- This action allows the user to check the initiated transactions by other users and should be given to checker role
  • Release- This action allows the user to release the initiated transactions by other users and should be given to releaser role

  1. In the Application Role Name field, the existing application role from which the clone of the application role is being created will be displayed.
  2. In the Custom Application Role Name field, enter the name of the application role.
  3. Select appropriate Module Name for transactions mapping.
  4. Select the check box against the list of Touch Points to map the transactions to selected touch points.
  5. Click Next to proceed to next step.
    OR

    Click Back to go back to previous step.

  6. To map the Transactions to the role, click viewdetails icon against the particular module, then select the transaction type, and then transactions to be mapped
  7. Select the respective check boxes preceding to transaction to be mapped.
    OR

    Select the checkbox at every transaction header level if you want to map all the transactions belong to that parent transactions at one instance.

  8. Click Save to save the changes.
    OR

    Click Cancel to cancel the transaction.

    OR

    Click Back to navigate to the previous screen.

  9. Select the appropriate Workflow Preference to specify the preference to implement the workflow, whether at Corporate Level or at Rule Level.
    1. If Workflow Preference is selected as Corporate Level;
      1. Select the Approval Flow to define the Approval workflow type, if it has to be sequential or parallel or No Approval is required.
  10. Select the Approval Routing Type;
    Select Auto if you wish system should resolve the rule and send the transaction for approval as per the rule resolved by the system.

    OR

    Select Manual if you wish to allow initiator to choose workflow from the resolved rules as part of transaction initiation.

  11. Select the Release Facility flag if the release functionality needs to be enabled at Group Corporate level.
  12. Select the Corporate Administrator Facility flag if Corporate Admin facility is required for the Group Corporate.
  13. Select Accessible Roles for Corporate Administrator field, select the Roles that should be available to Corporate admin for onboarding new users.
  14. Click Save to save the maintenance, and redirect to the review page.
    OR

    Click Back to navigate back to previous screen.

    OR

    Click Next to proceed to the next logical step.

    OR

    Click Submit to submit the steps performed so far for approval.

    OR

    Click Retain Draft to save the details entered as draft.

    OR

    Click Cancel to cancel the transaction.

Note:

Admin can submit the maintenance after any step. Maintenances saved so far will be sent for approval in one flow. Admin would not be able to make any changes or maintain another step for the same Group Corporate till the time the approval of the wizard is not done.

  1. The Review screen appears.
    Verify the details, and click Submit.

    OR

    Click Edit to modify the details entered.

    OR

    Click Next to proceed to next step.

    OR

    Click Retain Draft to save all the steps completed so far, and allow Admin resume the same application.

    OR

    Click Cancel to cancel the transaction.

  2. The success message appears along with the transaction reference number.
    Click OK to complete the transaction.