51.2 Transaction Working Window - Create
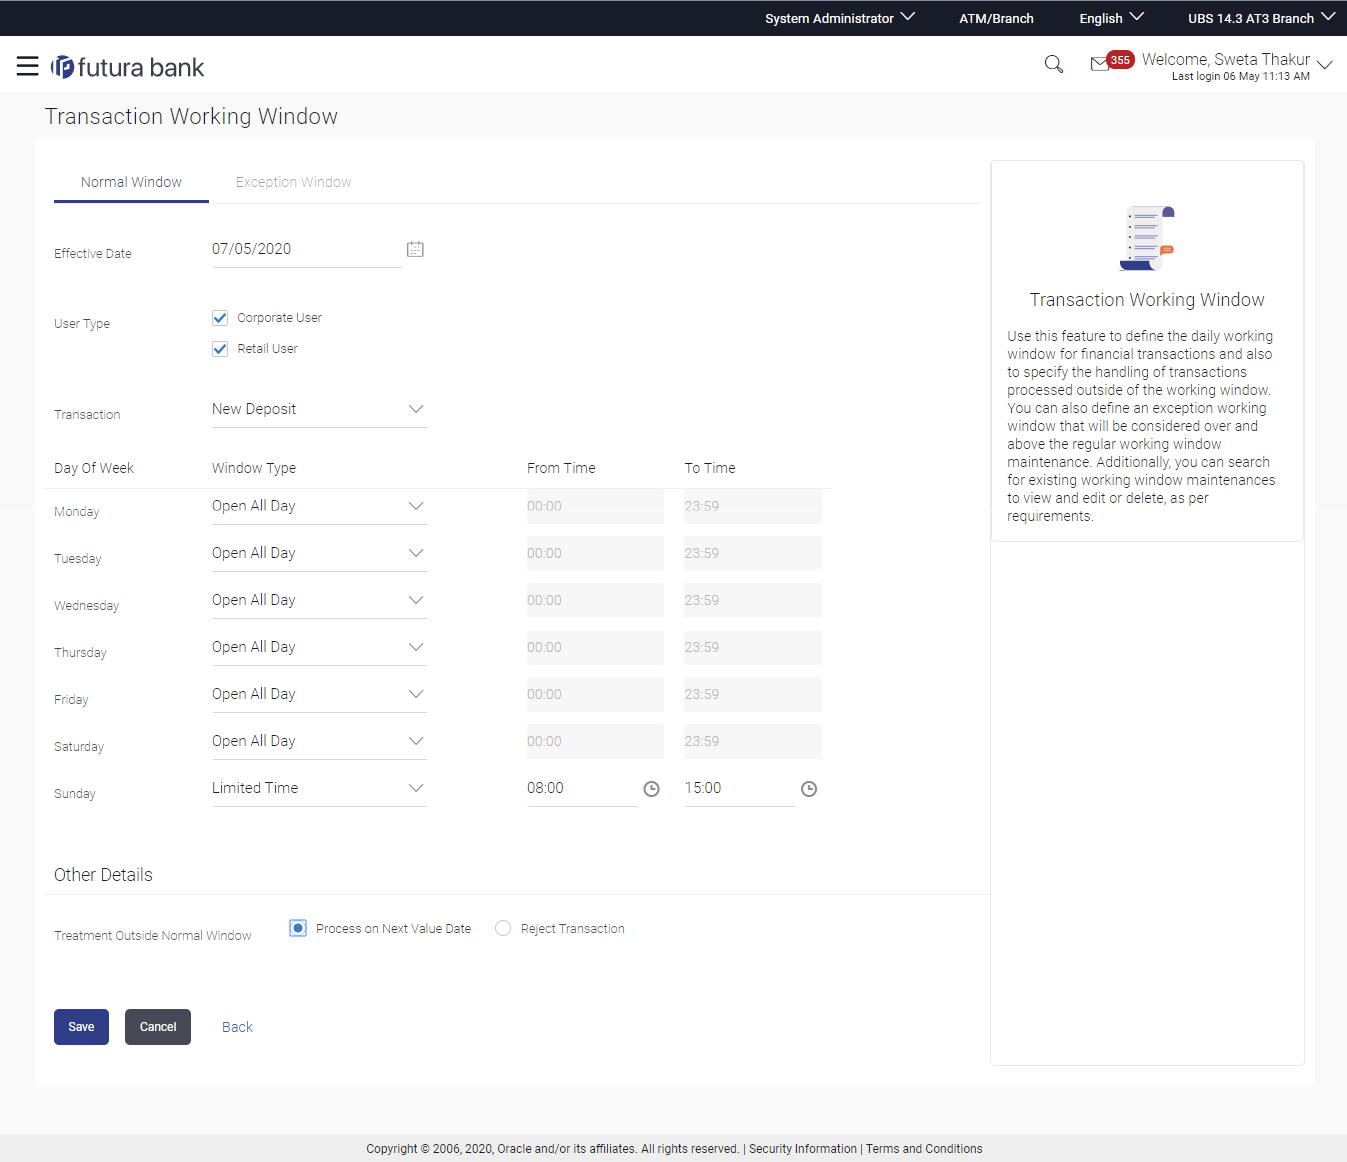
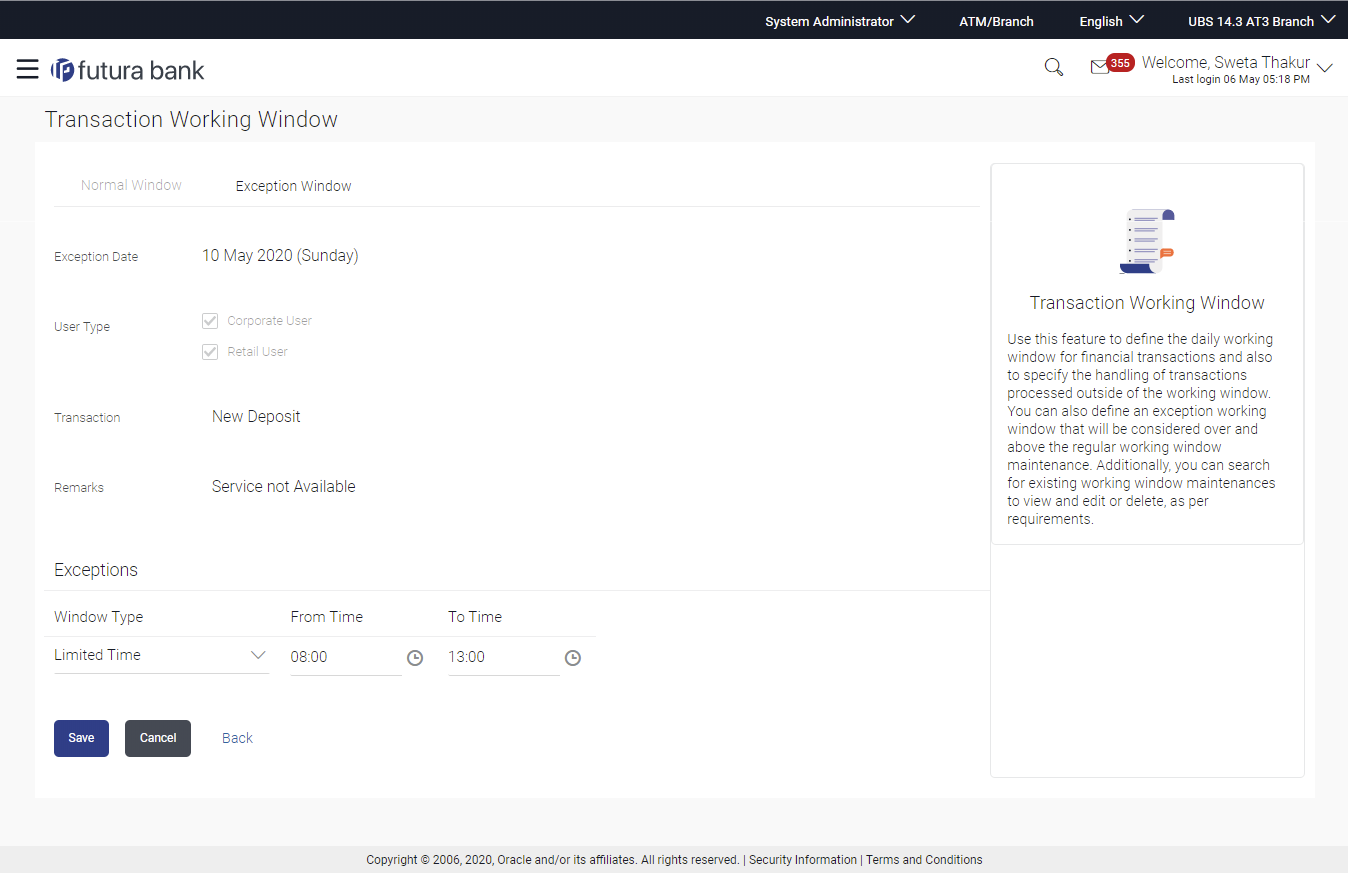
System Administrator can create new transaction working window maintenance for the selected transaction. Working window can be set as ‘Normal’ working window (for all days of the week) and ‘Exception Window’.
To create normal window:
- Navigate to one of the above paths.
The Transaction Working Window screen appears.
- If you select Normal Window tab,
- Click Create.
Table 51-4 Field Description
Field Name Description Effective Date Effective date of working window. User Type The type of user for whom the transaction working window is being maintained. The user types could be:- Corporate User
- Retail User
Transaction The specific financial transaction, for which a working window is maintained. Day of Week Day of week for which the transaction working window is applicable. Window Type Type of working window for the transaction. The type can be:- Limited Time
- Open All Day
- Closed All Day
From Time Start time of transaction working window. This field is enabled if you select Limited Time from the Window Type field.
To Time End time of transaction working window. This field is enabled if you select Limited Time from the Window Type field.
Other Details Treatment Outside Normal Window Indicates the treatment outside normal window: The options are:- Process on Next Value Date
- Reject Transaction
- From the Effective Date list, select the start date of the transaction working window.
- From the Window Type, select the appropriate option.
- If you select the Window Type as Limited Time, from the From Time / To Time list select the start and end time of the transaction working window.
- In the Other Details section, from the Treatment Outside Normal Window field, select the appropriate option.
- Click Create.
- Click Save to create the transaction working
window.
OR
Click Cancel to cancel the transaction.
OR
Click Back to navigate to the previous screen.
- The Review screen appears.
Verify the details, and click Confirm.
OR
Click Edit to modify details if any.
OR
Click Back to navigate to the previous screen.
- The success message is displayed along with the transaction reference
number.
Click OK to complete the transaction.
- Navigate to one of the above paths.
The Transaction Working Window screen appears.
- Select the working window.
- If you select Exception Window tab,
- Click Create.
Table 51-5 Field Description
Field Name Description Exception Date Exception date or date range, when processing for a transaction, overrides that set in the normal transaction working window. The exception date could be:- Specific Date: Exception for a single day
- Date Range: Exception for a date range
User Type Type of user, whether the transaction exception is applicable for a retail or corporate user. Transaction The specific financial transaction, for which an exceptional working window is maintained. Remarks Reason for exception for e.g. a national holiday. Exceptions Type of working window for the transaction. Window types:- Limited Time
- Open all Day
- Close all Day
Window Type Type of working window for the exception. Window types:- Limited Time: Transaction is applicable for a limited time.
- Open all Day: Transaction can be done for the entire day.
- Close all Day: Transaction is closed for the whole day.
Time Range Business hours of the transaction. This field is enabled, if you select Limited Time, option from the Window Type list.
- From the Exception Date list, select the start date of the working window - exception.
- From the Window Type, select the appropriate option.
- If you select the Window Type as Limited Time, from the From Time / To Time list select the start and end time of the working window - exception.
- Click Create.
- Click Save to create the transaction working
window.
OR
Click Cancel to cancel the transaction.
OR
Click Back to navigate to the previous screen.
- The Review screen appears.
Verify the details, and click Confirm.
OR
Click Edit to modify details if any.
OR
Click Back to navigate to the previous screen.
- The success message is displayed along with the transaction reference
number.
Click OK to complete the transaction.
Parent topic: Working Window

