3.3 Convert to EMI

This topic provides the systematic instructions to break up a credit card bill into smaller, more manageable monthly payments.

Using the Manage Columns feature, bank can configure and enable customizable UI display/download option for the end users. Using this feature, users can personalize the information to be displayed/downloaded from search grid displayed on the screen.

By clicking on Manage Columns option available on the screen, user can
  • Rearrange columns
  • Remove specific columns

Note:

  • The downloaded report will have the same columns as displayed on the UI as per user preference as well as there will also be an option to modify the column selection while downloading.
  • The column preferences setup by the user will be saved for future reference i.e. in case the user revisits this screen, the preferred columns will only be displayed in the table.

To convert credit card bill into EMI:

  1. Perform anyone of the following navigation to access the Convert to EMI screen.
    • From the Dashboard, click Toggle menu, then click Menu, and then click Cards . Under Cards , click Credit Cards tab, and then from the Credit Card List, then click on the credit card, and from Credit Card Details , and then click EMI wdiget, and then click on the Convert to EMI.
    • From the Search bar, type Credit Cards – Card Detailsand press Enter, and then click EMI wdiget, and then click on the Convert to EMI.
    • On the Dashboard, click Overview widget, then click Credit Cards card, and then from the Credit Card List, then click on the credit card, and from Credit Card Details page, and then click click EMI wdiget, and then click on the Convert to EMI.
    The Convert to EMI screen appears.
  2. From the Convert to EMI list, select the debit card to be upgrade.
  3. Click on the Convert to EMI.
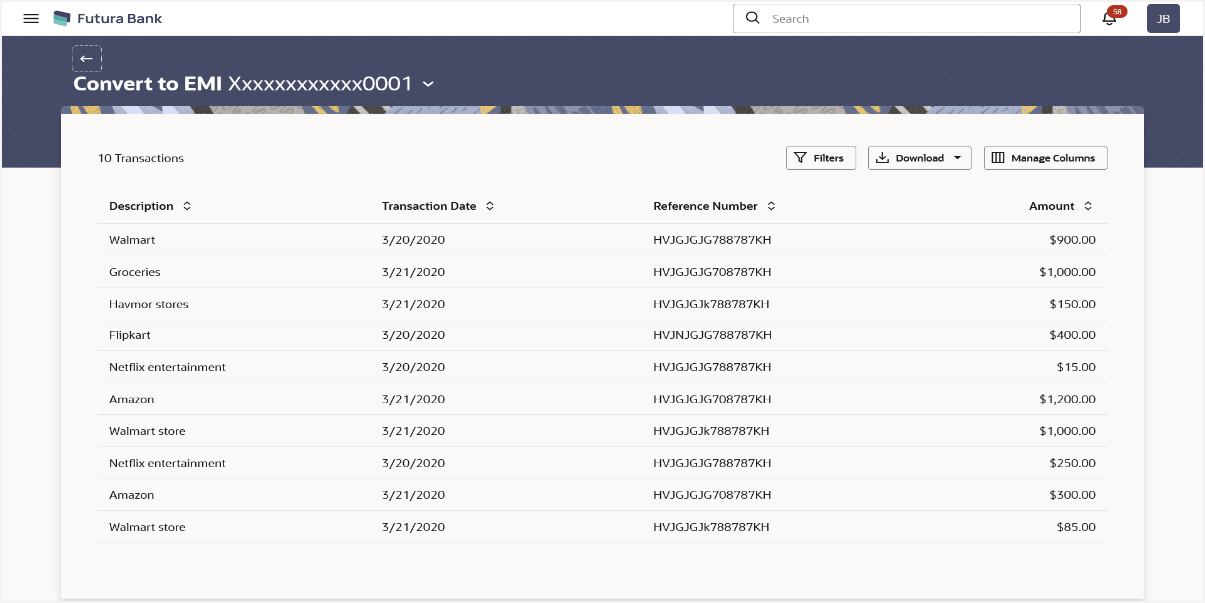
    The Convert to EMI screen appears.

    Note:

    The fields which are marked as Required are mandatory.

    For more information on fields, refer to the field description table.

    Table 3-6 Convert to EMI - Field Description

    Field Name Description
    Number of Transactions Displays the count of the transactions.
    Description Displays the merchant or location where the transaction Occurred.
    Transaction Date Displays the date the transaction occurred.
    Reference Number Displays a unique identifier for the transaction.
    Amount Displays the transaction amount.
  4. Perform anyone of the following actions:
    1. Click
      Filter

      to change filter criteria.
      The Filter overlay screen appears.

      Based on the defined criteria you can view transactions.

    2. Click Downloadto download the records in CSV & PDF format.
    3. Click Manage Columns to setup a column preferences by rearranging or removing columns.
  5. Click on the transaction which you wish to convert into a emit.
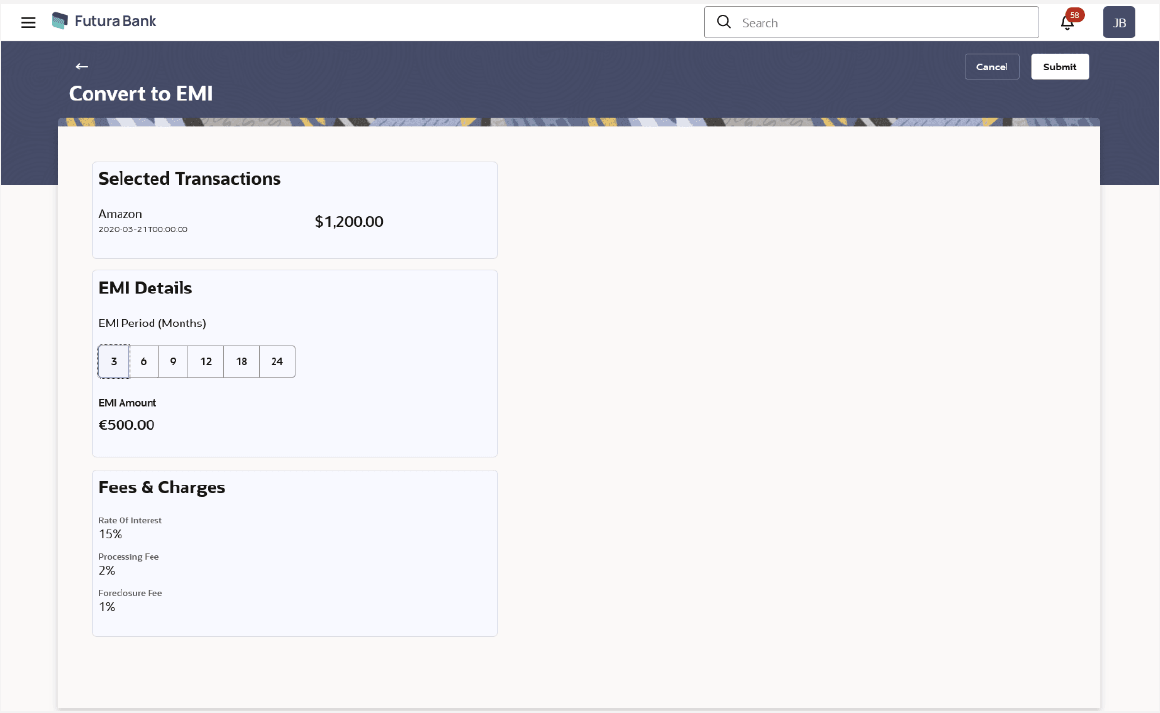
    The Convert to EMI screen appears.

    Note:

    The fields which are marked as Required are mandatory.

    For more information on fields, refer to the field description table.

    Table 3-7 Convert to EMI - Field Description

    Field Name Description
    Selected Transaction Displays the details of the transactions.
    Description Displays the merchant or location where the transaction Occurred.
    Transaction Date & Time Displays the date & time of the transaction occurred.
    Amount Displays the transaction amount.
    EMI Period (Months) Specify the EMI period in months.
    EMI Amount Displays the EMI amount based on the selected EMI months.
    Rate of Interest Displays the rate of interest applicable for converting the transaction into EMI.
    Processing Fee Displays the processing fee applicable for converting the transaction into EMI.
    Foreclosure Fee Displays the foreclosure fee applicable for converting the transaction into EMI.
  6. Perform anyone of the following actions:
    1. Click
      Filter

      to change filter criteria.
      The Filter overlay screen appears.

      Based on the defined criteria you can view transactions.

    2. Click Downloadto download the records in CSV & PDF format.
    3. Click Manage Columns to setup a column preferences by rearranging or removing columns.
  7. Perform anyone of the following actions:
    1. Click Submit.
    2. Click Cancel to cancel the transaction.
    The success message appears, along with the transaction reference number.
  8. Perform anyone of the following actions:
    1. Click Transaction Details to view the details of the transaction.
    2. Click Card Details to view the card details.
    3. Click View Credit Cards link to visit Cards summary page.
    4. Click Go To Dashboard link to navigate back to dashboard page.