- Analytical Application Infrastructure User Guide
- Operations
- Batch Scheduler
- Creating Batch Schedule
Creating Batch Schedule
Note:
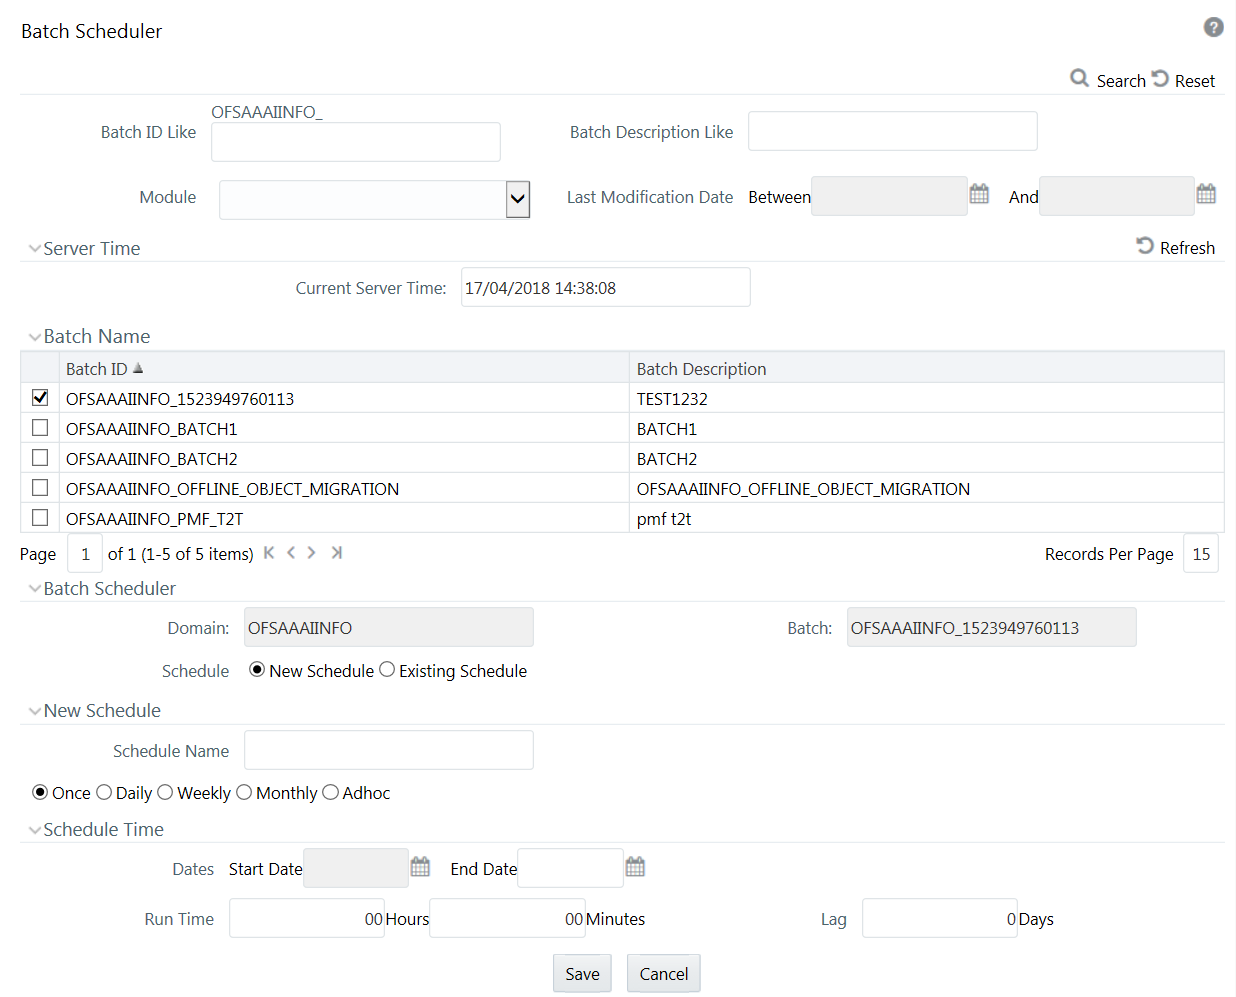
Any change made to the Server Time to accommodate for Daylight Savings Time will not be reflected automatically in the Batch Scheduler. All OFSAA services have to be restarted after the time has been changed in the server to reflect the change in time in the Batch Scheduler.Figure 13-7 Batch Scheduler window

- Select the checkbox adjacent to the Batch ID whose details are to be
updated.The options to schedule a new Batch are displayed. By default, the Schedule type is selected as New Schedule in the Batch Scheduler section.
- In the New Schedule section, enter the Schedule Name to identify the task.
- Select the Schedule option as one of the following, and specify the related
details as tabulated.The following table shows the Schedule Options and its Schedule Task Details.
Table 13-3 Schedule Options and its Schedule Task Details
Schedule Option Schedule Task Details Once (default option) Specify the Date on which the Batch has to be scheduled for processing using the Calendar.
Enter the Run Time during which the Batch Scheduling should be run, in hours (hh) and minutes (mm) format.
Enter the number of Lag days which signifies the misdate when the Batch is currently run. For the schedule type “Once” lag days is optional.
Daily Specify the Date, Start and End dates during which the Batch has to be scheduled for processing using the Calendar.
Enter the Run Time during which the Batch Scheduling should be run, in hours (hh) and minutes (mm) format.
Enter the number of Lag days which signifies the misdate when the Batch is currently run.
Enter the frequency of Batch Run in the Every field as per the defined schedule type. For example, Every 2 day(s)
Weekly Specify the Dates, Start and End dates during which the Batch has to be scheduled for processing using the Calendar.
Enter the Run Time during which the Batch Scheduling should be run, in hours (hh) and minutes (mm) format.
Enter the number of Lag days which signifies the misdate when the Batch is currently run.
Enter the frequency of Batch Run in the Every field as per the defined schedule type. For example, Every 2 week(s).
Select the checkbox adjacent to the Days of the Week to specify the days on which you need to run the Batch schedule.
Monthly Specify the Dates, Start and End dates during which the Batch has to be scheduled for processing using the Calendar.
Enter the Run Time during which the Batch Scheduling should be run, in hours (hh) and minutes (mm) format.
Enter the number of Lag days which signifies the misdate when the Batch is currently run.
Select Interval option to enter the frequency of Batch Run in the Every field or select Random to select the checkbox adjacent to Months on which you need to run the Batch schedule.
Do one of the following:
Select Dates (default) option and enter the Dates of the Month on which you need to run the Batch schedule. Also select the checkbox Include Month’s Last Date to do so.
-Or-
Select Occurrence and specify the day of the week days and select the specific weekday by clicking on the drop-down list.
Adhoc Specify the Information Date of Batch schedule using the Calendar.
Specify the Run Date of Batch schedule using the Calendar.
Enter the Run Time of Batch schedule in hours (hh) and minutes (mm) format.
You can also click to add another row or click to delete the row in the Schedule Time tool bar.
- Click Save to save the new Batch schedule details.