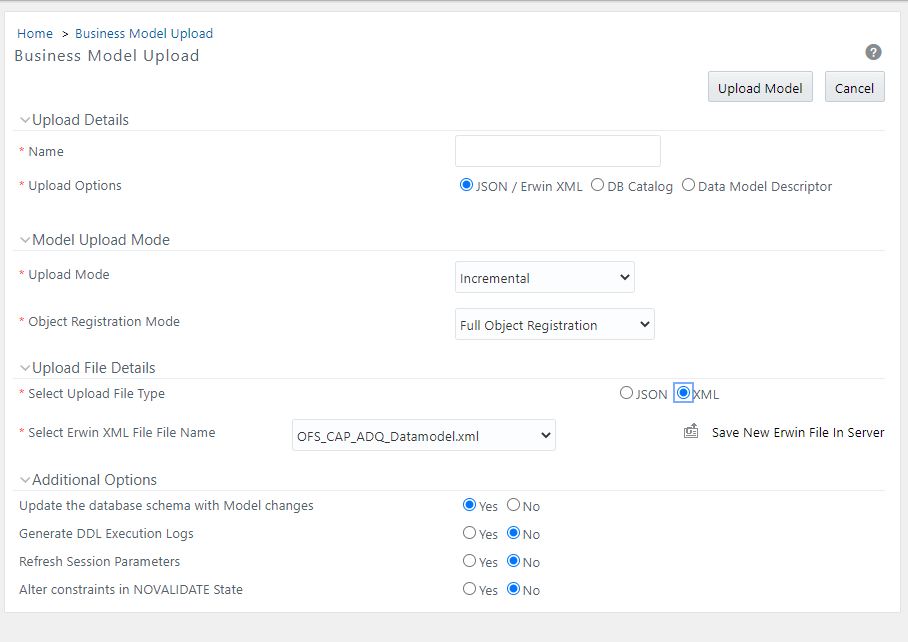
You can upload the warehouse data from the
operational
systems to the database schema using the erwin XML,
JSON,
or Database XML file. Using the stand-alone command line utility TransformErwin.sh, you
can transform the erwin XML into Database XML or JSON.
Ensure the following
if
you are using other utilities to convert the file format to
JSON(ODM)
format:
A zip file is created with name of model name with extension
ODM.
Zip file contains:
- A
master XML File: This XML file is generated after the transformention is
complete..
This file
contains
the model name if provided while
invoking the
utility
and along with that the list of JSON files generated.
- A
JSON File:
This
file
is created
for
each table definition in erwin XML file. The JSON files, which would be made up
of table name and erwin Model version separated by a ~ (tilde) symbol.
For example
<?xml version="1.0" encoding="UTF-8" standalone="yes"?> <jsonupload> <modelname> </modelname>
<!—modelname--> <jsonfiles> <jsonfile>TBL_MSG~
80000.json</jsonfile> <!—json file names --> <jsonfile>
TBL_ACC~80000.json</jsonfile> <jsonfile>TBL_ACC_CLASS~
80000.json</jsonfile> <jsonfile> TBL_LOAN_APP~80000.json</jsonfile> <jsonfile>TBL_CUST~
80000.json</jsonfile> <jsonfile> TBL_LOAN~
80000.json</jsonfile> </jsonfiles> </jsonupload>
You should upload JSON or XML file (erwin or Database) by hosting it on the server
and customize the update process while uploading a Business Model.
To perform Model Upload using the JSON / erwin option, follow these
steps:
- In the Business Model Upload window, select Upload
Options as JSON / erwin XML.
- Select the Upload Mode from the drop-down list. You can
select New only for the first model upload. For
subsequent uploads, you can select Incremental,
Rebuild, or Sliced upload mode.
For more information, see Model Upload modes. For the Sliced Model Upload, you can use SQL
Data Modeler. For more information, see OFSAA Data Model Extensions through the SQL Data Modeler.
- Select the Object Registration Mode from the drop-down
list as Full Object Registration or
Incremental Object Registration. You can
select Incremental Object Registration for the
Upload Mode as Incremental and
Sliced. It is recommended to select incremental only
if the changes are minimal.
Note:
Incremental object registration is not supported for model having super
type-sub type and partitions.
- Select the Upload File Details pane, and select the upload file type from the
following:
JSON: Select the ODM File for Upload from the drop-down list.
XML: Select the erwin XML or Database XML file for upload from the drop-down
list.
- The list displays the ODM, erwin, or Database files that reside in the default
server path (that is, ftpshare
(Application
                        layer/<infodom>/erwin/erwinXML)
.
Note:
The
erwin XML file name should have only
alphanumeric characters and underscore.
- In the Additional Options grid:
- Select Yes to directly
Update the Database Schema with Model
changes.
- If you select Yes, the
generated SQL scripts are executed at runtime to update the
model changes in the database.
- If you select No, it
restricts the system from updating the database
automatically with the model changes and only the model
scripts are created. Later, you must execute the SQL scripts
in the correct sequence
to
make the Infodom Schema to be consistent with the JSONs
persisted in the DB. For more information, see Sequence of Execution of
Scripts.
Additionally, when you select
No, ensure the following:
- You have a third party tool or ETL tool to
manage the schema updates.
- Database consistency and schema updates are
maintained manually by the Database Administrator.
Note:
Only the table
scripts are created and they must be updated manually. If you
choose this option for the first time and later perform an
Incremental / Sliced / Complete Model Re-build, you must
manually synchronize the schema with the Database Schema.
- Select Yes for the
Generate DDL Execution Logs option if you
want execution audit information such as execution start time, end time,
and status of each SQL statement Run as part of the Model Upload
process. The execution log file is available under the
ftpshare/<INFODOM>/executionlogs folder.
- Select Yes for the
Refresh Session Parameters option to use
Database session parameters during the model upload process. For more
information, see Configuring Session Parameters section.
- Select Yes to directly update the
Alter constraints in NOVALIDATE State. During
the Incremental or Sliced Model Upload, alterations to the constraints
consume a lot of time as the constraints have to be validated.
- If you select Yes, an
option to alter the constraints in the NOVALIDATE state is
enabled and it will not check the existing data for the
integrity constraint violation. It is useful when the
existing data is clean. Therefore, NOVALIDATE potentially
reduces the additional overhead of the constraint validation
and enhances the performance.
- By default, the option selected is
No and the option to alter the
constraints is not enabled. It checks the existing data for
the integrity constraint violation.
Note:
Note the
following points about the NOVALIDATE option.
- Constraints in the NOVALIDATE state are
supported only in Incremental and Sliced modes.
- The Model Upload process, irrespective of
the status of success or failure, brings the constraints
into the NOVALIDATE state. Therefore, ENABLE VALIDATE
must be done as a post-model upload activity. That is,
Rollback does not validate the constraints that are
non-validated during the upload activity.
- The NOVALIDATE option is not relevant for
the HDFS systems.
- Click Upload Model.


