19.15 Adding and Configuring Case Type Attribute
This section describes how to add and configure Case Type Attribute.
- Define the type of attribute in the ATTRBT_TYPE_CD column. The
following types are available:
- Text box: Allows for string values
- Hierarchy: The field brings the data from
another table. The table it pulls from is defined
in Case Attribute Value (KDD_CASEATTRBT_VAL). In
this table, the following should be defined for
each hierarchy attribute. It is not possible at
this time to have nested hierarchy drop-downs.
- The first row defines the table where the values should be retrieved.
- The second row is the ID attribute
- The third row defines which column to show in the drop-down list
- The fourth row is a Yes/No values to define if the multiple select options should be shown for the drop-down.
- The fifth row is used to specify the filter (‘Where’ clause) for the table if any is needed.
- The sixth row is used to specify the order by attribute. If not specified, it orders the values based on the description or shown column (third-row value).
- Drop-down: This is used for defining a finite set of values that do not come from a table. The Case Attribute Value table is also used to define the list. For each attribute, there should be one row for each value in the drop-down. The Drop-down will always be single select.
- Date: The format of the date field is defined in the ATTRBT_DT_FRMT column of the table.
- Text area: Allows for text areas
- Check box: Allows for any number of values to be check-box options. The Case Attribute Value table is also used to define the list. For each attribute, there should be one row for each value that needs a check-box. Check-box attributes are multi-select
- Number: The number field automatically comes with the up/down arrows when displayed.
- Derived: This type allows you to derive the
attribute from information related to the case in
the case. Derived Attributes are only visible in
the Case Context Area of the case. They are not
shown on the Manual Case Creation page or the
search page (even if configured as such). They are
also read-only in format. Any value can be derived
as long as it can be obtained from the Case
ID.
Note:
If the attribute is mandatory for all case types, then the ATTRBT_MNDTRY_FL column is set to Y for that attribute.
- For Derived type attributes code, define the query that
retrieves the value. Enter the query into the ATTRBT_VAL
column of the KDD_CASEATTRBT_VAL table. Both request
and session parameters are supported. You can specify them
using the below
notation:
Request Parameter: @@ ParameterName@@ Session Parameter: ## ParameterName## - Define the behavior of each attribute that is how it behaves in
the UI need to be defined. Define this in Case Attribute
Behavior table KDD_CASEATTRBT_BHVR. Define the
following page codes in the PAGE_CD column for every
attribute:
- Case Designer: Controls the attribute’s behavior in Case Type Designer
- Create: Controls the attribute’s behavior in Manual Case Creation
- Modify: Controls the attribute’s behavior in the Case Context
- Operator: If the attribute is a number field this controls if there is an operator in the search field for this attribute. Currently available operators are Greater than Equal to, Less than Equal to, and Equal To.
- Search: Controls the attributes behavior in Case Search
- Define the behavior of each page code in the
ATTRBT_MODE_NBcolumn:
- Editable
- Disabled
- Hidden
- For derived type attributes, a record for each page code needs
to be added to the KDD_CASEATTRBT_BHVR table. You can
define the following modes:
- Case Designer
- Create
- Modify
- Operator
- Search
Adding and Configuring Search Attributes
You can customize new search attributes in ECM. The following types of Search Attributes are available based on its visibility:
There are the following two types of Search attributes:
- Generic Search Attribute
- Case Type Specific Search Attributes
- KDD_CASE_ATTRBT_VAL_MAP table (Pure Optional
Attribute):
This type of search attribute performs the search only on the optional attributes present in KDD_CASE_ATTRBT_VAL_MAP. Example: Risk Score.
- Searching on a field stored in any other table:
This type of search attribute performs the search on any table like KDD_CASES, KDD_- CASE_ACTIONS, or any other table which can be filtered based on join with KDD_CASES’s CASE_INTRL_ID column.
Generic Search Attribute
This type of search attribute implies to all Case Type. It will be available for all case types. It can be displayed in the Less Criteria Section/ More Criteria section. An example is Case Class or Case Created Date.
- Add the Search Attribute in the
simpleSearchAtrArrayfor the respective
Attribute ID. Enter the attribute ID in this array
in the order you want it to appear.
Figure 19-10 simpleSearchAtrArray attribute

- Add the search parameter passing code for
respective Attribute ID under
self.buttonClickSimpleSearchfunction.
Figure 19-11 self.buttonClickSimpleSearch

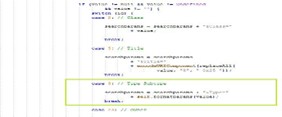
- Add the search parameter passing code for
respective Attribute ID under
self.buttonClickSearchfunction.
Figure 19-12 Search Parameter Passing Code
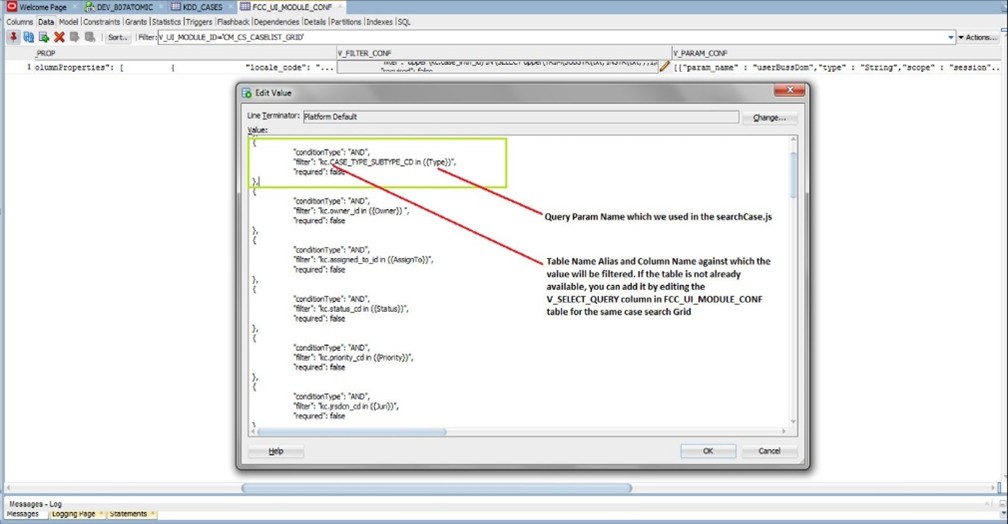
- Configure the search parameter in the
FCC_UI_MODULE_CONF table for
V_UI_MODULE_ID='CM_CS_CASELIST_GRID'. To configure,
the V_FILTER_CONF entry should be updated with the
JSON object for the new search parameter.
Figure 19-13 FCC_UI_MODULE_CONF table
Case Type Specific Search Attributes
This type of search attribute applies only to the Case Type to which it is associated. It will be shown only in the Optional Attribute Area in More Criteria Section and only when the user selects a Case Type. An example is Risk Score which is displayed when the KYC Case Type is selected.
- Add the Search Attribute in AdvSearchOrdrSrchArrayfor the
respective Attribute ID. Enter the attribute ID in this
array in the order you want it to appear.
Figure 19-14 AdvSearchOrdrSrchArray

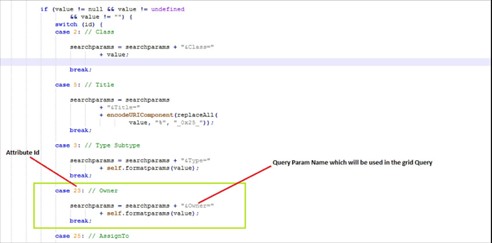
- Add the search parameter passing code for respective
AttributeIdunder
self.buttonClickSearchfunction.
Figure 19-15 self.buttonClickSearch
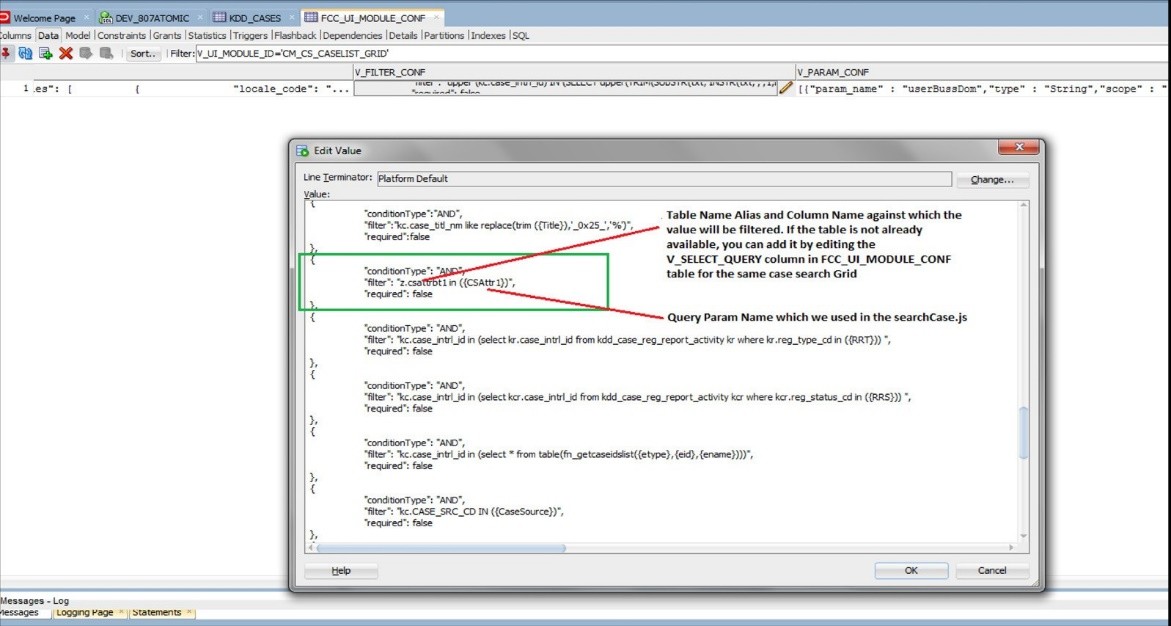
- Configure the search param in the FCC_UI_MODULE_CONF table for
V_UI_MODULE_ID='CM_CS_CASELIST_GRID.To configure, the
V_FILTER_CONF entry should be updated with the JSON object
for the new search parameter.
Figure 19-16 New search parameter

- Case type Specific Search Attribute whose search is based on the KDD_CASE_ATTRBT_VAL_MAP table, then no advanced configuration is required.
- Add the search param passing code for respective Attribute ID
underself.buttonClickSearch function.
Figure 19-17 Case Type Specific Search Attribute

- Configure the search param in the FCC_UI_MODULE_CONF table for
V_UI_MODULE_ID='CM_CS_CASELIST_GRID. To configure, the
V_FILTER_CONF entry should be updated with the JSON object
for the new search parameter.
Figure 19-18 Configure Search Parameter
Adding and Configuring Derived Attribute
You can define the attribute type as “Derived” which will display in the context area of Case Summary UI.
You can add attributes like Show Case Age, the Last Action Taken, Case Created By, Last Updated Date, Last System Added Event Date, Scenario to specific to Case context.
- Definethe basic attribute details in KDD_CASEATTRBT_MASTER with
type as “Derived”.
Figure 19-19 KDD_CASEATTRBT_MASTER

- Below is the request attribute passed as part of OOB to the
getCaseDetails Service: caseId (CaseId of the case whose
details page is currently accessed).
Figure 19-20 Request attribute passed as part of OOB

- Define the behavior of the attribute in the KDD_CASEATTRBT_BHVR
table:
Figure 19-21 KDD_CASEATTRBT_BHVR
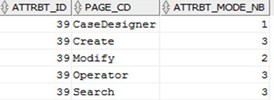
The derived attribute is supported only in Case Designer (for associating/Disassociating) the derived attributes to case types and in Case Details Page (Modify Page) for showing the derived attribute value. Derived Attributes are not displayed on the Create/Search page even if configured as visible in the KDD_CASEATTRBT_BHVR table. Also, Derived attributes will be displayed in a read-only format.
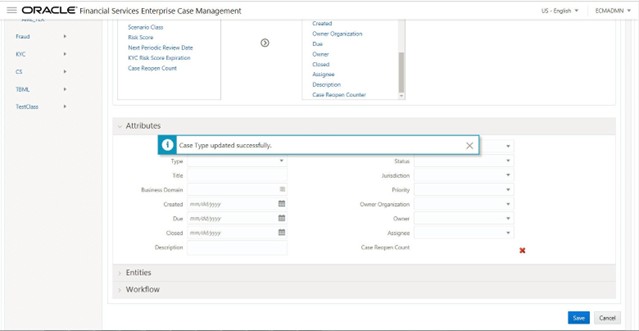
- Associate the newly created attribute to the
required case type using Case Designer UI.
Figure 19-22 Case Type updated successfully
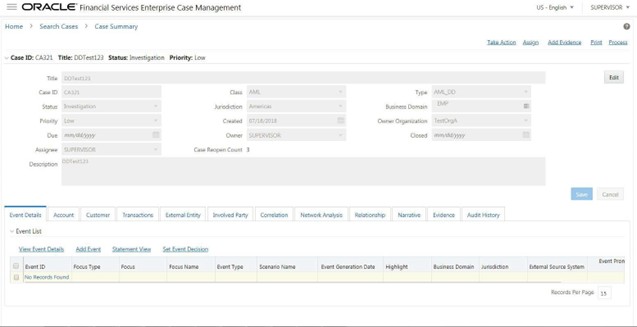
- Log in as a supervisor and check the Case details of the
respective case type for which you have added the derived
attribute.
Figure 19-23 Checking the Case details of the respective case type
Configuring the Case Title
During the Batch execution, all the cases will be updated with a common Case title (correlation rule name) thereby making it difficult to identify a case. To resolve this, you can update the values in the V_CASE_TITLE_RULE field of FCC_CORRELATION_RULE, and add a task manually before batch execution.
The value defined in this field will be populated on the UI after batch execution.
- Update the values in the V_CASE_TITLE_RULE field of
FCC_CORRELATION_RULE. For example, customerName,
eventType.
For more information on the FCC_CORRELATION_RULE table, see Configuring Correlation section.
For AML case type, the following attributes can be defined: AML: focusType, focusEntityName
For example, ACCOUNT-YUV: CUSTOMER-CUSTOMER_NAME: ACCOUNT-SAPNA GOBA: ACCOUNT-SMITH
For CS case type, the following attributes can be defined:
CS: customerName, eventType
For KYC case type, the following attributes can be defined:
KYC: customerName, kycRiskScore, jurisdiction, business Domain
- Create a task case title manually under BD_Create_Case/Create_Case process before batch execution.
- Navigate to Enterprise Case Management Application.
- Go to the Common task section. Select the Run Rule Framework.
- ClickProcess. The Process window is displayed with the
available Processes. Search for ‘Create process’. The list
of processes will be displayed.
Figure 19-24 BD_Create_Case process

- Select the BD_Create_Case and click
Edit.
Figure 19-25 Edit BD_Create_Case process
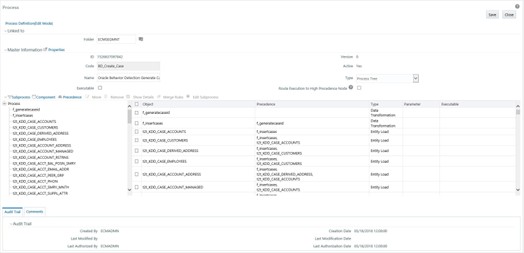
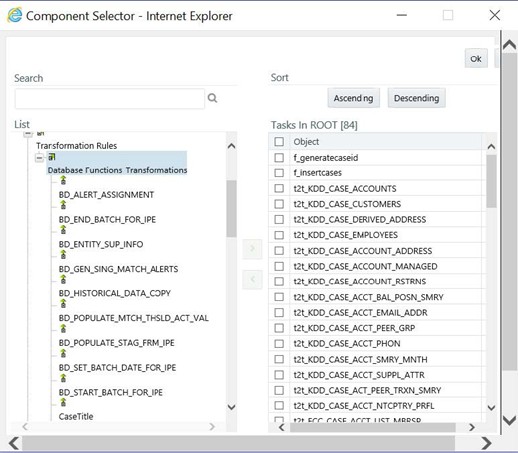
- ClickComponent.The Component Selector
window is displayed. Under Transformation
Rules, select CaseTitle and move it to the
task list.
Figure 19-26 CaseTitle Component
- Set the precedence of the task afterf_insertcases.
- Select the BD_Create_Case and click
Edit.
Configuring Case Title for Case Creation (Create Event and Promote to Case)
This feature is available only for AML, CS, and KYC_OB case types.
Case title can be configured for the API-created cases by configuring the required parameters available in the FCC_CORRELATION_RULE table before Case Creation API execution.
The value defined in this field will be populated on the UI after Case Creation API execution.
- In the FCC_CORRELATION_RULE table, go to the
required N_CORRELATION_RULE_SKEY, and update the values
under the V_CASE_TITLE_RULE field.
For example:
N_CORRELATION_RULE_SKEY = 21
V_RULE_NAME = AML_Events_Processing_Rule
V_CASE_TITLE_RULE = AML:focusType,focusEntityName
For more information, see Configuring the Case Title.
For KYC OB cases, the values are as follows:
N_CORRELATION_RULE_SKEY = 18 (KYC_OB case type)
V_RULE_NAME = Events_Assessment_Rule
V_CASE_TITLE_RULE = KYC:customerName,kycRiskScore,jurisdiction,businessDomain
For CS cases, the values are as follows:
N_CORRELATION_RULE_SKEY = 12 (CS_RT_SAN case type)
V_RULE_NAME = RT Screening rule - SAN
V_CASE_TITLE_RULE =
For more information on API services, see the Create Event and Promote to Case section in OFS ECM API and Services.