Entering Data in a CRF
All CRFs, whether empty or entered, already contain basic information such as the study, site, patient, CRF name, and investigator name. You must enter responses to the remaining questions in the CRF. You enter your responses into the appropriate field.
For more information, see:
- Standard Text Fields versus Extended Text Fields
- Entering Data in a Standard Text Field
- Entering Data in an Extended Text Field
- Selecting Data from a List of Acceptable Values
- Entering Dates
- Processing Validation Errors During Initial Data Entry
- Adding and Updating an Investigator Comment
- Changing Your Preferences for Data Entry
- Viewing CRF and Field Help Customized by Your Sponsor
Parent topic: Entering and Updating Patient Data
Standard Text Fields versus Extended Text Fields
A CRF can have one or more fields into which you insert data. When designing the layout and format of a CRF, your sponsor can define the field as a standard text field or as an extended text field. In addition, your sponsor can define the maximum number of characters allowed in the field.
- A standard text field can have up to 200 characters. Most fields in a CRF are standard text fields.
- An extended text field can have up to 10,000 characters. In an extended text field, you can enter lengthy comments and narratives, such as patient case history or serious adverse events.
The following privileges apply to both standard text fields and extended text fields:
- If you have browse-only privileges, you can view but not edit the data.
- If you have update privileges, you can view and modify the data.
For more information, see:
- Yellow Note Icon Indicates an Extended Text Field in the CRF
- ATTACHMENT Prefix Indicates Extended Text Fields
Parent topic: Entering Data in a CRF
Yellow Note Icon Indicates an Extended Text Field in the CRF
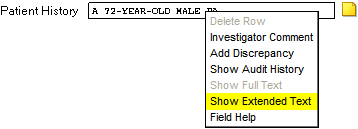
When you open a CRF in the Data Entry window, RDC Onsite indicates an extended text field by displaying a yellow note icon to the right of the field. See Figure 3-2.
RDC Onsite always displays the Extended Text icon regardless of whether the field has any data. Once the field has data, the Data Entry window displays the beginning of your extended text followed by the ellipsis (…) character.
To view all the data associated with an extended text field, click the Extended Text icon (that is, the yellow note) to open the Show Extended Text dialog box. Alternatively, you can double-click in the field or use the right-click menu to open the Show Extended Text dialog box.
Note:
You can use double-click or right-click on all supported devices except for iPad.Figure 3-2 Extended Text Field in the RDC Onsite Data Entry Window
Parent topic: Standard Text Fields versus Extended Text Fields
ATTACHMENT Prefix Indicates Extended Text Fields
In the Audit History pane, the Discrepancies Details pane, and the Patient Data Reports, RDC Onsite uses the following prefix to indicate that the value is an extended text value:
ATTACHMENT V <X.Y>:
where X is the version number and Y is the sub-version number. The system increments these numbers each time the data in an extended text field is saved.
After the ATTACHMENT prefix, RDC Onsite adds the beginning of your extended text followed by the ellipsis (…) character. For example:
ATTACHMENT V<1.1>: A 21-year-old woman presented…
Parent topic: Standard Text Fields versus Extended Text Fields
Entering Data in a Standard Text Field
To enter data in a standard text field in a CRF:
- Open a CRF in the Data Entry window.
- Click a standard text field. Ensure that the cursor is in the correct field. Alternatively, use the Tab key to move from field to field.
- Enter data in the field.
- Tab or mouse-click from the field after adding or changing a value. RDC Onsite then performs a field-level validation.
The data you entered may fail a validation check and raise an error. To resolve a validation error, see Processing Validation Errors During Initial Data Entry.
See also:
Displaying the Full Text of a Standard Text Field
A standard text field may contain more information than can be displayed in the space defined on the CRF.
To view the complete text for a standard text field, you can:
- Press the left and right arrow keys to scroll through the text.
- Double-click the standard text field. The Show Full Text dialog box displays the complete text.
-
Right-click the standard text field and select Show Full Text from the menu. The Show Full Text dialog box displays the complete text.
Note:
You can use double-click or right-click on all supported devices except for iPad.
You can edit text in the Show Full Text dialog box under the following circumstances:
- You have update privileges.
- The field is not display-only.
- The form is not being updated by another user.
- The patient data is not frozen.
- The CRF is unlocked. But if locked, you have update privileges to the CRF or privileged update.
After you modify text in the Show Full Text dialog box, you can either click OK for RDC Onsite to accept your changes, or click Cancel to close the dialog box without keeping your changes.
Parent topic: Entering Data in a Standard Text Field
Entering Data in an Extended Text Field
In an extended text field, you can enter lengthy comments and narratives, such as patient case history or serious adverse events.
For more information, see:
- Opening the Show Extended Text Dialog Box
- Viewing or Entering Data in an Extended Text Field
- Keys for Entering Data in the Show Extended Text Dialog Box
- Using Special Characters and Advanced Formatting in Extended Text Fields
Parent topic: Entering Data in a CRF
Opening the Show Extended Text Dialog Box
Before you can enter or update data for an extended text field, you must open the Show Extended Text dialog box. You cannot make changes directly in an extended text field in the Data Entry window.
To open the Show Extended Text dialog box, you can:
- Click the Extended Text icon next to the field.
- Double-click the extended text field.
-
Right-click the extended text field and select Show Extended Text from the menu.

Note:
You can use double-click or right-click on all supported devices except for iPad.
Parent topic: Entering Data in an Extended Text Field
Viewing or Entering Data in an Extended Text Field
To view or enter data in an extended text field:
Parent topic: Entering Data in an Extended Text Field
Keys for Entering Data in the Show Extended Text Dialog Box
Table 3-1 lists several keys that are useful for entering data in the Show Extended Text dialog box.
Table 3-1 Keys for Entering Data in the Show Extended Dialog Box
| Key | Description |
|---|---|
|
Backspace |
Delete the previous character |
|
Ctrl + A |
Select all text in the dialog box |
|
Ctrl + C |
Copy text |
|
Ctrl + V |
Paste Text |
|
Ctrl + X |
Cut text |
|
Delete |
Delete the next character |
|
End |
Move the cursor to the end of the line |
|
Enter |
Insert a line break |
|
Page Up |
Move the cursor to the start of the text |
|
Page Down |
Move the cursor to the end of the text |
|
Tab |
Move the cursor to the OK and then the Cancel button in the dialog box |
Note:
You can use combinations of keys including Ctrl on all supported devices except for iPad.Parent topic: Entering Data in an Extended Text Field
Using Special Characters and Advanced Formatting in Extended Text Fields
Like all dialog boxes, the Show Extended Text dialog box supports a simple text editor that you use to enter and edit plain text. You can enter standard keyboard alphanumeric characters, punctuation marks, and spaces. However, extended text fields:
- Do not support special characters such as symbols, dingbats, accented letters, and ALT characters. Special characters might not display properly in all areas of the RDC Onsite application.
- Do not support advanced formatting such as font sizes and styles, alignment, automatic line spacing, automatic numbered or bulleted lists, indents, and tables. If you copy text from a document processing application, such as Microsoft Word, RDC Onsite ignores all advanced formatting.
Keep formatting plain. Use spaces to create indents; use the Enter key to create blank lines.
Parent topic: Entering Data in an Extended Text Field
Selecting Data from a List of Acceptable Values
When defining the study database protocol, the sponsor specifies a list of acceptable values for some fields.
To select a value from a pre-defined list:
- Click any header or response field. If a list of values has been defined for the selected field, a magnifying glass icon appears.
-
Click the Magnifying Glass icon to open a dialog box and view the list of possible values for the field. Alternatively, you can press Alt+L.

- Select a value from the list. Use the scroll bar to scroll through the list if necessary. You can also press the up and down arrow keys on the keyboard.
- Click OK. RDC Onsite inserts your selected value into the field. (The selected value may appear abbreviated in the field.)
Parent topic: Entering Data in a CRF
Entering Dates
To enter a date, click the Calendar icon beside a date field, and then select a date from the calendar.
Keyboard shortcuts for dates are also available in RDC Onsite. To use them, place your cursor inside a date field and press one of the following keys, as needed:
- L — Populates the field with the date that was last entered in the current session.
- T — Populates the field with today's date.
- Y — Populates the field with yesterday's date.
Parent topic: Entering Data in a CRF
Processing Validation Errors During Initial Data Entry
Your sponsor defines rules your data entries must meet. For example, you cannot enter a numeral in a field defined as requiring characters. Or, you cannot enter characters in a defined date field that requires numerals. If you enter data that conflicts with defined validation rules, RDC Onsite alerts you accordingly with a Validation Error dialog box.
To process a Validation Error, check that your entered data matches the source data and:
- Enter an explanatory comment if you want.
- Click OK if the entered data is correct. The Validation Error dialog box closes. You can resume data entry.
- Click Cancel if the entered data is incorrect or you want to navigate back to the response field. The Validation Error dialog box closes. RDC Onsite returns the previously saved values to the response field that generated the error.
Note:
Your configuration may suppress the Validation Error dialog box from appearing during data entry or update. In that case, you must deal with discrepancies later.
If the Highlight field in the toolbar is set to Active Discrepancies or Active and Other Discrepancies, you see discrepant responses highlighted in red. See Managing Discrepancies for more information routing and resolving discrepancies.
Parent topic: Entering Data in a CRF
Adding and Updating an Investigator Comment
When you are entering or updating the patient data in a CRF, you may want to add an investigator comment to the response.
You can add and update investigator comments from the Data Entry window only. In addition, you can perform these actions only if you have update privileges and if your sponsor has configured RDC Onsite to allow it.
The process to add or update an investigator comment is similar. When you create an investigator comment, RDC Onsite displays an Add Investigator Comment dialog box. If you reopen a saved investigator comment, RDC Onsite displays an Update Investigator Comment dialog box.
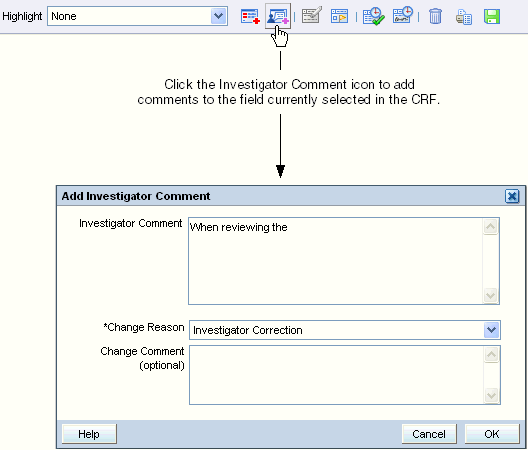
To add an investigator comment to a field in the CRF:
- Open the CRF in the Data Entry window.
-
Position the cursor in the field you want to add the investigator comment to, and then click the Investigator Comment icon in the toolbar.
Alternatively, you can right-click a field in the CRF, and then select Investigator Comment from the menu.

- Add text in the Investigator Comment field.
-
Click the Change Reason field, and then select an explanation for this change from the list. Note that:
- If the CRF status is Saved Complete, and you add an investigator comment, you may or may not need to provide a change reason as configured by your sponsor.
- If the CRF status is Saved Incomplete, you are not required to specify a change reason when you add or update an investigator comment.
- If you modify a previously saved investigator comment, you must enter a change reason.
- Click the Change Comment field if you want to provide any additional information about your changes or comments.
- Click OK to save your changes and add the investigator comment.
See Reviewing Investigator Comments for more information on reviewing investigator comments in the Data Entry window and on working with the Review Investigator Comments page.
Parent topic: Entering Data in a CRF
Changing Your Preferences for Data Entry
The Data Entry window may display a Preferences link if your sponsor choose to include the link when installing the RDC Onsite application.
If the Preferences link is available, you can customize whether RDC Onsite:
- Gives you a choice to save the CRF as complete or incomplete
- Alerts you if a validation error occurs during data entry or update
To set your preferences for data entry:
- Open the Data Entry window.
-
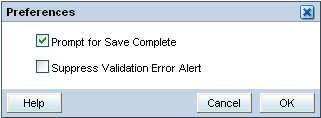
Click the Preferences link at the top of the window. The Preferences dialog box opens:

-
Select the appropriate check boxes to set your preferences for data entry.
-
If the Prompt for Save Complete check box is selected and you save a CRF, RDC Onsite prompts if you want to save the CRF as complete or incomplete.
When you save a CRF as incomplete, its status is Entry Started. By saving a CRF as incomplete, you can:
- Save data without raising system-generated discrepancies.
- Continue data entry in the same CRF later, without being prompted for a change reason on every field input.
If not selected, RDC Onsite does not prompt you with a choice of saving the CRF as complete or incomplete.
-
If the Suppress Validation Error Alert check box is not selected, RDC Onsite alerts you to possible validation errors that occur during data entry or data update. You then have the opportunity to correct the data before continuing to the next field.
If selected, RDC Onsite suppresses the error message. RDC Onsite creates a discrepancy when the validation error occurs, but does not alert you to the problem.
-
- Click OK to confirm your choices.
Parent topic: Entering Data in a CRF
Viewing CRF and Field Help Customized by Your Sponsor
The content, format, and layout of CRFs used in a clinical trial vary from study to study. The information requested on each form may be unique to your study. In addition, you may need help with the type of information required in a field or have questions about a particular field.
When setting up the RDC Onsite application, your sponsor has the option of creating help information for a CRF and for each data entry field in a CRF. You can then open and view this information when you are entering or updating the data in a CRF.
![]() To view customized help for the CRF, click the Help icon in the toolbar in the Data Entry window. This icon appears only if your sponsor provided help text for the CRF.
To view customized help for the CRF, click the Help icon in the toolbar in the Data Entry window. This icon appears only if your sponsor provided help text for the CRF.
To view customized help text for a data entry field in a CRF:
- Open a CRF in the Data Entry window.
- Right-click a field in the CRF and then select Field Help from the menu. The Oracle Clinical Data Collection Help dialog box displays help text for the question group, help text for the question (that is, the field you selected), and details about how the field is defined in the Oracle Clinical database.
Note:
If visible to you, the Help from the browser toolbar or main menu provides information on browser related issues. It is not the RDC Onsite Online Help that appears within the application.Parent topic: Entering Data in a CRF