Updating Existing Data in a CRF
To update the existing data in a CRF, you can use any RDC Onsite page that displays CRF icons: Casebooks, Review CRFs, Review Discrepancies, and Review Investigator Comments pages. You can update data in a CRF by selecting the CRF icon for the patient, visit, and CRF you want to update.
To update a response in a CRF:
- Open a CRF in the Data Entry window.
- Select a response field.
- Change the value of the response.
-
Navigate to another field. Depending on the CRF status, RDC Onsite processes your change as follows:
-
For a CRF status of Entry Started (the CRF was previously saved incomplete):
- If the entry you recorded is valid, the system accepts the update.
- If your response evokes a validation error, the Validation Error dialog box opens. See Processing Validation Errors During Initial Data Entry for information.
-
For a CRF status of Entry Complete:
- If the entry you recorded is valid, the Reason for Change dialog box opens. See Specifying the Reason for Changing a Data Value for details.
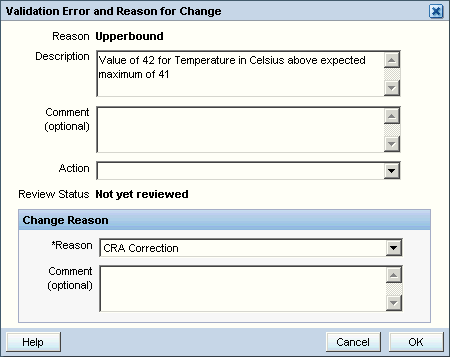
- If your response evokes a validation error, a change reason is also generally required for the update. In this case, a combination Validation Error and Reason for Change dialog box opens. See Processing Validation Errors During Data Update for more information.
-
- Click Save to save all pending CRF changes.
For more information, see:
Parent topic: Entering and Updating Patient Data
Specifying the Reason for Changing a Data Value
When you update a CRF previously saved as complete (Entry Complete status), RDC Onsite opens a Reason for Change dialog box.
To enter a reason why you changed a value on the CRF:
- Click the Reason field and select an explanation from the list. The Reason field is a mandatory field.
- Click the Comment field and enter additional information about why the value was changed.
- Click OK to process your changes.
If the CRF was saved as incomplete (Entry Started status), you do not have to provide a change reason.
Parent topic: Updating Existing Data in a CRF
Processing Validation Errors During Data Update
When a validation error occurs during a data update, RDC Onsite displays a combination Validation Error and Reason for Change dialog box.
This dialog box lets you acknowledge that the current value of the response field raised a discrepancy. In addition, and perhaps more importantly, you can use the dialog box to take immediate action on the discrepancy.

To respond to the validation error, select one of the following actions:
Revising Discrepant Data
The system lists the discrepant response in the Description field of the Validation Error and Reason for Change dialog box.
To revise data in the discrepant response field:
- Click Cancel. The system closes the dialog box, deletes the discrepant response value, rolls back previously entered data, if any, and returns focus to the response field.
- Revise the discrepant entry.
- Continue to the next field.
Parent topic: Processing Validation Errors During Data Update
Allowing Discrepant Data
If you feel that the entered data is correct, complete the Validation Error and Reason for Change dialog box as follows:
- Review the Error Message. Ensure it has relevant information about the data entered.
- Enter a comment in the Comment text box.
- Select a Change Reason from the drop-down list provided in the Reason field. RDC Onsite also allows for user-supplied change reasons.
- Enter an explanatory comment in the Comment field of the Change Reason section, if you want. The OK button becomes active.
- Click OK. The dialog box closes and RDC Onsite moves the cursor to the next response field.
See Changing Your Preferences for Data Entry for information on disabling validation error messages.
Parent topic: Processing Validation Errors During Data Update