Removing Data from a CRF
During a clinical study, patient events may occur that require CRF sections to be marked as blank or to be deleted.
For more information, see:
Parent topic: Entering and Updating Patient Data
Marking a CRF or CRF Section as Blank
In certain circumstances, you may need to mark a CRF as intentionally blank; for example, if a patient fails to appear for a scheduled visit. When you mark a CRF or a CRF section as blank, its information becomes inaccessible and the section is grayed out. You can mark a CRF as blank only if you have update privileges.
Note:
You cannot mark a CRF or a CRF section as blank when:
- The CRF status is Pass 2 Started, Pass 2 Pending, Pass 2 Complete, or Batch Loaded.
- The CRF is opened in browse-only mode.
For the CRF currently displayed in the Data Entry window, you can mark a CRF or CRF section blank by:
- Clicking the Blank Flag Icon
- Selecting the Blank Flag Check Box in the CRF
- Changing Between Blank and Non-blank Status
Parent topic: Removing Data from a CRF
Clicking the Blank Flag Icon
To use the Blank Flag icon to mark a CRF as blank:
Parent topic: Marking a CRF or CRF Section as Blank
Selecting the Blank Flag Check Box in the CRF
Depending upon the design of the CRFs you use, select the Blank Flag check box in the CRF header or CRF section header. The Blank Flag check box option may not be available to you.
To use the Blank Flag check box to mark CRFs as blank:
- Click the CRF or CRF section.
-
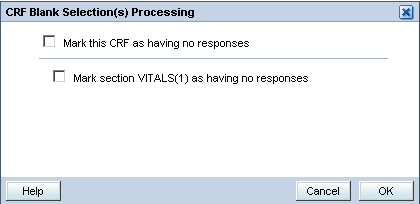
Select the Blank Flag check box in either the CRF header or CRF section header. A CRF Blank Selection(s) Processing dialog box appears with these choices:
- Mark entire CRF as having no responses.
- Mark section n as having no responses. The system lists each section separately.
RDC Onsite grays out the CRF or the CRF section that you marked blank. If the marked section contains data, the data remains visible but cannot be modified.
Parent topic: Marking a CRF or CRF Section as Blank
Changing Between Blank and Non-blank Status
If you mark a CRF or CRF section blank, and then unmark and save the CRF, the previous values appear in the CRF without being grayed out.
To enter or modify data after marking a section blank:
- Open the CRF that you marked blank in a Data Entry window.
- Click the CRF or CRF section.
- Deselect the Blank Flag check box.
If a CRF of status Entry Complete was marked blank (sectionally or fully), and you undo the blank selection, you must provide a change reason.
When you save changes after marking the CRF or a CRF section as blank, RDC Onsite deletes any existing responses in the marked sections or CRF. However, header field information is maintained.
Parent topic: Marking a CRF or CRF Section as Blank
Deleting a Row from a Repeating Question Group
The response fields of a repeating question group appear in many rows in the CRF. If necessary, you can delete a row from a repeating question group from within the CRF in the Data Entry window.
To delete a row, you can:
- Right-click a field in the row and select Delete Row from the menu.
- Click a field in the row and then click the Delete Row icon in the Data Entry window toolbar.
If the CRF status is Entry Complete, RDC Onsite prompts you for a change reason.
Parent topic: Removing Data from a CRF
Deleting a CRF
You can delete a CRF only under certain circumstances. You can delete a CRF even if changes to it are pending.
You cannot delete a CRF if:
- Your sponsor has disabled the Delete CRF icon.
- You do not have update or batch update privileges
- The CRF is locked and you do not have the privileges to work with locked CRFs.
- The CRF data is frozen.
- The CRF is being updated by another user.
To delete a CRF:
Parent topic: Removing Data from a CRF
