Configuring the DCI Form Runtime Settings
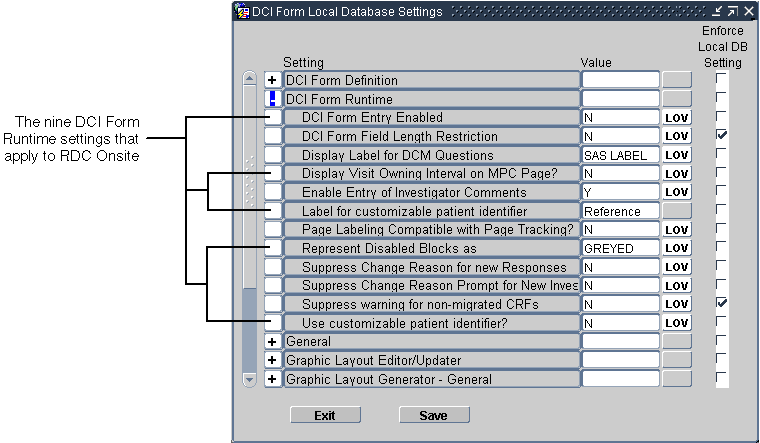
The DCI Form Runtime settings let you customize the RDC application.
In Oracle Clinical, you can configure the DCI Form Runtime settings at the database level or at the study level.
At the database level, the DCI Form Runtime settings define the default values when a new study is created. For each setting, you can choose to enforce the default value across all studies in the database or allow modification at the study level. You define the default values in the DCI Form Local Database Settings form.
For more information, see:
- Defining the DCI Form Runtime Settings at the Database Level
- Defining Report Settings at the Study Level
- Enabling HTML Data Entry for RDC
- Displaying the Visit-Owning Interval on the Casebooks Page
- Allowing Investigator Comments
- Adding a Customized Reference Field to the Search Pane
- Controlling the Display of Conditional Blocks within a CRF
- Suppressing Prompts and Warnings
Parent topic: Customizing Data Entry Behavior
Defining the DCI Form Runtime Settings at the Database Level
To define the DCI Form Runtime settings at the database level:
- Open Oracle Clinical.
- Navigate to Admin and select DCI Form Local Database Settings.
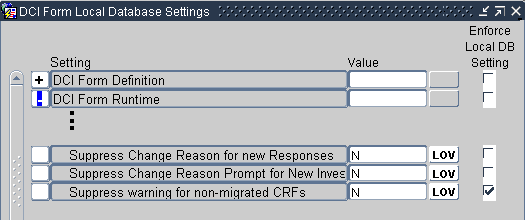
- Expand the DCI Form Runtime node. See the image below:

- Change the value of the settings you want. The sections that follow provide provide more information about each setting.
- Select the Enforce Local DB Setting check box to always use this value as
the default value.
If not selected, a user who has privileges to the DCI Form Study Database Settings form at the study level can override the default values.
Note:
The Enforce Local DB Setting check box is always selected for the Suppress warning for non-migrated CRFs setting because you cannot change its value at the study level. - Save your changes.
Parent topic: Configuring the DCI Form Runtime Settings
Defining Report Settings at the Study Level
To define the DCI Form Runtime settings at the study level:
- Open Oracle Clinical.
- Navigate to Design and select DCI Form Local Study Settings.
- Expand the DCI Form Runtime node.
- Deselect the Inherit From Local DB Setting check box for any value you want to change.
- Change the value of the settings you want. The sections that follow provide more information about each setting.
- Save your changes.
Parent topic: Configuring the DCI Form Runtime Settings
Enabling HTML Data Entry for RDC
To allow RDC to collect data by presenting HTML forms to the user, you must configure the correct settings in Oracle Clinical. You enable data entry with DCI Forms at the study level. If you do not enable this setting, RDC does not display the study to the user.
To enable a study to use HTML data entry:
- Open Oracle Clinical.
- Navigate to Conduct, Security, and then select Clinical Study States.
- Query for your study.
- Select the study from the results of your query.
- Enable the DCI Forms Entry Enabled? check box.
- Save your changes.
Note:
The DCI Forms Definition Enabled? setting, which is also in the Clinical Study States form, controls the ability to define DCI Forms for the selected study.Parent topic: Configuring the DCI Form Runtime Settings
Displaying the Visit-Owning Interval on the Casebooks Page
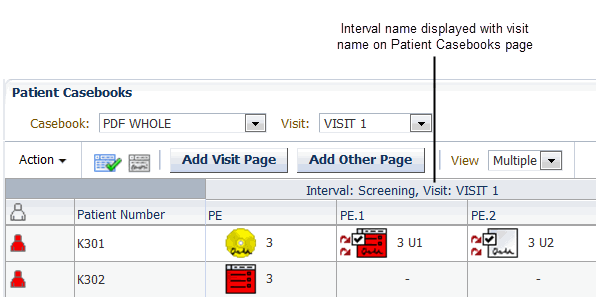
Use the Display Visit Owning Interval on MPC Page? setting to customize the spreadsheet heading on the RDC Casebooks page.
- If set to Y, the spreadsheet heading on the Casebooks page displays the name
of the interval — phase, period, or subperiod — along with the name of the
current visit.

- If set to N, the spreadsheet heading on the Casebooks page displays only the name of the current visit. The default value is N.
Parent topic: Configuring the DCI Form Runtime Settings
Allowing Investigator Comments
Use the Enable Entry of Investigator Comments setting to specify whether the RDC application allows users to enter and update investigator comments.
- If set to Y, RDC allows the entry of investigator comments. Users with UPDATE privileges can add investigator comments to a response field and update existing investigator comments. All users can review investigator comments in the Data Entry window and on the Review Investigator Comments page.
- If set to N, RDC does not allow the entry of any investigator comments by any user, regardless of privileges.
Parent topic: Configuring the DCI Form Runtime Settings
Adding a Customized Reference Field to the Search Pane
You can customize the RDC application to include an additional patient-level search field on the Home page and the Casebooks page.
This patient attribute field:
- Lets you search for a particular patient or a set of patients based on the contents of the field
- Can be up to 25 alphabetic, numeric, and special characters
- Supports wildcard searches (%)
To configure the customized field, you need to:
- Specify values for two DCI Form Runtime settings that define a label for the field and enable the customized field
- Write a procedure to populate the Patient Positions table with the user-entered value
For more information, see:
- Searching and Viewing Enhancements for the Customized Field
- Labeling and Enabling Your Customized Search Field
- Writing the Derivation Procedure to Use Your Customized Field
Parent topic: Configuring the DCI Form Runtime Settings
Searching and Viewing Enhancements for the Customized Field
If you define and enable the custom field, RDC adds the following search and view enhancements to display the patient data associated with your customized field:
- Searching enhancements
- RDC adds your customized field to the Patient Search pane on the Home page and to the Search pane on the Casebooks page.
- When you specify search information in the field, the search runs against the Reported Patient Reference field in the Patient Positions table.
- The customized field supports wildcard searches (%).
- Viewing enhancements
- On the Home page, RDC adds a column to the Patient List and populates the column with the information defined in the Reported Patient Reference field in the Patient Positions table. The column heading uses the same name as the label you defined for your customized field.
- On the Casebooks page, you can position the cursor over the patient icon or the patient number to reveal the data associated with your customized field.
- On the Review CRFs page, Review Discrepancies page, and Review Investigator Comments page, you can position the cursor over the patient number to reveal the data associated with your customized field.
Parent topic: Adding a Customized Reference Field to the Search Pane
Labeling and Enabling Your Customized Search Field
To change the label (or name) of your customized search field, and to enable the field, use the following DCI Form Runtime settings:
- Label for customizable patient identifier — Specifies the text that labels the field. RDC uses this label for the additional search field displayed on the Home page and the Casebooks page, and as the column heading in the Patient List on the Home page. The default value is Reference.
- Use customizable patient identifier? — Defines whether to show or hide your customized search field. If set to Y, RDC enables your customized field, and adds searching and viewing enhancements to the application pages. If set to N, no changes occur in the RDC application. The default value is N.
You can set the default values at the database level, and then change the setting as needed at the study level.
Parent topic: Adding a Customized Reference Field to the Search Pane
Writing the Derivation Procedure to Use Your Customized Field
Your customized patient-level search field on the Home page and the Casebooks page lets RDC users search for a patient based upon the Reported Patient Reference value stored in the Patient Positions table.
To support population of the field, the ocl_utils.update_pat procedure includes an optional parameter (vRepPatRef), which allows the Reported Patient Reference value in the Patient Positions table (rxa_des.patient_position) to be updated.
To populate your customized field:
- Write a procedure that will be triggered by a DCM of your choosing, such that when the response is entered, the Reported Patient Reference field in the Patient Positions table is populated with a value determined by your procedure.
- Define your procedure to call the ocl_utils.update_pat procedure to update the
Patient Positions table. The ocl_utils.update_pat package includes an optional
parameter (vRepPatRef) for the customized Reported Patient Reference field.
If you do not want to change a particular field value for the patient, use rxcpdstd.patients_rec.field-name as a value for that parameter.
The following table describes the parameters in the ocl_utils.update_pat procedure:
| Parameter | Description | Example Values (assuming alias for DCM Question Group is d) |
|---|---|---|
|
vMode |
|
rxcpdstd.v_mode |
|
npatpos |
ID for the patient that should be updated |
rxcpdstd.patients_rec.patient_position_id |
|
vSex |
Value to use to update patient's gender:
|
rxcpdstd.patients_rec.reported_sex or d.sex |
|
vbirthdate |
Value to use to update patient's date of birth |
rxcpdstd.patients_rec.reported_birth_date or d.birthdate |
|
vinits |
Value to use to update patient's initials |
rxcpdstd.patients_rec.reported_initials or d.inits |
|
vRepPatRef |
Value to use to update the patient attribute; the value must be 25 characters or less |
rxcpdstd.patients_rec.reported_patient_reference or d.reportedPatientRef Note: This parameter, which is new with this version of the ocl_utils.update_pat procedure, is optional. Therefore, if you have used previous versions, your existing procedures will continue to work. |
For example, you can add the following lines to your procedure to update the patient reference using the d.reportedPatientRef question without updating the other values for the patient:
ocl_utils.update_pat (
  rxcpdstd.v_mode,
  rxcpdstd.patients_rec.patient_position_id,
  rxcpdstd.patients_rec.reported_sex,
  rxcpdstd.patients_rec.reported_birth_date,
  rxcpdstd.patients_rec.reported_initials,
d.reportedPatientRef)
Parent topic: Adding a Customized Reference Field to the Search Pane
Controlling the Display of Conditional Blocks within a CRF
When defining the questions for a CRF (that is, DCM questions), you can associate one or more conditions with a question. You can define a data response value so that when the user enters that value, other questions and fields become active, and the cursor automatically moves to a specified question within the same CRF. This action is called conditional branching.
With conditional branching, you can define a path through the CRF based on the responses enter. For example, you can use conditional branching to bypass pregnancy-specific questions if the patient is male.
You can the Represent Disabled Blocks As setting to control how RDC displays the conditional blocks within a CRF. You can choose one of the following options:
- Select Greyed if you want RDC to gray out the section in the CRF with the conditional questions. In this case, the user can see the section, but the questions remain disabled until a response value triggers the condition defined for the source question.
- Select Hidden if you want RDC to completely hide the section in the CRF with
the conditional questions. The next expected questions, if any, are displayed in
the same area, so there is no empty space. The section remains hidden until a
response value triggers the condition defined for the source question.
For multi-page CRFs, RDC preserves the locations of page breaks relative to the questions in the form. Therefore, when conditional blocks are hidden, questions from the next CRF page are not moved to fill the resulting additional blank space on the page.
Parent topic: Configuring the DCI Form Runtime Settings
Suppressing Prompts and Warnings
You can use the DCI Form Runtime settings to suppress the:
- Change reason prompt for new responses
- Change reason prompt for new investigator comments
- Warning for non-migrated CRFs

For more information, see:
- Suppressing the Change Reason Prompt for New Responses
- Suppressing the Change Reason Prompt for Investigator Comments
- Suppressing the Warning for Non-migrated CRFs
Parent topic: Configuring the DCI Form Runtime Settings
Suppressing the Change Reason Prompt for New Responses
By default, RDC requires users to specify a change reason whenever they update any data in a CRF previously saved complete. Updating data includes adding new responses, modifying existing responses, and deleting responses.
If the Suppress Change Reason for New Responses setting is Y, RDC does not prompt users for a change reason when they add a new response (that is, a response entered for the first time) to a CRF previously saved complete. RDC automatically saves the change reason as RESP_ADDED.
Note that RDC considers a response to be new only if:
- The response value is null.
- The response has no audit history.
The existence of an investigator comment or any investigator comment history does not factor into the audit history of a response. If a response is null and has always been null but has an investigator comment, the response is still considered new (that is, being entered for the first time).
You can suppress the change reason prompt when the user updates RDCI comments in accessible documents. For more information, see Making a Reason for Change Optional for Updates to RDCI Comments in Accessible Documents
Parent topic: Suppressing Prompts and Warnings
Suppressing the Change Reason Prompt for Investigator Comments
If the Suppress Change Reason Prompt for New Investigator Comment setting is Y, RDC does not prompt investigators for a change reason the first time they enter a comment on a particular response.
Parent topic: Suppressing Prompts and Warnings
Suppressing the Warning for Non-migrated CRFs
Use the Suppress Warning for Non-migrated CRFs setting to control whether RDC displays a warning message when the user opens a non-migrated CRF.
The Allow HTML Data Entry for Non-migrated CRFs configuration setting controls whether RDC users are able to open and update CRFs that were entered via batch load operation, Oracle Clinical data entry, or RDC Classic data entry, and you choose NOT to migrate those CRFs to DCI Forms.
The Suppress Warning for Non-migrated CRFs setting has meaning only if you allow data entry for non-migrated CRFs:
- If the Allow HTML Data Entry for Non-migrated CRFs configuration setting is set to Y and the Suppress Warning for Non-migrated CRFs setting is set Y, RDC does not display a warning message when the user opens a non-migrated CRF.
- If the Allow HTML Data Entry for Non-migrated CRFs configuration setting is set to Y and the Suppress Warning for Non-migrated CRFs setting is set N, RDC displays a message that the data in the CRF was originally entered using another interface.
See Allowing Access to CRFs Entered via Oracle Clinical for more information on allowing data entry for non-migrated CRFs.
Parent topic: Suppressing Prompts and Warnings