Configuration Settings for RDC
The RDC Configurations form has many settings. This section describes only the settings applicable to RDC. See the Configuration Settings Applicable to RDC table below:
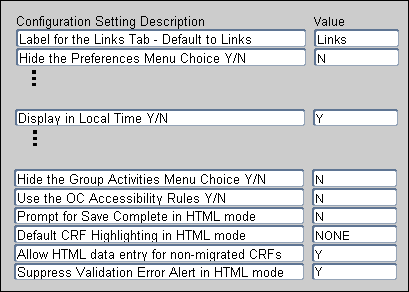
For more information, see:
- Customizing the Label for the Links Section on the Home Page
- Hiding the Preferences Links
- Displaying Time Stamps in Local Time
- Allowing CRF Group Actions
- Using the Oracle Clinical Accessibility Rules
- Disabling the Save Complete Prompt
- Specifying a Default Highlighting Scheme for the Data Entry Window
- Allowing Access to CRFs Entered via Oracle Clinical
- Suppressing the Validation Error Alert
Parent topic: Customizing with RDC Configurations
Customizing the Label for the Links Section on the Home Page
The Label for the Links Tab configuration setting lets you customize the title of the Links section on the Home page. For example, you may want to change the title to More Study Information or Helpful Web Sites.

You can enter any combination of alphabetic, numeric, and special characters for the title. If you do not specify a value, RDC uses Links.
In addition, you can configure and customize the links that display in the Links section by using the Maintain Links form in the RDC Administration application. See Configuring Links for more information.
Parent topic: Configuration Settings for RDC
Hiding the Preferences Links
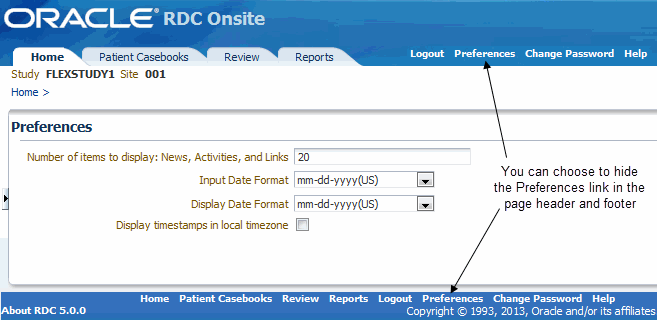
The Hide the Preferences Menu configuration setting determines whether RDC displays the Preferences links in the page header and footer, and in the Data Entry window.
- Preferences link in the page header and footer. If the link is available,
the user can customize the number of items to display in lists, the format of
dates, and the time zone to use when displaying time stamps.
-
Preferences link in the Data Entry window. If the link is available, the user can customize whether to show or hide the Save Complete prompt and the Validation Error Alert prompt.
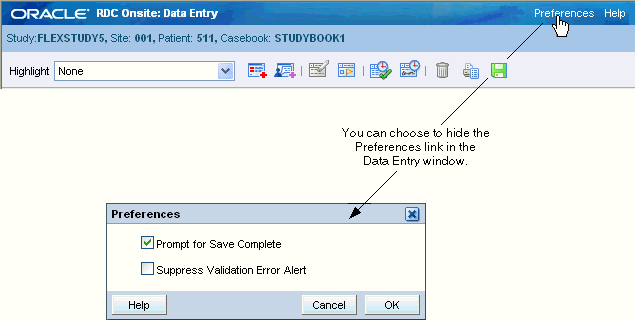
If you set the Hide the Preferences Menu configuration setting to N, the Preferences links are available. Note that when the links are available, users can change the value you defined for the following configuration settings:
- Prompt for Save Complete in HTML Mode
- Suppress Validation Error Alert in HTML Mode
Preferences remain in effect for the current session or until the user switches to another study. The next time the user logs in, RDC loads the assigned configuration and your defined settings. If you do not want the user to be able to change the preferences, set the Hide the Preferences Menu configuration setting to Y.
Parent topic: Configuration Settings for RDC
Displaying Time Stamps in Local Time
The Display in Local Time configuration setting affects only the display of time stamps for events such as when the CRF was last modified, reviewed, verified, approved, or locked. If you set this value to Y, users see time stamps adjusted to their local time zone.
Note that this setting:
- Does not affect the format RDC uses to record time stamps in the database. RDC always stores time stamps according to the time zone of the database server.
- Does not affect the format of the time stamp entered as part of CRF data entry.
- Does not affect the format of the Last Refresh time displayed in the session information.
If the Preferences link is available in RDC, a user can open the Preferences page and then select the Display timestamps in local timezone check box to change the setting for the current session. To prevent users from setting preferences, you can hide the Preferences link. See Hiding the Preferences Links for information.
Parent topic: Configuration Settings for RDC
Allowing CRF Group Actions
In RDC, the Multi Patient Casebooks page, the Single Patient Casebooks and the Review CRFs page can include several options that let the user:
- Verify a group of CRFs
- Approve a group of CRFs
- Update the custom review status for a group of CRFs
The Hide the Group Activities Menu configuration setting determines whether RDC hides or shows the group update custom review status, verification, and approval options.
- If you set this value to Y, RDC hides the group update custom review status, verification, and approval options.
- If you set this value to N, RDC displays the group update custom review status, verification, and approval options.
This setting only controls the ability to update the custom review status, verify, or approve a group of CRFs (that is, the group review, verification, and approval options). Users with the appropriate REVIEW, VERIFY, and APPROVE privileges are still able to update review status, verify, and approve an individual CRF from the Data Entry window.
For details about other options on the Group Verify and Group Approve screens, see the Options in Group Verify Dialog and Options in Group Approve Dialog sections from the Oracle Clinical Administrator's Guide.
Parent topic: Configuration Settings for RDC
Using the Oracle Clinical Accessibility Rules
When a CRF becomes accessible, Oracle Clinical runs validation and derivation procedures against that CRF during batch validation or in RDC, during site validation, during patient validation, or when you save the CRF.
Ordinarily, RDC marks a CRF as accessible whenever you perform a Save Complete on the CRF.
However, if you are running a paper study or a hybrid study, you may need to apply Oracle Clinical accessibility rules. In Oracle Clinical, if a study requires Pass 2 Data Entry, Oracle Clinical does not mark the CRF as accessible until Pass 2 is complete. If a study does not require two passes, Oracle Clinical marks the CRF as accessible when Pass 1 is complete (Entry Complete).
- If Use the OC Accessibility Rules is set to N, when a CRF becomes Entry Complete, RDC marks the CRF as accessible and runs the ONLINE/DCM procedures when the CRF is saved. In addition, Oracle Clinical also processes the CRF during the next batch validation.
- If Use the OC Accessibility Rules is set to Y and the study requires two passes, RDC does not mark the CRF as accessible until the CRF reaches a status of Pass 2 Complete. As a result, the ONLINE/DCM procedures are not run until the CRF reaches a status of Pass 2 Complete.
- If Use the OC Accessibility Rules is set to Y and the study does not require two passes, the behavior is the same as if there is no accessibility setting. When a CRF becomes Entry Complete, RDC marks the CRF as accessible and runs the ONLINE/DCM procedures when the CRF is saved. In addition, Oracle Clinical also processes the CRF during the next batch validation.
Parent topic: Configuration Settings for RDC
Disabling the Save Complete Prompt
The Prompt for Save Complete in HTML Mode configuration setting lets you give users the chance to save a CRF as data complete or data incomplete.
It may be convenient to allow users to save a CRF in an incomplete status. When a CRF is saved incomplete, responses are saved to the database, but no validation procedures are executed and no prompt for change reason is issued when data is updated. Saving a CRF as incomplete implies that the user is not yet finished inputting responses and that the user intends to complete the CRF at a later time.
If Prompt for Save Complete in HTML Mode is set to Y, RDC displays a dialog box that lets the user click Save Incomplete or Save Complete to save the CRF.
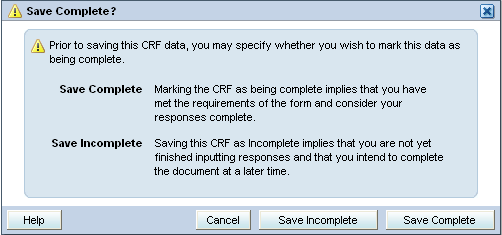
If you always want CRFs to be saved in a complete status, specify N for this setting. In this case, RDC displays no prompt before saving the CRF. The user has no option to save the CRF as incomplete.
If the Preferences link is available in the Data Entry window, the user can control whether RDC prompts to save the CRF as complete or incomplete. If you do not want the user to be able to change the preferences, set the Hide the Preferences Menu configuration setting to Y. See Hiding the Preferences Links for information.
Parent topic: Configuration Settings for RDC
Specifying a Default Highlighting Scheme for the Data Entry Window
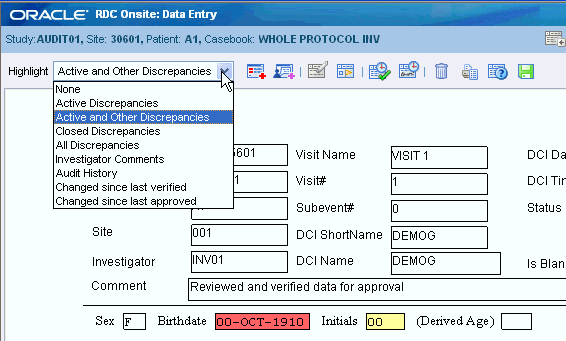
In the Data Entry window, RDC uses color to highlight fields in a CRF that have discrepancies, investigators comments, an audit history, or changes since the last verification or approval.
You use the Default CRF Highlighting in HTML Mode configuration setting to specify the initial highlighting scheme for the Data Entry window.
configuration-settings-rdc.html#GUID-BB8BD791-4A87-493C-B8BC-F741298CD059__BHCEAACH lists the valid values for the highlighting scheme. You can also position the cursor in the Value field on the RDC Configurations form, and then press F9 to select from the list of valid values.
Table 3-3 Valid Values for the Highlighting Scheme in the Data Entry Window
| Value | Description |
|---|---|
|
NONE |
Highlights no fields. |
|
ACTIVE_DISC |
Highlights all fields that have active discrepancies. |
|
OPEN_DISC |
Highlights all fields that have an open discrepancy. Open discrepancies include active and other discrepancies. |
|
CLOSED_DISC |
Highlights all fields that have closed discrepancies. (These are manually resolved discrepancies not system closed discrepancies). |
|
ALL_DISC |
Highlights all fields that have a discrepancy. |
|
INV |
Highlights all fields that have an investigator comment. |
|
AUDIT |
Highlights all fields that have an audit history. |
|
CHANGED_SINCE_LAST_VERIFY |
Highlights all fields that have changed since the last verification. Note that fields whose only update is an update to the investigator comment are highlighted. |
|
CHANGED_SINCE_LAST_APPROVE |
Highlights all fields that have changed since the last approval. Note that fields whose only update is an update to the investigator comment are highlighted. |
The user has these same options available in the Highlight field in the Data Entry window. The user can change the setting and choose to highlight different fields during a session. Once changed, the setting persists throughout the session until the user either changes the highlighting again or changes to another study. The next time the user logs in, RDC reverts to the default setting defined in the configuration.
Parent topic: Configuration Settings for RDC
Allowing Access to CRFs Entered via Oracle Clinical
The Allow HTML Data Entry for Non-migrated CRFs configuration setting affects how RDC treats CRFs that were entered via batch load operation, Oracle Clinical data entry, and you choose NOT to migrate those CRFs to DCI Forms.
- If set to N, RDC prevents users from opening and updating those non-migrated CRFs.
- If set to Y, RDC lets users open and update CRFs entered in Oracle Clinical,
even if those CRFs have not been migrated to a DCI Form. (This assumes that a
DCI Form exists for the DCI.)
You can control whether RDC displays a warning message when the user opens a non-migrated CRF. See Suppressing Prompts and Warnings for more information.
Parent topic: Configuration Settings for RDC
Suppressing the Validation Error Alert
During data entry or data update, RDC checks the information for possible validation errors. RDC checks the data against the rules defined for the study in Oracle Clinical. For example, RDC can check if the data is the correct type (numeric, alphabetic, date), exceeds a maximum length, or matches a value in a discrete value group. If the data is incorrect, RDC displays an error message. Users have the opportunity to correct the data before continuing to the next field.
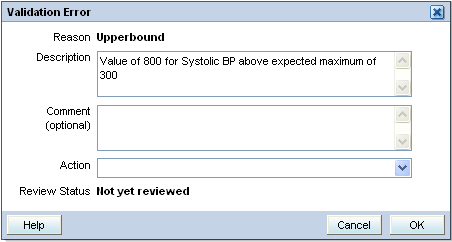
If the Suppress Validation Error Alert in HTML Mode configuration setting is set to Y, RDC does not display a message when a validation error occurs. Users can perform data entry without being interrupted by alerts when tabbing from a field where discrepant data has been entered.
Note:
When you suppress the validation error message, RDC still creates a discrepancy when the error occurs, but does not alert the user to the problem.If the Preferences link is available in the Data Entry window, the user can control whether RDC shows or hides the validation alert. If you do not want the user to be able to change the preferences, set the Hide the Preferences Menu configuration setting to Y. See Hiding the Preferences Links for information.
Parent topic: Configuration Settings for RDC