6 Assortment Period Maintenance Task
The Assortment Period Maintenance task defines the relationship between time (assortment periods) and location groupings (clusters), forming the foundation for assortment planning and item flow.
In this task, planners define assortment periods by assigning weeks, associate cluster versions to those periods, and establish receipt timing parameters. This alignment ensures that assortments are planned and executed consistently across locations and time.
Create the Assortment Maintenance Segment
To create the Assortment Period Maintenance segment:
- From the Oracle Home page, navigate to the Oracle Retail icon to open the task selection panel.
- Locate the Assortment Period Maintenance task using the available navigation options or by entering Assortment Period Maintenance in the search field.
- Select the Assortment Period Maintenance task. The wizard dialog opens.
- Click Create New Plan.
- Enter a plan label and click OK.
- In Select Product, choose one or more departments and click Finish.
Step: Assortment Period Maintenance
This step defines assortment periods, assigns cluster versions, and establishes receipt timing parameters. These decisions align clusters (locations) with time (assortment periods), enabling consistent assortment planning and execution. It is recommended that departments planned together share the same assortment periods and flows to ensure merchandising alignment across planning.
Tab and Views in this Step:
Application Actions
Assign Cluster
Copies the selected cluster version to the assortment period and populates the Cluster Version measure with the assigned version for reference in planning.
Approve
Validates and commits the assortment period configuration to the database, ensuring no unresolved alerts (such as overlapping weeks) exist before saving.
Assortment Period Maintenance Tab
This tab is used to define assortment periods, assign cluster versions, and review planning alignment across time and locations.
Define Assortment Periods View
The Define Assort Periods view is used to create and maintain assortment periods by assigning weeks, defining receipt timing, and associating cluster versions.
The steps to complete this process:
-
Enter a value in Define Label to name the assortment period.
This label will be shown in the Assortment Services wizards when selecting Assortment Periods.
-
Enter a value in Start Date to define the beginning of the period.
The Start Week measure will populate.
-
Enter a value in Duration (Weeks) to define the length of the period.
The End Week measure will populate.
-
Enter a value in Maximum Initial Receipt Lead Time to define the number of weeks available for planning receipts prior to the start of the assortment period.
This setting establishes the allowable window for early receipts as defined by week outside of the Assortment Period definition. Within the Item Flow segment, planners can specify the exact receipt week within this window, while Admin Lead Time (Weeks) determines the timing of receipts within the calculation logic.
- Select a value in Assign Cluster to assign a cluster version.
-
Review alerts:
-
Cluster Not Assigned
Triggers when one assortment period does not have a cluster assigned.
-
Invalid Definition
Triggers when required fields are missing or invalid (label, start date, positive duration) or when time periods overlap.
-
- Execute the Assign Cluster application action to copy the selected cluster version to the assortment period.
- Execute the Approve application action to validate and commit the assortment period.
Note:
Weeks cannot overlap between assortment periods. Overlaps generate alerts that must be resolved before committing data.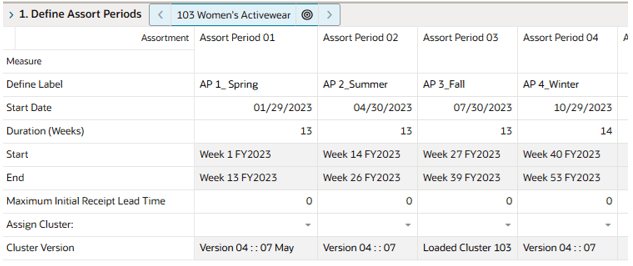
Review Assortment Periods by Calendar View
This view provides a calendar-based representation of assortment periods, allowing planners to visualize how periods align across weeks, months, quarters, and seasons.
The step to complete this process:
- View Assortment Periods by category, week, month, quarter, half, or year, as desired.

Review Clusters by Location View
This view provides visibility into how locations are assigned to clusters across assortment periods. It enables planners to validate that all locations are properly assigned and identify any gaps.
The step to complete this process:
- Using the Assigned Cluster measure, view each location's cluster assignments by department and Assortment Period, as desired.
Note:
If a Location appears as Unassigned, it will not be available for selection in Assortment Planning, as it means the location does not belong to a cluster.
Bell, Trend, and Slow Item Curves View
The Bell, Trend, and Slow Item Curve view provides predefined selling curves used in Item Flow planning to distribute sales and receipts over time. These curves are used during Item Flow to generate weekly sales and receipt plans based on the selected selling pattern.
The steps to complete this process:
- Review available selling curves.
- Validate that curves align with category or product behavior.
