3 Planning Administration Task
The Planning Administration task establishes the foundational configuration required for assortment planning. It enables users to map prior year data to the current planning calendar, define product and location attributes, configure clustering strategy inputs, set export parameters, and establish default Item Flow settings.
Create the Planning Administration Segment
To create the Planning Administration segment:
-
From the Oracle Home page, navigate to the Oracle Retail icon to open the task selection panel.
-
Locate the Planning Administration task using the available navigation options or by entering Planning Administration in the search field.
- Select the Planning Administration task. The wizard dialog opens.
-
Click Create New Plan.
-
Enter a descriptive plan label and click Ok.
-
In Select Product, choose one or multiple departments and click Finish.
Step: Week Mapping
The Week Mapping step aligns prior year weeks to the current year calendar to support accurate year-over-year analysis and trend comparison. By default, weeks are mapped on a one-to-one basis (for example, Week 1 of last year aligns to Week 1 of the current year). However, adjustments may be required in scenarios such as 53-week years or when major holidays shift between fiscal weeks or months. Updating the week mapping ensures that comparable business periods—such as holiday events—are correctly aligned, enabling more accurate historical analysis and planning decisions.
The step to complete this process:
-
Confirm and adjust the week mapping as required to reflect the correct alignment between prior year and current year periods.
Tab and View in this Step:
Week Mapping Tab
Used to review and update the week mapping between current year and prior year weeks.
Week Mapping View
Displays the relationship between current year weeks and their mapped prior year counterparts. Users can modify mappings to account for calendar shifts, such as holiday movement or non-standard fiscal years. This flexibility ensures consistent comparisons and supports accurate forecasting and planning, even when fiscal calendars vary across years.
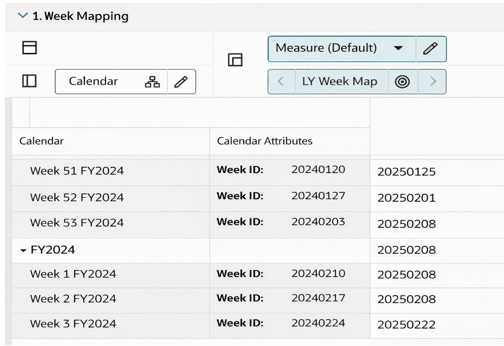
In this example, w53_2024 (calendar 02/03/24) is the last year of calendar 02/08/2025.
Step: Product Setup
The Product Setup step is used to define and manage product attributes that support assortment planning. This includes defining attribute values, assigning attributes to categories, and maintaining attribute values at the item level. Administrators can also configure placeholder-related properties such as base unit retail and cost, product images, and placeholder naming conventions.
Tabs and Views in this Step:
Product Setup Tab
This tab is used to define, assign, and manage product attributes used in assortment planning.
Define Product Attributes View
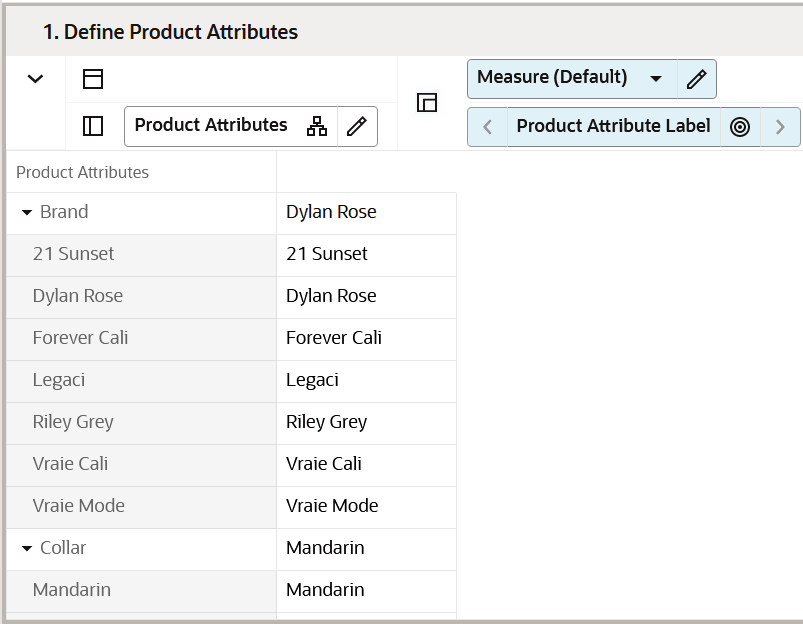
The Define Product Attributes view is used to review, rename, and maintain product attributes and their associated values. These attributes are used to differentiate items within an assortment and support planning, analysis, and reporting. Common examples of attributes include brand, size, product type, and color.
Users can also create new attribute values as needed. To add a new attribute value, right-click on a Product Attribute Value position and select Add Positions (Dynamic Position Maintenance – DPM functionality). This allows users to create new values associated with a specific attribute.
The Filter Placeholder Product Attributes special filter is available to display only placeholder product attributes only.
If attribute values need to be updated for existing items, it is recommended to make those updates in the source system to ensure data consistency.
Select Product Attributes View
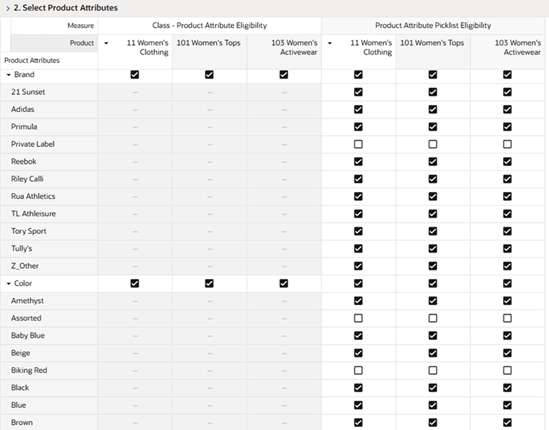
The Select Product Attributes view is used to define which attribute types are applicable to each product category (class). This mapping controls which attributes, and their associated values are available for display and use within assortment planning. Attribute applicability can vary by category. For example, an attribute such as sleeve length may apply to sweaters but not to trousers.
Attributes are enabled for a product category by setting the Class–Product Attribute Eligibility and/or Product Attribute Picklist Eligibility Boolean measures. A selected (true) value indicates that the attribute is available for that category.
Assign Product Attribute View
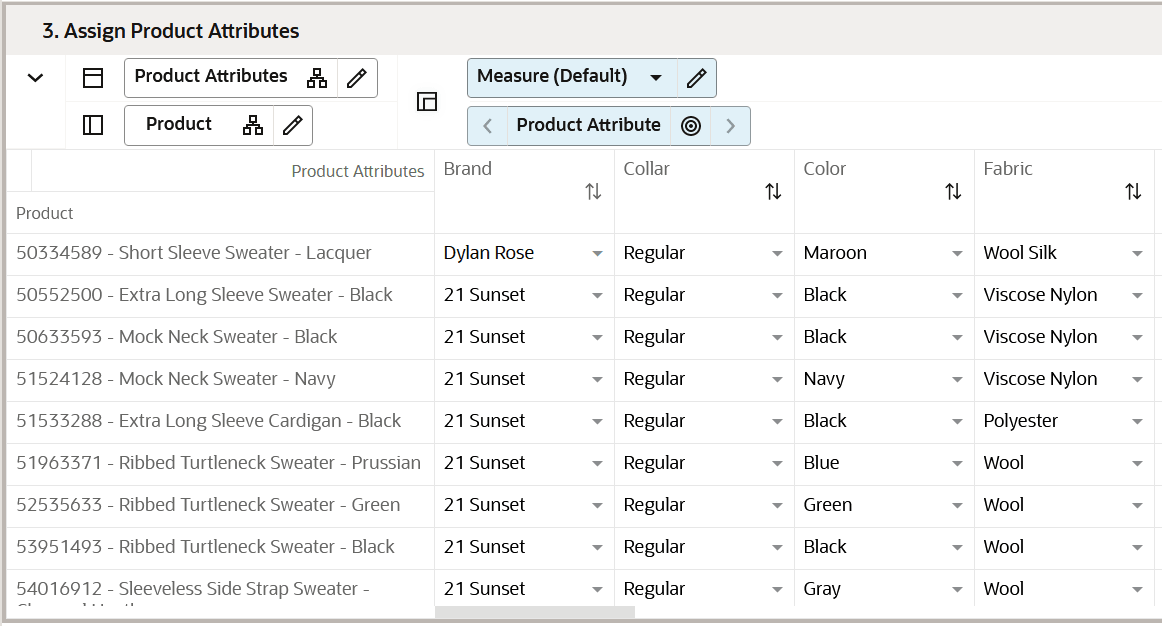
The Assign Product Attributes view is used to assign or update attribute values for both placeholder items and existing items.
The Filter by Eligibility special filter is available to display only product attribute types that have been defined as eligibility for that class.
While administrators can modify attributes for existing items in this view, these changes are not written back to the source system. The system of record for product attributes remains the master data management system (for example, Oracle Retail Merchandising Foundation Cloud Service (MFCS)).
If attribute values are updated for an existing item within this view, those changes must be communicated and maintained in the source system to ensure data consistency.
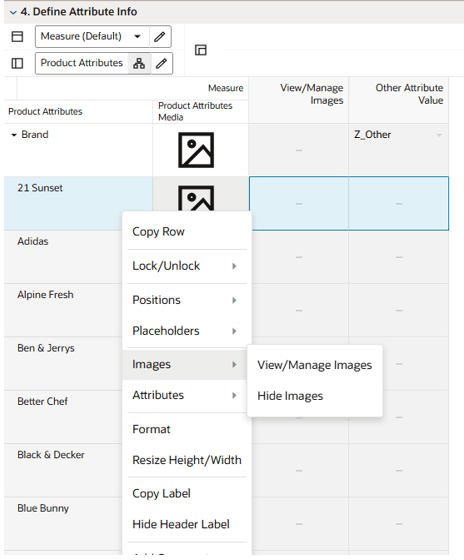
Define Attribute Info View
The Define Attribute Info view enables administrators to manage product attribute value images and define labels for grouped attribute values.
Administrators can assign images to product attribute values by accessing the View/Manage Images functionality (right-click on the attribute value, select Images, then View/Manage Images) and entering the image URL. Images may also be populated through integration and are displayed throughout the application wherever attribute values are used.
This view also allows administrators to define the label for grouped attribute values created through threshold logic in later process steps (for example, z_others). The label is defined by attribute type and can be modified as needed for use in the Assortment Planning task.
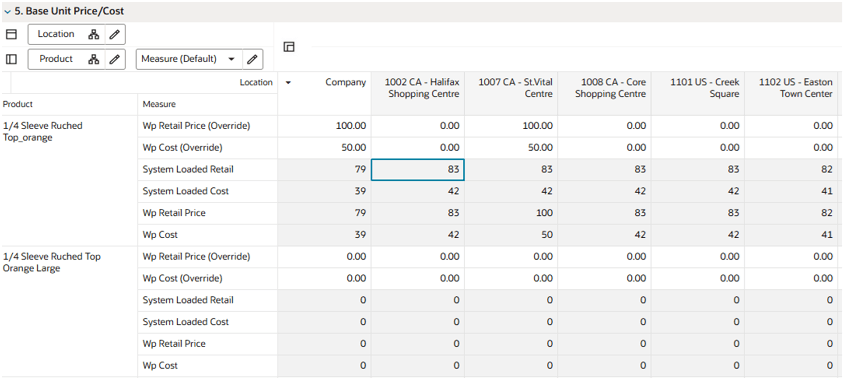
Base Unit/Price Cost View
The Base Unit Price/Cost view is used to define the retail price and cost for placeholder items. If the same retail price and cost apply across all locations, the location hierarchy can be rolled up to All Locations to simplify data entry. Wp Retail Price / Cost (Override) measures will also be available to users in different workspaces throughout the process.
While administrators can update retail price or cost for existing items in this view, these changes are not written back to the source system. The system of record for product pricing remains the merchandising system (for example, Oracle Retail Merchandising Foundation Cloud Service (MFCS)). If pricing updates are made to existing items within this view, those changes must be communicated and maintained in the source system to ensure data consistency.
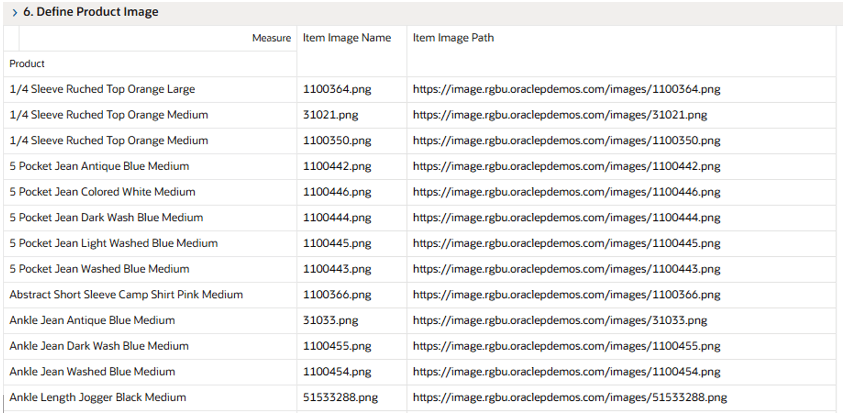
Define Product Image View
The Define Product Image view is used to associate image files with style-color items for visualization within assortment planning. Product images support visual decision-making during assortment creation and review. Images are linked to items using an image name and corresponding image path (URL). These images are displayed in visual planning views, enabling planners to evaluate assortment composition based on style, color, and overall product presentation.
Administrators can assign or update image references for items by maintaining the image name and path fields or they may be loaded. Image paths reference externally hosted image repositories. If image updates are required for existing items, it is recommended to maintain consistency with the source system or centralized image repository to ensure alignment across applications.
Rename Placeholder Positions View
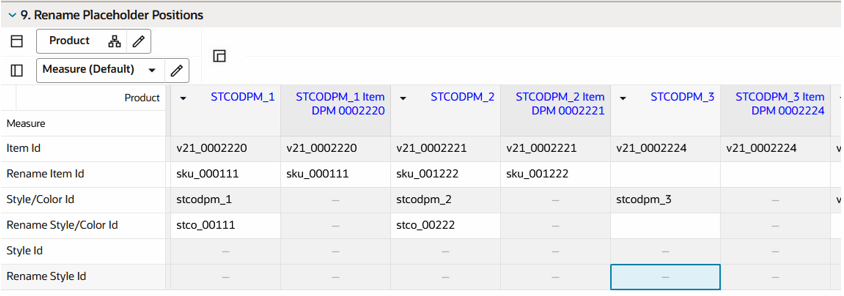
The Rename Placeholder Positions view enables administrators to map placeholder items created in APCS to realized item identifiers from external systems.
This mapping supports integration with external planning or merchandising systems by aligning placeholder positions at different levels of the product hierarchy, including style, style-color, and SKU (style-color-size).
The Placeholder Items special filter is available to display only placeholder items. This filter is enabled by default but may be disabled as needed.
Exception Rules Tab
The Exception Rules tab is used to define product attribute–store exception rules that function as global constraints within assortment planning. These rules restrict specific product attributes from being assorted to designated stores and are applied consistently across all assortment periods and seasons.
Define Product Attribute Store Exception View
The Define Product Attribute Store Exception view is used to establish and maintain product attribute–store exception rules. These rules are defined at an organizational level and persist across planning cycles unless updated by an administrator. When a product attribute is defined as an exception for a store, items with that attribute are excluded from assortment recommendations for that store in the Assortment Planning task.
These rules are respected by the Assortment Fit process and influence system-generated recommendations. Planners may override these rules within the assortment planning workspace when required, allowing flexibility while maintaining default governance.

Step: Location Setup
The Location Setup step defines and manages location-specific attributes and configurations used in assortment planning. It enables users to assign attribute values to locations, activate locations for planning, and define relationships such as Like Locations.
Additional settings include defining space attributes, setting cluster strategy inputs, and establishing exclusions that influence how assortments are localized. This setup ensures that location groupings and planning inputs accurately reflect store characteristics and support precise assortment decisions.
Tabs and Views in this Step:
Attribute Setup Tab
This tab is used to view and assign the location attributes and their values.
Define Location Attributes View
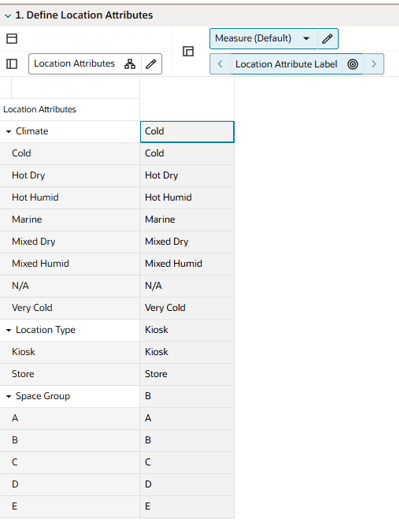
The Define Location Attributes view is used to maintain location attributes and their values, which are used to differentiate and group locations for clustering and assortment localization. These attributes represent key store characteristics—such as region, format, or size—that influence how assortments are planned and allocated across locations.
Assign Location Attributes View
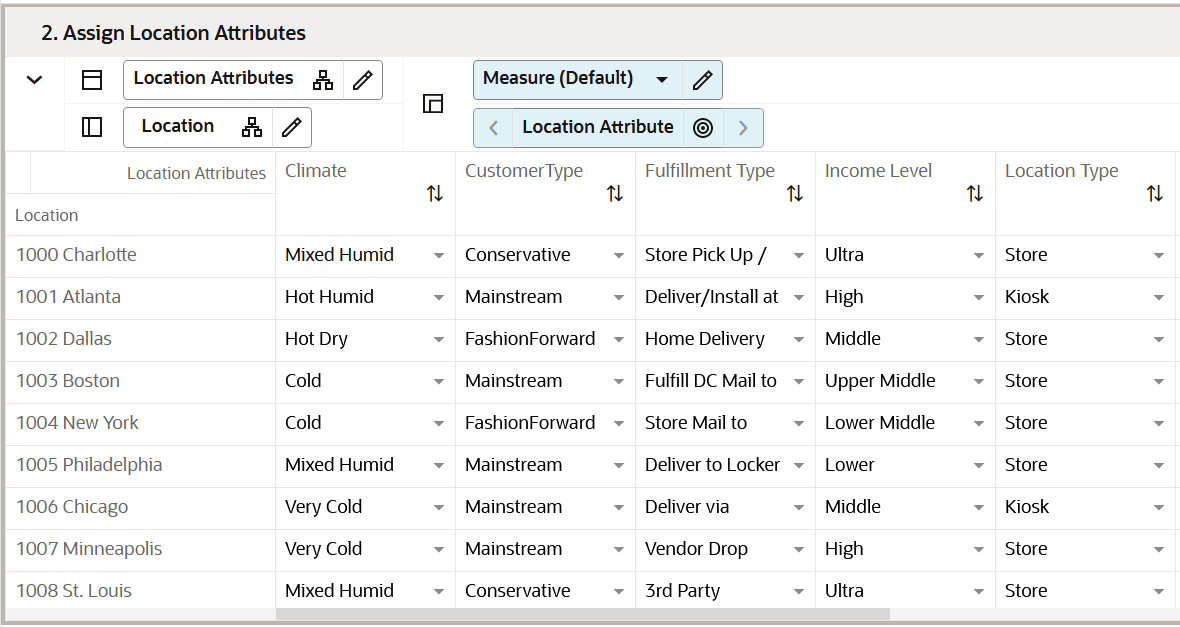
The Assign Location Attributes view is used to assign and maintain attribute values for each store. These attribute assignments are used in Location Clustering and drive how assortments are localized across stores.
While administrators can update location attribute values in this view, these changes are not written back to the source system. The system of record for location attributes remains the merchandising system (for example, Oracle Retail Merchandising Foundation Cloud Service (MFCS)). If updates are made to existing location attributes within this view, those changes must be communicated and maintained in the source system to ensure data consistency.
Location Strategy Tab
The Location Strategy tab is used to define key location-level planning inputs, including location attributes, clustering strategy parameters, and location relationships. These configurations support how locations are grouped and how assortments are distributed.
Define Location Info View
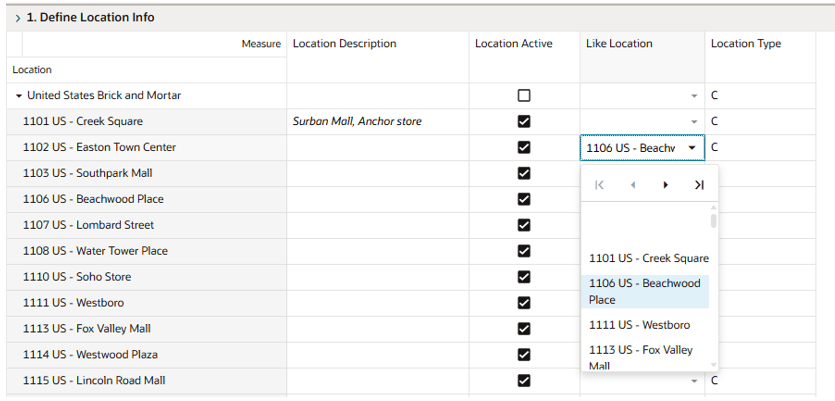
The Define Location Info view is used to maintain core location properties required for planning. This includes defining location descriptions, activating, or deactivating locations for use in planning, assigning Like Locations, and identifying direct (online) versus physical store locations. These settings influence location eligibility in planning segments and support accurate clustering and assortment localization.
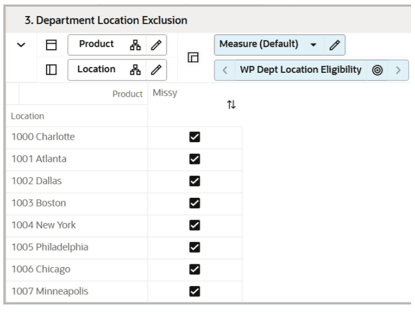
Department Location Exclusion View
The Department Location Exclusion view is used to define stores that should be excluded from clustering and assortment planning for specific departments. A Boolean measure is used to flag store– department combinations for exclusion. When selected, the store is excluded from clustering and will not receive assortments for that department. Exclusions are defined based on business requirements, such as when certain products are not ranged or sold in specific stores.
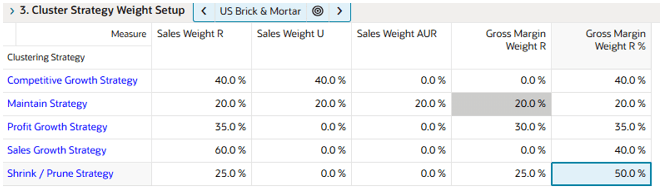
Cluster Strategy Weight Setup View
The Cluster Strategy Weight Setup view is used to define how different performance metrics contribute to location clustering by assigning weights to each measure within a clustering strategy.
The total weight across all metrics within a strategy should equal 100%. After performing a calculate, commit, and/or refresh, the system will normalize the values to ensure the total equals 100%.
Administrators can also create and maintain additional clustering strategies using Dynamic Position Maintenance (DPM), allowing flexibility to support different planning approaches across categories.
Step: Batch Setup
The Batch Setup step is used to define which data is included in standard exports from APCS. It allows administrators to control the scope of exported data by selecting relevant planning positions and determining whether elapsed periods are included. This configuration ensures that only the required data is exported for downstream processes and integration with external systems.
Tab and Views in this Step:
Batch Setup Tab
This tab is used to configure export parameters, including which positions are included in exports and whether elapsed periods should be part of the exported data.
Batch Setup View
The Batch Setup view is used to define whether elapsed periods are included in export outputs. Including elapsed periods ensures that historical data is available for downstream systems, while excluding them limits exports to current and future periods.
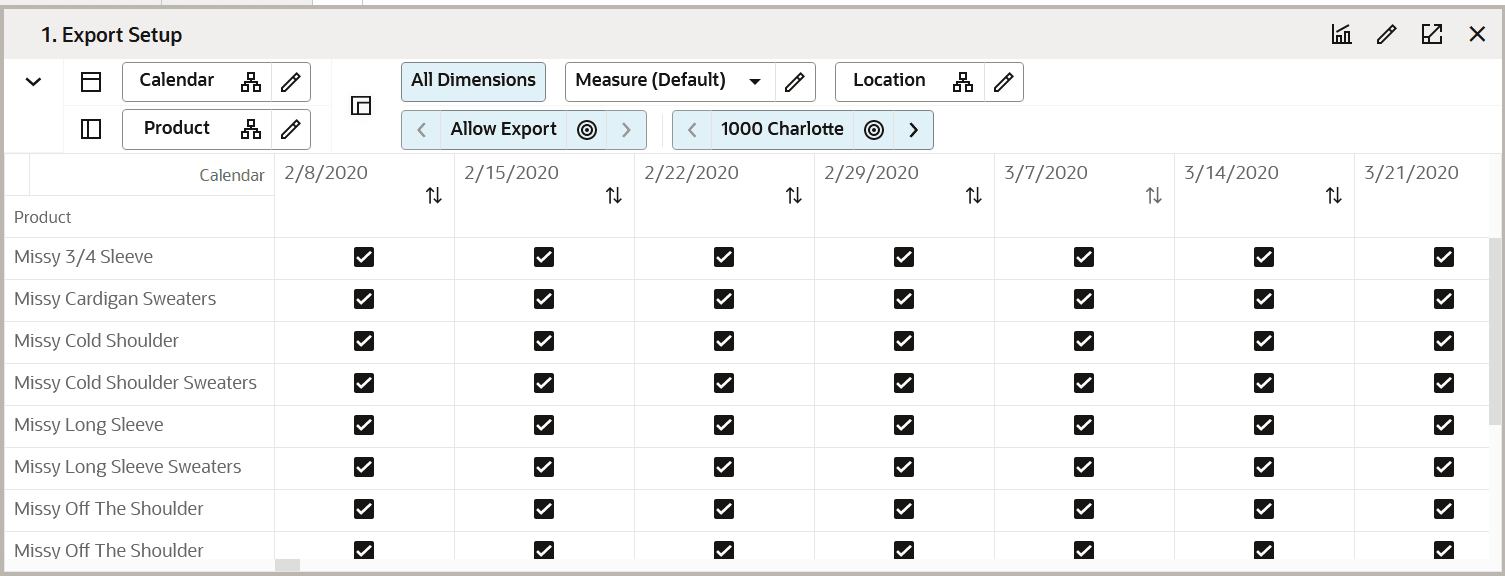
Export Setup View
The Export Setup view is used to define which positions are included in plan data exports.
Administrators can select the relevant product, location, and time positions to control the scope of exported data. This ensures that only required data is included in exports for downstream systems and processes.
Step: Item Flow Parameters
The Item Flow Parameters step defines default inventory and receipt planning assumptions used during the Item Flow process steps. These parameters establish baseline values for lead time, order frequency, and safety stock that drive initial receipt calculations.
Tab and View in this Step:
Item Flow Parameters Tab
The Item Flow Parameters tab is used to define default inventory and receipt planning parameters that are applied during Item Flow for Short Life Cycle (SLC) items.
These administration parameters establish baseline assumptions that drive receipt timing and quantity calculations during Item Flow planning. They ensure that initial plans align with operational constraints such as vendor requirements, inventory policies, and store presentation needs.
Planners can override these default values within the Item Flow workspace to adjust receipt plans based on specific item, cluster, location, or business requirements.
Item Flow Parameters View
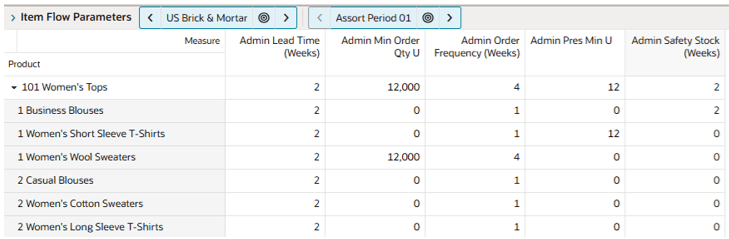
The Item Flow Parameters view defines default values for key Item Flow planning inputs, including lead time, order frequency, minimum order quantity, presentation minimum, and safety stock.
Admin Lead Time (Weeks) differs from the Maximum Initial Receipt Lead Time defined in the Assortment Period Maintenance task. The Maximum Initial Receipt Lead Time controls how many “early” weeks are available for receipt planning within Item Flow workspace, while Admin Lead Time is used directly in receipt calculations to determine when receipts should occur.
The steps to complete this process:
- Enter a value in Admin Lead Time (Weeks) to define how many weeks in advance receipts should be delivered.
- Enter a value in Admin Min Order Qty U to define the minimum quantity that must be ordered based on vendor requirements.
- Enter a value in Admin Order Frequency (Weeks) to define how often receipts are scheduled (such as, weekly, bi-weekly).
- Enter a value in Admin Pres Min U to define the minimum presentation units required at the store level.
- Enter a value in Admin Safety Stock (Weeks) to define the number of weeks of demand that should be maintained as safety stock.