4 Create a Delivery
Note:
If at any time you want to go back to a prior step, click the step name in the right-hand panel.
As steps are completed, a check mark displays next to each step in the right-hand panel.
Note:
The Collect and Receive Status Notification Webhook can be leveraged and used to facilitate and trigger communication to the sending and/or receiving parties of a delivery. For more information, see the Leveraging the Status Notification Webhook for Delivery Communications section in the Collect and Receive Foundation Cloud Service Web Services Guide.Start a Delivery
-
Select the Create Delivery button on the Delivery Metrics, Inbound, Outbound and All Deliveries page or select Create Deliveries from the Ask Oracle navigation menu. The Start Delivery page appears.
Note:
Click on the step indicator to minimize/collapse the step panel to create more space for the main page. This is helpful if you enlarge the view or use different screen resolutions.
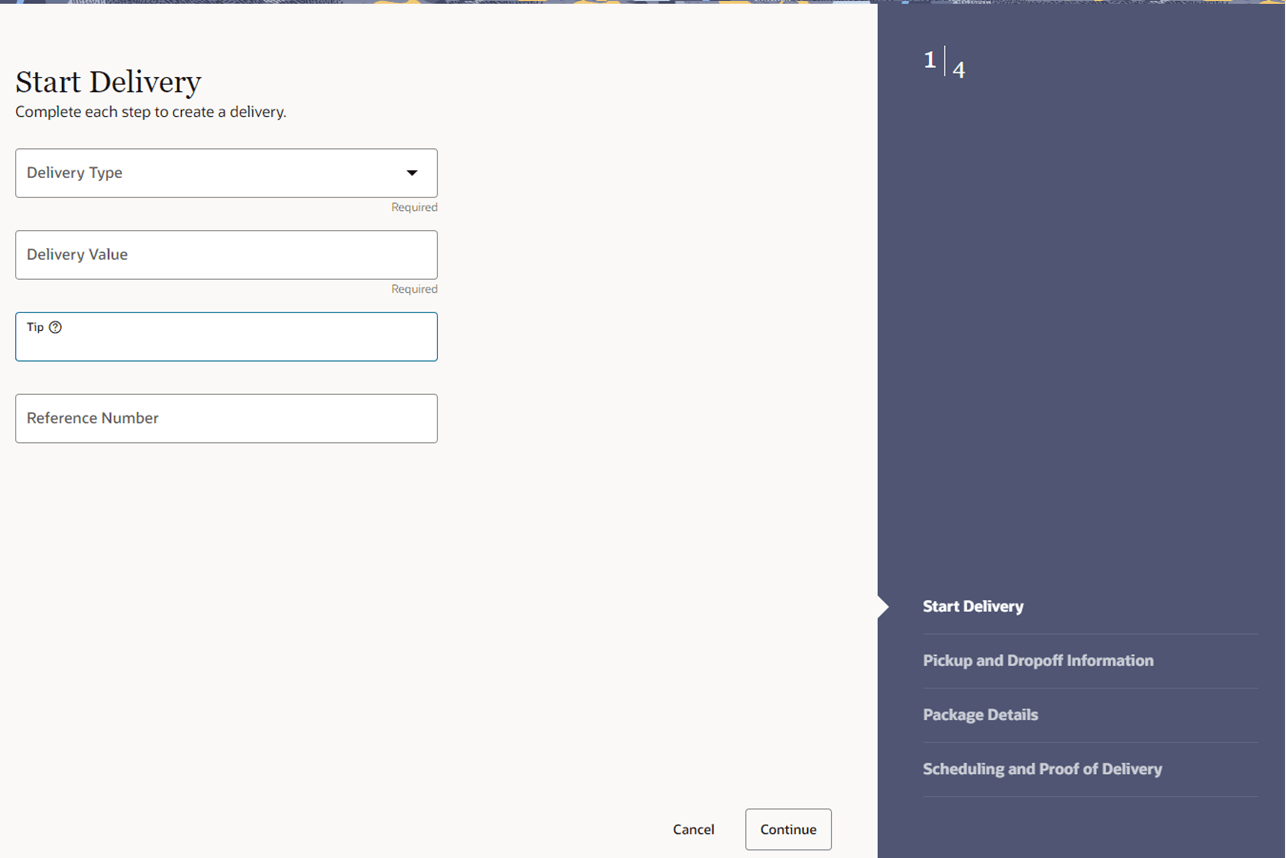
Figure 4-1 Start Delivery
-
In the Delivery Type field, select the Outbound or Inbound delivery option. This is a required field.
-
Select Outbound when a delivery will be leaving your store/business location. Most commonly, this is selected when sending merchandise from a store to a customer.
-
Select Inbound when a delivery will be coming into your store/business location. Most commonly, this is selected when needing to pickup return merchandise from a customer and deliver it back to a store.
-
-
In the Delivery Value field, enter the amount of the delivery. This is a required field.
This is the total value of the items/assets in the delivery. This is captured for insurance purposes with the courier.
-
In the Tip field, enter the amount of the tip paid to the courier.
-
In the Reference Number field, enter the reference number of the delivery.
The reference number might be an Order number or a PO number.
-
Then choose one of the following options.
-
Click Continue to continue with the next step Pickup and Dropoff Information.
Note:
All required fields must be completed to proceed to the next step. -
Click Cancel to reject all entries and close the page. When prompted, click Yes to confirm cancellation of the delivery. You are redirected back to the page you left when you started the Create Delivery process.
-
Pickup and Dropoff Information
Pickup and Dropoff Information — Inbound Deliveries
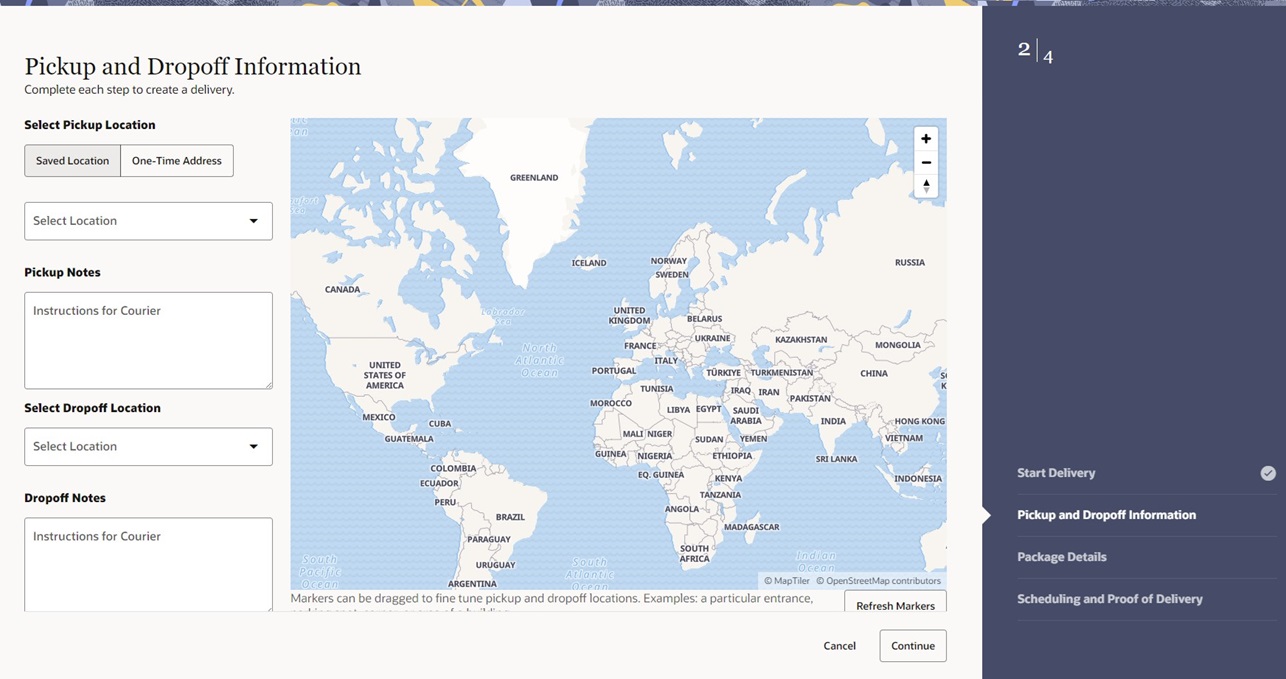
Figure 4-2 Pickup and Dropoff Information — Inbound Deliveries
-
In the Select Pickup Location section, select one of the following options:
-
Select Saved Location to choose a business location within your company and start typing the location to search for the specific location in the drop-down list.
The Saved Locations are the business locations that are managed via the Locations page. For more details about the Locations page, see the Manage Locations section.
The address for the selected location is displayed in the Pickup Contact and Address section and a marker is dropped on the map showing the pickup location. To edit the Pickup Contact and Address information, see the Edit Contact and Address section.
-
Select One-Time Address to enter a one-time address for this delivery. The input fields are displayed. The Address Finder field can be used to suggest addresses or complete the form manually. Enter all required fields. A marker is dropped on the map showing the pickup location.
One-Time address should be used for customer, client, or addresses that are external to your business.Note:
If you type in/update a One-Time Address without using the Address Finder field, you need to click the Refresh Markers button to make the marker appear on the map.
-
-
In the Pickup Notes section, enter instructions for the courier. For example, pickup at the side door.
Note:
If a Saved Address is selected and has associated delivery instructions, the pickup notes are prepopulated with those instructions. For more information about how to add delivery instructions to a location, see the Manage Locations chapter.
-
In the Select Dropoff Location section, select a location from the Select Location dropdown list or begin typing the location to search for the specific location in the list. The address for the selected location is displayed in the Dropoff Contact and Address section and a marker is dropped on the map showing the dropoff location. To edit the Dropoff Contact Address information, see the Edit Contact and Address section.
Note:
If you set a preferred location, it is defaulted as the Dropoff Location.
-
In the Dropoff Notes section, enter instructions for the courier.
Note:
If the Location has associated delivery instructions, the dropoff notes are prepopulated with those instructions.
-
On the map, click the Pickup or Dropoff Marker to see an information box with the detailed address. If necessary, you can zoom the map and then click, hold, and drag the marker(s) to fine tune the pickup or dropoff spot. This is helpful if the courier needs to go to a specific entrance, parking lot, or corner of a building.
-
Then choose one of the following options.
-
Click Cancel to reject all entries and close the page. When prompted, click Yes to confirm you want to cancel the delivery.
-
Click Continue to continue with the next step Package Details.
Note:
When clicking Continue, the system validates all required fields and determines if the provided addresses are serviceable by the courier. If the validation fails or the address is not serviceable, an error message displays. An exclamation mark also appears next to the name of the current step in the right panel. To edit or change a one-time address, edit the fields in the form. For a saved location, use the Edit Contact and Address option or select a new Saved Location.
-
Pickup and Dropoff Information — Outbound Deliveries
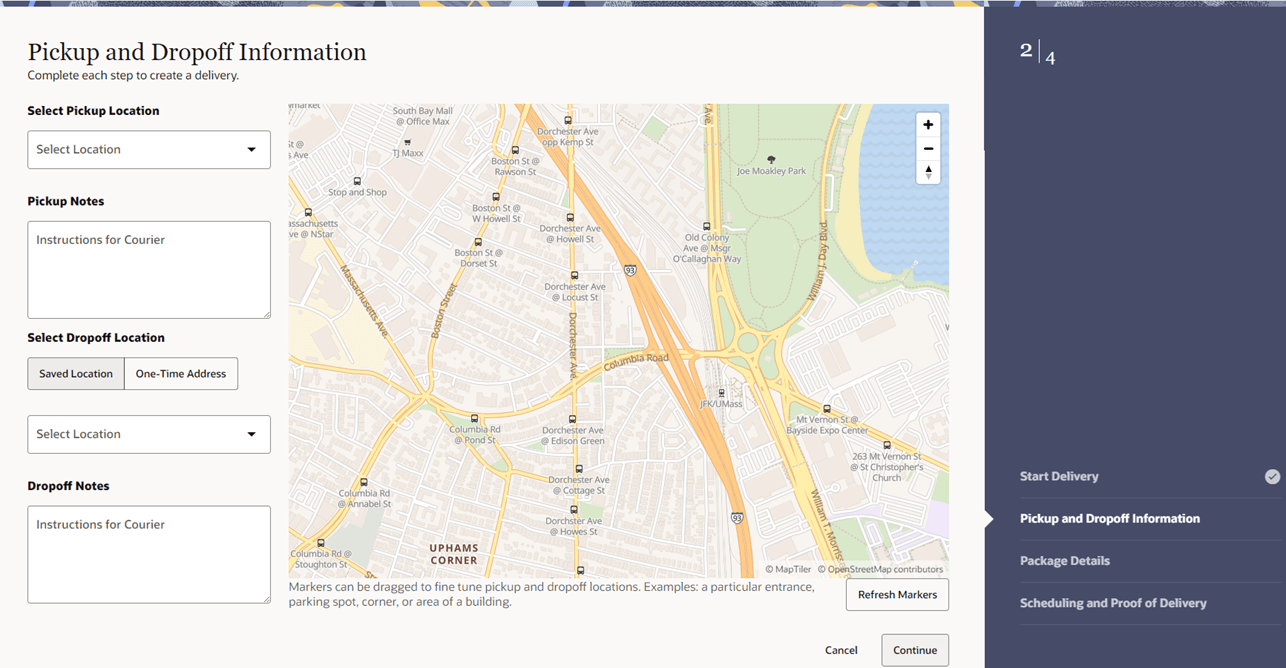
Figure 4-3 Pickup and Dropoff Information — Outbound Deliveries
-
In the Select Pickup Location section, select a location from the Select Location dropdown menu and begin typing the location to search for the specific location in the list. The address for the selected location is displayed in the Pickup Contact and Address section and a marker is dropped on the map showing the pickup location. To edit the Pickup Contact Address information, see the Edit Contact and Address section.
Note:
If you set a preferred location, it is defaulted as the Pickup Location.
-
In the Pickup Notes section, enter instructions for the courier.
Note:
If the Location has associated delivery instructions, the pickup notes are prepopulated with those instructions.
-
In the Select Dropoff Location section, select one of the following options:
-
Select Saved Location to choose a business location within your company or start typing the location to search for the specific location in the drop-down list. The address for the selected location is displayed in the Dropoff Contact and Address section and a marker is dropped on the map showing the Dropoff location. To edit the Dropoff Contact and Address information, see the Edit Contact and Addres section.
-
Select One-Time Address to enter a one-time address for this delivery. The input fields are displayed. The Address Finder field can be used to suggest addresses or complete the form manually. Enter all required fields. A marker is dropped on the map showing the dropoff location.
A One-Time address should be used for customer, client, or addresses that are external to your business.Note:
If you type in/update a One-Time Address without using the Address Finder field, you need to click the Refresh Markers button to make the marker appear on the map.
-
-
In the Dropoff Notes section, enter instructions for the courier.
Note:
If a Saved Address is selected and has associated delivery instructions, the dropoff notes are prepopulated with those instructions.
-
On the map, click the Pickup or Dropoff Marker to see an information box with the detailed address. If necessary, you can zoom the map and then click, hold, and drag the marker(s) to fine tune the pickup or dropoff spot. This is helpful if the courier needs to go to a specific entrance, parking lot, or corner of a building.
-
Then choose one of the following options.
-
Click Cancel to reject all entries and close the page. When prompted, click Yes to confirm you want to cancel the delivery.
-
Click Continue to continue with the next step Package Details.
Note:
When clicking Continue, the system validates all required fields and determines if the provided addresses are serviceable by the courier. If the validation fails or the addresses are not serviceable, an error message displays. An exclamation mark also appears next to the name of the current step in the right panel.
To edit or change a one-time address, edit the fields in the form. For a saved location, use the Edit Contact and Address option or select a new Saved Location.
-
Edit Contact and Address
To edit the contact information, follow the steps below:
-
Click Edit in the Contact and Address section. The Edit Contact Information window appears.
-
Edit the values as required.
-
Then select one of the following options.
-
Click Close to close the Edit Contact Information without applying any changes.
-
Click Apply to validate all required fields and update the Contact Information and return to the Pickup and Dropoff Information step.
-
Package Details
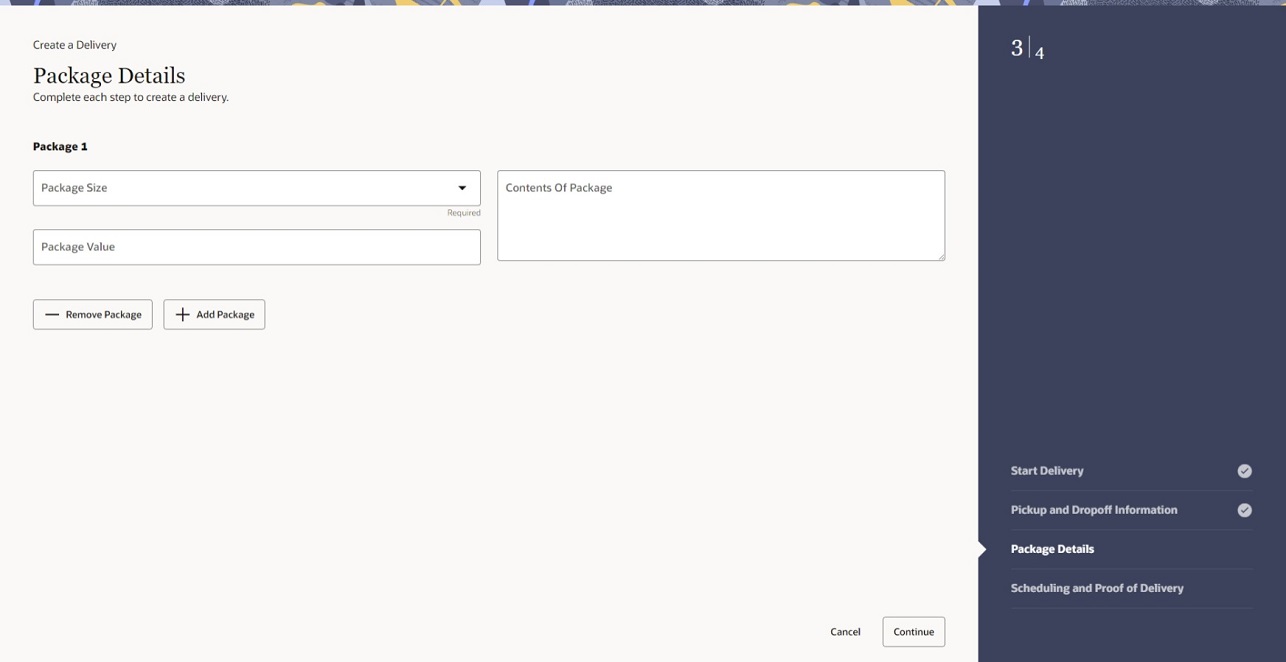
Figure 4-4 Package Details
-
In the Package 1 section, select the Package Size from the dropdown menu. This is a required field.
Note:
The list of values displayed in the Package Size dropdown menu are the values that are configured in the Foundation Data - Package Dimensions Setup. For more information, see the Configure Package Dimensions section.
-
In the Package Value field, enter the value of the current package.
-
In the Contents of Package field, enter what the package consists of.
-
If there are more packages, select the Add Package button and enter the package details. Do this for all packages of the current delivery. You can add up to five packages to a delivery.
Note:
The most recently added package can be removed by selecting the Remove Package button.
-
Then choose one of the following options.
-
Click Cancel to reject all entries and close the page. When prompted, click Yes to confirm you want to cancel the delivery.
-
Click Continue to continue with the next step Scheduling and Proof of Delivery.
-
Scheduling and Proof of Delivery
Scheduling and Proof of Delivery — Inbound Deliveries
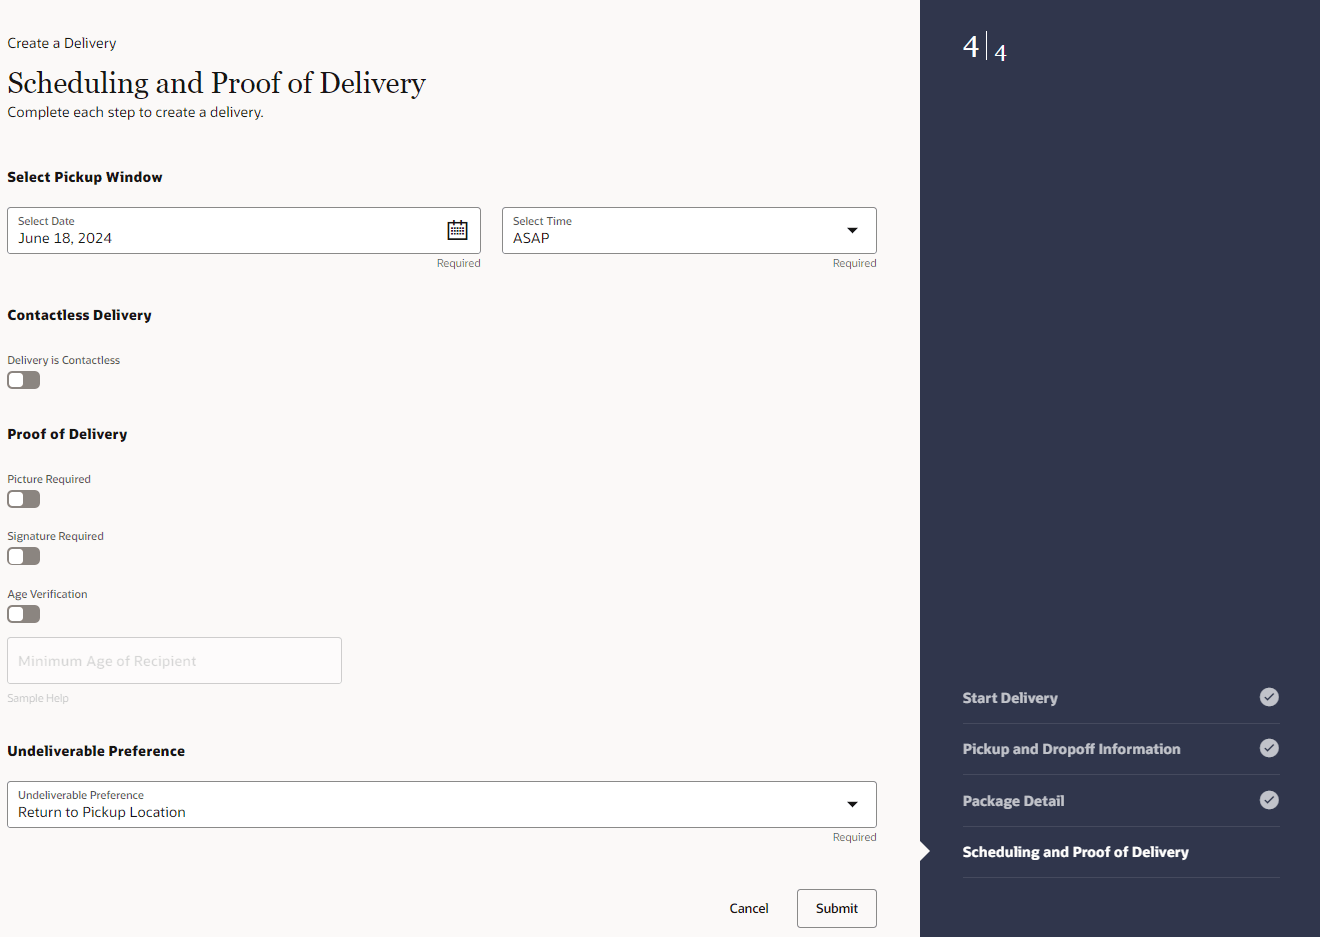
Figure 4-5 Scheduling and Proof of Delivery — Inbound Deliveries
-
In the Select Pickup Window section, select the date and the time. These fields are required.
Note:
The date and time selected is the local date/time for the delivery area, using the dropoff location.
-
In the Contactless Delivery section, enable the Delivery is Contactless option, if requested.
-
In the Proof of Delivery section, enable the following options if necessary:
Note:
If you enabled the Contactless Delivery option, some proof of delivery options are not available for certain selections.-
Picture Required
-
Signature Required
-
Age Verification
If the Age Verification option is enabled, enter the minimum age of the recipient in the field below.
-
In the Undeliverable Preference section, select your preference from the dropdown menu in case the packages cannot be delivered. This is a required field.
Below option is available for inbound deliveries:-
Return to Pickup Location — This is the default option.
-
-
-
Then choose one of the following options.
-
Click Cancel to reject all entries and close the page. When prompted, click Yes to confirm you want to cancel the delivery.
-
Click Submit to create the delivery. The system validates all entries. Then the system returns to the page where you started the Create a Delivery process. A message is displayed that the delivery has been successfully created.
-
Scheduling and Proof of Delivery — Outbound Deliveries
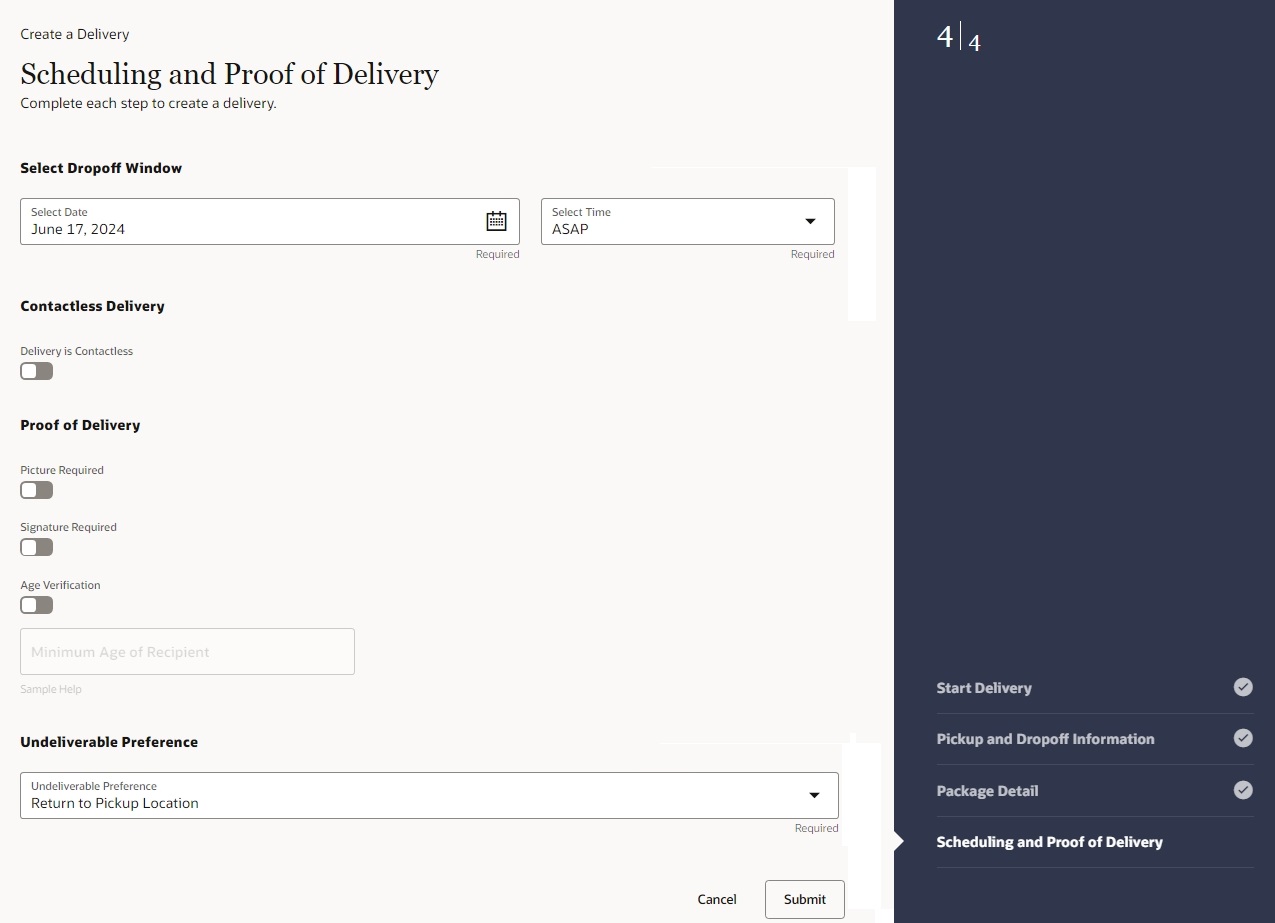
Figure 4-6 Scheduling and Proof of a Delivery — Outbound Deliveries
-
In the Select Dropoff Window section, select the date and the time. These fields are required.
Note:
The date and time selected is the local date/time for the delivery area, using the pickup location.
-
In the Contactless Delivery section, enable the Delivery is Contactless option, if requested.
-
In the Proof of Delivery section, enable the following options if necessary:
Note:
If you enabled the Contactless Delivery option, some proof of delivery options are not available for selection.-
Picture Required
-
Signature Required
-
Age Verification
If the Age Verification option is enabled, enter the minimum age of the recipient in the field below.
-
In the Undeliverable Preference section, select your preference from the dropdown menu in case the packages cannot be delivered. This is a required field.
The following options are available for outbound deliveries:
-
Return to Pickup Location — This is the default option.
-
Leave at Door
-
-
-
Then choose one of the following options.
-
Click Cancel to reject all entries and close the page. When prompted, click Yes to confirm you want to cancel the delivery.
-
Click Submit to create the delivery. The system validates all entries.
-
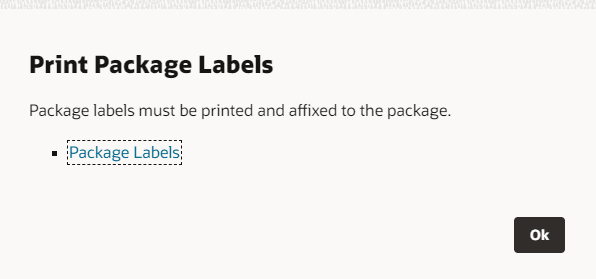
You are prompted to print the package labels.
Figure 4-7 Print Package Labels Prompt
-
If you open the Package Label link, a new browser tab opens containing package label(s) for you to print.
Figure 4-8 Example — Package Label

-
After printing all package labels, click OK to close the Print Package Labels prompt. The system returns to the page where you started the Create a Delivery process. A message is displayed that the delivery has been successfully created.
-
-
-