Associate Assignment
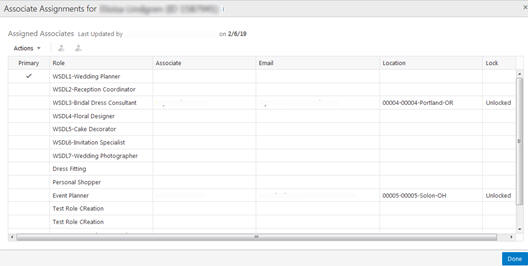
The Associate Assignment page lets you add, update, or delete associates assigned to a role for a customer. Choose the Associate Assignment option on the Actions menu in the Customer Dashboard for access to the Associate Assignment page:
Figure 4-60 Associate Assignment

The Associate Assignment window offers the following information and features:
-
The customer name and ID
-
The user who last updated the window and the date it was last updated
-
The Actions menu and corresponding icons let you Assign and Unassign associates.
-
Primary – Indicates the pre-designated Primary role, which is set by the client.
-
Role – Associate Role. See the Oracle Retail Customer Engagement Cloud Service Implementation Guide for more information about Associate Roles
-
Associate – Name of the associate
-
Email – The email of the associate
-
Location – ID of the associate's location
-
Lock – Indicates whether the associate user assignment can be changed (Unlocked) or not changed (Locked).
-
If an associate is not assigned, this field is blank.
-
When the assignment is locked, the logged in user must be the same as the assigned user to edit or unlock the associate user assignment, with the exception of a system administrator. The system administrator can edit any assigned user.
-
If a user without the privileges to change the associate assignment attempts to do so, an error message displays: The assignment is locked, and can only be changed by the assigned user or a system administrator.
-
Assigning an Associate
To assign an associate to a role for a customer:
-
In the Associate Assignment grid, select the role to which you want to assign an associate.
-
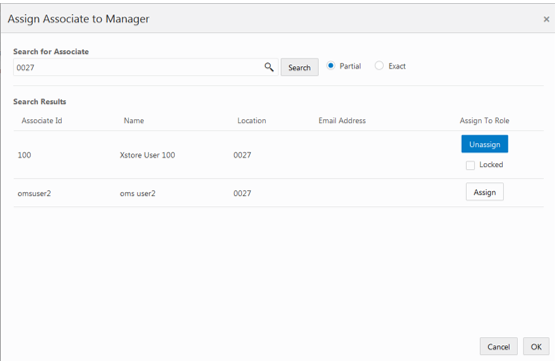
From the Action menu, choose Assign, or click the Assign icon. This displays the Assign Associate dialog:
Figure 4-61 Assign Associate

-
In the Search for Associate prompt, enter the ID, Name, Location or E-mail of the associate you want to assign to the role. Select Partial to search on a partial entry, or Exact, to search for only exact matches.
-
Click Search. This displays the associates matching the search criteria in the Search Results grid.
-
Click Assign in the row of the associate that you want to assign to the role. Assign changes to Unassign, and the Locked check box is displayed:
-
If you want to lock the assignment so that only you and system administrators can change it, select the Locked check box. If not, leave it clear.
-
Click OK. This returns you to the Associate Assignments page. The associate added to the role is displayed in the assignment row.
Unassigning an Associate
To un-assign an associate from a role for customer:
-
In the Associate Assignment grid, select the assignment from which you want to un-assign an associate. Only one assignment can be selected to un-assign at one time.
-
From the Action menu, choose Unassign, or click the Unassign icon. This removes the associate from the role, and their information is deleted from the assignment row.
-
Click Done when you are finished with associate assignments. This returns you to the Customer Dashboard