Creating a Program
There are two choices available to start the process of creating a Program. The Create Program button is available in both the Program Home window and the Program Search window.
Creating a Program - Program Search
Figure 10-6 Program Search

To Create a new program from the Program Search screen, click the Create Program button, which opens the program wizard on the Information tab. Proceed to Step 5 in Creating a Program - Program Home.
Creating a Program - Program Home
To create a new Program or Personal List from the Program Home window do the following:
-
Click the Tasks icon.
-
Click Program.
-
Click Program Home. The Tile default is All Active Programs.
Figure 10-7 Program Home

-
Click Create Program. The Create Program wizard may contain any of the following tabs, depending on configuration and the selected Program Type.
-
Information
-
Franchisees
-
Tender Program
-
Account Details
-
Award Program
-
Award Rules (Award Program)
-
Loyalty Program
-
Levels
-
Issue Rules
-
Award Rules (Loyalty Program)
-
Movement Rules
-
Card Definition
-
Card Series
-
Attributes
-
Review
-
-
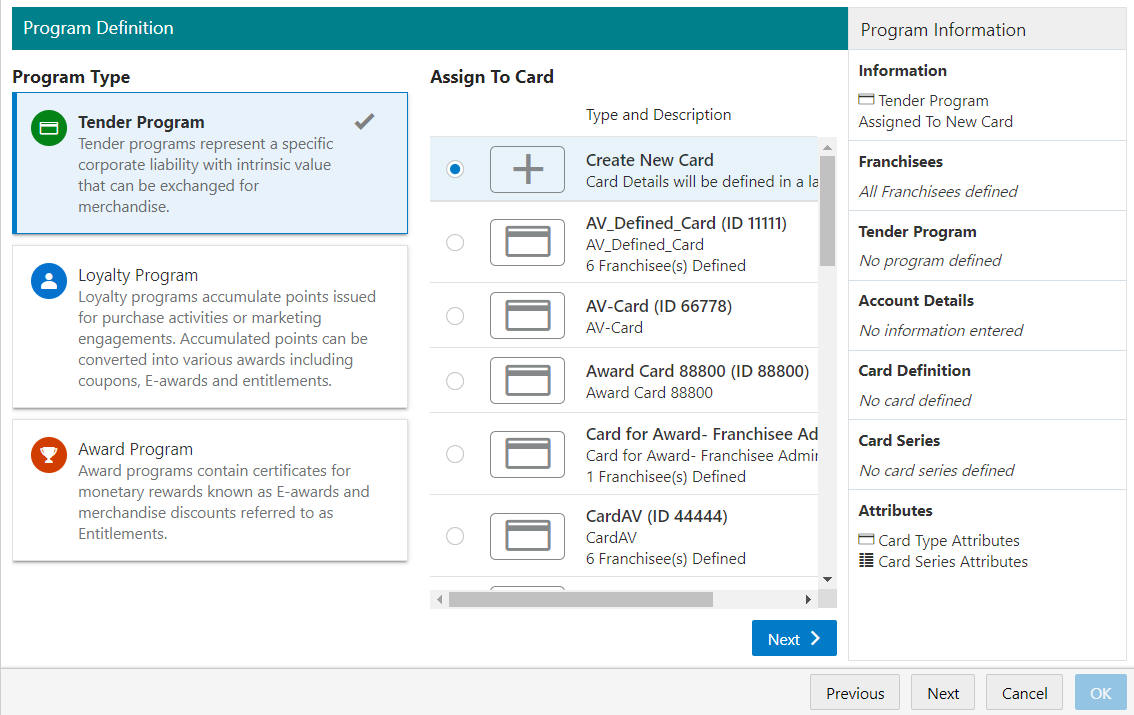
Enter the following items for the Information Tab:
Figure 10-8 Information Tab
Note:
The read-only Program Information Panel displays details throughout most of the tabs of the wizard.
-
Program Type - Select the type of Program from the available options:
-
Tender Program - Tender programs represent a specific corporate liability with intrinsic value that can be exchanged for merchandise.
Note:
When Tender Program is selected, the screen displays cards that do not already have a tender program.
-
Loyalty Program - Loyalty programs accumulate points issued for purchase activities or marketing engagements. Accumulated points can be converted into various awards including coupons, E-awards and Award Certificates.
-
Award Program - Award programs contain certificates for monetary rewards known as E-awards and merchandise discounts referred to as Award Certificates.
-
-
Assign To Card
-
-
Proceed to the step based on the type of program and card configuration chosen in the previous step.
-
If the Program Type is Tender, and you are creating a new card, click Next to proceed to Step 7 the Franchisees tab.
-
If the Program Type is Tender, and you are assigning an existing card, proceed to Step 10 the Tender Program tab.
-
If the Program Type is Loyalty, and you are creating a new card, click Next to proceed to Step 7 the Franchisees tab.
-
If the Program Type is Loyalty, and you are assigning an existing card, proceed to Step 13 the Loyalty Program.
-
If the Program Type is Award, and you are creating a new card, click Next to proceed to Step 7 the Franchisees tab.
-
If the Program Type is Award, and you are assigning an existing card, proceed to Step 15 the Award Program tab.
-
-
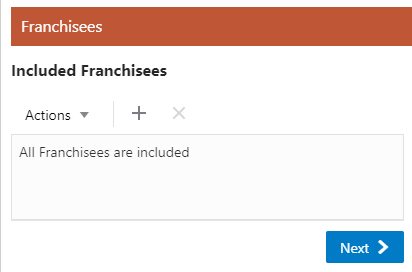
The Franchisees tab allows you to add or change the Franchisees you wish to assign to the program.
Note:
The Franchisee tab is only visible if the
EnableFranchiseSupportconfiguration is enabled, and Franchisees are defined. If you are assigned specific franchisees, then only those franchisees you are associated with are shown.-
If Franchisees are enabled in Customer Engagement, the Franchisees Tab appears. Proceed to Step 8.
-
If Franchisees are not enabled in Customer Engagement and the Program Type is Tender, the Tender Program tab appears. Proceed to Step 10.
-
If Franchisees are not enabled in Customer Engagement and the Program Type is Loyalty, the Loyalty Program tab appears. Proceed to Step 13.
-
If Franchisees are not enabled in Customer Engagement and the Program Type is Award, the Award Program tab appears. Proceed to Step 15.
Figure 10-9 Franchisee Tab
-
-
To assign a Franchisee:
-
Assigning a Franchisee
-
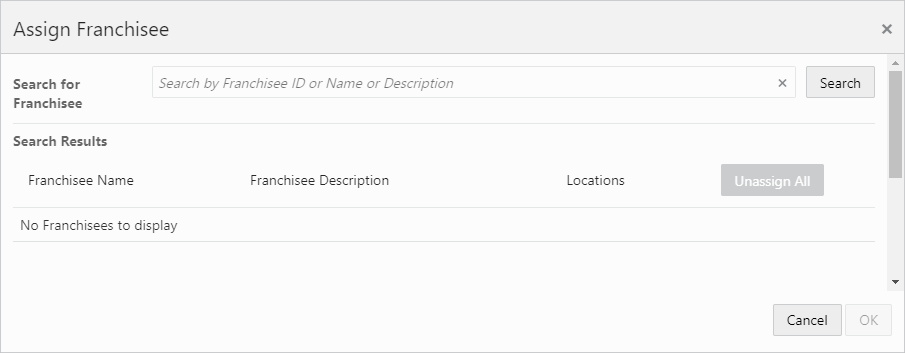
Either click the Action Menu and then click Assign; or click Add (+). This opens the Assign Franchisee window.
Figure 10-10 Assign Franchisee
-
By default, all franchisees are assigned to the program. To make changes to those assignments, you can search for specific franchisees by entering all or part the franchisee Name, ID, or Description. Click Search in the Search for Franchisee search box.
Note:
You also have the option to enter no search criteria and click Search to retrieve all available franchisees from which to select for assignment.
-
In the Included Franchisees results list, click Assign All to assign all the search results, or click Assign for a specific franchisee to add to the program.
-
Click OK to accept the changes or Cancel to close the window without saving.
Note:
A confirmation notification appears to confirm the Franchisees has been assigned.
After a Franchisee is assigned, it appears at the top of the list. The rest of the Franchisees are ordered by ID.
Figure 10-11 Confirmation Notification

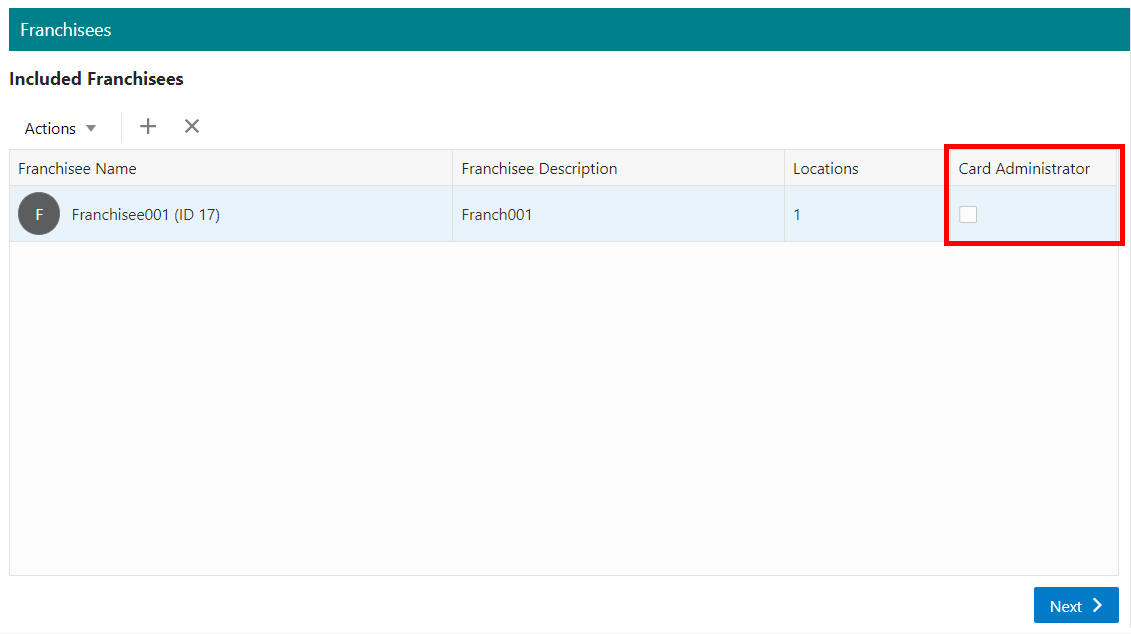
Card Administration Field
This field (unique to Programs) determines whether the franchisee will have Card Administrator privileges for the Card Definition. Select the Card Administration check box to enable Card Administrator privileges.
Figure 10-12 Card Administration Field
-
-
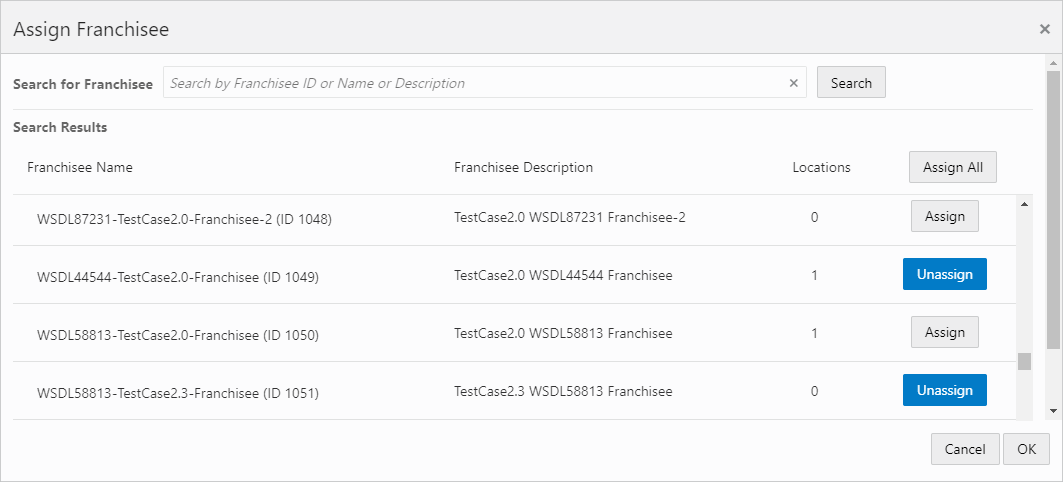
Unassigning a Franchisee
There are two ways to unassign any of the assigned franchisees on the program.
-
In the Assign Franchisee window, click Unassign on any Franchisees currently assigned to the program. Click OK to accept the changes or Cancel to close the window without saving.
-
To unassign Franchisees listed in the Included Franchisees table on the Franchisees tab, first highlight the row and then select the Action Menu. Either click Unassign or click X to remove the associated Franchisee.
Figure 10-13 Assign Franchisee (Using the Unassign Button)
Note:
A confirmation notification appears to confirm that the Franchisees are deleted.
Figure 10-14 Confirmation Notification

-
-
-
When finished selecting the franchises on the Franchisee tab, click Next to continue to the next tab.
Note:
Before you save the Program, you can use the tab links along with Previous and Next to go back to any point in the create program process and make changes.
-
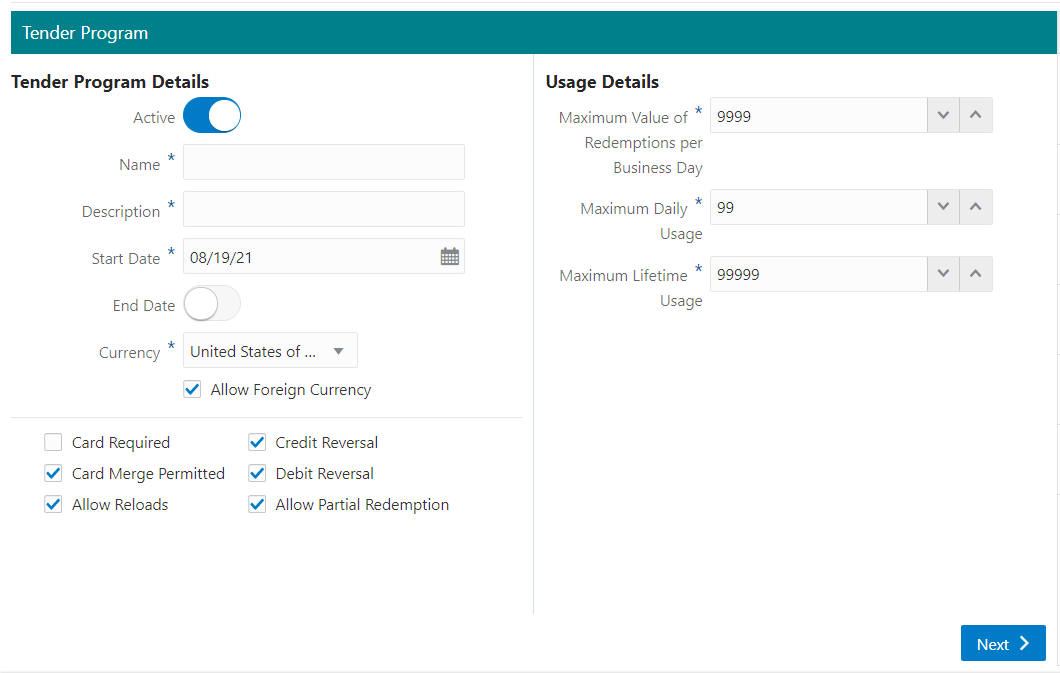
Enter the following information for the Tender Program tab:
Figure 10-15 Tender Program Tab
-
Tender Program Details
-
Active - Toggle on to activate the program immediately on the Start Date.
-
Name - Name of the Program.
-
Description - Description of the Program.
-
Start Date - Date on which the Program starts.
-
End Date - Toggle on to activate the Ends On date selector.
-
Ends On (displays when the End Date toggle is on) - Date on which the Program ends.
-
Currency - The base currency for the Program.
-
Allow Foreign Currency - Indicates whether foreign currency transactions (that is, a transaction performed in a currency other than the base currency) are applied to the Program.
-
Card Required - Indicates whether the customer must have the physical card present during the transaction to receive credit for the transaction.
-
Card Merge Permitted - Indicates whether the Card can be merged with another Card.
-
Allow Reloads - Indicates whether the Program allows accounts to be reloaded.
-
Credit Reversal - Indicate whether credit reversals can be performed.
-
Debit Reversal - Indicate whether debit reversals can be performed.
-
Allow Partial Redemption - Indicates whether a balance on a Tender Account can be partially redeemed.
-
-
Usage Details
-
Maximum Value of Redemptions per Business Day - The total amount of all redemptions that can be performed on a Tender Account in one day.
-
Maximum Daily Usage - The total number of times that a Tender Account can be used in one day.
-
Maximum Lifetime Usage - The total number of times that a Tender Account can be used over the lifetime of the account.
-
-
-
When finished entering the information on the Tender Program tab, click Next, then proceed to the Account Details tab.
-
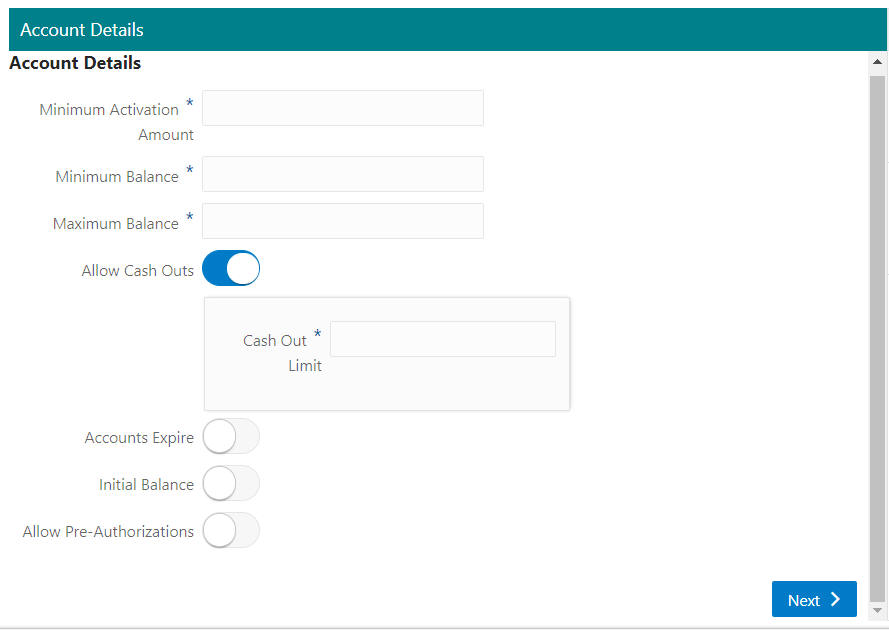
Enter the following for the Account Details tab.
Figure 10-16 Tender Program - Account Details
-
Minimum Activation Amount - The minimum amount that can be in an Account for it to be activated.
-
Minimum Balance - The minimum amount that must be kept in an Account.
-
Maximum Balance - The maximum amount that can be put into the Account
-
Allow Cash Outs -Toggle to on to indicate whether the account can be redeemed for cash or an equivalent tender.
-
Cash Out Limit - If cash out transactions are allowed, the maximum amount that can be cashed out in a transaction.
-
-
Accounts Expire - Toggle to on to indicate the account expires after a certain period of time.
-
Expire After - Enter the number of periods (from Period Type) that passes before a Tender Account expires.
-
Period Type - Indicates the type of period used for the Expire After field.
-
-
Initial Balance - Toggle to on to indicate there is an initial balance on each account. Enter the following:
-
Initial Balance Amount - The amount of the initial balance.
-
Initial Book Value - The initial book value of the account.
-
-
Allow Pre-Authorizations - Toggle to on to indicate that pre-authorizations are allowed for the Tender Accounts.
-
Pre-Authorizations Expire - Toggle to on to indicate that the pre-authorizations expire.
Expire After - Enter the number of periods (from Period Type) that will pass before a Tender Account expires.
Period Type - Indicates the type of period used for the Expire After field.
-
-
-
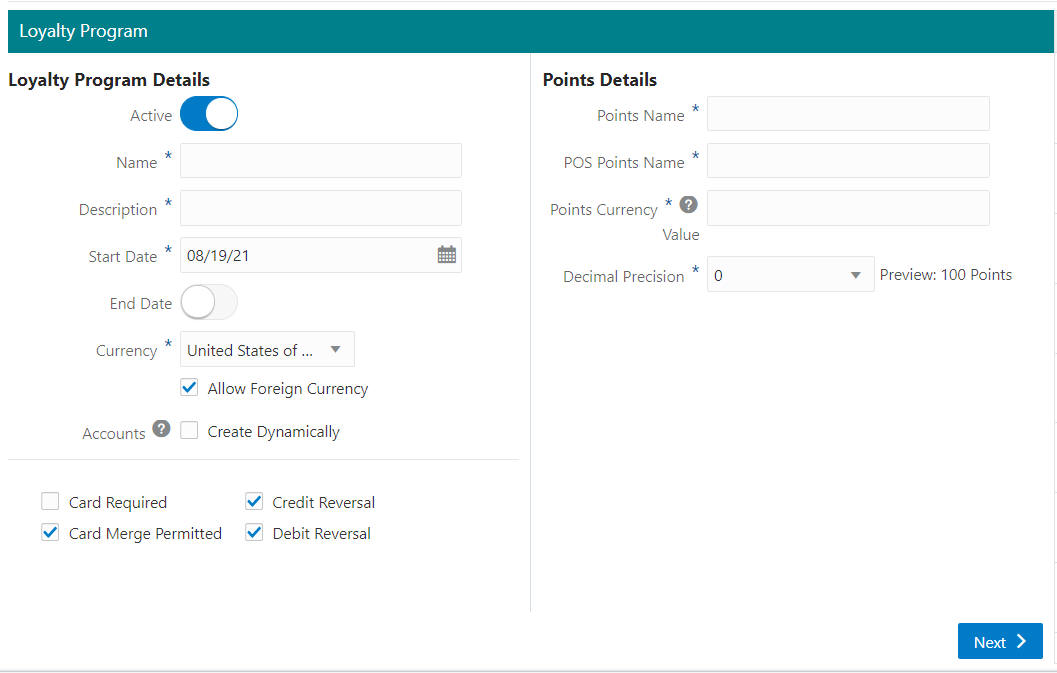
Enter the following for the Loyalty Program tab.
Figure 10-17 Loyalty Program Tab
-
Loyalty Program Details
-
Active - Toggle on to activate the program immediately on the Start Date.
-
Name - Name of the Program.
-
Description - Description of the Program.
-
Start Date - Date on which the Program starts.
-
End Date - Toggle on to activate the Ends On date selector.
-
Ends On (displays when the End Date toggle is on) - Date on which the Program ends.
-
Currency - The base currency for the Program.
-
Accounts - If the check box is selected, then, a loyalty account for a card is not created until there is a POS transaction added to the card. If the check box is clear, then, the loyalty account is created when the card is generated.
-
Allow Foreign Currency - Indicates whether or not foreign currency transactions (that is, a transaction performed in a currency other than the base currency) are applied to the Program.
-
Card Required - Indicates whether or not the customer must have the physical card present during the transaction to receive credit for the transaction.
-
Card Merge Permitted - Indicates whether or not the Card can be merged with another Card.
-
Credit Reversal - Indicate whether or not credit reversals can be performed.
-
Debit Reversal - Indicate whether or not debit reversals can be performed.
-
-
Points Details
-
Points Name - Name of the points used by the Program.
-
POS Points Name - Name of the points displayed on the point of sale system.
-
Points Currency Value - Informational and reporting use only.
-
Points Decimal Precision - The number of decimal points used in tracking points.
-
Figure 10-18 Loyalty Program Tab

-
-
When finished entering the information on the Loyalty Program tab, click Next, then proceed to Step 20, the Levels tab.
-
Enter the following for the Award Program tab.
Figure 10-19 Award Program Tab
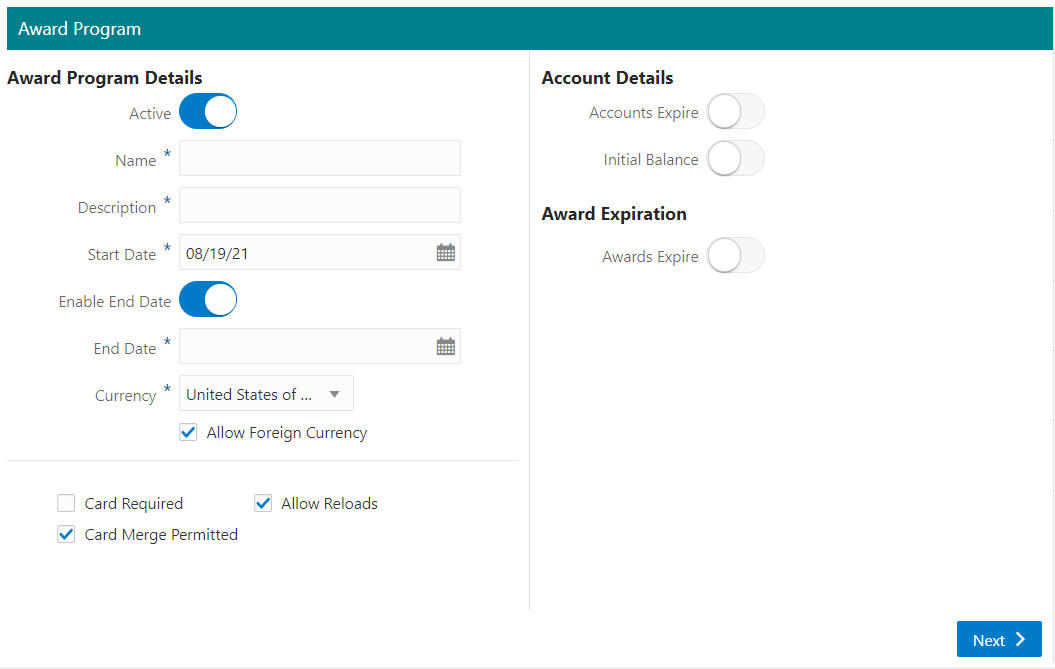
Award Program Details
-
Active - Toggle on to activate the program immediately on the Start Date.
-
Name - Name of the Program.
-
Description - Description of the Program.
-
Start Date - Date on which the Program starts.
-
Enable End Date - Toggle on to activate the Ends On date selector.
-
End Date (displays when the Enable End Date toggle is on) - Date on which the Program ends.
-
Currency - The base currency for the Program.
-
Allow Foreign Currency - Indicates whether or not foreign currency transactions (that is, a transaction performed in a currency other than the base currency) are applied to the Program.
-
Card Required - Indicates whether the customer must have the physical card present during the transaction to receive credit for the transaction.
-
Card Merge Permitted - Indicates whether or not the Card can be merged with another Card.
-
Allow Reloads - Indicates whether or not the Program allows accounts to be reloaded.
Note:
The account balance for an award account holds the value of any e-awards added to an award program. If the Allow Reloads is not checked, once the initial value is used up, the program cannot add more value to the account balance. If it is checked, E Award values can continue to be added. E Awards are created and issued from loyalty programs but the value is held in a linked award program.
Account Details
-
Accounts Expire - Toggle on to enter the preferred time period for the account to expire.
-
Initial Balance - This initial balance will hold a currency value that will be added automatically to an award account when it is activated on an individual card. This currency value can be used in the retail location toward a purchase.
Award Expiration
-
Award Expire - Toggle on to enter the preferred time and period for the award to expire.
-
Extend Expiration based on Activity (appears only when Awards Expire is toggled to on) - If the check box is clear, then the expiration date is fixed and determined by the date the coupon is issued. If the check box is selected, the expiration date is initially determined by the date the coupon is issued, but is then recalculated based on the current activity date as a courtesy to the customer when they are shopping with your company.
Note:
Before you save the Program, you can use the tab links along with Previous and Next to go back to any point in the create program process and make changes.
-
-
When finished configuring the Award Program, Click Next. Proceed to Award Rules tab.
-
Enter the following for the Award Rules tab:
Note:
The Award Rules tab in the Award Program allows the user to create an award certificate and assign time and or location rules to limit when and or where they can be redeemed.
-
Click the + Add Award Certificate button.
Figure 10-20 Add Award Certificate
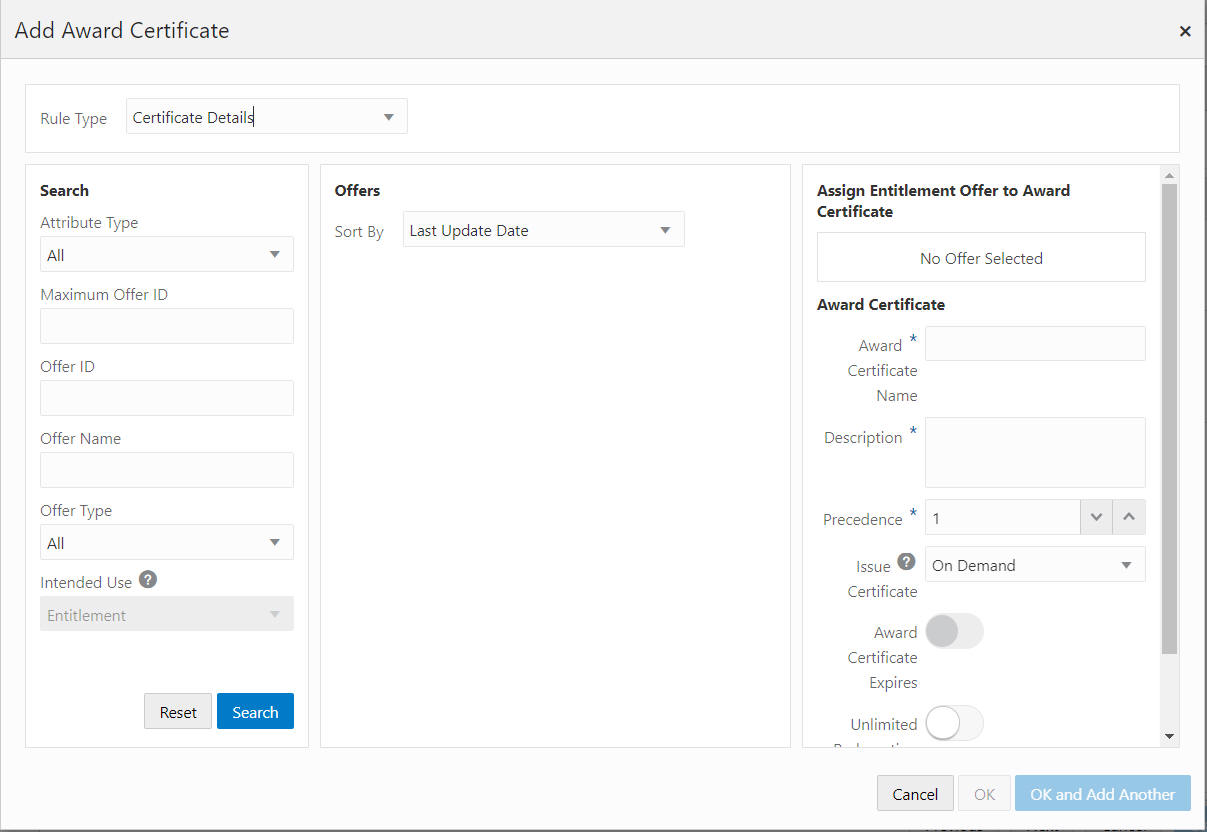
The Award Rules tab for the Award Program defaults the to Rule Type, Certificate Details. After the Offer is added to the Assign Entitlement Offer to Award Certificate, you are able to add additional Rule Types to this Award Certificate.
There are four sections; Search, Offers, Assign Entitlement Offer to Award Certificate, and Award Certificate.
-
Search - Use this section to populate the Offers Section. Fields include:
-
Attribute Type
-
Maximum Offer ID
-
Offer ID
-
Offer Name
-
Offer Type
-
Intended Use
Note:
The Intended Use field is disabled and uses the default value of Entitlement. Only offers with an Intended Use of Entitlement can be assigned to an award certificate.
-
-
Click Search to populate the Offers Section. Click Reset to clear all Search fields.
-
Sort By - Select an option to sort by the following:
-
Last Update Date
-
Offer ID
-
Offer Name
-
Offer Type
-
-
Click Add to populate the Assign Entitlement Offer to Award Certificate section.
Assign Entitlement Offer to Award Certificate
-
Click Remove to remove an offer. Return to the Offers section to select a new offer to assign.
Award Certificate
-
Enter the Award Certificate Name.
-
Enter the Description.
-
Enter the Precedence (Order in which the Award Rule will be applied if more than one Award Rule is effective).
-
Select Issue Certificate setting.
-
On Demand
-
When Account is First Activated
-
When Card is Registered to Customer
Note:
When the On Demand option is selected, the award certificate can be issued manually, by a web service or by a loyalty issue rule using the Create Loyalty Award batch.
-
-
Award Certificate Expires - This is a toggle switch, but it is read only. It is on or off based on the Issue Certificate setting. When Issue Certificate = On Demand, this toggle is Off. The expiration date is controlled by the web service or loyalty issue rule. When Issue Certificate is NOT On Demand, then the toggle is On (read only) and the user is required to select expiration parameters.
-
To allow unlimited redemptions, toggle on Unlimited Redemption.
-
When the Unlimited Redemption toggle is off, enter the number of Maximum Redemptions allowed.
Rule Types - These are the eligibility rules that will be used to determine when the award certificate is effective.
Note:
The next section deals with the Rule Types available for the Award Certificate once an Entitlement Offer is assigned. Any of the Rule Types can be combined with other Rule Types.
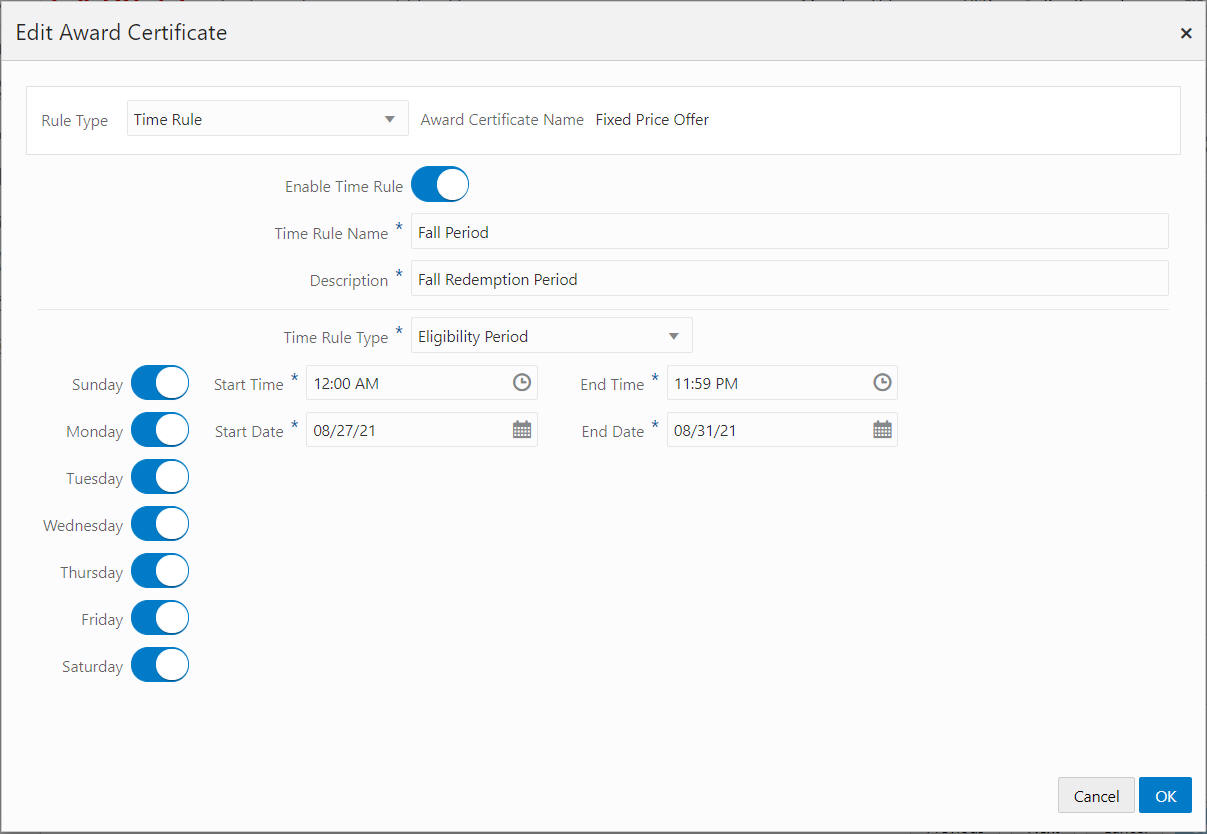
Time Rule - Defines the time rules when the award certificate is effective.
-
Enable Time Rule - Toggle on to activate the Time Rule Name, Description, and Time Rule Type fields, and the purpose is to define when the award certificate is effective. If it is turned off, the award certificate has no restrictions as to when it is effective.
-
Time Rule Name - Name of the Time Rule.
-
Description - Description of the Time Rule.
-
Time Rule Type - Types include:
-
Eligibility Period
-
Blackout Period
Figure 10-21 Time Rule - Eligibility Period / Blackout Period
-
-
Toggle on to select each day of the week for which the time rules apply for this Item Rule.
-
Enter a Start Time.
-
Enter an End Time.
-
Enter a Start Date.
-
Enter an End Date.
Location Rule (Include) or Location Rule (Exclude)
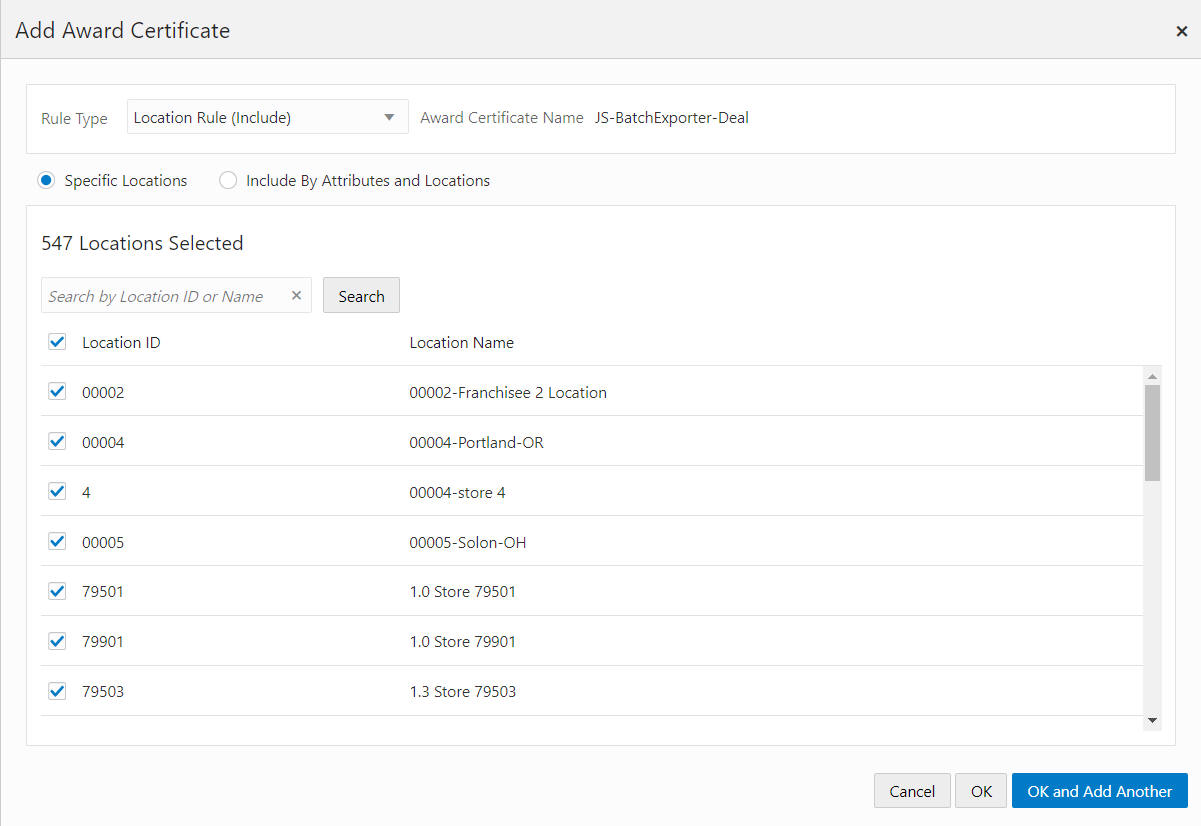
Defines which locations the award certificate is effective in, or which locations are excluded. Both Rule Types are configured in the same way.
Figure 10-22 Location Rule (Include)
-
To add an Award certificate by Specific Locations:
Note:
The Location ID check box at the top of the list enables you to clear or select all locations. If you clear all the locations, then you can scroll through the list or search for a specific location.
-
Enter part or all of a Location ID or Name.
-
Click Search.
-
Select the check box for each of the desired Locations.
-
-
To add an Award certificate using Include By Attributes and Locations or Exclude By Attributes and Locations
-
Click Add to select an attribute. The By Attributes and By Location options can be collapsed or expanded.
-
After the initial selection, additional choices display in the query with the condition, Or (one or more of the conditions must be met). Click Or to change to And (both conditions must be met).
-
Click the Vertical Ellipsis and select Remove to clear the attribute from the query.
-
-
Click OK to add the Award Certificate to the Program or click OK and Add Another to add another Award Certificate. Click Cancel to close the window without adding the Award Certificate.
-
-
When finished entering all the Award Rules to the Award Certificates, in the Award Rules tab, click Next.
-
When finished defining Account Details do the following:
-
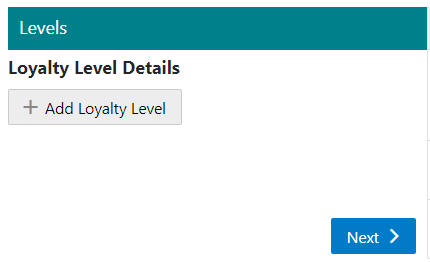
The Levels tab displays information for each Level in the Loyalty Program. Enter the following information to add Loyalty Levels.
Figure 10-23 Levels Tab
Adding Initial Loyalty Level
-
Click + Add Loyalty Level.
Loyalty Level Details
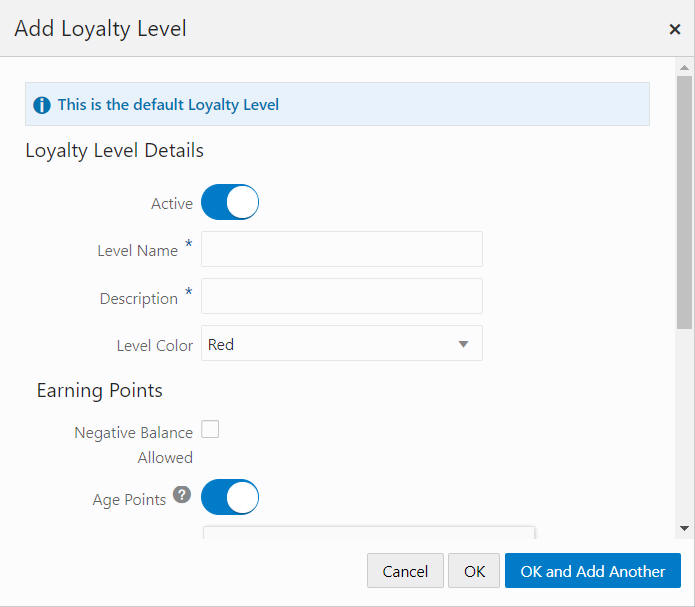
Figure 10-24 Loyalty Level Details
-
The Active toggle default is on. Click the toggle off to inactivate the Loyalty Level.
-
Enter a Level Name.
-
Enter a Description.
-
Select a Level Color.
Earning Points
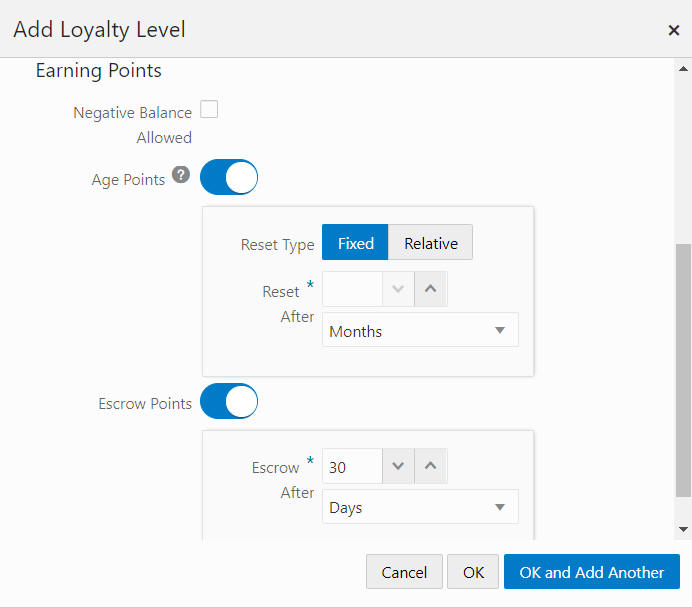
Figure 10-25 Earning Points
-
Select the Negative Balance Allowed check box to indicate when the Loyalty Level allows customers to have negative point balances.
-
Age Points (toggle on to activate) - Selecting the Fixed reset type expires the entire unused points balance after the account has been inactive for x periods. Selecting the Relative reset type expires the individual unused points x periods after each has been earned. Enter the Reset After number of periods then select the type of period.
-
Escrow Points (toggle on to activate) - Determines whether points are escrowed before they become available for use as Earned Points. Enter the Escrow After number of periods then select the type of period.
-
Click OK to add the Level to the Program or click OK and Add Another to add another Level. Click Cancel to close the window without adding the Level.
Edit/Deactivate Loyalty Levels
-
Click the Additional Options ellipsis to Deactivate or Edit a Loyalty Level.
-
-
When finished entering all Loyalty Levels on the Levels tab, click Next to proceed to the Issue Rules tab.
-
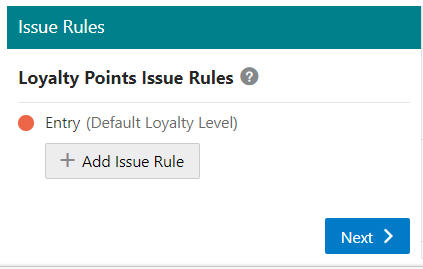
The Issue Rules tab contains a Layer List of rules that determine how points are issued by the Loyalty Level. The default Rule Type is Definition.
Figure 10-26 Issue Rules Tab
Adding an Issue Rule
-
Click + Add Issue Rule.
Note:
Issue Rules are required to use the Definition Rule Type. Once the Definition rule type has been completed and validated, you can add additional Rule Types before you click OK to save the Issue Rule. Availability of the Rule Types are determined based on the selected Calculation Type.
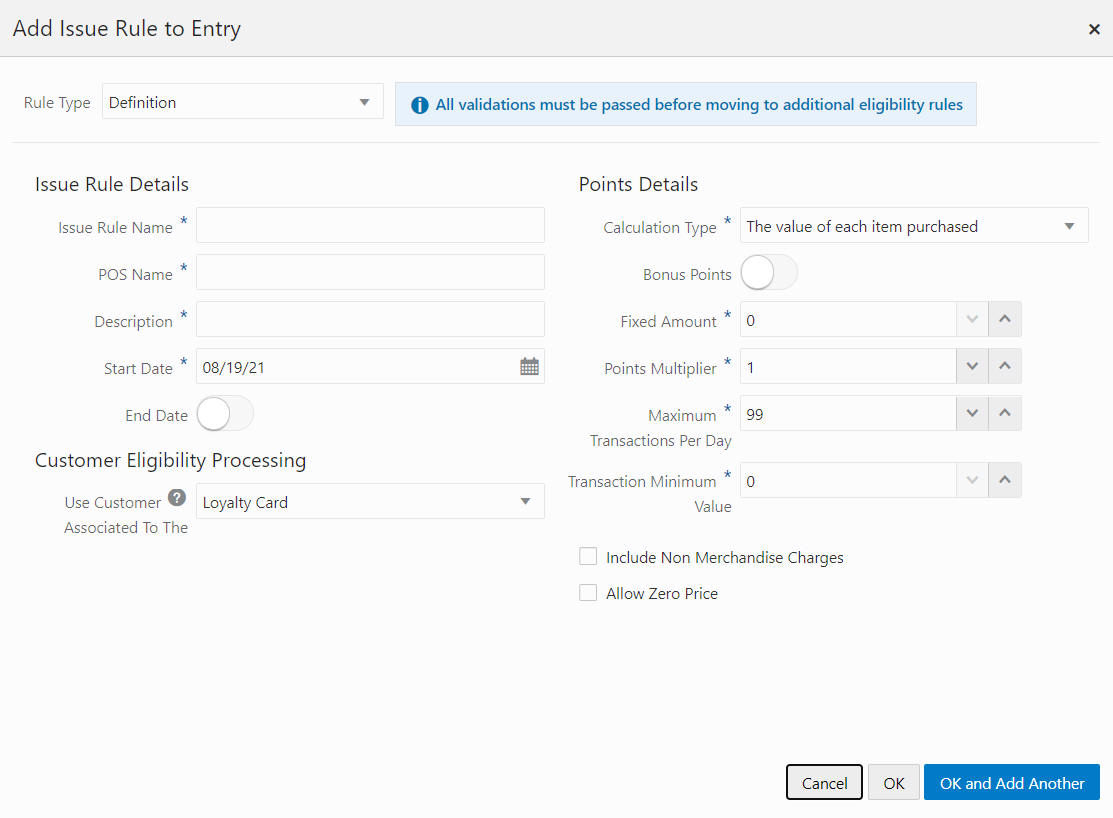
Issue Rule Details
Figure 10-27 Add Issue Rule to Entry
-
Use the required default Definition Rule Type.
-
Enter the Issue Rule Name.
-
Enter the POS Name.
-
Enter the Description.
-
Click the Date Selector icon to choose a Start Date or enter the date in the Start Date text box.
-
If desired, toggle off End Date to display the Ends On text box. Click the Date Selector icon to choose a Ends On date or enter the ends on date in the Ends On date text box.
Customer Eligibility Processing
-
Select the Use Customer Associated To The Loyalty Card or Transaction.
Note:
When Loyalty Card is selected, the customer associated to the card is used to evaluate audience rule eligibility. When Transaction is selected, the customer associated to the transaction is used.
Points Details
-
Calculation Type - Indicates the value that is used as the point-determination method.
-
The value of each item purchased - The sale amount of each item purchased in the transaction.
-
The quantity of each item purchased - The quantity of each item purchased in the transaction.
-
The number of marketing engagements - The number of times the customer interacts with marketing media, such as watching a video online.
-
The number of qualifying transactions - The number of qualifying transactions made by the Customer.
-
The number of qualifying visits - The number of qualifying visits made by the Customer
-
-
Bonus Points - Indicates whether this Issue Rule stipulates that the Loyalty Program issues points as Bonus Points (defaults to ON if the Calculation Type is The number of marketing engagements) or Regular Points.
-
Fixed Amount - The Fixed Amount, if any, assigned to each transaction or marketing engagement.
-
Points Multiplier - The number multiplied by the value indicated in the Calculation Type field (only shown if the selected Calculation Type is either The value of each item purchased or The quantity of each item purchased).
-
Maximum Transactions Per Day - The maximum number of sales transactions in a single day that will be used to calculate Loyalty points.
-
Transaction Minimum Value - Minimum amount of a transaction for it to be applied to a Loyalty account.
-
Include Non-Merchandise Charges - Determines whether points will be issued for non-merchandise charges in a transaction.
-
Allow Zero Price - Determines whether points will be issued for zero priced items in a transaction.
Issuance Rules - Displays when the Calculation Type is, The number of marketing engagements.
-
Frequency Period - This field determines the time period used to control the frequency with which a Customer can earn points through marketing engagements. Can be set to One-time only, Daily, Weekly, Monthly, or Yearly.
-
Issues Per Period - The number of times a Customer can earn points through marketing engagements during the Frequency Period. Set to 1 if the Frequency Period is One-time only.
-
Unlimited Issuance - Determines whether points can be issued an unlimited number of times during the Frequency Period.
-
Rule Count Limit - The total number of times a Customer can earn points through marketing engagements.
Rule Types - Rules to set limits on how and when Issue Rules are applied and used.
Note:
Availability of Rule types are based on a previously selected Calculation Type.
Note:
The next section deals with the seven Rule Types available. They can be combined within a single Issue Rule.
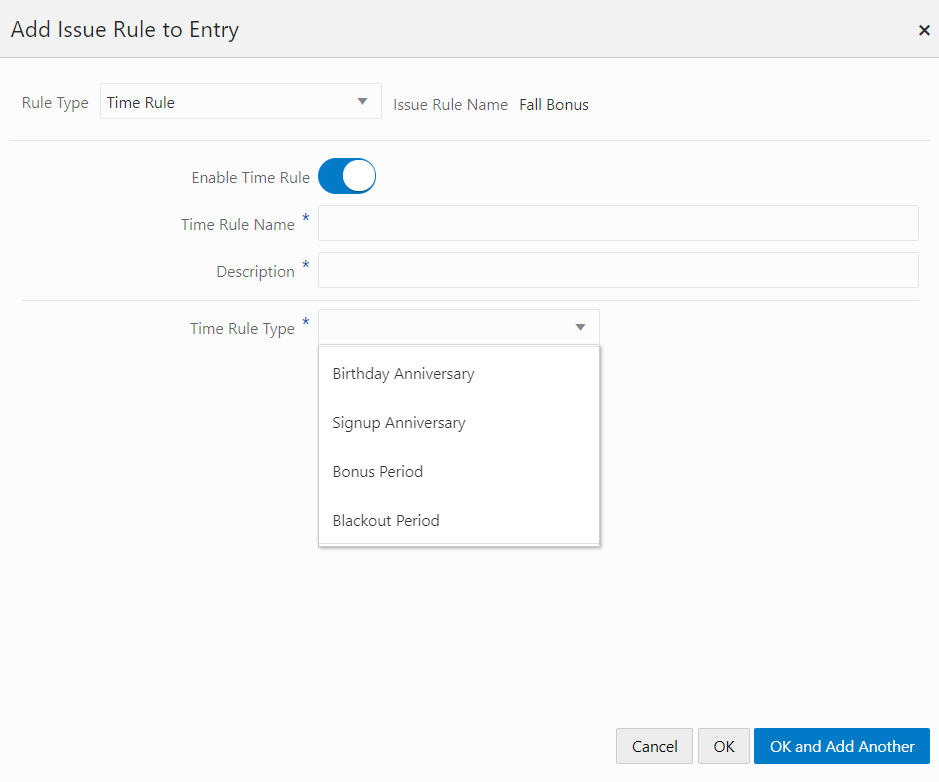
Time Rule - Defines the time rules when loyalty points can be issued for a loyalty program, that rewards customers when they purchase during specific hours and date ranges.
Figure 10-28 Time Rule
-
Enable Time Rule - Toggle to On to activate Time Rule Name, Description, and Time Rule Type fields.
Note:
This switch can be turned off after defining the rules so there are no limitations to the time the issue rule applies.
-
Time Rule Name - Name of the Time Rule.
-
Description - Description of the Time Rule.
-
Time Rule Type - Types include:
-
Birthday Anniversary
-
Signup Anniversary
-
Bonus Period
-
Blackout Period
Figure 10-29 Time Rule Type - Bonus Period/Blackout Period Options
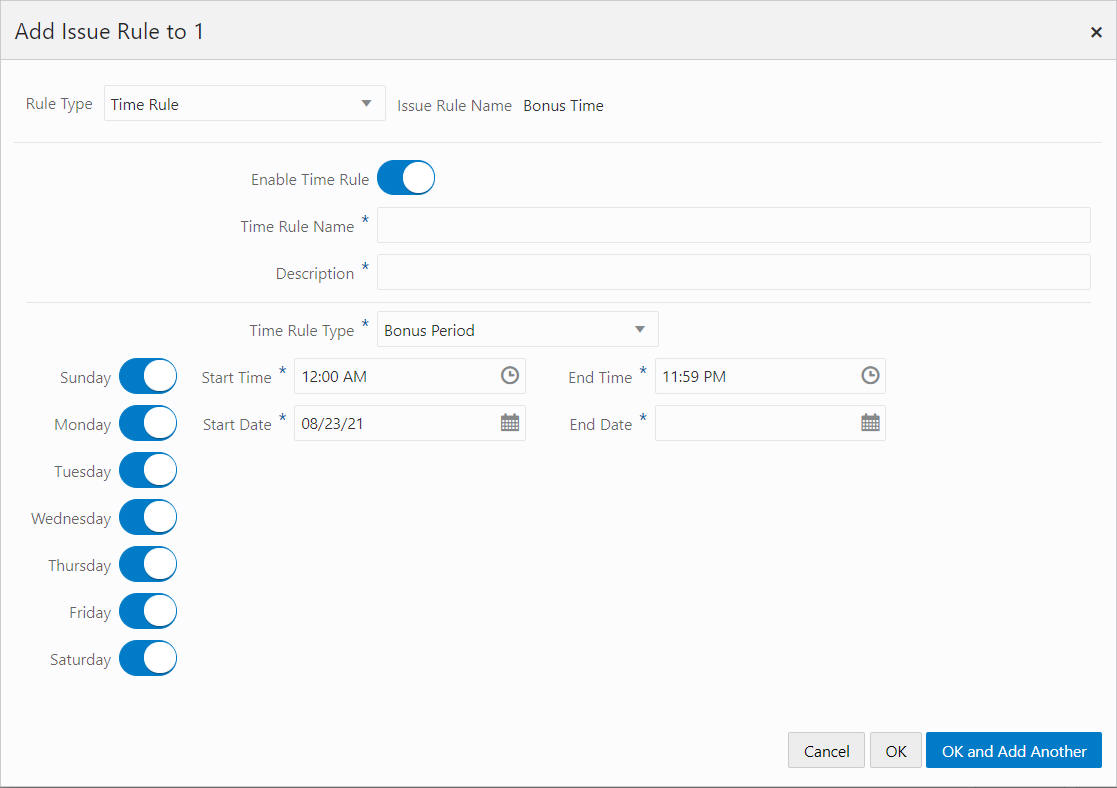
Bonus/Blackout Period Time Type Configuration
-
-
Select the Day of the Week for which the time rules will apply for this Item Rule.
-
Enter a Start Time.
-
Enter an End Time.
-
Enter a Start Date.
-
Enter an End Date.
Note:
Each Rule Type configuration is saved during the process. To configure more Rule Types, select a Rule Type from the options list. Do not click OK until all desired Rule Types are configured.
-
If no more Rule Types are desired, click OK to save, Cancel to close without saving, or click OK and Add Another to create additional Issue Rules for that Loyalty Level. Otherwise continue to configure additional Rule Types.
Item Rule (Include) or Item Rule (Exclude)
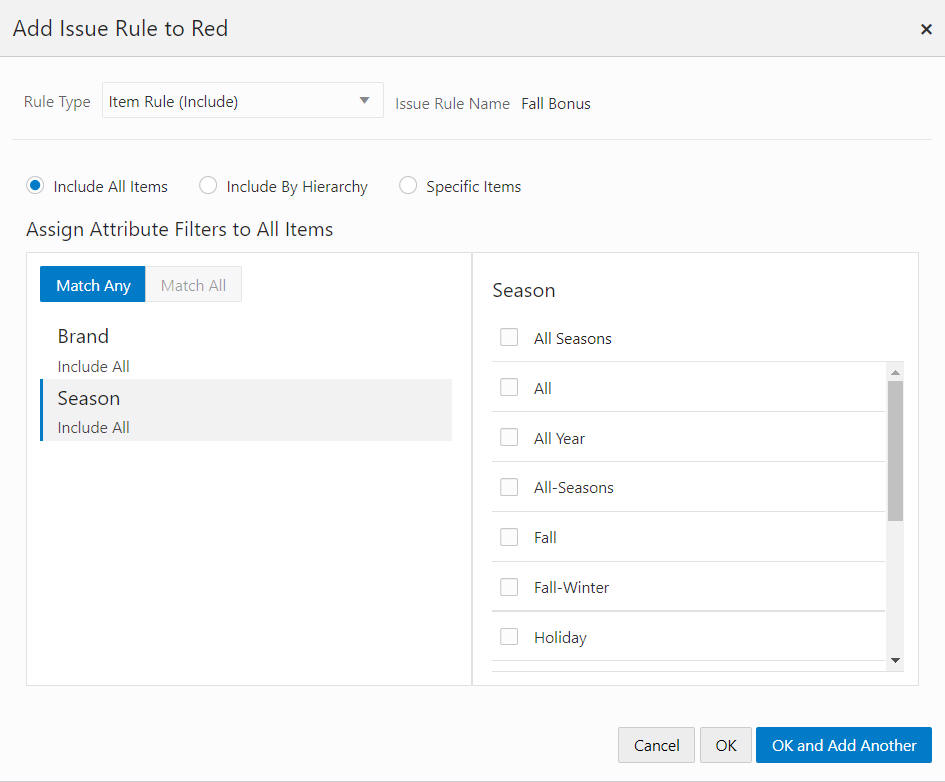
Defines which items are eligible to accrue loyalty points. Both Rule Types are configured in the same way by selecting either: Include All Items, Include By Hierarchy, or Specific Items
-
To configure a Rule Type by using Include All Items:
Figure 10-30 Item Rule (Include) - Include All Items
-
In the left pane, select the desired attribute filter from the list of available choices. Once selected, any associated values for the attribute appear in the right pane.
-
In the right pane, select or clear values of the selected attribute filter. You can add all values for that attribute by selecting the check mark in the top check box.
-
Repeat the process for any or all the available Attribute Filters in the left pane.
-
-
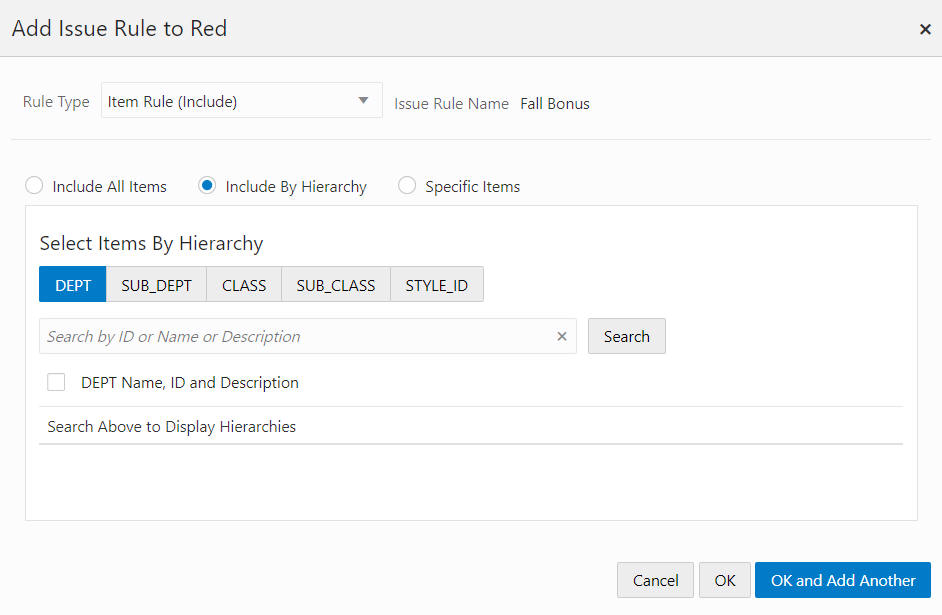
To configure a Rule Type by using Include By Hierarchy:
Figure 10-31 Item Rule (Include) - Include By Hierarchy
-
In the Search by ID or Name or Description field, enter any part or entire Hierarchy ID, Name, or Description.
-
Click Search.
-
Select or clear values of the selected attribute filter. You can add all values for that attribute by selecting the check mark in the top check box.
-
-
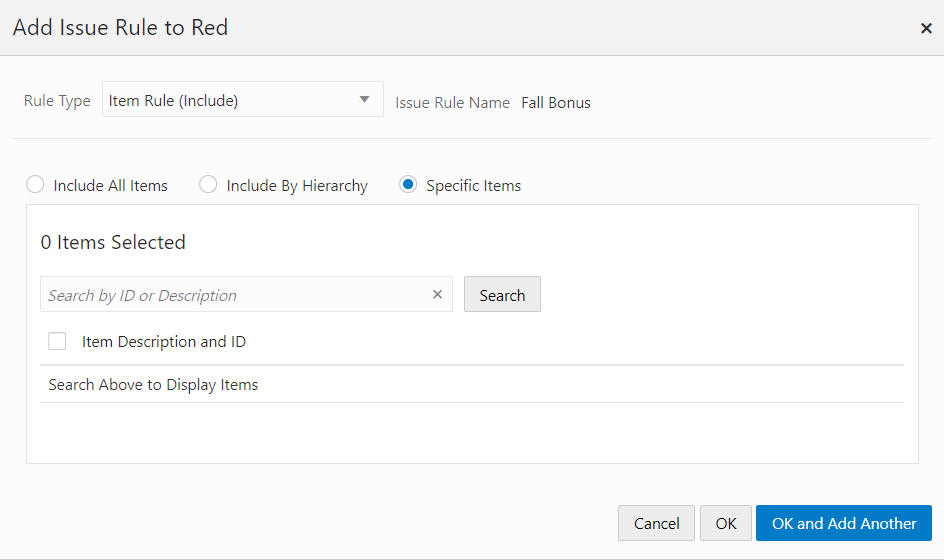
To configure a Rule Type by using Specific Items:
Figure 10-32 Item Rule (Include) - Specific Items
-
In the Search by ID or Description field, enter any part or entire Item ID or Description.
-
Click Search.
-
Select or clear values of the selected attribute filter. You can add all values for that attribute by selecting the check mark in the top check box.
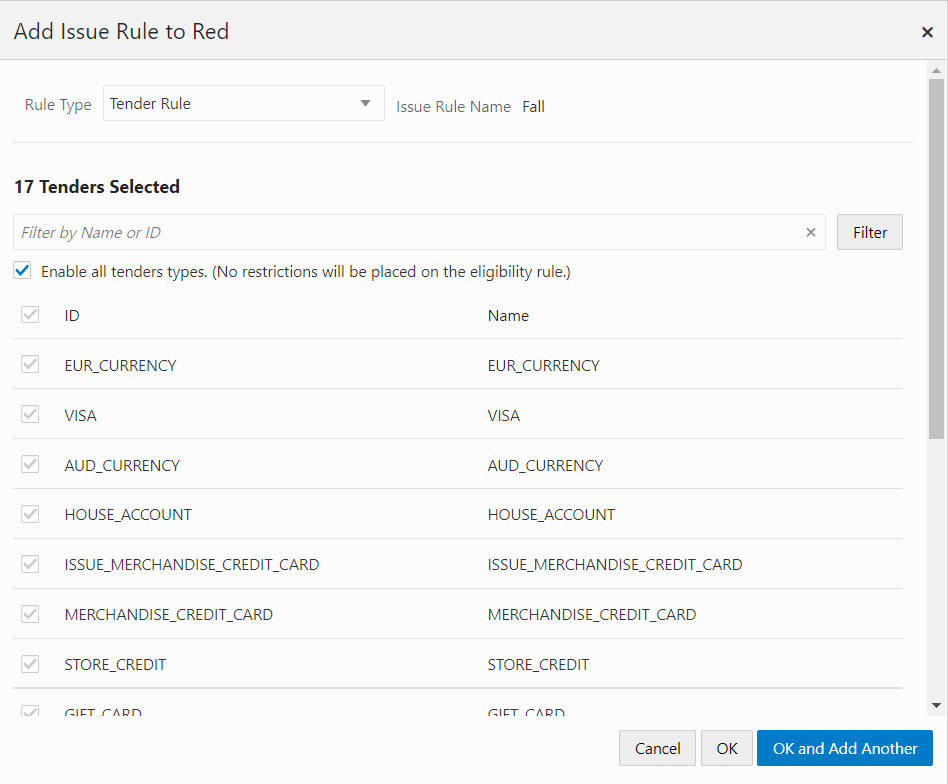
Tender Rule
This can be used to define when the customer uses specific tender types, the customer is eligible for points to be issued.
Figure 10-33 Tender Rule
-
-
In the Filter by Name or ID field, enter any part or entire Tender Name or ID.
-
Click Filter.
-
You can clear Enable All Tender Types by clearing the check mark in the top check box. Then you can look through the list and choose specific tenders by selecting the associated check box.
Location Rule (Include) or Location Rule (Exclude)
Defines which locations are eligible to accrue loyalty points. Both Rule Types are configured in the same way.
-
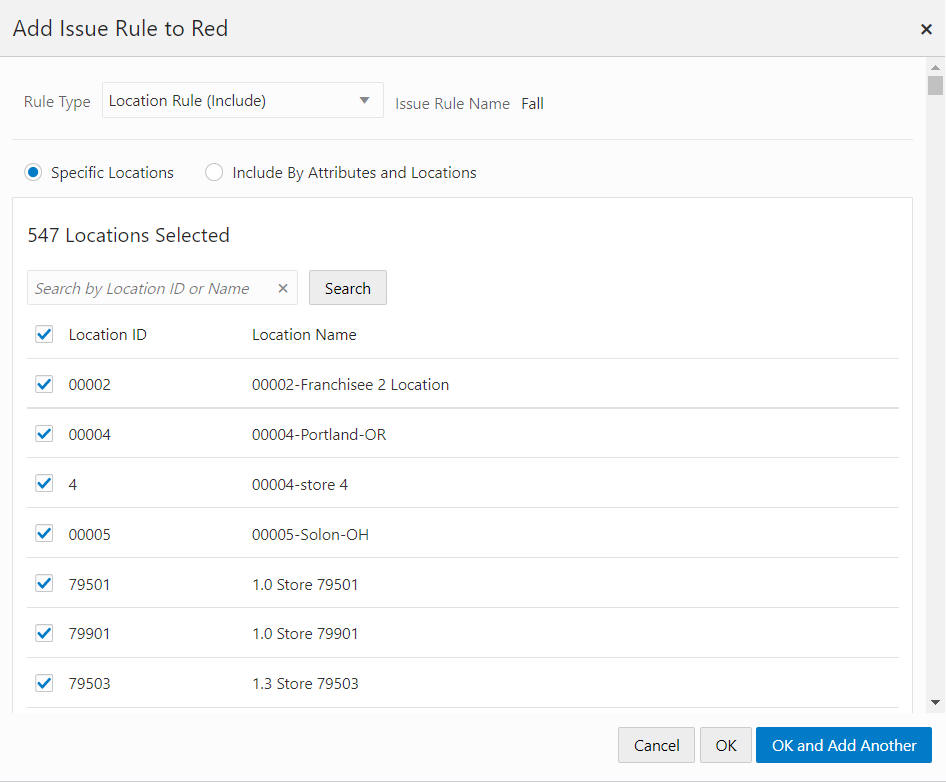
Specific Locations
Figure 10-34 Location Rule (Include) - Specific Locations
Note:
The Location ID check box at the top of the list enables you to clear or select all locations. If you clear all the locations, then you can scroll through the list or search for a specific location.
-
Enter part or all of a Location ID or Name.
-
Click Search.
-
Choose specific Locations by selecting the associated check box.
OR
-
-
Include By Attributes and Locations/Exclude By Attributes and Locations
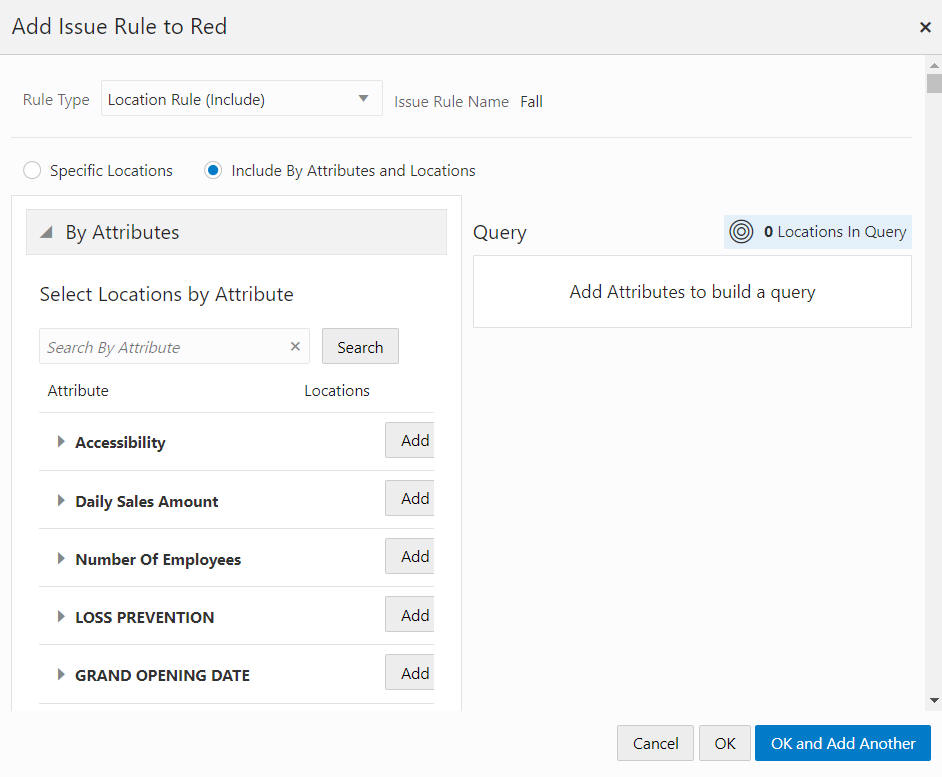
Figure 10-35 Location Rule (Include) - Include By Attributes and Locations
-
Click Add to select an attribute. The By Attributes and By Location options can be collapsed or expanded.
-
After the initial selection, additional choices display in the query with the condition, Or (one or more of the conditions must be met). Click Or to change to And (both conditions must be met).
-
Click the Vertical Ellipsis and select Remove to clear the attribute from the query.
Audience Rule
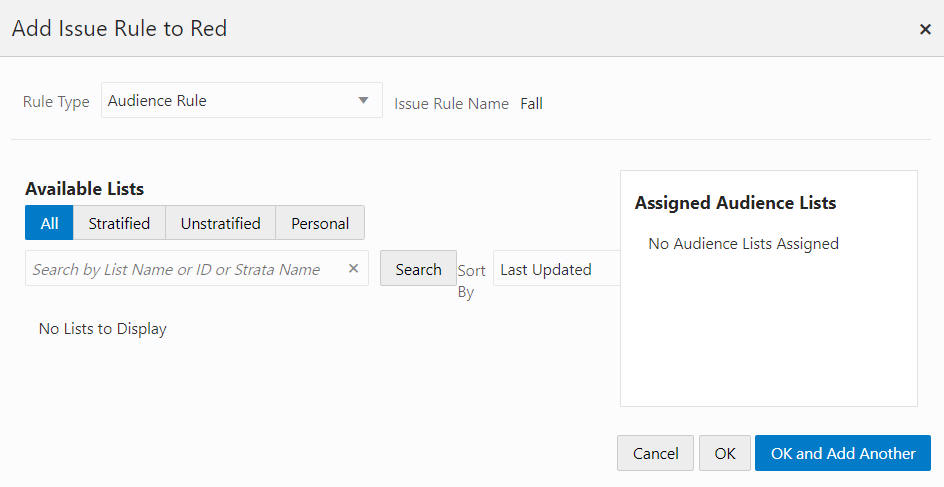
If an audience rule is created, only customers in the selected lists will earn points.
Figure 10-36 Audience Rule
-
-
Select an Available List type.
-
All - Default
-
Stratified - The customers within a Stratified list are divided into levels.
-
Unstratified - The customers within an Unstratified list are not differentiated into separate groups.
-
Personal - customers maintained by the user.
-
-
In the Search field, enter part or all of the List Name, ID, or Strata Name.
-
Click Search. The results can be sorted by using the Sort by list menu with the following options:
-
Last Updated
-
Name
-
Customer Count
-
-
Click Add for each Available List to add the selection to the Assigned Audience Lists.
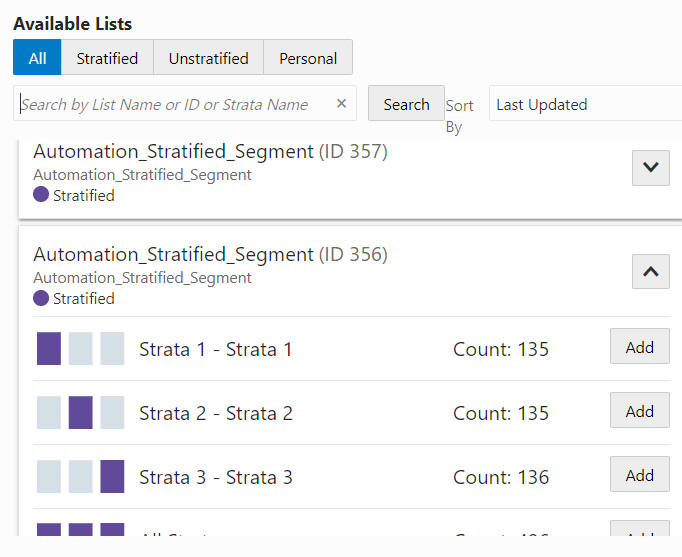
Note:
Lists with more than one group display an Expand icon. Click the Expand icon to see the available choices within that list.
Figure 10-37 Available Lists - Expand Icon
-
Click OK to save, click Cancel to close without saving, or click OK and Add Another to save the configured Rule Types and configure additional Issue Rules.
-
-
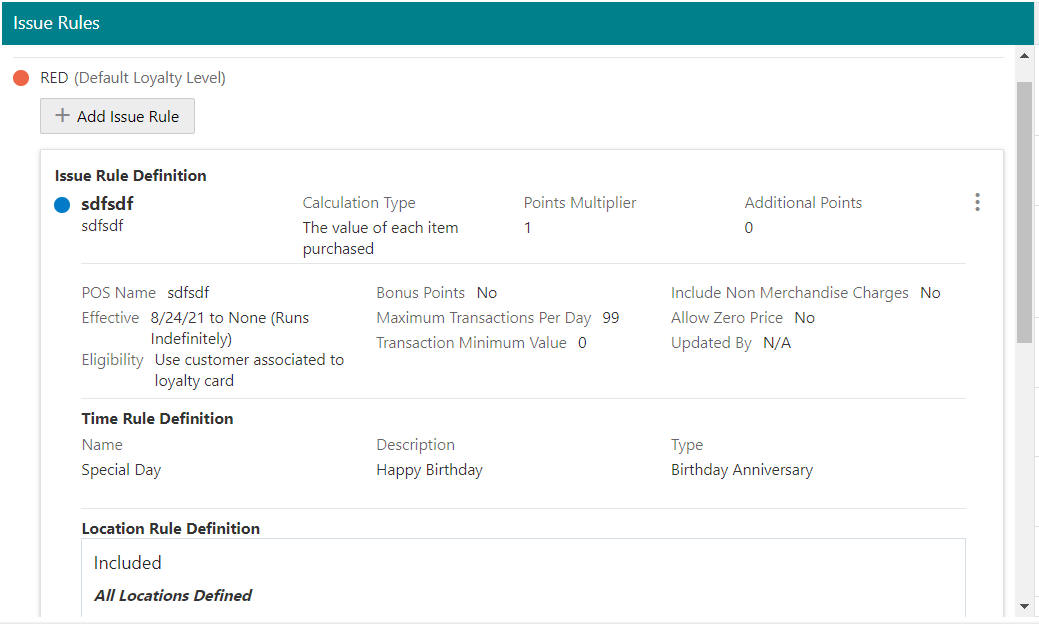
Review the Issue Review Definition area as shown in Figure 10-38. Click the Vertical Ellipsis to Edit or Remove the Issue Rule.
Figure 10-38 Issue Rule Definition
-
When finished entering all Issue Rules, click Next to go to the Award Rules tab.
-
Enter the following for the Award Rules tab. The Award Rules tab contains a Layer List of rules that determine how Coupon, E Award, or Award Certificates are issued by the Loyalty Level.
-
Click the + Add Award Rule button.
Note:
'The Award Rules Tab, in the Loyalty Program, defines what awards can be issued, when an award can be issued based on the loyalty points balance and the points cost to use the award. An award program is required to hold an Award Certificate or E-Award value. Therefore, when creating a new card, Coupon is the only available Award Type Rule, since an existing award program is not required.
-
Select an Award Rule Type (Coupon -Default) and enter the following:
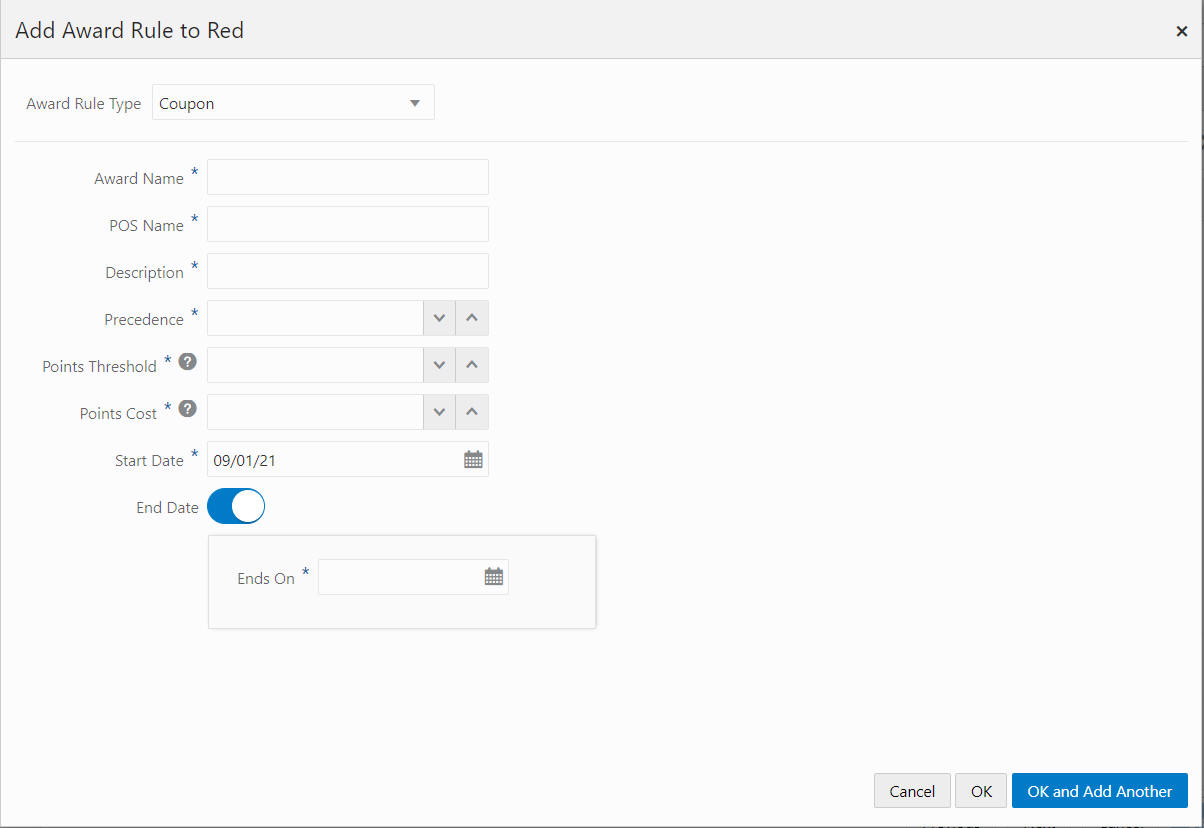
Coupon
Figure 10-39 Award Rule Type - Coupon
-
Award Name
-
POS Name
-
Description
-
Precedence (Order in which the Award Rule will be applied if more than one Award Rule is effective).
-
Points Threshold (The customer's loyalty account balance must be equal to or greater than the number entered in this field to issue this award).
-
Points Cost
-
Start Date
-
End Date - Toggle the End Date On to enter an End Date if desired.
E Award
Figure 10-40 Award Rule Type - E Award
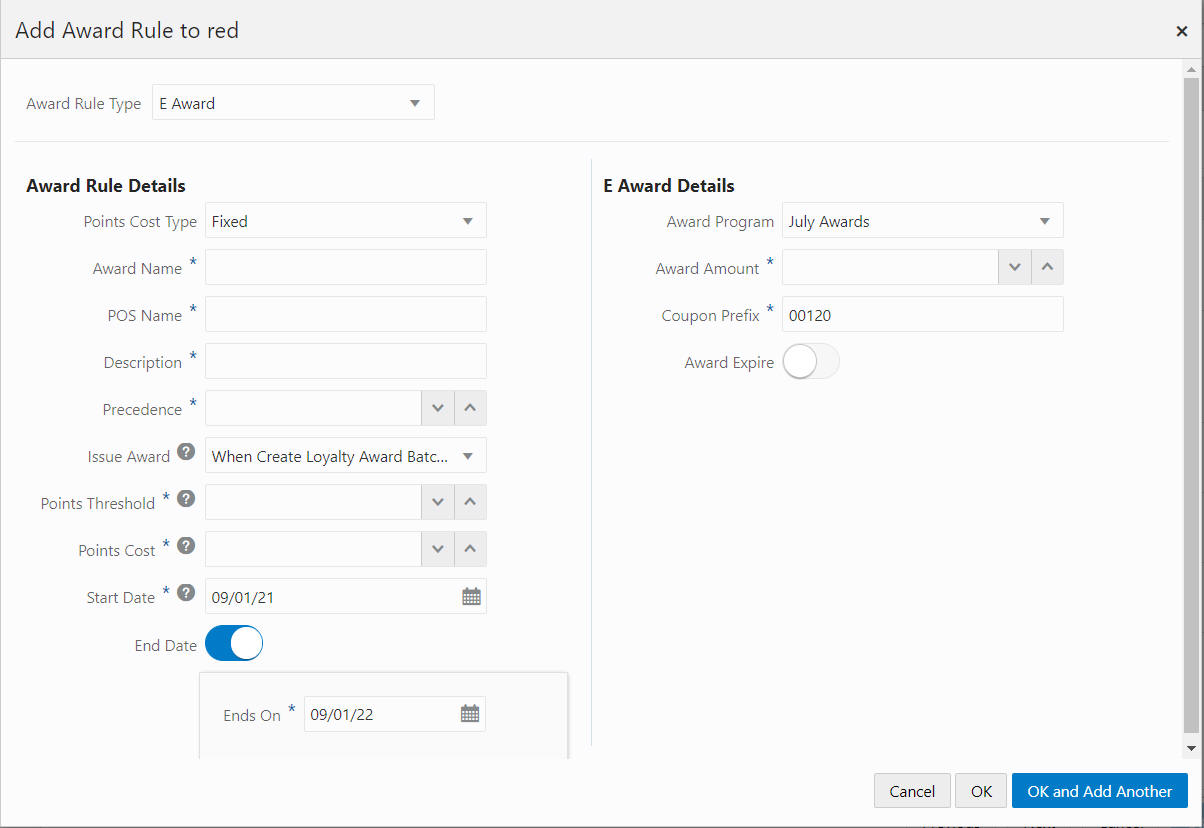
Awards Rule Details
-
Enter the Points Cost Type. The fields in the Award Rules Details section for an E Award will change depending upon the value in the Points Cost Type Selection Menu
-
Fixed - E Award is a fixed amount.
-
Cashback - E Award value will depend upon the number of points in the Loyalty Account, which allows for full redemption.
-
-
Enter the Award Name.
-
Enter the POS Name.
-
Enter the Description.
-
Enter the Precedence (Order in which the Award Rule will be applied if more than one Award Rule is effective).
-
Select Issue Reward setting.
Note:
When the Issue Certificate is set to Immediately Upon Transaction Posting, the award certificate will be issued to a customer account as soon as the system processes the purchase activity. If the selection is set to When Create Loyalty Award Batch Runs, the award certificate will not be issued after the scheduled batch job runs.
-
Enter the Award Factor (Cashback only). A multiple used to convert points to an E-Award amount (in the base currency of the Award Program).
-
Reset Balance (Cashback only) - Indicates whether the loyalty points balance is reset when the Award is issued.
-
Enter the Points Threshold.
-
Enter the Start Date.
-
End Date - Toggle the End Date to On to enter an End Date if desired.
E Award Details
-
Select an Award Program.
Note:
The list will display the award programs already on the selected card
-
Enter the Award Amount.
-
Enter the Minimum Award Amount (Cashback only).
-
Enter the Coupon Prefix.
-
Award Expire - Toggle on to configure expiry settings.
-
Select Expiration Type.
Relative - Enter the Expires After value and select a Time Period.
Program - E Award will use the Award Expiration defined for the award program the E Award will be held in.
Award Certificate
Figure 10-41 Award Rule Type - Award Certificate
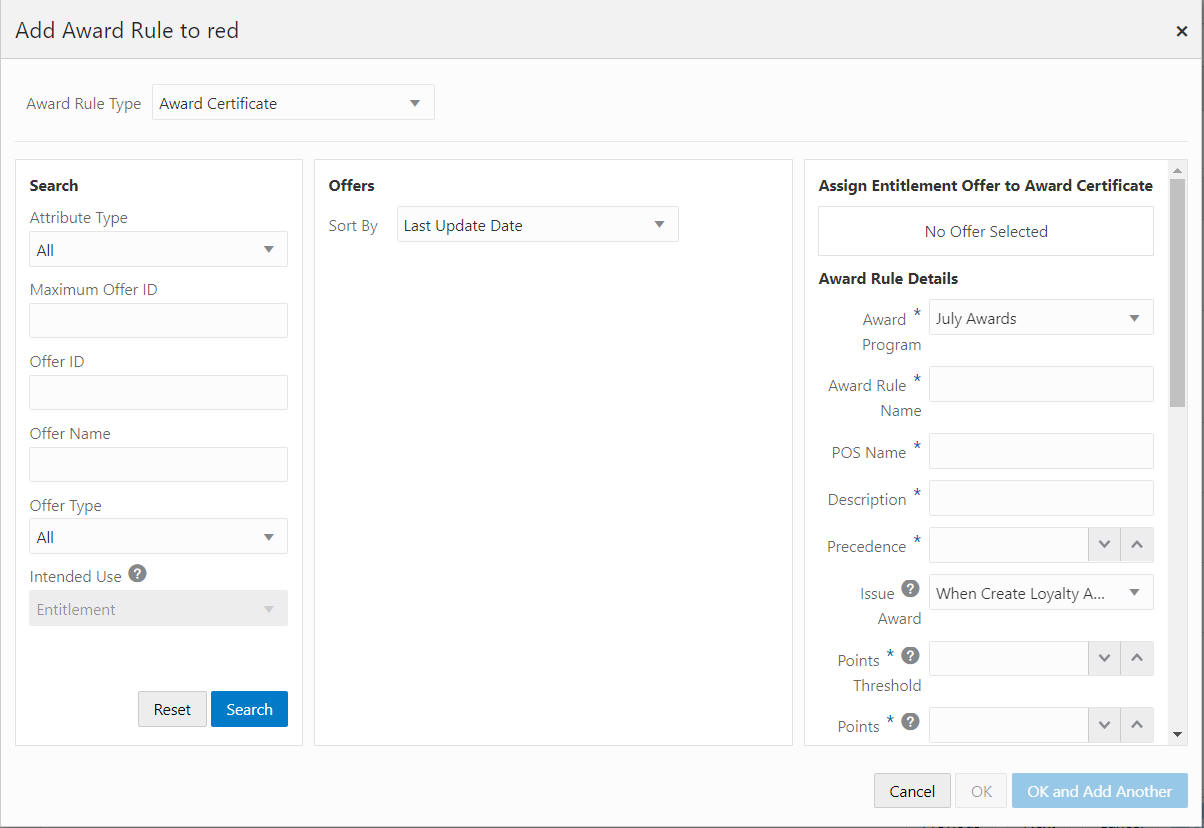
There are five sections; Search, Offers, Assign Entitlement Offer to Award Certificate, Award Rule Details, and Certificate Details.
-
-
Search - Use this section to populate the Offers Section. Fields include:
-
Attribute Type
-
Maximum Offer ID
-
Offer ID
-
Offer Name
-
Offer Type
-
Intended Use
Note:
The Intended Use field is disabled and uses the default value of Entitlement. Only offers with an Intended Use of Entitlement are assigned to an award certificate.
-
-
Click Search to populate the Offers Section. Click Reset to clear all Search fields.
-
Sort By - Select an option to sort by the following:
-
Last Update Date
-
Offer ID
-
Offer Name
-
Offer Type
-
-
Click Add to populate the Assign Entitlement Offer to Award Certificate section.
Assign Entitlement Offer to Award Certificate
-
Click the X to remove an offer. Return to the Offers section to select a new offer to assign.
Award Rule Details
-
Select the Award Program.
Note:
An Award Certificate can be previously created in an Award Program on the same card as the Loyalty Program. Additionally, a new Award Certificate can be created from the Loyalty Program and associated with an Award Program on the same card. If an existing award certificate exists for the selected offer, the Award Program will be defaulted into the options list. If the offer is NOT associated with an existing award certificate, the first active award program on the card will display by default and the award certificate will be created from the Loyalty Program.
-
Enter an Award Rule Name.
-
Enter a POS Name.
-
Enter a Description.
-
Enter the Precedence (Order in which the Award Rule will be applied if more than one Award Rule is effective).
-
Select Issue Reward setting.
Note:
When the Issue Certificate is set to Immediately Upon Transaction Posting, the award certificate will be issued to a customer account as soon as the system processes the purchase activity. If the selection is set to When Create Loyalty Award Job Runs, the award certificate is issued after the scheduled job runs.
-
Enter the Points Threshold.
-
Enter the Points Cost.
-
Enter the Start Date.
-
End Date - Toggle the End Date to On to enter an End Date if desired.
-
Enter the Coupon Prefix.
-
Award Certificate Expires - Toggle to On to configure the expiry settings.
-
Select an Expiration Type.
Relative - Enter the Expires After value and select a Time Period.
Program - Award Certificate will use the Award Expiration defined for the award program the Award Certificate will be held in.
Certificate Details
Note:
If the user selects an offer that is already assigned to an existing award certificate, the fields in the Certificate Details section will be populated and will be read only.
-
-
Enter the Award Certificate Name.
-
Enter the Description.
-
Enter the Precedence (Order in which the Award Rule will be applied if more than one Award Rule is effective).
-
Toggle Unlimited Redemption to On to allow unlimited redemptions.
-
Enter the number of Maximum Redemptions (Displays when Unlimited Redemptions is OFF).
-
-
Either click OK to accept all changes for the configured Award Rules or click Cancel to close without saving.
Note:
Before you save the Program, you can use the tab links along with Previous and Next to go back to any point in the create program process and make changes.
-
When finished entering all Award Rules, click Next to go to the Movement Rules tab.
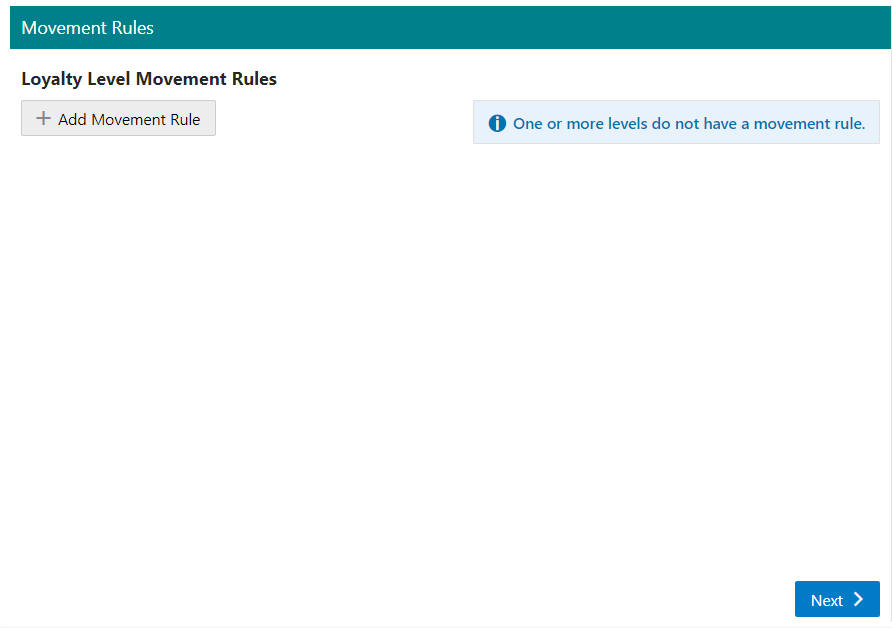
Movement Rules determine how customers are moved from one Loyalty Level to another. Movement Rules are accessed through the Loyalty Level to which they belong.
Figure 10-42 Movement Rules Tab
-
Click + Add Movement Rule.
-
Select a Movement Rule Type.
-
Advancement - The Customer Account is moving to a higher level.
-
Sustain - The move is a lateral move.
-
Demotion - The Customer Account is moving to a lower level.
-
-
Select the Levels to configure using the From, To, or Sustain option list.
Note:
Advancement and Demotion Movement Rule Types both use the From and To option lists. The Sustain Movement Rule Type uses the Sustain option list. All three Movement Rule Types share the same Movement Rule and Test Details.
Movement Rule Details
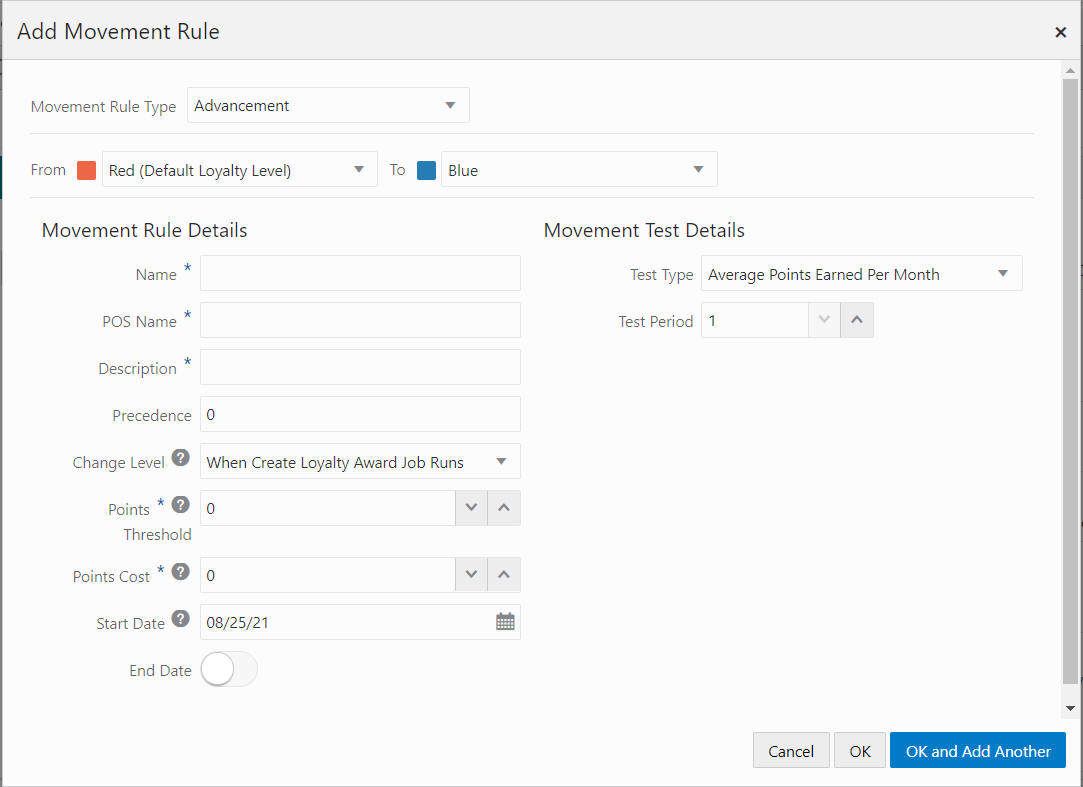
Figure 10-43 Movement Rule Details
-
Enter the Name.
-
Enter the POS Name.
-
Enter the Description.
-
Enter the Precedence (Order in which the Award Rule will be applied if more than one Movement Rule is effective).
-
Select Change Level setting.
Note:
When the Change Level is set to Immediately Upon Transaction Posting, the movement rule will be applied to a customer account as soon as the system processes the purchase activity. If the selection is set to When Create Loyalty Award Job Runs, the movement rule will be applied when the scheduled job runs.
-
Enter the Points Threshold.
-
Enter the Points Cost.
-
Enter the Start Date.
-
End Date - Toggle the End Date to On to enter an End Date if desired.
Movement Test Details
-
Select the Test Type. Type of test performed to determine whether a Customer should be moved. This Selection Menu has the following options:
-
YTD Points - Movement depends upon the number of points earned year-to-date in the Customer account.
-
LTD Points - Movement depends upon the number of points earned lifetime-to-date in the Customer account.
-
Points Earned Since Last Level Move - Movement depends upon the number of points earned since the last level move, or the creation of the Customer account.
-
Average Points Earned Per Month - Movement depends upon the average number of points earned per month in a defined number of months.
-
Time Period Since Last Level Move - Movement occurs after a defined period of time has passed since the last level move, or the creation of the Customer account.
-
-
Enter the Test Period. The number of periods (from Test Period Type) used for the movement test (visible only if the Test Type is either Average Points Earned Per Month or Time Period Since Last Level Move).
-
Enter the Test Period Type. The type of period used for the movement test (visible only if the Test Type is Time Period Since Last Level Move)
-
Extend Sustain Period - When the toggle is on, then customers remain at the same level for an additional amount of time past the test period until the customer meets additional criteria.
-
Select the Extension Test Type.
-
Enter the Extension Test Period (only visible when the Extension Test Type is Average Points Earned Per Month).
-
Enter the Extension Points Threshold.
-
Enter an Extend By value.
-
Enter the Period Type.
-
-
Click OK to save, click Cancel to close without saving, or click OK and Add Another to save the Movement Rule and configure additional Movement Rules.
-
-
When finished defining Movement Rules do the following:
-
The Card Definition tab allows you to add a card image and identify the contact details if there is a supplier for the physical cards. Enter the following information:
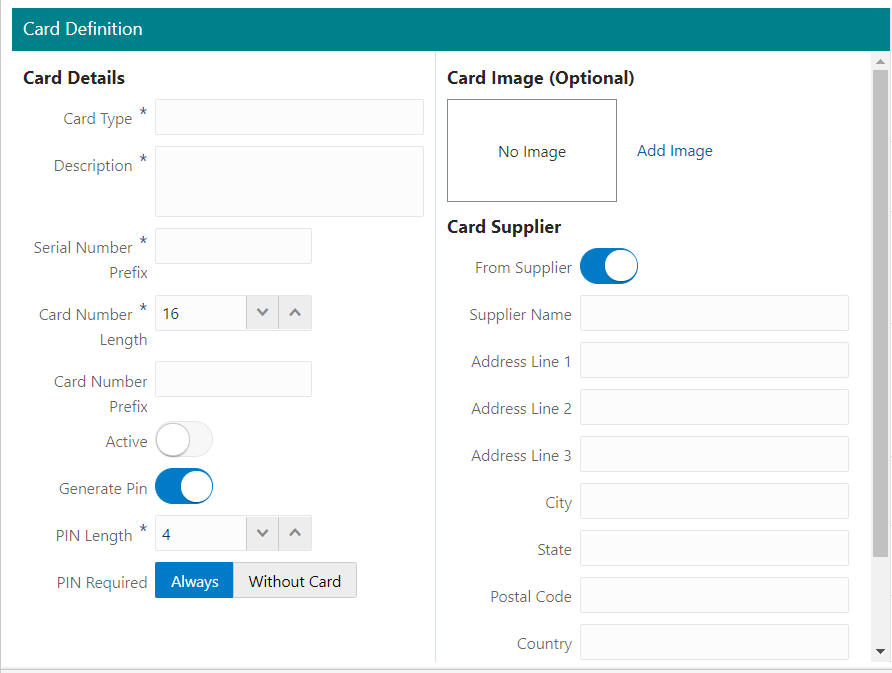
Figure 10-44 Card Definition Tab
Card Details
-
Card Type - Type of Card.
-
Description - Description of Card.
-
Serial Number Prefix - The Card Serial Number Prefix for this Card Definition.
-
Active - Indicates whether the Card Definition is currently active.
-
Generate Pin - Toggle on to enable Customer Engagement to generate PINs for the Cards.
-
PIN Length - The length of each PIN. (This field is only visible if the Generate Pin Toggle is On). Enter 0 [default] for Cards that will not have PINs.
-
-
PIN Required - For each Check Box, indicate whether a PIN is required for that situation. (These fields are only visible if the Generate Pin Toggle is On.)
-
Always - A customer must enter a PIN every time their Card is used.
-
Without Card - A customer must enter a PIN if they do not have their Card.
Card Image (Optional)
You can also edit the image once it has been added.
-
-
Click Add Image. The Add Card Image window opens.
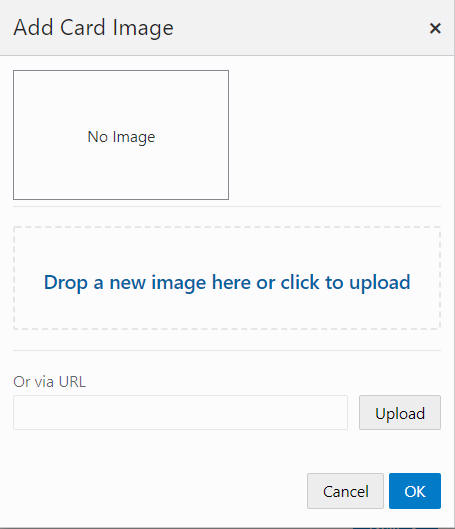
Figure 10-45 Add Card Image
To add a new Card Image, either:
-
Drag and Drop a new image as shown in Figure 10-45.
-
Click anywhere in the Drop a new image here or click to upload box.
-
Or Via URL - Enter the URL of the image, then click Upload to complete the process.
-
-
Either click OK to create the add the card image or click Cancel to close without saving.
Card Supplier
-
From Supplier - Toggle On to enter the following Supplier details:
-
Supplier Name
-
Address Line 1
-
Address Line 2
-
Address Line 3
-
City
-
State
-
Postal Code
-
Country
-
Phone Number
-
-
-
When finished entering the Program information on the Card Definition tab, click Next to continue to the Card Series tab.
-
The Card Series tab enables you to setup a new card series at the same time you are defining a new card. Enter the following information:
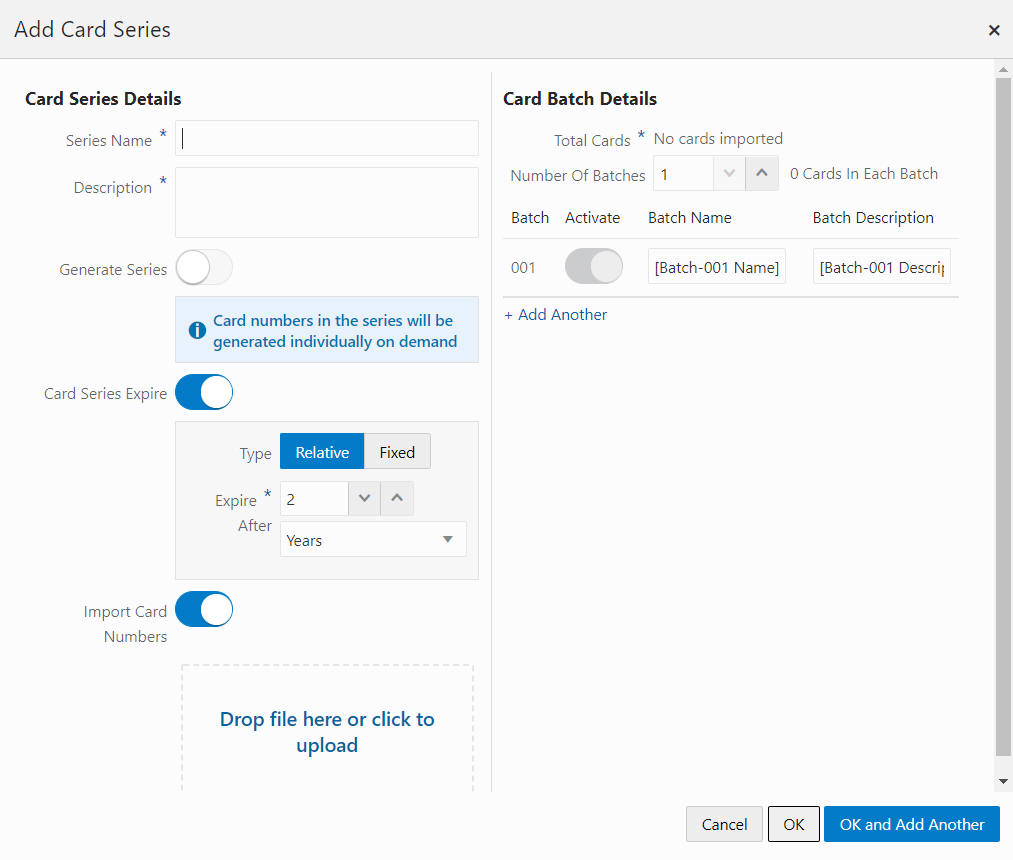
Figure 10-46 Add Card Series
Card Series Details
-
Series Name - Name of the Card Series Distribution.
-
Description - Description of the Card Series Distribution.
-
Generate Series
-
Toggle on - When the wizard is completed, the card series is generated.
-
Toggle off (Default) - Card numbers in the series are generated individually on demand.
-
-
Card Series Expire - Determines the type of expiration date to use for the Card Series Distribution. This Selection Menu has the following options:
-
Relative - The ending expiration date will be a certain, defined period of time after the initial activation date. If this option is selected, the Expire After section displays the Number of Periods and Period Type fields.
-
Fixed - Beginning and ending expiration dates are defined by the User.
-
-
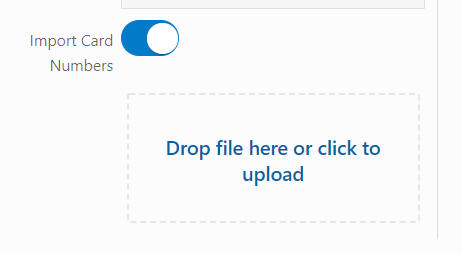
To Import Card Numbers, either:
-
Drag and Drop a file as shown in Figure 10-47.
Figure 10-47 Import Card Numbers
-
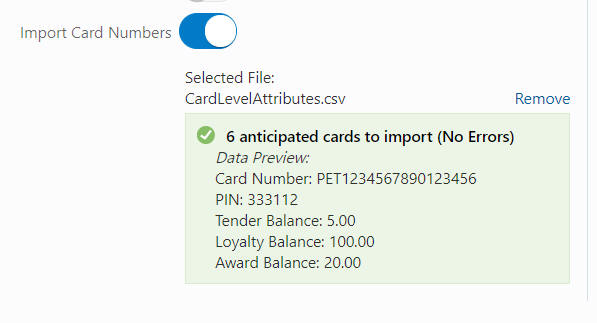
Click anywhere in the Drop file here or click to upload box.
Figure 10-48 Import Card Numbers
Remove an Imported File
You have the option to remove the file at any time before the wizard is completed. Click Remove to remove the imported file.
Note:
The Import Card Numbers option is not allowed once cards have been generated for the card series.
Card Batch Details
-
-
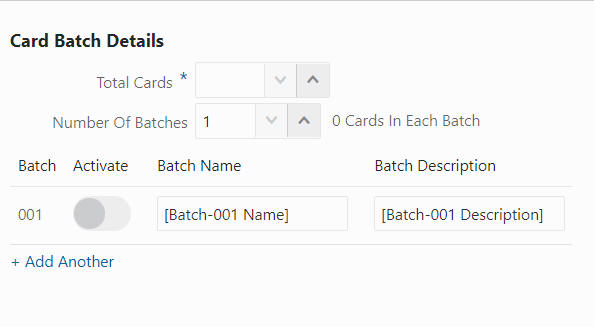
Total Cards - Total Number of cards to be generated for the Card Definition.
Note:
This field is filled in automatically when card numbers are imported.
-
Number of Batches - The number of separate Card batches included in the Card Series Distribution.
Activate Cards
When the wizard is completed, the cards in the batch set to activate will be set to active. If this is toggled off, the cards can be activated from the Card Series tab or from the View Card screen.
To activate a set of Cards within Card Series configuration:
Figure 10-49 Card Batch Details
-
Activate - Toggle on to activate the Cards when the wizard is completed.
-
Enter a Batch Name.
-
Enter a Batch Description.
Note:
Click + Add Another to add another batch. You can also adjust the Number of Batches field. Click the X icon next to each Batch to remove a batch from the list.
-
Click OK to add the Card Series to the Program or click OK and Add Another to add another Card Series. Click Cancel to close the window without adding the Card Series.
Edit Card Series
Figure 10-50 Card Series Details
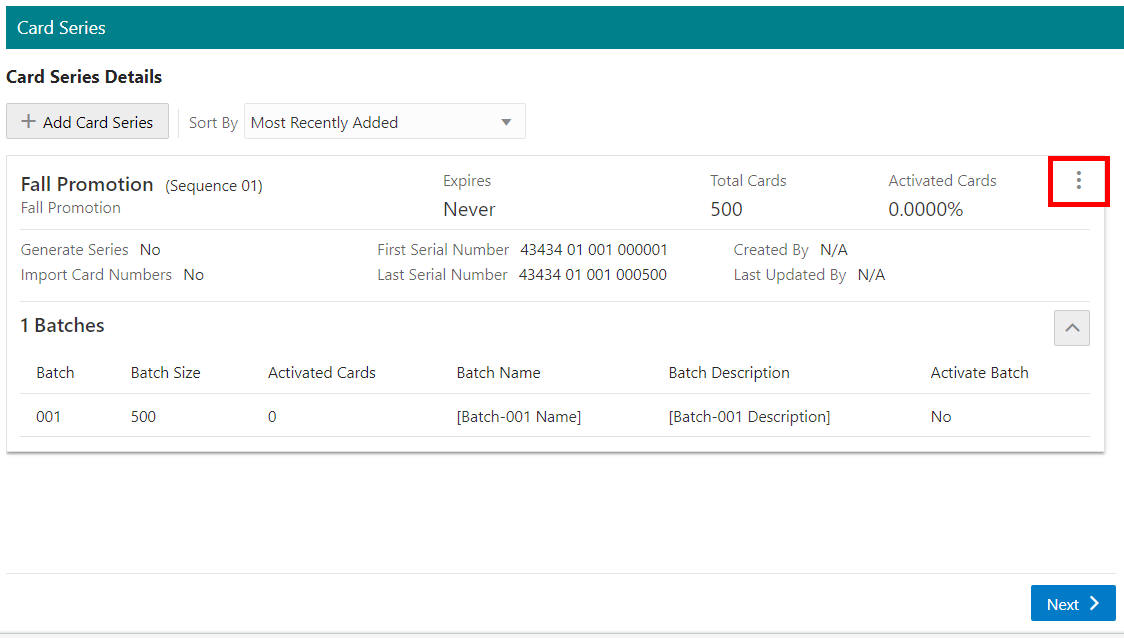
To Edit an existing Card Series click the Action menu and select, Edit. The Edit Card Series window opens. See Step 31, the Card Series tab to edit the card.
Remove a Card Series
To Remove an existing Card Series, click the Action menu and select, Remove. The Card Series is deleted immediately.
Note:
Before you save the Program, you can use the tab links along with Previous, Next, or Cancel to go back to any point in the create program process and make changes.
-
-
When finished entering the Program information on the Card Series tab, click Next to continue to the Attributes tab.
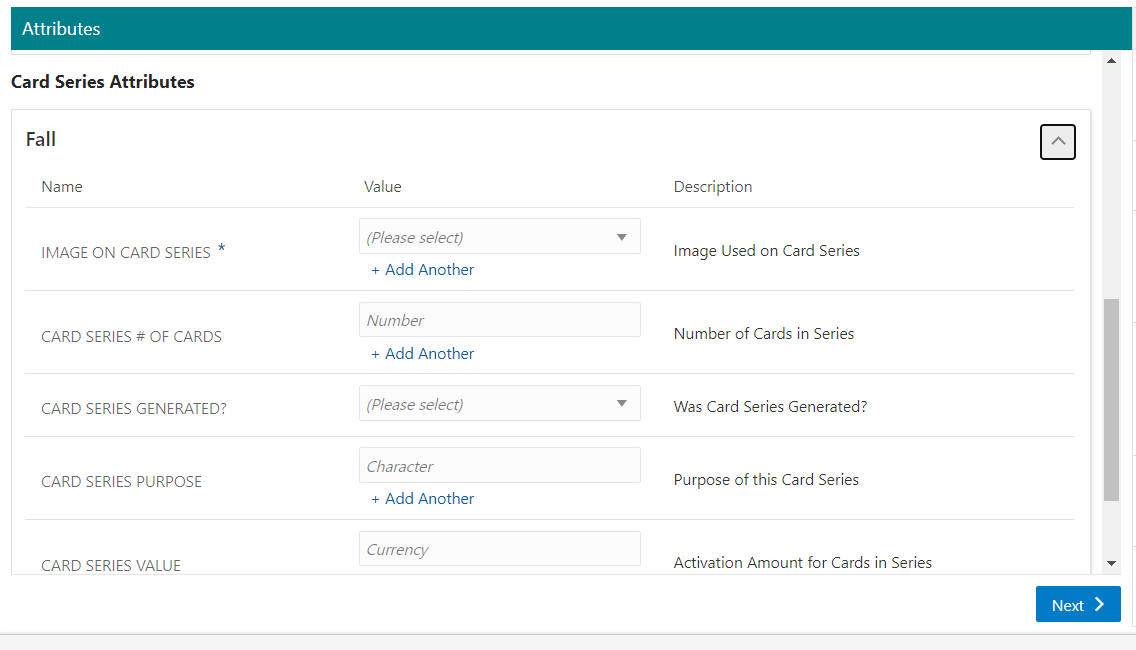
Enter the following for the Attributes tab. Attributes can be added to the Card Type to further distinguish qualifications for the Offer.
Figure 10-51 Attributes - Card Type Attributes
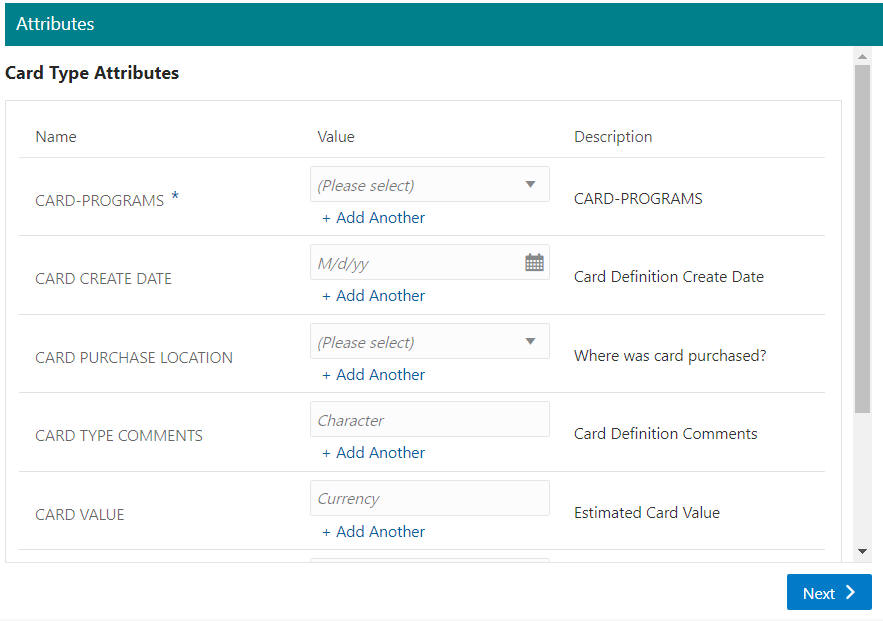
Figure 10-52 Attributes - Card Series Attributes
-
Select or enter the Values for each of the required attributes (indicated by an asterisk*).
-
Add Values for any optional attributes.
-
Select or enter the configuration value for the Attribute.
Note:
Repeat this step for all optional Attributes you wish to add to the Card or Card Series.
-
-
When finished defining any attributes for the Program, click Next to continue to the Review tab (Assigned to New Card).
-
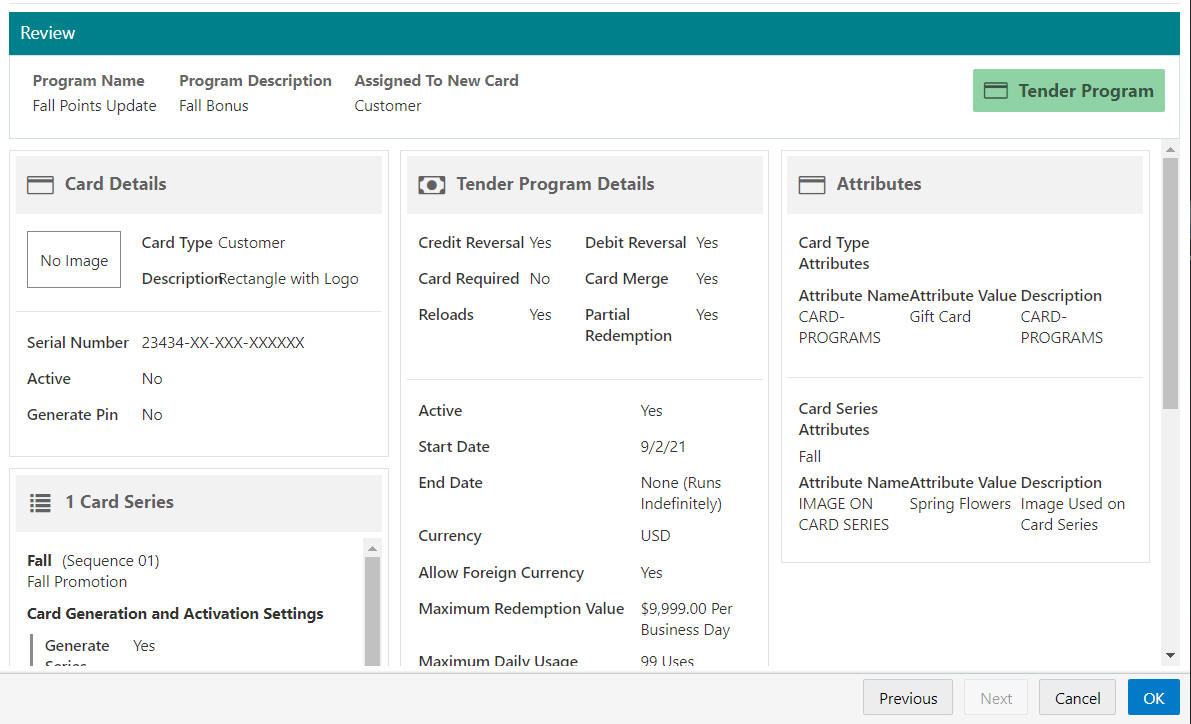
The Review tab (Assigned to New Card) displays key elements in the Program Setup. Review the following for the Tender Program Type.
Figure 10-53 Tender Program - Review Tab (Assigned to New Card)
-
Either click OK to create the Program or click Cancel to close without saving.
Note:
Before you save the Program, you can use the tab links along with Previous and Next to go back to any point in the create program process and make changes.
-
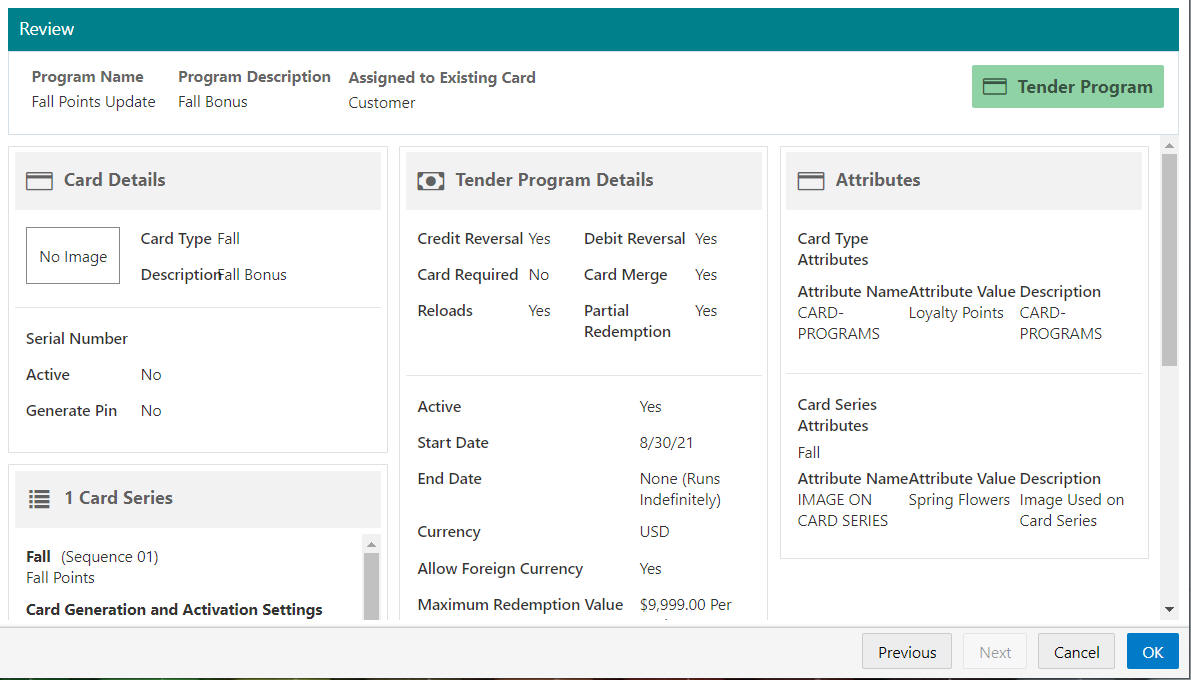
The Review tab (Existing Card) displays key elements in the Program Setup. Review the following for the Tender Program Type.
Figure 10-54 Tender Program - Review Tab (Assigned to Existing Card)
-
Either click OK to create the Program or click Cancel to close without saving.
Note:
Before you save the Program, you can use the tab links along with Previous and Next to go back to any point in the create program process and make changes.
-
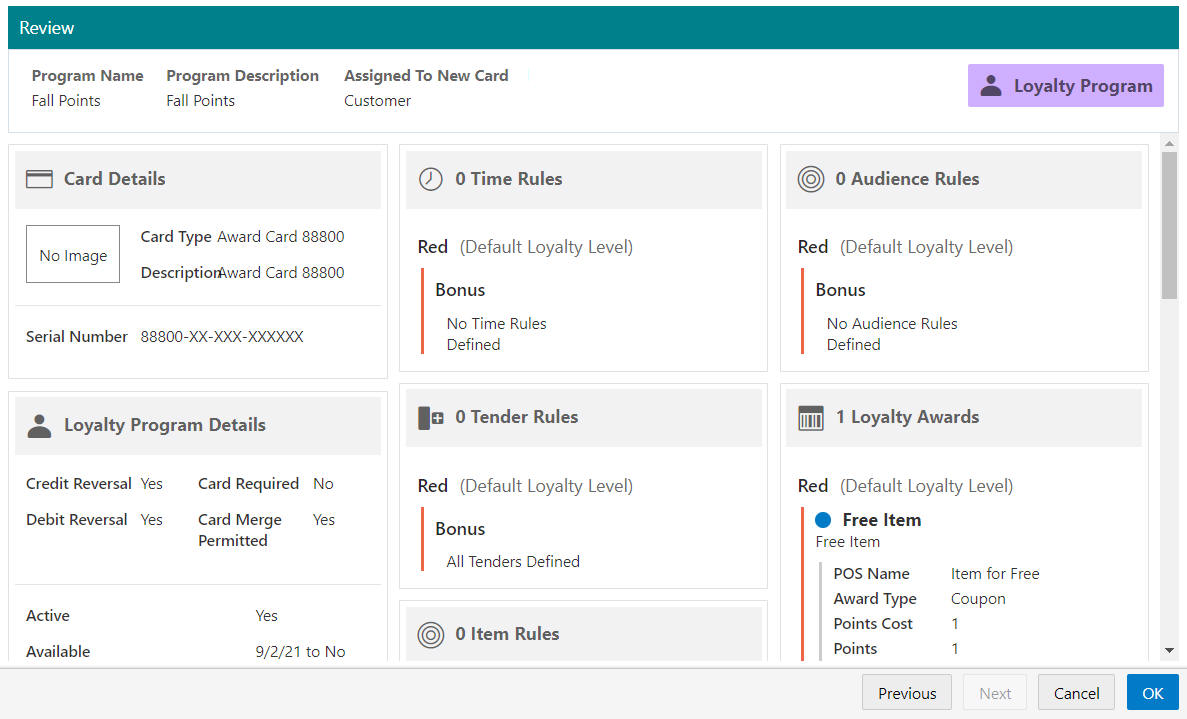
The Review tab (Assigned to New Card) displays key elements in the Program Setup. Review the following for the Loyalty Program Type.
Figure 10-55 Loyalty Program - Review Tab (Assigned to New Card)
-
Either click OK to create the Program or click Cancel to close without saving.
Note:
Before you save the Program, you can use the tab links along with Previous and Next to go back to any point in the create program process and make changes.
-
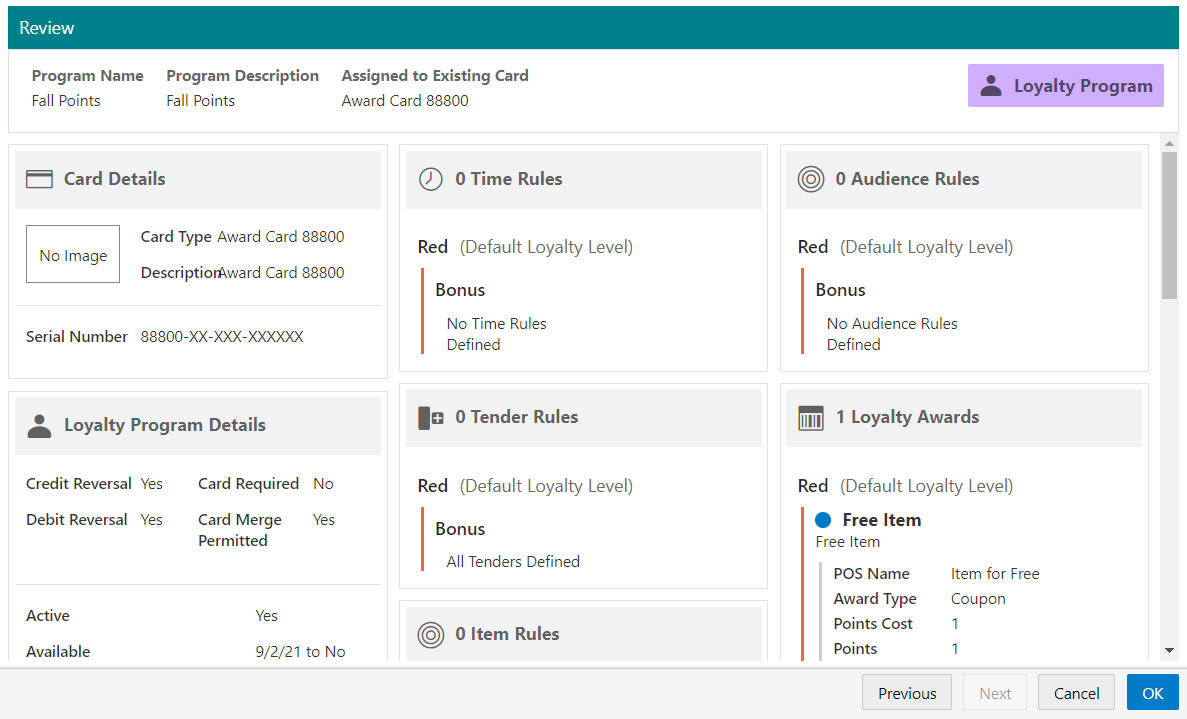
The Review tab (Existing Card) displays key elements in the Program Setup. Review the following for the Loyalty Program Type.
Figure 10-56 Loyalty Program - Review Tab (Assigned to Existing Card)
-
Either click OK to create the Program or click Cancel to close without saving.
Note:
Before you save the Program, you can use the tab links along with Previous and Next to go back to any point in the create program process and make changes.
-
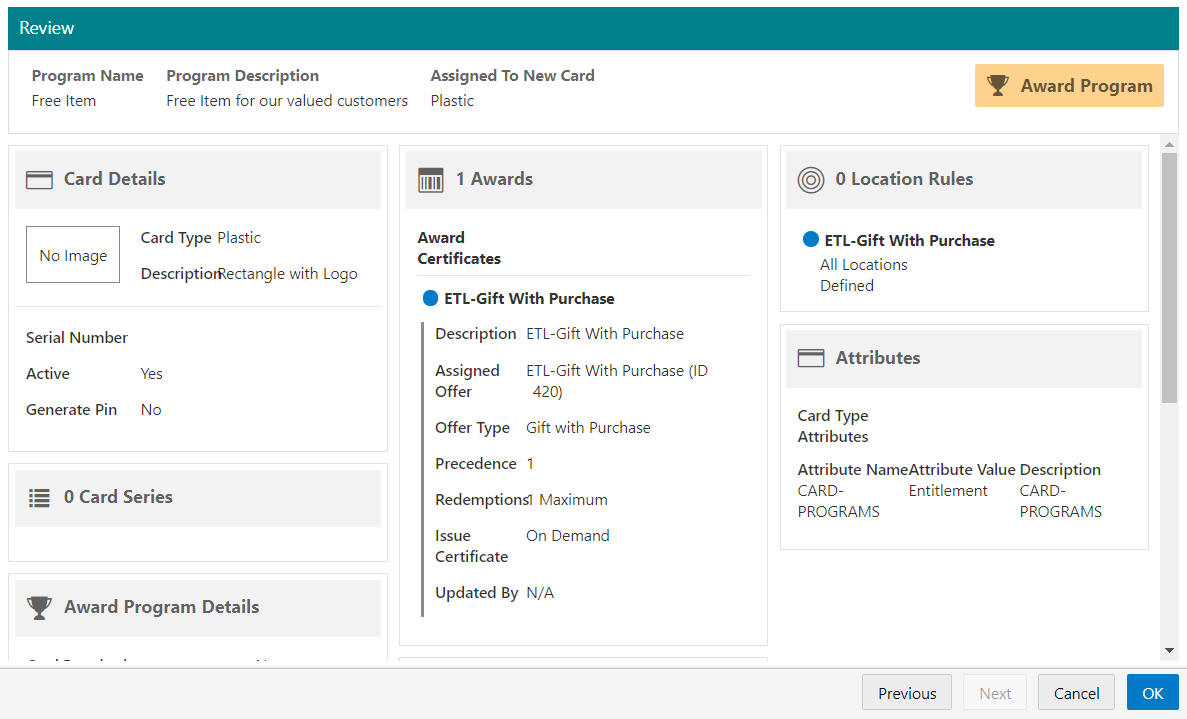
The Review tab (Assigned to New Card) displays key elements in the Program Setup. Review the following for the Award Program Type.
Figure 10-57 Award Program - Review Tab (Assigned to New Card)
-
Either click OK to create the Program or click Cancel to close without saving.
Note:
Before you save the Program, you can use the tab links along with Previous and Next to go back to any point in the create program process and make changes.
-
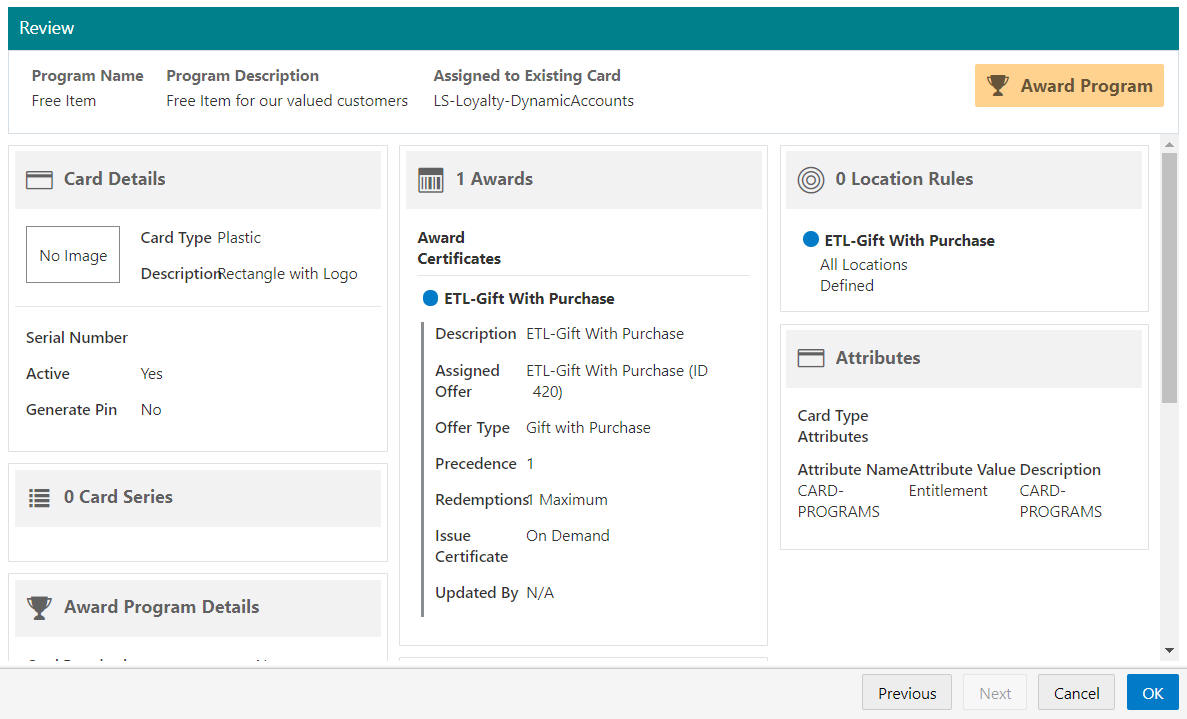
The Review tab (Existing Card) displays key elements in the Program Setup. Review the following for the Award Program Type.
Figure 10-58 Award Program - Review Tab (Assigned to Existing Card)
-
Either click OK to create the Program or click Cancel to close without saving.
Note:
Before you save the Program, you can use the tab links along with Previous and Next to go back to any point in the create program process and make changes.