Creating a Registry
Step 1: Information
-
From the Actions menu on a Customer's Dashboard, choose Registries, or click the Registries icon to display the Registries window, and click Create Registry. Either action displays the Create Registry Wizard.
Figure 8-3 Create Registry Wizard
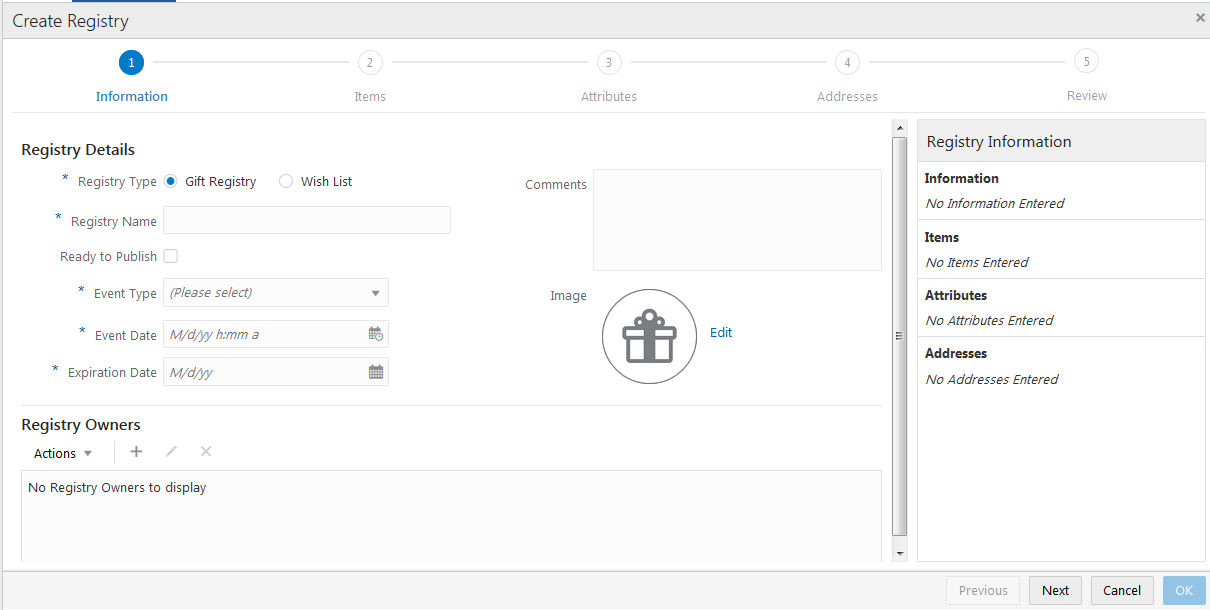
The progress bar at the top indicates that you are located at step 1, Information. As you progress, the Create Registry Wizard moves you through each of the five steps.
-
Under Registry Details, Select the Registry Type. A Gift Registry is tied to an event, while a Wish List is open-ended. This is mandatory.
-
Enter a name for the registry in the Registry Name field. This is mandatory.
-
If the Ready to Publish check box is selected, it indicates that the registry is available for export to a third party when the registry is saved
-
If the Registry Type is Wish List, there are no other mandatory fields under Registry Details. If the Registry Type is Gift Registry, also make selections for these mandatory fields:
Event Type – Select an Event Type from the list.
Event Date – Select the date and time of the event from the calendar.
Expiration Date – Select the date that the registry expires, from the calendar.
-
Optionally, you can enter comments about the registry in the Comments field.
-
Optionally, you can add an image that represents the Gift Registry. Click Edit next to the logo in the Image field to display an Edit Registry Image prompt that lets you drop or upload a new image. This is only available for Gift Registries.
-
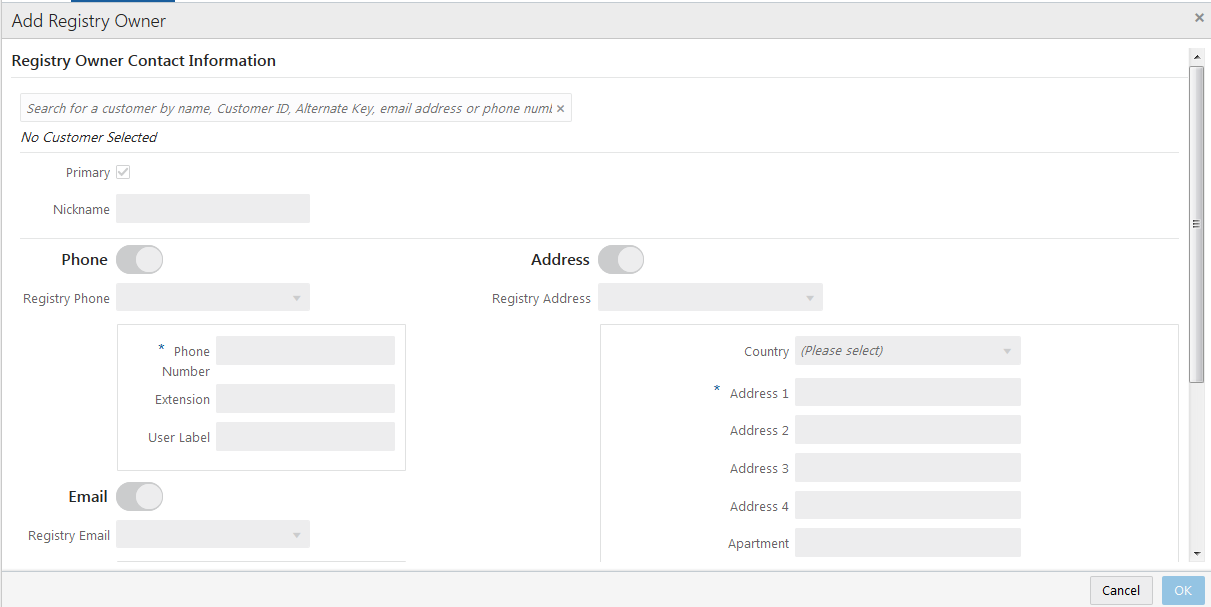
Under Registry Owners, choose Add from the Actions Menu, or click the Add Icon. Either action displays the Add Registry Owner window:
Figure 8-4 Add Registry Owner
-
In the search field at the top of the window, enter search criteria such as customer name or ID. A list of customers matching the search criteria is displayed. Select the customer for whom you are creating the registry. This displays the Name, ID, Alternate Key, and primary contact information of the selected customer under the search field. When you select a customer, the window is populated with available information about the customer.
-
Add any details that are missing. The following information can be entered, with mandatory fields marked by asterisks (*):
-
Primary – Indicates whether this customer is the primary owner of the registry.
-
Nickname –Enter an optional nickname for the registry owner.
-
Phone – Information about the registry owner's phone number:
-
The Phone switch defaults to On. If this switch is set to Off, the following fields are not displayed.
-
Registry Phone – Select the type of phone number being used for the registry from the list, or select Create New to enter a new phone number.
-
Phone Number – The registry phone number. This field is mandatory.
-
Extension – the extension of the registry phone number, if applicable.
-
User Label – Enter an optional user label for the registry phone number
-
-
Email – Information about the registry owner's email address:
-
The Email switch defaults to On. If this switch is set to Off, the following fields are not displayed.
-
Registry Email – Select the type of email address being used for the registry from the list, or select Create New to enter a new email address.
-
Email – The registry email address. This field is mandatory.
-
User Label – Enter an optional user label for the registry email address
-
-
Address – Information about the registry owner's address:
-
The Address switch defaults to On. If this switch is set to Off, the following fields are not displayed.
-
Registry Address - Select the type of address being used for the registry from the list, or select Create New to enter a new address.
-
Country – Select the country of the registry form the list.
-
Address 1-4 –The street address of the registry. Address 1 is mandatory
-
Apartment – The apartment number of the registry, if applicable.
-
City – The city of the registry. This field is mandatory.
-
State – The state or province of the registry. This field is mandatory.
-
Postal Code – The postal code of the registry. This field is mandatory.
-
County – The County of the registry.
-
-
-
Click OK when you are finished entering the customer details. This returns you to the Create Registry window. The customer information is displayed in the Registry Owners list. If you are done entering registry information, click Next to go to Step 2: Items.
Step 2: Items
Figure 8-5 Create Registry Items
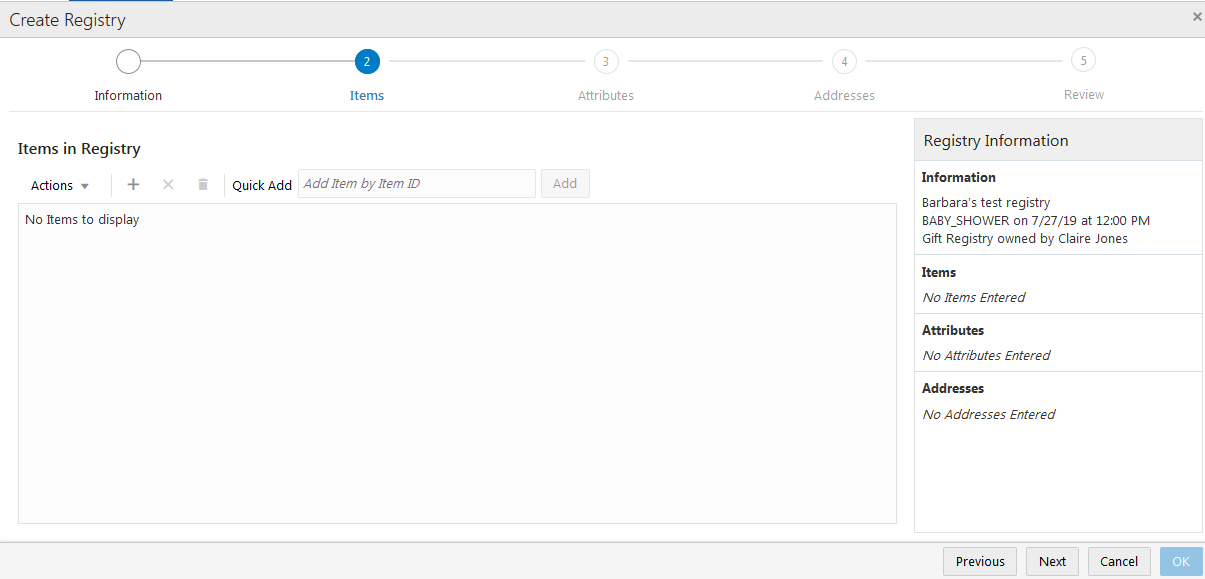
To add items to a Registry:
-
There are two methods for adding items to a registry, using the Add command to display the Add Items to Registry dialog, where you can search for items, or by entering the exact Item ID in the Quick Add field:
-
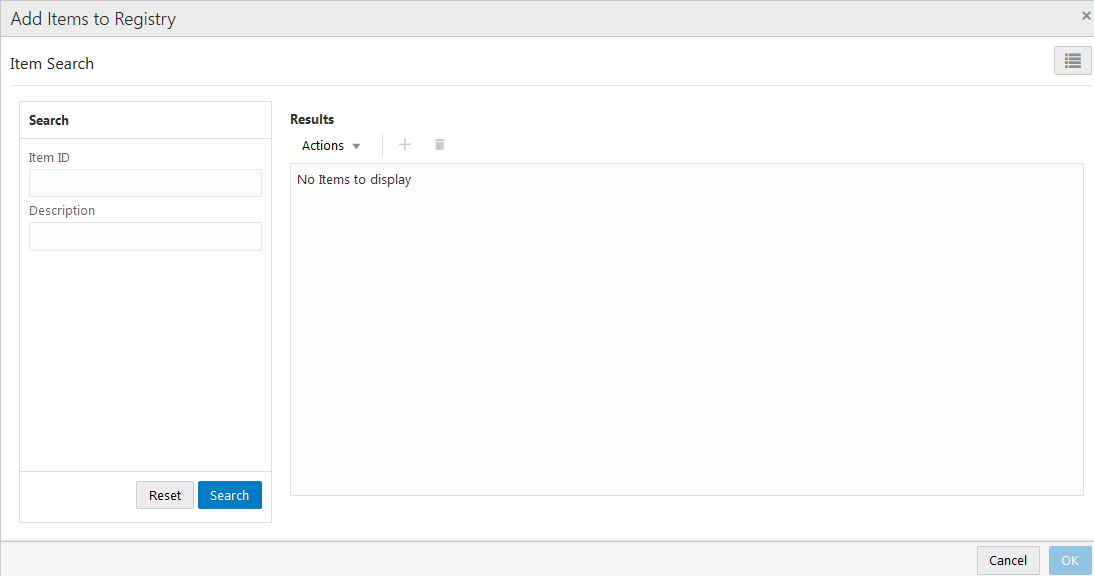
Under Items in Registry, choose Add from the Actions menu, or click the Add Icon. Either action displays the Add Items to Registry dialog:
Figure 8-6 Add Items to Registry
-
-
In the Search panel, enter an Item ID, Description, or both in the provided fields and click Search. This displays a list of items matching the search criteria in the Results panel. If you want to clear a search, click Reset. Use the Search panel to add more items.
-
The Results panel displays the Image, Item ID and Description of the items in the search results:
Figure 8-7 Search Results
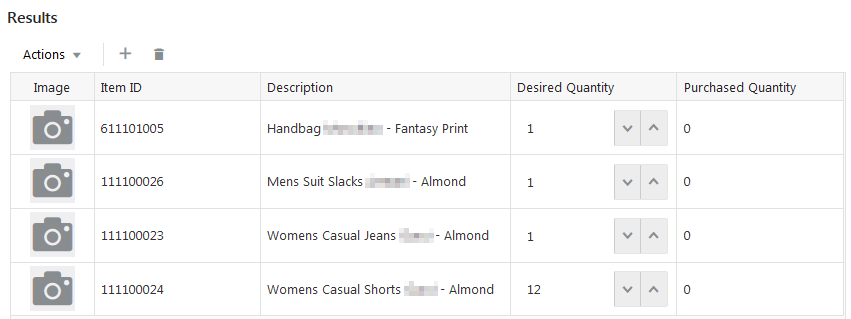
If you want to specify the desired quantity of this item, use the Increment and Decrement arrows to increase or decrease the quantity. The Desired Quantity value defaults to 1.
-
If you want to add an item from the Results panel to the Registry, select the item and choose Add from the Actions Menu, or click the Add (+) Icon. Items that you add are displayed in an Add Items to Registry panel on the right side of the page. To remove all items from the list, choose Remove All from the Actions menu or click the Remove All icon.
-
Click OK to add items. The selected items are added to the Items in Registry list on the Items tab.
Or use this alternate method:
-
In the Quick Add field (see Figure 8-5), enter the exact Item ID and click Add. If the exact match is found, the item is added to the Items in Registry table. If the item is not found, the message
Invalid itemdisplays. -
If the item is found, the Image, Item ID and Description of the item and a Desired Quantity field are displayed. The default quantity is 1. You can change the quantity using the Increment and Decrement arrows to increase or decrease the quantity.
-
-
When you are done adding items to the registry, click Next to go to Step 3: Attributes.
Step 3: Attributes
Figure 8-8 Registry Attributes
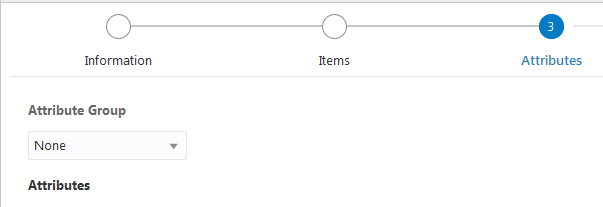
To add attributes to a registry:
-
Select a group from the Attribute Group list. A list of attributes specific to the selected Attribute Group is displayed.
Note:
This step is optional unless specific attributes are included in a group and you want to select any of them.
Figure 8-9 Attributes List

-
If you selected an Attribute Group, the attributes belonging to that group are listed in the Attributes grid. Enter values for the attributes you want applied to the registry. You must enter a value for each required attribute (indicated by an asterisk*).
-
The grid displays the name, description and value entry field for each attribute.
-
Attributes are displayed by group, with mandatory attributes displayed first.
-
Attribute value entry fields will initially indicate the type of value to enter, for example, (Please select) for a list of items.
-
If there is more than one possible value for the attribute, there is a + Add Another link under the attribute value entry field. Click the + Add Another link if you have entered a value and need to add another. This displays a duplicate entry field for the attribute.
-
A value can only be removed if an X appears next to it. The X is only displayed if the value can be removed.
-
-
If you want to add attributes not assigned to the available Attribute Groups, click the Manage button under Additional Attributes.
Note:
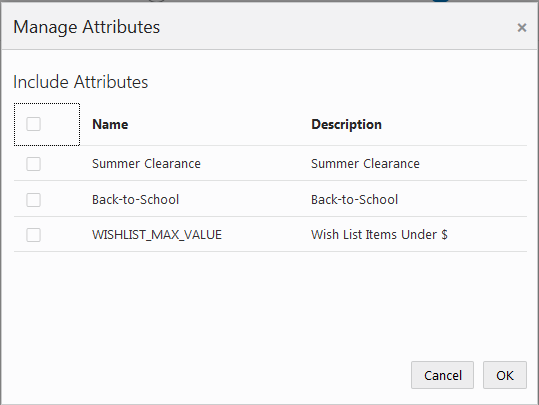
This is only available for Wish Lists. This displays a Manage Attributes window:
Figure 8-10 Manage Attributes
-
Click the check box next to the Name and Description header row to select all of the attributes, or select the check box next to each attribute that you want to include, and click OK. The selected attributes are display beneath Manage.
-
If you have added attributes using the Manage Attribute window, specify values for those attributes.
-
When you are done selecting attributes and entering values, click OK.
-
Click Next to go to Step 4: Addresses.
Step 4: Addresses
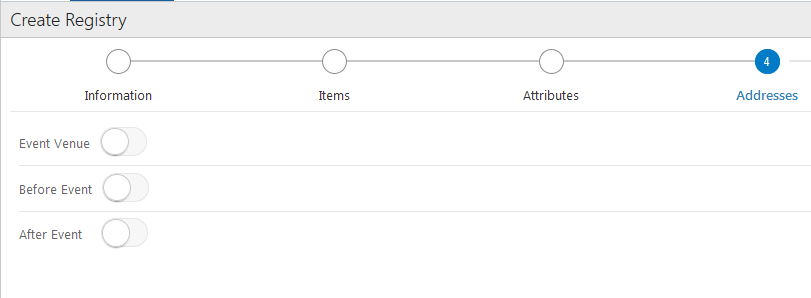
Figure 8-11 Addresses
Note:
This section only applies to Gift Registries.
To add Addresses:
-
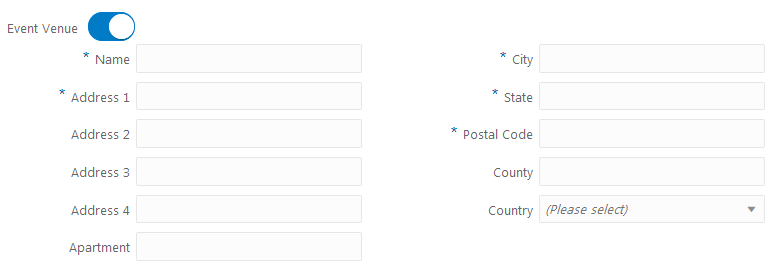
Click the switch next to an address type to On to display a list of fields associated with that address. To hide the fields, set the switch to Off. The following example shows the fields associated with the Event Venue address. Fields marked with an asterisk (*) are mandatory:
Figure 8-12 Event Venue
-
Enter information in the fields.
-
Name – The name of the event venue. This field is mandatory.
-
Address 1-4 – The street address of the venue. Address 1 is mandatory.
-
Apartment – The apartment number, if applicable.
-
City – The city of the venue. This field is mandatory.
-
State – The state or province of the venue. This field is mandatory.
-
Postal Code – The postal code of the venue. This field is mandatory.
-
County – the County of the venue.
-
Country - The country of the venue. Choose a country from the list
If there is a Use Address field for the event, as in the following example, select a name from the list. This will populate the remaining fields:
Figure 8-13 Address Fields

-
-
When you are done entering addresses, click OK.
-
Click Next to go to Step 5: Review. This displays a page where you can review all the information you have entered for the registry.
Step 5: Review
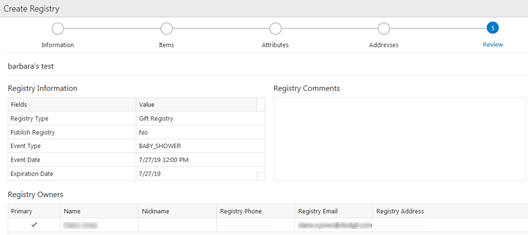
Figure 8-14 Review
To review the registry:
-
Look over the information in the review page. If there is anything you want to change, click the step located in the top bar where the information was first entered. For example, click Information to return to the Information window. To navigate to the previous step, click Previous.
-
Make the changes to the information. For example, if you want to publish the registry, go back to the Information window and select the Ready to Publish check box. This ensures that the registry is published the next time it is saved.
-
Click OK to save your changes in each window.
-
Click Review located in the top bar, and then click OK in the Review window when complete. This saves the registry, and it now appears in the list of registries for the customer.