Tasks
The Tasks page displays the tasks that are associated with the customer. Choose the Tasks option on the Actions menu in the Customer Dashboard for access to the Tasks page:
Figure 4-81 Customer Tasks
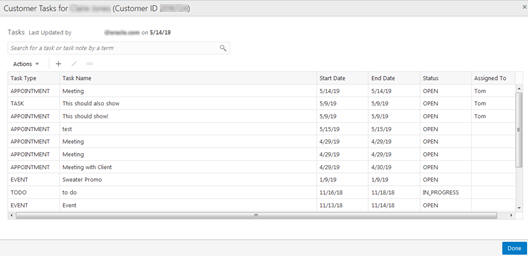
The Tasks page offers the following information and features:
-
The customer name and ID
-
The user who last updated the window and the date it was last updated
-
The Search panel lets you search for a task by entered text
-
The Actions menu and corresponding icons let you Add, Edit, and View a task
-
Task Type – The type of task. These are configured by the customer. See the
Oracle Retail Customer Engagement Cloud Services Implementation Guidefor information about configuring custom Task types -
Task Name – A name for the task that was entered by the user who created the task
-
Start Date – The start date of the task
-
End Date – The end date of the task
-
Status – The selected status of the task
-
Assigned to – The associate to whom the task is assigned
Adding a Task
To add a task:
-
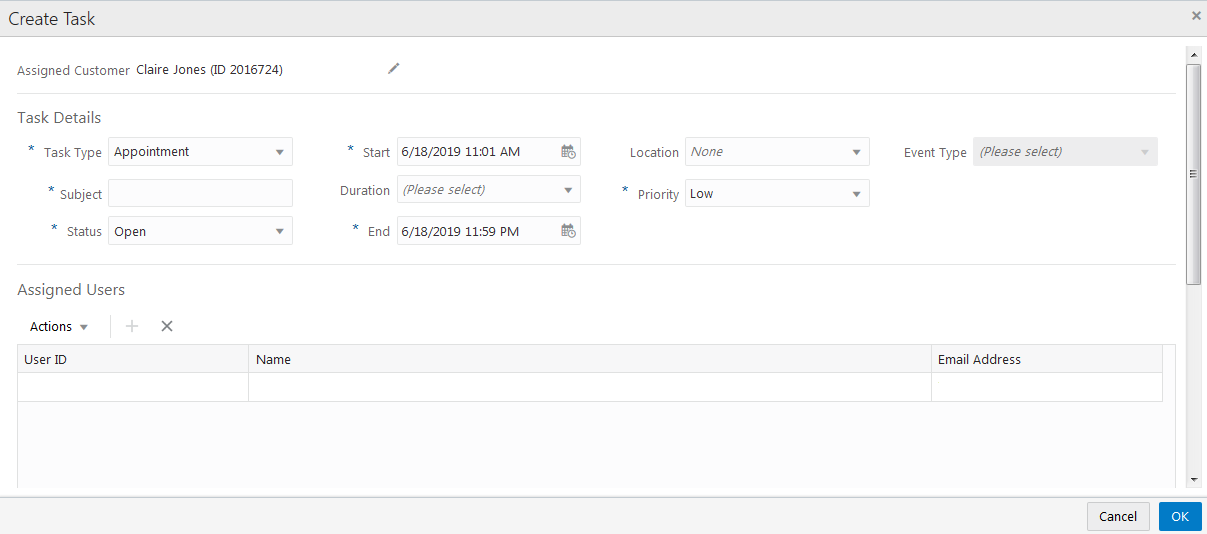
Choose Add from the Actions menu, or click the Add icon. This displays the Create Task window:
Figure 4-82 Create Task
-
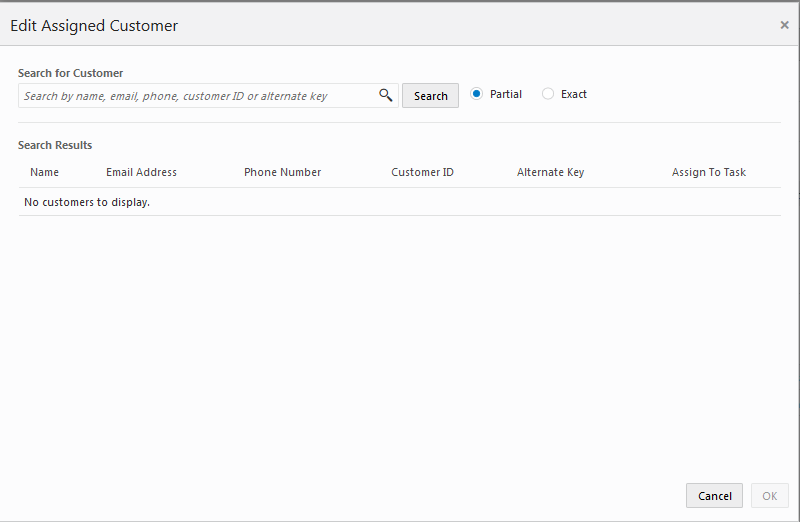
If you want to change the customer assigned to the task, click the Edit icon next to the Assigned Customer Name and ID. This displays the Edit Assigned Customer window:
Figure 4-83 Edit Assigned Customer
-
In the Search for Customer field, enter the Name, Email, Phone, Customer ID, or Alternate Key of the customer you want to search for. Select Partial to search for customers that partially match the search text, or Exact, to search for an exact match.
-
Click Search. This displays the list of matching customers under Search Results.
-
Select the customer in the list that you want to assign to the task and click OK, or click Cancel if you do not want to change the customer assignment. This returns you to the Create Task window. If you click OK, the Customer Name and ID for the selected customer precede the Task Details.
-
-
Enter the details for the new task. Mandatory fields are indicated with asterisks (*):
-
Task Type – Select a task type from the list. This list is determined by the customer.
-
Subject – Enter a subject. This will appear in the Task Name field.
-
Status – Select a status from among those on list:
-
Open – Set the status of your task to Open.
-
In Progress – Set the status of your task to In Progress
-
Cancelled – Set the status of your task to Cancelled.
-
Closed – Set the status of your task to Closed.
-
-
Start – Select a start date for the task from the calendar.
-
Duration – Select the duration of the task from the list (optional). Selecting one of the duration options will determine the value for the End Date/Time based on the option chosen.
-
End – If no selection was made in the Duration field, select an end date for the task using the calendar.
-
Location – Select a location from the list.
-
Priority – Select a priority level from the list. These are configured by the customer. See the Customer Engagement Cloud Services Implementation Guide for information about configuring custom Task Priority Codes.
-
Event Type – If you selected Event as the Task Type, select an Event Type from the list. For all other task types, this field is disabled.
-
-
Under Assigned Users, assign a user to the task. This defaults to the current logged-in user.
-
If you want to remove the current user, select the user and choose Remove from the Actions menu, or click the Remove icon. This clears the user from the grid.
Note:
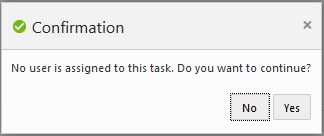
If no user is assigned to the task, and you click OK in this window, a Confirmation prompt is displayed:
Figure 4-84 Confirmation
-
Click No if you want to return to the Create Task window.
-
Click Yes if you want to create the task without a user assigned.
-
-
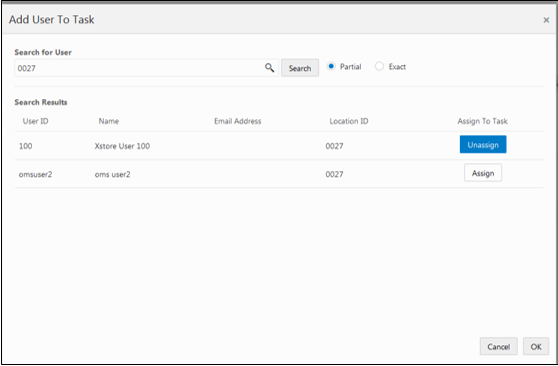
If you want to add a user, remove the current user (see previous) and choose Add from the Actions menu, or click the Add icon. This displays an Add User to Task dialog:
Figure 4-85 Add User to Task - Search Results
-
-
In the Add User to Task Search field, enter the User ID, Name, Email Address, or Location. Select Partial, to search a partial entry, or Exact, to search for only exact matches.
-
In the Search Results list, select the user you want to add to the task, and click Assign, then click OK. This returns you to the Create Task window.
-
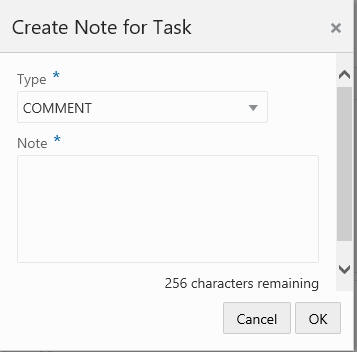
If you want to add a note with more information about the task, in the Task Notes panel, choose Add from the Actions menu, or click the Add + icon. This displays a Create Note for Task window:
Figure 4-86 Create Note for Task
-
Select a note type from the Type list.
-
Enter a note of up to 256 characters in the Note box.
-
Click OK. This returns you to the Create Task window.
-
-
Click OK. This returns you to the Tasks page. The new task is displayed in the grid.
Editing a Task
To edit a task:
-
In the Tasks List, in the Customer Tasks window (see Figure 4-81, select the task that you want to edit.
-
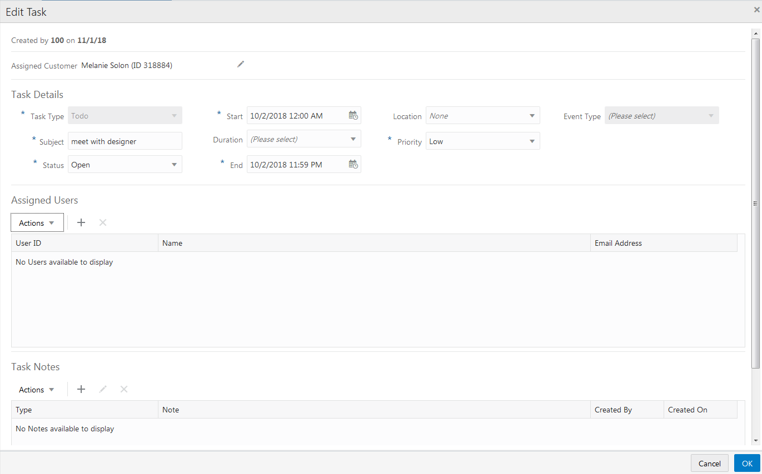
Choose Edit from the Actions menu, or click the Edit icon. This displays the task in the Edit Task window:
Figure 4-87 Edit Task
-
The user who created the task and the date it was created are displayed at the top of the window.
-
The Assigned Customer Name and ID precede the Task Details. You can change the assigned customer.
-
The Task Type and Event Type fields are not editable.
-
-
If you want to change the customer assigned to the task, click the Edit icon next to the Assigned Customer Name and ID. This displays the Edit Assigned Customer window. See Adding a Task for more information on editing the assigned customer.
-
Modify what you want to change in the Task Details, Assigned Users, and Task Notes panels. See Adding a Task for more information on entering information in these fields.
-
Click OK to return to the Customer Tasks page. Or, click Cancel to return to the Customer Tasks page without saving any of your changes.
If you clicked OK to save the changes, the Update User and Update Date are updated to that of the logged-in user and the date/time the changes were saved and displayed at the top of the Customer Tasks window.
Viewing a Task
To view a task:
-
In the Tasks List, in the Customer Tasks window (see Figure 4-81) select the task that you want to view.
-
Choose View from the Actions menu, or click the View icon. This displays the task details in view-only mode in the View Task window.
-
Review the task details. See Adding a Task for more information on the task details in these fields.
-
Click Done when you are finished reviewing the task details. This returns you to the Tasks page.