11 Job Management
In Customer Engagement, Job Management is used to view and edit Jobs scheduled to be run in Customer Engagement.
Job Quick Search
Job Quick Search displays a list of results as you type in characters in the search box. To use the Job Quick Search do the following:
-
Click the Menu icon.
-
Click Job Management.
-
Click Job Home. The Job Management window opens.
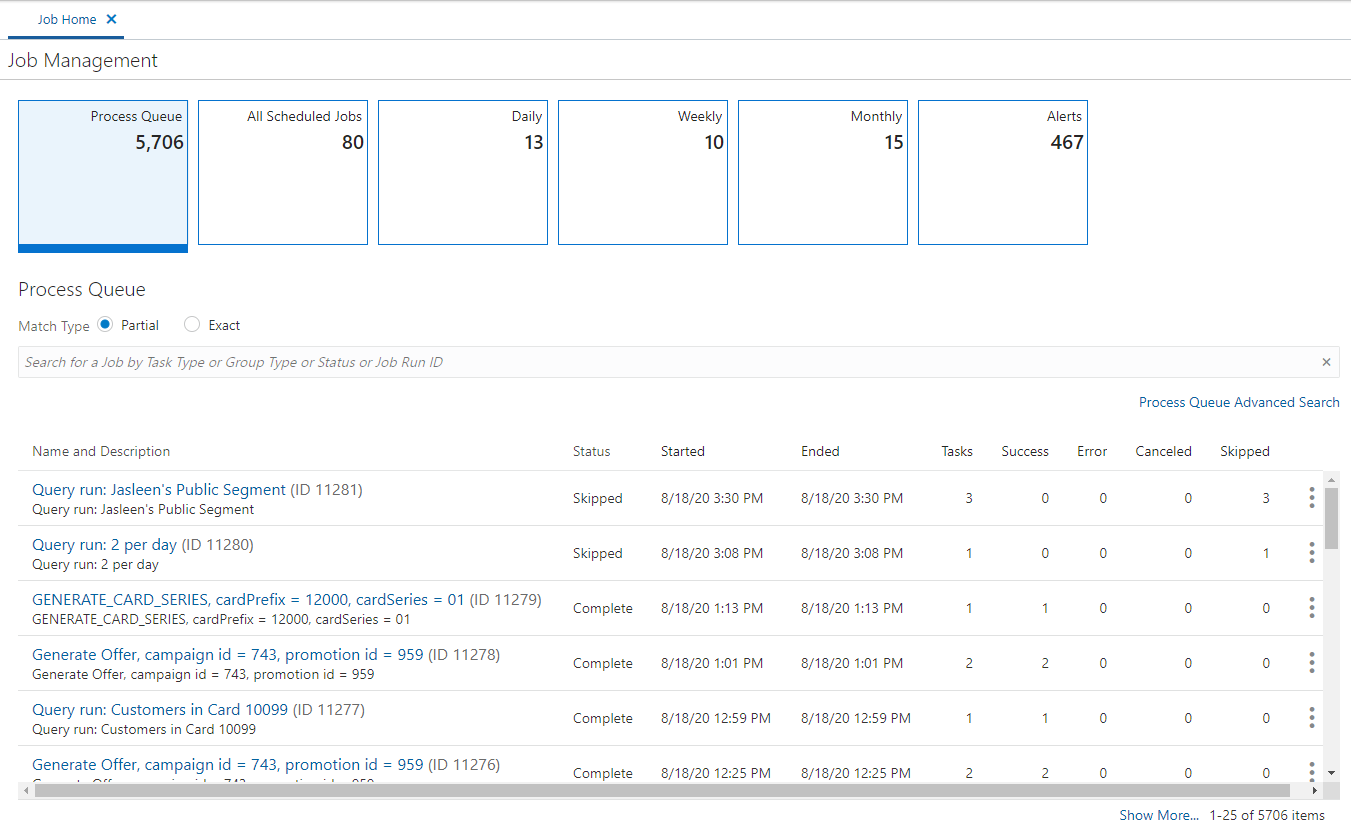
Figure 11-1 Job Management - Process Queue Tile
-
Select a Metric Tile, options include:
-
Process Queue
-
All Scheduled Jobs
-
Daily
-
Weekly
-
Monthly
-
Alerts
-
Job Quick Search - Process Queue and Alerts Tiles
These tiles display the following information for each job.
-
Name and Description - Name and Description of the Job.
-
Job Run ID - ID Number of the Job.
-
Status - Current status of the Job.
-
Started - The date and time at which the Job started running.
-
Ended - The date and time at which the Job stopped running.
-
Tasks - The number of Tasks performed by the Job.
-
Success - The number of Tasks completed successfully by the Job.
-
Error - The number of Tasks in the Job that resulted in an Error.
-
Canceled - The number of Tasks in the Job that were canceled.
-
Skipped - The number of Tasks in the Job that were skipped, possibly because an error occurred in a previous task.
Perform the following steps to search for a Job:
-
Click the Process Queue or Alerts tile.
-
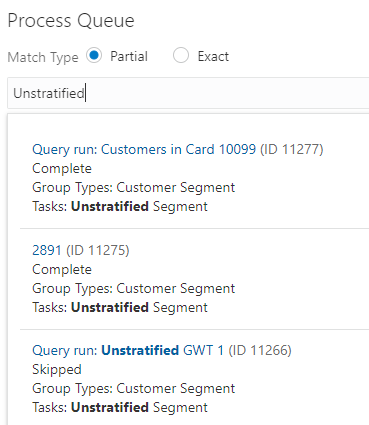
In the Search for a Job field, enter the Task Type, Group Type, Status or Job ID of the Job you want to search for. Select Partial to search for Jobs that partially match the search text, or select Exact, to search for an exact match.
Figure 11-2 Process Queue Quick Search Results
Note:
If more than 25 Jobs match the search criteria, the first 25 Jobs are displayed. Select Show More... at the bottom of the page to display more Jobs.
-
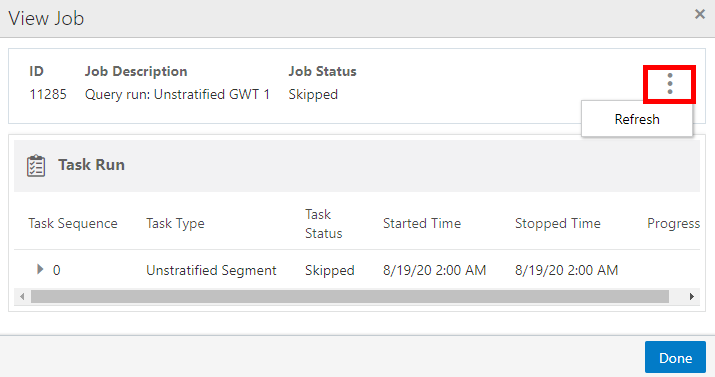
Click the Name which appears as a link for any Job to open the Job Details. See Viewing a Job in Process Queue for more information. Click the Action Menu to Refresh the Task Run details.
Figure 11-3 Action Menu Options - Quick Search
Job Quick Search - Job Scheduling Tiles
Scheduled Jobs are a list of Jobs that are configured to be run by the system. They include the following tiles:
-
All Scheduled Jobs
-
Daily
-
Weekly
-
Monthly
Figure 11-4 Job Management - All Scheduled Jobs Tile
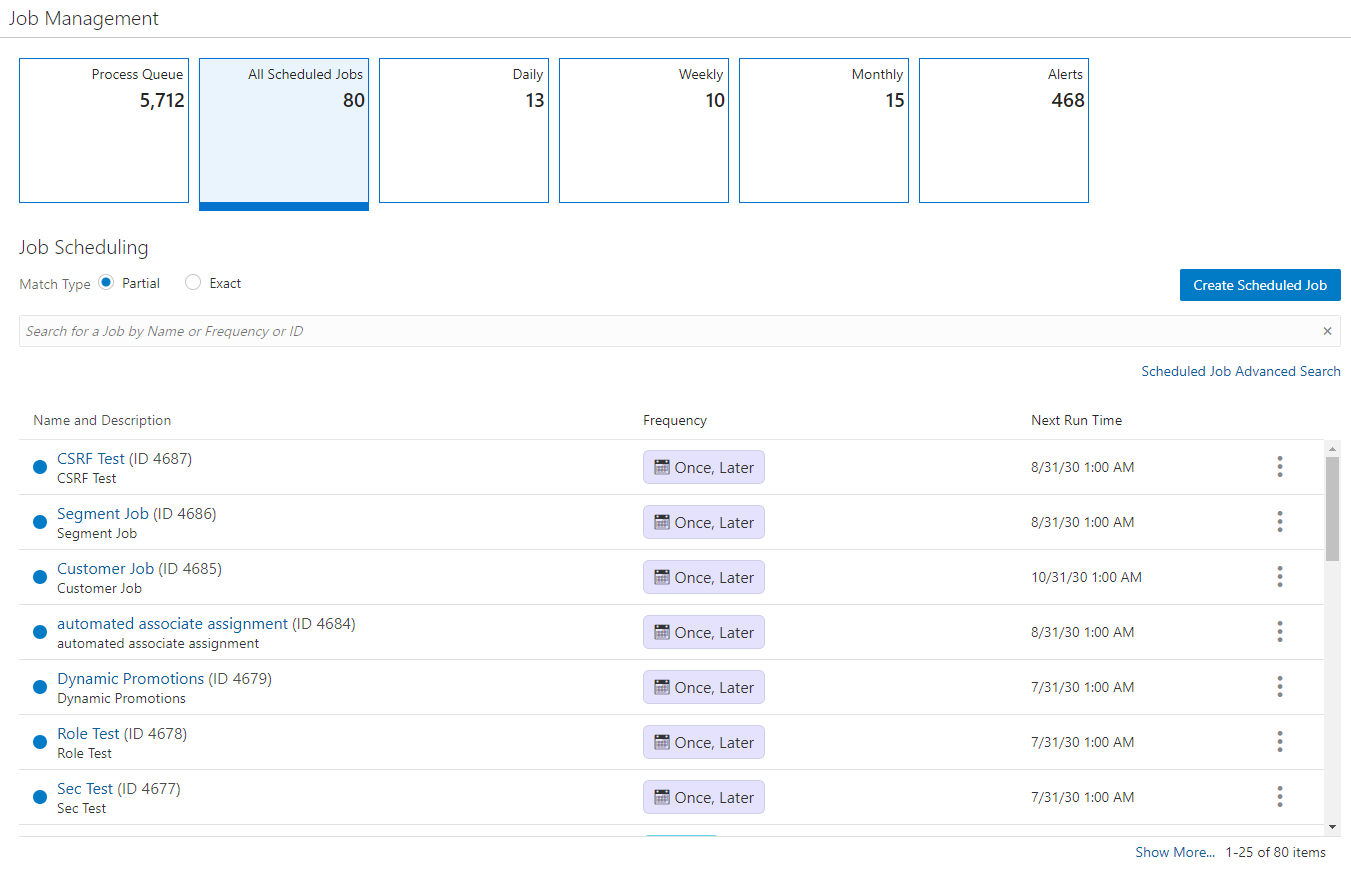
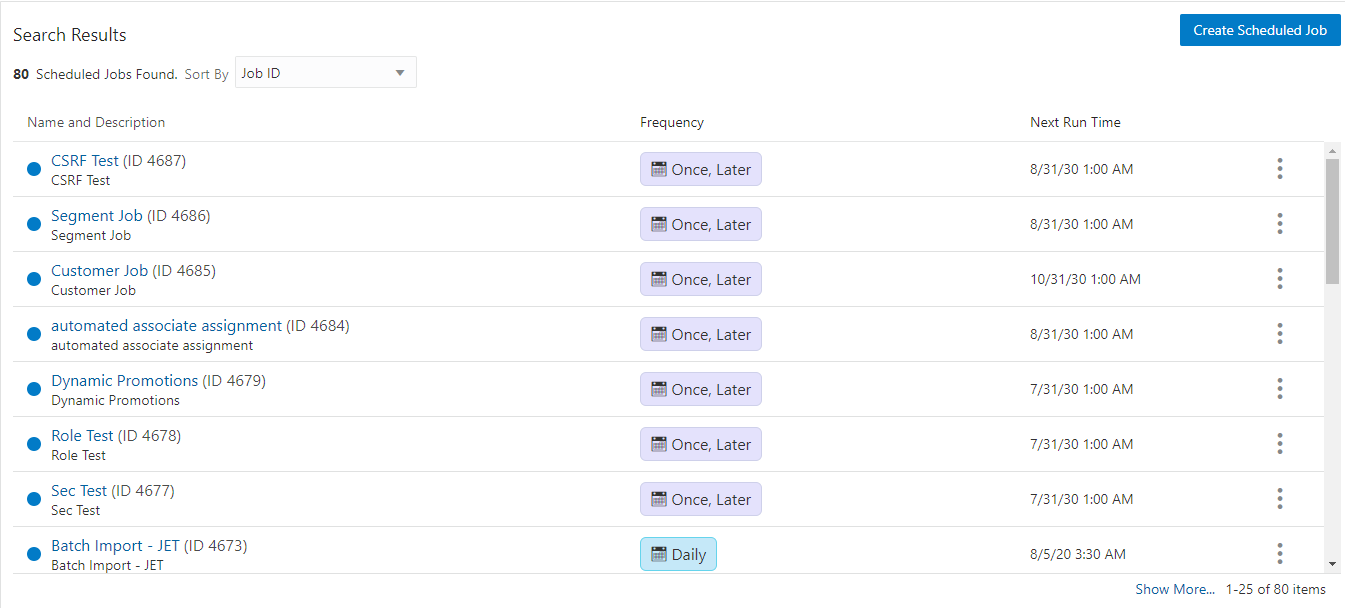
The Job Scheduling Tiles displays the following information for each Job:
-
Job Status - Indicates whether the Job is currently enabled. A full circle indicates the Job is active. An empty circle indicates the job is inactive.
-
Name and Description - Name and Description of the Job.
-
ID - ID Number of the Job.
-
Frequency - The frequency at which the Job is performed.
-
Next Run Time - The Time at which the Job is run next.
Perform the following steps to search for a Job.
-
Click the All Scheduled Jobs, Daily, Weekly, or Monthly tile.
-
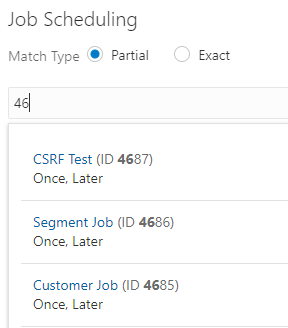
In the Search for a Job field, enter the Name, Frequency, or Viewing a Job in Process Queue of the Job you want to search for. Select Partial to search for Jobs that partially match the search text, or select Exact, to search for an exact match.
Figure 11-5 Jobs Scheduling Quick Search Results
Note:
If more than 25 Jobs match the search criteria, the first 25 Jobs are displayed. Select Show More... at the bottom of the page to display more Jobs.
-
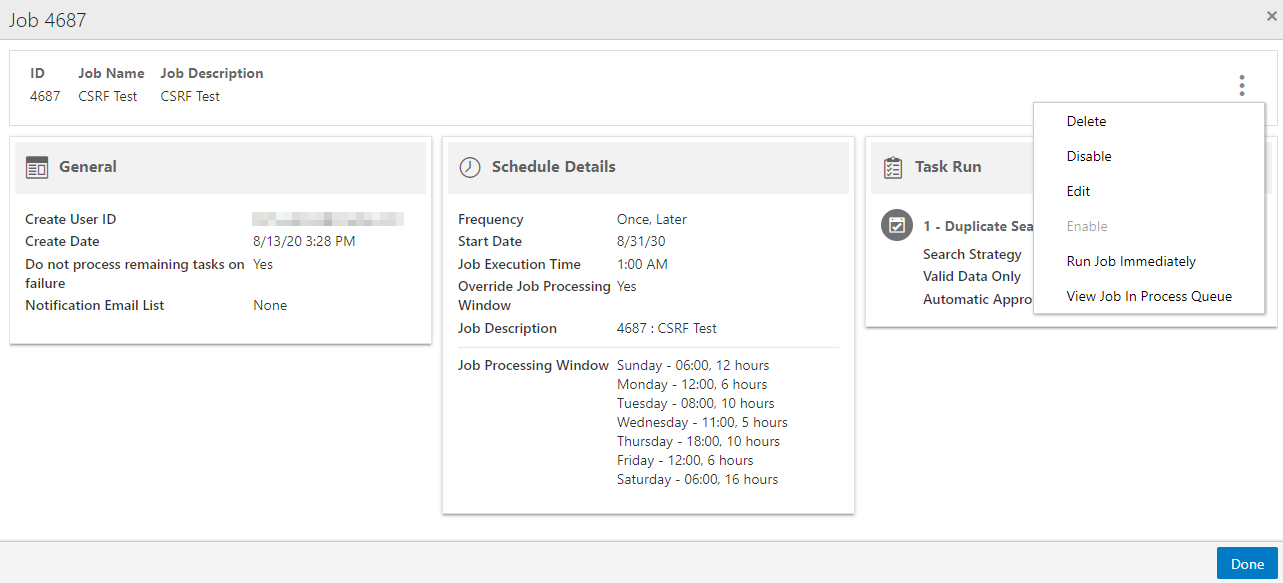
Click the Name which appears as a link for any Job to open the Job Details. See Viewing a Scheduled Job for more information. Click the Action Menu to Delete, Disable, Edit, Enable, Run Job Immediately, or View Job in Process Queue.
Figure 11-6 Action Menu Options - Quick Search
Job Advanced Search
The Job Advanced Search allows you to select more criteria that are not available in the Job Quick Search box. The Job Advanced Search is accessed by the following methods:
-
Click the Advanced Search link underneath the Job Quick Search box in the Job Home window.
-
Click Job Search in the Job Management menu. See Navigation for more information.
Job Advanced Search - Process Queue
Figure 11-7 Job Advanced Search - Process Queue
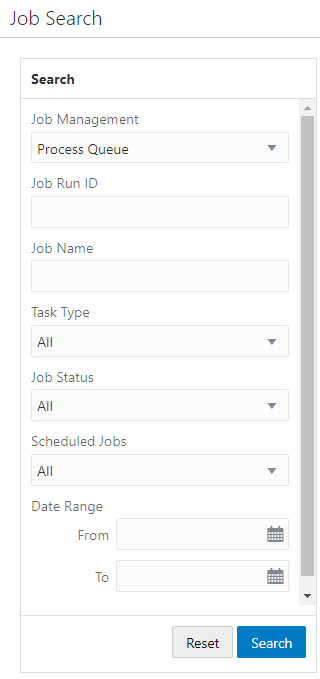
The following search fields are available when Job Management is set to Process Queue:
-
Job Run ID
-
Job Name
-
Task Type - The type of task. The values in this Selection menu depend upon configuration. See the Oracle Retail Customer Engagement Implementation Guide for information about configuring custom task types.
-
Job Status
-
All Default
-
Pending
-
Running
-
Complete
-
Failed
-
Skipped
-
Abnormal Termination
-
-
Scheduled Jobs
-
Date Range
-
From - Click the Calendar icon to select the beginning Month and Day of the date range
-
To - Click the Calendar icon to select the ending Month and Day of the date range
-
Job Advanced Search - Scheduled Jobs
Figure 11-8 Job Advanced Search - Scheduled Jobs
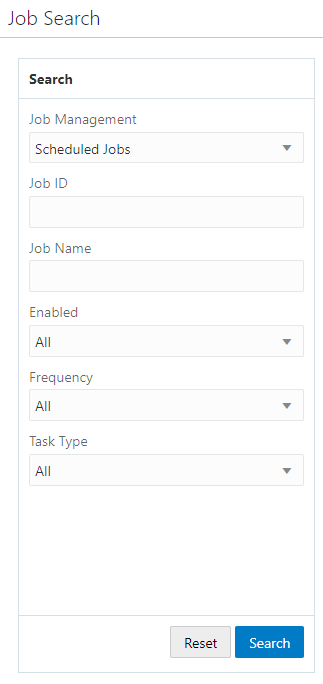
The following search fields are available when Job Management is set to Scheduled Jobs:
-
Job ID
-
Job Name
-
Enabled
-
All - Default
-
Yes
-
No
-
-
Frequency
-
All - Default
-
Once, Immediately
-
Once, Later
-
Daily
-
Daily, Business Days Only
-
Weekly
-
Monthly
-
-
Task Type - The type of task. The values in this Selection menu depend upon configuration. See the Oracle Retail Customer Engagement Implementation Guide for information about configuring custom task types.
Searching Jobs
Once all the desired information has been entered, click Search to see the results. If more than 25 results are returned, click the Show More… link to show the next 25 Jobs.
Figure 11-9 Advanced Search Results - Process Queue
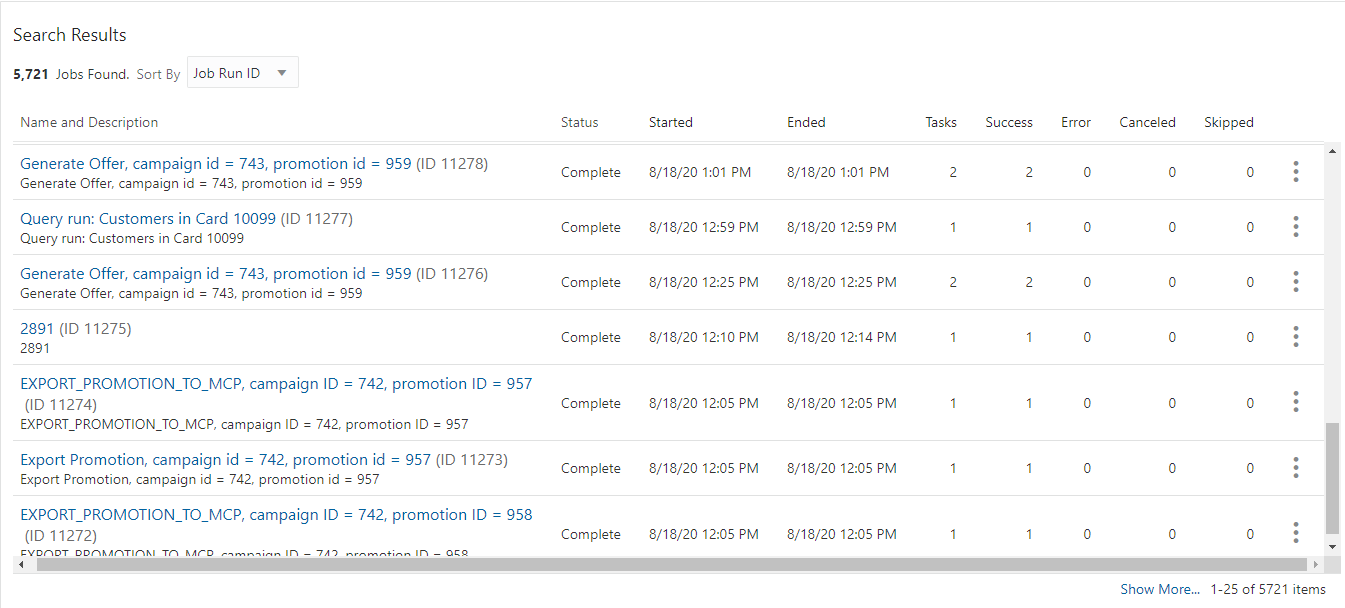
Figure 11-10 Advanced Search Results - Scheduled Jobs
Note:
Click Reset to clear all fields and return list values to the default selections. You can also click Search without entering any criteria to see a complete list of Jobs.
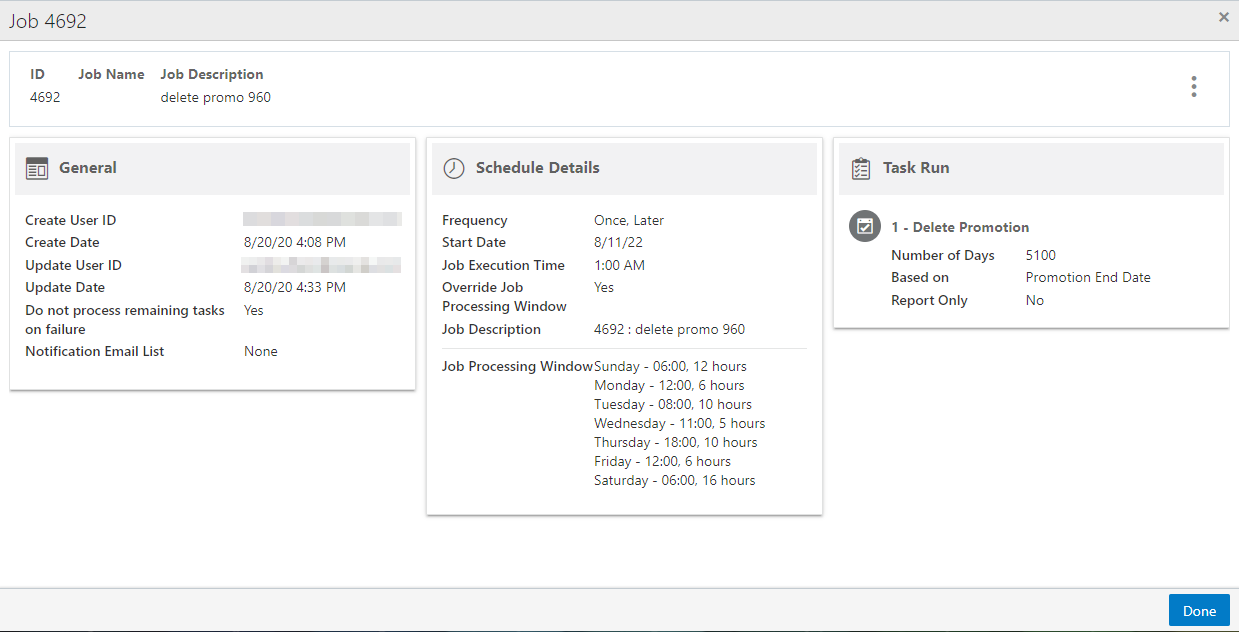
Viewing a Scheduled Job
To view a scheduled job:
-
Search for a Job. See Job Quick Search or Job Advanced Search.
-
For the Job you want to view, click the Action Menu.
-
Click View. The Job opens.
Figure 11-11 Job View
-
Click Done to return to the Scheduled Job List.
Note:
To use the available options in the Action Menu, see Deleting a Job, Disabling a Job, Editing a Job, Enabling a Job, Running a Job Immediately, or Viewing a Job in Process Queue.
Creating a Scheduled Job
There are a two choices available to start the process of creating a Scheduled Job. Access the Create Scheduled Job button from either:
-
Job Home
-
Job Search
-
To access the Create Scheduled Job wizard: Proceed to Step 2.
Or use this alternate method:
To Create a new Scheduled Job from Job Search: Click the Create Scheduled Job button, which will open the Scheduled Job wizard on the Information tab. .
-
From Job Home, click Create Scheduled Job which opens the Schedule Job Wizard on the information tab. Proceed to Step 2
Figure 11-12 Job Home

Note:
To access the Create Scheduled Job button, you must select either the All Scheduled Jobs, Daily, Weekly, or Monthly tile.
-
From Job Search, click Create Scheduled Job which opens the Scheduled Job wizard on the Information tab. Proceed to Step 2
Figure 11-13 Job Search

-
-
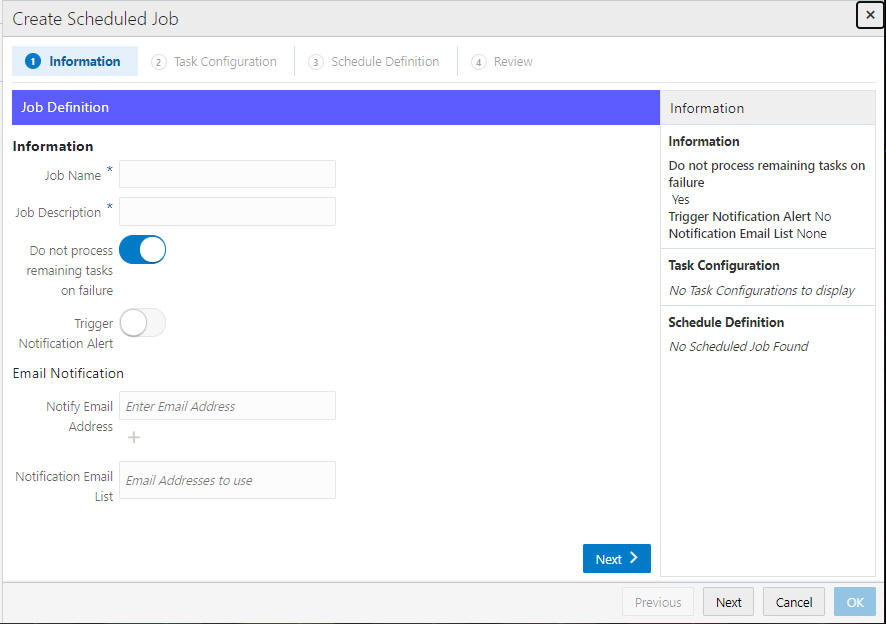
Enter the following for the Information tab.
Figure 11-14 Information Tab
-
Job Name (required)
-
Job Description (required)
-
Do Not Process Remaining Tasks on Failure - Default is ON.
-
Trigger Notification Alert - Toggle to ON to set up an alert that notifies users to items needing their attention when creating a scheduled job to be run in Customer Engagement. See Notifications for more information.
-
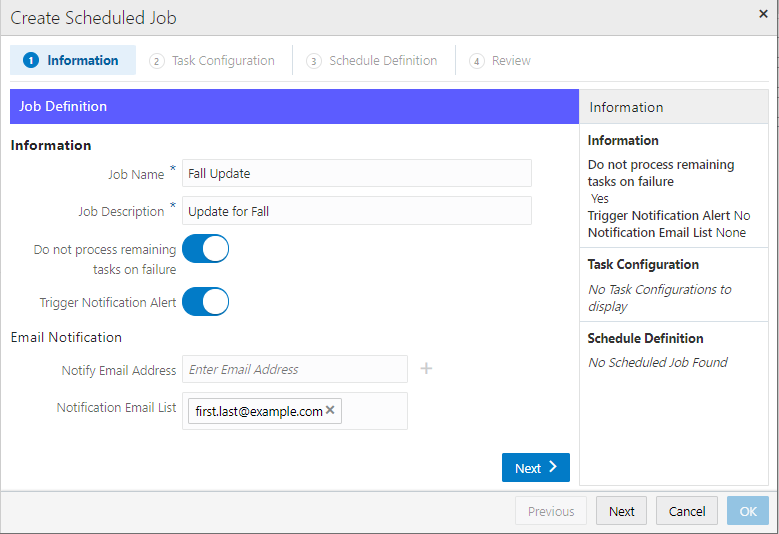
Notify Email Address - Enter one or more email addresses using the Plus icon to move each email address to the Notification Email List.
-
Notification Email List - This field populates as email addresses are entered.
Figure 11-15 Information Tab - Notification Email List
-
-
Click Next to continue to the Task Configuration tab.
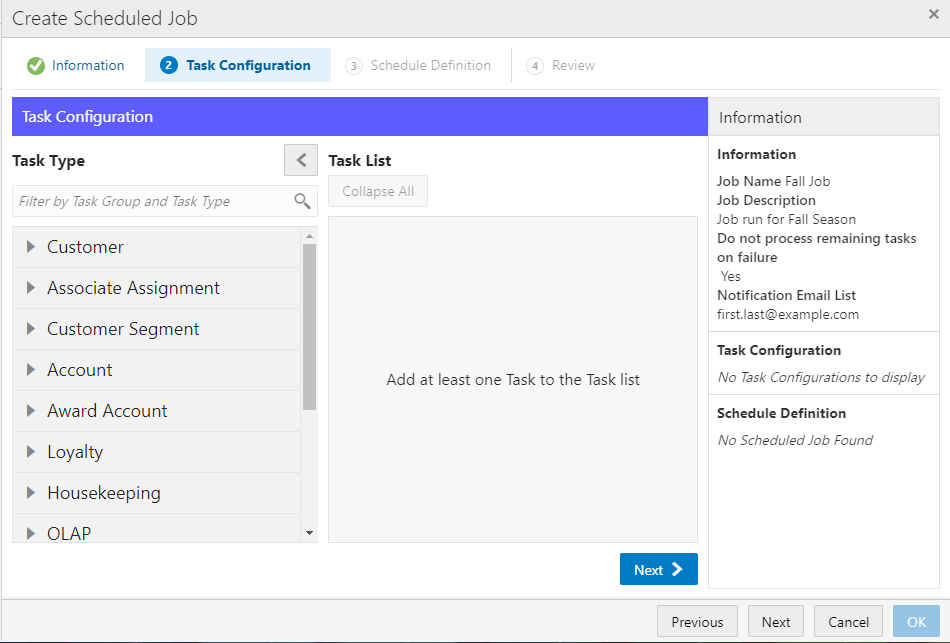
Figure 11-16 Task Configuration
Building the Task List
-
To start the Task List selection, you can either filter by Task Group and Task Type or you can select one of the Templates to expand the Task Type selections.
-
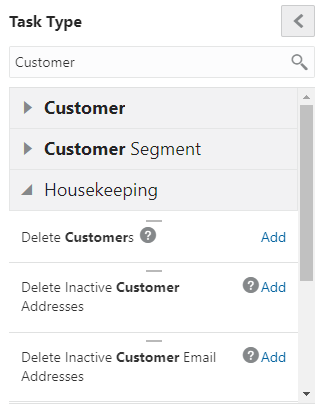
To filter by Task Group and Task Type: In the Filter by Task Group and Task Type box, enter part or all of a Task Group or Task Type.
-
Press Enter, or click the Search icon.
Figure 11-17 Task Type - Filtered
Note:
To see the available tasks in your filtered list, expand the Template to see the available choices from which to select.
To reset the filter, highlight the words and press Delete. Then press Enter, or click the Search icon.
-
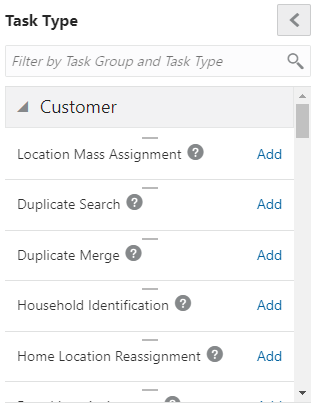
In the Task Type selection list, click a Template Group to expand its list of Task List options. See Jobs and Tasks for more information about Task Type group organization.
Figure 11-18 Expanded Task Type List
-
Click the Add link, or drag and drop the Task Type Name into the Task List window.
Figure 11-19 Adding Task Types to Task List
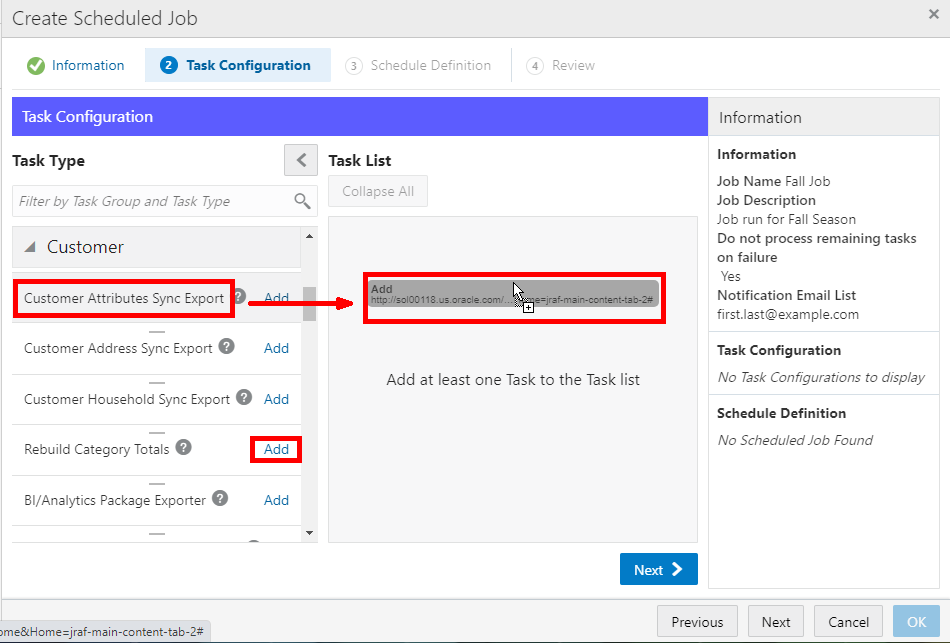
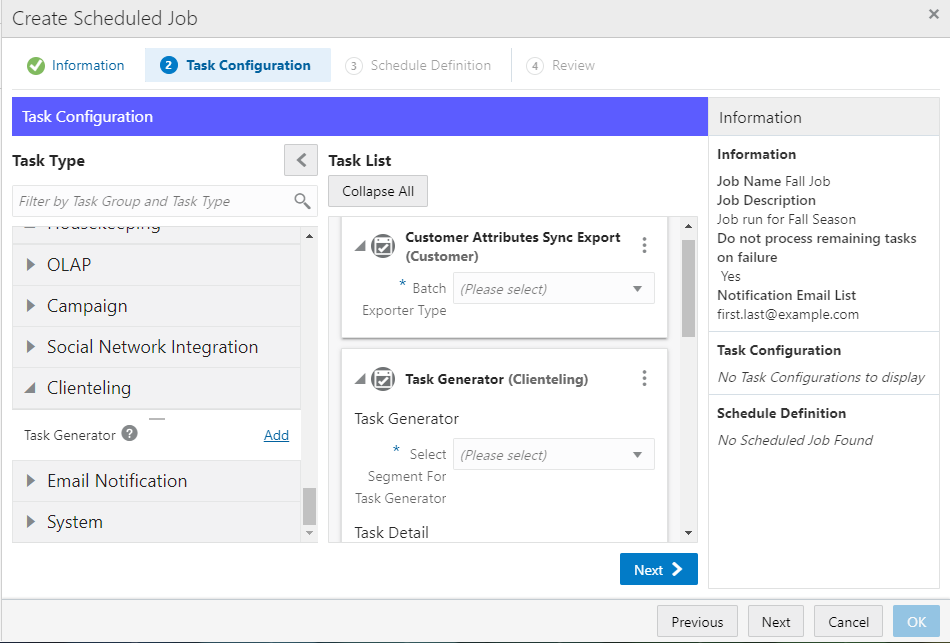
Figure 11-20 Added Task Types
-
Repeat Step 3.e until all tasks are added.
-
Enter the Task List Criteria into the appropriate fields. See Jobs and Tasks for more information about Task List fields.
Figure 11-21 Tasks
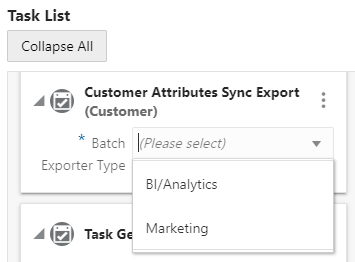
Figure 11-22 Task List Options
-
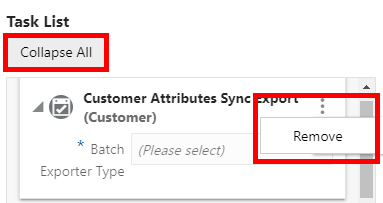
After entering the search criteria you can collapse or expand the details at any time. To collapse a task in the list, click the arrow next to each task. To change all tasks at once, click Collapse All/Expand All to Collapse/Expand.
-
When you need to clear a task from the Task List, click the Action Menu and then click Remove.
-
-
Click Next to go to the Schedule Definition tab.
-
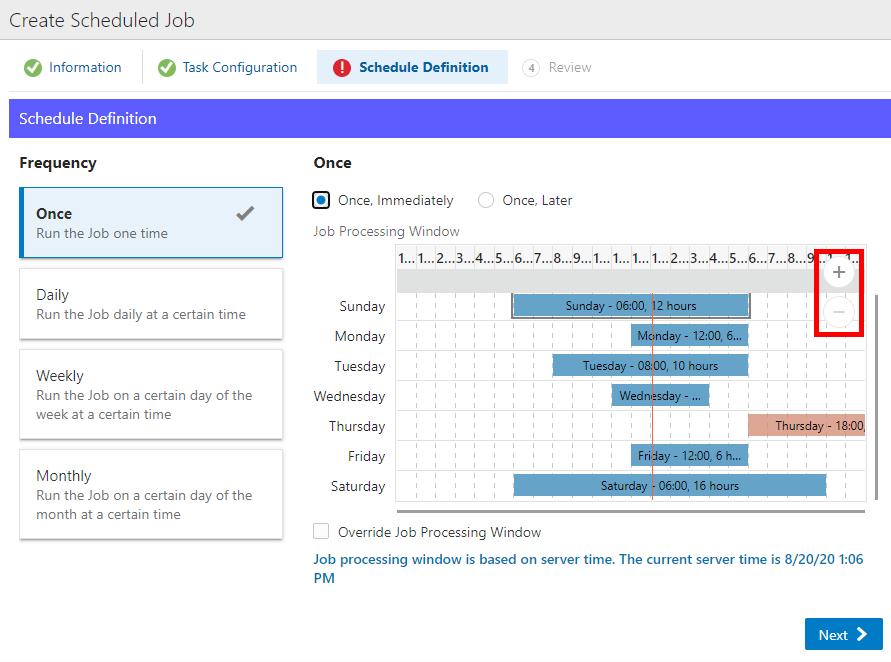
Enter the following for the Schedule Definition tab:
Figure 11-23 Schedule Definition Tab
Note:
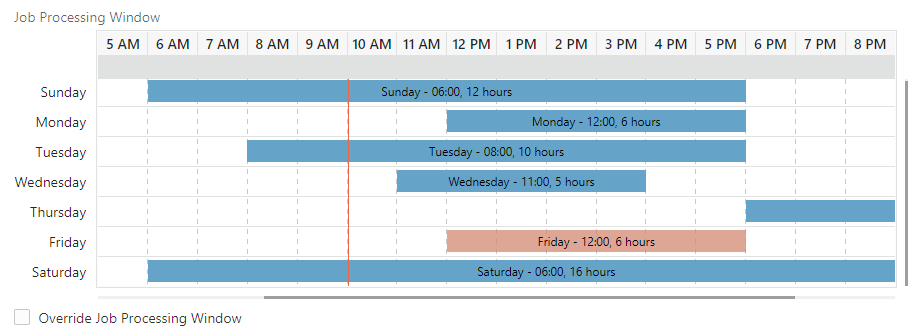
As shown in Figure Figure 11-23, hovering the mouse over the Job Processing Window enables the Zoom in and Zoom out icons. Click these icons to better view the days and times.
-
Select one of the following Job Execution Frequencies:
-
Once, Immediately to run the Job immediately, once you have finished creating/saving this job. If you select this option, continue with Step 6.f.
-
Once, Later to run the Job at a later date. If you select this option, continue with Step 6.a.
-
Daily to run the Job every day. If you select this option, continue with Step 6.a.
-
Daily, Business Days Only to run the Job only on business days (that is, Monday through Friday). If you select this option, continue with Step 6.a.
-
Weekly to run the Job once each week. If you select this option, continue with Step 6.a.
-
Monthly to run the Job once each month. If you select this option, continue with Step 6.a.
-
Use the Start Date Calendar Menu to select the start of the date range in which the Job will run. If you selected a Job Execution Frequency of Once, Later, continue with Step 6.e.
-
Use the End Date Calendar Menu to select the end of the date range in which the Job will run.
Note:
For Daily, Daily, Business Days Only, Weekly, and Monthly, if Disable End Date is selected, the End Date configuration is deactivated, leaving the Job in effect, forever. To enable the End Date Calendar Menu, clear the check box.
If you selected a Job Execution Frequency of Daily, or Daily, Business Days Only, continue with Step 6.e.
If you selected a Job Execution Frequency of Weekly, continue with Step 6.c.
If you selected a Job Execution Frequency of Monthly, continue with Step 6.d.
-
Use the Day of Week Selection check boxes to select the days of the week that you want the Job to run. Continue with Step 6.e.
-
Use the Day of Month Selection Menu to select the day of the month on which the Job will run.
-
Use the Job Execution Time Menus to determine the time at which the Job will run.
It is recommended that you select a time that is within the Job Processing Window. If you select a time outside the Job Processing Window, the Override Job Processing Window setting (see Step 6.f) must be checked for the Job to run.
-
Use the Override Job Processing Window Check Box to indicate whether the Job should run, even if it is scheduled outside the Job Processing Window. See the Job Processing Window for more information on how the Job Processing Window works.
-
-
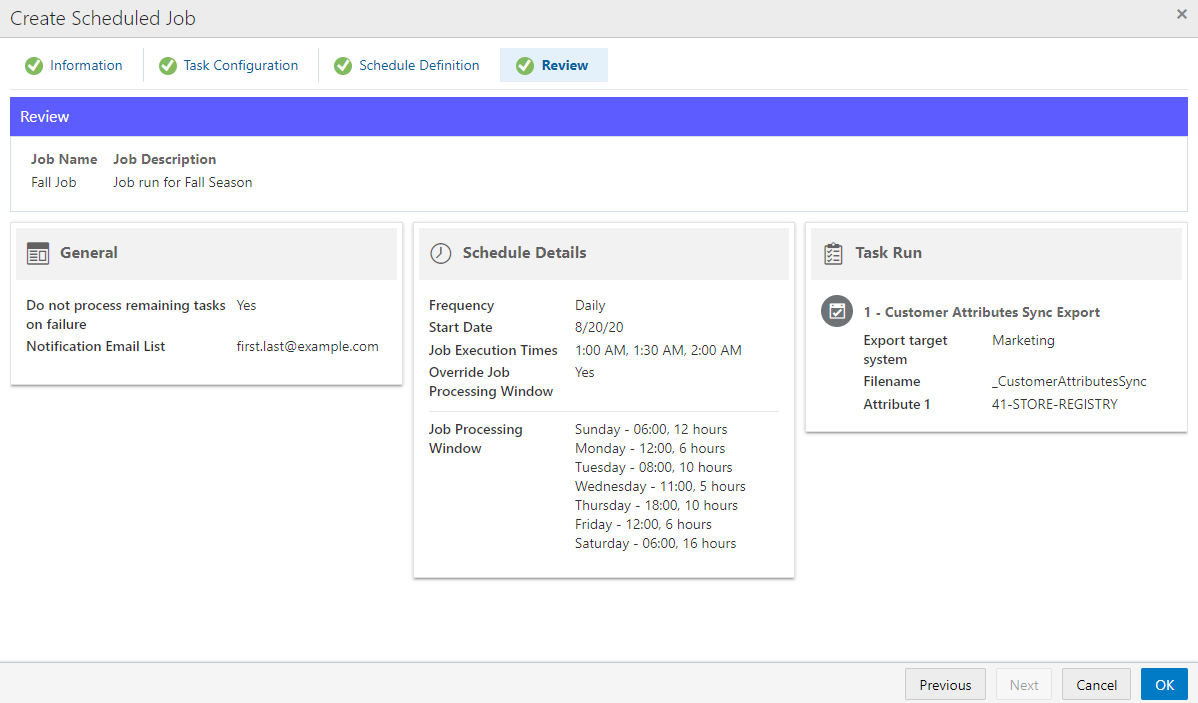
After defining the schedule, click Next to proceed to the Review tab.
Figure 11-24 Review Tab
Note:
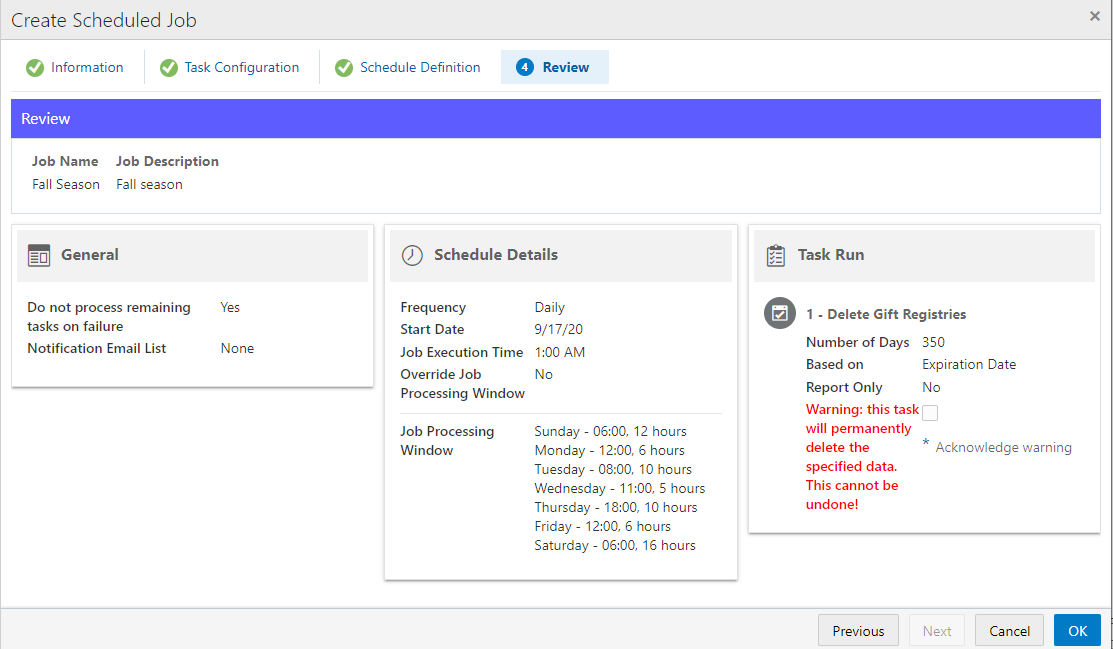
Before you can submit certain jobs, you need to acknowledge any warning in the Review step.
Figure 11-25 Review Tab - Confirm Choice Warning
-
Review the entered information to ensure that it is correct. Click OK to save the Job, or click Cancel to close the Job without saving. Click Previous or any Tab to return to any point of the Create Scheduled Job process.
Note:
Clicking OK triggers a confirmation notification to confirm the job has been created successfully.
Figure 11-26 Confirmation Notification

Editing a Job
To edit an existing Job:
-
Navigate to Job Home. See Job Quick Search.
-
Click the All Scheduled Jobs tile.
The Scheduled Jobs list appears.
-
Search for the Job. See Job Quick Search - Job Scheduling Tiles or Job Advanced Search.
-
For the Job you want to edit, click the Action Menu.
-
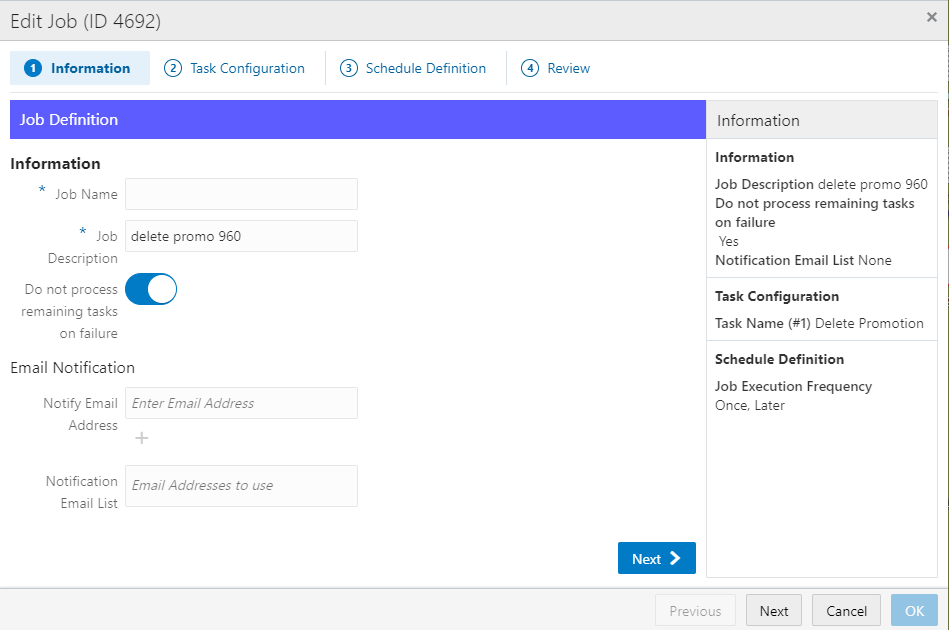
Click Edit. The Job Create Wizard opens with all fields populated with the current configuration information.
Figure 11-28 Edit Job
-
Use Wizard Navigation to make any necessary changes. See Creating a Scheduled Job for a description of the fields and information.
-
When you are finished making changes to the Job, do one of the following, either:
-
Click Save to save the Job with the current settings and return to the Scheduled Jobs List or
-
Click Cancel to delete all changes and return to the Scheduled Jobs List.
-
Deleting a Job
To delete an existing job:
-
View a Job. See Viewing a Scheduled Job.
-
Click the Action Menu.
-
Click Delete.
A warning message appears.
Figure 11-29 Warning Message

-
Click Ok to delete the job or Cancel to return to the Job.
Disabling a Job
To disable an existing job:
-
View a Job. See Viewing a Scheduled Job.
-
Click the Action Menu.
-
Click Disable.
Figure 11-30 Confirmation Notification

Note:
A confirmation notification appears to confirm the job has been disabled.
-
Click Done to close the job and return to the Job list.
An empty circle before the Job Name indicates the job is disabled.
Enabling a Job
To enable a previously disabled job:
-
View a Job. See Viewing a Scheduled Job.
-
Click the Action Menu.
-
Click Enable. A confirmation notification appears to confirm the job is enabled.
Figure 11-31 Confirmation Notification

-
Click Done to close the job and return to the Job List.
A filled circle before the Job Name indicates the job is enabled.
Running a Job Immediately
To run an existing job immediately:
-
View a Job. See Viewing a Scheduled Job.
-
Click the Action Menu.
-
Click Run Job Immediately.
Figure 11-32 Confirmation Notification

Note:
A confirmation notification appears to confirm the job has been run.
-
Click Done to close the job and return to the Job List.
Viewing a Job in Process Queue
To view a job in the Process Queue:
-
View a Job. See Viewing a Scheduled Job.
-
Click the Action Menu.
-
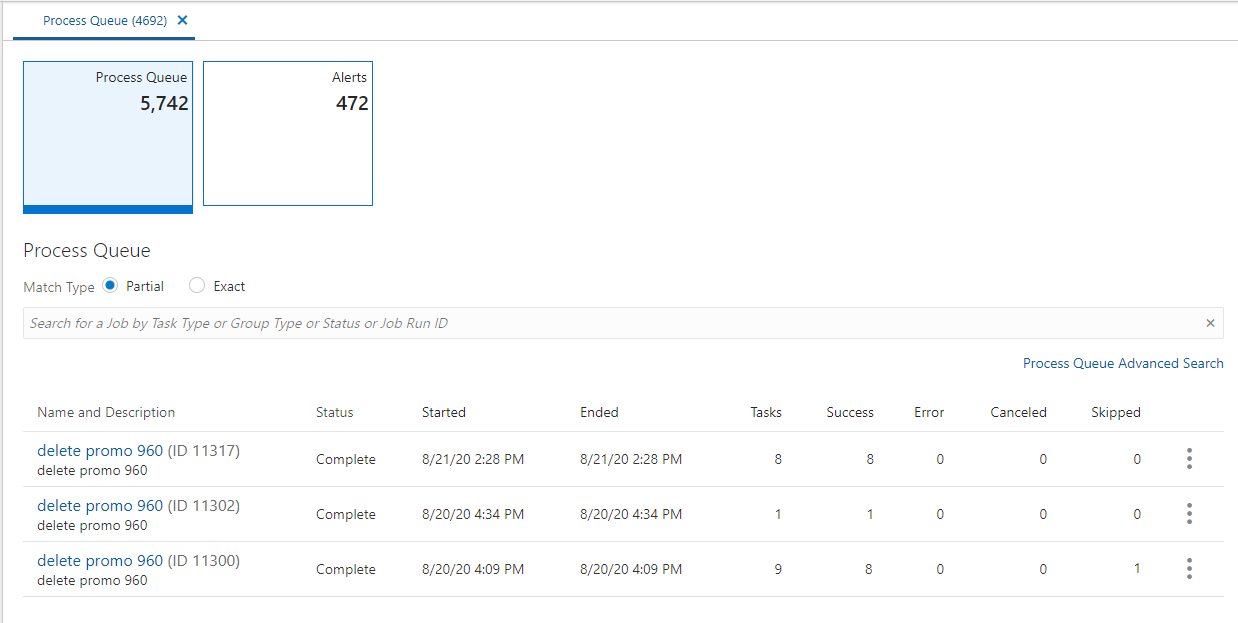
Click View Job in Process Queue. The Process Queue opens with all of the previous runs of the selected Job in the Process Queue.
Figure 11-33 View Job in Process Queue
-
For the run you want to view details for, click the Action Menu.
-
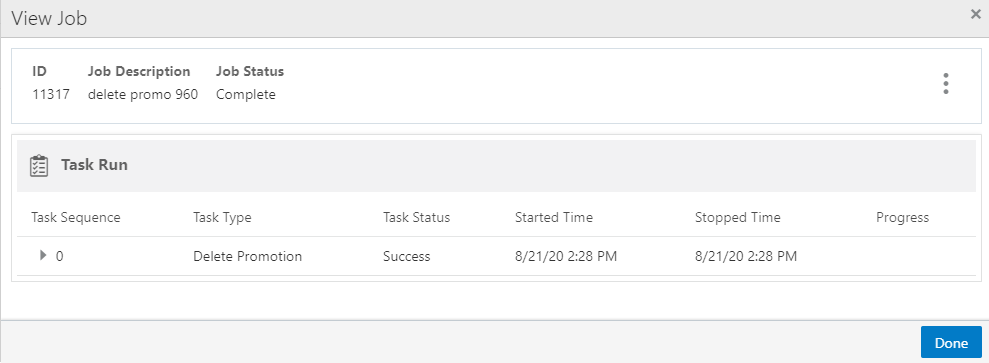
Click View. The specific Job Run appears.
Figure 11-34 Job Run Details
-
Click the Action Menu and then click Refresh to update the Task Run fields.
-
Click Done to close the job and return to the Process Queue for that job.
Jobs and Tasks
Jobs include one or more tasks that are chained together to run sequentially.
Each Job has additional parameters that must be configured. For information about these parameters, see Configure Job Parameters.The type of tasks that can be scheduled within a job are described in this section.
Customer Tasks
This section describes customer tasks.
Location Mass Assignment
This task searches Customer transaction histories in a selected date range and assigns each Customer to a Home Location, based on where the Customer shopped most frequently over the chosen date range.
In the database, there are two location fields: Home Location and Sign-Up Location. The system expects to see the Sign-Up Location populated from the POS or other data entry client. This field is static.
The Home Location field is intended to be the location to which the Customer is assigned as their primary location. As an example; it is possible that a Customer signs up in a location during a trip. However, there is a location in the Customer's neighborhood and subsequent to sign up, the Customer is seen to shop there regularly. As a basic management function, the administrator wants to assign the Customer to this location.
As Customers move around and as a retailer opens and closes locations it is a common, on-going requirement to assign and re-assign Customers to a home location. The Location Mass Assignment task will re-assign Customers to the home location where they shopped most frequently during the selected date range.
See Location Mass Assignment for job scheduling details.
Duplicate Search
This process allows you to schedule a search for duplicate Customer records. The search will identify potential duplicate Customer records by comparing information in each record and grouping them into Duplicate Sets.
See Duplicate Search for job scheduling details.
Duplicate Merge
This task performs the process of actually merging duplicate Customer records identified by the Duplicate Search job.
The Merge process that runs on this schedule will merge all duplicate sets that are marked as Approved regardless of the search strategy used to find them. After the merge, Customer Engagement will clean out all duplicate sets (Approved, Not Approved, and Merged) from the database.
Duplicates can be approved through a Duplicate Search job using the Automatic Approval option (see Duplicate Search), or in the Customer Merge Review procedure.
See Duplicate Merge for job scheduling details.
Household Identification
The Household Identification task determines which Customers belong to the same household. This is useful when creating mailing lists, as this allows you to limit the number of mailings sent out to one per household. Only primary home addresses are evaluated.
See Household Identification for job scheduling details.
Home Location Re-Assignment
The Home Location Re-Assignment task changes the Home Locations assigned to Customers.
See Home Location Re-Assignment for job scheduling details.
Franchisee Assignment
The Franchisee Assignment task assigns Franchisees to Customers.
See Franchisee Assignment for job scheduling details.
Customer Sync Export
Creates a file of customer data for export to a marketing system or a business intelligence/analytics system. The data includes the customers name, address, email address, phone number, and additional information.
Depending on the selected batch export type, the export task may also generate a listing of customer records that have been deleted as a result of Customer Housekeeping or Customer Merge, or include deleted customer records in a single customer export file.
See Customer Sync Export for job scheduling details and generated files.
Customer Activity Sync Export
Creates a file for export to a marketing system. The data includes details on customer transactions.
See Customer Activity Sync Export for job scheduling details and generated files.
Customer Attributes Sync Export
Create a file for export to a marketing system or a business intelligence/analytics system. The data includes details on customer attributes.
See Customer Attributes Sync Export for job scheduling details and generated files.
Customer Address Sync Export
Create a file for export to a business intelligence/analytics system. The data includes details on the customer‚ Äôs address.
See Customer Address Sync Export for job scheduling details and the generated address file.
Customer Household Sync Export
Create a file for export to a business intelligence/analytics system. The data includes details on the association of a customer with a household.
See Customer Household Sync Export for job scheduling details and generated files.
Rebuild Category Totals
Recalculate the totals in the CST_DEPARTMENT_TOTALS tables for all customers active within a specified number of days, months, or years, for example: rebuild totals for customers active within the last 4 weeks. The maximum period of time is up to three years.
See Rebuild Category Totals for job scheduling details.
BI/Analytics Package Exporter
The BI/Analytics Package Exporter task enables you to package the export files into a zip file for export to the business intelligence/analytics system. This task should be the last task performed for a single job, running after the individual exports.
See BI/Analytics Package Exporter for job scheduling details.
Reset Customer YTD Totals
Resets the YTD totals for all Customers to zero.
See Reset Customer YTD Totals for job scheduling details.
Associate Assignment Tasks
This section describes associate assignment tasks.
Automated Associate Assignment
This task automatically assigns Associates to Customers, based on a set of selected criteria.
See Automated Associate Assignment for job scheduling details.
Associate Mass Re-assignment
This task automatically reassigns the Customers assigned to a selected Associate to one or more new Associates.
See Associate Mass Re-assignment for job scheduling details.
Customer Segment Tasks
This section describes customer segment tasks.
Unstratified Segment
This task finds Customers to be entered into an Unstratified Segment and counts the number of Customers in the Segment. For more information on Unstratified Segments, see Unstratified Segments.
See Unstratified Segment for job scheduling details.
Stratified Segment
This task organizes Customers into user-defined levels and counts the number of Customers in each strata level. For more information on Stratified Segments, see Stratified Segments.
See Stratified Segment for job scheduling details.
Segment Sync Export
This task generates a CSV file of customers within a stratified, unstratified, or manual segment for export to a marketing system or a business intelligence/analytics system.
See Segment Sync Export for job scheduling details and generated files.
Account Tasks
This section describes account tasks.
Export Card Series
This task creates an export file for Cards created using a SOAP Message or batch file.
When a Generate Card message is processed, individual Cards are created and, depending on configuration, assigned to Customers; however, the Card and Customer information is not exported to an XML file. This job will create an export file that includes the Customer Engagement-generated Card numbers and the Customer assigned to each Card.
Note:
The export file for this type of job is not compressed.
See Export Card Series for job scheduling details and generated files.
Release Expired PreAuthorizations
This task releases (removes) expired pre-authorization amounts that have not been settled or post-authorized. It searches Tender Accounts for PreAuth amounts that are older than their configured expiration time and removes them from the associated Tender Account.
See Release Expired PreAuth for job scheduling details.
Points/Awards Transfer Notification Export
This task creates CSV files for notifications about points transfers and/or award transfers. A separate file is generated for each type of transfer, and information is included to notify both the source (originating) Customer for the transfer and the target (recipient) Customer.
The integrated system, such as Responsys, can use the information to generate transfer notification emails to the originator and recipient of the award or points transfer, based on each Customer’s Contact Permissions. SMS messages can also be generated if the integrated system supports it.
The Enable Responsys Transfer Notification configuration property controls whether to send the notification in real time, or capture the data in a separate table and generate notifications through a batch export file. See the Oracle Retail Customer Engagement Implementation Guide for more information about System Configuration.
When interactive notification requests are sent through a web service message, use of the export file occurs only if an interactive request to generate the notification did not succeed. In this case, the details of the transfer are retained in the database until a scheduled notification export job runs.
See Points/Awards Transfer Notifications Export for job scheduling details and generated files. The Marketing Integration Properties chapter of the Oracle Retail Customer Engagement Implementation Guide describes the configuration required for transfer notification integration with a marketing system such as Responsys.
Notify Card Renewal
This task notifies Customers that they need to renew Cards that are set to expire within a certain, defined period of time.
See Notify Card Renewal for job scheduling details.
Tender Sync Export
This task generates a file of tender accounts and tender account activity for export to an external system.
See Tender Account Sync for job scheduling details and generated files.
Award Account Tasks
This section describes award account tasks
Issue Anniversary Awards
This task searches for Customers who have a birthday or signup date anniversary within the time frame specified and issues an eAward.
This process schedules the Issue Anniversary Awards process.
This task will look behind and ahead of the run date for Customers who have birthdays or signup anniversaries within the time period. The Customers that are found will receive an award coupon as created in this process. When this task is run, an export file (birthday or signup anniversary) is created.
See Issue Anniversary Awards for job scheduling details.
Notify Awards Expire
This task searches for Customers whose awards are scheduled to expire within a defined time window, and creates an export file containing award expiration notification information for those Customers.
See Notify Awards Expire for job scheduling details.
Award Sync Export
This task generates a file of award accounts and a file of award coupons for export to a marketing system.
See Award Sync Export for job scheduling details and generated files.
Loyalty Tasks
This section describes loyalty tasks.
Distribute Loyalty Awards
This task creates an export file for all pending awards.
See Distribute Loyalty Awards for job scheduling details.
Create Loyalty Awards
This task converts loyalty points into awards, based on the parameters set for the program and program level.
See Create Loyalty Awards for job scheduling details.
Earn Loyalty Points
This task converts pending (escrow) loyalty points into earned loyalty points.
See Earn Loyalty Points for job scheduling details.
Expire Loyalty Points
This task expires (deletes) loyalty points based upon parameters in the Program/Level.
See Expire Loyalty Points for job scheduling details.
Reset Loyalty YTD Points
This task resets the YTD points earned by each Customer. This task should be run at the end of each calendar/fiscal year to reset YTD Points balances to zero. This task is used for reporting purposes only; it does not affect the actual loyalty points on an account. Life-to-date (LTD) points are not affected by this process.
See Reset Loyalty YTD Points for job scheduling details.
Loyalty Account Sync Export
This task generates a file of customer loyalty data for export to a marketing system or a BI/analytics system.
See Loyalty Account Sync Export for job scheduling details and generated files.
Loyalty Account Activity Sync Export
This task generates a file of customer loyalty account activity to a BI/analytics system.
See Loyalty Account Activity Sync Export for job scheduling details and generated files.
Loyalty Program Sync Export
This task generates a file of loyalty programs to a BI/analytics system.
See Loyalty Program Sync Export for job scheduling details and generated files.
Loyalty Award Transaction Sync Export
This task generates a file of loyalty award transactions to a BI/analytics system. See Loyalty Award Transaction Sync Export for job scheduling details and generated files.
Housekeeping Tasks
This section describes housekeeping tasks.
When a database contains large amounts of old data, database performance and response may be slowed. To prevent the overburdening of the database with old, unneeded information, housekeeping tasks can be performed to remove old information.
Delete Award Inquiry Activities
This task deletes old award inquiry activities.
See Delete Award Inquiry Activities for job scheduling details.
Delete Batch Process Tracking
This task deletes old Batch Process Tracking records. Consolidated daily, weekly, and monthly records are stored in XMLAPI record tables in the database, and used to display information at the Batch Process Tracking pages.
See Delete Batch Process Tracking for job scheduling details.
Delete Customers
The Delete Customers task removes old Customer records that are no longer needed.
See Delete Customers for job scheduling details.
Delete Gift Registries
This task deletes all database information for Gift Registries that expired prior to a certain, defined period of time in the past.
See Delete Gift Registries for job scheduling details.
Delete Inactive Customer Addresses
This task deletes Customer addresses that are flagged as inactive.
See Delete Inactive Customer Addresses for job scheduling details.
Delete Inactive Customer Email Addresses
This task deletes Customer email addresses that are flagged as inactive.
See Delete Inactive Customer Email Addresses for job scheduling details.
Delete Inactive Customer Phone Numbers
This task deletes Customer phone numbers that are flagged as inactive.See Delete Inactive Customer Phone Numbers for job scheduling details.
Delete Inactive Customers
This task deletes old Customer records that are inactive.See Delete Inactive Customers for job scheduling details.
Delete Inactive Item Registries
This task deletes all database information for inactive Wish Lists that have not been updated within a certain, defined period of time.See Delete Inactive Item Registries for job scheduling details.
Delete Inactive Segment
This task deletes all database information for inactive segments.
See Delete Inactive Segment for job scheduling details.
Delete Job History
This task deletes old job history information.
See Delete Job History for job scheduling details.
Delete Loyalty Accounts and Activities
This task deletes old loyalty accounts and activities.
See Delete Loyalty Accounts and Activities for job scheduling details.
Delete Loyalty Inquiry Activities
This task deletes old loyalty inquiry activities.
See Delete Loyalty Inquiry Activities for job scheduling details.
Delete Loyalty Program Summary
This task clears down the Loyalty aggregation tables based on the YEAR and MONTH values and the "Number of Months" parameter value.
See Delete Loyalty Program Summary for job scheduling details.
Delete Merged/Archived Customers
This task deletes old Customer records that have been merged into other Customer records and archived.
See Delete Merged/Archived Customers for job scheduling details.
Delete Promotion
This task deletes old promotions. It also has the ability to delete an Offer that is associated with the Promotion which is being deleted.
Note:
This method deletes an Offer, provided it is not associated with any other Promotion and if it is associated with any other promotion, the Offer will not be deleted.
See Delete Promotion for job scheduling details.
Delete Segment History
This task deletes old segment history information.
See Delete Segment History for job scheduling details.
Delete Social Activity
This task deletes all social activities from the database that were posted before a certain number of days in the past.
See Delete Social Activity for job scheduling details.
Delete Tasks
This configuration is for a job that deletes tasks from the system. Users can select either or both the Status and Last Update check boxes to close all tasks based on a status only, status and time period, or only a time period.The default option for status is closed.
See Delete Tasks for job scheduling details.
Delete Stored Files
This task deletes old transfer files.
See Delete Stored Files for job scheduling details.
Delete Transaction History
This task deletes old transaction information.
See Delete Transaction History for job scheduling details.
Delete Web Service Tracking
This task deletes old Web Service Tracking records.
See Delete Web Service Tracking for job scheduling details.
Delete Import Files
The Delete Import Files task removes files in import directories that have not been modified in a specified number of days.
See Delete Import Files for job scheduling details.
Delete Batch Import History
This task deletes old records from the XMLAPI_PROCESSED_RECORD table. This information is displayed at the Batch Import Review screen.
See Delete Batch Import History for job scheduling details.
OLAP Tasks
This section describes OLAP tasks.
Aggregate Award Program Summary
As part of the Online Analytical Processing (OLAP), this task summarizes data by program and month for award activity and account data for the Award Program Scorecard.
See Aggregate Award Program Summary for job scheduling details.
Aggregate Loyalty Program Summary
As part of the Online Analytical Processing (OLAP), this task summarizes data by program and month for loyalty activity and account data for the Loyalty Program Scorecard.
See Aggregate Loyalty Program Summary for job scheduling details.
Aggregate Tender Program Summary
As part of the Online Analytical Processing (OLAP), this task summarizes data by program and month for tender activity and account data for the Tender Program Scorecard.
See Aggregate Tender Program Summary for job scheduling details.
Aggregate Loyalty Facts
As part of Online Analytical Processing (OLAP), information about the loyalty program must be aggregated into a summary that can then be retrieved. This task aggregates loyalty information into a summary that can be used by OLAP processes.
See Aggregate Loyalty Facts for job scheduling details.
Aggregate Tender Facts
As part of Online Analytical Processing (OLAP), information about Tender Accounts must be aggregated into a summary that can then be retrieved. This task aggregates Tender Account information into a summary that can be used by OLAP processes.
See Aggregate Tender Facts for job scheduling details.
Campaign Tasks
This section describes campaign tasks.
Dynamic Promotions
This task updates the Targets for all dynamic Promotions.
See Dynamic Promotions for job scheduling details.
Promotion Response Data Import
This task imports customer event data from a marketing system such as Responsys.
See Promotion Response Data Import for job scheduling details and import file formats.
Social Network Integration Tasks
This section describes social network integration tasks.
Social Network Listener
This task searches social networks for Customer posts that meet search criteria defined by Social Listeners.
See Social Network Listener for job scheduling details.
Social Network Update
This task checks for new Social Profiles to add to Customer records.
See Social Network Update for job scheduling details.
Clienteling Tasks
This section describes clienteling tasks.
Task Generator
Generate tasks for Segments with Task Generation enabled. See Segments.
See Task Generator for job scheduling details.
Email Notification Tasks
This section describes email notification tasks.
Batch Import Review
Allows the Batch Import Review settings to be maintained.
See Batch Import Review for job scheduling details.
System Tasks
This section describes system notification tasks.
OCDS Sync
This task generates requests to the Omnichannel Cloud Data Service (OCDS) for updates on item and merchandise hierarchy data as well as location and franchise data.
See ODCS Sync for job scheduling details.
Data Sync
This task is responsible for moving data from the multiple pending Queues to the InProgress Queue in batches. Once the movement of each batch is complete, the records are deleted from the respective Pending Queue. After the data is transferred into the InProgress Queue, the job creates a message based on the operation and the object Name associated with each record. Next, one by one, each message is transferred to the third party application.
See Data Sync for job scheduling details.
Configure Job Parameters
The parameters that must be configured for a given task depend upon the task being defined.
The processes performed by these jobs are described above in Jobs and Tasks.
The following sections describe the fields that configure each task.
Location Mass Assignment
This Task has the following parameters:
-
Date Range Type - This Selection Menu determines the Date Range used.
-
Start Date - This Calendar Menu determines the first date of the Date Range (only available if Date Range Type is set to Specific Date Range).
-
End Date - This Calendar Menu determines the final date of the Date Range (only available if Date Range Type is set to Specific Date Range).
Duplicate Search
This task has the following parameters:
-
Search Strategy - This Selection Menu determines the strategy used to search for duplicate Customers. See Search Strategy Field Comparisons for a description of search strategies.
-
Valid Data Only - This toggle determines whether the search strategy will only look at addresses, phone number, and/or email addresses that have been validated (see Customer Validation for more information). If the toggle is off, Customer Engagement will look at all addresses, phone number, and email addresses.
-
Automatic Approval - This toggle determines whether the Duplicate Sets found by the search process is automatically approved for merging on the next scheduled merge.
Search Strategy Field Comparisons
The following table shows which fields are compared for the search strategy selected.
Table 11-1 Search Strategy Fields Comparison
| Field | Name Address | Name Phone | Name Email | Name Address Phone Email |
|---|---|---|---|---|
|
First Name |
X |
X |
X |
X |
|
Middle Name |
X |
X |
X |
X |
|
Second First Name |
X |
X |
X |
X |
|
Second Last Name |
X |
X |
X |
X |
|
Last Name |
X |
X |
X |
X |
|
Suffix |
X |
X |
X |
X |
|
Address 1 |
X |
X |
||
|
Address 2 |
X |
X |
||
|
City |
X |
X |
||
|
State |
X |
X |
||
|
Postal Code |
X |
X |
||
|
Area Code |
X |
X |
||
|
Phone Number |
X |
X |
||
|
Email Address |
X |
X |
Duplicate Merge
This task has the following parameter:
-
Generate customer note - This toggle determines whether a Customer note is generated when duplicate Customers are merged.
Merge Behavior
The merge behavior described in this section can be overridden through the use of configuration settings. Contact your Project Manager for more information.
When a duplicate set is merged, there are certain checks that are made on each Customer record in the set and specific actions taken based on the results of that check. These duplicate checks are configured through System Configuration. See the Oracle Retail Customer Engagement Implementation Guide for more information about configuring duplicate checks.
Merge Records Logic
This section describes the new Customer record that results from the merge process. The following table lists information categories and where the information for the new record comes from.
Table 11-2 Merge Records Logic
| Category | Comes From |
|---|---|
|
Customer ID |
New |
|
Home Location |
Source |
|
Personal Preferences |
Source |
|
Name |
Source |
|
Address(es) |
Source |
|
Email Address(es) |
Source |
|
Telephone Number(s) |
Source |
|
Personal Summary |
Source |
|
Socioeconomic Profile |
Source |
|
Alternate IDs |
All Duplicate records |
|
Customer Attributes |
All Duplicate records |
|
Transactions |
All Duplicate records |
|
Effective Date |
Maximum of all Duplicate Records |
|
Expiry Date |
Maximum of all Duplicate Records |
|
Create Date |
Maximum of all Duplicate Records |
|
First Transaction Date |
Maximum of all Duplicate Records |
|
Last Transaction Date |
Maximum of all Duplicate Records |
|
Total Values |
Sum of all Duplicate Records |
|
YTD Values |
Sum of all Duplicate Records |
|
Signup Date/Location |
Minimum of duplicate records that have both, or source if has both, or minimum date of duplicate records and any location. |
|
Birthday |
Source or any if source is empty. |
|
Update Date |
Current Date |
|
Card Associations |
All Cards associated with new Customer ID. |
Household Identification
-
Identify Household Strategy - This Selection Menu determines the search method used to organize Customers into Households.
-
PRIMARY HOME ADDRESS - Customers with the same primary home address is organized into a Household.
-
LAST NAME PRIMARY HOME ADDRESS - Customers with both the same last name and the same primary home address is organized into a Household.
Business addresses are not evaluated.
-
-
Valid Data Only - This toggle determines whether the search strategy will only look at addresses and names that have been validated (see Customer Validation for more information). If the toggle is off, Customer Engagement will look at all addresses and names.
-
Reset Prior Run Data - This toggle determines how existing Households are treated by the Task.
-
On - Existing Households are ignored and the Households are created anew each time the Task runs.
-
Off - [default] Existing Households are kept in place.
-
Home Location Re-Assignment
This task has the following parameters:
-
Assignment Method - These Radio Buttons determine how Customers are assigned to Locations.
-
Re-assign - [default] Check all Customers for reassignment.
-
Distribute among - Assign Customers from one Home Location among a set of Locations.
-
-
Currently Assigned To - This Selection Menu determines which Location's Customers are reassigned. This field is only shown when Distribute among is selected in the Assignment Method Radio Buttons.
-
Re-Assign to - The area displays the set of Locations among which the Customers are reassigned. This field is only shown when Distribute among is selected in the Assignment Method Radio Buttons.
To add a Location:
-
Click the Click here to select Link. A Search Home Location Window opens.
-
Select the Location in the Selection Menu.
-
Click the OK button. The Search Home Location Window closes and the Location is added to the Re-Assign to area.
To delete a Location:
-
Click to select the Location in the Re-Assign to area.
-
Click the Delete Link. The Location is removed.
-
-
Lock Until - After a Customer is assigned to a Home Location by this task, that Customer cannot be assigned to a new Home Location during the period of time determined by this Selection Menu.
Franchisee Assignment
This task has the following parameters:
-
Assignment Method - These Radio Buttons determine how Customers are assigned to Franchisees.
-
Basic Assignment - [default] Check whether the Franchisee Assignment for each Customer record needs to be changed.
-
Franchisee Group - Assign Customers from one Franchisee among a set of Franchisees.
-
-
Currently Assigned To - This Selection Menu determines which Franchisee's Customers are reassigned. This field is only shown when Franchisee Group is selected in the Assignment Method Radio Buttons.
-
Franchisee Group - The area displays the set of Franchisees among which the Customers are reassigned. This field is only shown when Franchisee Group is selected in the Assignment Method Radio Buttons.
-
Lock Until - After a Customer is assigned to a Franchisee by this task, that Customer cannot be assigned to a new Franchisee during the period of time determined by this Selection Menu.
Customer Sync Export
Before you submit this task, you must select an export target system of either Marketing for a system such as Responsys, or BI/Analytics for a system such as Retail Insights. The Supported Batch Exporter Types property controls which of these options are available.
See the Oracle Retail Customer Engagement Implementation Guide for more information about System Configuration.
Customer Sync Export - Marketing
If you select an export target system of Marketing, the following options are displayed.
With a selection of Marketing as the export target system, this task has the following parameters:
-
Export type - Controls which records to include in the export file:
-
Export all active records - Include all active customer records with email addresses.
-
Export updated records only - Include customer records only if they have changed since the last export. With this selection, the Once Immediately and Once Later options for scheduling the job are not available.
Note that, regardless of your selection here, the first time you run the export all active customer records are included.
-
-
Specify export filename - These fields control the creation of the CSV file containing new or updated customer records.
At least one entry (prefix, static name, or suffix) is required:
-
Prefix - The date and time stamp format to use as a prefix for naming the export file.
-
no prefix - Do not use a date and time stamp prefix on the file name.
-
yyyyMMdd_HHmmss - Use a date and time stamp prefix in this format (for example, 20160630_123456 where the year is 2016, the month is June, the date is 30, and the time is 12:34:56).
-
yyyy-MM-dd_HHmmss - Use a date and time stamp prefix in this format (for example, 2016-06-30-123456, where the year is 2016, the month is June, the date is 30, and the time is 12:34:56).
-
The setting of the Responsys Export Filename Default Prefix property defaults.
-
Static Name - The text string to include in the file name between the prefix and suffix, if any. The setting of the Responsys Customer Sync Default Filename property defaults.
-
Suffix - The date and time stamp format to use as a suffix for naming the export file. The date and time stamp format options for the suffix are the same as for the prefix, described above. The setting of the Responsys Export Filename Default Suffix property defaults.
-
Filename - Displays an example of the export file name with the prefix and suffix format, if any. This field is blank if you have not yet selected a prefix format, suffix format, or static name.
-
-
Specify deletes export filename - These fields control the creation of the CSV file listing the customer IDs of customer records that have been deleted through a housekeeping job or a customer merge since the last time you ran the export. At least one entry (prefix, static name, or suffix) is required.
-
Prefix - The date and time stamp format to use as a prefix for naming the deletes export file:
-
no prefix - Do not use a date and time stamp prefix on the file name.
-
yyyyMMdd_HHmmss - Use a date and time stamp prefix in this format (for example, 20160630_123456 where the year is 2016, the month is June, the date is 30, and the time is 12:34:56).
-
yyyy-MM-dd_HHmmss - Use a date and time stamp prefix in this format (for example, 2016-06-30-123456, where the year is 2016, the month is June, the date is 30, and the time is 12:34:56).
-
The setting of the Responsys Export Filename Default Prefix property defaults.
-
Static Name - The text string to include in the file name between the prefix and suffix, if any. The setting of the Responsys Customer Deletes Sync Default Filename property defaults.
-
Suffix - The date and time stamp format to use as a suffix for naming the deletes export file. The date and time stamp format options for the suffix are the same as for the prefix, described above, with a default of no suffix. The setting of the Responsys Export Filename Default Suffix property defaults.
-
-
Filename - Displays an example of the deletes export file name with the prefix and suffix format, if any. This field is blank if you have not yet selected a prefix format, suffix format, or static name.
Customer Export File - Marketing
The customer export file is a comma-separated values file containing the following information:
-
Customer ID and home store code.
-
Customer name, including salutation, first name, second first name, middle name, last name, second last name, and suffix.
-
Active flag (set to 1 if active).
-
Primary address, including address lines 1 through 4, city, state, postal code, and country code.
-
Primary email address, including email type code.
-
Primary phone number, including phone type code.
-
Customer's mail, email, and phone contact flags, set to 1 if selected and 0 if unselected.
Only customer records with email addresses are included in the export.
Customer Sync Export - BI/Analytics
If you select an export target system of BI/Analytics, the following options are displayed.
With a selection of BI/Analytics as the export target system, this task has the following parameters:
-
Export type - Controls which records to include in the export file:
-
Export all active records - Include all active customer records.
-
Export updated records only - Include customer records only if they have changed since the last export. With this selection, the Once Immediately and Once Later options for scheduling the job are not available.
Note that, regardless of your selection here, the first time you run the export all active customer records are included.
-
-
Specify export filename - If you selected an Export type of BI/Analytics, the setting of the Retail Insights Customer Sync Default Filename property is displayed and cannot be changed.
Customer Export File - BI/Analytics
The customer export file is a pipe-delimited values file that typically contains the following information:
-
Customer ID.
-
Postal code.
-
City.
-
State.
-
Country.
-
Active flag for the customer.
-
Prospect flag indicating if the customer is a prospect.
-
Gender.
-
Ethnicity.
-
Marital status.
-
Educational level.
-
Effective date for the address.
-
Annual income.
-
Contact flag setting.
-
Organization name, if the customer is an organization.
-
Date when customer was added to the system.
-
Flag indicating if the customer is an organization.
-
Phone contact flag setting.
-
Email contact flag setting.
-
Fax contact flag setting.
-
Mail contact flag setting.
-
Birth month.
-
Birth date.
The export file does not include a header row. Instead, there is a separate file with the same name as the customer sync export file, but with an extension of .ctx, that includes the titles of each column in the export file. For example, if the customer sync export file name is W_PARTY_PER_DS.dat, the file containing the header row names is W_PARTY_PER_DS.ctx.
Any customers that have been deleted are included in the customer export file. The only information included for deleted customers is the customer ID, active flag, prospect flag, call flag, delete flag, organization flag, and the contact flag settings.
Customer Address Sync Export
This task has the following parameters:
-
Batch Exporter Type - Defaults to BI/Analytics and cannot be changed.
-
Export type - Defaults to Export all active records and cannot be changed.
-
Specify export filename - The setting of the Retail Insights Customer Activities Sync Default Filename property is displayed and cannot be changed.
Customer Address Export File - BI/Analytics
The customer address export file is pipe-delimited, and typically contains the following information:
-
Customer ID.
-
Sequence number identifying the order in which the customer's addresses were added to the database.
-
Primary address flag setting.
-
Date when the address became effective.
-
Date when the address expired.
-
First, second, and third lines of the customer's street address.
-
City.
-
State.
-
Country.
-
Postal code.
The export file does not include a header row. Instead, there is a separate file with the same name as the customer address export file, but with an extension of .ctx, that includes the titles of each column in the export file. For example, if the customer address export file name is W_RTL_CUST_ADDRESS_DS.dat, the file containing the header row names is W_RTL_CUST_ADDRESS_DS.dat.ctx.
Customer Activity Sync Export
This task has the following parameters:
-
Select target batch exporter system - Select Marketing.
-
Export type - Controls which records to include in the export file:
-
Export all active records - Include activity for all active customer records.
-
Export updated records only - Include activity for customer records only if the activity occurred since the last export With this selection, the Once Immediately and Once Later options for scheduling the job are not available.
Note that, regardless of your selection here, the first time you run the export, activity for all active customer records is included.
-
-
Specify export filename - These fields are displayed only if you selected an Export type of Marketing, and control the creation of the CSV file containing new or updated customer records.
At least one entry (prefix, static name, or suffix) is required:
-
Prefix - The date and time stamp format to use as a prefix for naming the export file:
-
no prefix - Do not use a date and time stamp prefix on the file name.
-
yyyyMMdd_HHmmss - Use a date and time stamp prefix in this format (for example, 20170830_123456 where the year is 2017, the month is August, the date is 30, and the time is 12:34:56).
-
yyyy-MM-dd_HHmmss - Use a date and time stamp prefix in this format (for example, 2017-08-30-123456, where the year is 2017, the month is August, the date is 30, and the time is 12:34:56).
The setting of the Responsys Export Filename Default Prefix property defaults.
-
-
Static Name - The text string to include in the file name between the prefix and suffix, if any. The setting of the Responsys Customer Activities Sync Default Filename property defaults.
-
Suffix - The date and time stamp format to use as a suffix for naming the export file. The date and time stamp format options for the suffix are the same as for the prefix, described above. The setting of the Responsys Export Filename Default Suffix property defaults.
-
Filename - Displays an example of the export file name with the prefix and suffix format, if any.
-
Customer Activity Export File
The customer activity export file contains the following information for each transaction it includes:
-
Customer ID.
-
Year when the activity occurred.
-
Item hierarchy levels 1, 2, and 3; for example, this might be DEPT, SUB_DEPT, and CLASS, with the Hierarchy ID for each level indicated for each record. The level is 0 if there is no hierarchy definition for that level.
-
The total count of the item for the activity. The count is 0 if the activity did not involve an item quantity.
-
The monetary value of the activity, based on the price of the item. Includes up to two decimal positions if the amount is not a whole number.
-
The code identifying the location, if any, associated with the activity. Blank if the activity was not associated with a location.
-
The latest business date when the activity occurred.
-
The latest business date when the activity was updated.
Customer Attributes Sync Export
This task has the following parameter:
-
Batch Exporter Type - Select either Marketing or BI/Analytics.
Customer Attributes Sync Export - Marketing
If you select a Batch Exporter Type of Marketing, complete the following parameters:
-
Specify export filename - These fields control the creation of the CSV file containing new or updated customer attribute records. At least one entry (prefix, static name, or suffix) is required:
-
Prefix - The date and time stamp format to use as a prefix for naming the export file:
-
no prefix - Do not use a date and time stamp prefix on the file name.
-
yyyyMMdd_HHmmss - Use a date and time stamp prefix in this format (for example, 20160630_123456 where the year is 2016, the month is June, the date is 30, and the time is 12:34:56).
-
yyyy-MM-dd_HHmmss - Use a date and time stamp prefix in this format (for example, 2016-06-30-123456, where the year is 2016, the month is June, the date is 30, and the time is 12:34:56).
The setting of the Responsys Export Filename Default Prefix property defaults.
-
-
Static Name - The text string to include in the file name between the prefix and suffix, if any. The setting of the Responsys Customer Attributes Sync Default Filename property defaults.
-
Suffix - The date and time stamp format to use as a suffix for naming the export file. The date and time stamp format options for the suffix are the same as for the prefix, described above. The setting of the Responsys Export Filename Default Suffix property defaults.
-
Filename - Displays an example of the export file name with the prefix and suffix format, if any. This field is blank if you have not yet selected a prefix format, suffix format, or static name.
-
-
Seq and Attribute - Use the drop-down list to select each attribute to include in the export file. Only attributes that have the Publish To Batch Exporter and Open Access flags selected are available for selection from the drop-down.
Customer Attribute Export File - Marketing
The customer attribute export file is comma-separated, and typically contains the following information:
-
Customer ID.
-
Customer primary email address.
-
A column for each attribute selected for inclusion in the export file, and the current setting of that attribute for the customer.
The file includes a header row with the name of each column. The column for each attribute is indicated by the attribute name and ID.
Customer Attributes Sync Export - BI/Analytics
If you select a Batch Exporter Type of BI/Analytics, complete the following parameters:
-
Customer Attributes Filename - The setting of the Retail Insights Customer Attributes Sync Default Filename property is displayed and cannot be changed.
-
Attribute Metadata Filename - The setting of the Retail Insights Attribute Metadata Sync Default Filename property is displayed and cannot be changed.
-
Seq and Attribute - Use the drop-down list to select each attribute to include in the export file. Only attributes that have the Publish To Batch Exporter and Open Access flags selected are available for selection from the drop-down. Select from the following types of attributes:
-
Varchar Type Attribute - The Retail Insights Varchar Type Attribute Allowed Count property controls the number of varchar type attributes you can select for export.
-
Numeric Type Attribute - The Retail Insights Numeric Type Attribute Allowed Count property controls the number of numeric type attributes you can select for export.
-
Data Type Attribute - The Retail Insights Date Type Attribute Allowed Count property controls the number of data type attributes you can select for export.
-
Customer Attribute Metadata Export File - BI/Analytics
The customer attribute export metadata file is pipe-delimited, and indicates how to map the Customer Attribute data from Customer Engagement to the target BI/Analytics system.
For example, a record in the metadata file might be:
RING_SIZE|CE|PARTY_ATTR1_NAME|W_PARTY_ATTR_DS|Customer Ring Size|VARCHAR|1|RING_SIZE~CE~PARTY_ATTR1_NAME~W_PARTY_ATTR_DS|
Where:
-
RING_SIZE = The attribute's Name, from the DTV_ATTRIBUTE_TYPE table
-
CE = Hard-coded to CE
-
A physical column name such as:
-
PARTY_ATTR[N]_NUM_VALUE = the [N] numeric attribute passed, or
-
PARTY_ATTR[N]_NAME_VALUE = the [N] name attribute passed, or
-
PARTY_ATTR[N]_DATE_VALUE = the [N] date attribute passed
Where
-
PARTY_ATTR is hard-coded
-
[N] indicates the column number for that datatype, and
-
VALUE is the type of column (NUMBER, NAME, or DATE)
Since there can be multiple attributes of the same data type passed, such as two date attributes, it is necessary to number the attributes with the same data type.
-
-
W_PARTY_ATTR_DS = the target table in the BI/Analytics system
-
Customer's Ring Size = the attribute’s Description, from the DTV_ATTRIBUTE_TYPE table
-
VARCHAR = the data type of the attribute in the BI/Analytics system; displayed as Character at the Attribute Definition list page
-
1 = Hard-coded to 1
-
RING_SIZE~CE~PARTY_ATTR1_NAME~W_PARTY_ATTR_DS = concatenation of the attribute name + CE + ~ + the physical column name + ~ + the target table name
The metadata file name is from the Retail Insights Customer Attribute Metadata Batch Exporter Templates property.
When you use the BI/Analytics Package Exporter to create a zip file containing the files for export to the BI/Analytics system, the attribute metadata file is merged with the metadata file from the Segment Sync Export.
Customer Attribute Export File - BI/Analytics
The customer attribute export file is pipe-delimited, and typically contains the following information:
-
Customer ID.
-
Category hard-coded to RETAIL
-
Supplier flag hard-coded to N.
-
Attribute value setting.
A column for each attribute selected for inclusion in the export file, and the current setting of that attribute for the customer.
The export file does not include a header row. Instead, there is a separate file with the same name as the customer attribute export file, but with an extension of .ctx, that includes the titles of each column in the export file. For example, if the customer attribute export file name is W_RTL_PARTY_PER_ATTR_DS.dat, the file containing the header row names is W_RTL_PARTY_PER_ATTR_DS.dat.ctx.
Customer Household Sync Export
This task has the following parameters:
-
Batch Exporter Type - Defaults to BI/Analytics and cannot be changed.
-
Export type - Defaults to Export all active records and cannot be changed.
-
Specify export filename - The setting of the Retail Insights Household Sync Default Filename property is displayed and cannot be changed.
-
Specify customer-household association export filename: The setting of the Retail Insights Household Customer Association Sync Default Filename is displayed and cannot be changed.
Household Export File - BI/Analytics
The household export file is pipe-delimited, and typically contains the unique identifier for each household, as well as some hard-coded fields that are required by the BI/Analytics system.
The export file does not include a header row. Instead, there is a separate file with the same name as the household sync export file, but with an extension of .ctx, that includes the titles of each column in the export file. For example, if the household sync export file name is W_HOUSEHOLD_DS.dat, the file containing the header row names is W_HOUSEHOLD_DS.dat.ctx.
Household Customer Association Export File - BI/Analytics
The household customer association export file is pipe-delimited, and typically contains the unique identifier for each household and the customer ID for each customer associated with the household. It also typically contains some hard-coded fields that are required by the BI/Analytics system.
The export file does not include a header row. Instead, there is a separate file with the same name as the household customer association file, but with an extension of .ctx, that includes the titles of each column in the export file. For example, if the household customer association export file name is W_RTL_CUST_HOUSEHOLD_DS.dat, the file containing the header row names is W_RTL_CUST_HOUSEHOLD_DS.dat.ctx.
The information in these files is formatted as binary data.
Rebuild Category Totals
This task has the following parameters:
Customer Department Totals Rebuild Period:
-
Select whether to recalculate totals based on activity within the most recent number of days, months, or years.
-
Enter the number of days, months, or years to include. You can enter a maximum of 3 years, 36 months, or 1095 days.
Before you can submit the job, you need to acknowledge the warning at the bottom area of the Review step, indicating that the task will recalculate customer department totals, and that this step cannot be undone.
When the job runs, the records in the CST_DEPARTMENT_TOTALS table are cleared for all Customer activity during the specified rebuild period, and then rebuilt. The CREATE_DATE is set to the date when the job is run, and the CREATE_USER is set to ORCE. Return transactions are not included in the category totals.
BI/Analytics Package Exporter
This task has no additional parameters.
This task packages the export files to the BI/Analytics system, and must be the last task in a single job that includes all other exports to the BI/Analytics system.
The package exporter creates a zip file that includes the export files from the sync tasks run within the job, so that the zip file is ready for the BI/Analytics system.
The zip file name is from the Retail Insights Zip Package Default Filename property.
For more information on the export tasks and the generated export files, see Customer Sync Export, Customer Address Sync Export, Customer Attributes Sync Export, Customer Household Sync Export, and Segment Sync Export.
Reset Customer YTD Totals
This task has the following parameter.
-
Year of data being reset - This Selection Menu determines the year for which the YTD data is reset.
Automated Associate Assignment
This task has the following parameters:
-
Date Range Type - This Selection Menu determines the Date Range used.
-
Start Date - This Calendar Menu determines the first date of the Date Range (only available if Date Range Type is set to Specific Date Range).
-
End Date - This Calendar Menu determines the final date of the Date Range (only available if Date Range Type is set to Specific Date Range).
-
Assignment Method - These Radio Buttons determine the selection method used to assign an Associate to a Customer. These Radio Buttons have the following options:
-
Sold most frequently - The Associate who performed the most sales to each Customer.
-
Sold largest total amount - The Associate who sold the largest total amount to each Customer.
-
-
Assignment Interval - Number of days between Associate reassignments for a Customer. After the Job assigns an Associate to a Customer, this is the number of days the Job will wait before changing that assignment.
-
Assignment Role - This Selection Menu determines the Associate Role used for the Associate assignment.
-
Criteria specification - Additional criteria to use when assigning the Associate. This Selection Menu has the following options:
-
No additional criteria - This Job will not require any additional criteria.
-
Select criteria from list - Add Item or Location criteria to the Job. A transaction must match one of the entered criteria to be used in determining the Associate to be assigned to the Customer.
-
-
When Select criteria from list is selected, the Item and Location Criteria appear. To configure Item Criteria, perform on of the following options:
-
Use the Quick Add option to enter a known ID which you wish to associate with this task. Click Add.
-
Click the Actions Menu and select Add Item Criteria.
-
Click +Add Item Criteria.
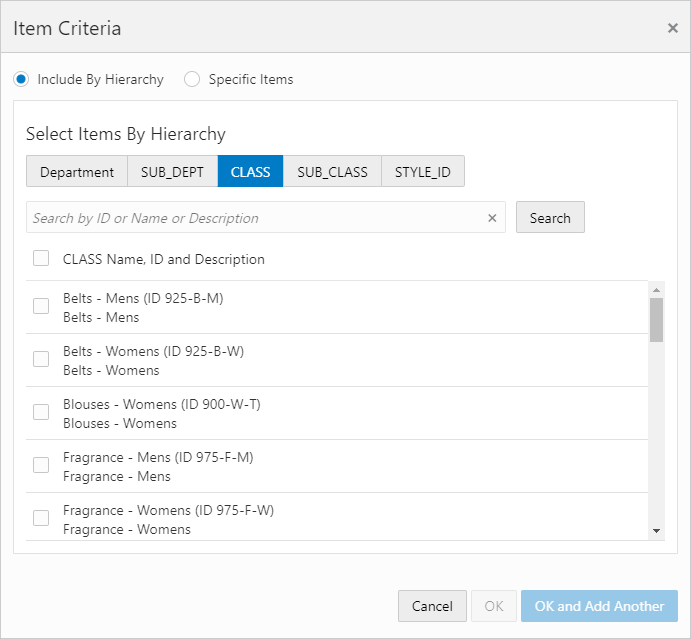
Include by Hierarchy
There are two ways to search for items in the Include by Hierarchy option, either:
-
Select one of the Hierarchy choices (Department or Class, for example) and click Search to retrieve all associated hierarchies.
-
Select one of the Hierarchy choices and enter part or all of the ID, Name, or Description in the field, and click Search to retrieve your refined search criteria.
-
After locating the items, then select or clear the check boxes from the list.
Figure 11-35 Item Criteria - Include By Hierarchy
-
Click OK to add the item to the Task or click OK and Add Another to add another item. Click Cancel to close the window without adding the item.
-
Click X to remove added items.
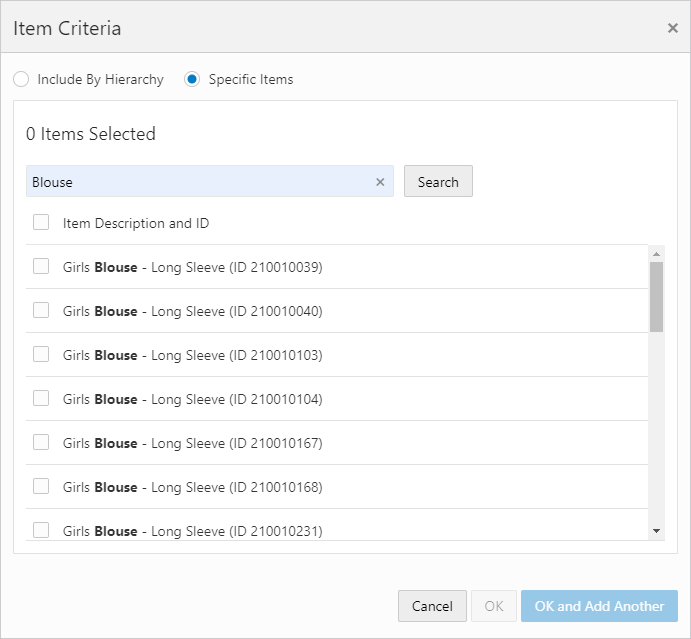
Specific Items
To search for items by specific items:
-
Enter the ID or Description of the Item.
-
Click Search.
Figure 11-36 Item Criteria - Specific Items
-
Select or clear the check boxes from the list.
-
Click OK to add the item to the Task or click OK and Add Another to add another item. Click Cancel to close the window without adding the item.
-
Click X to remove items.
-
-
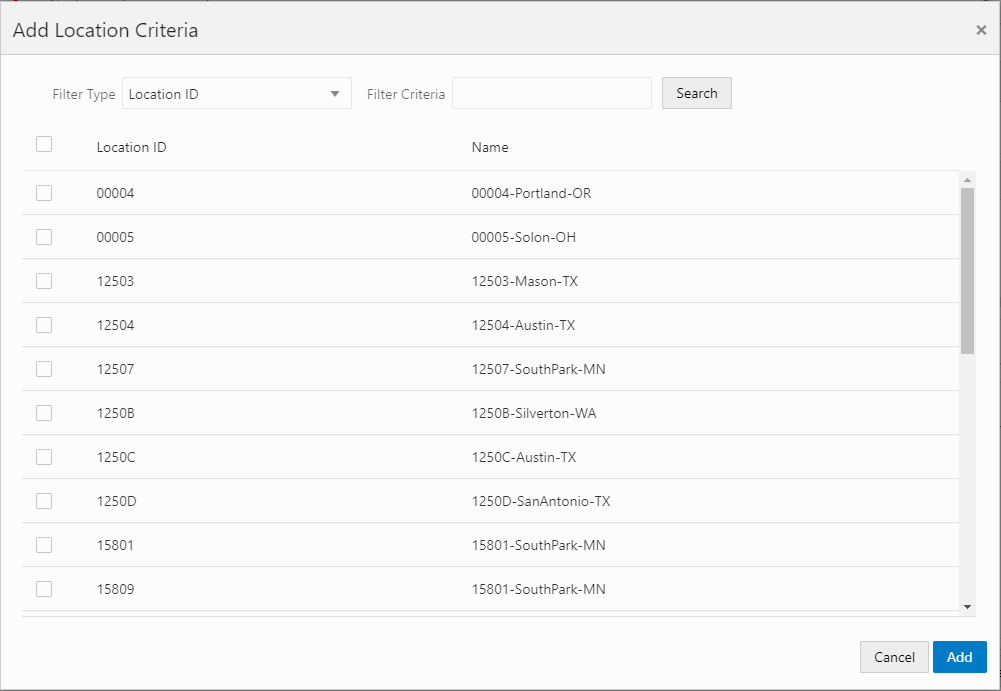
When Select criteria from list is selected, the Item and Location Criteria appear. To configure Location Criteria do the following:
-
Click +Add Location Criteria.
Figure 11-37 Add Location Criteria
-
Click the list arrow to select a Filter Type.
-
Click Search to return all Locations that meet the Filter Type Criteria.
-
You can use the Filter Criteria field before or after a search. The Filter Criteria is determined by your implementer.
Note:
The Filter Criteria field accepts partial input.
-
Select or clear the check boxes from the list.
-
Click Add to add the location to the task. Click Cancel to close the window without adding the location.
-
Click X to remove added locations.
-
Associate Mass Re-assignment
This task has the following parameters:
-
Assignment Method - Method used for reassigning the Customers. These Radio Buttons have the following options:
-
Re-assign - Assign all Customers to one Associate.
-
Distribute among - Distribute Customers among all Associates at the current Associate's location.
-
-
Currently assigned to - Displays the Associate who is having their Customers reassigned. Perform a Change/Add Associate procedures to change the Associate.
-
Selection Menu for the Associate Role that is used for the new Associates.
-
Re-Assign to - Displays the User ID(s) of the Associate(s) to whom the Customers are reassigned. Perform a Change/Add Associate procedures to add an Associate to the field. Only displayed if the Assignment Method is set to Re-assign.
Associate reassignment selections have the following rules:
-
This field is only displayed when Re-assign is selected as the Assignment Method.
-
The Associates must all belong to the same Location.
-
If a new Associate does not belong to the same Location as previously selected Associates, the previously selected Associates are removed and the new Associate is entered.
-
If the Associate selected does not belong to the Location to which the currently assigned Associate, a confirmation response is displayed.
-
Unstratified Segment
This Task has the following parameter:
-
Customer Segment - This Selection Menu determines the Unstratified Segment that is counted.
Stratified Segment
This Task has the following parameter:
-
Customer Segment - This Selection Menu determines the Stratified Segment that is organized and counted.
Segment Sync Export
Before you submit this task, you must select an export target system of either Marketing for a system such as Responsys, or BI/Analytics for a system such as Retail Insights. The Supported Batch Exporter Types property controls which of these options are available. See the Oracle Retail Customer Engagement Implementation Guide for more information about System Configuration.
Segment Sync Export - Marketing
If you select an export target system of Marketing, the following options are displayed:
-
Specify export filename - These fields control the creation of the CSV file containing new or updated segment records. At least one entry (prefix, static name, or suffix) is required:
-
Prefix - The date and time stamp format to use as a prefix for naming the export file:
-
no prefix - Do not use a date and time stamp prefix on the file name.
-
yyyyMMdd_HHmmss - Use a date and time stamp prefix in this format (for example, 20160630_123456 where the year is 2016, the month is June, the date is 30, and the time is 12:34:56).
-
yyyy-MM-dd_HHmmss - Use a date and time stamp prefix in this format (for example, 2016-06-30-123456, where the year is 2016, the month is June, the date is 30, and the time is 12:34:56).
The setting of the Responsys Export Filename Default Prefix property defaults.
-
-
Static Name - The text string to include in the file name between the prefix and suffix, if any. The setting of the Responsys Segment Sync Default Filename defaults.
You can include multiple segments in the same task. However, if you include multiple segment sync tasks to Marketing in the same job, you need to specify a unique static name for each to avoid overwriting one export sync file with another.
-
Suffix - The date and time stamp format to use as a suffix for naming the export file. The date and time stamp format options for the suffix are the same as for the prefix, described above. The setting of the Responsys Export Filename Default Suffix property defaults.
-
Filename - Displays an example of the export file name with the prefix and suffix format, if any. This field is blank if you have not yet selected a prefix format, suffix format, or static name.
-
-
Strata Type - Defines the type of Segments that can be included in the export file:
-
Unstratified Segment - Unstratified Segments and Manual Segments are available for selection in the dropdown list.
-
Stratified Segment - Stratified Segments are available for selection in the drop-down list.
Note:
A single Job Definition can include either Unstratified/Manual Segments or Stratified Segments, but not both. If you have selected one or more Segments and then change the setting of the Strata Type, the previously selected Segments are cleared from the listing for the Job Definition.
-
-
Seq N Segment = Use the drop-down list to select each Segment to include in the export file. Only Segments that have the Publish To Batch Exporter flag selected and that match the selected Strata Type are available for selection from the drop-down. As you select each Segment, it is added to the Seq. and Attribute listing between the Strata Type and the Seq N Segment drop-down.
-
Seq and Attribute - Use the drop-down list to select each attribute to include in the export file. Only attributes that have the Publish To Batch Exporter and Open Access flags selected are available for selection from the drop-down.
Customer Segment File for Marketing: Stratified Segments
The customer segment export file for one or more stratified segments contains the following information:
-
Customer ID.
-
Customer primary email address.
-
For each Segment included in the Job Definition:
-
A column with a setting of 1 if the customer is included in the Segment, or a setting of 0 if the customer is not included in the Segment.
-
The Segment stratification format (RANGE or NTILE).
-
The Segment strata type (Customer, Loyalty, or Transaction).
-
The data that the strata is based on (Customer for a Customer strata type; Loyalty Summary or Loyalty Detail for a Loyalty strata type; Header or Detail for a Transaction strata type).
-
The field to stratify on. See Creating a Segment or Personal List in the Segments chapter for a list of possible fields based on the selected strata type.
-
The strata ID.
-
The strata value.
-
Customer Segment Export File for Marketing: Unstratified Segments
The customer segment export file for one or more unstratified or manual segments contains the following information:
-
Customer ID.
-
Customer primary email address.
-
Segment name.
-
A column for each Segment included in the Job Definition, with a setting of 1 if the customer is included in the Segment or a setting of 0 if the customer is not included in the Segment.
Segment Sync Export - BI/Analytics
If you select a Batch Exporter Type of BI/Analytics, the following parameters are displayed:
-
Segment Filename - The setting of the Retail Insights Segment Sync Default Filename property is displayed and cannot be changed.
-
Segment Attributes Filename - The setting of the Retail Insights Segment Attributes Sync Default Filename property is displayed and cannot be changed.
-
Customer Segment Association Filename - The setting of the Retail Insights Segment Customer Association Sync Default Filename property is displayed and cannot be changed.
-
Attribute Metadata Filename - The setting of the Retail Insights Attribute Metadata Sync Default Filename property is displayed and cannot be changed.
-
Customer Segment Category Filename - The setting of the Retail Insights Customer Segment Category Sync Default Filename property is displayed and cannot be changed.
-
Seq N Segment = Use the drop-down list to select each Segment to include in the export file. Only Segments that have the Publish To Batch Exporter flag selected are available for selection from the drop-down. As you select each Segment, it is added to the Seq. and Attribute listing.
-
Seq and Attribute - Use the drop-down list to select each attribute to include in the export file. Only attributes that have the Publish To Batch Exporter and Open Access flags selected are available for selection from the drop-down. Select from the following types of attributes:
-
Varchar Type Attribute - The Retail Insights Varchar Type Attribute Allowed Count property controls the number of varchar type attributes you can select for export.
-
Numeric Type Attribute - The Retail Insights Numeric Type Attribute Allowed Count property controls the number of numeric type attributes you can select for export.
-
Data Type Attribute - The Retail Insights Date Type Attribute Allowed Count property controls the number of data type attributes you can select for export.
-
-
Suffix - The date and time stamp format to use as a suffix for naming the export file. The date and time stamp format options for the suffix are the same as for the prefix, described above, with a default of no suffix.
Segment Export File - BI/Analytics
The customer segment export file contains the following information:
-
Segment ID.
-
Segment name.
-
Datasource, which is hard-coded to 1.
The file also includes the values for attributes whose names match the following, if they exist:
-
CUSTSEG_TYPE (if this attribute is not defined, a cluster type of Rule Based is passed)
-
AGE_RANGE
-
SEX_MF_CODE
-
FAMILY_SIZE
-
OCCUPATION_CODE
-
EDUCATION_BCKGND_CODE
-
ETHNICITY_CODE
-
NATIONALITY_CODE
-
RELIGION_CODE
-
SOCAL_CLASS_CODE
-
FAMILY_LIFE_CYCL_CODE
-
REGION_CODE
-
METRO_AREA_SIZE
-
POPULATION_DENSITY
-
CLIMATE_CODE
-
BENEFIT_SOUGHT_CODE
-
USAGE_RATE
-
READINESS_TO_BUY_CODE
-
OCCASION_CODE
-
ACTIVITY_CODE
-
INTEREST_CODE
-
OPINION_CODE
-
ATTITUDE_CODE
-
VALUE_CODE
-
EFFECTIVE_START
-
EFFECTIVE_END
-
CUSTSEG_SRC_TYPE
-
ANNL_INCOME_RANGE
-
CUSTSEG_DESC
The above attributes in Customer Engagement map to segment properties in Retail Insights.
The export file does not include a header row. Instead, there is a separate file with the same name as the segment export file, but with an extension of .ctx, that includes the titles of each column in the export file. For example, if the segment export file name is W_RTL_CUSTSEG_DS.dat, the file containing the header row names is W_RTL_CUSTSEG_DS.dat.ctx.
Segment Attributes Export File - BI/Analytics
The customer segment attributes export file contains the following information:
-
Segment ID.
-
The CUSTSEG_TYPE attribute value. If this attribute is not defined, a cluster type of Rule Based is passed.
-
The CUSTSEG_SRC_TYPE attribute value, if any. Typically set to CUSTOMER.
-
The value for each attribute assigned to the segment and selected for export.
-
Datasource, which is hard-coded to 1.
The attribute mapping is defined in the generated metadata file. The file name for the metadata file is defined in the Retail Insights Attribute Metadata Sync Default Filename property.
The export file does not include a header row. Instead, there is a separate file with the same name as the segment attributes export file, but with an extension of .ctx, that includes the titles of each column in the export file. For example, if the segment attributes export file name is W_RTL_LYL_TRANS_DS.dat, the file containing the header row names is W_RTL_LYL_TRANS_DS.dat.ctx.
Customer Segment Association Export File - BI/Analytics
The segment customer association export file contains the following information for the customers included in a segment:
-
Segment ID.
-
Customer ID.
-
Datasource, which is hard-coded to 1.
The export file does not include a header row. Instead, there is a separate file with the same name as the segment association export file, but with an extension of .ctx, that includes the titles of each column in the export file. For example, if the segment association export file name is W_RTL_CUST_CUSTSEG_DS.dat, the file containing the header row names is W_RTL_CUST_CUSTSEG_DS.dat.ctx.
Attribute Metadata Export File - BI/Analytics
This export file defines mapping for attributes. See the Customer Attribute Metadata Export File - BI/Analytics for an example of attribute mapping.
The export file does not include a header row. Instead, there is a separate file with the same name as the attribute metadata export file, but with an extension of .ctx, that includes the titles of each column in the export file. For example, if the attribute metadata export file name is W_RTL_INT_METADATA_G.dat, the file containing the header row names is W_RTL_INT_METADATA_G.dat.ctx.
Points/Awards Transfer Notifications Export
See Points/Awards Transfer Notification Export for background on this job. This task has the following parameters:
-
Please select transfer notification type - Indicates the type of transfer notifications to export: All, Awards Only, or Points Only.
-
Specify Awards Transfer Export Filename - These fields control the creation of the CSV file containing contact information for Customers originating or receiving Award Coupon transfers. At least one entry (prefix, static name, or suffix) is required:
-
Prefix - The date and time stamp format to use as a prefix for naming the export file:
-
no prefix - Do not use a date and time stamp prefix on the file name.
-
yyyyMMdd_HHmmss - Use a date and time stamp prefix in this format (for example, 20170830_123456 where the year is 2017, the month is August, the date is 30, and the time is 12:34:56).
-
yyyy-MM-dd_HHmmss - Use a date and time stamp prefix in this format (for example, 2017-08-30-123456, where the year is 2017, the month is August, the date is 30, and the time is 12:34:56).
The setting of the Responsys Export Filename Default Prefix property defaults.
-
-
Static Name - The text string to include in the file name between the prefix and suffix, if any. The setting of the Responsys Awards Transfer Sync Default Filename defaults.
-
Suffix - The date and time stamp format to use as a suffix for naming the export file. The date and time stamp format options for the suffix are the same as for the prefix, described above. The setting of the Responsys Export Filename Default Suffix property defaults.
-
Filename - Displays an example of the export file name with the prefix and suffix format, if any. This field is blank if you have not selected a prefix format, suffix format, or static name.
-
-
Specify Points Transfer Export Filename - These fields control the creation of the CSV file containing contact information for Customers originating or receiving Loyalty Points transfers. At least one entry (prefix, static name, or suffix) is required:
-
Prefix - The date and time stamp format to use as a prefix for naming the export file:
-
no prefix - Do not use a date and time stamp prefix on the file name.
-
yyyyMMdd_HHmmss - Use a date and time stamp prefix in this format (for example, 20170830_123456 where the year is 2017, the month is August, the date is 30, and the time is 12:34:56).
-
yyyy-MM-dd_HHmmss - Use a date and time stamp prefix in this format (for example, 2017-08-30-123456, where the year is 2017, the month is August, the date is 30, and the time is 12:34:56).
The setting of the Responsys Export Filename Default Prefix property defaults.
-
-
Static Name - The text string to include in the file name between the prefix and suffix, if any. The setting of the Responsys Awards Transfer Sync Default Filename defaults.
-
Suffix - The date and time stamp format to use as a suffix for naming the export file. The date and time stamp format options for the suffix are the same as for the prefix, described above. The setting of the Responsys Export Filename Default Suffix property defaults.
-
Filename - Displays an example of the export file name with the prefix and suffix format, if any. This field is blank if you have not selected a prefix format, suffix format, or static name.
-
Award Transfer Notifications Sync Export File
The Award Transfer Notification sync export file contains the following information:
-
From Card Number - The Card number originating the transfer. The number is partially masked with X's.
-
To Card Number - The Card number receiving the transfer. The number is partially masked with X's.
-
From email address - The primary email address of the Customer originating the transfer. Included only if the Customer's contact permissions allow it.
-
From phone number - The primary phone number of the Customer originating the transfer. Included only if the Customer's contact permissions allow it.
-
To email address - The primary email address of the Customer receiving the transfer. Included only if the Customer's contact permissions allow it.
-
To phone number - The primary phone number of the Customer receiving the transfer. Included only if the Customer's contact permissions allow it.
-
Date and time when the transfer took place.
-
The amount of the Award Coupon. Might be 0 for an Entitlement Coupon.
An entry for a transfer is included in the file only if there is phone or email contact information for either the originator of the transfer or the recipient, and if an interactive notification request was not successfully sent.
Points Transfer Notifications Sync Export File
The Award Transfer sync export file contains the following information:
-
From Card Number - The Card number originating the transfer. The number is partially masked with X's.
-
To Card Number - The Card number receiving the transfer. The number is partially masked with X’s.
-
From email address - The primary email address of the Customer originating the transfer. Included only if the Customer's contact permissions allow it.
-
From phone number - The primary phone number of the Customer originating the transfer. Included only if the Customer's contact permissions allow it.
-
To email address - The primary email address of the Customer receiving the transfer. Included only if the Customer's contact permissions allow it.
-
To phone number - The primary phone number of the Customer receiving the transfer. Included only if the Customer's contact permissions allow it.
-
Date and time when the transfer took place.
-
The number of points transferred.
An entry for a transfer is included in the file only if there is phone or email contact information for either the originator of the transfer or the recipient, and if an interactive notification request was not successfully sent.
Export Card Series
This Task has the following parameters:
-
Card Prefix - This Text Field indicates the Card Prefix of the Card Definition to be exported.
-
Card Series - This Text Field indicates the Card Series of the Card Definition to be exported.
Notify Card Renewal
This Task has the following parameters:
-
Card Program - This Selection Menu determines the Card Program for which to notify Customers.
-
Period Type - This Selection Menu determines the type of time period used to determine the notification time frame.
-
Number of Periods - This Text Field defines the number of periods (from Period Type) before the Card expiration date that a Customer is notified of their Card's coming expiration.
Tender Account Sync
This Task has the following parameter:
-
Tender Program - The Tender Program to include in the export files. The Task generates an export file of Tender Accounts and an export file of Tender Account Activity.
Tender Account Export File
The tender account export file contains the following information for each Tender account:
-
Tender account ID.
-
Last activity date.
-
Effective date.
-
Account expiry date.
-
Card serial number.
-
Card number.
-
Card activation date.
-
Date when card was first used.
-
Date when card was last used.
-
Card expiry date.
-
Date when the card was associated with the customer.
-
Start date, if any.
-
End date., if any
-
Customer ID.
-
Primary flag, set to 1 if the customer is the primary account holder.
-
Status indicator if Active or Inactive.
-
Current balance on the account.
-
Book balance for accounting purposes.
-
Amount of balance that is frozen or unusable.
-
Program ID to uniquely identify the tender program.
-
Currency typecode.
-
Usage count indicating the total number of times the tender account has been accessed for a transaction.
-
Total number of lifetime credits for the account.
-
Total number of lifetime debits for the account.
-
Date created.
-
User who created the account.
-
Date updated.
-
Use who updated the account.
Tender Account Activity Export File
The tender account activity export files contains the following information:
-
Tender account ID.
-
Program ID to uniquely identify the tender program.
-
Unique identifier for the account activity record.
-
Authorization code.
-
Customer ID.
-
Card number.
-
Flag indicating whether the transaction was voided.
-
Code to categorize the type of transaction or activity.
-
Date and time when the activity took place.
-
Amount of the activity or transaction.
-
Currency typecode.
-
Operator ID from the POS.
-
Transaction ID from the POS.
-
Transaction ID generated by Customer Engagement.
-
Retail location where the activity took place.
-
ID or serial number identifying the workstation where the activity took place.
-
Date that corresponds to an accounting period fiscal day at the retail store.
-
Account ID affected by the activity.
-
ID of the activity.
-
Flag indicating if the card was swiped during the activity.
-
Error code, if any.
-
User comments on the activity, if any.
-
Code identifying the currency requested for the activity.
-
Amount of currency being exchanged.
-
Currency exchange rate.
-
If the activity was a Card Merge, the unique ID for the source account of the merge.
-
Unique identifier for the franchisee, if any.
-
Account adjustment reason code, if any.
-
Expiration date for the activity.
-
Date created.
-
User who created the activity.
-
Date updated.
-
Use who updated the activity.
OCDS Sync
This Task requires SystemConfig or SystemAdmin authority, and has the following parameters:
-
Item and Merchandise Hierarchy - Select this option to request item and merchandise hierarchy data from the Omnichannel Cloud Data Service, including:
-
Merchandise Hierarchy
-
Item Header
-
Item Image
-
Item Price
-
-
Location and Franchise - Select this option to request location and franchise data from the Omnichannel Cloud Data Service, including:
-
Store Location
-
Organizational Hierarchy/Franchise
-
-
Reset Last Run Date - Select this option to retrieve all data, regardless of date created or updated; otherwise, leave this option unselected to request only data that has been created or updated since the last time you ran the OCDS data sync.
See Bulk Imports through Oracle Cloud Data Service (OCDS) in the Batch Processing and Web Services Guide for more information on the integration and the data received.
Issue Anniversary Awards
This Task has the following parameters:
-
Award Program - This Selection Menu determines the Award Program to use for the Anniversary Awards.
-
Coupon Prefix - This Text Field indicates the Coupon Prefix for the Coupons generated.
-
Amount - This Text Field defines the amount for the Coupons generated.
-
Expiration Period Type - This Selection Menu indicates the type of period used in determining when the Coupons will expire.
-
Expiration Number of periods - This Selection Menu determines the number of periods (from Expiration Period Type) that will pass before the Coupons expire (not displayed if Expiration Period Type is set to Use Program).
-
The Expiration Date is Based On - This Selection Menu determines how the Coupon expiration dates are determined. This Selection Menu has the following options:
-
Run Date - The Coupon expiration dates are calculated from the date the Task runs.
-
Customer Date - The Coupon expiration dates are calculated from the anniversary date.
-
-
Anniversary Award Type - This Selection Menu determines the type of anniversary for which Awards are issued.
-
Birthday - Customer birthday.
-
Signup - Customer signup.
-
-
Generate customer note - This toggle determines whether a Customer note is generated when a Coupon is generated for a Customer.
-
Period Type - This Selection Menu indicates the type of period used in determining the window of dates for which Awards are issued.
-
Num of Periods Before Run Date - This Text Field defines the number of periods (from Period Type) before the run date for which Awards are issued.
-
Num of Periods After Run Date - This Text Field defines the number of periods (from Period Type) after the run date for which Awards are issued.
Export File
The export file for either a birthday or sign-up anniversary contains the following information:
-
Award Account information including account number, Card number, and Card serial number.
-
Customer information including name, address, email, phone, and anniversary date.
-
Award information including the amount of coupon, coupon number, and the coupon expiration date. See the Oracle Retail Customer Engagement Implementation Guide for more information on export templates.
Notify Awards Expire
This Task has the following parameters:
-
Award Program - This Selection Menu determines the Award Program for which notifications are sent.
-
Period Type - This Selection Menu indicates the type of period used for determining the award expiration notification window.
-
Number of Periods - Defines the number of periods (from Period Type) of the notification window.
Award Sync Export
This task has the following parameters:
-
Select target batch exporter system - Set to Marketing by default.
-
Export type - Controls which records to include in the export file:
-
Export all active records - Include all active award account and award coupon records.
-
Export updated records only - Include award account and award coupon records only if they have changed since the last export. With this selection, the Once Immediately and Once Later options for scheduling the job are not available
Note that, regardless of your selection here, the first time you run the export all, active award account and award coupon records are included.
-
-
Specify export filename - These fields control the creation of the file containing new or updated award account records.
At least one entry (prefix, static name, or suffix) is required:
-
Prefix - The date and time stamp format to use as a prefix for naming the export file.
-
no prefix - Do not use a date and time stamp prefix on the file name.
-
yyyyMMdd_HHmmss - Use a date and time stamp prefix in this format (for example, 20160630_123456 where the year is 2016, the month is June, the date is 30, and the time is 12:34:56).
-
yyyy-MM-dd_HHmmss - Use a date and time stamp prefix in this format (for example, 2016-06-30-123456, where the year is 2016, the month is June, the date is 30, and the time is 12:34:56).
The setting of the Responsys Export Filename Default Prefix property defaults.
-
-
Static Name - The text string to include in the file name between the prefix and suffix, if any. The setting of the Responsys Award Account Sync Default Filename property defaults.
-
Suffix - The date and time stamp format to use as a suffix for naming the export file. The date and time stamp format options for the suffix are the same as for the prefix, described above. The setting of the Responsys Export Filename Default Suffix property defaults.
-
Filename - Displays an example of the export file name with the prefix and suffix format, if any. This field is blank if you have not yet selected a prefix format, suffix format, or static name.
-
-
Specify export filename - These fields control the creation of the file containing new or updated award coupon records.
At least one entry (prefix, static name, or suffix) is required:
-
Prefix - The date and time stamp format to use as a prefix for naming the export file.
-
no prefix - Do not use a date and time stamp prefix on the file name.
-
yyyyMMdd_HHmmss - Use a date and time stamp prefix in this format (for example, 20160630_123456 where the year is 2016, the month is June, the date is 30, and the time is 12:34:56).
-
yyyy-MM-dd_HHmmss - Use a date and time stamp prefix in this format (for example, 2016-06-30-123456, where the year is 2016, the month is June, the date is 30, and the time is 12:34:56).
The setting of the Responsys Export Filename Default Prefix property defaults.
-
-
Static Name - The text string to include in the file name between the prefix and suffix, if any. The setting of the Responsys Award Account Sync Default Filename property defaults.
-
Suffix - The date and time stamp format to use as a suffix for naming the export file. The date and time stamp format options for the suffix are the same as for the prefix, described above. The setting of the Responsys Export Filename Default Suffix property defaults.
-
Filename - Displays an example of the export file name with the prefix and suffix format, if any. This field is blank if you have not yet selected a prefix format, suffix format, or static name.
-
-
Award Program = Use the drop-down list to select an award program to include in the export files.
Award Account Export File
The award account export file contains the following information:
-
Customer ID.
-
Card number.
-
Card active flag (set to 1 if active; if not active, indicates a deactivation or merge).
-
Card expiration date.
-
First used date.
-
Last used date.
-
Program name.
-
Program ID.
-
Update date.
-
Currency code.
-
Account expiration date.
-
Account ID.
-
Award balance.
-
E-award count.
-
Entitlement count.
Award Coupon Export File
The award coupon export file contains the following information:
-
Customer ID.
-
Card number.
-
Account ID.
-
Program ID.
-
Coupon typecode (e-award or entitlement).
-
Coupon ID.
-
Coupon balance, if any; for example, an entitlement for a line item discount would not have a balance.
-
Currency code.
-
Deal name, if any; for example, a deal name is specified for an entitlement.
-
Deal ID, if any; for example, a deal ID is specified for an entitlement.
-
Expiration date.
-
Update date.
Distribute Loyalty Awards
This Task has the following parameter:
-
Export File - This Text Field defines the name of the export file created by the Task.
Note that the Create Loyalty Awards process should be run before this process.
Create Loyalty Awards
This Task has the following parameters:
-
Generate customer note - This toggle indicates whether a Customer note is generated when a Loyalty Award is generated for a Customer.
-
Each Check Box in the List indicates whether the associated Loyalty Program or Program Level is included in the Task:
-
To select all programs and all levels [default], click the Top Level check box.
-
To deselect all programs and all levels, Clear the Top Level check box.
-
To select or deselect individual program levels, click the Enabled Check Box for the level. If there is a check mark in the box, the level is included in the task.
-
Loyalty Account Sync Export
Before you submit this task, you must select an export target system of either Marketing for a system such as Responsys, or BI/Analytics for a system such as Retail Insights. The Supported Batch Exporter Types property controls which of these options are available. See the Oracle Retail Customer Engagement Implementation Guide for more information about System Configuration.
Loyalty Account Sync Export - BI/Analytics
If you select BI/Analytics as the export target system, the following options are displayed:
-
Export type - Controls which records to include in the export file:
-
Export all active records - Include all active loyalty account records.
-
Export updated records only - Include loyalty account records only if they have changed since the last export. With this selection, the Once Immediately and Once Later options for scheduling the job are not available.
Note that, regardless of your selection here, the first time you run the export all active loyalty account records are included.
-
-
Specify export filename - If you selected an Export type of BI/Analytics, the setting of the Retail Insights Loyalty Account Sync Export Default Filename property is displayed and cannot be changed.
Loyalty Account Sync Export File - BI/Analytics
The customer export file is a pipe-delimited values file that typically contains the following information:
-
Loyalty Account Id
-
Card Serial Number - Sixteen-digit number embossed on the card
-
Primary Customer Number
-
Loyalty Program Id
-
Loyalty Program Level Id
-
Account Active Flag
-
Account Expiry Flag
-
Earned Points Balance
-
Escrow Points Balance
-
Last Award Processed Date
-
Last Accrual Date
-
Last Program Level Change Date
-
Last Transaction Date
The export file does not include a header row. Instead, there is a separate file with the same name as the loyalty account sync export file, but with an extension of .ctx, that includes the titles of each column in the export file. For example, if the loyalty account sync export file name is W_RTL_LYL_ACCOUNT_DS.dat, the file containing the header row names is W_RTL_LYL_ACCOUNT_DS.ctx.
Loyalty Account Sync Export - Marketing
If you select an export target system of Marketing, the following options are displayed:
-
Select target batch exporter system - Set to Marketing by default.
-
Export type - Controls which records to include in the export file:
-
Export all active records - Include all active loyalty records.
-
Export updated records only - Include loyalty records only if they have changed since the last export. With this selection, the Once Immediately and Once Later options for scheduling the job are not available.
Note that, regardless of your selection here, the first time you run the export all active loyalty records are included.
-
-
Specify export filename - These fields control the creation of the CSV file containing new or updated loyalty records. At least one entry (prefix, static name, or suffix) is required:
-
Prefix - The date and time stamp format to use as a prefix for naming the export file:
-
None - Do not use a date and time stamp prefix on the file name.
-
yyyyMMdd_HHmmss - Use a date and time stamp prefix in this format (for example, 20160630_123456 where the year is 2016, the month is June, the date is 30, and the time is 12:34:56).
-
yyyy-MM-dd_HHmmss - Use a date and time stamp prefix in this format (for example, 2016-06-30-123456, where the year is 2016, the month is June, the date is 30, and the time is 12:34:56).
The setting of the Responsys Export Filename Default Prefix property defaults.
-
-
Static Name - The text string to include in the file name between the prefix and suffix, if any. The setting of the Responsys Loyalty Account Sync Default Filename property defaults.
-
Suffix - The date and time stamp format to use as a suffix for naming the export file. The date and time stamp format options for the suffix are the same as for the prefix, described above, with a default of no suffix.
-
Filename - Displays an example of the export file name with the prefix and suffix format, if any. This field is blank if you have not yet selected a prefix format, suffix format, or static name.
-
-
Loyalty Program - Select a single loyalty program to include in the export file.
Loyalty Account Sync Export File - Marketing
The customer export CSV file contains the following information:
-
Customer ID.
-
Card number.
-
Card active flag (set to 1 if active; if not active, indicates a deactivation or merge).
-
Card expiration date.
-
First use date.
-
Last use date.
-
Life-to-date balance.
-
Year-to-date balance.
-
Earned point balance.
-
Escrow point balance.
-
Program name.
-
Level ID.
-
Level name.
-
Account expiration date.
-
Update date.
-
Account ID.
Loyalty Account Activity Sync Export
This task has the following parameters:
-
Batch Exporter Type - Defaults to BI/Analytics and cannot be changed.
-
Export Type - Controls which records to include in the export file:
-
Export all active records - Include all active loyalty account records.
-
Export updated records only - Include loyalty account records only if they have changed since the last export. With this selection, the Once Immediately and Once Later options for scheduling the job are not available
Note that, regardless of your selection here, the first time you run the export all active loyalty account records are included.
-
-
Specify export filename - The setting of the Retail Insights Loyalty Transaction Data Sync Export Default Filename property is displayed and cannot be changed.
Loyalty Account Activity Export File - BI/Analytics
The export file is pipe-delimited, and typically contains the following information:
-
Loyalty Transaction ID - Main identifier of the loyalty account activity.
-
Loyalty Program ID - Unique identifier of the loyalty program.
-
Loyalty Program Level ID - Unique identifier of the loyalty program level.
-
Loyalty Account ID - Main identifier of the loyalty account associated with the transaction.
-
Card Serial Number - The card associated with the loyalty account.
-
Customer Number - Unique identifier of the primary customer associated with the card.
-
Transaction Date - Date when the loyalty transaction took place.
-
Transaction Type Code - Includes Activate, Deactivate, Issue, PointRecovery, Return, Award, Expire, ChangeLevel, SustainExtension, AccountMerge, ResetExpirationDate, TransferOut, and TransferIn. Inquiries are not included.
-
Transaction Trigger Type - System where the transaction was triggered from, such as POS, CRM server, or loyalty admin module.
-
Retail Transaction ID - Unique identifier of the transaction, provided by the POS System.
-
Points Accrued - Number of points accrued for an Issue, Point Recovery, Earn, or Return. For a return, this is a negative number.
-
Points Redeemed - Number of Points Redeemed for an Award.
-
Bonus Points - Number of points issued as bonus points for an Issue, Point Recovery, Earn, or Return. For a return, this is a negative number.
-
Points Expired - Number of points expired as a part of this transaction.
-
Transaction Amount - The sale transaction amount that has earned the given points in original currency for an Issue, Point Recovery, Earn, or Return. For a return, this is a negative number.
-
Original Currency Code - The currency code of the transaction amount.
-
Converted Amount - The sale transaction amount that has earned the given points in program currency for an Issue, Point Recovery, Earn, or Return. For a return, this is a negative number.
-
Program Currency Code - The currency code of the program.
-
Location ID - Retail location ID where the transaction occurred.
-
Points Transferred Out - The total number of points transferred out for the transaction. Included as a negative number when the transaction type is Transfer Out.
-
Points Transferred In - The total number of points transferred in for the transaction. Included as a positive number when the transaction type is Transfer In.
The export file does not include a header row. Instead, there is a separate file with the same name as the loyalty account activity export file, but with an extension of .ctx, that includes the titles of each column in the export file. For example, if the loyalty account activity export file name is W_RTL_LYL_TRANS_DS.dat, the file containing the header row names is W_RTL_LYL_TRANS_DS.dat.ctx.
Loyalty Program Sync Export
This task has the following parameters:
-
Batch Exporter Type - Defaults to BI/Analytics and cannot be changed.
-
Export Type - Controls which records to include in the export file:
-
Export all active records - Include all active loyalty programs.
-
Export updated records only - Include loyalty programs only if they have changed since the last export.
Note that, regardless of your selection here, the first time you run the export all active loyalty programs are included.
-
-
Specify export filename - The setting of the Retail Insights Loyalty Program Data Sync Export Default Filename property is displayed and cannot be changed.
Loyalty Program Data Export File - BI/Analytics
The export file is pipe-delimited, and typically contains the following information:
-
Loyalty Program Id
-
Loyalty Program Name
-
Points Name
-
Points Currency Value
-
Loyalty Program Active Flag
-
Loyalty Program Start Date
-
Loyalty Program End Date
-
Loyalty Program Level Id
-
Loyal Program Level Name
-
Loyalty Program Level Active Flag
-
Default Program Level flag
-
Program Currency
The export file does not include a header row. Instead, there is a separate file with the same name as the loyalty program data export file, but with an extension of .ctx, that includes the titles of each column in the export file. For example, if the loyalty program data export file name is W_RTL_LYL_PROG_DS.dat, the file containing the header row names is W_RTL_LYL_PROG_DS.dat.ctx.
Loyalty Award Transaction Sync Export
This task has the following parameters:
-
Batch Exporter Type - Defaults to BI/Analytics and cannot be changed.
-
Export Type - Controls which records to include in the export file:
-
Export all active records - Include all award transactions for all active loyalty programs.
-
Export updated records only - Include award transactions only if they have occurred since the last export.
Note that, regardless of your selection here, the first time you run the export all award transactions for all active loyalty programs are included.
-
-
Specify export filename - The setting of the Retail Insights Loyalty Award Transaction Data Sync Export Default Filename property is displayed and cannot be changed.
Loyalty Award Transaction Data Export File - BI/Analytics
The export file is pipe-delimited, and typically contains the following information:
-
Award Transaction ID- The unique numeric identifier of the transaction.
-
Award Account ID - The unique numeric identifier of the award account.
-
Award Program ID - The unique numeric identifier of the award program.
-
Card Serial Number - The serial number for the account.
-
Customer Number - The unique numeric identifier of the customer.
-
Award Type - E-Award or Entitlement Coupon.
-
Award Transaction Type code - IssueCoupon, IssueEntitlementCoupon, Redeem, AutomaticRedeem, TransferIn, TransferOut, VoidAwardTransaction, NotifyCouponExpire, ActivateAccount, DeactivateAccount, and AccountMerge.
-
Coupon ID - The unique numeric identifier for the award coupon.
-
Coupon Effective Date - The date when the coupon becomes effective.
-
Coupon Expiry Date - The date when the coupon expires.
-
Issue Amount - Amount awarded in award currency during a E-Award issue. Populated when the transaction type is IssueCoupon or IssuePromoAwardCoupon.
-
Redeem Amount - Amount redeemed in award currency during an E- Award redemption. Populated when the transaction type is Redeem or AutomaticRedeem.
-
Balance Amount - Balance of an E-Award coupon.
-
Deal ID - Deal associated to the given Coupon for an entitlement deal award.Deal Name - The name of an entitlement deal.
-
External Deal ID - Promote-side Deal ID that is used to trigger the deal at POS for an entitlement coupon. The external deal ID and the Deal ID can be the same.
-
Max Redeem Count - The maximum redeemable count for the deal. Included only for an Entitlement Deal.
-
Redeemed Count - The redeemed count for this specific entitlement coupon record. Included only for an Entitlement Deal.
-
Redemption Balance - The total count eligible for redemption. Calculated by subtracting the Redeemed Count from the Max Redeem Count. Included only for an Entitlement Deal.
-
Award Currency - The currency defined for the award program.
-
Award Transaction Date - The date when the transaction took place.
-
Coupon Fully Redeemed Flag - Flag indicating if the given coupon has been fully redeemed. For an E-Award, this is the Issue Amount = Redeem Amount. For an Entitlement Deal, this is the Max Redeem Count = Redeemed Count.
-
Coupon Expiry Flag - Flag indicating if the Expiry Date for the coupon has passed.
-
Transfer Out Amount - The amount transferred out to another account.
-
Transfer In Amount - The amount transferred in from another account.
The export file does not include a header row. Instead, there is a separate file with the same name as the loyalty award transaction data file, but with an extension of .ctx, that includes the titles of each column in the export file. For example, if the loyalty award transaction data file name is W_RTL_LYL_AWD_DS.dat, the file containing the header row names is W_RTL_LYL_AWD_DS.dat.ctx.
Delete Customers
This Task has the following parameters:
-
Number of Days - This Text Field defines the number of days after a Customer's Last Purchase Date on which a Customer is deleted.
-
Based On - A field that describes what the Number of Days field is determined by.
-
Report Only - This toggle indicates whether the Task only reports the number of Customers that would be deleted, or if the Customers are deleted.
-
On () - Only a count of the Customers are reported.
-
Off () - The Customers are deleted.
-
Delete Inactive Customers
This Task has the following parameters:
-
Number of Days - This Text Field defines the number of days after a Customer's Last Update Date on which a Customer is deleted.
-
Based On - A field that describes what the Number of Days field is determined by.
-
Report Only - This toggle indicates whether the Task only reports the number of Customers that would be deleted, or if the Customers are deleted.
-
On - Only a count of the Customers are reported.
-
Off - The Customers are deleted.
-
Purged data includes:
-
The customer ID is set to null in the following tables:
-
TRN_LINE_ITEM
-
TRN_LINE_ITEM_MODIFIER
-
TRN_TRANSACTION
-
AWD_ACCT_ACTIVITY
-
LYL_LOYALTY_ACCT_ACT
-
SVC_TENDER_ACCT_ACT
-
-
Archived customer data is deleted from the following tables:
-
ARCH_CST_CUST_PHONE
-
ARCH_CST_ADDRESS
-
ARCH_CST_CUST_ATTRIBUTES
-
ARCH_CST_CUST_ALT_KEY
-
ARCH_TRN_CUST_HISTORY
-
ARCH_CST_DEPARTMENT_TOTALS
-
ARCH_CST_CUSTOMER
-
ARCH_CST_CUST_NOTES
-
ARCH_CST_PREFERENCE_CENTER
-
ARCH_CST_CUST_SOCIAL_PROFILE
-
ARCH_CST_CUST_SOCIAL_ACTIVITY
-
ARCH_CST_CUST_FRANCHISEE_MAP
-
ARCH_CMP_SOCIAL_RESULT_MAP
-
Also, any Item Registry that includes only the inactive Customer is deleted, regardless of whether the inactive Customer is the primary Customer for the Registry.
Oracle recommends scheduling this Task to run weekly.
Delete Inactive Customer Addresses
This Task has the following parameters. The deletion is always based on the setting of the Active flag. Customer addresses are flagged as inactive when you select the Delete option for the address.
-
Report Only - This toggle indicates whether the Task only reports the number of Customer addresses that would be deleted, or if the Customer addresses will actually be deleted.
-
On - Only a count of the Customer addresses are reported. The listing displayed at the Job Details Window indicates the total number of inactive addresses that would be deleted for all Customers, and the total number of Customers that would have inactive addresses deleted. These numbers might be different, for example, if you deleted two addresses for the same Customer.
-
Off - The Customer addresses are deleted.The listing displayed at the Job Details Window indicates the total number of inactive addresses that were deleted for all Customers, and the total number of Customers that had inactive addresses deleted. These numbers might be different, for example, if you deleted two addresses for the same Customer.
-
Delete Inactive Customer Phone Numbers
This Task has the following parameters. The deletion is always based on the setting of the Active flag. Customer phone numbers are flagged as inactive when you select the Delete option for the phone number.
-
Report Only - This toggle indicates whether the Task only reports the number of Customer phone numbers that are deleted, or if the Customer numbers are actually deleted.
-
On - Only provides a count of the Customer phone numbers that are reported as inactive. The count at the Job Details Window indicates the total number of inactive phone numbers that will be deleted for all Customers and the total number of Customers that will have inactive phone numbers deleted. These numbers might be different, for example, if you deleted two phone numbers for the same Customer.
-
Off - The Customer phone numbers are deleted. The listing displayed at the Job Details Window indicates the total number of inactive phone numbers that were deleted for all Customers, and the total number of Customers that had inactive phone numbers deleted. These numbers might be different, for example, if you deleted two phone numbers for the same Customer.
-
Delete Inactive Customer Email Addresses
This Task has the following parameters. The deletion is always based on the setting of the Active flag. Customer email addresses are flagged as inactive when you select the Delete option for the email address.
-
Report Only - This toggle indicates whether the Task only reports the number of Customer email addresses that are deleted, or if the Customer email addresses are actually deleted.
-
On - Only provides a count of the Customer email addresses that are reported as inactive. The count at the Job Details Window indicates the total number of inactive emails that will be deleted for all Customers and the total number of Customers that will have inactive emails deleted. These numbers might be different, for example, if you deleted two phone numbers for the same Customer.
-
Off - The Customer email addresses are deleted. The listing displayed at the Job Details Window indicates the total number of inactive email addresses that were deleted for all Customers and the total number of Customers that had inactive email addresses deleted. These numbers might be different, for example, if you deleted two email addresses for the same Customer.
-
Delete Transaction History
This Task has the following parameters:
-
Number of Days - This Text Field defines the number of days after a Transaction Business Date on which a Transaction is deleted.
-
Based On - A field that describes what the Number of Days field is determined by.
-
Report Only - This toggle indicates whether the Task only reports the number of Transactions that are to be deleted, or if the Transactions will be deleted.
-
On - Only a count of the Transactions are reported.
-
Off - The Transactions are deleted.
-
Delete Promotion
This Task has the following parameters:
-
Number of Days - This Text Field defines the number of days after a Promotion's End Date on which a Promotion is deleted.
-
Based On - A field that describes what the Number of Days field is determined by.
-
Report Only - This toggle indicates whether the Task only reports the number of Promotions that would be deleted, or if the Promotions are deleted.
-
On - Only a count of the Promotions are reported.
-
Off - The Promotions are deleted.
-
Delete Merged/Archived Customers
This Task has the following parameters:
-
Number of Days - This Text Field defines the number of days after a merged Customer record's Create Date on which the merged Customer records are deleted. Any Customer record that was merged and archived before that date is removed from the system
-
Based On - A field that describes what the Number of Days field is determined by.
-
Report Only - This toggle indicates whether the Task only reports the number of Customers that would be deleted, or if the Customers are deleted.
-
On - Only a count of the Customers are reported.
-
Off - The Customers are deleted.
-
Oracle recommends that you schedule this task to run every week.
Delete Loyalty Accounts and Activities
This Task has the following parameters:
-
Number of Days - This Text Field defines the number of days after a Loyalty Account's Last Update Date on which a Loyalty Account and its activities are deleted.
-
Based On - A field that describes what the Number of Days field is determined by.
-
Report Only - This toggle indicates whether the Task only reports the number of Loyalty Accounts that would be deleted, or if the Loyalty Accounts are deleted.
-
On - Only a count of the Loyalty Accounts are reported.
-
Off - The Loyalty Accounts and activities are deleted.
-
Delete Loyalty Inquiry Activities
This Task has the following parameters:
-
Number of Days - This Text Field defines the number of days after a Loyalty Inquiry's Last Activity Date on which a Loyalty Inquiry is deleted.
-
Based On - A field that describes what the Number of Days field is determined by.
-
Report Only - This toggle indicates whether the Task only reports the number of Loyalty Inquiries that would be deleted, or if the Loyalty Inquiries are deleted.
-
On - Only a count of the Loyalty Inquiries are reported.
-
Off - The Loyalty Inquiries are deleted.
-
Delete Loyalty Program Summary
This Task has the following parameters:
-
Number of Months - Set the number of months after which data from the Loyalty Summary Aggregate tables will be deleted based on the Year and Month fields. If 0 is entered, all data will be deleted. If 1 is entered, only one month (the latest) will be kept and all previous data deleted. If 2 is entered, only the latest and previous month will remain and so on.
-
Report Only -
-
On - The data will not be deleted, a count of the rows to delete from each table will be shown in the job processing output when the job is complete.
-
Off - The data will be deleted and a summary will be shown in the job processing output.
-
Delete Segments
This Task has the following parameters:
-
Number of Days - This Text Field defines the number of days after a Segment's Last Run Date on which a Segment is deleted.
-
Based On - A field that describes what the Number of Days field is determined by.
-
Report Only - This toggle indicates whether the Task only reports the number of Segments that would be deleted, or if the Segments are deleted.
-
On - Only a count of the Segments are reported.
-
Off - The Segments are deleted.
-
Delete Segment History
This Task has the following parameters:
-
Number of Days - This Text Field defines the number of days after a Segment's Last Run Date on which the History for the Segment is deleted.
-
Based On - A field that describes what the Number of Days field is determined by.
-
Report Only - This toggle indicates whether the Task only reports the number of Segment Histories that would be deleted, or if the Segment Histories are deleted.
-
On - Only a count of the Segment Histories are reported.
-
Off - The Segment Histories are deleted.
-
Delete Job History
This Task has the following parameters:
-
Number of Days - This Text Field defines the number of days after a Job's End Date on which the History for the Job is deleted.
-
Based On - A field that describes what the Number of Days field is determined by.
-
Report Only - This toggle indicates whether the Task only reports the number of Job Histories that would be deleted, or if the Job Histories are deleted.
-
On - Only a count of the Job Histories are reported.
-
Off - The Job Histories are deleted.
-
Delete Export Files
This Task has the following parameter:
-
Number of Days - This Text Field defines the number of days to retain files in export directories before they are eligible to be deleted. The Task uses the date when a file was most recently modified to determine whether it is eligible for deletion.
Once an export file has been deleted, the Job Details Window for the export job displays a message: File no longer available.
Oracle recommends scheduling this Task to run weekly.
The following configuration properties define the export directories where files are created for export that are subject to deletion through this task.
-
Account Batch Exporter Export Directory
-
Award Export Directory
-
Card Export Directory
-
Card Series Export Directory
-
Customer Batch Exporter Export Directory
-
Customer Segment Export Directory
-
Directory For Promotion Batch Export Files
-
Directory For Segment Batch Export Files
-
Location Specific Transform Export Directory
-
Loyalty Export Directory
-
Promote Transforms Export Directory
-
Promotion Transforms Export Directory
-
Promotion Export Directory
-
Promotion Transforms Export Directory
-
Retail Insights Batch Exporter Export Directory
-
Tender Activity Report Export Directory
See the Oracle Retail Customer Engagement Implementation Guide for information on setting up configuration properties.
Delete Import Files
This Task has the following parameter:
-
Number of Days - This Text Field defines the number of days to retain files in import directories before they are eligible to be deleted. The Task uses the date when a file was most recently modified to determine whether it is eligible for deletion.
Oracle recommends scheduling this Task to run weekly.
The following configuration properties define the import directories where files are deleted.
-
Card Series Import Upload Directory
-
Batch File Input Directory
See the Oracle Retail Customer Engagement Implementation Guide for information on setting up configuration properties.
Delete Gift Registries
This task has the following parameters:
-
Number of Days - This Text Field defines the number of days after a Gift Registry's Expiration Date on which the Gift Registry is deleted.
-
Based On - A field that describes what the Number of Days field is determined by.
-
Report Only - This toggle indicates whether the Task only reports the number of Gift Registries that would be deleted, or if the Gift Registries are deleted.
-
On - Only a count of the Gift Registries are reported.
-
Off - The Gift Registries are deleted.
-
Delete Inactive Item Registries
This task has the following parameters:
-
Number of Days - This Text Field defines the number of days after an Inactive Wish List's or Gift Registry's Last Update Date on which the Wish List is deleted.
-
Based On - A field that describes what the Number of Days field is determined by.
-
Report Only - This toggle indicates whether the Task only reports the number of Gift Registries that would be deleted, or if the Wish Lists are deleted.
-
On - Only a count of the Wish Lists are reported.
-
Off - The Wish Lists are deleted.
-
Delete Social Activity
This task has the following parameters:
-
Search Strategy - This Selection Menu determines the social network for which the Social Activity is being deleted.
-
Number of Days - This Text Field defines the number of days after a Social Activity item's Last Activity Date on which the item is deleted.
-
Based On - A field that describes what the Number of Days field is determined by.
-
Report Only - This toggle indicates whether the Task only reports the number of Social Activity items that would be deleted, or if the Social Activity is deleted.
-
On - Only a count of the Social Activity items that are reported.
-
Off - The Social Activity is deleted.
-
Delete Tasks
This task has the following parameters:
-
Task Status - This Selection Menu includes the following options.
-
All (Default)
-
Open
-
In Progress
-
Cancelled
-
Closed
-
-
Number of Days - Set the number of days after a Task's Update/Create Date on which the Task is deleted.
-
Based On - A field that describes what the Number of Days field is determined by.
-
Report Only - This toggle indicates whether the Task only reports the tasks that would be deleted, or if the tasks are deleted.
-
toggle Right - Only a count of the tasks that are reported.
-
toggle Left - The Tasks that are deleted.
-
Delete Award Inquiry Activities
This task has the following parameters:
-
Number of Days - This Text Field defines the number of days after a Award Inquiry's Last Activity Date on which a Award Inquiry is deleted.
-
Based On - A field that describes what the Number of Days field is determined by.
-
Report Only - This toggle indicates whether the Task only reports the number of Award Inquiries that would be deleted, or if the Award Inquiries are deleted.
-
On - Only a count of the Award Inquiries are reported.
-
Off - The Award Inquiries are deleted.
-
Delete Web Service Tracking
This task has the following parameters:
-
Number of Days - This Text Field defines the number of days after which tracked Web Service activity is deleted, based on the date when the record in the database was most recently updated.
-
Based On - A field that describes what the Number of Days field is determined by.
-
Report Only - This toggle indicates whether the Task only reports the number of Web Service Tracking records that would be deleted, or if the Web Service Tracking records would be deleted.
-
On - Only a count of the consolidated daily, weekly, and monthly Web Service Tracking records are reported.
-
Off - The consolidated Web Service Tracking records are deleted.
-
Delete Batch Import History
This task has the following parameters:
-
Number of Days - This Text Field defines the number of days after which batch import history is deleted, based on the END_DATE in the XMLAPI_PROCESSED_RECORD table.
-
Based On - A field that describes what the Number of Days field is determined by.
-
Report Only - This toggle indicates whether the Task only reports the number of Batch Import History records that would be deleted, or if the Batch Import History records would actually be deleted.
-
On - Only a count of the Batch Import History records are reported.
-
Off - The Batch Import History records are deleted.
-
Delete Batch Process Tracking
This task has the following parameters:
-
Number of Days - This Text Field defines the number of months after which tracked Batch Process activity is deleted, based on the date when processing ended. If this field is set to 0, all existing consolidated daily, weekly, and monthly Batch Processing data is eligible for deletion.
-
Based On - A field that describes what the Number of Days field is determined by.
-
Report Only - This toggle indicates whether the Task only reports the number of Batch Process Tracking records that would be deleted, or if the Batch Process Tracking records would be deleted.
-
On - Only a count of the consolidated daily, weekly, and monthly Batch Process Tracking records are reported.
-
Off - The consolidated Batch Process Tracking records are deleted.
-
Delete Stored Files
Number of Days - This Text Field defines the number of days after which transfer file data currently stored in the database is deleted, based on each file's Create Date.
Based On - A field that describes what the Number of Days field is determined by.
Report Only - This toggle indicates whether the Task only reports the number of stored file records that would be deleted, or if the stored file records would be deleted.
-
ON - Only a count of the stored transfer files records are reported.
-
OFF - The stored transfer file records are deleted.
Data stored in the database on failed transfer files is deleted automatically based on the Delete Failed Transfer in X Days system configuration property.
Aggregate Loyalty Facts
This task has the following parameters:
-
Number of prior years to begin aggregation of loyalty data - This Text Field determines the number of years prior to the current date that is included in the aggregation.
-
Maximum number of months to collect data - This Text Field defines the number of months for which data is aggregated.
If this field is left blank [default], the system will aggregate all the data included in the indicated number of years.
-
Reset Prior Run Data - This toggle indicates whether the task will delete the previously aggregated loyalty information and create an entirely new summary, or if the summary information from previous aggregations are kept.
-
On - The task will remove all of the currently existing summary information and create an entirely new summary.
-
Off - The task will keep the previously collected summary information.
-
Dynamic Promotions
This task has no additional parameters.
This job should be scheduled for the very early morning, before users generate Promotions. This allows the Job to run before any Dynamic Promotions are generated.
If a Dynamic Promotion was generated earlier in the day, do not run this job on the same day.
Do not run this job more than once per day.
Promotion Response Data Import
This task has no additional parameters.
This task processes the following import files to create Customer Notes recording each of the specific customer events. These files are typically submitted by a marketing system such as Responsys.
SENT_EMAILS Promotion Import File
This import file includes the following information:
-
Campaign ID.
-
Promotion ID.
-
Event Type of 1 (sent email).
-
Customer ID.
-
Event Captured Date.
Each processed record in the import file creates a Customer Note:
-
Type - EMAIL_SENT.
-
User - OMC.
-
Location - The organization's default location.
-
Note contents:
-
Campaign ID.
-
Promotion ID.
-
Event Type ID.
-
CLICK_EMAILS Promotion Import File
This import file includes the following information:
-
Event Type of 5 (click email).
-
Customer ID.
-
Event Captured Date.
-
Campaign ID.
-
Promotion ID.
-
Offer Name (the name from the marketing system, such as Responsys).
-
Offer Category (the category from the marketing system, such as Responsys).
-
Offer URL.
Each processed record in the import file creates a Customer Note:
-
Type - EMAIL_CLICKED.
-
User - OMC.
-
Location - The organization's default location.
-
Note contents:
-
Campaign ID.
-
Promotion ID.
-
Event Type ID.
-
Offer Name.
-
Offer Number.
-
Offer Category.
-
Offer URL.
-
OPEN_EMAILS Promotion Import File
This import file includes the following information:
-
Event Type of 4 (open email).
-
Account ID.
-
List ID (the list ID from the marketing system, such as Responsys).
-
RIID (ID code from the marketing system, such as Responsys).Customer ID.
-
Event Captured Date.
-
Campaign ID.
-
Promotion ID.
Each processed record in the import file creates a Customer Note:
-
Type - EMAIL_OPENED
-
User - OMC.
-
Location - The organization's default location.
-
Note contents:
-
Campaign ID.
-
Promotion ID.
-
Event Type ID.
-
FAIL_EMAILS Promotion Import File
This import file includes the following information:
-
Customer ID.
-
Event Type of 8 (failed email).
-
Event Captured Date.
-
Campaign ID.
-
Promotion ID.
Each processed record in the import file creates a Customer Note:
-
Type - EMAIL_FAILED
-
User - OMC.
-
Location - The organization's default location.
-
Note contents:
-
Campaign ID.
-
Promotion ID.
-
Event Type ID.
-
Social Network Listener
This task has the following parameter:
-
Social Network - This Selection Menu determines the social network to search for social activity matching the entered criteria.
Social Network Update
This task has the following parameters:
-
Search Strategy - This Selection Menu determines the social network for which the Social Activity is being deleted.
-
Number of Days - This Text Field defines the number of days in the past for which to search for updates.
-
Based On - A field that describes what the Number of Days field is determined by.
-
Report Only - This toggle indicates whether the Task only reports the number of updates available, or if the Social Profiles are updated.
-
On - Only a count of the updates that are reported.
-
Off - Social Profiles are updated.
-
Task Generator
This task has the following parameters:
-
Select Segment For Task Generator - This Selection Menu determines the Segment for which tasks are generated.
-
Task Type - This field cannot be edited.
-
Subject - [required] This Text Field defines the subject line for the tasks.
-
End after X days - This Text Field defines the number of days from the present day that the task will end.
-
Skip if issued within X days - This Text Field defines a number of days before the present date in which, if the customer had a task created within those days, the job will not generate a task for that customer.
-
Status - This field cannot be edited.
-
Priority - This Selection Menu defines the priority for the created tasks.
-
Associate Assignment Detail - These Radio Buttons determine the associate role for the associate who is assigned each task.
-
Assign to Primary - Assign each task to the customer's primary associate.
-
Assign to Role - Assign each task to the associate assigned to a specified role.
-
If Assign to Role is selected, a Selection Menu is enabled for determining the associate role to use when assigning the tasks.
-
-
Note Type - This Selection Menu determines the type of note (if any) to add to each task.
-
Note - This Text Area Field is used to enter the text of a note (if any) to add to each task.
-
Batch Import Review
This task has the following parameters:
-
Select processed file result type: - These options determine the result types to include in the generated email:
-
All - Include all results in the generated email.
-
Error/Warning [default] - Include only errors or warnings in the generated email.
See the Oracle Retail Customer Engagement Batch Processing and Web Services Guide for more information.
-
-
List of Users - Select one or more Users to receive the email from the Selected Users Selection Search window.
-
Click the Selected Users Plus icon to open a search window and search for the User to receive the email.
-
Click Select. The User is added to the Selected Users List.
-
Repeat step 2 for each User to be added to the Users list.
-
To remove a User from the Users list, click the X icon. The User is removed from the Users list.
-
-
List of Email Addresses - Enter one or more emails to add to the Notification Email List.
-
Enter the email address in the Notify Email Address field.
-
Click the Plus icon. The email address is added to the Notification Email List.
Note:
Validation is performed on the email address.
-
Repeat steps 1-2 for each email address to be added to the Notification Email List.
-
To remove an email address from the Notification Email List, click the X icon. The email address is removed from the Notification Email List.
-
ODCS Sync
This task generates requests to the Omnichannel Cloud Data Service (OCDS) for updates on item and merchandise hierarchy data as well as location and franchise data. The three toggles are set to OFF by default and require SystemConfig or SystemAdmin authority, and have the following parameters:
-
Item and Merchandise Hierarchy - Select this option to request item and merchandise hierarchy data from the Omnichannel Cloud Data Service, including:
-
Merchandise Hierarchy
-
Item Header
-
Item Image
-
Item Price
-
-
Location and Franchise - Select this option to request location and franchise data from the Omnichannel Cloud Data Service, including:
-
Store Location
-
Organizational Hierarchy/Franchise
-
-
Reset Last Run Date - Select this option to retrieve all data, regardless of date created or updated; otherwise, leave this option OFF to request only data that has been created or updated since the last time you ran the OCDS data sync.
See Bulk Imports through Oracle Cloud Data Service (OCDS) in the Batch Processing and Web Services Guide for more information on the integration and the data received.
Data Sync
This task has the following parameters:
-
Click Send Sample Message to test the connection to a third party application. A confirmation appears indicating the message was sent successfully. If the connection is not working contact your application administrator.
-
Enter the Client ID.
-
Enter the Secret credential.
Note:
The Client ID and Secret are provided by the third party application that integrates with Customer Engagement.
-
Click Save.
