5 Data Conversion Application
Once your files have been created with the expected file name patterns and format, they can be moved to the folder in the app server for uploading. You will have received instructions from the Oracle Cloud Operations team for moving files using the Merchandising File Transfer Service that should be followed here.
Once this is complete, you will be ready to use the Data Conversion Application to load data from these files into the conversion schema. Data can be loaded one table at a time or in bulk. For your first runs, you may want to run tables individually to determine if there are any major formatting issues that need correcting in your transformation programs.
Logging In
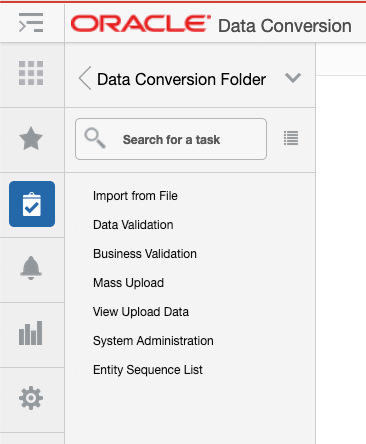
Log in to the Data Conversion application with your configured username and password. Once logged in, your task list should look like the picture below, depending on the privileges granted to you.
Import from File
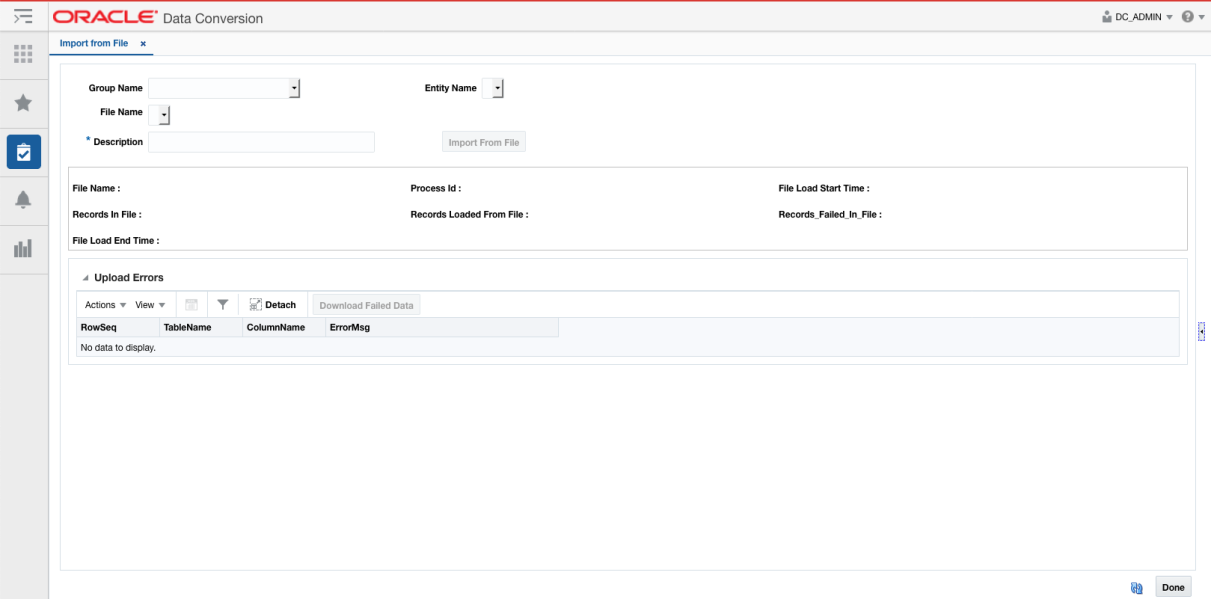
Start with the Import from File option. This screen will aid you in loading data from the files you uploaded to the staging tables present in the data conversion schema. See the "Appendix: Entity Sequence List" section in the appendix for details on the entity groups, entities, naming conventions, and file types supported for this step in the process.
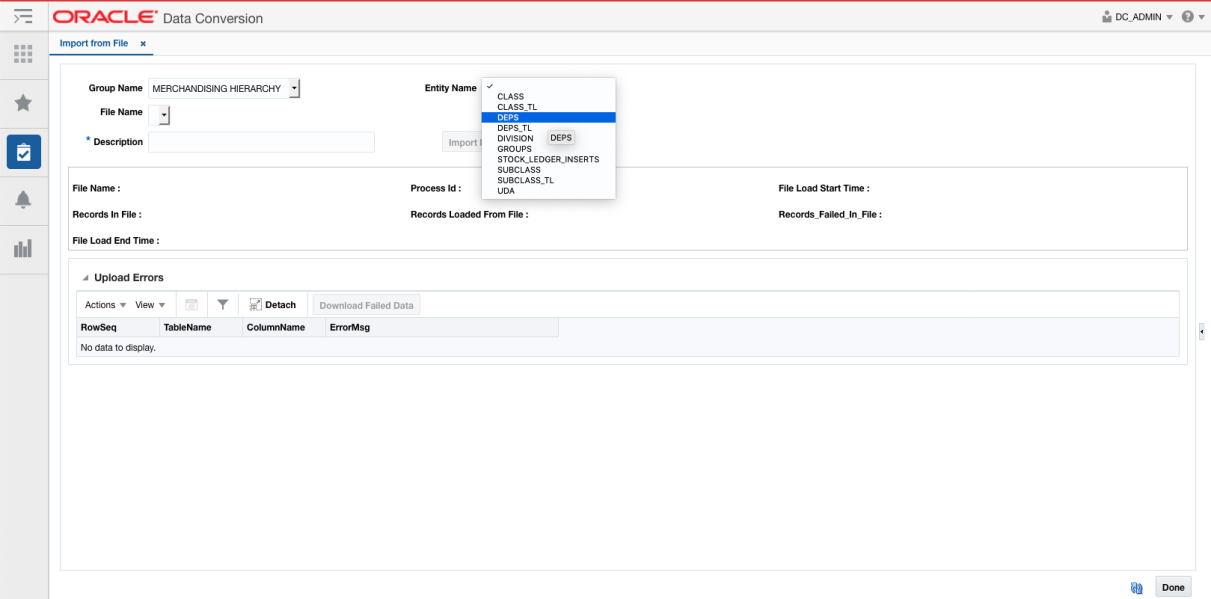
Select the entity group whose data you want to load. Then select the entity name for the table whose files you want to load. In the example below, DEPS is selected to load department data.
Next, select a file name to load. The dropdown will display the list that is available for loading based on the group and entity combination selected. In this example, a .zip file has been selected that contains two .dat files - one for DEPS and one for VAT_DEPS.
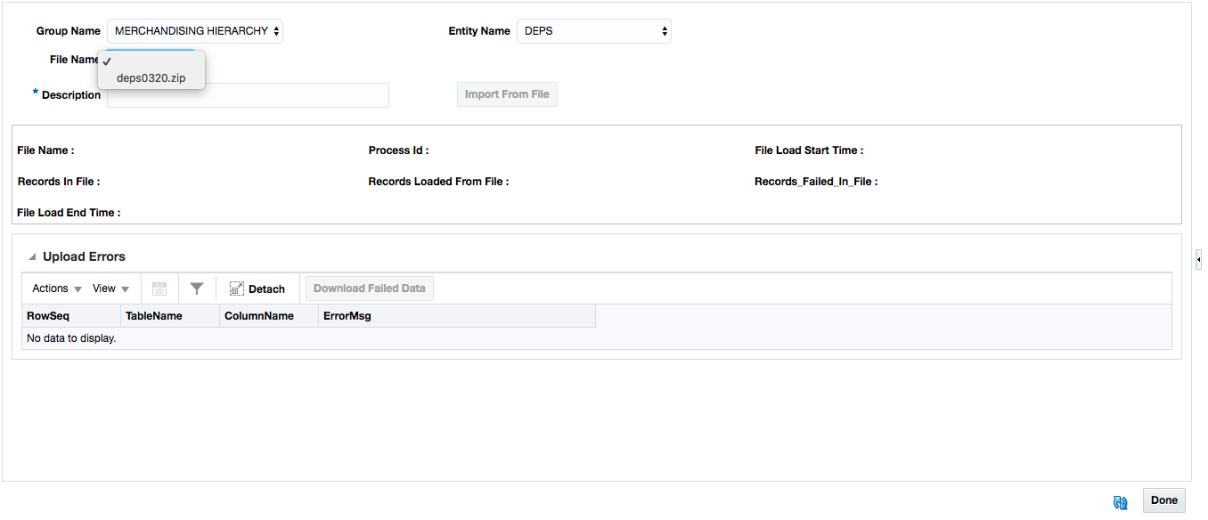
Then, provide a description to identify the process. This will enable the Import From File button. On clicking the button, the data is imported from the file to staging tables. During import, the zip file is extracted for the individual dat files, when applicable.
At this stage, all files are considered individually, so no errors will be raised for missing files for tables that have a dependency on the entity selected, like in this example where DEPS and VAT_DEPS have dependencies.
This allows you to load the dependent tables separately. If not loaded prior to reaching the business valdation step, the missing dependent records would be caught during that stage.
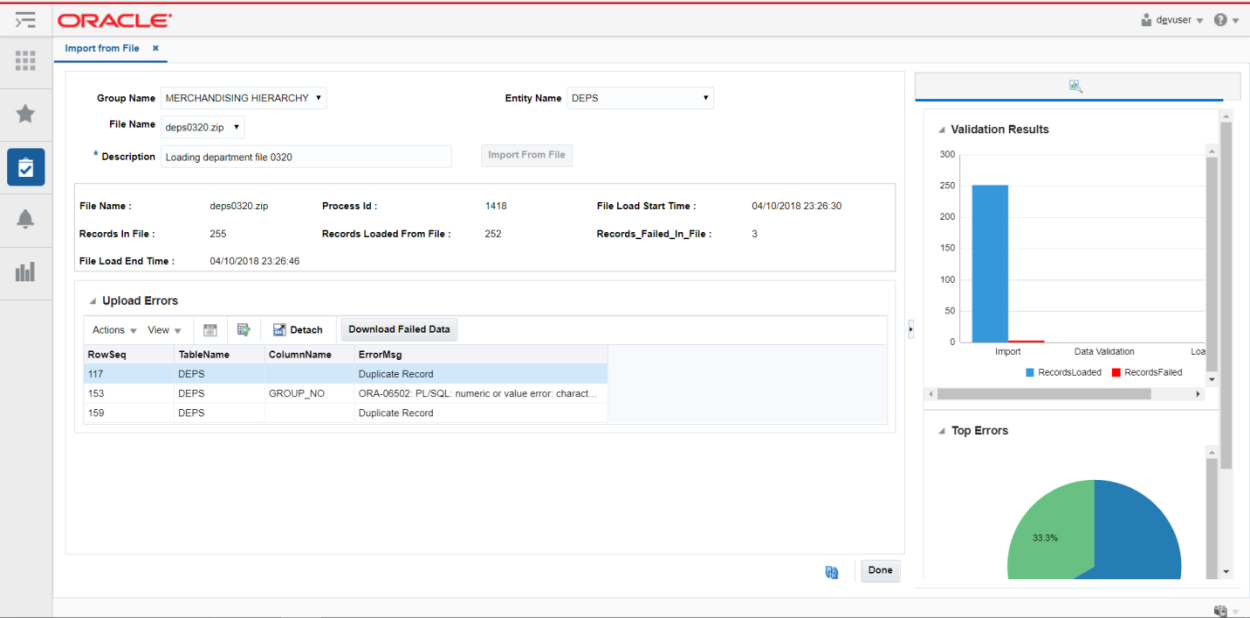
Each file upload is identified using a Process ID. This becomes the identifier while progressing with the validation and load actions on the successive screens. After the import completes, a summary of the import results can be seen in the middle of the screen.
-
File Name: this is the original file you imported.
-
Process ID: unique identifier for the upload generated by the application.
-
Records in File: total records detected in the original file.
-
Records Loaded from File: the total records that were successfully loaded into the staging tables from the selected file.
-
Records Failed in File: the total records rejected from the file.
-
Start and end timings: date and time stamps for these data points to help you gauge the time it takes to load your data and better plan your conversion timeframes.
For all the above statistics, the sum of all the records in all the dat files contained in the zip file is displayed in this section.
View Upload Errors
Records with errors are displayed in the table at the bottom of the screen. This table shows which row in the original file had the error, which table it was trying to load, the column in error, and details on what error occurred.

For the above error examples, the file below is an example of a file that may have generated the second two errors.
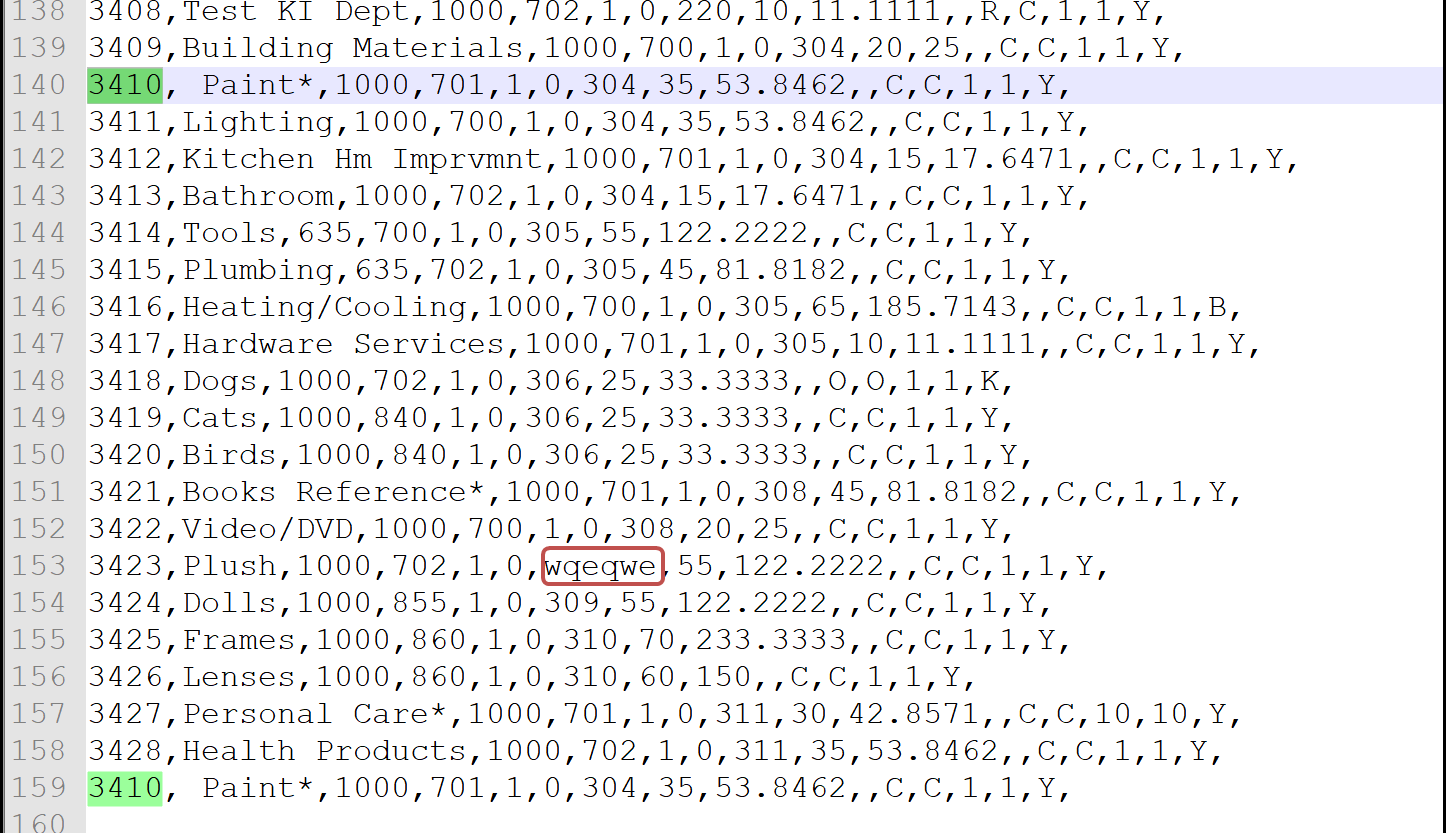
At this stage, records can be rejected due to the following reasons:
-
Data type mismatches in any of the columns
-
Size mismatches in any of the columns
-
Duplicate records within the same file based on the primary key of the table
If there a large number of errors, you can export the errors to a spreadsheet by selecting the Export to Excel button on the toolbar.
All files that were successfully process will be moved to a process folder and can proceed to the next step. You can also choose to proceed to the next step for the successfully loaded data before correcting the import errors. If you choose to proceed, then the records that had failed can be loaded separately in a new file after making corrections.
Correct Import Errors
To help with correcting errors, you can use the Download Failed Data option in the screen. This will download the file (maximum size 2MB) to your local machine with only the erroneous records. You can then manually correct them and reload them to trigger a fresh file upload against that data.
After analyzing the errors displayed, you can make corrections in the original file and re-load all data or you may need to correct the legacy data or transformation code and regenerate your files. Regardless of the method, you will need to transfer the corrected file through Merchandising File Transfer Service and repeat the load process. A new process ID is generated against this second load.
To load a different file for the same or a different entity, click the refresh icon (![]() ) at the bottom right of the screen, to reset the search section.
) at the bottom right of the screen, to reset the search section.
To close the screen, click the Done button at the bottom of the screen.
Data Validation
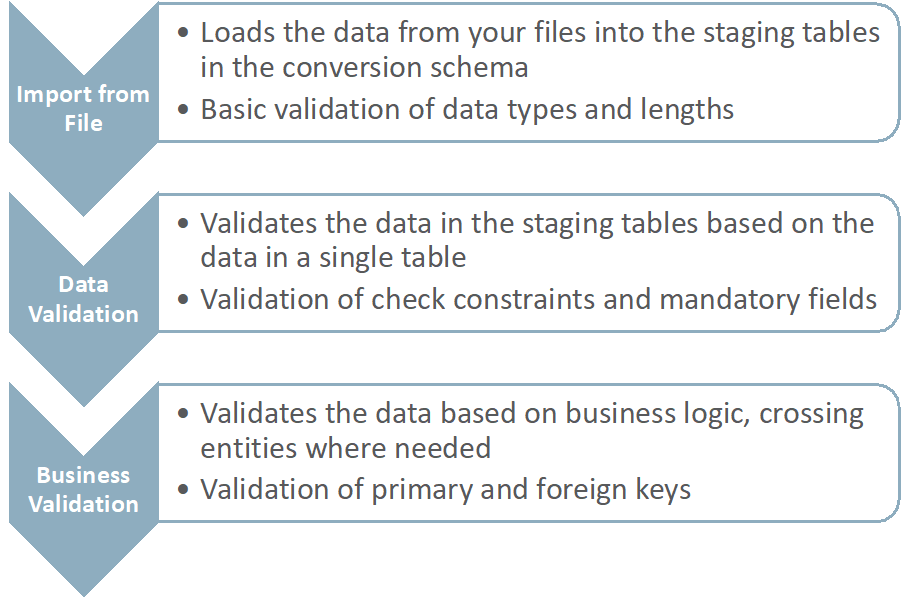
The next step in the process will take the data that was successfully loaded data from the imported files and validate it for data correctness. The validations covered in this step are:
-
Mandatory fields/not null checks
-
Check constraints on columns
-
Complex check constraints on the table rows
-
To access this function, click on the Data Validation link from the task list, to open the screen. Then, from the Process drop down, select the process against which the file was loaded. The drop-down allows you to search based on the process description that was provided during file import.
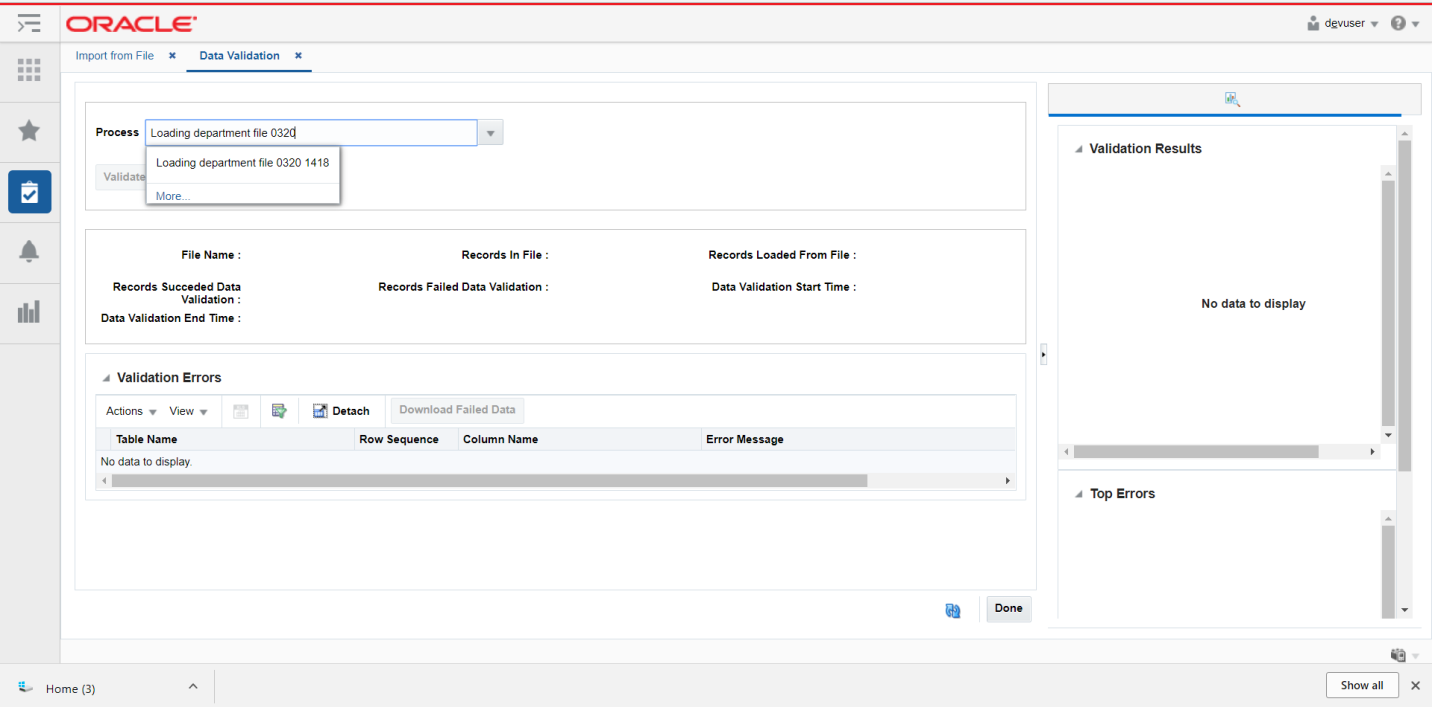
Click the Validate button to begin data validation on your set of records. Once complete, you will see the statistics for this processing similar to the Import from File screen.
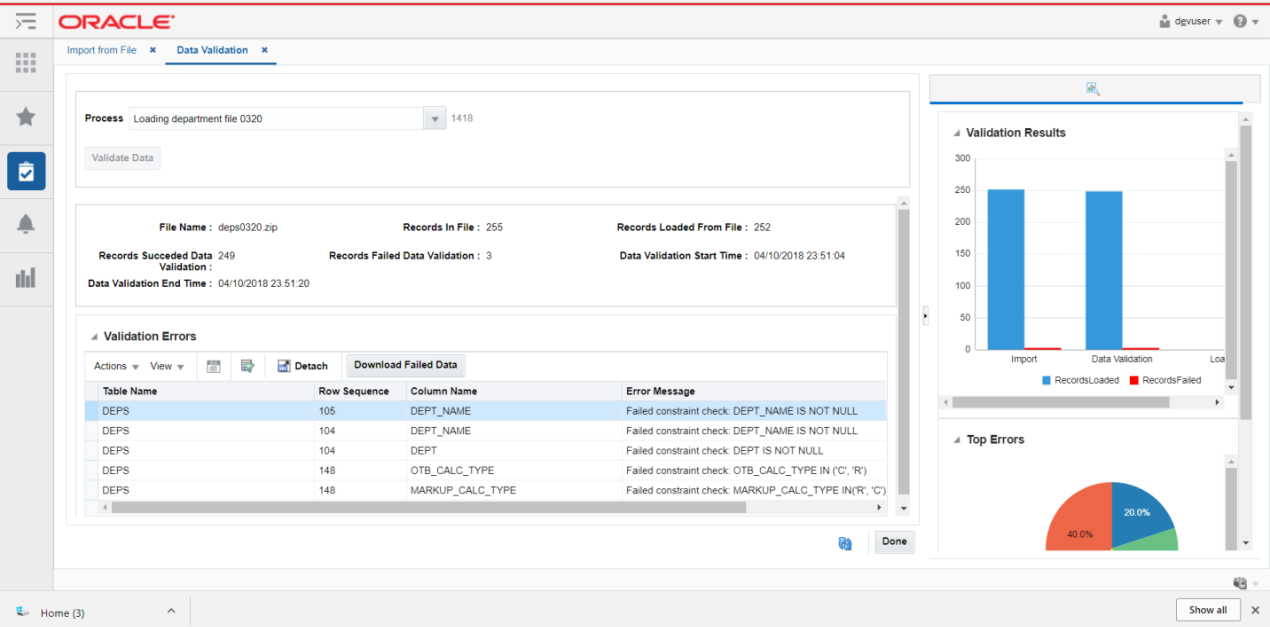
View Data Validation Errors
The validation errors will be displayed in the table at the bottom of the screen after this process runs. As with the Import from File process, you can see the row number that had the issue, the table with the issue, and the error message indicating the issue. For the Data Validation screen, the column with the issue is also displayed.

In the example above, you can see several example errors that might occur during this stage. In this case, three records (row numbers: 105, 104, and 148) have failed data validations. In some cases, there were multiple issues for a particular row of data, but as you can see failures for every column are captured.
After analyzing the errors displayed, you can either make corrections on the original file or continue processing the records that were successfully validated. If you choose to continue to the business validations, then you can use the same process ID to continue processing just the successfully validated records.
Correct Data Validation Errors
To correct the errors, you can make corrections in the original file and re-load all data or you may need to correct the legacy data or transformation code and regenerate your files. To help with this process, use the Download Failed Data button to download the erroneous records into a file, bounded by size configurations on the deployed application. Then, you will need to re-import the file and then re-run the data validation process to validate that all errors have been corrected. A new process ID is generated against this second load.
To validate another process, click the refresh icon (![]() ) at the bottom right of the screen. This will reset the search section.
) at the bottom right of the screen. This will reset the search section.
Close the screen by clicking on the Done button at the bottom of the screen.
Business Validation
Records that have been successfully validated will next be validated for business rules and, if successful, will be loaded to the main Merchandising tables. The validations covered in this step are:
-
Primary keys
-
Foreign keys
-
Unique keys
-
Merchandising and Pricing business validations
To access this screen, click Business Validation link in the task list. From the Process drop down, select the process against which the file was loaded. The drop-down allows you to search based on the process description that was provided during file import.
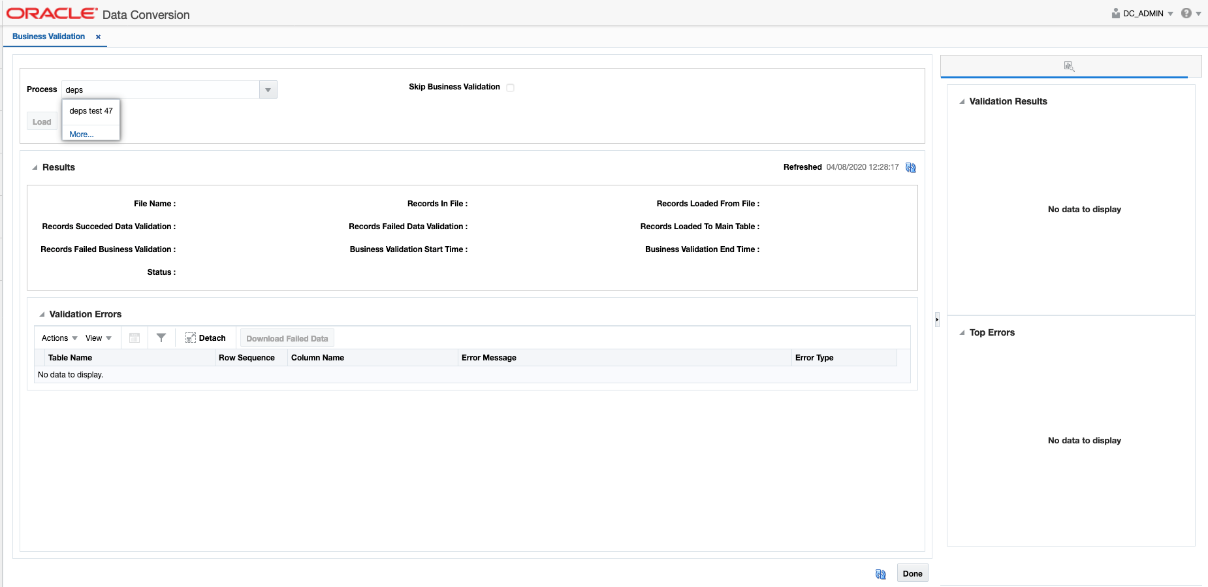
At this point, you will also be given an option to skip business validations and directly load all records that have passed the first two steps of the process (Import from File and Data Validation). If you do this, then records will be loaded from staging to the main Merchandising tables without doing any validation against database constraints. This can speed up the process of loading data, but can result in loading incorrect data that may be harder to correct later. It is not recommended to use this process for initial conversion runs. Additionally, this option will get overridden for the entities that do not insert the data directly as it is in the input files. For example, if there are calculations for some columns that need to be made prior to loading the data into the tables.
Click the Load button to run the business validations and load data to the main tables.
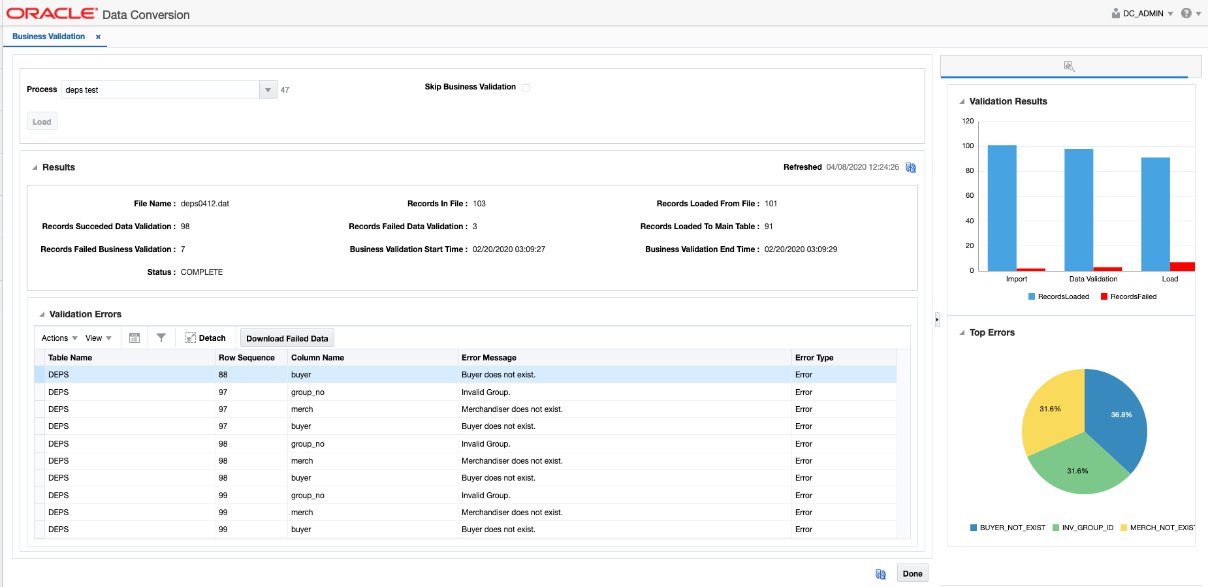
Once the process completes, the loading statistics are displayed in the screen, giving details of total records processed and how many were successful or had errors.
View Business Validation Errors
The validation errors will be displayed in the table at the bottom of the screen after this process runs. As with the previous steps, you can see the row number that had the issue, the table and column with the issue, and the error message indicating the issue.

Correct Business Validation Errors
To correct the errors, you can make corrections in the original file and re-load all data or you may need to correct the legacy data or transformation code and regenerate your files. To help with this process, use the Download Failed Data button to download the erroneous records into a file, bounded by size configurations on the deployed application. Then, you will need to re-import the file and then re-run the data and business validation process to validate that all errors have been corrected. A new process ID is generated against this second load.
To validate another process, click on the refresh icon (![]() ) at the bottom right of the screen to reset the search section. Or close the screen by clicking the Done button at the bottom of the screen.
) at the bottom right of the screen to reset the search section. Or close the screen by clicking the Done button at the bottom of the screen.
View Uploaded Data
After performing the three steps outlined above, it is highly recommended that you verify the records have made it into the base tables as expected. To assist with this the View Upload Data screen can be used.
To access this screen, select the View Upload Data option from the task list and select the group name and entity you wish to view.
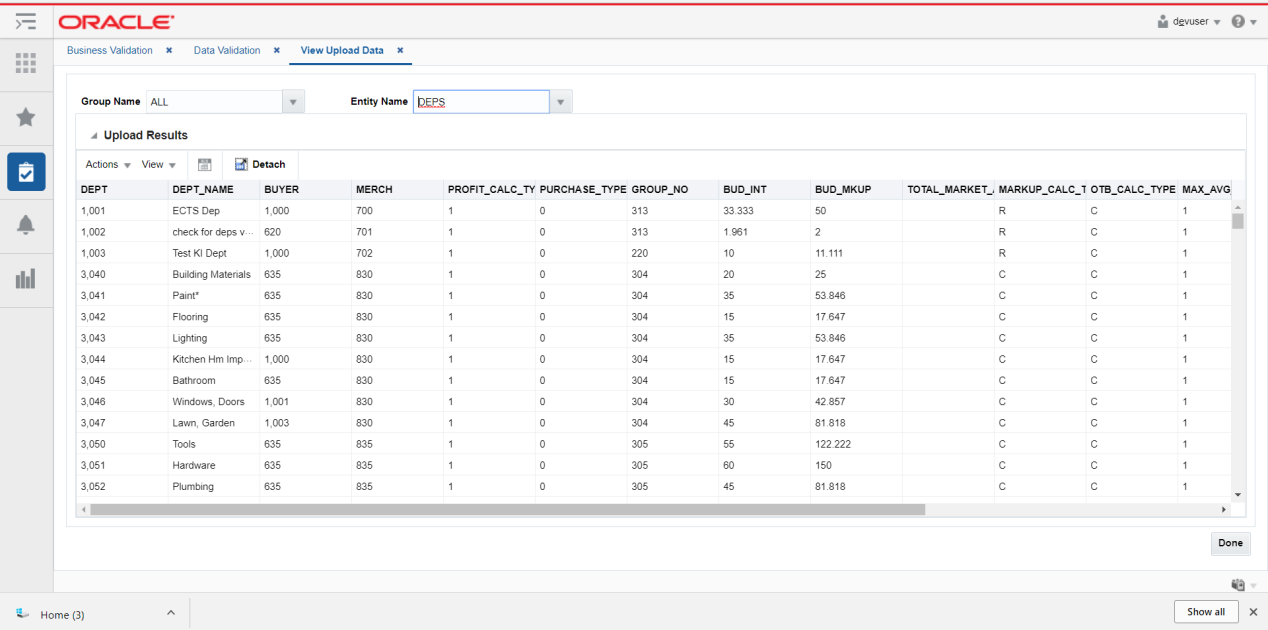
No changes can be made to the data in this screen; however, you can use the Export to Excel option to export the data if you see errors that need correcting.
You can also view the data in the Merchandising screens or directly in the database using the APEX Data Viewer (via the link in Merchandising).
Mass Upload
This feature is provided in the application to trigger an upload of multiple entities sequentially through the same three stages described above. It is not recommended to use this during the initial conversion cycles, but rather is intended to be used during the final runs, where there is a higher level of confidence that the data files are clean.
You can use this to trigger an upload for each of the entity groups, one after the other or everything together. If you choose the first option, then you should ensure that the groups are triggered sequentially, one after the other, as per the sequence defined in appendix. Not following this could lead to errors stating mismatch between dependent records.
Only one mass upload process can run at a time. Trying to create a new mass upload process will throw an error if the first hasn't completed. Additionally, when a mass upload is being run, the remaining screens for individual upload (import, validate, load) should not be used. As a Prerequisite, the required files should be available on the configured upload folder, similar to when using the Import from File screen. The mass upload process will process the files that match the prescribed pattern.
To access the screen to initiate the mass upload, click on the Mass Upload option in the task list. Next, select the New radio button and then select the entity group for the mass upload. If you want to trigger it for all entities, then select the All optionFoot 1.
Then, you will next need to provide a description for the process.
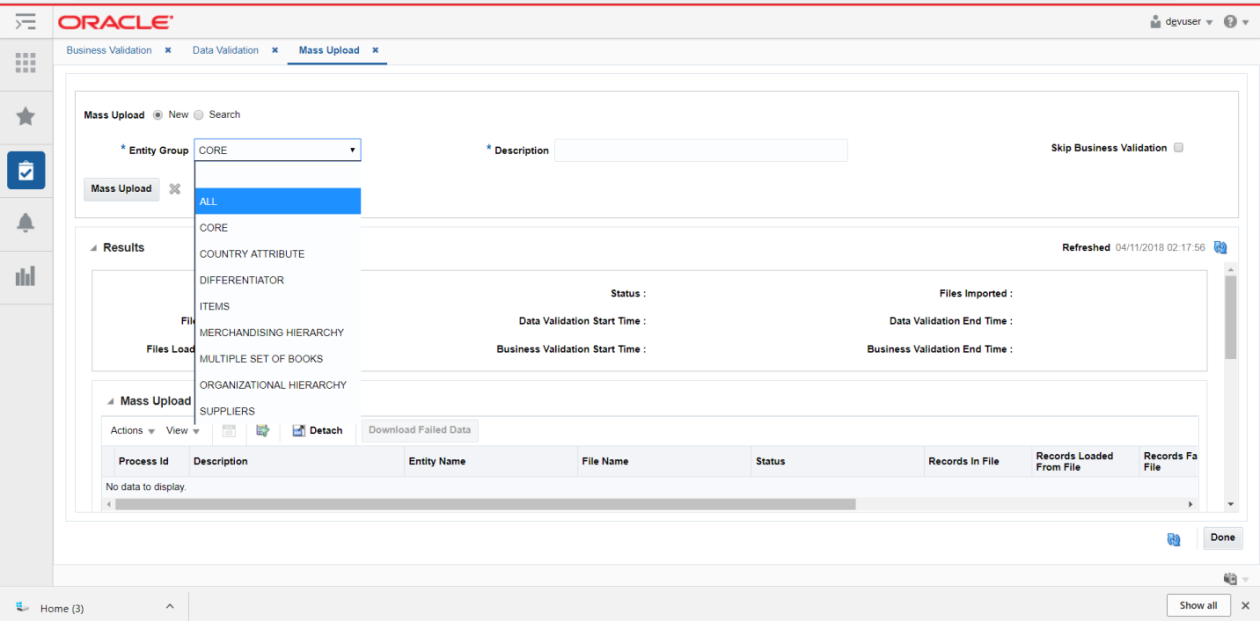
Similar to the Business Validation process, you are given the option to skip business validations at this point by checking the Skip Business Validation checkbox. This will directly load all successfully validated records from the import and data validation stages into the Merchandising tables. If you choose to do this, then records will be loaded from staging to main Merchandising tables without doing any validation against database constraints like primary key, foreign key, or unique key violations. This can speed up the process of loading data, but can result in loading incorrect data that may be harder to correct later. Additionally, this option will get overridden for the entities that do not insert the data directly as it is in the input files. For example, if there are calculations for some columns that need to be made prior to loading the data into the tables.
Click the Mass Upload button to trigger the mass upload, which is an asynchronous process. You will need to click the refresh icon button (![]() ) to see the status of the process.
) to see the status of the process.
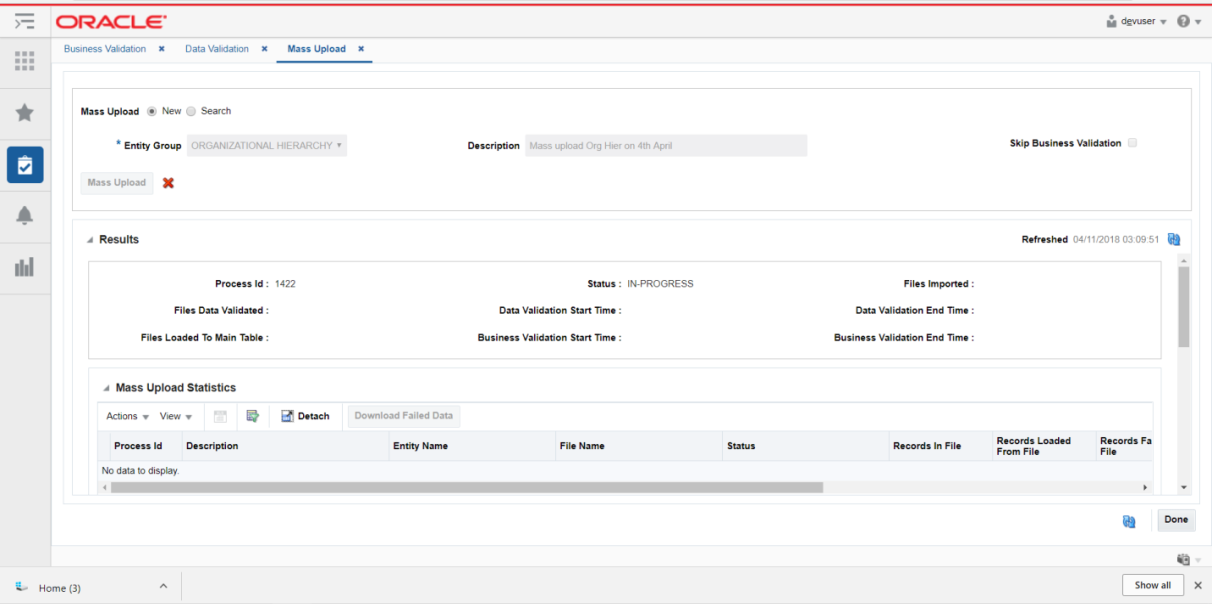
Once you have kicked off a process, a stop icon button (![]() ) will be enabled. This can be used to halt the execution for in cases where you wish to make some alterations and restart. Restarting will be a fresh mass upload process. This option will be available only in the initial stage where the records are not yet moved to main table. Once the mass upload process has started moving the records to the main table, then the option will not be available in order to prevent any corruption of data.
) will be enabled. This can be used to halt the execution for in cases where you wish to make some alterations and restart. Restarting will be a fresh mass upload process. This option will be available only in the initial stage where the records are not yet moved to main table. Once the mass upload process has started moving the records to the main table, then the option will not be available in order to prevent any corruption of data.
Once the upload is completed the status on the screen for this process will be marked as COMPLETE. The Results panel provides the statistics for the overall mass upload process.
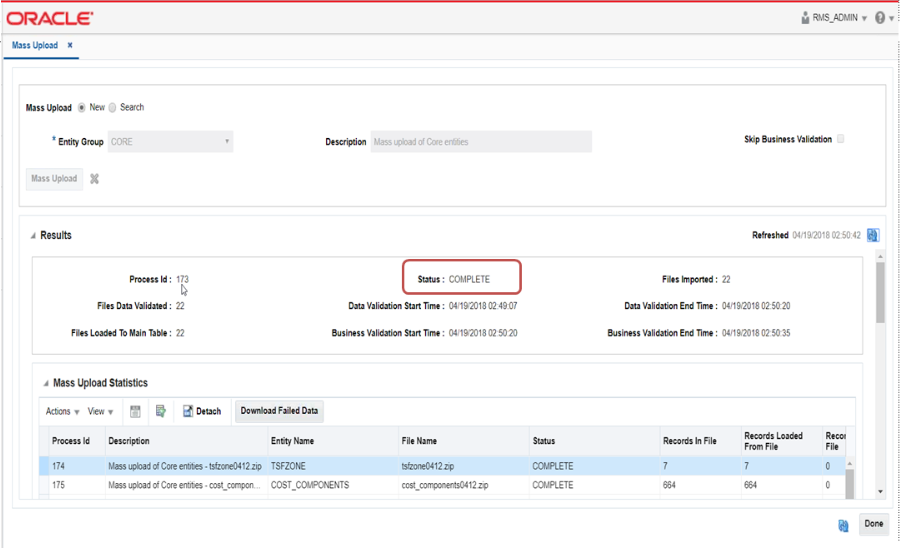
Mass Upload Results

At the bottom of the page, a table provides the details of the individual child processes. Each file will be loaded in a separate child process and is listed in the table with details like file name, record count, processing status, and so on.
Like in the other screens, a Download Failed Data button is provided to download the records that have failed for the selected child process into a file with details on all three validation steps.
View Errors
To view the errors for each child process, select the row in the Mass Upload Statistics table. This will display the data in three separate tables below - one for each stage of the process - in the Errors section. Each of these tables also have a Download Failed Data button so that the errors for each stage can be exported and viewed separately.


Download Errors
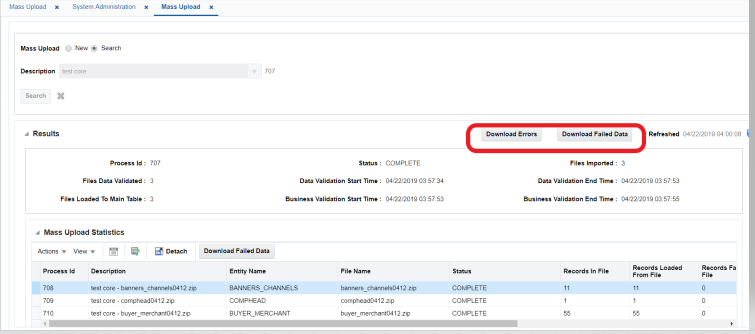
For completed processes, the consolidated errors for the entire upload process can be downloaded using one of two options:
Download Errors
For this option, a .csv file with the errors for all the files processed in the selected mass upload will be generated. If the file is less than 2MB in size it will be generated to your machine. If not, it will be moved to object storage from where you can download using the Merchandising File Transfer Service.
Download Failed Data
For this option, a .zip file with the data from failed rows will be generated. This could then be corrected and reprocessed separately. If the file is less than 2MB in size it will be generated to your machine and can be downloaded from the UI. If not, it will be moved to object storage from where you can download using the Merchandising File Transfer Service. While downloading the files, use dataconversion/outgoing as the object storage (OS) prefix. Details on Merchandising File Transfer service can be found in the Oracle Retail Merchandising System Operations Guide, Volume 2.
Note:
The file containing failed records will not include any escape characters. Before uploading the file for reprocess, it should be verified and, as needed, escape characters should be added.
Footnote Legend
Footnote 1:Best practice for using the Mass Upload is to use the entity group level for your initial runs to make it easier to find and correct format and data errors. Then, once there is a level of confidence in the converted data, the All option can be selected.