4 Prepare for Conversion
Overall Customer Responsibilities
Across all functional areas of conversion, there are some basic customer responsibilities as it relates to data conversion that you and your system implementation partner need to consider. You will be responsible for:
-
Defining rules to determine which data in legacy systems will be converted.
-
Cleaning up data in legacy and closing all open transactions that can be closed prior to conversion to minimize the data needing to be converted. It is generally assumed that any closed transactions in legacy will not be converted, bringing only active data forward into Merchandising.
-
Building extracts and transformation programs to format all data into the structure needed to utilize the conversion tool outlined later in this document. Where necessary, these programs should also include defaults for attributes not available in legacy.
The method of extraction and data cleansing in your legacy solutions can use various tools and methods in order to transform it into the format expected in Merchandising. However, the transformed data must be formatted into the format described in the provided templates in order to load properly using this tool.
Download Templates
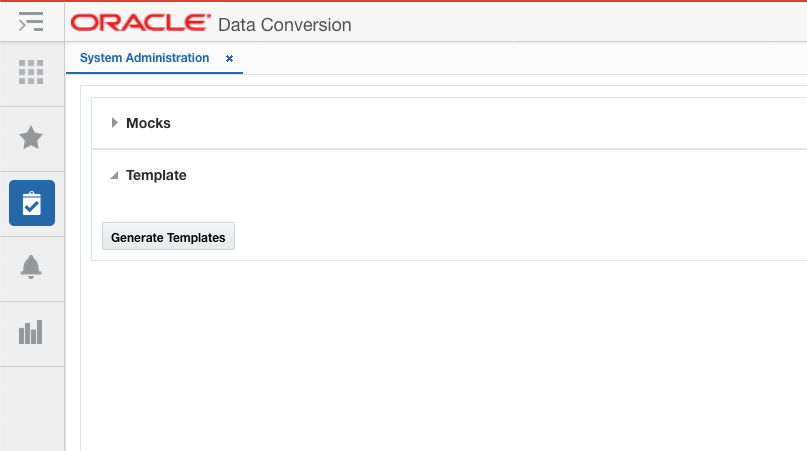
To download the templates that give the format for the various data entities to be converted, access the System Administration screen in the Data Conversion application.

Click the Generate Templates button to download the templates. The generated templates will be moved to object storage from where you can download them using the Merchandising File Transfer Service. While downloading the templates, use dataconversion/outgoing as the object storage (OS) prefix.
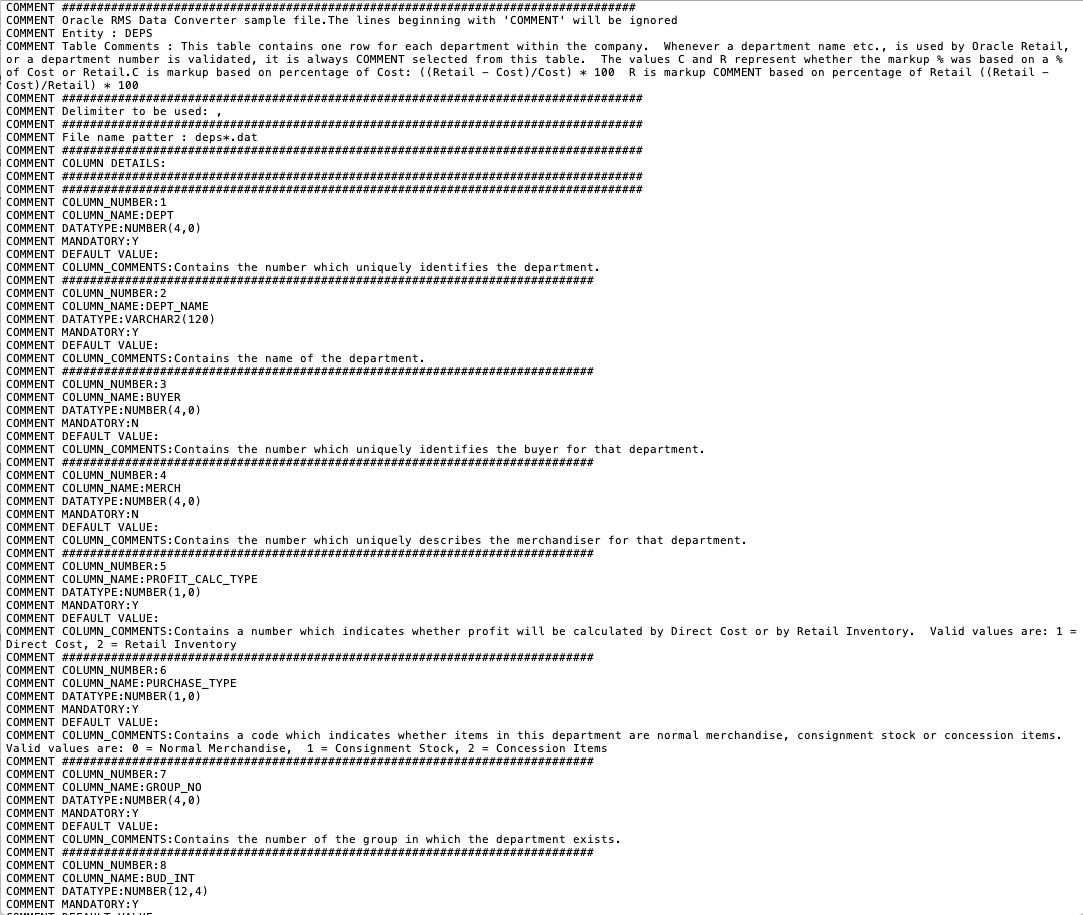
There will be one file per table that can be supported in the conversion and each file will contain details on:
-
File naming pattern
-
For example, the naming pattern for the DEPS table is defined as deps*.dat. The * in the name can be replaced by a number (such as deps1.dat, deps2.dat) or just left off, depending on your conversion plans.
-
If the filename does not match the pattern it will be ignored and will not be picked for loading.
-
-
Column sequences
-
Your data files must follow the sequence of the columns specified in the template. If any column data is to be left as null, then it should be present, but just left blank.
-
-
Data type and length of each column in the table, including a short description of the columns and table
-
Whether the column is mandatory
-
Primary key for the table, along with any foreign or unique keys and any check constraints
Note:
This file is generated based on the Merchandising data model and only the validations aligned with the Merchandising data model are listed. The business-level validations are not called out.

Key Data File Assumptions
When generating your data files based on the template format, there are few key things to keep in mind.
-
The data for each table will need to be loaded separately as its own .dat file - at least one per table.
-
The file names should match exactly the pattern specified in the template. The file names are case sensitive and should match the case in the prescribed pattern.
-
The delimiter to be used to separate the data for each column must be a comma.
-
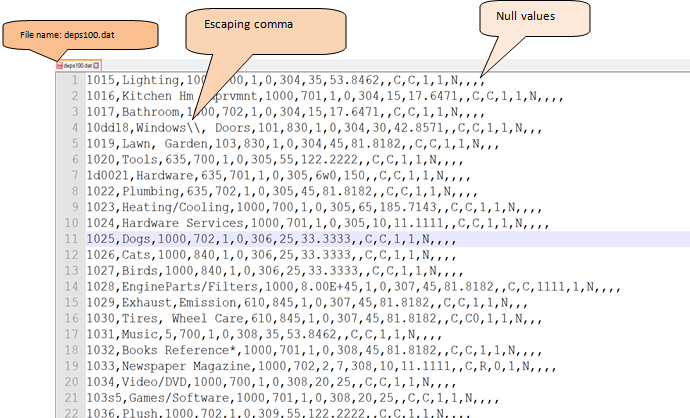
The data file should contain all the columns as expected by the template. If one or more columns are to be left null, then they should still be separated with commas signifying no value; see example below. If the value of null is loaded as 'null', then it will be considered as a string with value 'null'.
-
If a comma is a part of the data, then it should be escaped using '\\'
-
For example, if an address field value is No. 21,2nd Street, it should be provided as: No.21\\,2nd Street
-
-
There should be no empty lines in between rows in your files, as it might consider it as the end of the file.
-
Newline (
\n) and backslash (\) are not supported in the input file. If these characters are required in the data, substitute them with an alternate character during data conversion. After data conversion is completed, as desired, replace the alternate character with newline or backslash characters using the APEX Data Viewer. -
The values in the fields exposed on the template will not be defaulted from Merchandising sequences. Similarly, the fields corresponding to IDs on the templates will not be based on the Merchandising sequences. The associated Merchandising sequences are automatically ramped up at the end of data conversion.
The tool mandates all of the data files to be zipped. The file name of the zip file as well as the individual files within should be as per the recommended pattern.
When zipping your files, ensure that there is only one file per table.
Note:
The files should be directly zipped and not zipped as a folder (For example, the unzip process of the tool, expects to extract the files directly without encountering any folders).
Department Example
Below is an example of a file used for loading department data, named deps100.dat. In the example, you can also see examples of how to format null columns and use the escaping comma.

Integration Triggers
During the data conversion run, it is highly recommended that you temporarily disable MFQUEUE publishing triggers, which capture data for integration to downstream systems. As noted in the "Converting Non-Merchandising Solutions" section, there are other methods that should be used for seeding downstream systems, if needed, after Merchandising conversion. To disable MFQUEUE triggers leverage the DISABLE_PUBLISHING_TRIGGERS task in the System Administration screen. This task will disable all MFQUEUE publishing triggers. Details on how to do this can be found in the "Task Execution Engine" section of this document.
Once the data conversion is completed, you will need to re-enable the triggers and also ensure that the converted data is properly readied for future publication, so that it is sent as an update (or delete) rather than create. Based on your Merchandising data integration to downstream systems, enable the required triggers by executing ENABLE_TRIGGER task in the System Administration screen. See the "MFQUEUE Triggers" section in the appendix for the list of triggers.
Finally, to prepare your data for future publication, records must be loaded into PUB_INFO tables for these entities with the published indicator set to Y. In the cases where the converted entities do not have a separate publishing table and published indicator resides in the merchandising table itself, the indicator should be marked as Y (published). To initialize Merchandising publishing tables, execute the INIT_PUBLISHING task in the System Administration screen. It will populate PUB_INFO tables as necessary and sets the published indicator to Y for the converted entities.
Golden Gate Replication
It is strongly recommended you choose an environment to use for conversion that does not need replication by Golden Gate, as disabling Golden Gate before data conversion and re-starting the services after import is completed is an extensive process involving efforts from both, you and Oracle Cloud Operations team. However, in case your data conversion environment does have Golden Gate replication enabled, it should be disabled for data conversion processes, including all mock runs, to progress at maximum throughput. For this, you are required to log an SR with Oracle Cloud Operations team. After completion of data conversion, Golden Gate replication can be turned back on.