Create Invoice Confirmation
Purpose: Use the Create Invoice Confirmation window to confirm the creation or update of an invoice through a Vendor Portal screen and to indicate whether to post the invoice immediately to the retailer, or save it so that you can make additional updates before posting.
How to display: Select:
- Update at the Purchase Order Shipping screen after specifying an Invoice #, or
- Create at the Invoice Creation screen after completing entry of the invoice information.
- Save at the Invoice screen after optionally entering any overrides to the invoice.
Completing this window:
- Select Update and Save for Changes and click Save if you would like to change any of the information on the invoice before submitting it to the retailer. See Updating and Saving for Changes, below, below for more information.
- Select Update and Post Immediately and click Save to submit the invoice to the retailer. See Posting Immediately, below, for more information.
Your last selected option is selected by default.
For more information: See the Invoice Creation screen for more information on creating and submitting invoices to the retailer.
If you display this window from the Purchase Order Shipping screen, this option provides a means to enter or change information not available through invoice creation.
Information available only through invoice inquiry is:
- payment terms
- changing the unit cost for one or more invoice detail lines
- freight, rate, and other charges at the invoice detail level
- informational messages (these are not sent to the retailer’s system)
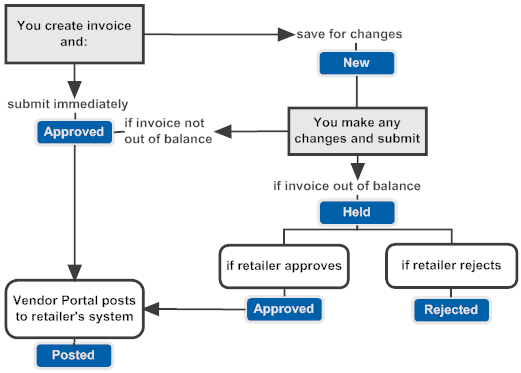
The invoice remains in New status until you post it to the retailer. As long as the invoice is in New status, you can use the Invoice screen to make additional changes to it, or delete it if you have the required authority.
If you change the unit cost of an invoice detail line beyond a percentage specified by the retailer, the invoice is flagged as out-of-balance. When you submit the invoice to the retailer, the invoice goes into Held status until the retailer approves or rejects it.
You cannot add additional purchase order lines to an invoice once you create it, regardless of its status.
See the Invoice screen for more information on the changes you can make to an invoice before posting.
If you select to post the invoice immediately, the Vendor Portal submits the invoice to the retailer. Once you select this option, you cannot override the unit cost, enter payment terms, or to enter or change any other information.
If you have not made any changes to the invoice, the invoice goes into Approved status, and then into Posted status as soon as it is posted to the retailer’s system.
If you have edited the invoice and changed the costs of an invoice detail line beyond a percentage specified by the retailer, the invoice is flagged as out-of-balance and goes into Held status until the retailer approves or rejects it.
Initial creation through Vendor Portal screens: When you first create an invoice at the Purchase Order Shipping screen or the Invoice Creation screen and then complete the Create Invoice Confirmation window, the invoice is created in:
- New status if you select Select Update and Save for Changes.
- Approved status if you select Update and Post Immediately.
If you save for changes: The invoice remains in New status until you save your changes at the Invoice screen and then select Update and Post Immediately at the Create Invoice Confirmation window. Until you select this option, the invoice remains in New status.
If the invoice does not include any out-of-balance lines: Once you select the Update and Save for Changes option, the invoice goes into Approved status, and then immediately goes into Posted status as soon as the Vendor Portal posts the invoice to the retailer’s system.
If the invoice includes any out-of-balance lines: Once you select the Update and Save for Changes option, the invoice goes into Held status. It remains in Held status until the retailer either:
- accepts the invoice: the invoice goes into Approved status, and then immediately goes into Posted status as soon as the Vendor Portal posts the invoice to the retailer’s system.
- rejects the invoice: the invoice goes into Rejected status. The Vendor Portal does not post a rejected invoice. Instead, you can use the Invoice screen to edit the invoice, or use the Invoice Inquiry screen to delete the invoice. If you delete the invoice, the purchase order shipments included in the invoice are again eligible to be included on a new invoice. Until you resubmit or delete the invoice, it remains in Rejected status.
Edit rejected invoice? You can use Invoice screen to edit the rejected invoice and resubmit it, or you can use the Invoice Inquiry screen to delete the rejected invoice.
Delete rejected invoice? If you delete the invoice, the invoice is no longer displayed on any screens, and the purchase order shipments included in the invoice are again eligible to be included on a new invoice.

Invoice upload: The invoice process flow is simpler for invoices that you upload rather than creating through Vendor Portal screens. See the Invoice Upload for more information.