Paid In and Paid Out Transactions
A paid in transaction allows you to move funds into a till from non-sale sources. A paid out transaction moves funds out of a till for non-refund purposes. The system's configuration controls which associates are allowed to move funds in or out of the till. It also specifies the list of valid reasons that an associate can select when performing a paid in or paid out transaction. In addition, the system's configuration controls whether receipts are produced by these two transaction types.
Paid Out
To perform a paid-out transaction:
-
Click Paid Out.
-
If necessary, scan the cash drawer to use for the paid out transaction.
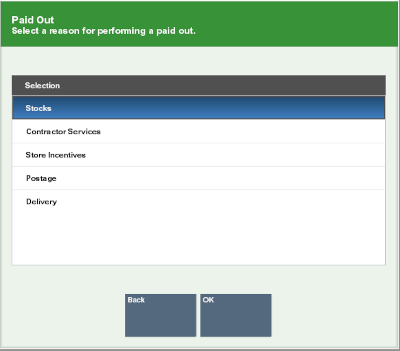
A reason code selection window opens.
-
Select the reason for the paid out transaction:
Figure 28-5 Paid Out Reason Codes

-
Click the reason.
-
Use the up and down arrows to highlight the reason, the press the Spacebar.
-
-
Click OK.
-
Enter more information about the reason for the paid out transaction.
-
Click OK.
-
Enter the amount of the paid out, then press Enter.
Note:
If you exceed your store's maximum amount allowed for a paid out transactions a notification window opens. Click OK to close the prompt and reenter a new paid out amount.
The cash drawer opens.
-
Remove the entered amount of the paid out from the cash drawer, then close the cash drawer.
The paid out transaction is complete.
Paid In
To perform a paid-in transaction:
-
Click Paid In.
-
If necessary, scan the cash drawer to use for the paid in transaction.
Xstore Point of Service prompts for a paid in tracking number.
Figure 28-6 Paid Out Receipt Barcode Prompt

-
Do one of the following:
-
Enter a tracking number for a previous paid-out transaction from which you are returning funds:
-
Scan the paid-out transaction receipt barcode and press Enter.
-
Enter tracking number for the paid-out transaction and press Enter.
-
-
Press Enter to skip entering a tracking number.
A reason code selection window opens.
-
-
Select the reason for the paid in transaction:
-
Click the reason.
-
Use the up and down arrows to highlight the reason, the press the Spacebar.
-
-
Click OK.
-
Enter more information about the reason for the paid in transaction.
-
Click OK.
-
Enter the amount of the paid in, then press Enter.
The cash drawer opens.
-
Put the paid-in money in the cash drawer, then close the cash drawer.
The paid in transaction is complete.