Uploading Files
Note:
Only the uploaded files that fall within the current user's org node are shown on the File Upload page. Files must have been uploaded by a user with the same, or lower, org node as the current user.
Note:
In Oracle Retail Xstore Office certain privileges are available which control the users who have the ability to access the file upload feature and who can upload files which are to be deployed.
Additionally, it is possible to control the ability to deploy one or more of the uploaded files.
The 'File Deploy' privilege should not be assigned to a user who has either the 'File Upload' or the 'Upload File to Deploy' privilege. One user should be restricted to have only the right to upload files for deployment, while another user is required to deploy the uploaded files. As a result critical deployments need to be independently approved, before they are made available to other systems.
-
From the Oracle Retail Xstore Office menu, select Deployment - File Upload, or click the File Upload link in the Deployment Manager panel.
-
At the File Upload page, click Add File to browse for the file you want to upload.
Figure 7-1 File Upload Page

Note:
Only files with the following valid extensions can be uploaded: .cip, .jar, .mnt, .rep, .reo, .dat, debit.txt (bin file), .tar.gz, and .zip. All uploaded files are compressed when a deployment is scheduled and are decompresses once they are deployed.
-
When prompted, click Browse to search for the file.
Figure 7-2 Select File to Upload Window

-
[OPTIONAL] Type a description for the file.
-
Click Upload. Uploaded file records are stored in the
cfg_upload_recordtable.Note:
If you try to upload a file that has been previously uploaded, you are prompted that this new upload will overwrite the previous one. Click Overwrite to overwrite the previous file or Cancel to return to the File Upload page without uploading the file.
-
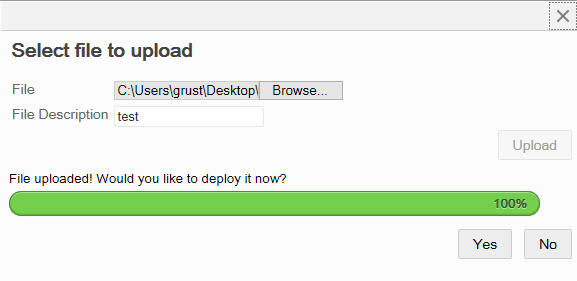
At the Upload Successful progress bar, choose whether to deploy the file now or deploy the file later:
Figure 7-3 Upload Successful Progress Bar

-
Click Yes to deploy the file now. Skip to File Upload: Deploying a File or Files, step 3.
-
Click No to return to the File Upload page without deploying the file.
-
-
Perform actions as needed:
-
To upload additional files, repeat steps 2 through 6.
-
To deploy an uploaded file, see File Upload: Deploying a File or Files.
-
To remove a file from the Upload File list, see File Upload: Removing an Uploaded File From the List.
-
File Upload: Removing an Uploaded File From the List
Follow the instructions in this section if you need to remove an uploaded file from the list.
-
At the File Upload page, click the Delete icon to remove the selected file from the list.
-
At the confirmation prompt, click Yes to remove the selected file.
File Upload: Deploying a File or Files
Follow the instructions in this section to deploy a file or multiple files.
-
At the File Upload page, select the file, or files, you want to deploy.
Figure 7-4 File Upload Page - File Selected

-
Click Deploy.
-
At the Schedule Deployment page, select a deployment option:
Figure 7-5 Schedule Deployment Page

-
Schedule a Planned Deployment -Select this option to use a pre-defined Deployment Plan to roll out the updates in waves. Skip to Deployment: Using a Deployment Plan.
Note:
This option assumes at least one Deployment Plan has been defined. See Creating a Deployment Plan for more information about setting up a Deployment Plan.
-
Schedule a Single Deployment - Select this option for a one-time rollout to a single organization node and date. Continue with Deployment: Using a Single Deployment.
-