Note:
- This tutorial requires access to Oracle Cloud. To sign up for a free account, see Get started with Oracle Cloud Infrastructure Free Tier.
- It uses example values for Oracle Cloud Infrastructure credentials, tenancy, and compartments. When completing your lab, substitute these values with ones specific to your cloud environment.
Integrate OCI Block Volumes with Oracle Cloud VMware Solution
Introduction
Oracle Cloud VMware Solution is capable of hosting virtual machines on different types of storage. Basically the primary storage for virtual machines within an Oracle Cloud VMware Solution SDDC is the VMware vSAN Datastore. Additionally the OCI File Storage Service (FSS), which provides an NFS Datastore to the SDDC can also be used to store virtual machines but at a rather high cost per GB.
The latest storage technology that is now available with Oracle Cloud VMware Solution is the Oracle Cloud Infrastructure (OCI) Block Volume Service, which provides highly redundant and high performance storage at a low cost. OCI Block Volume can be created as a iSCSI Block Volume and attached to the Oracle Cloud VMware Solution ESXi hosts and used as a iSCSI Datastore to host virtual machines, store templates, ISOs, and so on.
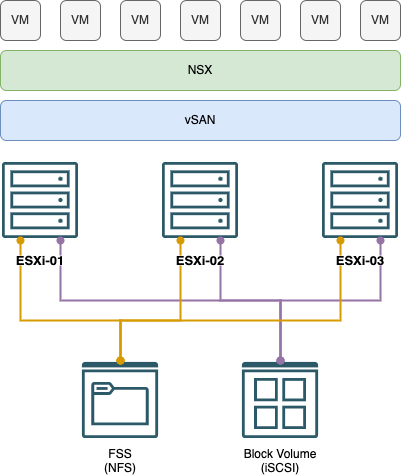
Oracle Cloud VMware Solution
Oracle Cloud VMware Solution is a native OCI service that provisions VMware SDDC (Software Defined Data Center) in a customer’s tenancy. The customer provides all the required networking infrastructure such as VCN, SDDC, and Workload CIDRs to successfully deploy Oracle Cloud VMware Solution SDDC. As a result, Oracle Cloud VMware Solution creates compute instances on behalf of the customer, connects VNICs to Subnet & VLANs, and installs VMware components to create a VMware SDDC.
Oracle Cloud VMware Solution currently uses BM DenseIO2.52 (Intel) and BM.DenseIO.E4.128 (AMD) compute shapes to create a VMware SDDC and offers an option to deploy SDDC with vSphere versions 6.5, 6.7 & 7.0.
NOTE: The End of General Support for VMware vSphere 6.5 and 6.7 was October 15, 2022. To upgrade, see the Perform an in-place upgrade from Oracle Cloud VMware Solution 6.x to 7.x tutorial link in the Related Links section.
The Oracle Cloud VMware Solution SDDC follows VMware Cloud Provider Stack (VCPS) to maintain the versions of SDDC components. The Oracle Cloud VMware Solution SDDC offers the following VMware software products:
- VMware vSphere
- VMware vCenter Server Standard
- VMware Hypervisor ESXi Enterprise
- VMware vSAN Enterprise
- VMware NSX-T Data Center Enterprise Plus
- VMware HCX Advanced (HCX Enterprise is optional and can be subscribed to on a monthly basis)
OCI Block Volume
The Oracle Cloud Infrastructure Block Volume service lets you dynamically provision and manage block storage volumes. You can create, attach, connect, and move volumes, as well as change volume performance, as needed, to meet your storage, performance, and application requirements. After you attach and connect a volume to an Oracle Cloud VMware Solution ESXi host, you can use the volume like a regular shared hard drive. You can also disconnect a volume and attach it to another Oracle Cloud VMware Solution ESXi host in another SDDC without the loss of data.
These components are required to create a volume and attach it to an instance:
- Instance: An Oracle Cloud VMware Solution ESXi Host, either a single host SDDC or a multi host SDDC
- Volume Attachment - iSCSI : A TCP/IP-based standard used for communication between a volume and attached Oracle Cloud VMware Solution Host.
- Volume - Block volume: A detachable block storage device that allows you to dynamically expand the storage capacity of an Oracle Cloud VMware Solution SDDC.
NOTE: OCI Block Volumes cannot be shared across Oracle Cloud VMware Solution SDDCs or across VMware vSphere clusters within a SDDC.
Volume Performance Units:
Block Volume performance includes the concept of volume performance units (VPUs). You can purchase more VPUs to allocate more resources to a volume, increasing IOPS/GB and throughput per GB. You also have the flexibility to purchase fewer VPUs, which reduces the performance characteristics for a volume, however it can also provide cost savings. You can also choose not to purchase any VPUs which can provide significant cost savings for volumes that don’t require the increased performance characteristics.
For more information on volume performance units, see the Volume Performance Units link in the Related Links section.
Objective
This tutorial provides an operational overview of how to perform the OCI Block Volume integration with Oracle Cloud VMware Solution. The intent is to enable Oracle Cloud VMware Solution teams, lift implementation teams, and customers to perform these steps to integrate OCI Block Volume (iSCSI) as a VMFS Datastore within their VMware SDDC.
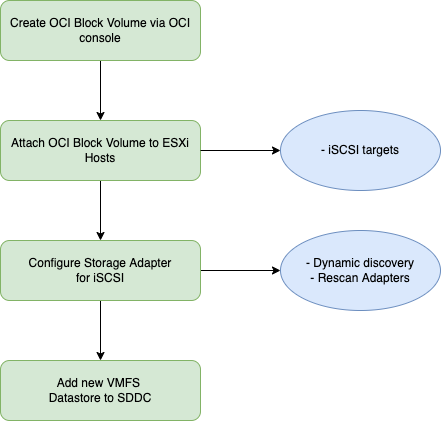
This tutorial covers the following tasks:
- Task 1: Create OCI Block Volume
- Task 2: Attach OCI Block Volume to Oracle Cloud VMware Solution ESXi hosts
- Task 3: Configure Storage Adapter (vmhba) for iSCSI
- Task 4: Add new VMFS Datastore to Oracle Cloud VMware Solution cluster
Audience
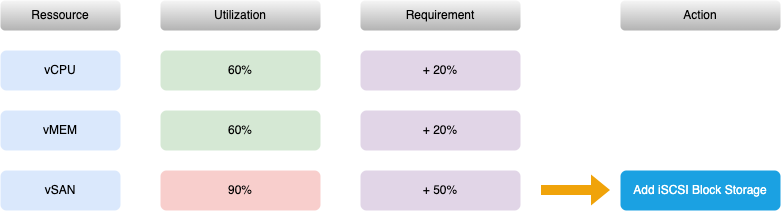
The OCI Block Volume integration is ideal for customers who have provisioned SDDCs with version 6.5, 6.7 or 7.0 where VMware vSAN is not scaling optimally in terms of storage compared to CPU and MEM resources (High Storage demand vs. low CPU and MEM demand).
OCI Block Volume Integration Workflow
This section describes the high level workflow for the iSCSI Block Storage integration.
Task 1: Create an OCI Block Volume
Note: You must follow the steps in the exact order to create an OCI Block Volume.
-
Login to the OCI console.
-
Navigate to Storage, Block Volumes.
-
Click Create Block Volume.
-
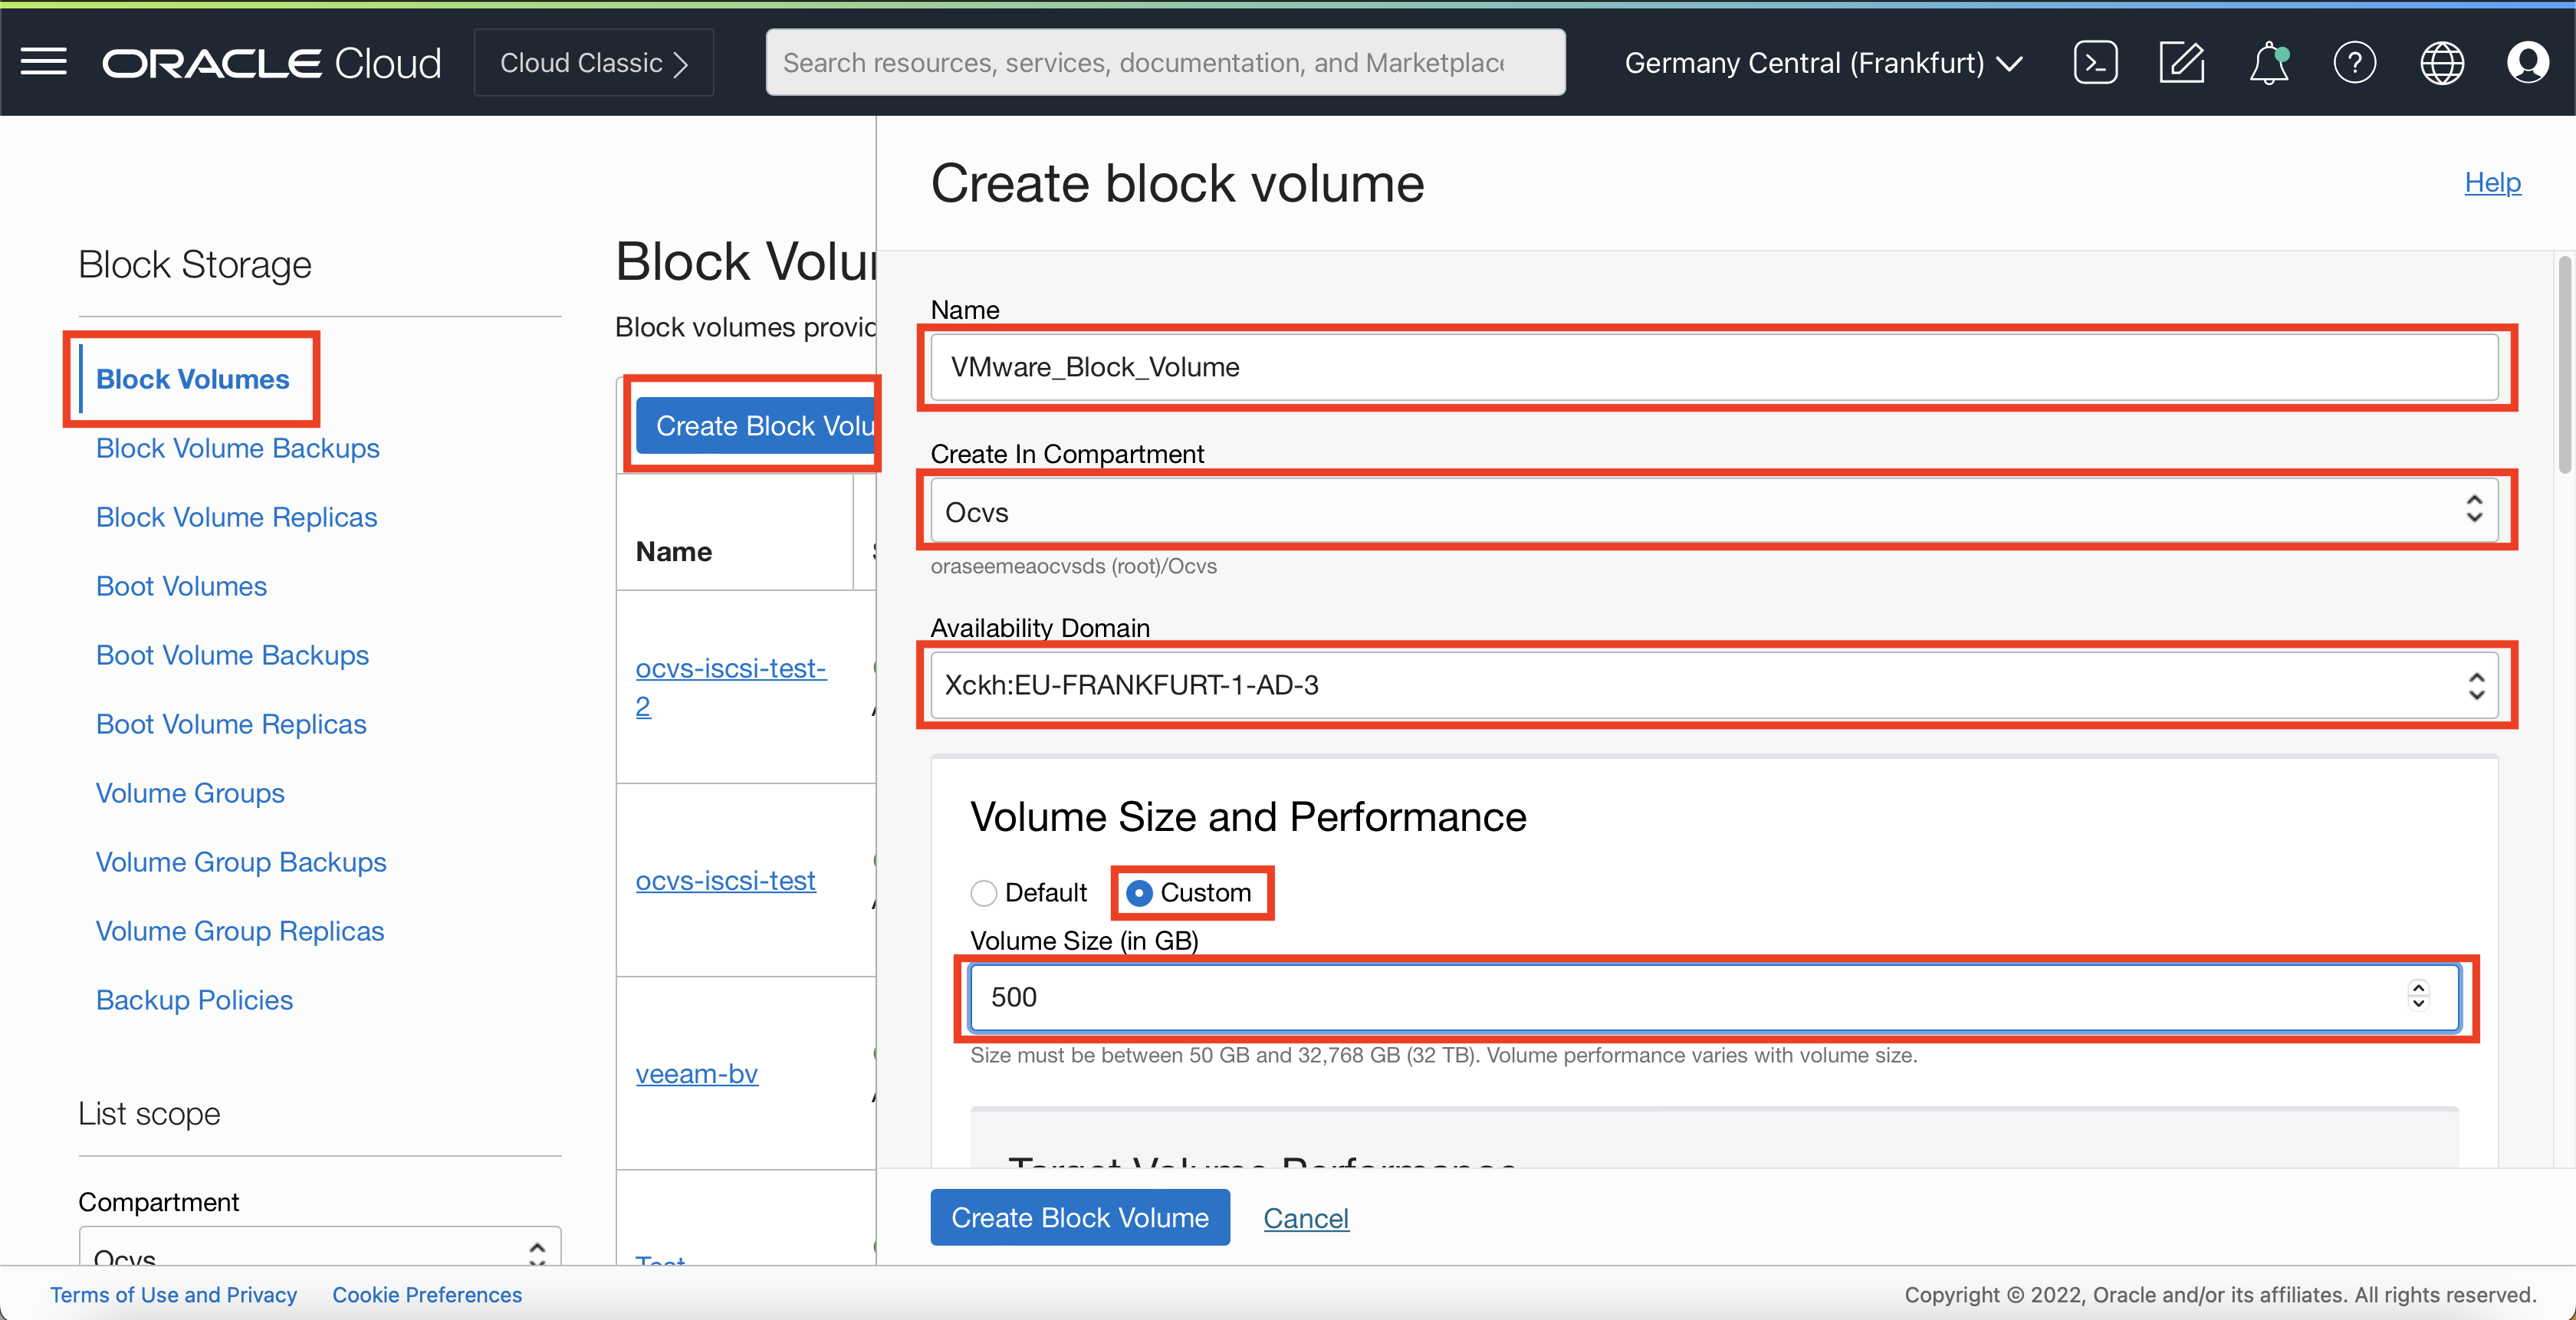
Enter the Name of the Block Volume, select the Compartment and the select Availability Domain.
NOTE: The OCI Block Volume must be created in the same Availability Domain where the Oracle Cloud VMware Solution ESXi hosts are located because OCI Block Volumes are Availability Domain specific and cannot be attached across OCI Availability Domains.
-
Select Custom configuration for Volume Size and Performance.
-
Select the VPUs/GB to define the Block Volume performance.
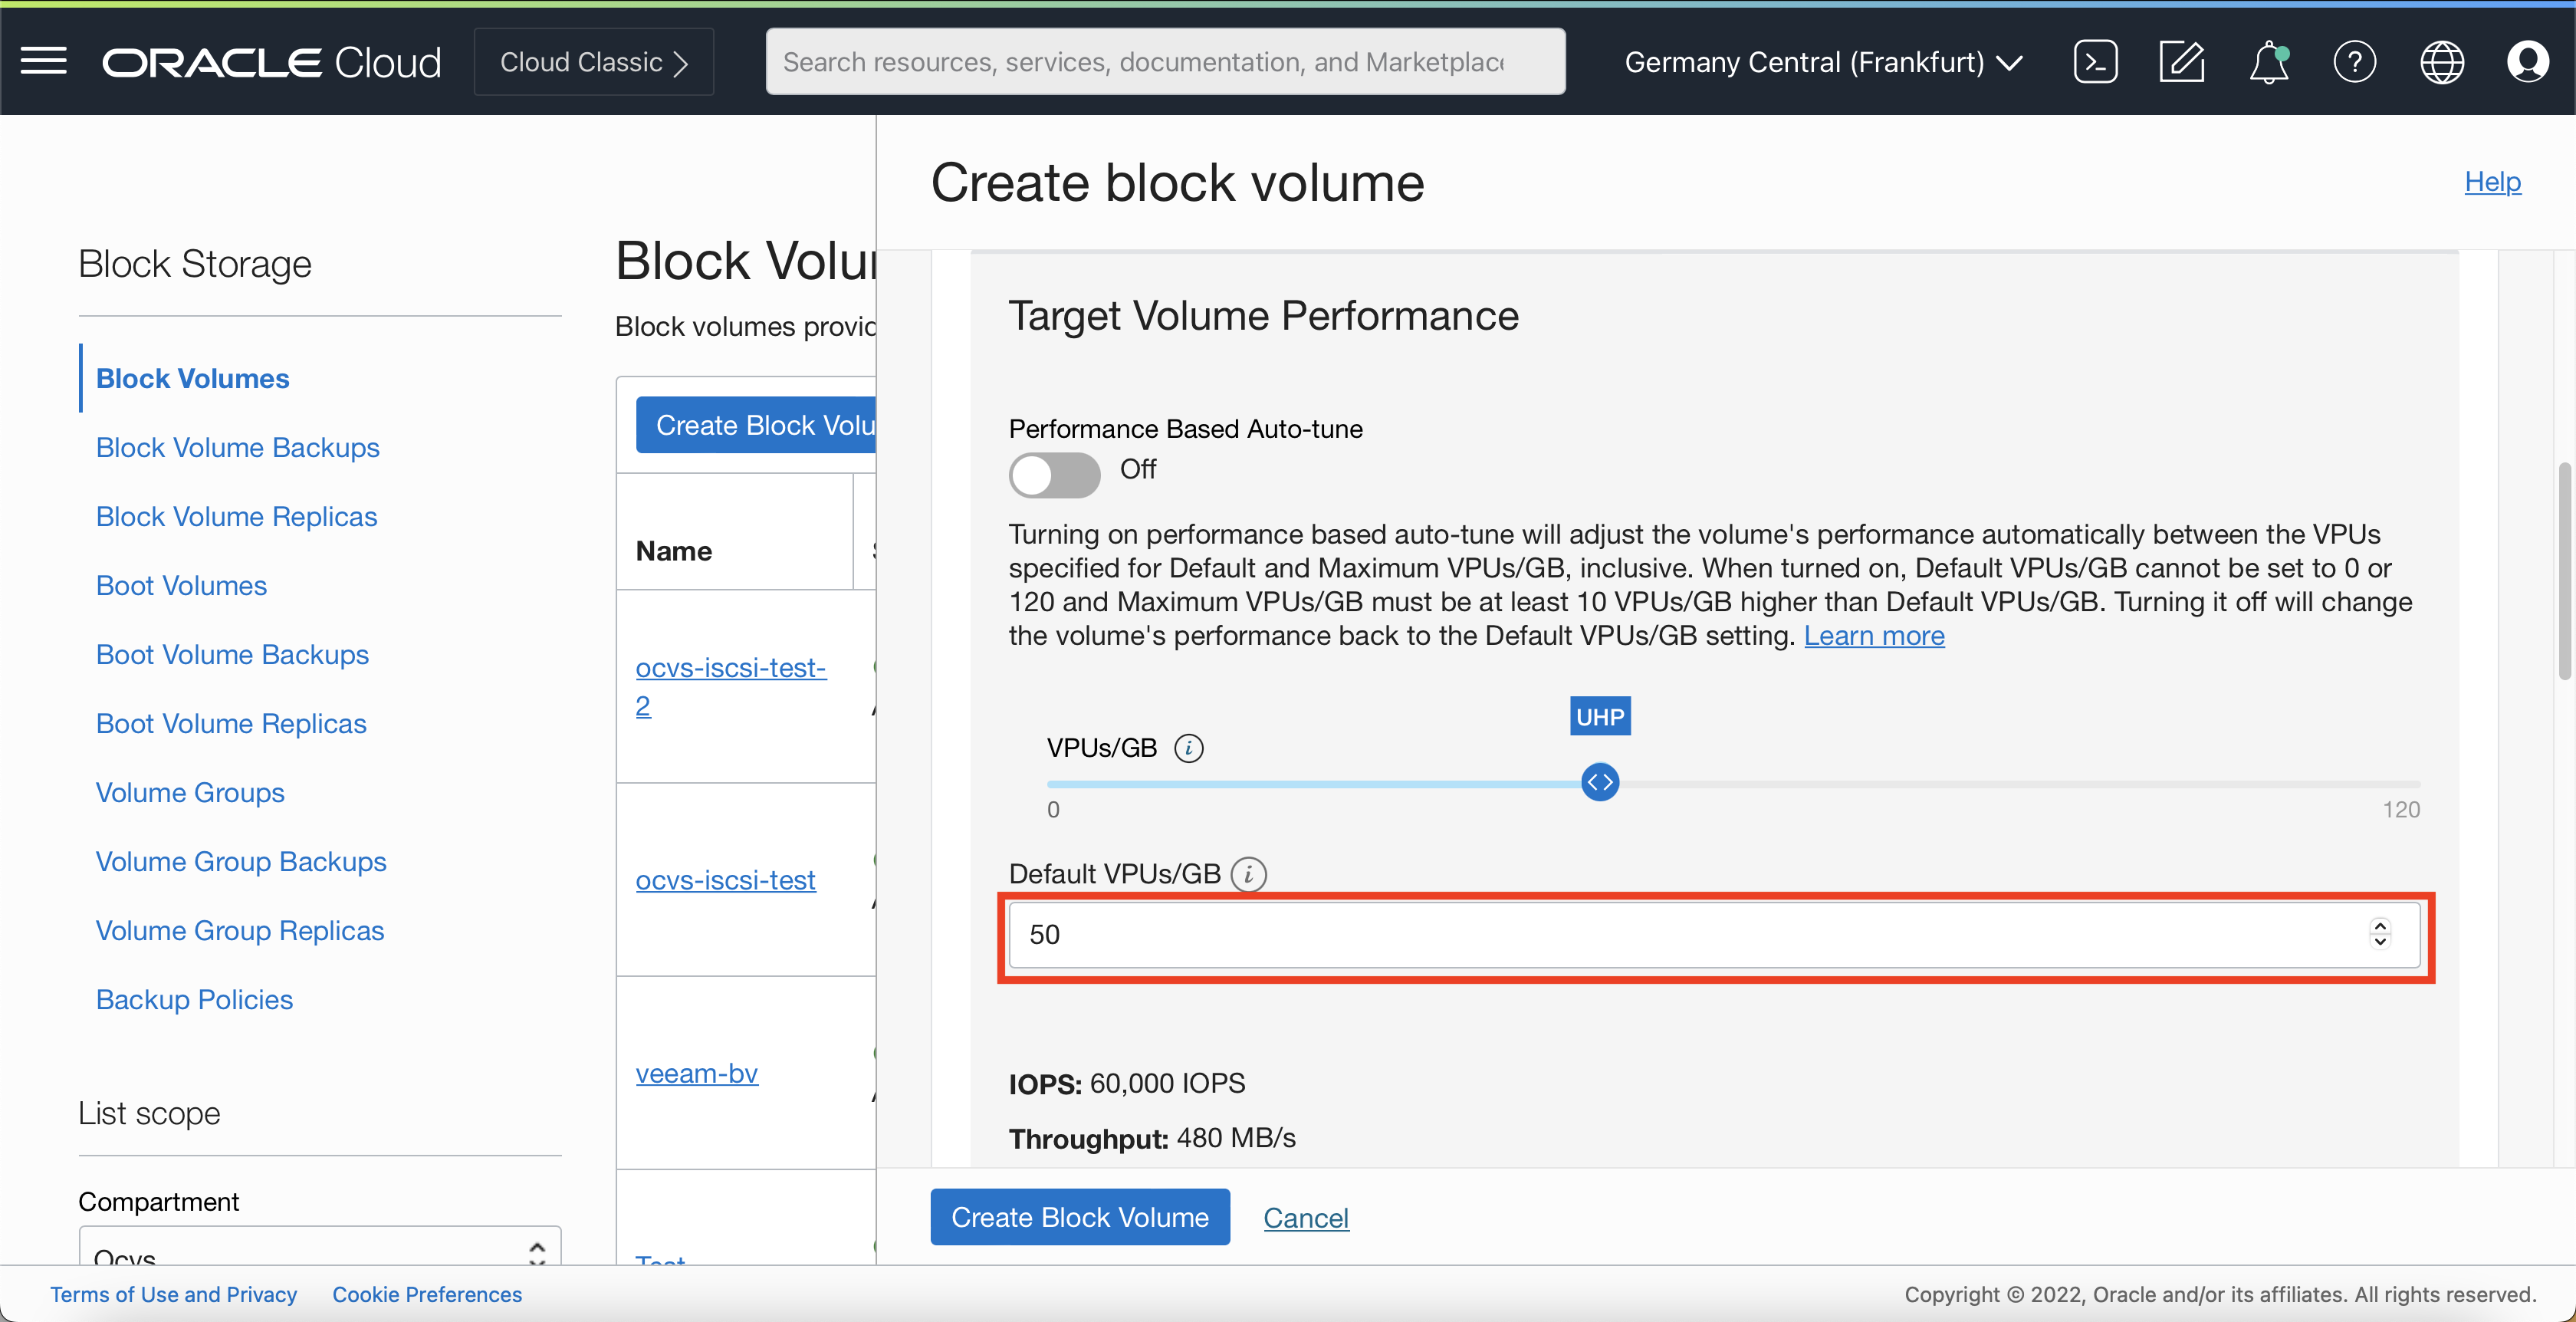
Note: Performance Based Auto-Tune is turned off within this example configuration. The mentioned option is available and supported and can be activated if required.
Turning on performance based auto-tune will adjust the volume’s performance automatically between the VPUs specified for Default and Maximum VPUs/GB, inclusive. When turned on, Default VPUs/GB cannot be set to 0 or 120 and Maximum VPUs/GB must be at least 10 VPUs/GB higher than Default VPUs/GB. Turning it off will change the volume’s performance back to the Default VPUs/GB setting.
-
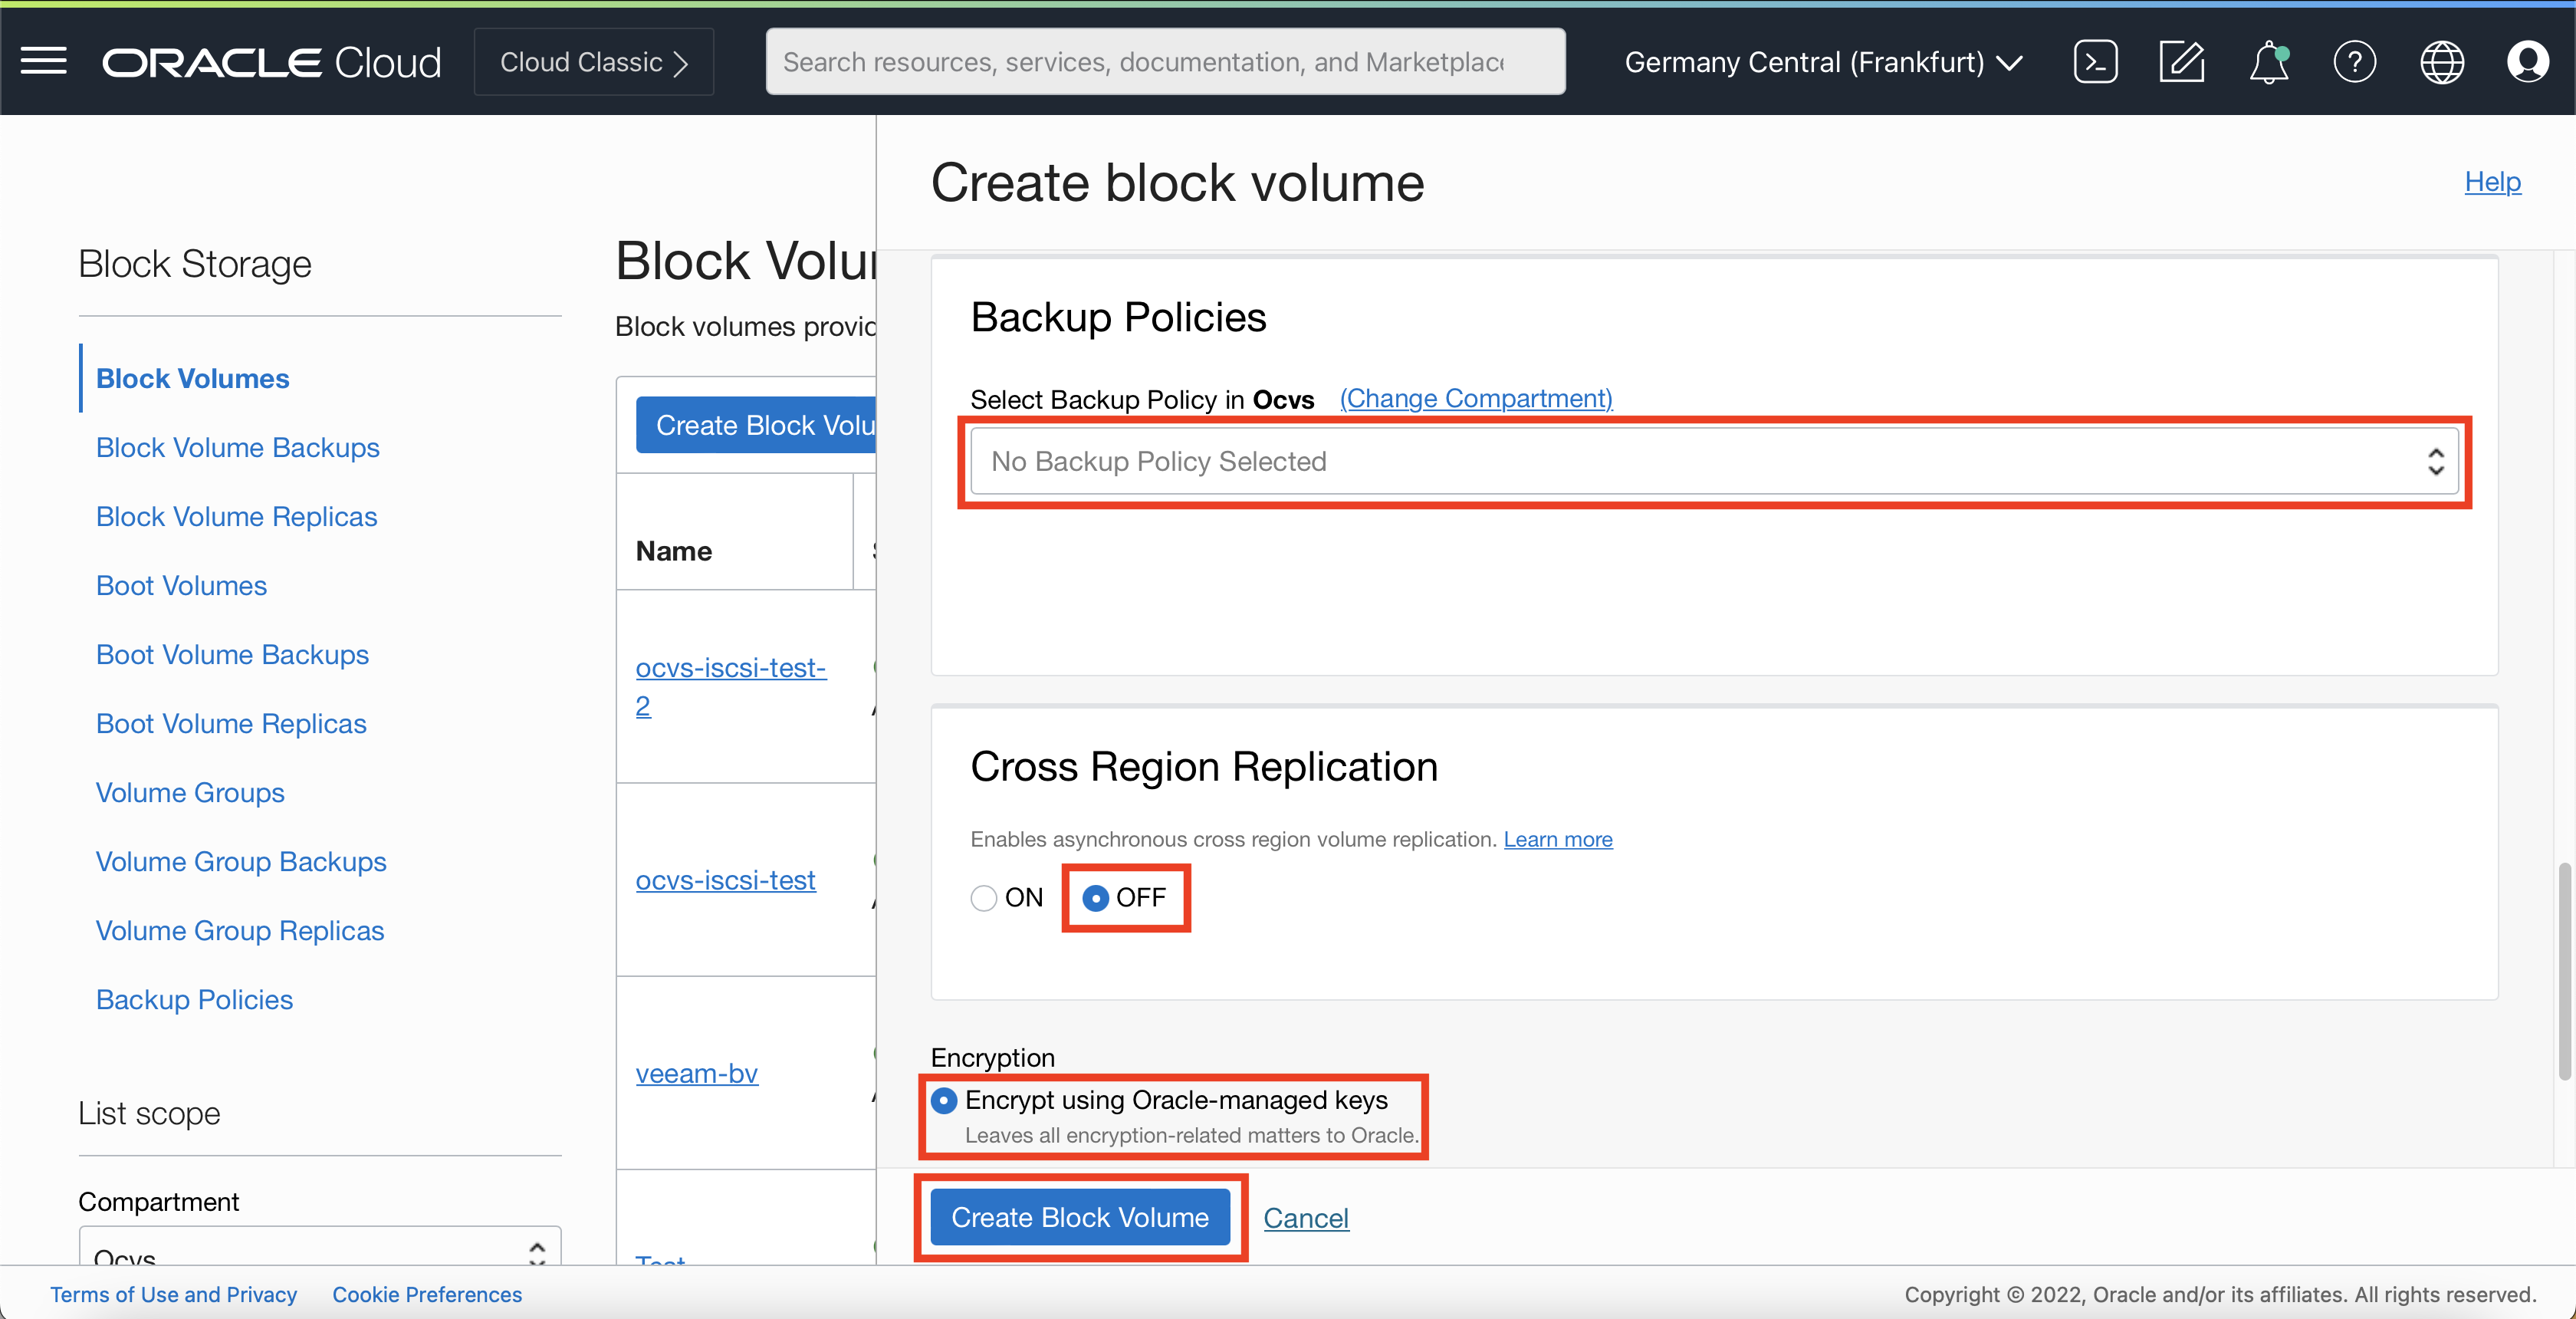
Select the No Backup Policy, leave Cross Region Replication turned off and select Encrypt using Oracle-managed keys
NOTE: For the example configuration of the OCI Block Volume in this tutorial, a Backup Policy, Cross Region Replication and Encryption using customer-managed keys has not been configured. The mentioned features are available and supported and can be activated if required.
-
Click Create Block Volume.
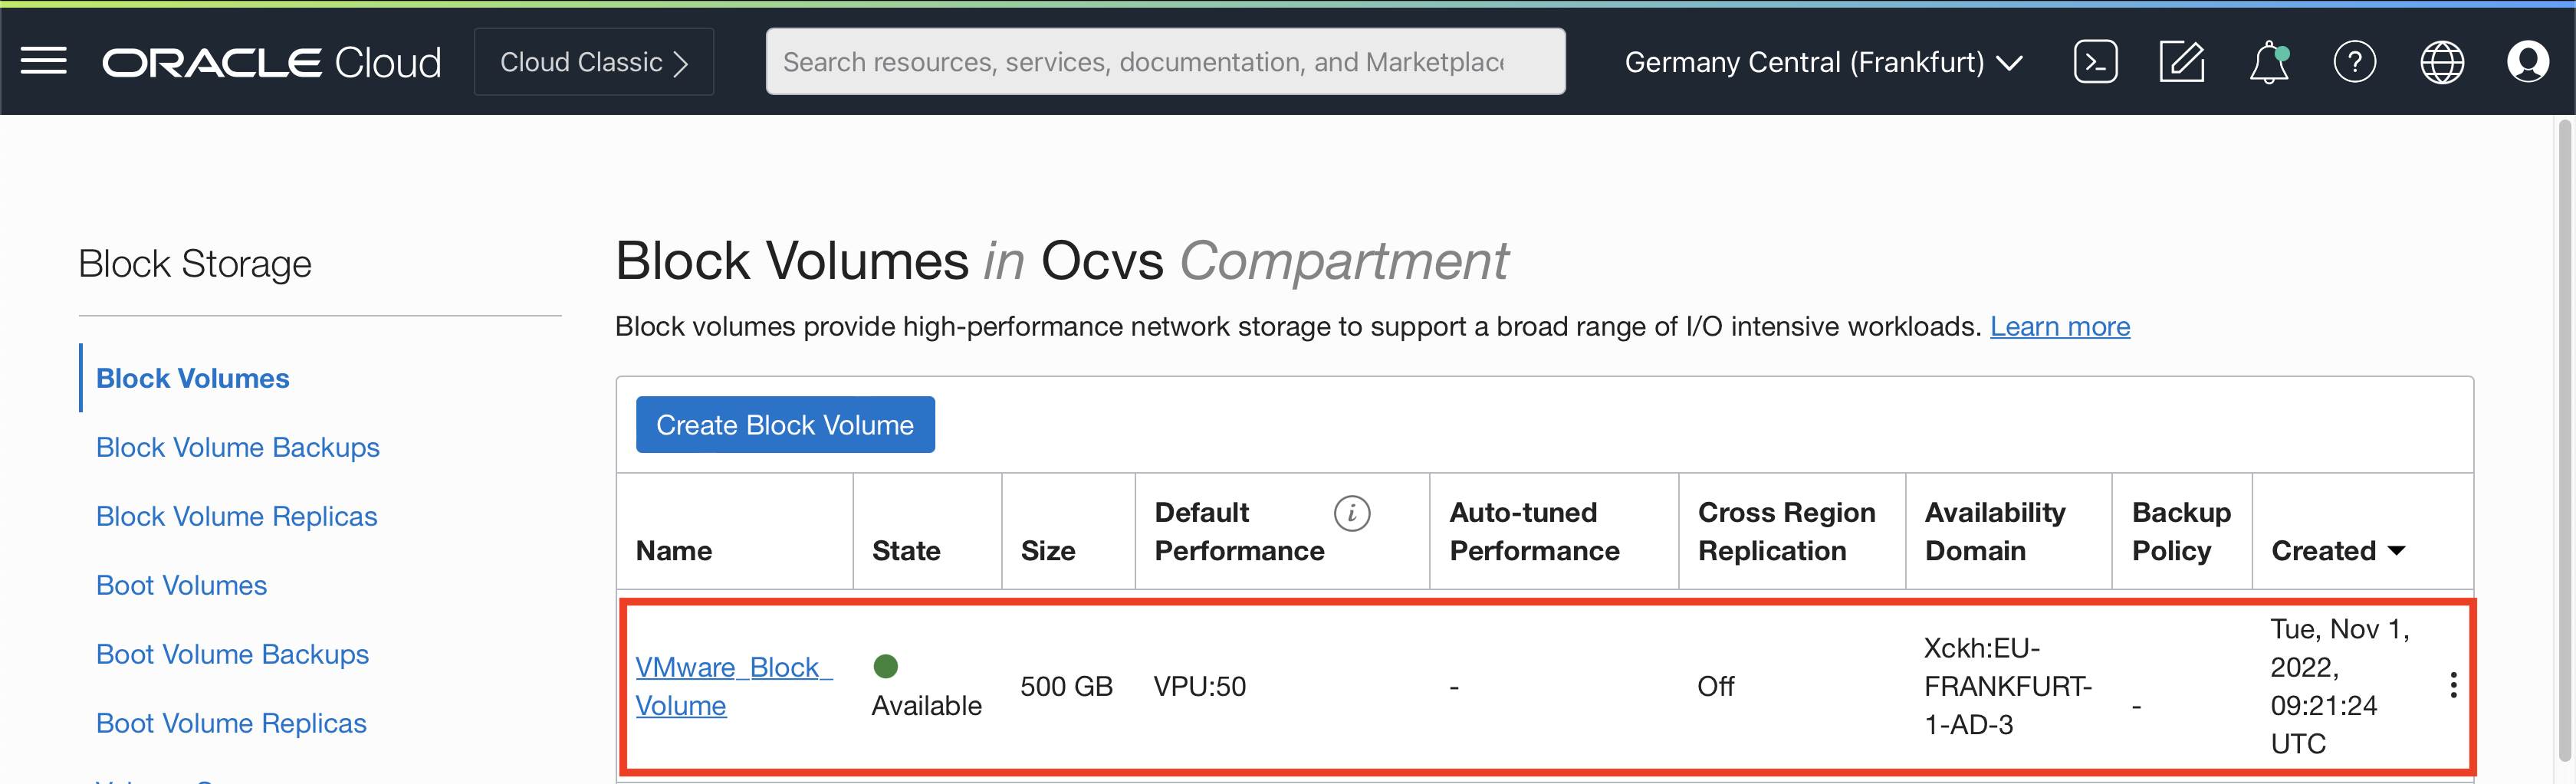
The Block Volume is successfully created.
Task 2: Attach the OCI Block Volume to ESXi Hosts
Note: You must follow the steps in the exact order to attach the OCI Block Volume to the desired ESXi hosts.
-
Select the OCI Block Volume created in Task 1.
-
Scroll down and select Attached Instances from the left hand menu.
-
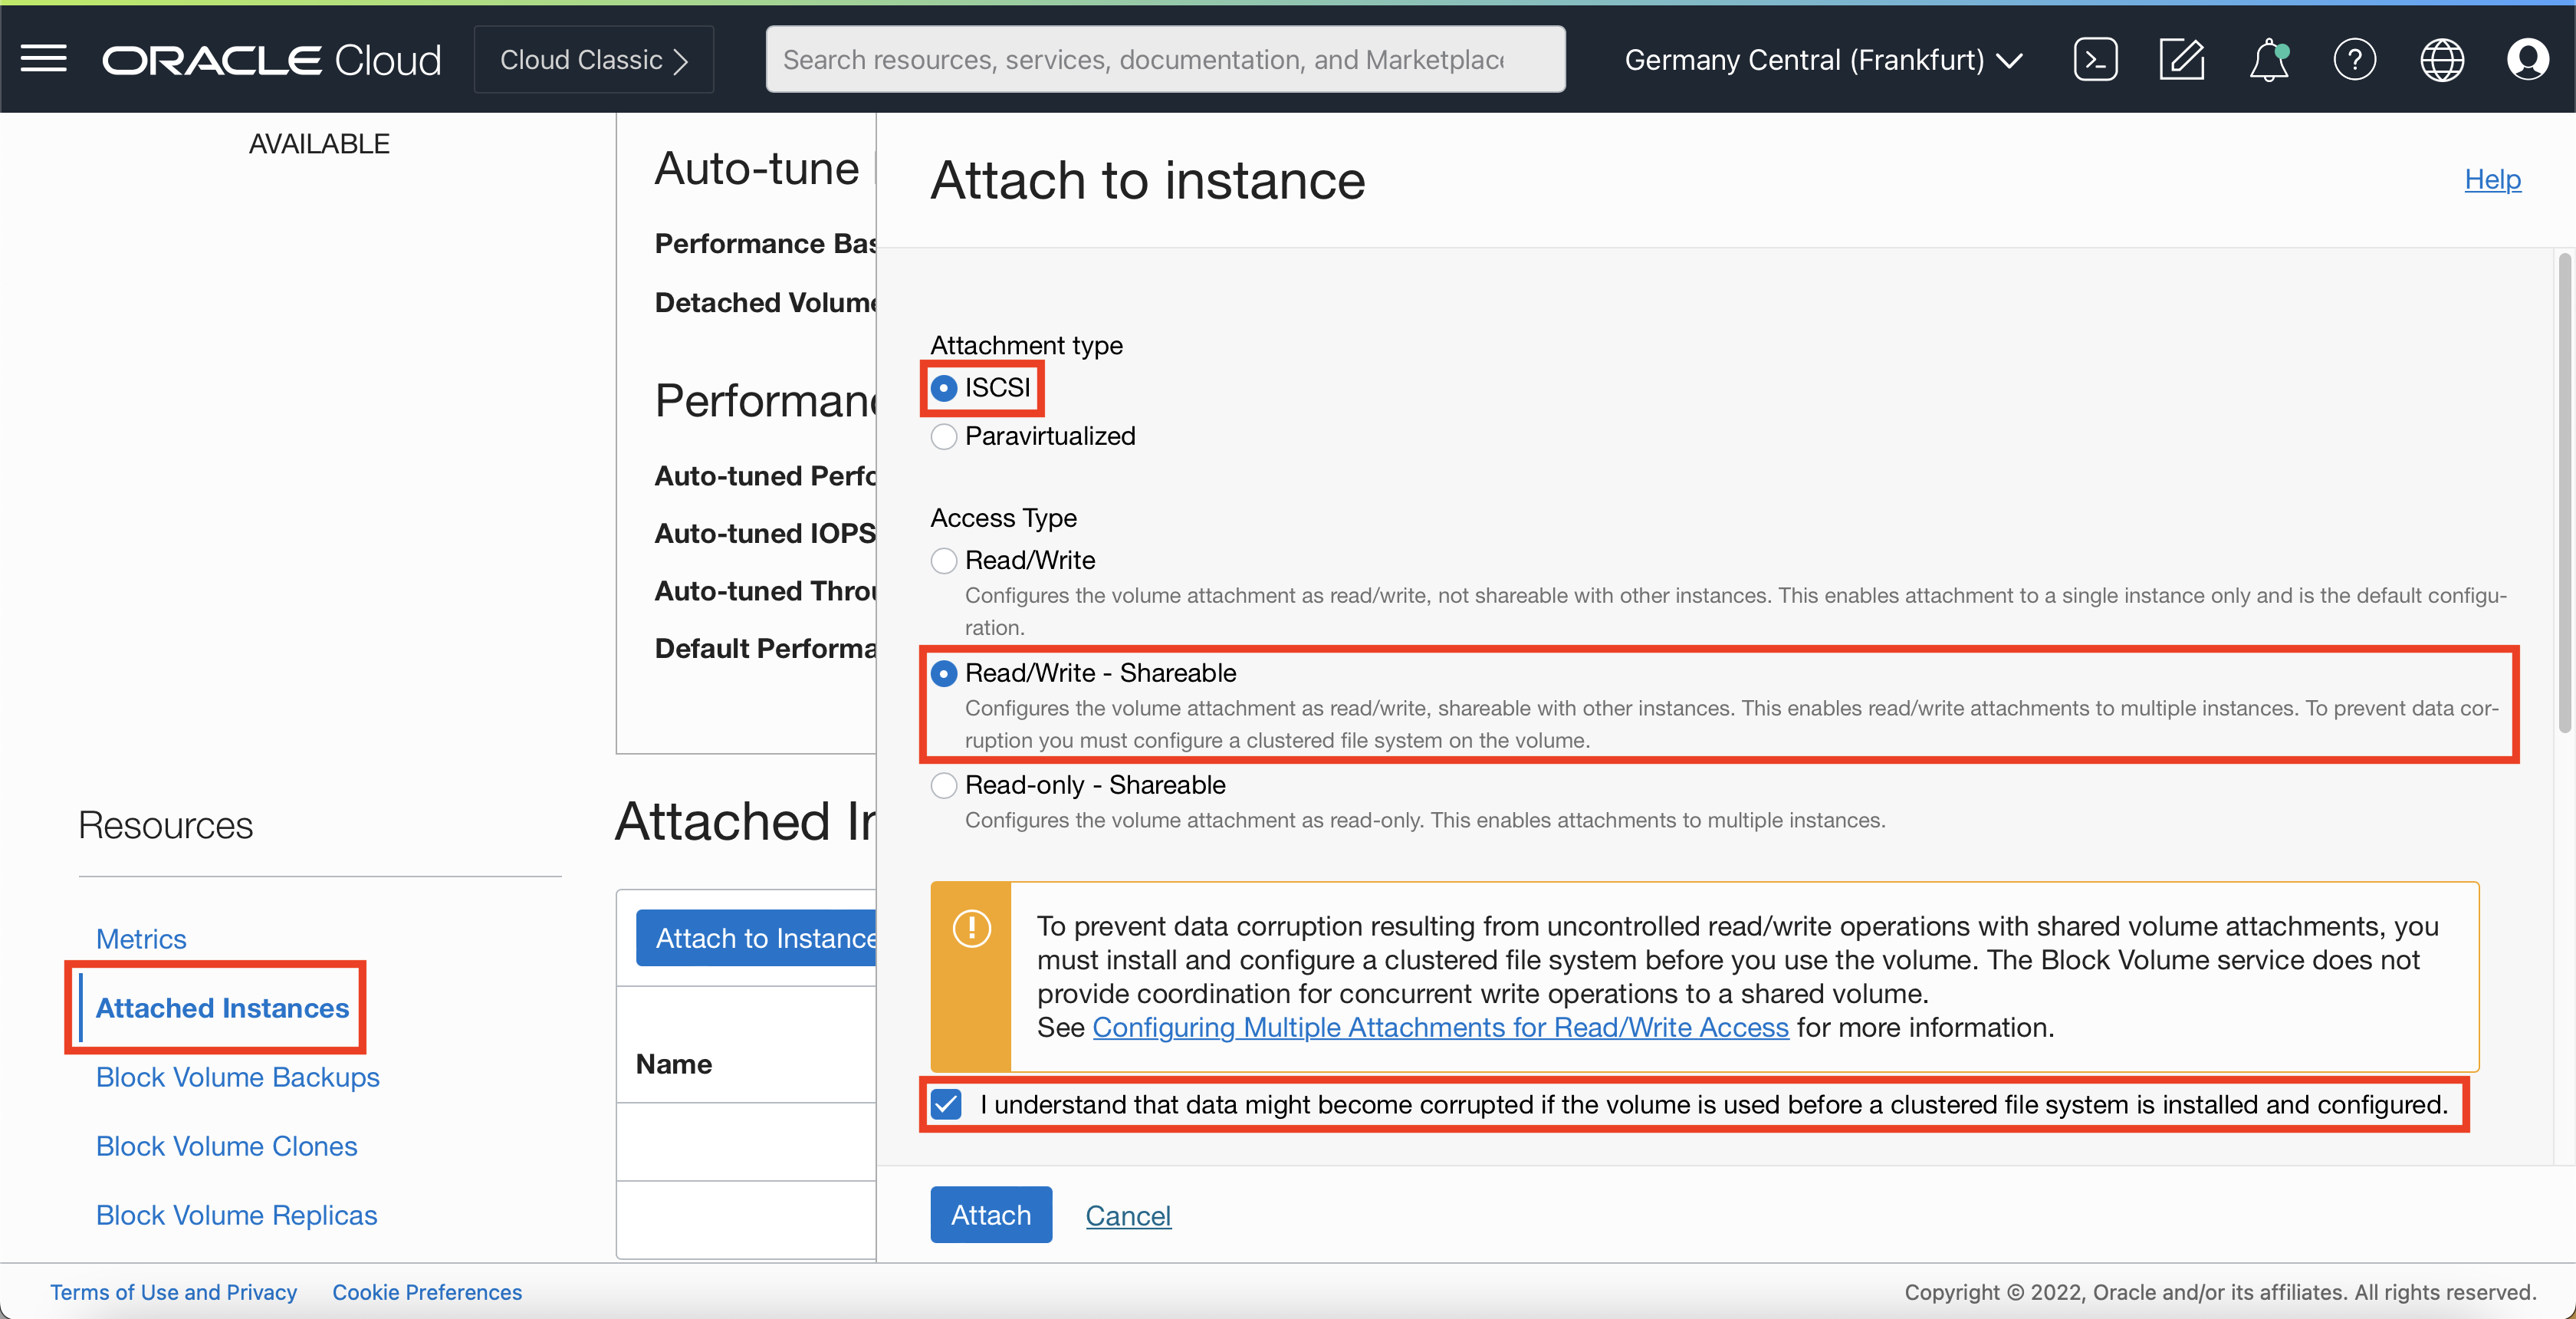
Select iSCSI as the Attachment type.
-
Select Read/Write - Shareable as the Access type.
-
Select the checkbox in the info message.
-
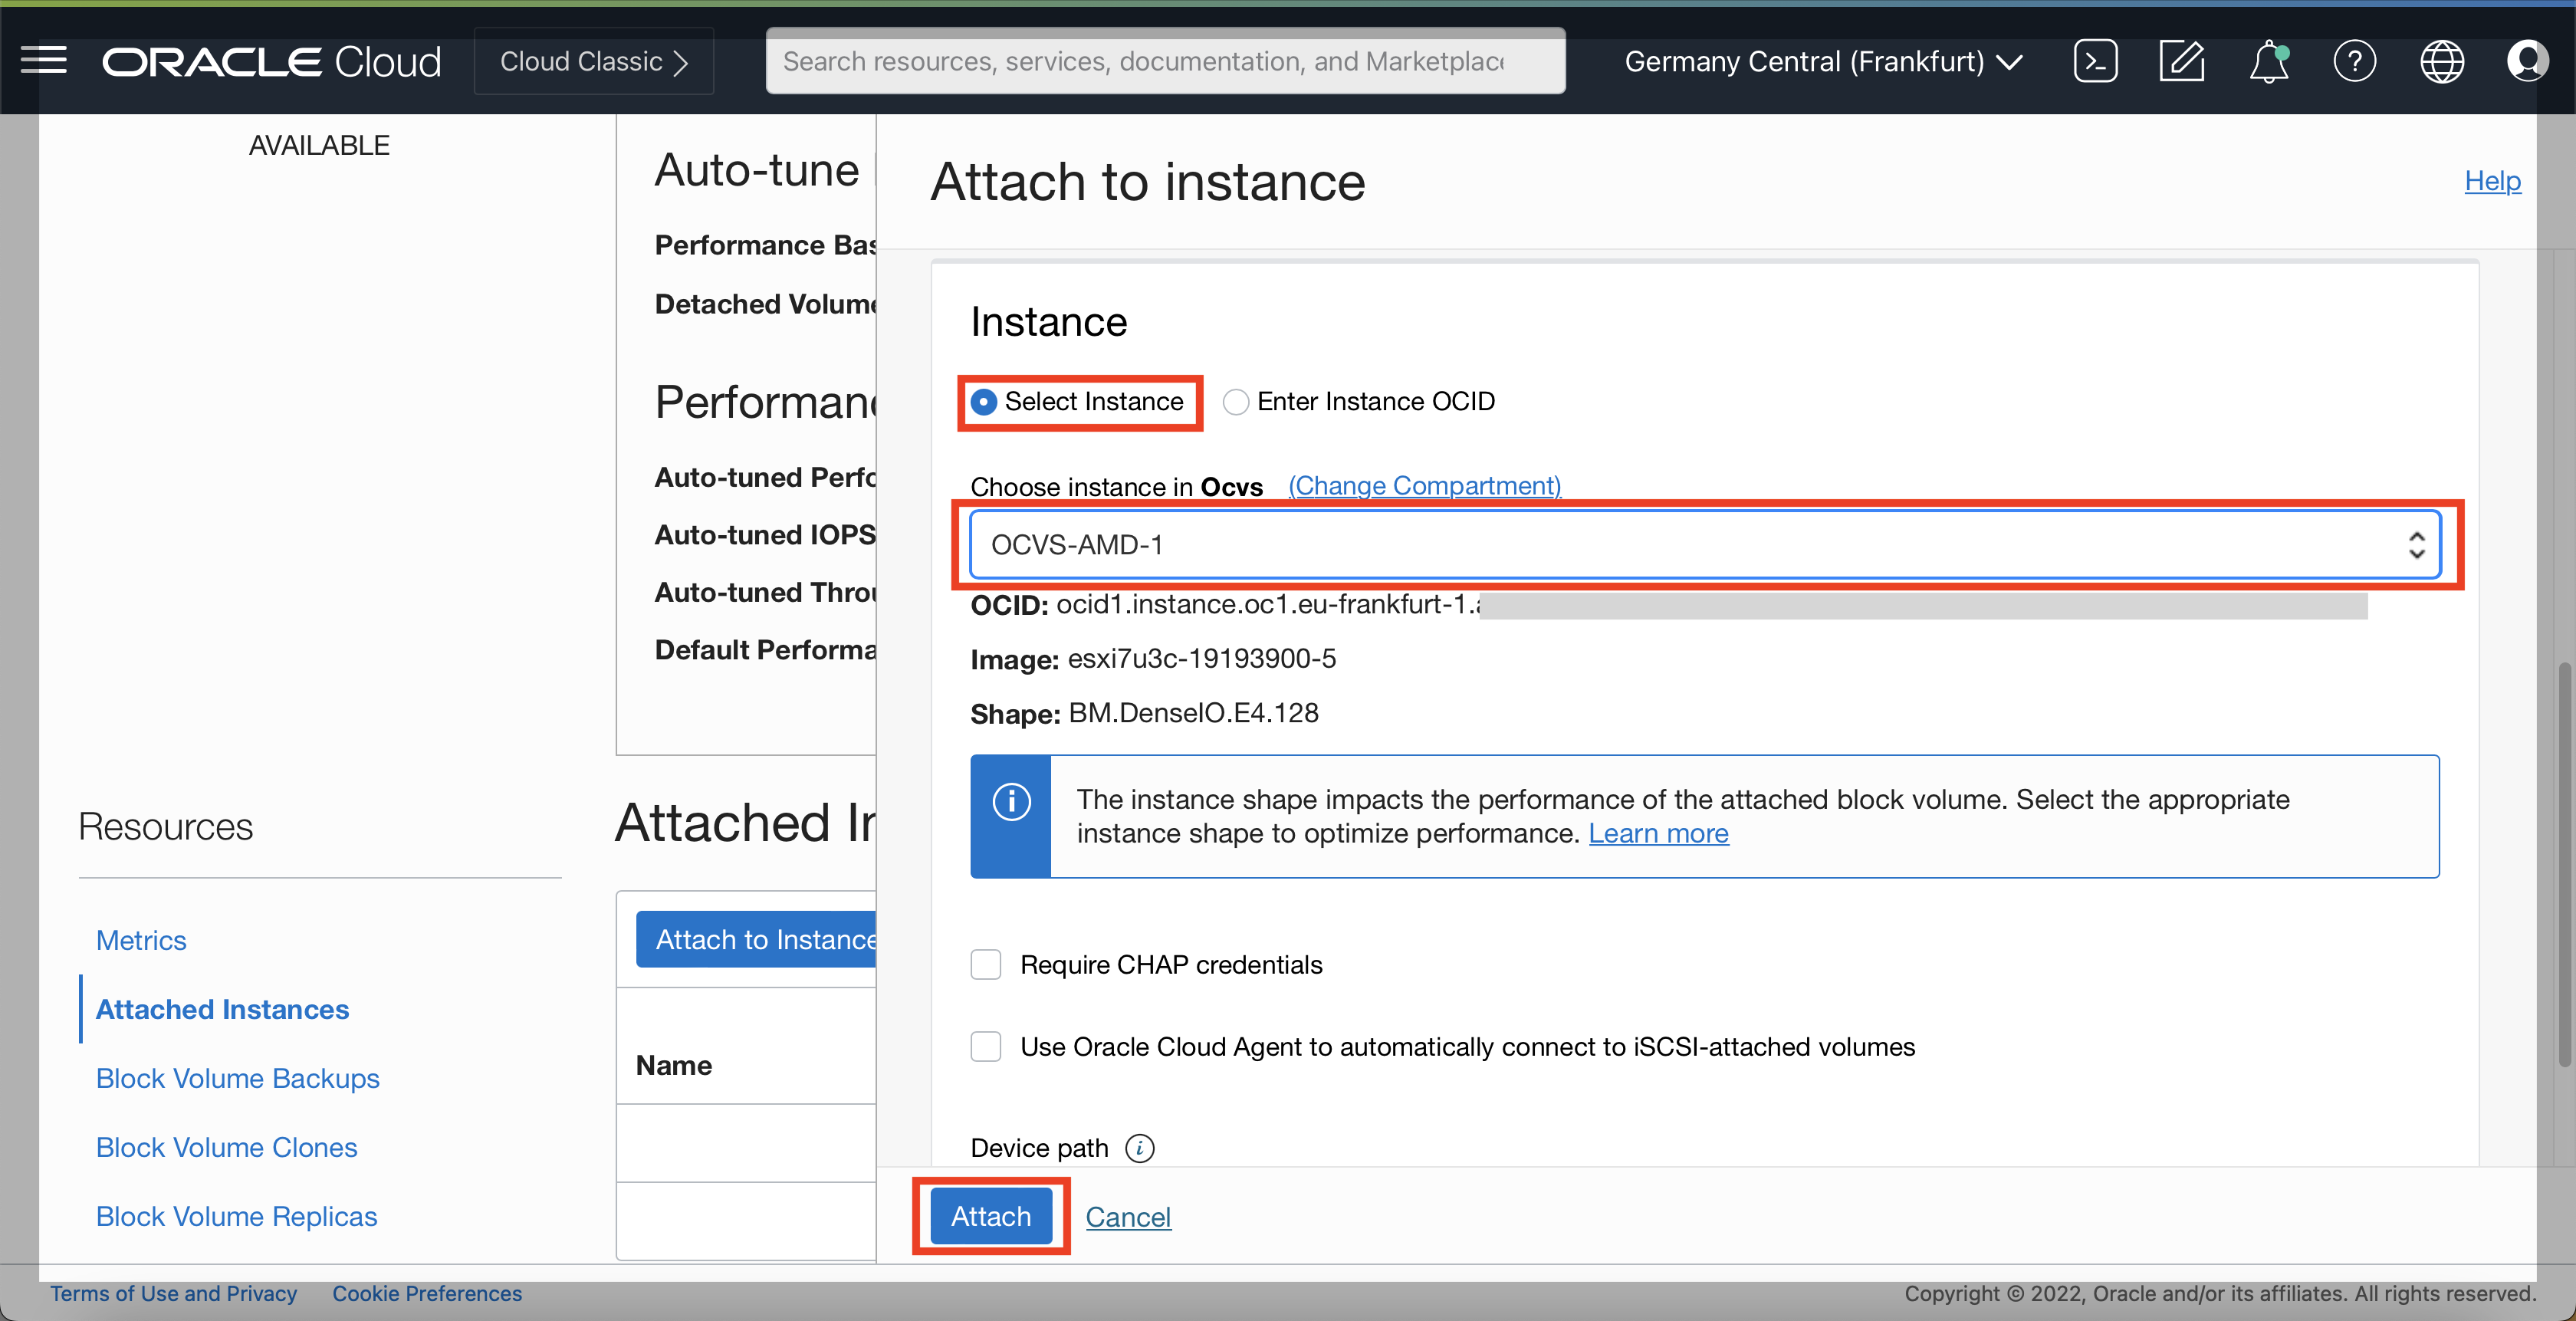
Choose Select Instance and select the desired Oracle Cloud VMware Solution ESXi host and then select the device path.
-
Click Attach to finish the wizard.
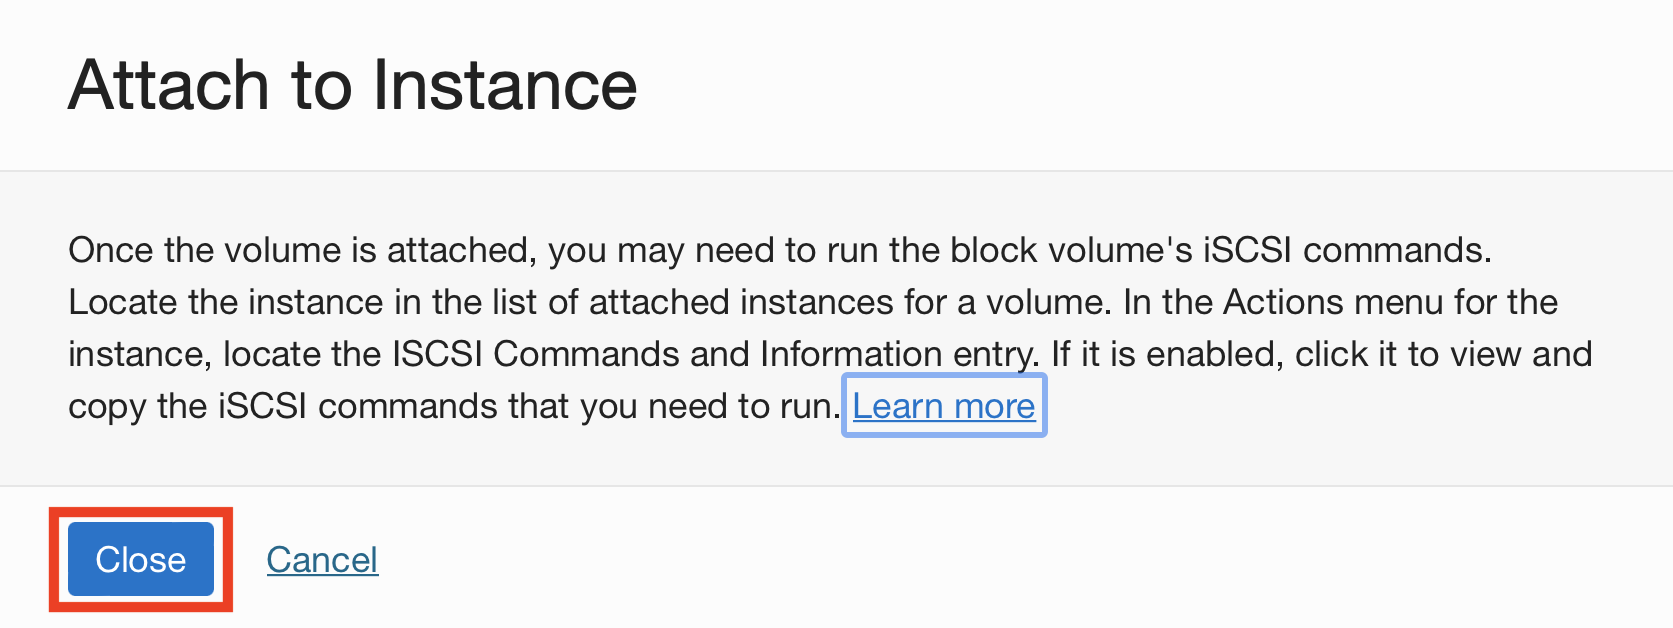
-
Click Close in the Attach to Instance dialog box.
-
The OCI Block Volume will be attached to the selected ESXi host. The Attached Instances now show up in the overview.
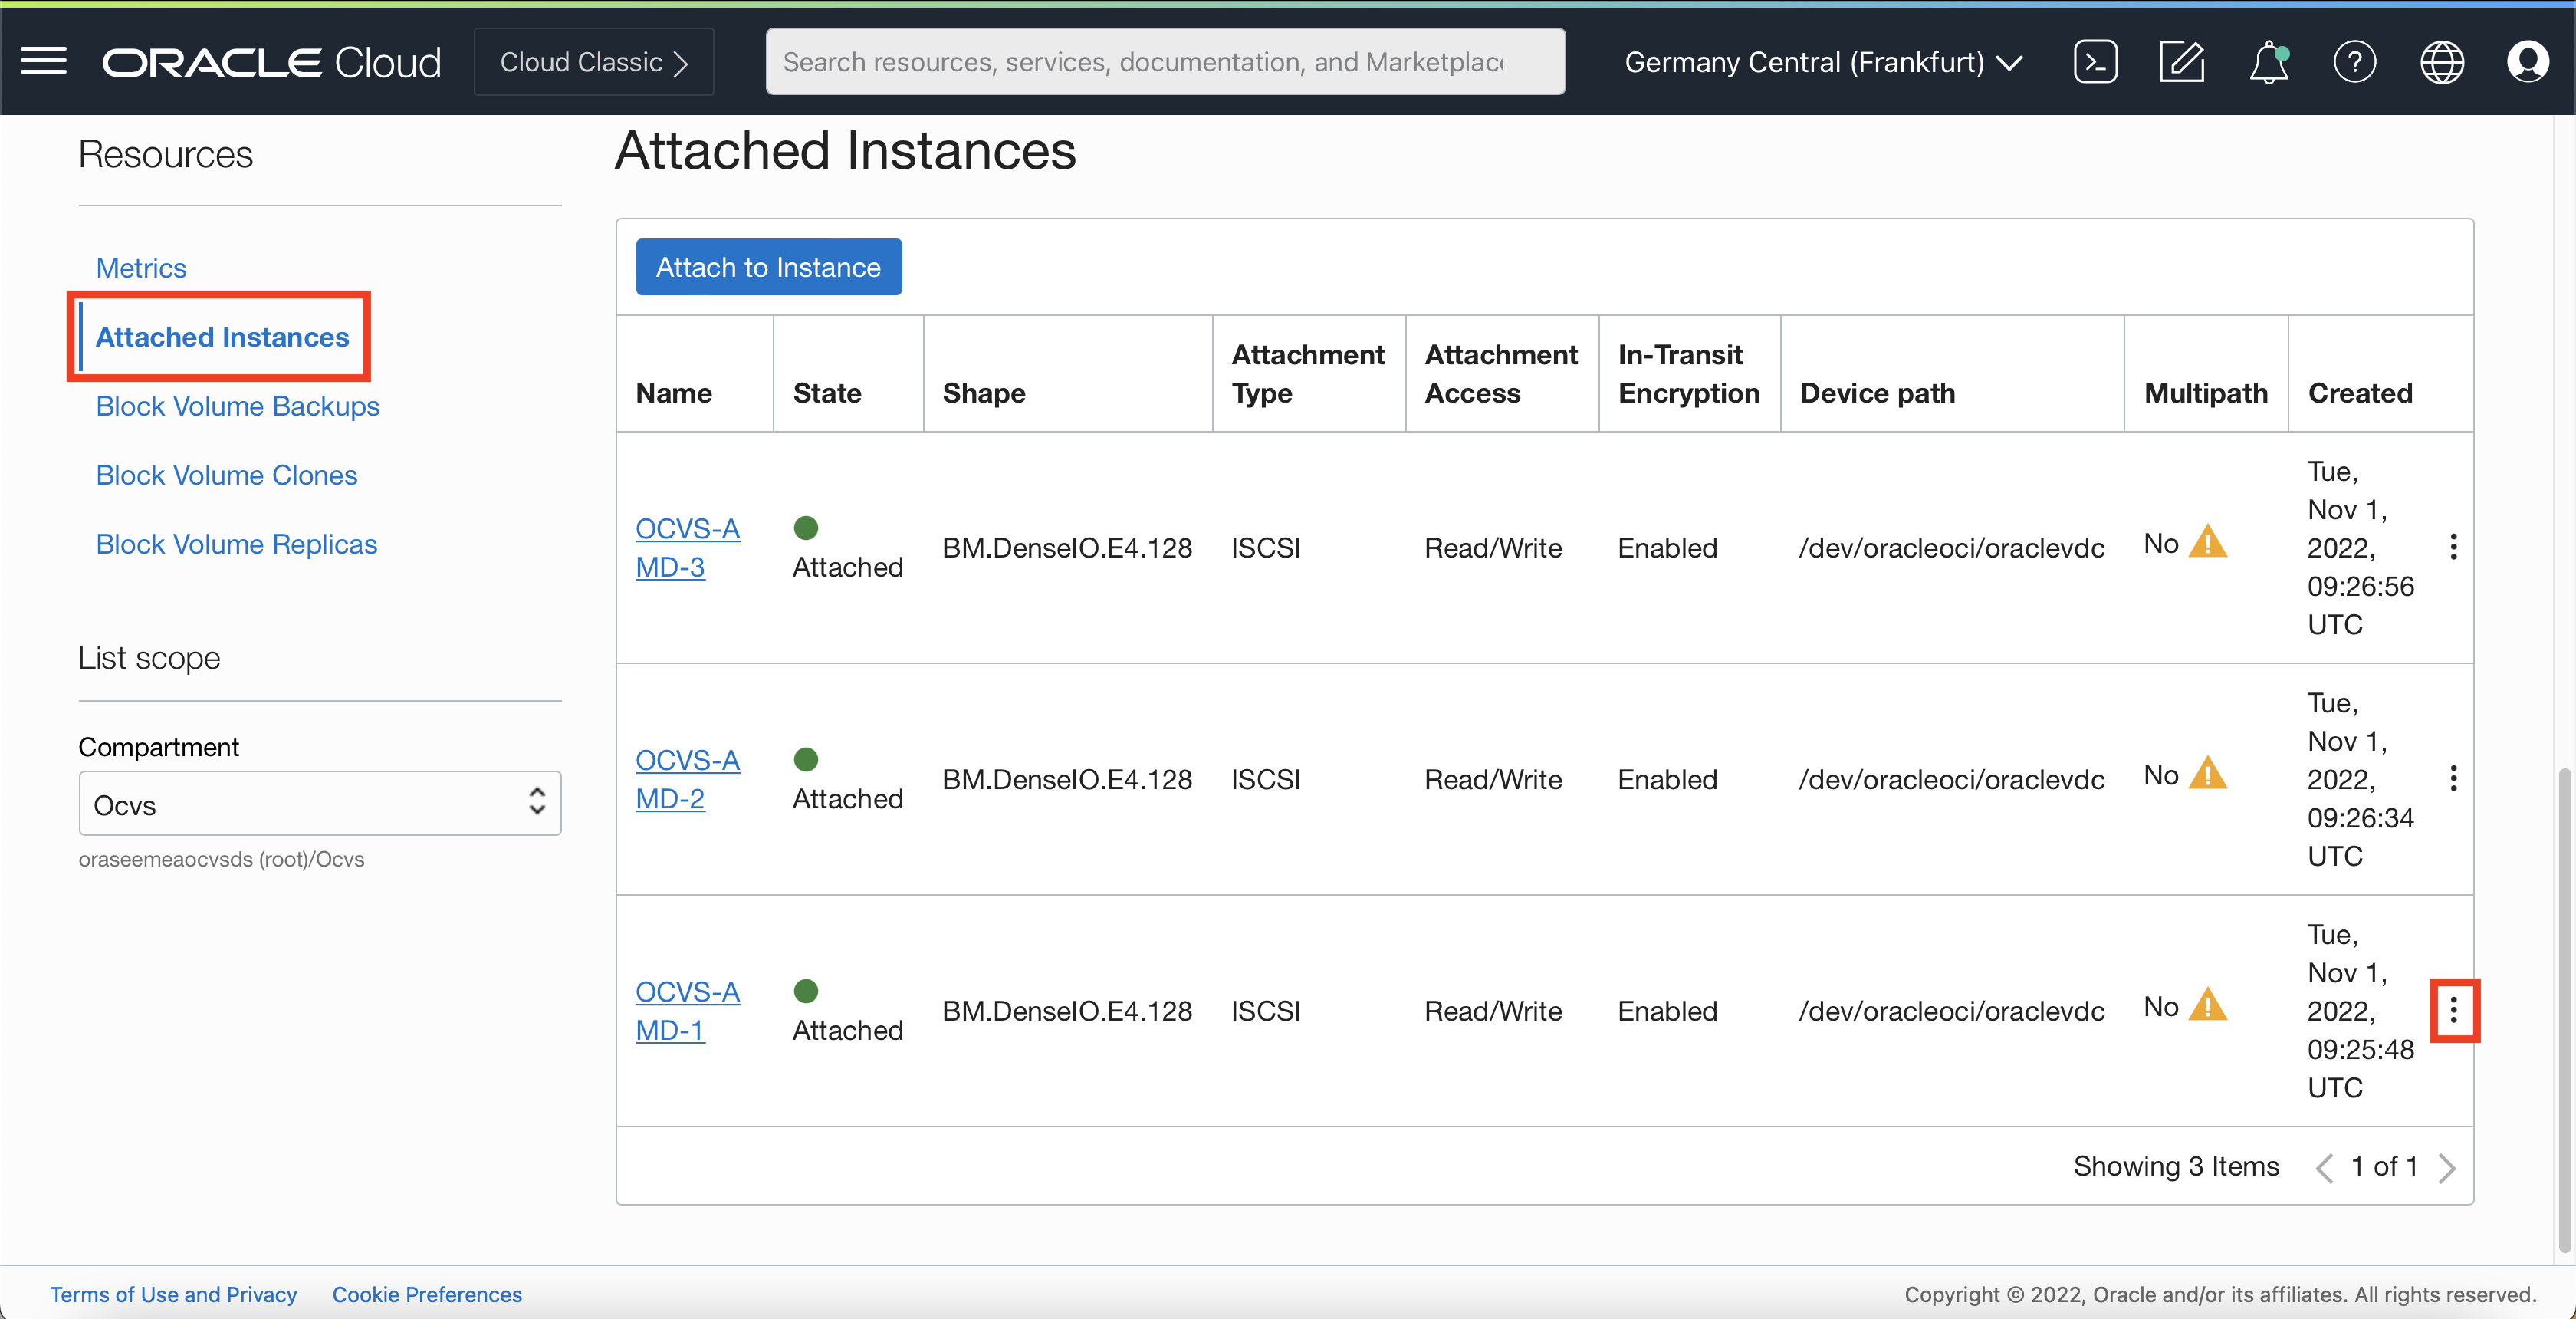
-
Repeat steps 1 to 8 in Task 2 for all the remaining ESXi hosts in the cluster.
-
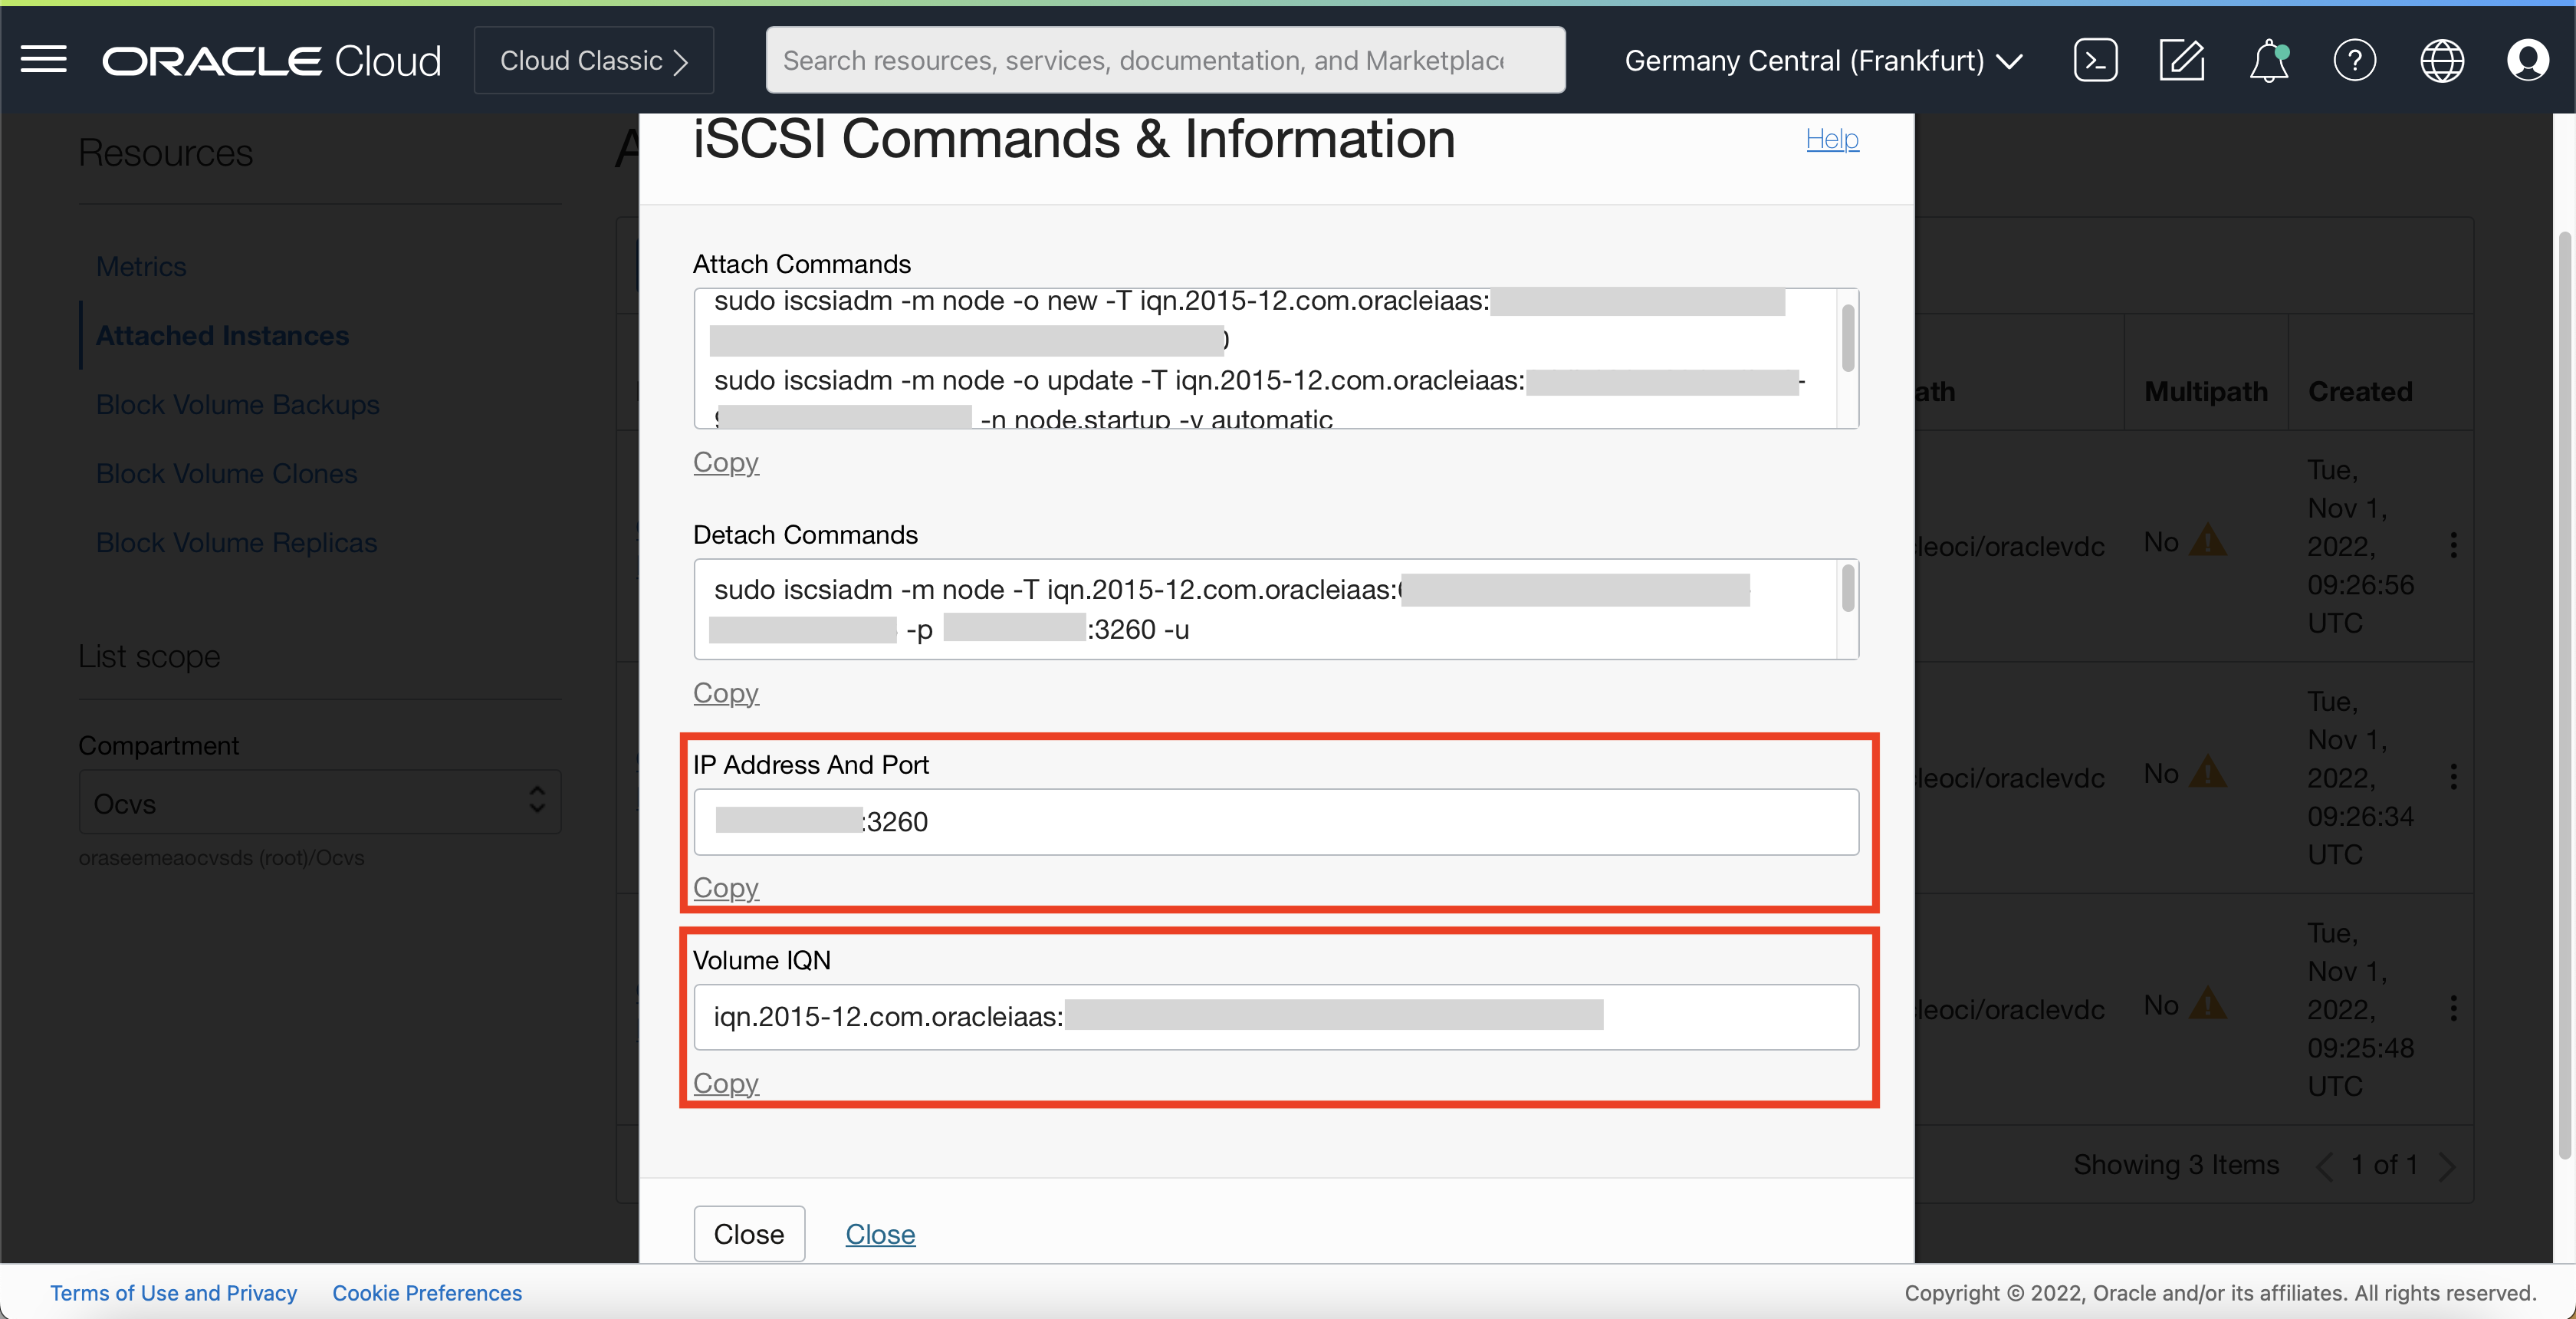
Click on the three dots next to the Attached Instance and note down the the iSCSI information (IP Address and Port and Volume IQN).
-
Repeat step 11 from for all the remaining attachments.
Note: The collected information is required for the Storage Adapter configuration on the Oracle Cloud VMware Solution ESXi hosts.
Task 3: Configure Storage Adapter (vmhba) for iSCSI
Note: You must follow the steps in the exact order to configure the Storage Adapter (vmhba) for iSCSI.
-
Connect to the VMware vCenter server.
-
Navigate to the first ESXi Host and select Configure, Storage, Adapters
-
Select vmhbaXX (iSCSI Software Adapter). In this tutorial example, it is
vmhba64.
-
Select Dynamic Discovery.
-
Click ADD.
-
Enter iSCSI server details.
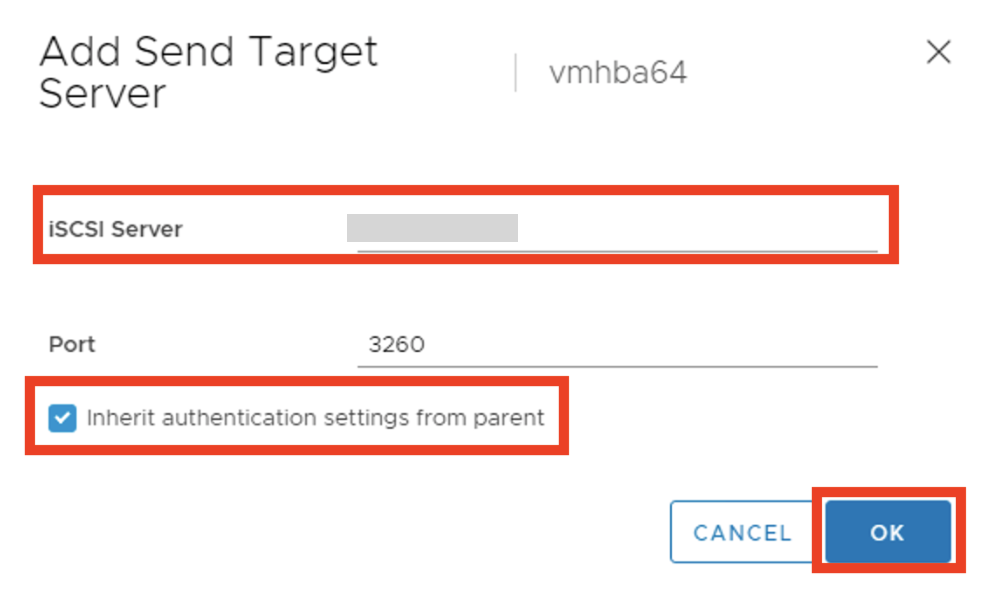
-
Click OK to finish the wizard.
-
Click RESCAN ADAPTER.
-
Click RESCAN STORAGE
-
Repeat the steps for all the remaining ESXi hosts in the cluster.
Task 4: Add the new VMFS Datastore to Oracle Cloud VMware Solution Cluster
Note: You must follow the steps in the exact order to add a VMFS Datastore to the ESXi hosts.
-
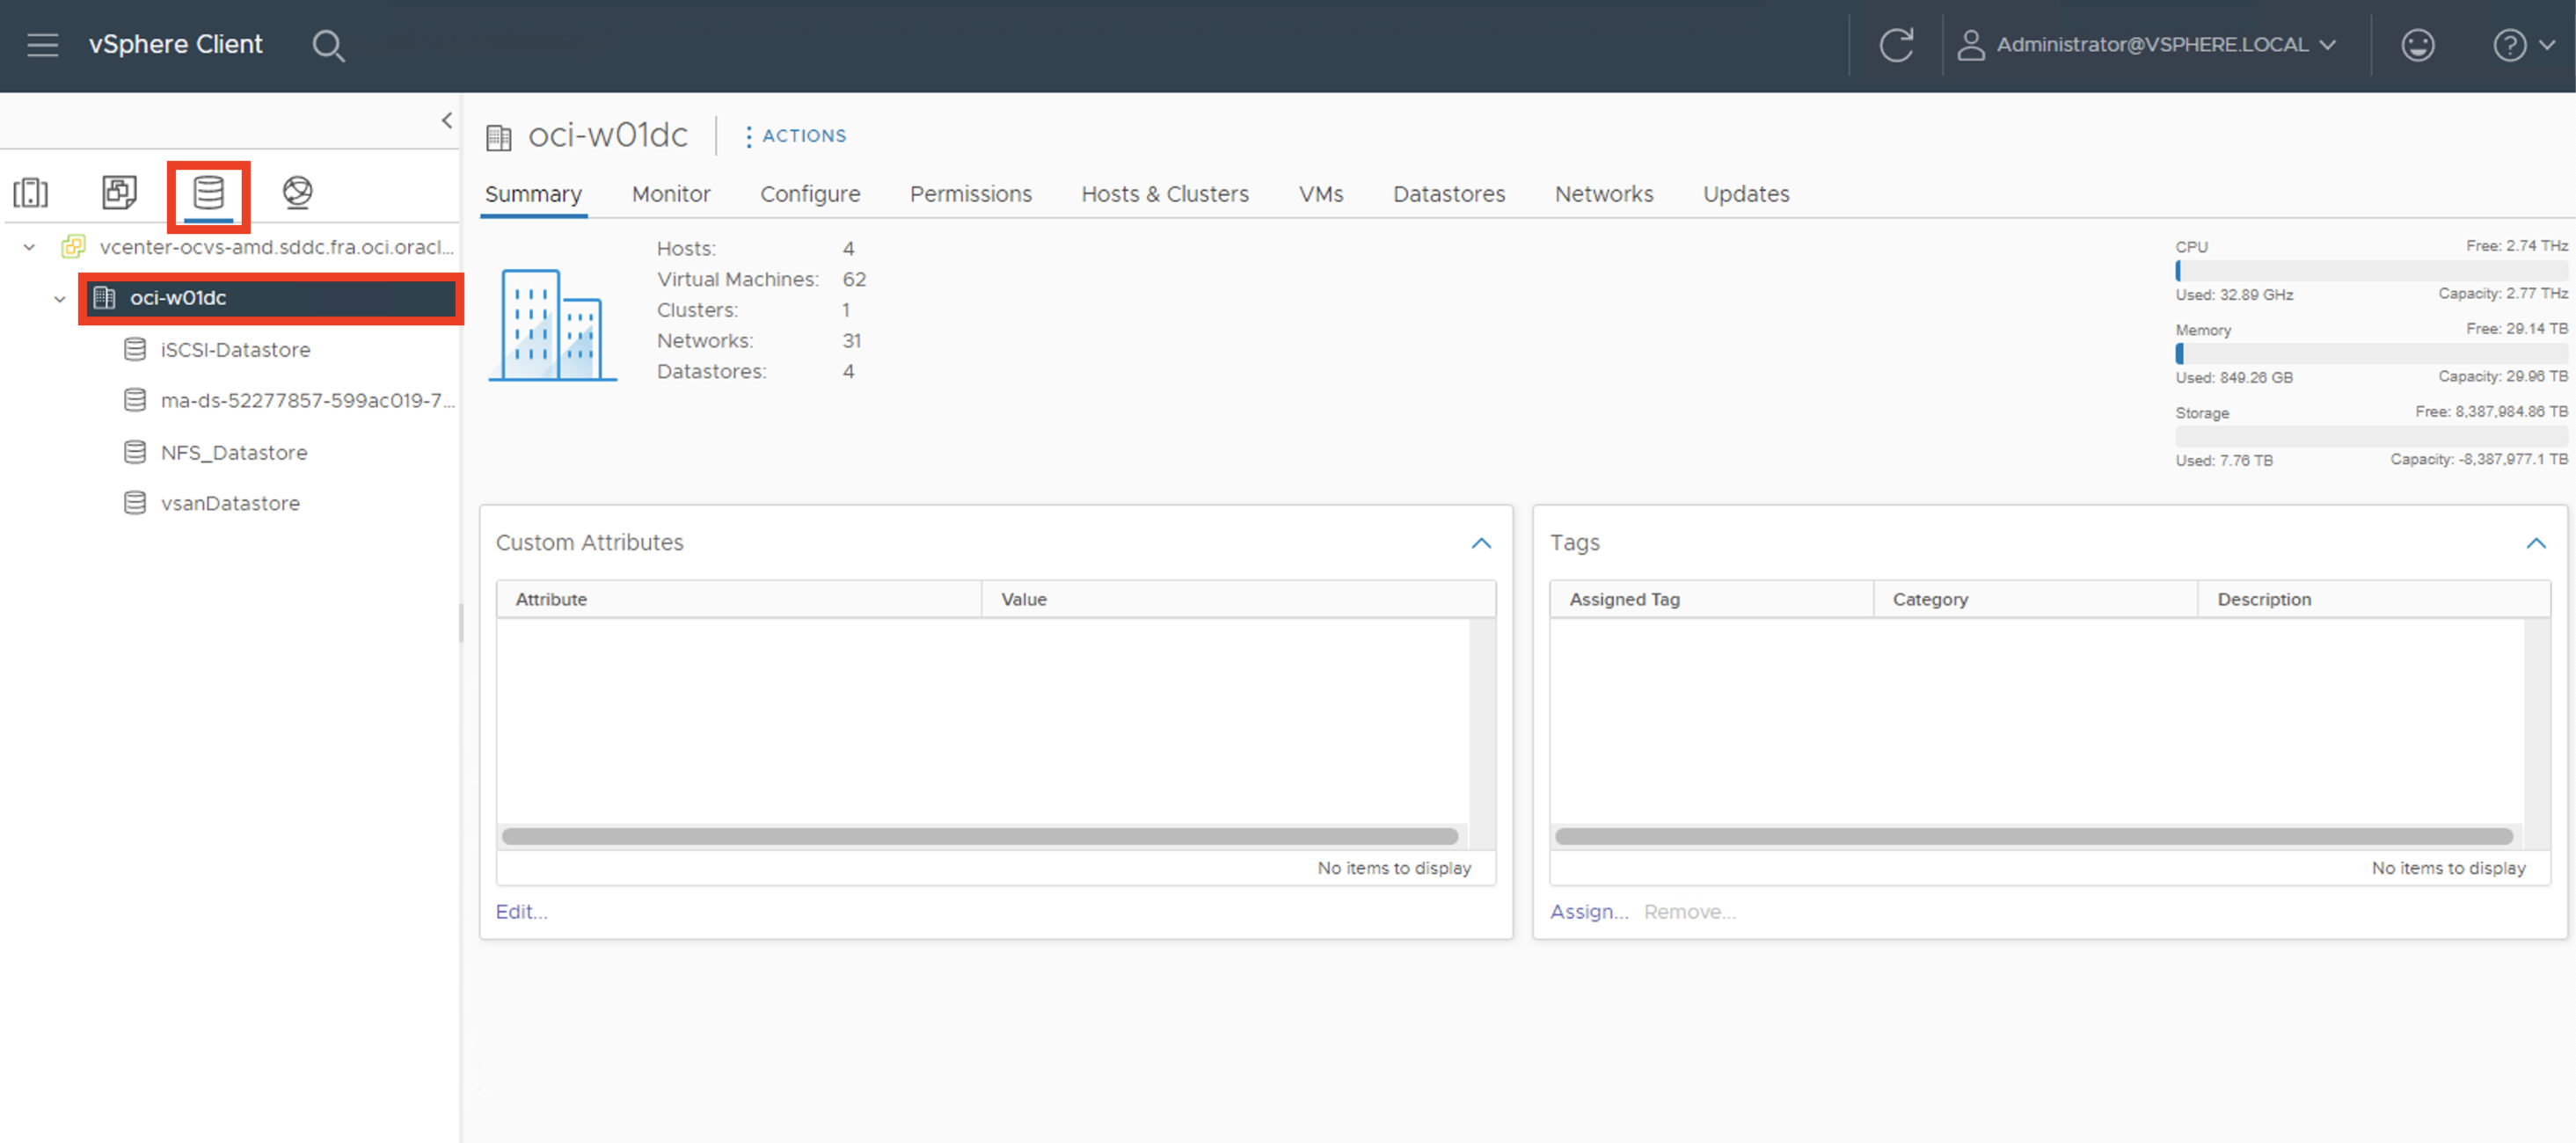
Navigate to the storage tab in the VMware vCenter Server.
-
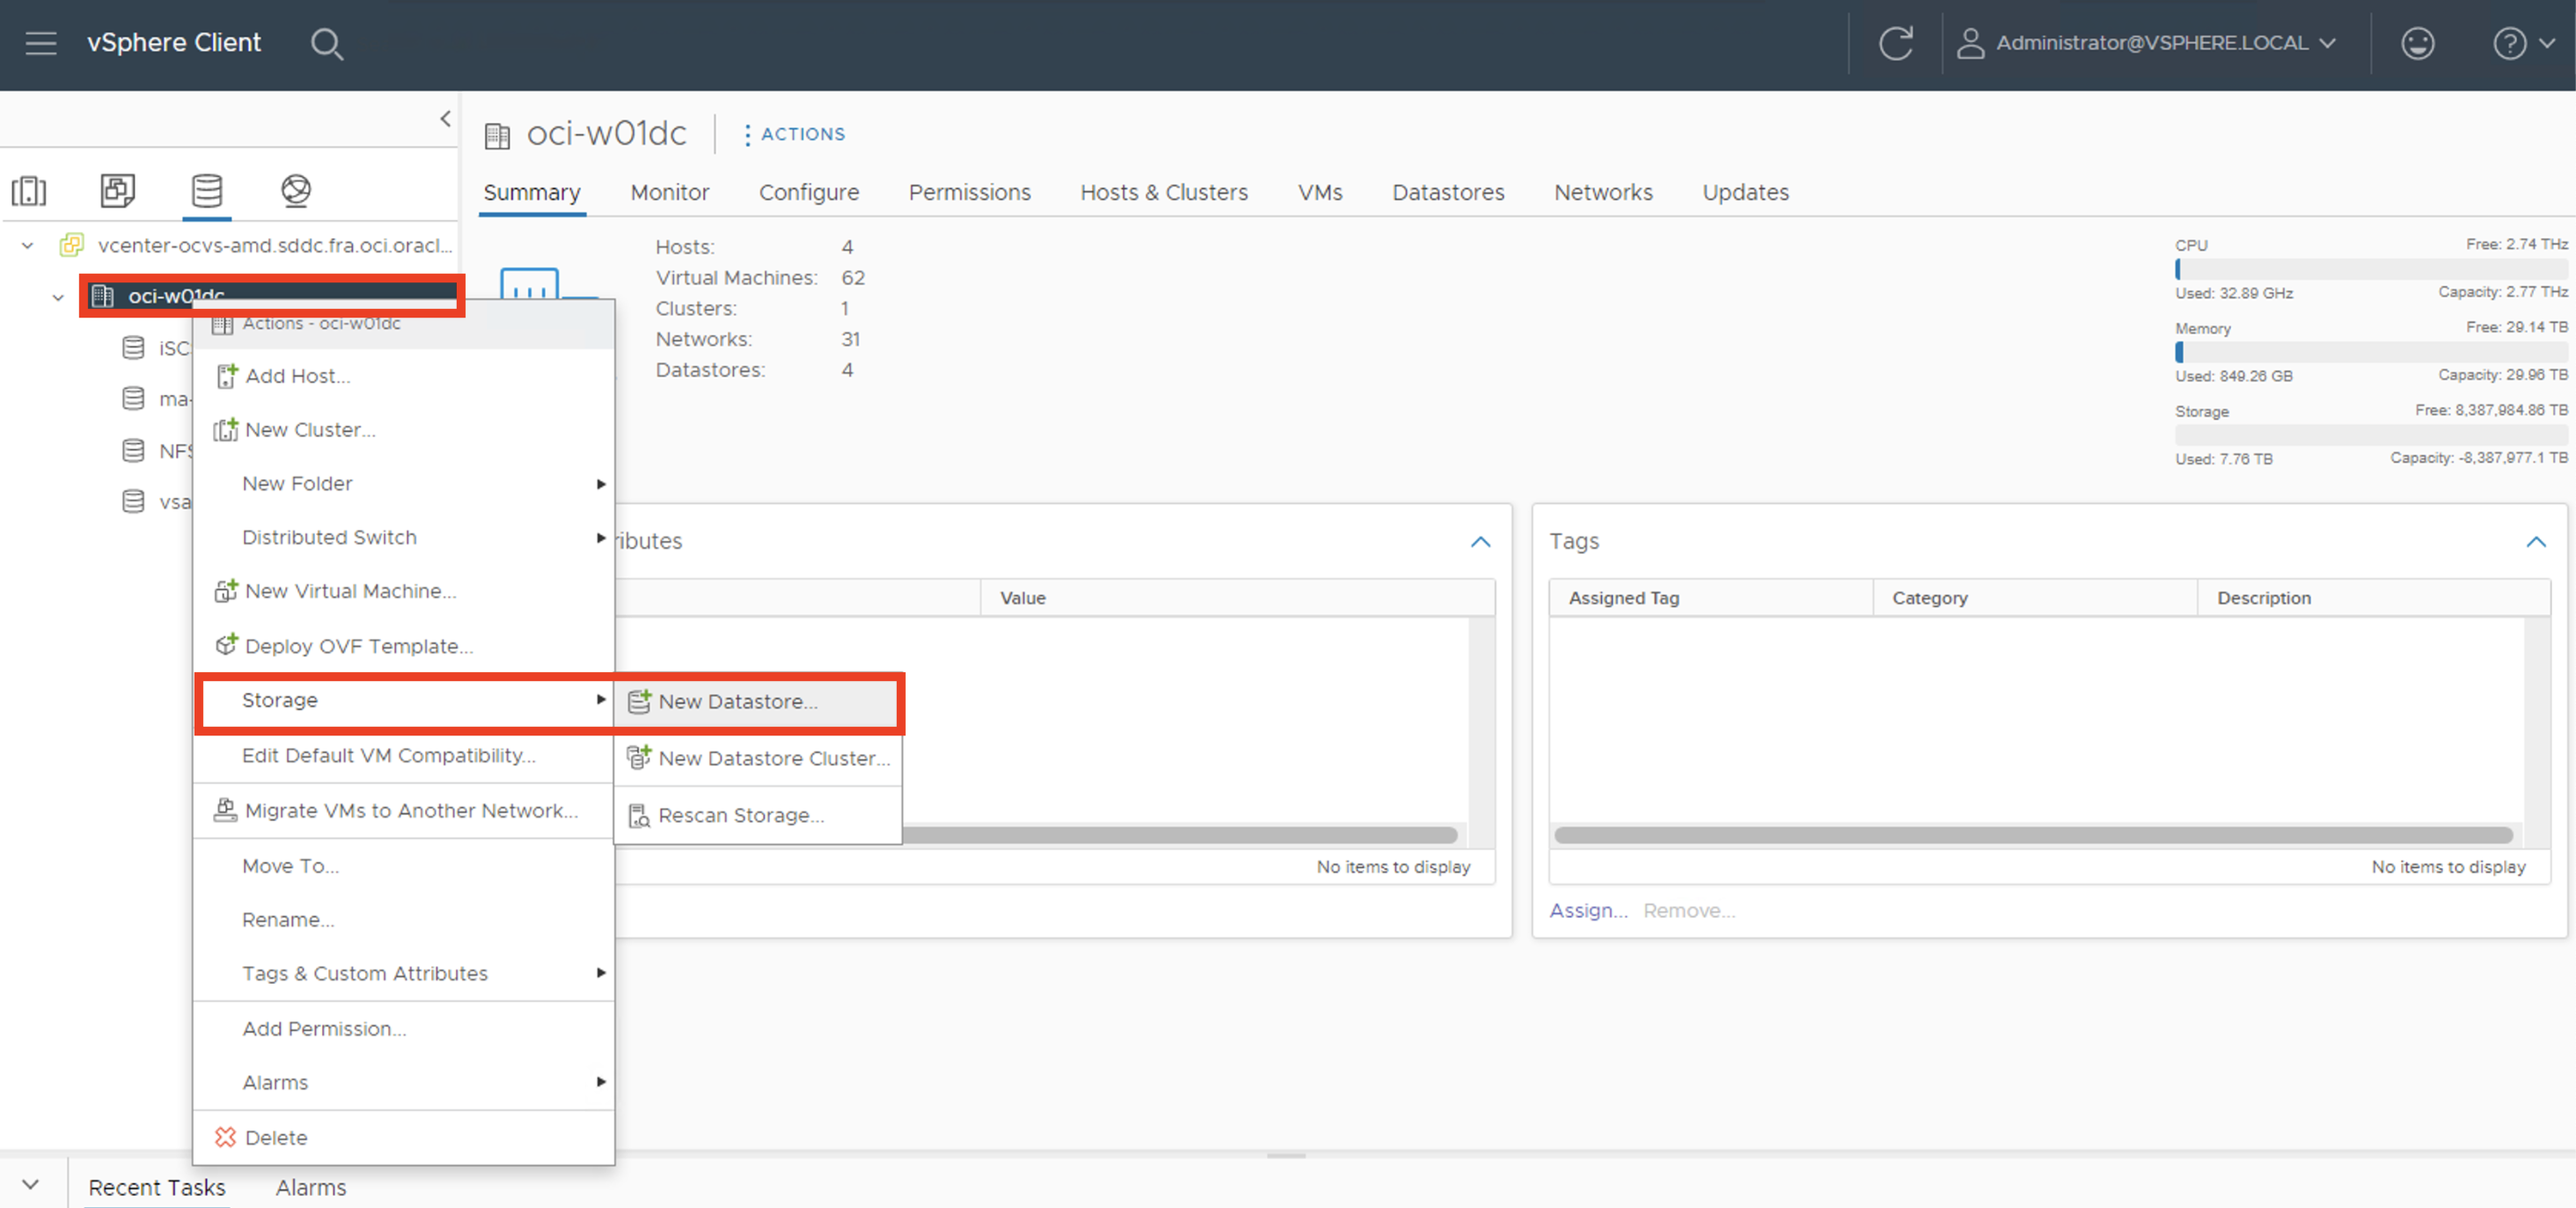
Right-click on the Datacenter Object and select Storage -> New Datastore.
-
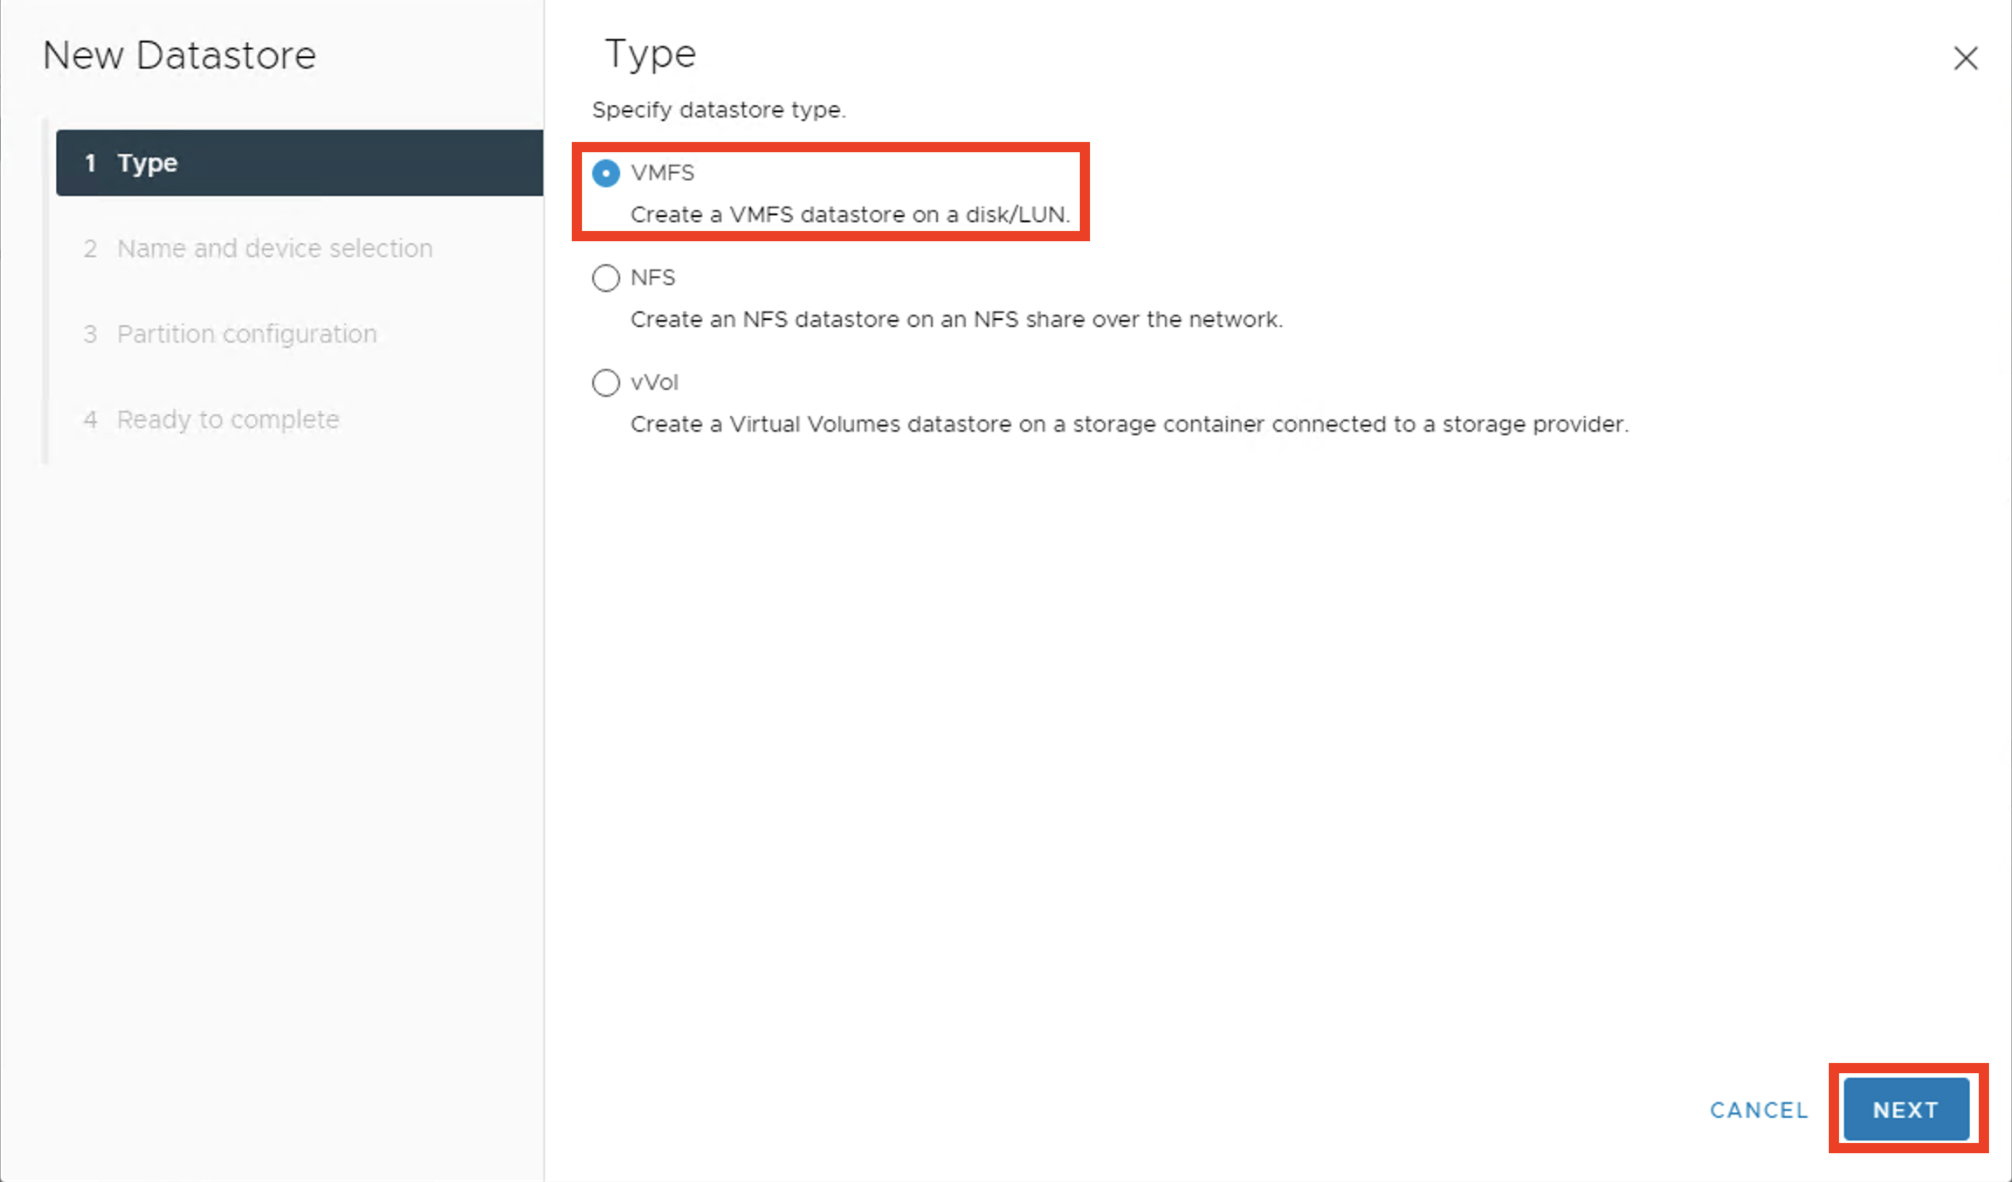
Select VMFS as the datastore type.
-
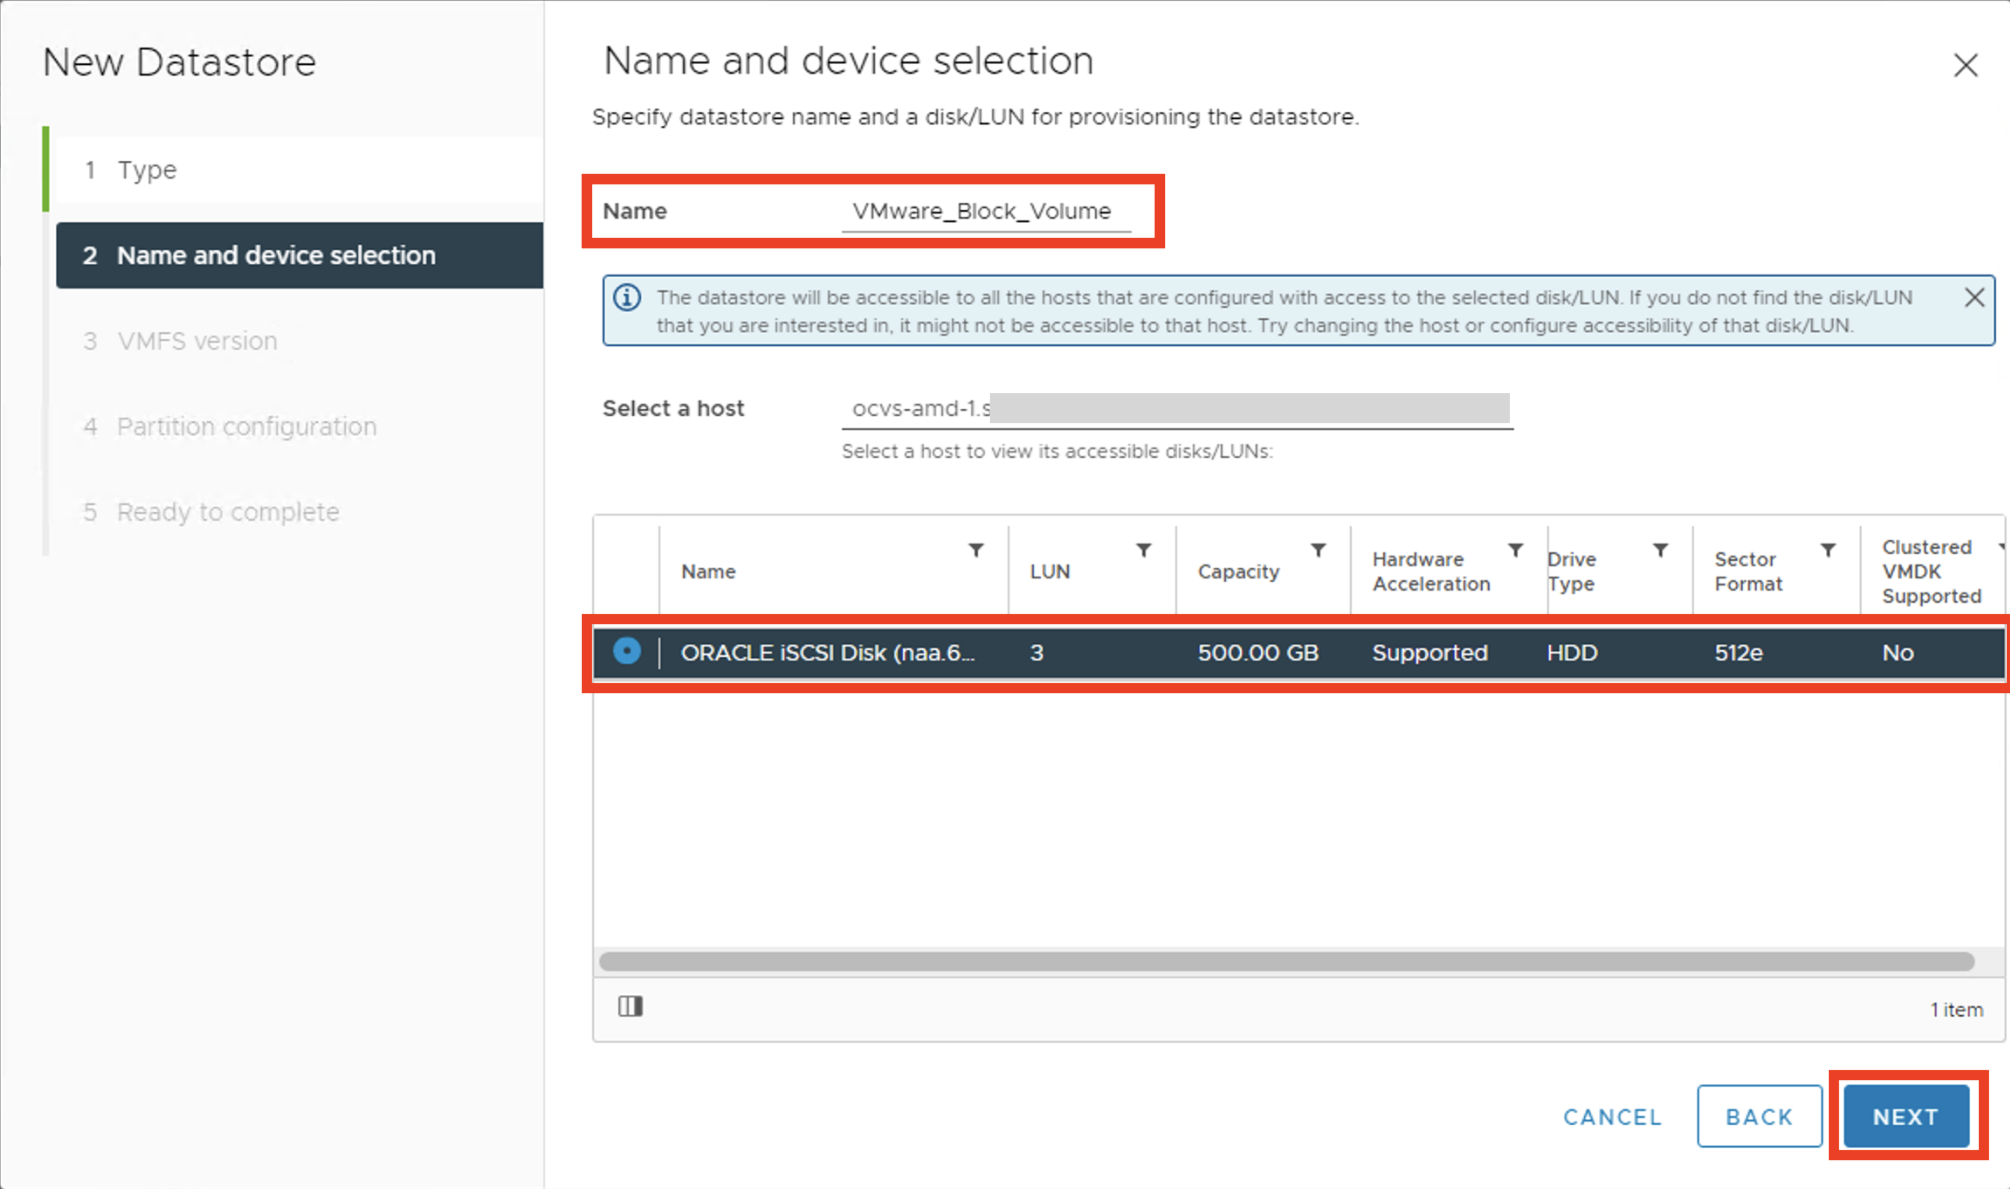
Enter Name for the Datastore and select the discovered Block Volume.
-
Select VMFS 6 as the VMFS version.

-
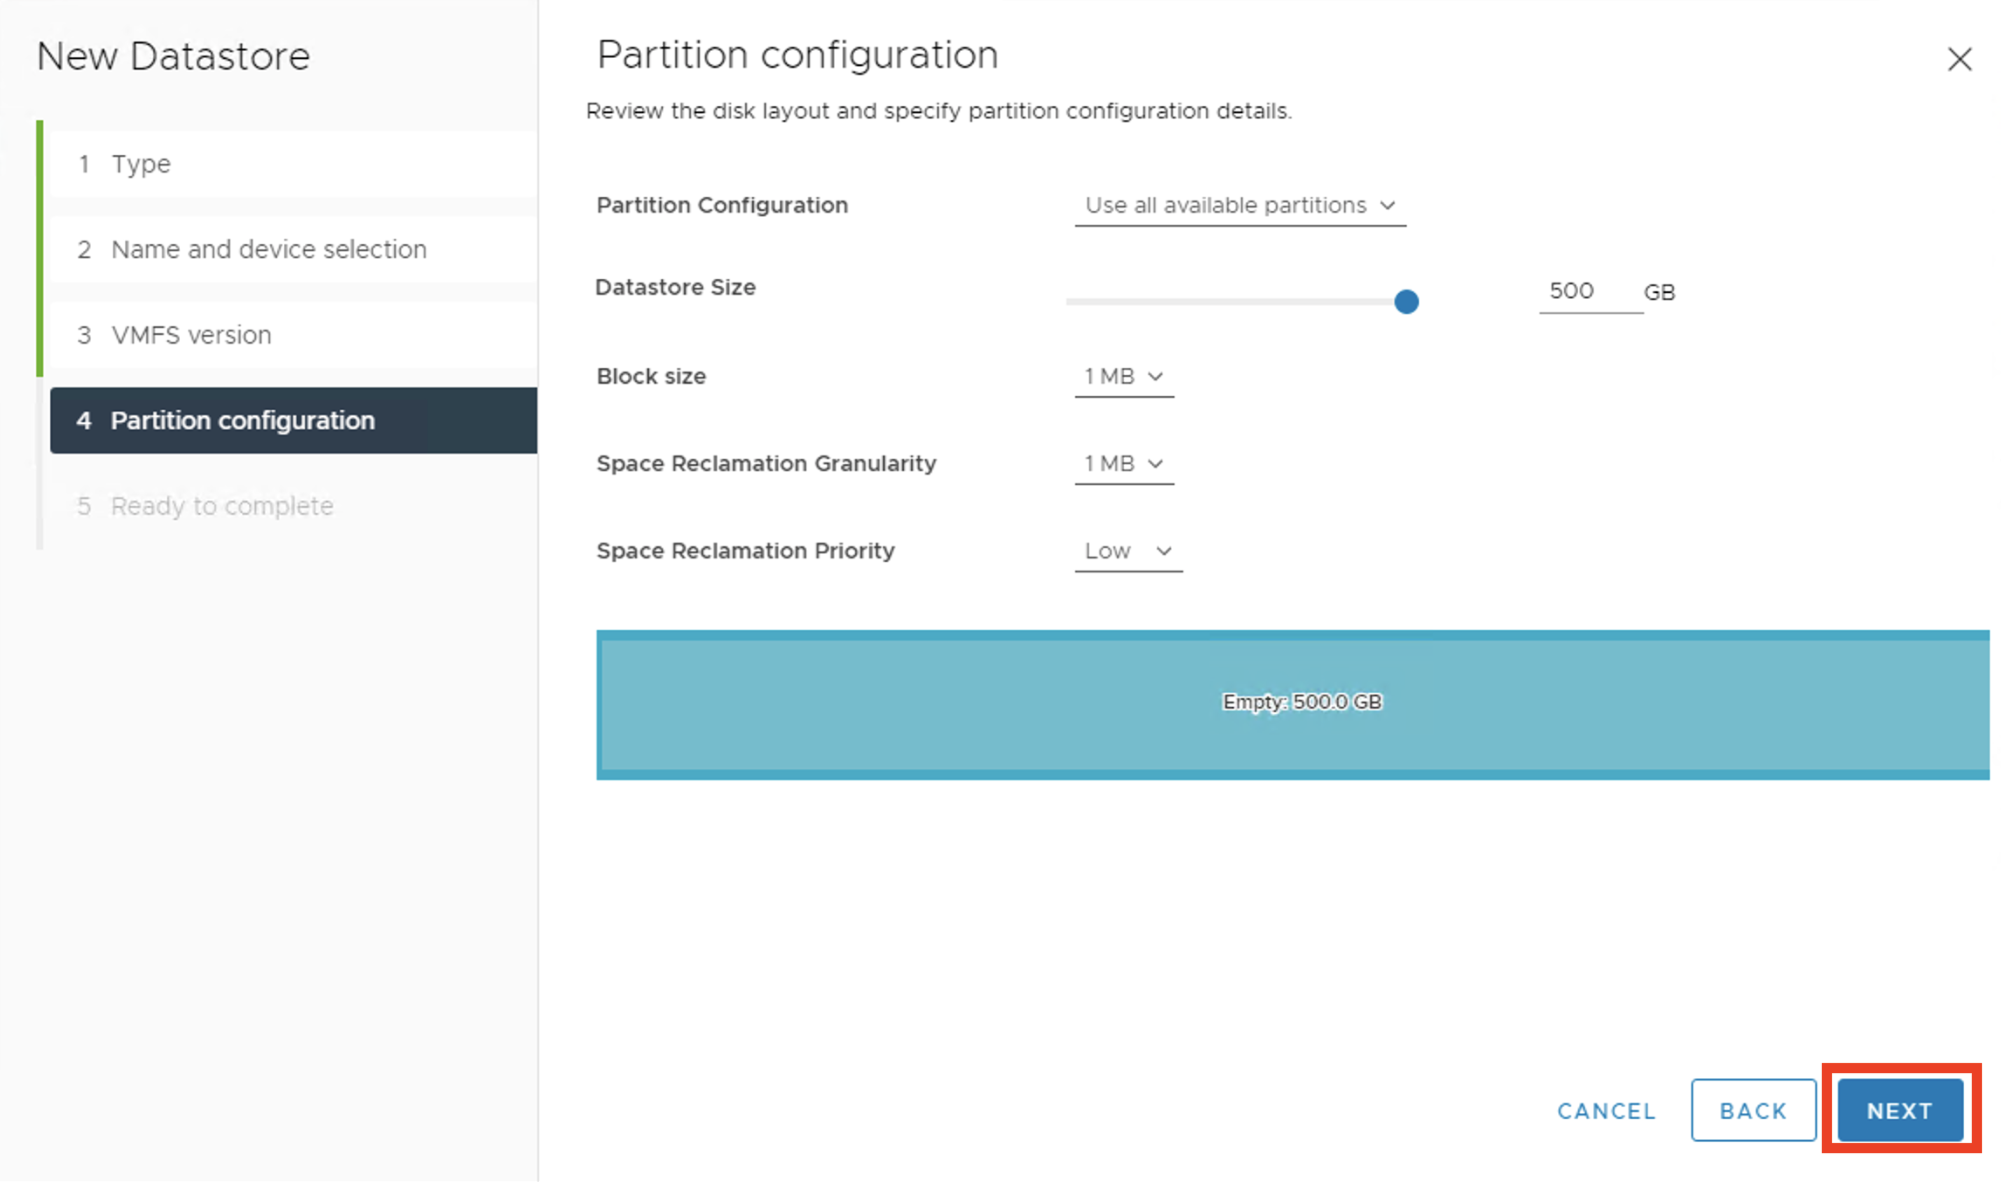
Leave all the settings as default and click NEXT.
-
Review Datastore configuration and click FINISH to exit the wizard.

-
The new VMFS Datastore will be created and added to all hosts in the cluster.
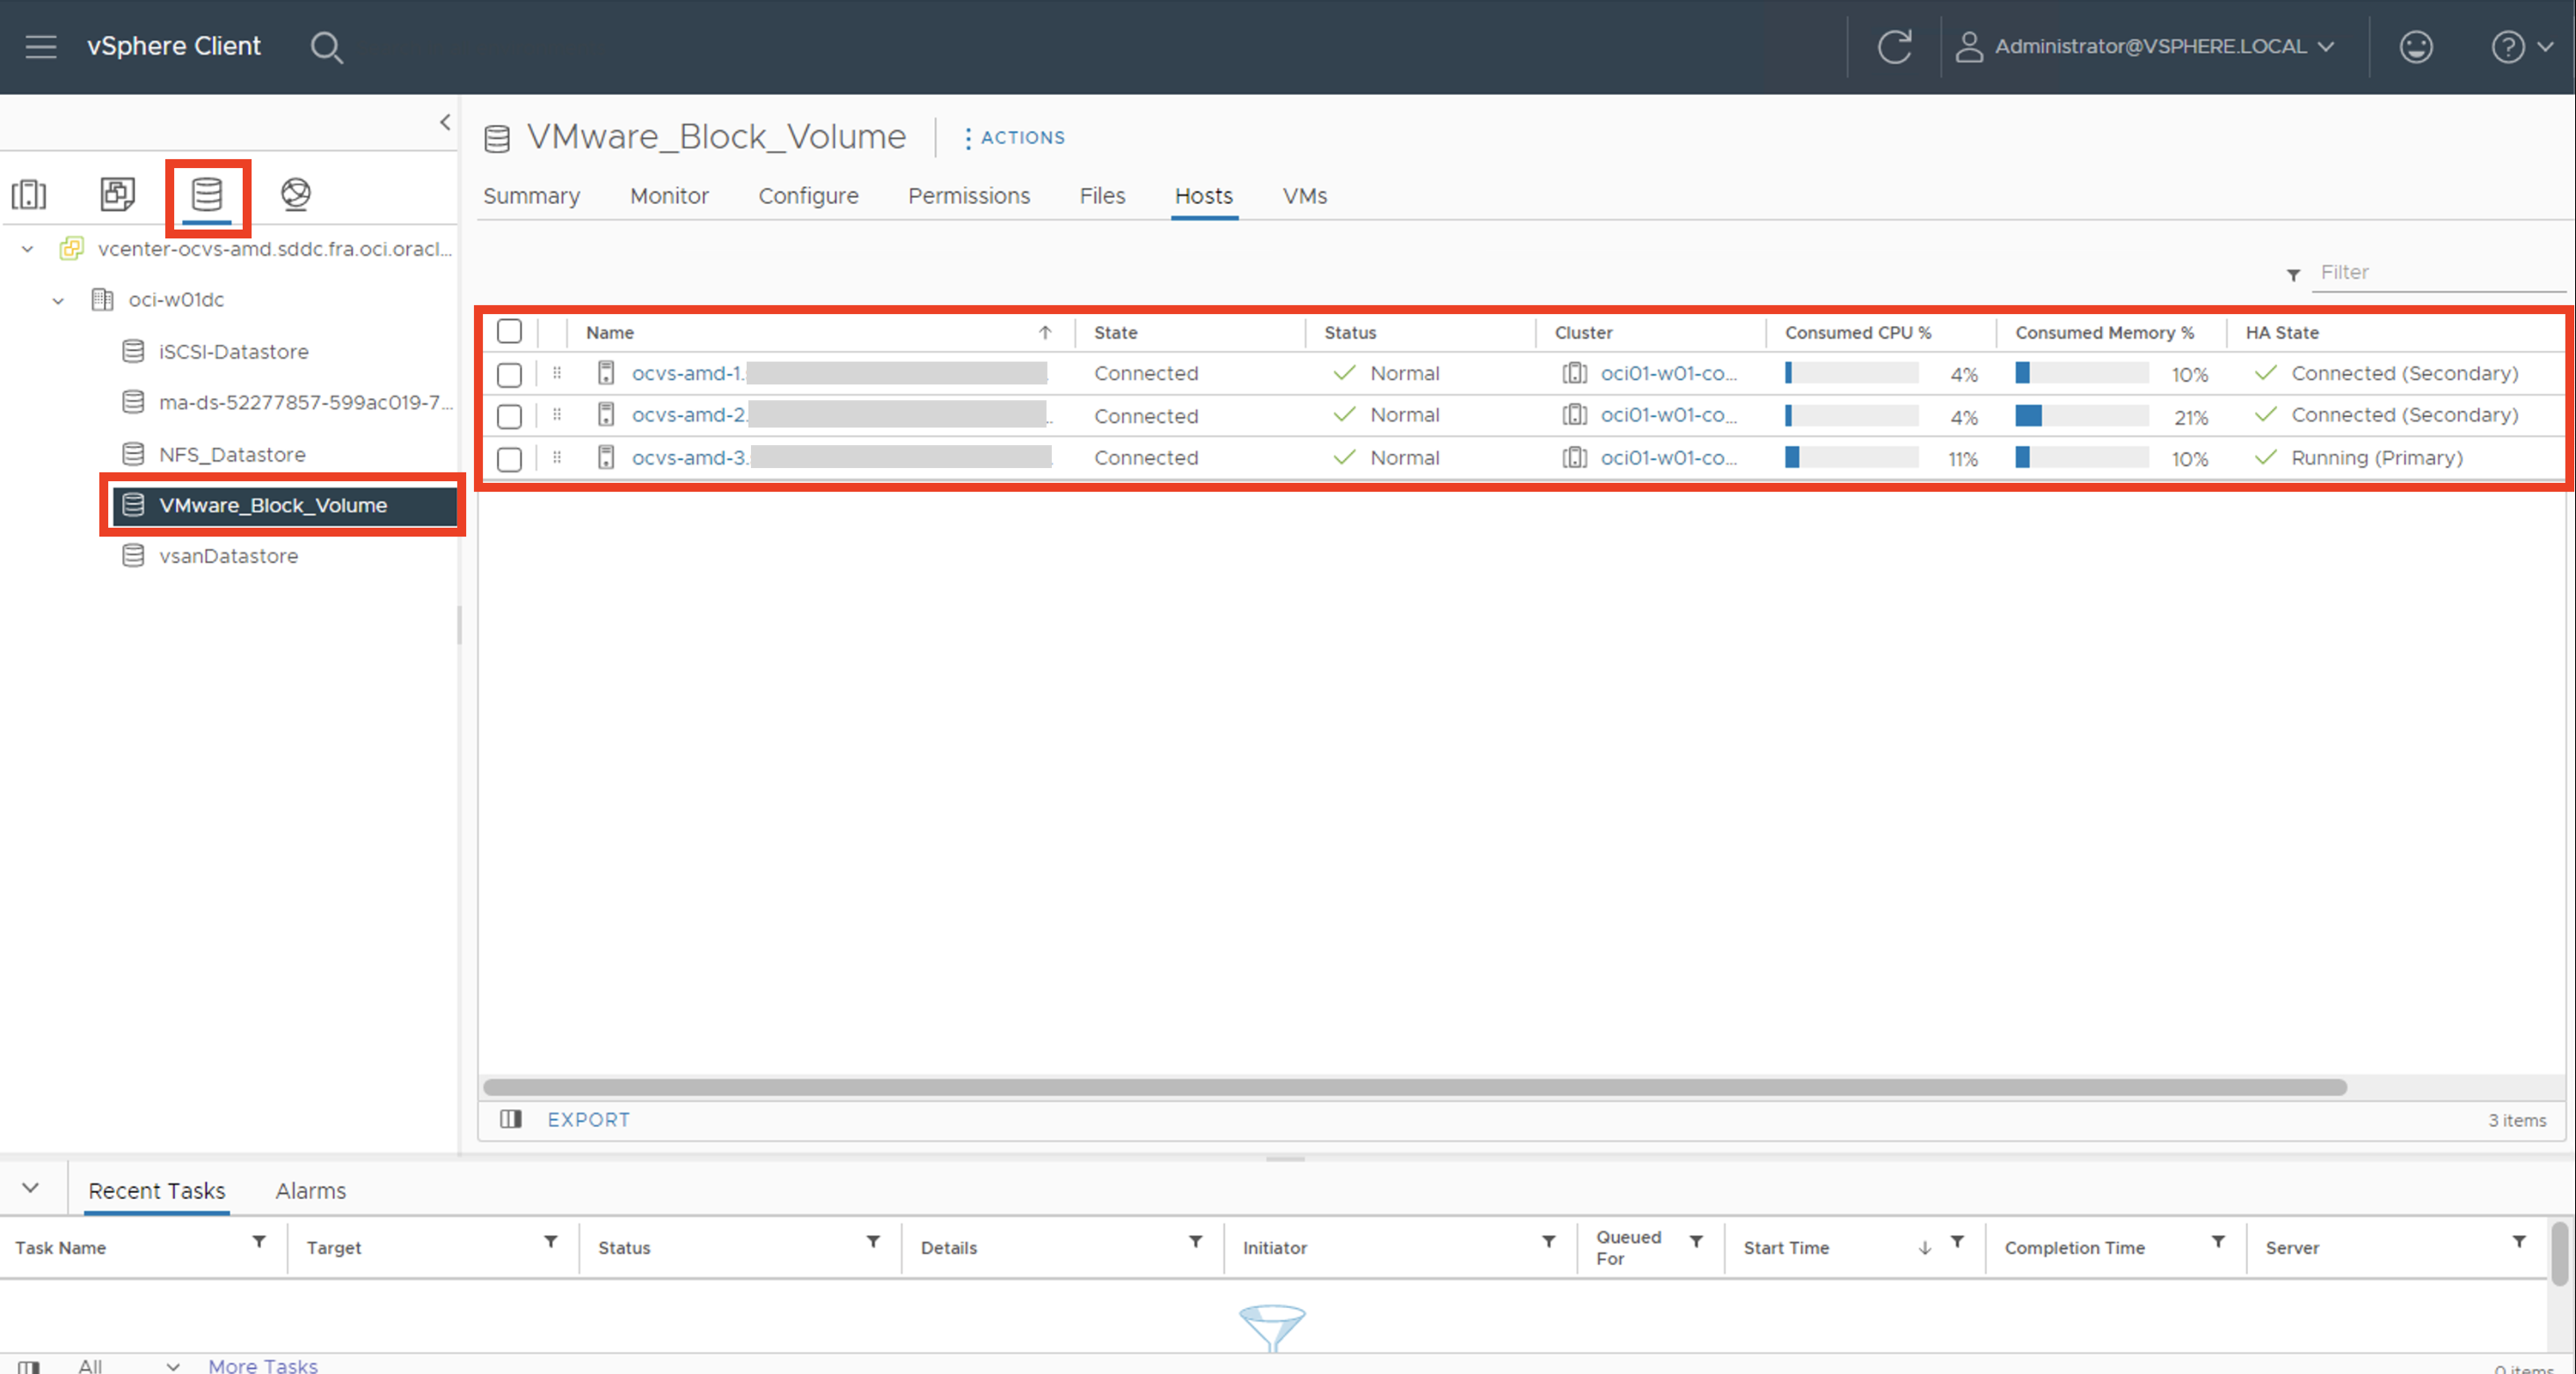
A VMFS Datastore will now be available to all Oracle Cloud VMware Solution ESXi hosts in the cluster to host virtual machines, store templates, ISOs, and so on.
Related Links
- Oracle Cloud VMware Solution
- Oracle Cloud VMware Solution Overview Help Center
- OCI Networking
- Add ESXi host from Oracle Cloud VMware Solution
- Remove ESXi host from Oracle Cloud VMware Solution
- vCenter Backup Procedure
- VMware Cloud Provider Stack
- VMware vSphere 7.0 release notes
- VMware vSphere Interoperability matrix
- NSX Backup Procedure
- OCI Block Volume
- Volume Performance Units
- Perform an in-place upgrade from Oracle Cloud VMware Solution 6.x to 7.x
Acknowledgments
-
Author: Thomas Thyen (Cloud VMware Solutions Specialist, EMEA)
-
Contributor: Adeel Amin (Cloud Solutions Architect, OCI Engineering)
More Learning Resources
Explore other labs on docs.oracle.com/learn or access more free learning content on the Oracle Learning YouTube channel. Additionally, visit education.oracle.com/learning-explorer to become an Oracle Learning Explorer.
For product documentation, visit Oracle Help Center.
Integrate OCI Block Volumes with Oracle Cloud VMware Solution
F74217-01
November 2022
Copyright © 2022, Oracle and/or its affiliates.