Note:
- This tutorial requires access to Oracle Cloud. To sign up for a free account, see Get started with Oracle Cloud Infrastructure Free Tier.
- It uses example values for Oracle Cloud Infrastructure credentials, tenancy, and compartments. When completing your lab, substitute these values with ones specific to your cloud environment.
Get started with Oracle Cloud Infrastructure Process Automation
Introduction
Use Oracle Cloud Infrastructure Process Automation to rapidly design, automate, and manage business processes. Its two working environments enable you to perform iterative process automation development:
- Use Designer, the design-time environment, to create and edit process applications and their components. This environment is geared towards automation developers.
- Use Workspace, the runtime environment, to test, run, monitor, and administer applications. This environment is geared towards administrators and end users.
Process Application Life Cycle
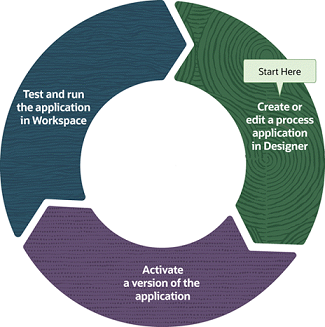
Description of the illustration process-lifecycle.png
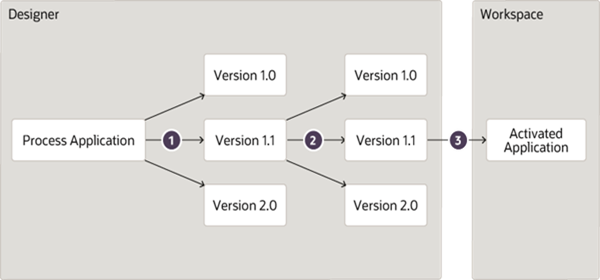
Description of the illustration process-lifecycle2.png
Designer Overview
Process Designers use the Designer environment to create and edit interrelated components within a process application. Whether you create a structured or dynamic process depends on your use case:
-
Use a structured process for defined flows of human or automated tasks.
-
Use a dynamic process for flows that depend on human actions, events, and data values.
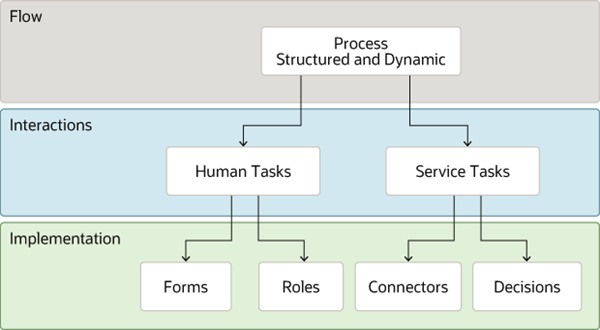
Description of the illustration designer-overview.png
Objectives
In this tutorial, you’ll learn how to:
-
Create a process application and its components in Designer.
-
Create roles
-
Create a process
-
Create human tasks and forms
-
-
Activate an application version.
-
Test and run the application in Workspace.
Prerequisites
You need a web address and sign-in credentials for Oracle Cloud Infrastructure Process Automation. Note that it is useful to have multiple credentials for testing purposes.
-
Enter the web address for Oracle Cloud Infrastructure Process Automation. Ask your administrator if you don’t have it.
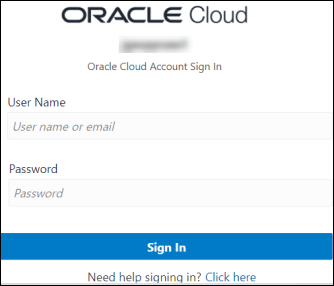
-
Complete the User Name and Password fields, and click Sign In.
The main page for Process Designer appears, listing any existing process applications.
Create a Process Application in Designer
A process application is a container for key components: processes, forms, connectors, and roles.
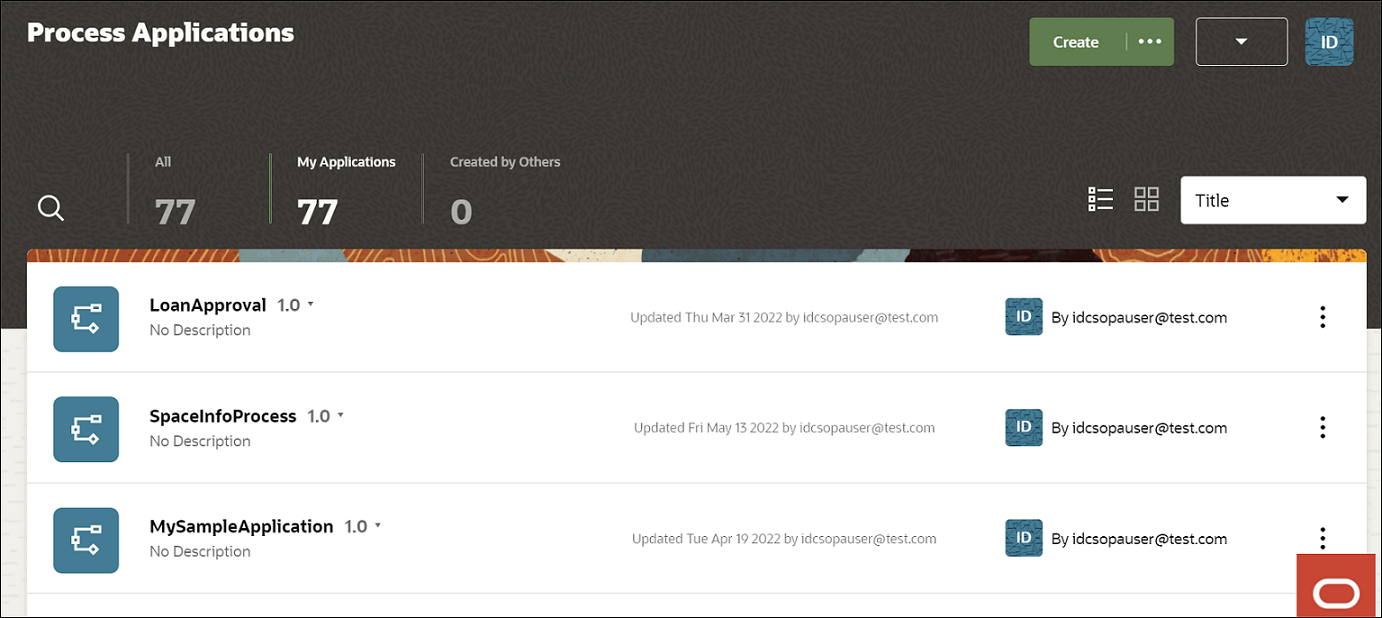
Description of the illustration designer-main-page.png
-
Click Create. The Create Application side pane opens.
-
In the Title field, enter
Subscription Application. The title can have spaces and special characters.Note that by default the Identifier Name field gets auto-populated with the title you enter.
Tip: You can modify the default identifier to a name of your choice. For example:
SubscriptionApp_1. But keep in mind that it has more restrictions than the title. For example, it supports hyphen (-) and under score (_) but does not support space, and it always begins with an alphabet (A-Z) but supports alphanumeric values also. -
Enter a meaningful description in the Description field.
-
Leave the Version Tag field as 1.0.
It will help you identify the application version when you activate it.
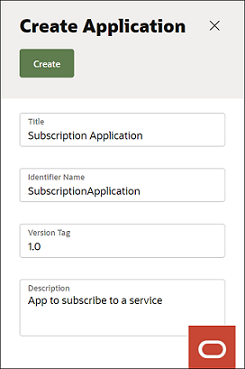
Description of the illustration create-process-application.png
-
Click Create.
A message indicates that it’s being created, then shows a link.
-
Click the Open now link in the message.
If the link disappeared, select the My Applications tab to filter the list to show only those you created. Click
 and enter the first few characters of the application’s name (sub). Once you locate the application, select it to open it.
About Components Tabs and Navigation
Opening a process application displays its components page. Components are design elements of your application, and they’re listed as tabs near the top of the components page.
-
From the Components tabs, click UIs.
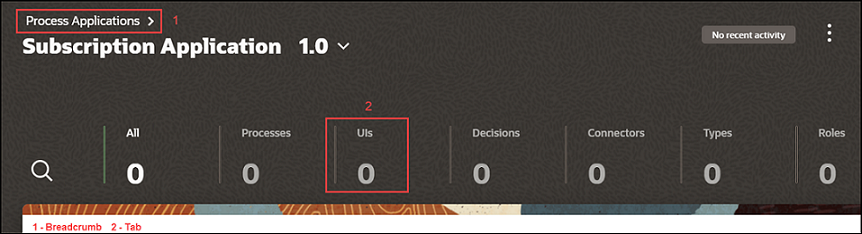
Description of the illustration components-tabs.png
Notice that a 0 appears for each component, since you haven’t created any yet.
For example, when you click UIs, the UIs page appears, offering you two ways to create a form or select a linked UI. Forms and linked UIs will be listed on this page after you create them.
-
Click the Process Applications breadcrumb at the top.
You return to the Process Applications page. As you design components in your application, the breadcrumbs at the top get updated. You can easily navigate between components using the breadcrumbs.
-
Open your process application again.
Create Roles
In Oracle Cloud Infrastructure Process Automation, you define roles to grant users or groups access to activated applications and to specify what they can do.
-
Permissions provide increasingly greater access to an application’s resources: Inspect, Read, Use, and Administer.
-
A role can be either local (to the application) or global (can be used in multiple applications). Note that permissions are specific to an application.
-
You don’t need to assign permissions to users who are assigned tasks. They inherit permissions from the task itself.
In this example, we’ll create two roles:
-
Subscriber - who starts the process and is assigned the use permission
-
Approver - who approves or rejects a request and is also assigned the use permission
Let’s create the two roles.
-
From the top of the page, click Add.
-
In the Add component pane, expand Roles, and click New.
-
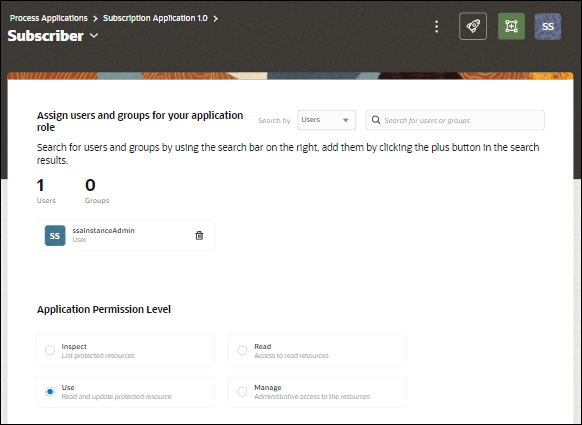
In the Title field, enter
Subscriber, and click Create.Notice how the role is now listed on the page and the Roles tab shows 1.
-
Click the Open now link or select the role from the Roles page to open it.
-
Let’s assign a user and review permissions for the role. In the Search by fields:
-
Leave Users selected in the drop-down field.
-
In the Search
field, enter the first few characters of the user name you signed in with. -
Select the user. The user gets listed in the page.
-
-
In the Application Permission Level options, leave Use selected.
This allows your user to start an application request in Workspace.
-
Repeat steps 1 - 4 to create the second role, only this time enter its name as
Approverin the Title field. -
Repeat step 5 to assign a user for the Approver role.
In a real life scenario, multiple users are selected to complete different tasks in an application. But to keep this example simple, we’ll use the same user.
-
In the Application Permission Level options, leave Use selected. This allows your user to update (in this case, Approve or Reject) a task in Workspace.
Now that we have created the two roles - Subscriber and Approver, let’s create a process where we implement the roles to specific user tasks.
Create a Structured Process
For this example, we’ll use a structured process. The scenario goes like this:
-
An end user makes a request to join an online community and enters some information.
-
An approver, such as a community manager, reviews and then approves or rejects the request.
Let’s get started.
-
Click the Subscription Application 1.0 breadcrumb to go to your application’s main page.
-
From the top of the page, click Add.
-
In the Add component pane, expand Processes, and click Structured.
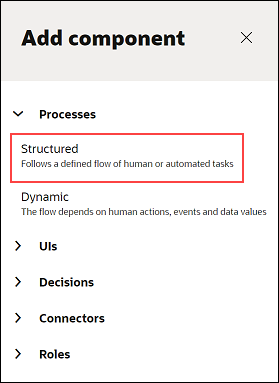
-
Enter
Subscribein the Title field. -
Click Create. A confirmation message shows that the process was created.
Notice how the process is listed on the page and the Processes tab shows 1.
-
Select the process to open it.
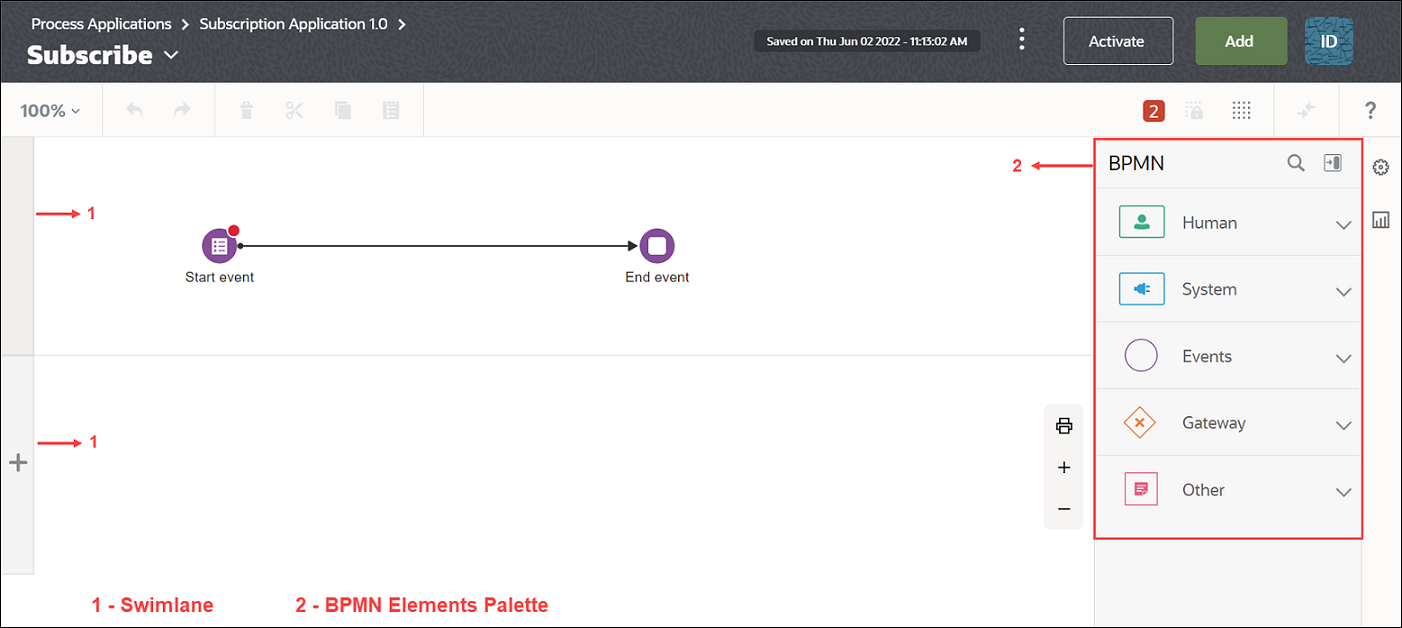
The structured process editor opens. Start and end elements are already positioned on the flow for you. There are two swimlanes and the BPMN elements palette is on the right side.
-
Select the first swimlane containing the start and end element by clicking the bar on the left of the canvas. Click the edit icon to open the Properties pane. In the Properties pane, select Subscriber in the Role drop-down field.
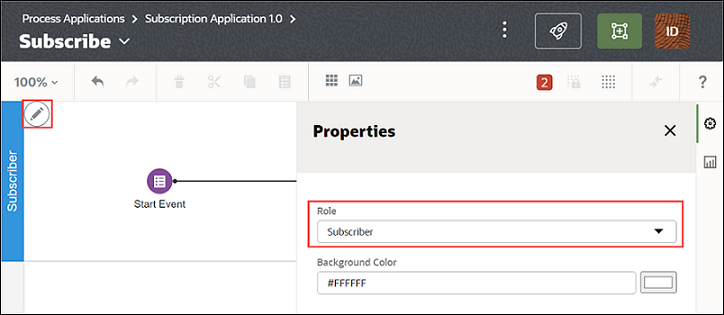
Description of the illustration edit-swimlane.png
Note that the swimlane’s name changes to Subscriber.
-
In the BPMN elements palette, expand the Human category and drag an Approve task to the second swimlane.
Notice that the swimlane’s name automatically gets mapped to the Approver role. Adjust the process flow so that the Approve task is the second element in the flow.

-
Rename the three elements from left to right as Sign up, Approve subscription, and Complete. Double-click the text to edit it.
Notice the small red circles on two of the elements, and in the toolbar. Those are validation alerts, notifying you that configuration is needed.
-
Select the Sign up element, choose its options menu, and select Open Properties.
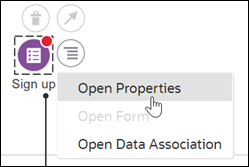
Description of the illustration open-properties.png
-
In the Properties pane, enter
Sign up herein the Title field. -
Click the UI field. Notice that it’s empty, since we haven’t created any forms.
Note that all changes or updates you make in the process editor get automatically saved.
Create a Simple Form
Use forms for human interaction.
-
Define what users see when they run your process application.
-
Use forms from human tasks or start events.
-
Choose to create a simple form with the quick editor or create an advanced form with the web form editor. If needed, choose the quick editor and later switch to the web form editor.
Let’s create a simple form.
-
Click Add at the top of the page.
-
In the Add component pane, expand UIs and click Quick Form.
-
In the Title field, enter
Subscription Form. -
Click Create, then click the Open now link.
If you missed the Open now link, click the expand arrow next to the Subscribe process at the top, then click the UIs tab, and select the new form.

-
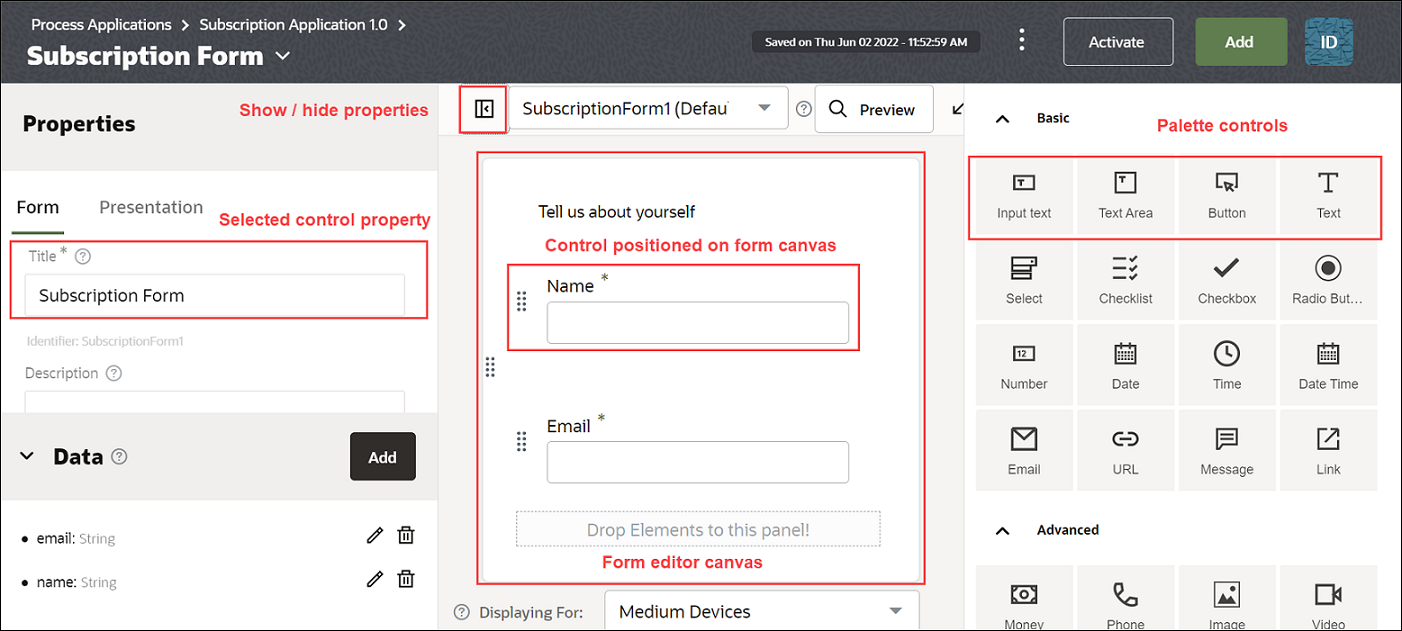
In the quick form editor, change the heading of the panel to:
Tell us about yourself.You can ignore the optional Description field.
-
Click +Control to add a control.
An InputText control is added to the form.
Note that whenever you add a control, by default an InputText control is added in the quick form editor. You can change it to a control type of your choice (such as number, date, email and so on) from the control type menu.
-
Select the control, and do the following:
-
Change its name from InputText to Name.
-
Make it required.
-
-
Add another control below the first control.
-
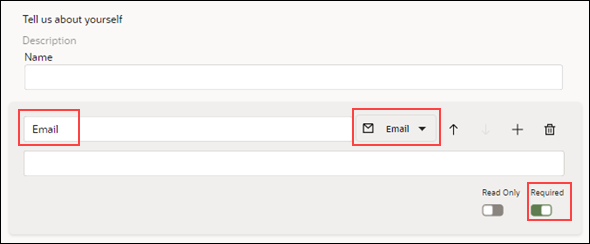
Select the second control, and do the following:
-
Change its name to Email.
-
Click
 and choose Email as the control type.
 -
Make it required.
-
Explore Advanced Form Options
Now let’s change to the web form editor to take advantage of its additional options. For example, the web form editor lets you create presentations, where you provide multiple views of a form.
-
In the top corner of the quick form editor, click Convert to Web Form.
A message appears about converting the form. It’s letting you know you can’t convert a form back to the quick editor.
-
Click Convert.
The form appears in the full editor.
-
Notice the following:
-
The palettes in the right pane. You have many more control types and options to choose from.
-
The tabs in the left Properties pane. Notice how they change depending on what is selected in the main canvas.
-
When the form is selected (click away from a control), Form and Presentation tabs appear.
-
When a control is selected, General and Styling tabs for that control appear.
-
-
-
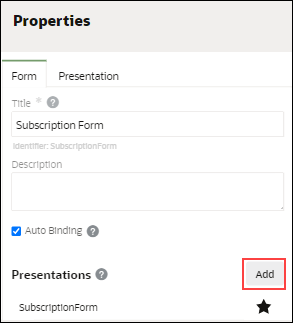
Create a presentation.
-
On the Form tab of the Properties pane, scroll down to Presentations and click Add. Note that the default presentation (SubscriptionForm), with the same name as the form is already shown.
-
In the Select Presentation Type dialog, choose Clone and then Select. We selected to clone or copy the default presentation.
-
In the Create Presentation dialog, leave SubscriptionForm selected in the Select from Previous Presentation field, change Presentation to
ApproveSubscriptionin the Name field, and leave the Switch to this presentation check box selected. -
Click Create.
The new presentation is created and displayed. You can see the name you assigned it in the top drop-down field. Because you cloned the default presentation, its content look the same.
-
-
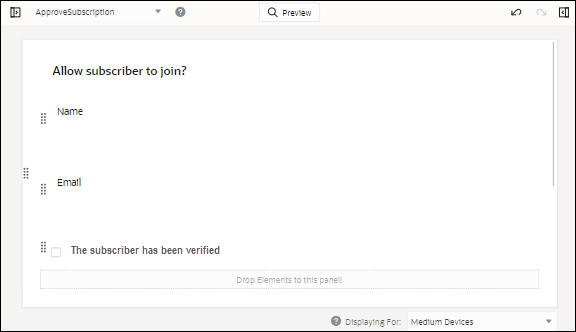
Make changes to the new ApproveSubscription presentation.
-
Select the panel, and then in the General tab of the Properties pane, change the Label field to
Allow subscriber to join?. -
Select the Name control. In the Properties pane, scroll down to the checkbox fields. Deselect Required and select Read Only.
-
Select the Email control. In the Properties pane, scroll down to the checkbox fields. Deselect Required and select Read Only.
-
Add another control. From the Basic palette, drag a Checkbox control and drop it below the Email control. Select the control, and in the Properties pane, change its name to
Verifiedand its label toThe subscriber has been verified.
-
Complete the Process
With the roles and form created, let’s return to the process and link them to the human tasks.
-
Open the structured process.
Click the expand arrow next to the Subscribe Form breadcrumb at the top, then click Processes, and select the Subscribe process.
-
Select the Sign up element, then select the options menu and click Open Properties. In the Properties pane:
-
Leave the Assignee field as Any User with Use Permission.
-
In the UI field, select your form, SubscriptionForm.
-
In the Presentation field that appears, select SubscriptionForm. Notice that the red circle disappears for this element as it is now fully configured.
-
-
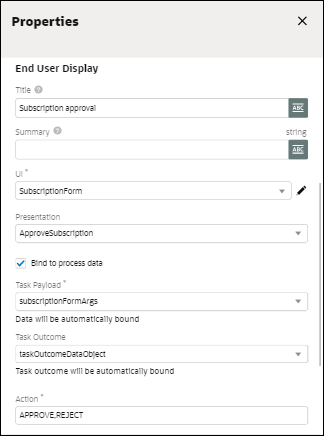
Select the Approve subscription task, then select the options menu and click Open Properties. In the Properties pane:
-
In the Assignees section, leave the Policy field as Any Single Assignee and the Select Participants field as Current Lane Participants.
-
In the End User Display section, enter
Subscription approvalin the Title field. The task assignee will see this title. -
In the UI field, select SubscriptionForm.
-
In the Presentation field, select ApproveSubscription.
-
Select the Bind to process data check box. The Task Payload and Task Outcome fields automatically populate. With binding set this way, form values are automatically associated.
-
Notice that the red circles are gone and a green checkmark appears at the top, indicating validation.
You’re ready to activate the application.
-
Activate a Version of the Application
Activating an application moves its metadata from design time (Designer) to runtime (Workspace), where it can be run in either a test or production capacity.
Before you activate, note the following about Snapshots and Versions:
-
When you activate, you specify the snapshot to use. A snapshot just refers to the application’s design-time metadata at a point in time. Save as many snapshots as you want so you can return to one if needed.
-
Create an application version as often as you want.
To activate the application:
-
Click Activate on the top right corner.
The Activate version pane appears. Notice that the version tag you specified at creation is shown (1.0).
-
Leave the Make it default field selected.
An application always has a default version. In Workspace, users can choose to see all versions or the default only.
-
Click Activate.
You’re informed that a snapshot of the application is being taken, followed by a message that the application is activated.
-
Click Test in Workspace.
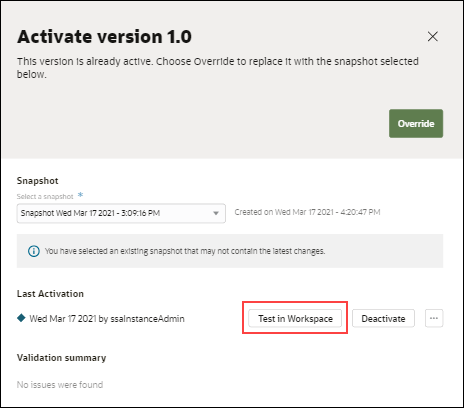
Description of the illustration test-app.png
Workspace opens in another tab. The Subscribe Application that you activated appears in the Start Requests page.
Test and Run the Application in Workspace
Use the Workspace environment to run, test, monitor, troubleshoot, or administer process applications. The options you see depend on your assigned role.
Note: Runtime APIs can be used instead of Workspace.
Before you begin, get familiar with the options in the Workspace navigation menu.
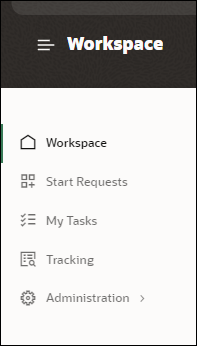
Description of the illustration workspace-menu.png
-
Workspace: Returns to the runtime home page.
-
Start Requests: Lists applications you have permission to start.
-
My Tasks: Lists tasks assigned to you or a group you’re part of.
-
Tracking: Lists structured and dynamic processes you can track.
-
Administration: Lists tasks that users with administrative permissions can perform, such as managing roles, notifications, and credentials. Displays to users assigned an administrator role only.
Start an Application Instance
In this case, pretend you are an end user who wants to subscribe. Each time the application is started, a process instance is created.
-
From the Start Requests page, select the Subscription Application.
The card’s banner lists the application identifier, and its process and start event titles appear below.
The subscription form you created appears, with the first presentation shown.

-
Complete the form and click Submit.
The fields each show an asterisk, indicating that they’re required. If you enter an invalid address in the Email field, an error alerts you.
A message confirms that an instance was created. The start event for the process is complete.
-
Optionally, repeat these steps to select the application and create a few more instances.
Complete an Assigned Task
Now put yourself in the role of an approver - in this case, a community manager who gets assigned a task when a subscriber makes a request.
-
Choose Workspace from the options menu.
The Workspace page lists tasks available to you and start requests below.
-
Click the Team Tasks tab.
You see tasks assigned with the title and process name you specified. Because they can be assigned to any user assigned to the role, you’ll need to claim a task to complete it.
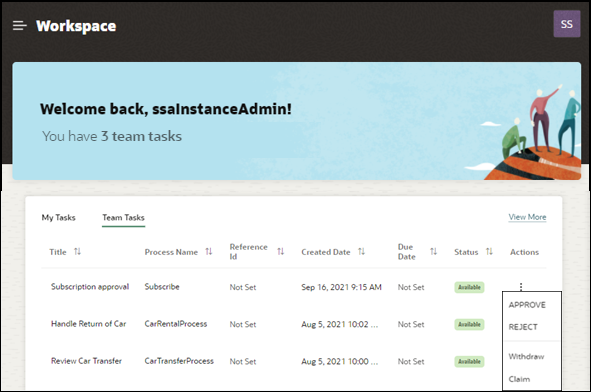
-
From the Actions column for a task, choose Claim. Click Claim in the Claim Task pane that appears.
-
Click the My Tasks tab and your claimed Subscription approval task now appears.
-
Select the Subscription approval task to open it.
The subscription form you created is displayed, with the second presentation shown this time.
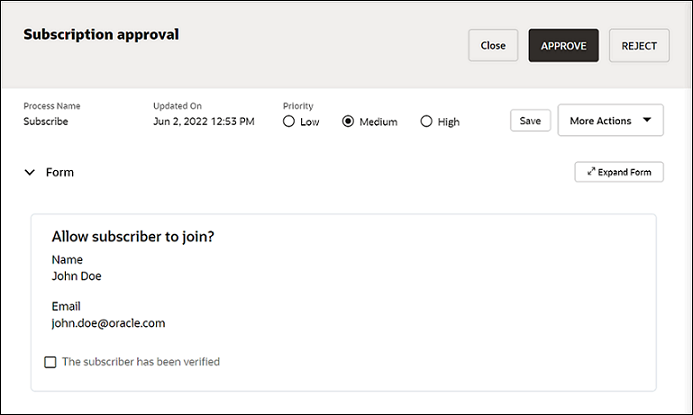
-
Complete the form.
Notice that the fields are read only.
-
Select the checkbox to confirm that the subscriber has been verified.
-
Expand Comments, enter a comment, and click Post.
-
Click APPROVE or REJECT.
A message confirms that the task was approved or rejected. The approval human task is complete.
You return to the My Tasks page. The task you just completed is no longer listed.
-
Track Your Process
Now step into the role of a process owner, who wants to monitor processes to ensure that they’re moving smoothly.
-
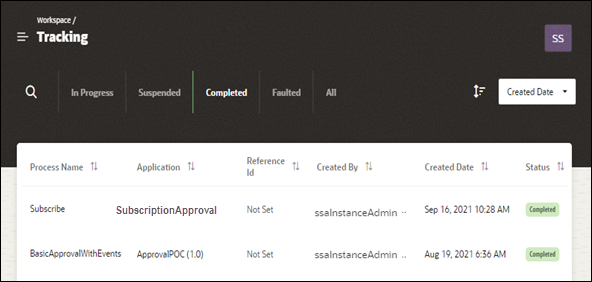
Choose Tracking from the Workspace navigation menu.
The Tracking page lists processes you’re authorized to view.
-
Select the Completed tab.
You should see the Subscribe process you just completed with a Completed status.
-
Select the completed process.
A page for viewing the process history is displayed.
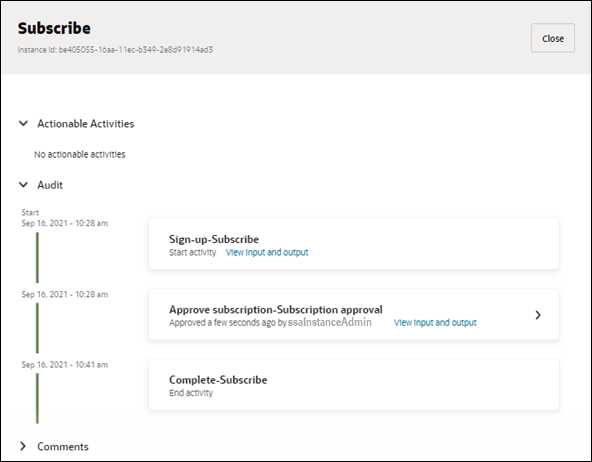
Description of the illustration process-history.png
-
Expand the Audit section and notice each element in the structured process listed: Sign up, Approve subscription, and Complete.
-
Click the View Input and output links to view the form entry data (payload).
-
Expand the Comments section to view any comments added or add a new one here. Comments are tracked with the user’s name.
-
More Learning Resources
Explore other labs on docs.oracle.com/learn or access more free learning content on the Oracle Learning YouTube channel. Additionally, visit education.oracle.com/learning-explorer to become an Oracle Learning Explorer.
For product documentation, visit Oracle Help Center.
Get started with Oracle Cloud Infrastructure Process Automation
F40441-02
July 2022
Copyright © 2022, Oracle and/or its affiliates.