7 Configuring Message Protection for Web Services
Topics:
7.1 Overview of Message Protection Configuration for Web Services
Message protection involves encrypting the message for message confidentiality and signing the message for message integrity. OWSM predefined policies and any policy you create using one of the message-protection assertion templates provide the options for message confidentiality, message integrity, or both.
The following steps summarize what you must do to configure the clients and services for message protection:
-
Attach the appropriate message protection policy to each of the clients and services.
Note: Message protection-only policies do not authenticate or authorize the requester.
-
Sign the message if you want message integrity.
-
Encrypt the message if you want message confidentiality.
-
Add the required public and private keys to the keystores of the clients and services. This step requires you to configure the keystore, as described in Overview of Configuring Keystores for Message Protection.
To sign and encrypt SOAP messages, you use public and private signature and encryption keys that you store in the OWSM keystore for the WebLogic domain. The keystore configuration is domain wide: all web services and web service clients in the domain use this keystore.
For summaries of the message protection policies available in the current release, see "Message Protection Only Policies" and "Message Protection and Authentication Policies" in Determining Which Predefined Policies to Use for a Web Service.
Note:
The OWSM run time does not use the WebLogic Server keystore that is configured using the WebLogic Server Administration Console and used for SSL as documented in About Configuring Keystores for SSL.
7.2 Overview of Configuring Keystores for Message Protection
Keys and the keystore provide the basis for configuring message protection. Before you can use any message protection security policies, or message protection and authentication with SSL security policies, you need to set up your keystores and truststores. (Authentication-only security policies do not require keys.).The keystore contains the entities private keys and the certificates associated with those private keys. A truststore contains certificates from a Certificate Authority (CA), or other entities that this entity trusts. The keystore and the truststore can be maintained together in a common store.
OWSM provides support for the following keystores:
-
Keystore Service (KSS). For more information, see Understanding OPSS Keystore Service for Message Protection.
-
Java Keystore (JKS). For more information, see Understanding Java Keystore for Message Protection.
-
Hardware Security Module (HSM). For more information about using HSM as your keystore, see Using Hardware Security Modules With OWSM.
-
PKCS11. For more information about using the PKCS11 keystore, see About Configuring OWSM for Oracle SPARC T5 and SPARC T4 Cryptographic Acceleration.
This section describes how to create JKS and KSS keystores, and how to populate these keystores with keys and certificates.
After these keystores are created, you need to configure the OWSM Keystore at the domain level. For more information, see the following topics:
This section contains the following topics:
7.2.1 Understanding OPSS Keystore Service for Message Protection
The OPSS Keystore Service provides a mechanism to manage keys and certificates for message security. This is the default approach for managing keys and certificates for message security.
For more information, see in "Managing Keys and Certificates with the Keystore Service" in Securing Applications with Oracle Platform Security Services.
This section contains the following topics:
7.2.1.1 Configuring Message Protection Using the OPSS Keystore Service
This topic describes how to use the OPSS Keystore Service for message protection.
Note:
In previous releases of OWSM, the JKS keystore was used by default. As of version 12.1.2, the OPSS Keystore Service is used by default for original installations. If you are upgrading from a prior release, your existing JKS keystore is used. You can perform the OPSS Keystore Service operations using both Fusion Middleware Control and WLST. This section focuses on the Fusion Middleware Control steps, but "Managing Keys and Certificates with the Keystore Service" describes both options.
To use the OPSS Keystore Service for message protection, perform the following steps:
-
Create a stripe and name it
owsm.-
In the content pane, select WebLogic Domain, then Security, and then Keystore.
-
Click Create Stripe. The Create Stripe screen is shown in Figure 7-1.
-
Enter
owsmand click OK.
-
-
Create a keystore named
keystorein theowsmstripe. (For more information, see "Creating a Keystore with Fusion Middleware Control" in Securing Applications with Oracle Platform Security Services.)-
Select the
owsmstripe you created and click Create Keystore.The Create Keystore page is shown in Figure 7-2.
-
Name this keystore
keystore. -
Set the protection type to Policy. (Password protected KSS keystores are not supported in this release.)
-
Clear the Grant Permission check box.
-
Do not specify a code base URL.
-
Click OK.
-
-
Select the keystore you just created and click Manage.
The Manage Certificates screen is shown in Figure 7-3.
-
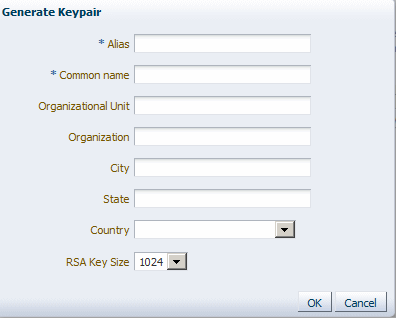
Click Generate Keypair to generate a private/public key pair.
You typically use this keypair to both sign and encrypt requests. However, you can create separate key pairs for signing and encryption if you so choose.
The Generate Keypair screen is shown in Figure 7-4.
-
Specify an alias such as
orakeyfor the key pair. -
Specify other site-specific information as appropriate.
-
Accept the default RSA key size if appropriate for your environment. Oracle requires a key length of 1024 bits or larger.
-
Click OK.
-
-
Configure OWSM to use this keystore and alias as described in Configuring OWSM to Use the KSS Keystore.
-
Optionally, obtain trusted certificates, as described in "Importing a Certificate or Trusted Certificate with Fusion Middleware Control" in Securing Applications with Oracle Platform Security Services.
7.2.1.2 Migrating a JKS Keystore Into the KSS Keystore
If you have an existing JKS keystore, you can migrate one or more aliases from the JKS keystore to the KSS keystore. To do this, perform the following steps:
7.2.1.3 Importing Certificates Into the KSS Keystore
As described in "Managing Keys and Certificates with the Keystore Service" in Securing Applications with Oracle Platform Security Services, keystores can be exported and imported. KSS supports migration for JKS and JCEKS certificate formats.
In previous releases of OWSM, the JKS keystore was used by default. As of version 12.1.2, the KSS Keystore Service is used by default for original installations. If you are upgrading from a prior release, your existing JKS keystore is used.
If you want to import your existing JKS keystore certificates into the KSS keystore, see "Importing a Certificate or Trusted Certificate with Fusion Middleware Control" in Securing Applications with Oracle Platform Security Services.
7.2.1.4 Overriding keystore.sig.csf.key and keystore.enc.csf.key Attributes
If you override keystore.sig.csf.key and keystore.enc.csf.key as described in Overview of Policy Configuration Overrides, you must change the attribute values to point directly to your chosen keystore alias instead of to csf-key.
The KSS Keystore Service does not use passwords and does not require you to configure the credential store. The alias for the sign and encrypt keys is used to store and retrieve the keys.
If you do not override keystore.sig.csf.key and keystore.enc.csf.key, no action on your part is required.
7.2.1.5 Renewing or Regenerating the Expiring Certificates or Keys
-
Use the WLST command
listExpiringCertificates.
Syntax:
svc.listExpiringCertificates(days='days', autorenew=true|false)Where:
-
svc: The service command object obtained through a call to getOpssService(). -
days: Only list certificates within these many days from expiration. You need to have a large number of days to have all the certificates renewed. -
autorenew: true for automatically renewing expiring certificates, false for only listing them.
Example:
svc.listExpiringCertificates(days='9999', autorenew=true)7.2.2 Understanding Java Keystore for Message Protection
You have the option to use the Java keystore instead of the default KSS.The Java keystore contains the entities private keys and certificates associated with those private keys.
There is a single OWSM keystore per domain, and it is shared by all web services and clients running in the domain. Therefore, if you choose to configure the JKS keystore as described in this section, OWSM uses only that JKS keystore and ignores any KSS keystores already defined.
This section contains the following topics:
7.2.2.1 Generating Private Keys and Creating the Java Keystore
The following section provides an outline of how to create a private key pair and the Java keystore (JKS) using the keytool utility. You can find more detailed information on the commands and arguments for the keytool utility at this Web address.
http://docs.oracle.com/javase/6/docs/technotes/tools/windows/keytool.html
7.2.2.2 Obtaining a Trusted Certificate and Importing it into the Keystore
You can obtain a certificate from a Certificate Authority (CA), such as Verisign or Entrust.net, and include it in the keystore. To get the certificate, you must create a Certificate Request and submit it to the CA. The CA will authenticate the certificate requestor and create a digital certificate based on the request.
To obtain a trusted certificate and import the certificate into the keystore, perform the following steps:
7.2.2.3 Configuring the OWSM Keystore
After you have created the keystore, you need to configure OWSM at the domain level to use the JKS keystore. You can do so using Fusion Middleware Control or WLST commands. Refer to the following sections for more information:
Refer to the following sections for more information:
7.2.3 Adding Keys and User Credentials to Configure the Credential Store
OWSM uses the Credential Store Framework (CSF) to manage the credentials in a secure form. The CSF provides a way to store, retrieve, and delete credentials for a Web Service and other applications
OWSM uses the credential store to look up the following:
-
Alias names and passwords for keys in the Java keystore.
For details about how OWSM uses the credential store to look up alias names and passwords from the Java keystore, see Understanding Web Service Security Concepts.
-
Usernames and passwords used for authentication.
Suppose, for example, that you have a web service that accepts a username token for authentication. If you create a web service client to talk to this web service, you need to configure the web service client with a username and password that can be sent to the web service. You store this username and password in the credential store (using either Fusion Middleware Control or WLST) and assign it a csf key.
For example, the
oracle/wss_username_token_client_policypolicy includes thecsf-keyproperty, with a default value ofbasic.credentials. To use thewss_username_token_client_policy, you should create a new password credential in the CSF using the credential namebasic.credentials, and the username and password with which the client needs to connect. If you have two web service clients that use this same client policy, these clients can either share the same password credential, which defaults tobasic.credentials, or each one can have its own credential. In the latter case, you need to create two password credentials in the CSF, for exampleApp1.credentialsandApp2.credentials, for Client1 and Client2 respectively. For Client1, you set the csf-key configuration override toApp1.credentials, and for Client2, you set the csf-key property toApp2.credentials. For more information, see Overview of Policy Configuration Overrides. Note that in both cases, the usernames and passwords must represent valid users in the OPSS identity store.
A password credential can store a username and password. A generic credential can store any credential object.
The CSF configuration is maintained in the jps-config.xml file in the domain-home/config/fmwconfig directory.
Note:
If you configured the KSS keystore as described in Configuring the OWSM Keystore, the credential store oracle.wsm.security map is not created for you. You must create it before you can use the credential store to store user credentials.
The credential store is not used for storing any keystore aliases when the KSS keystore is used.
If you configured the JKS keystore as described in Configuring the OWSM Keystore, the aliases and passwords that you specified were securely stored in the credential store. If, however, you add other aliases to the keystore, or you need to add authentication credentials for a client, you need to ensure that they are configured and stored in the credential store also, as described in the following section.
You can use Fusion Middleware Control or WLST commands to add keys and user credentials to the credential store. Both methods are described in the following procedures.
Note:
The example procedures in this section describe how to add user credentials for the basic.credentials key as described above, and the example ServiceA and ServiceB aliases described in "Setting up Private Keys and Certificates for Message Protection Policies" in Understanding Oracle Web Services Manager.
In your own environment, you should use aliases and passwords that are appropriate for your configuration.
Before adding key credentials to the credential store, ensure that the private keys and aliases exist in the Java keystore. You can create them using commands such as the following:
keytool -genkeypair -keyalg RSA -alias ServiceA -keypass password -keystore default-keystore.jks -storepass password -validity 3600

keytool -genkeypair -keyalg RSA -alias ServiceB -keypass welcome3 -keystore default-keystore.jks -storepass password -validity 3600
For more information about the keystore, see Generating Private Keys and Creating the Java Keystore.
This section contains the following topics:
7.2.3.1 Adding Keys and User Credentials to the Credential Store Using Fusion Middleware Control
Follow these steps in Fusion Middleware Control to add keys and certificates to the credential store:
-
From WebLogic Domain, select Security then Credentials.
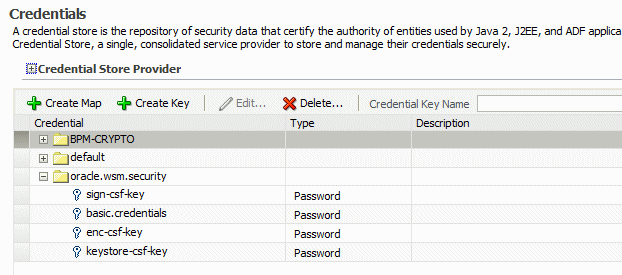
The Credentials page is displayed, as shown in Figure 7-5.
Figure 7-5 Credential Store Provider Configuration Page
Note that in this configuration, the
oracle.wsm.securitycredential map already exists in the credential store. This credential map was created when you configured the OWSM keystore as described in Configuring the OWSM Keystore.If you do not see this credential map in your configuration, you can create it by clicking the Create Map button, and entering
oracle.wsm.securityin the Map Name field. -
Optionally, expand the
oracle.wsm.securitymap in the Credential table to view the keys that have been configured in the map. Figure 7-6 illustrates a sample OWSM credential store configuration.Figure 7-6 Keys Configured in OWSM Credential Map
You can edit the keys in the credential map by selecting the key and clicking Edit. Make sure that any changes you make in the credential store are consistent with the definition of the key in the OWSM Java keystore.
-
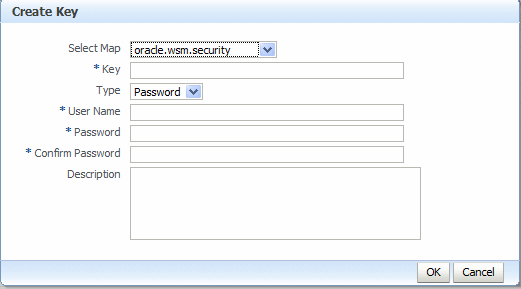
Click Create Key to create new entries in the
oracle.wsm.securitycredential map, for example for theServiceAandServiceBaliases. The Create Key dialog box appears, as shown in Figure 7-7.-
From the Select Map menu, select the map name oracle.wsm.security if it is not already selected.
-
In the Key field, enter
csfServiceAto create a key-value pair to access the key store. -
From the Type menu, select Password.
-
In the User Name field, enter the alias name that you specified for the private key in the keystore, for example
ServiceA. -
In the Password and Confirm Password fields, enter the password that you specified for the alias in the keystore, for example
password. -
In the Description field, enter a description of for the entry, for example,
Key for ServiceA. -
Click OK.
-
Click Create Key again and provide the values for any additional keystore aliases, such as
csfServiceBfor theServiceBalias.
-
-
Optionally, click Create Key to create entries in the
oracle.wsm.securitycredential map for the anycsf-keyuser credentials, for examplebasic.credentials, as follows:-
From the Select Map menu, select the map name oracle.wsm.security if it is not already selected.
-
In the Key field, enter
basic.credentials. In this example, we usebasic.credentialsbut you can specify any name you choose for the key. -
From the Type menu, select Password.
-
In the User Name field, enter a valid username that exists in the OPSS identity store, for example
AppID. -
In the Password and Confirm Password fields, enter a valid password for the user, for example
AppPWord%. -
In the Description field, enter a description of for the entry, for example,
Username and Password for basic.credential key. -
Click OK.
-
-
Restart the server.
7.3 About Creating an Application-level Credential Map
An application-level credential map name can be set in certain predefined policies using the csf.map configuration property, which can be used to override the domain-level credential map on a per-attachment basis. The csf.map configuration override is available in all policies and assertion templates that have either a csf-key or keystore-related csf keys.
The following topics describe creating application level credential map in detail:
-
"How CSF Keys Are Retrieved from an Application-level Credential Map"
-
"About Permissions to Access an Application-level Credential Map"
-
"Policies that Can Be Used to Access an Application-level CSF Map"
For more information about configuring overrides, see Overriding Policy Configuration Properties.
7.3.1 How CSF Keys Are Retrieved from an Application-level Credential Map
The domain-level oracle.wsm.security credential map is created in the credential store when you configure the Oracle WSM keystore.
More details about configuring the Oracle WSM keystore is described in Configuring the OWSM Keystore.
When an application-level credential map is configured, then the client csf-keys (csf-key and user keys sts.auth.user.csf.key) are retrieved only from that map, and not the domain-level map, as follows:
-
If an application-level csf map is configured, csf keys are retrieved from it. An exception is thrown if the csf key is not found.
-
If an application-level map is not configured, csf keys are retrieved from the domain-level csf map. An exception is thrown if the csf key is not found.
Note that the behavior is different for shared cfs-keys, as follows:
-
keystore-csf-key– This csf key will always be retrieved from the domain-level credential map (oracle.wsm.security). -
enc-csf-key– If an application-level map is configured, this csf key will be retrieved from it first; if not found, then from the domain-level csf map. -
sign-csf-key– If an application-level map is configured, this csf key will be retrieved from it first; if not found, then from the domain-level csf map.
7.3.2 About Permissions to Access an Application-level Credential Map
To access an application-level credential map you must do the following settings.
Following sections describe the procedure to access an application-level credential map:
7.3.2.1 Configuring the csf.map Property Override
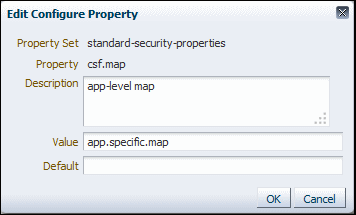
For an application to access its own credential map, the csf.map configuration override must be set for the policy that is attached to the application.
Perform the following steps to configure the csf.map Property Override:
For an application to access its own credential map, the csf.map configuration override must be set for the policy that is attached to the application.
7.3.2.2 About Granting CredentialAccessPermission to wsm-agent-core.jar
Grant CredentialAccessPermission to the wsm-agent-core.jar. This permission is required for Oracle Platform Security Services (OPSS) to allow access to the credential map in the CSF store.
Granting Credential Access permission can be done in one of the following ways:
7.3.2.2.1 Granting CredentialAccessPermission Using Oracle Enterprise Manager
You can grant CredentialAccessPermission to an application-level credential map from the domain's System Policies page.
For more information about configuring system policies, see "Managing System Policies" in Securing Applications with Oracle Platform Security Services.
7.3.2.2.2 Granting CredentialAccessPermission Using WLST
You can grant CredentialAccessPermission to an application-level credential map using the grantPermission WLST command.
You can grant CredentialAccessPermission to an application-level credential map using the grantPermission WLST command.
For more information about this WLST command, see "Infrastructure Security Custom WLST Commands" in the WLST Command Reference for WebLogic Server.
7.3.2.3 About Grant WSIdentityPermission to wsm-agent-core.jar
Grant WSIdentityPermission to wsm-agent-core.jar by using the mapName term and the getKey action. If this permission is not given to a particular application, it will not be able to access the application-level credential map. This can be done in one of the following ways:
7.3.2.3.1 Granting WSIdentityPermission Using Oracle Enterprise Manager
You can grant CredentialAccessPermission to an application-level credential map from the domain's System Policies page.
For more information about configuring system policies, see "Managing System Policies" in Securing Applications with Oracle Platform Security Services.
7.3.2.3.2 Granting WSIdentityPermission Using WLST
You can grant CredentialAccessPermission to an application-level credential map using the grantPermission WLST command.
For more information about this WLST command, see "Infrastructure Security Custom WLST Commands" in the WLST Command Reference for WebLogic Server.
7.3.2.4 Example of Granting Permission for Application-level In system-jazn-data.xml
Here is an example of granting permission in system-jazn-data.xml when used to access an application-level credential map and restrict access to a specific application. resource is the name of application for which application credential map needs to be configured and mapName is the name of the application-level credential map that needs to be configured.
<grant>
   <grantee>
      <codesource>
         <url>
file:${common.components.home}/modules/oracle.wsm.agent.common_${jrf.version}/wsm-agent-core.jar
         </url>
      </codesource>
   </grantee>
   <permissions>
      <permission>
            <class>oracle.wsm.security.WSIdentityPermission</class>
            <name>resource=usermessagingserver,mapName=application.specific.map</name>
            <actions>getKey</actions>
      </permission>
    </permissions>
</grant>
The resource term and mapName term also support asterisk (*) wildcards. Here are some examples of legal permission names when the action is getKey:
-
resource=usermessagingserver,mapName=application.specific.mapOnly the
usermessagingserverapplication can access the credential mapapplication.specific.map. -
resource=*,mapName=application.specific.mapAll applications can access the credential map
application.specific.map. -
resource=usermessagingserver,mapName=*The application
usermessagingservercan access all credential maps. -
resource=usermessagingserver,mapName=intel-*The application
usermessagingservercan access all credential maps that start withintel-. -
resource=intel-*,mapName=application.specific.mapAll applications that have a name starting with
intel-*can access the credential mapapplication.specific.map.
Note:
When using WSMIdentityPermission to access an application-level credential map:
-
The permissions are checked only for managed applications. For Java SE applications, permissions are not checked.
-
The permissions do not work in Oracle Java Cloud Service environments where
java.security.AllPermissionis given to Oracle WSM JARs. -
The permission is not required for accessing the domain-level credential map. See "Adding Keys and User Credentials to Configure the Credential Store"
7.3.3 Policies that Can Be Used to Access an Application-level CSF Map
An application-level credential map name can be set in the following predefined policies using the csf.map configuration override property, enabling you to override the domain-level credential map on a per-attachment basis.
For more information about predefined security assertion templates that contain the csf.map configuration property, see Predefined Assertion Templates for Oracle Web Services
-
http_basic_auth_over_ssl_client_policy
-
http_jwt_token_client_policy
-
http_jwt_token_identity_switch_client_policy
-
http_jwt_token_over_ssl_client_policy
-
http_jwt_token_over_ssl_service_policy
-
http_jwt_token_service_policy
-
http_oauth2_token_client_policy
-
http_oauth2_token_identity_switch_opc_oauth2_over_ssl_client_policy
-
http_oauth2_token_identity_switch_over_ssl_client_policy
-
http_oauth2_token_opc_oauth2_client_policy
-
http_oauth2_token_opc_oauth2_over_ssl_client_policy
-
http_oauth2_token_over_ssl_client_policy
-
oauth2_config_client_policy
-
http_saml20_token_bearer_client_policy
-
http_saml20_token_bearer_over_ssl_client_policy
-
multi_token_over_ssl_rest_service_policy
-
multi_token_rest_service_policy
-
wss10_message_protection_client_policy
-
wss10_message_protection_service_policy
-
wss10_saml20_token_client_policy
-
wss10_saml20_token_with_message_protection_client_policy
-
wss10_saml20_token_with_message_protection_service_policy
-
wss10_saml_hok_token_with_message_protection_client_policy
-
wss10_saml_hok_token_with_message_protection_service_policy
-
wss10_saml_token_client_policy
-
wss10_saml_token_with_message_integrity_client_policy
-
wss10_saml_token_with_message_integrity_service_policy
-
wss10_saml_token_with_message_protection_client_policy
-
wss10_saml_token_with_message_protection_service_policy
-
wss10_saml_token_with_message_protection_ski_basic256_client_policy
-
wss10_saml_token_with_message_protection_ski_basic256_service_policy
-
wss10_username_id_propagation_with_msg_protection_client_policy
-
wss10_username_id_propagation_with_msg_protection_service_policy
-
wss10_username_token_with_message_protection_client_policy
-
wss10_username_token_with_message_protection_service_policy
-
wss10_username_token_with_message_protection_ski_basic256_client_policy
-
wss10_username_token_with_message_protection_ski_basic256_service_policy
-
wss10_x509_token_with_message_protection_client_policy
-
wss10_x509_token_with_message_protection_service_policy
-
wss11_message_protection_client_policy
-
wss11_message_protection_service_policy
-
wss11_saml20_token_with_message_protection_client_policy
-
wss11_saml20_token_with_message_protection_service_policy
-
wss11_saml_or_username_token_with_message_protection_service_policy
-
wss11_saml_token_identity_switch_with_message_protection_client_policy
-
wss11_saml_token_with_message_protection_client_policy
-
wss11_saml_token_with_message_protection_service_policy
-
wss11_sts_issued_saml_hok_with_message_protection_client_policy
-
wss11_sts_issued_saml_hok_with_message_protection_service_policy
-
wss11_sts_issued_saml_with_message_protection_client_policy
-
wss11_username_token_with_message_protection_client_policy
-
wss11_username_token_with_message_protection_service_policy
-
wss11_x509_token_with_message_protection_client_policy
-
wss11_x509_token_with_message_protection_service_policy
-
wss_http_token_client_policy
-
wss_http_token_over_ssl_client_policy
-
wss_saml20_token_bearer_over_ssl_client_policy
-
wss_saml20_token_over_ssl_client_policy
-
wss_saml_token_bearer_client_policy
-
wss_saml_token_bearer_over_ssl_client_policy
-
wss_saml_token_bearer_identity_switch_client_policy
-
wss_saml_token_over_ssl_client_policy
-
wss_sts_issued_saml_bearer_token_over_ssl_client_policy
-
wss_username_token_client_policy
-
wss_username_token_over_ssl_client_policy
7.4 Understanding Service Identity Certificate Extensions
For web services that implement a message-protection policy, the base64-encoded public certificate for the web service is published in the WSDL. The certificate is included for message protection policies regardless of whether the policy encrypts or decrypts data.
The certificate published in the WSDL is the service's public key by default, specified by the Encryption Key you configured in the keystore as described in Overview of Configuring Keystores for Message Protection.
Note:
In prior releases of OWSM, for web services that implemented a message-protection policy, the web service client needed to store the web service's public certificate in its domain-level keystore. The client then used the keystore.recipient.alias property to identify the certificate in the keystore. To do so, you either identified the keystore.recipient.alias property on the Configuration page for the client policy, or specified a configuration override for the property on a per-client basis when you attached the policy (or programmatically).
If the public key certificate is not found in the WSDL, the keystore.recipient.alias property is used instead and the certificate must be in the client's domain-level keystore as before.
Note:
Self-signed certificates must be available in the client-side keystore to be trusted.
The hostname verification feature ensures that a certificate retrieved from a WSDL was not the subject of a substitution attack or "man in the middle" attack and is indeed the expected certificate.
To verify the hostname, OWSM validates that the common name (CN) or the subject Group Base Distinguished Name (DN) in the certificate matches the hostname of the service. This feature depends upon the subject DN of the certificate. By default, hostname verification is disabled.
OWM provides domain configuration properties that enable you to specify whether to enforce web service policies by publishing the X509 certificate in the WSDL and whether to use the hostname verification feature. For details about setting these properties, see Configuring Identity Extension Properties Using Fusion Middleware Control.
This section contains the following topics:
7.4.1 Ignoring the Service Identity Certificate Extension From the Client
Learn how to set the value of the Ignore Identity WSDL property.
Note:
By default, if the certificate is published in the WSDL, then the client override property value for keystore.recipient.alias is ignored.
For a Java EE client, the value of the Ignore Identity WSDL property is read automatically and no additional configuration is required. To turn identity verification on and off, set this property in as described in Configuring Identity Extension Properties Using Fusion Middleware Control.
For a JSE client, the web service client must take explicit action to ignore the certificate in the WSDL and rely solely on the keystore.recipient.alias property it sets.
To do this, set the value of wsm.ignore.identity.wsdl to true:
BindingProvider.getRequestContext().put(SecurityConstants.ClientConstants.WSM_IGNORE_IDENTITY_WSDL, "true");
7.4.2 Ignoring Hostname Verification from the Client
For a Java EE client, the value of the Ignore Hostname Verification property is read automatically and no additional configuration is required.
To turn hostname verification on and off, set this property as described in Configuring Identity Extension Properties Using Fusion Middleware Control.
For a JSE client, the web service client must take explicit action to ignore hostname verification.
To do this, set the value of wsm.ignore.hostname.verification to true:
BindingProvider.getRequestContext().put(SecurityConstants.ClientConstants.WSM_IGNORE_HOSTNAME_VERIFICATION,"false");
7.5 Caching the Nonce with Oracle Coherence
To protect against replay attacks, several policies provide the option to require a nonce in the username token. A nonce is a unique number that can be used only once in a SOAP request and is used to prevent replay attacks.
For example, see oracle/wss10_username_token_with_message_protection_client_policy.
The nonce is cached to prevent its reuse. However, in a cluster environment you must take steps to synchronize this cache across the Managed Servers. Otherwise, a request sent to a web service running on one server can be replayed and sent to another Managed Server, where it will be processed. OWSM uses the Oracle Coherence cache to cache the nonce.
The application servers (using OWSM) must be part of the Coherence cluster. By default, when you run Configuration Wizard all the Managed Servers or clusters are part of the Coherence cluster. Within the cluster, two storage-enabled servers are sufficient for caching the nonce and provide failover protection. Those two servers can be the application servers, or, if the application server(s) are storage-disabled, two storage-enabled cache servers may be used.
Note:
You might need to configure the Coherence Cluster settings to avoid conflicts between them. For more information, see "Configuring and Managing Coherence Clusters" in Administering Clusters for Oracle WebLogic Server.
Depending on the topology of your environment, use one of the following procedures to enable Oracle Coherence to cache the nonce:
For information about setting the nonce time-to-live duration in the cache, see "Configuring Security Policy Enforcement Using Fusion Middleware Control" in Securing Web Services and Managing Policies with Oracle Web Services Manager.
7.5.1 Caching the Nonce Where There Are No Managed Coherence Servers
Learn how to cache the coherence cluster topology.
Topics:
7.5.1.1 Understanding Coherence Cluster Topology Where There Are No Managed Coherence Servers
The Coherence cluster topology is formed by one or more WebLogic Server clusters or servers. Some of the servers are one or more storage-disabled (the WebLogic Server Coherence client tier) and one or more storage-enabled servers (the WebLogic Server Coherence server tier). There are no managed Coherence containers in this topology. This topology is typically used when the data storage requirement is low (usually less than 100 megabytes).
Figure 7-9 illustrates a possible topology that consists of storage-enabled and storage-disabled servers within a WebLogic Server cluster. Notice that two servers are storage-enabled: in case of failover, one server can be used as backup for the other. When you run configuration wizard, all of the managed servers or clusters are part of the Coherence cluster by default.
Figure 7-9 Cluster Topology with Storage-Enabled and -Disabled WebLogic Servers
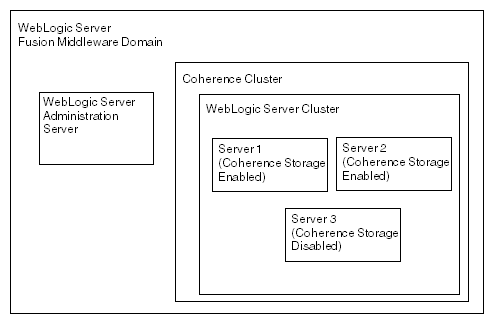
Description of "Figure 7-9 Cluster Topology with Storage-Enabled and -Disabled WebLogic Servers"
7.5.1.2 Configuring the Standard Topology Using Fusion Middleware Configuration Wizard
Follow the instructions in Installing the Infrastructure Software to install WebLogic Server and configure the standard installation topology. That standard topology provides a default coherence cluster that meets these requirements.
Note that in the Create Domain page in the Configuration Wizard, you can select Create a new expanded domain.
No other configuration is necessary. When you employ the wss_username_token_client_policy and wss_username_token_service_policy policies, the nonce will be stored in the Coherence cache.
7.5.2 Caching the Nonce for Storage-Disabled WebLogic Servers and Storage-Enabled Managed Coherence Servers
Learn how to cache the coherence cluster topology.
Topics:
7.5.2.1 Understanding Coherence Cluster Topology For Storage-Disabled WebLogic Servers and Storage-Enabled Managed Coherence Servers
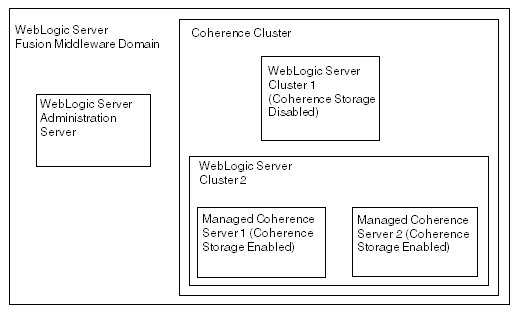
This Coherence cluster topology is formed by one or more storage-disabled WebLogic Server clusters or servers, and two or more managed storage-enabled Coherence servers (for failover protection).Figure 7-10 illustrates this topology, which is typically used when the caching requirement is high (greater than 100 megabytes) and the WebLogic Servers are not used for data caching. Note that in this topology, every access to the cache requires a network round trip to the cache server.
Note:
The data storage requirement is a general recommendation from Oracle Coherence from a caching perspective. For OWSM, this requirement is very low from a caching perspective. If you have already enabled caching on at least two application servers (for failover protection), then it is optional to add more Coherence containers to the server group WSM-CACHE-SVR.
For example, if you think that the nonce will be lost if all of your application servers go down, then you can add additional Coherence containers as backup.
Figure 7-10 Cluster Topology with Storage-Enabled Managed Coherence Servers within the Coherence Cluster
7.5.2.2 Configuring the Cluster Topology Using Fusion Middleware Configuration Wizard
You can use Fusion Middleware Configuration Wizard to add the managed Coherence servers to a server group for caching the nonce. Then use WebLogic Server Administration console to ensure that local storage is enabled for the managed Coherence servers and that storage is disabled for the WebLogic servers.
Note:
If you have Coherence storage enabled on the application servers, then the following steps are optional. They are required only if you want to backup the nonce on the managed Coherence containers.
When you employ the wss_username_token_client_policy and wss_username_token_service_policy policies, the nonce will be stored in the Coherence cache.
7.6 About Configuring Partial Encryption with Fusion Middleware Control
The assertion templates support partial signing and encryption as well as full signing and encryption of the message body. For those assertion templates or predefined policies that provide SOAP message protection, the default behavior is to protect the entire SOAP message body by signing and encrypting the entire SOAP body. You can configure the assertions and policies to protect selected elements, if you wish.
Topics:
7.6.1 Configuring Partial Encryption Using Fusion Middleware Control
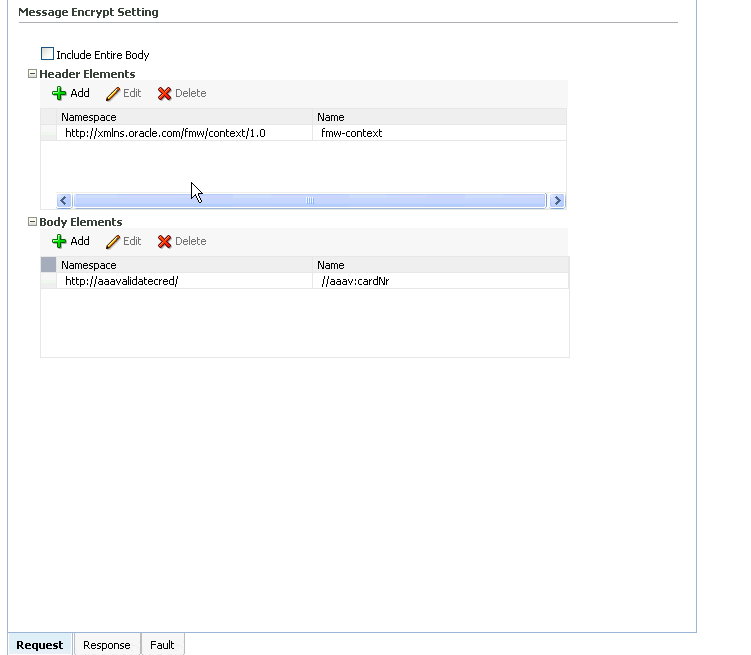
The Fusion Middleware Control user interface for the predefined message protection policies makes it easy to specify which message parts are signed, encrypted, or both. You can require that the entire body be signed, encrypted, or both, or identity specific header and body elements. The following is an example of partial encryption.
In this example, a part of the SOAP message is encrypted using Fusion Middleware Control:
Figure 7-11 Example of Partial Encryption of Message Protection Policies
7.6.2 Securing SwA Attachments
Packaging SOAP messages with attachments (SwA) has become common for any data that cannot be placed inside SOAP Envelope. The primary SOAP message can reference additional entities as attachments or attachments with MIME headers.
Each SwA attachment is a MIME part and contains the MIME header. Include SwA Attachment signs the attachment but not the MIME header corresponding to that. Include MIME Headers signs the corresponding MIME headers as well as the attachments.


