11 Oracle JCA Adapter for UMS
11.1 UMS and UMS Adapter Concepts
This section includes the following topics:
11.1.1 User Messaging Service
The User Messaging Service is an Oracle Fusion Middleware Component that enables communication between users and application. It consists of the following:
-
UMS Server: The UMS Server orchestrates message flows between applications and users. The server routes outbound messages from a client application to the appropriate driver, and routes inbound messages to the correct client application. The server also maintains a repository of previously sent messages in a persistent store, and correlates delivery status information with previously sent messages.
-
UMS Drivers: UMS Drivers connect UMS to the messaging gateways, adapting content to the various protocols supported by UMS. Drivers can be deployed or undeployed independently of one another depending on what messaging channels are available in a given installation.
-
UMS client applications: UMS client applications implement the business logic of sending and receiving messages. A UMS client application might be a SOA application that sends messages as one step of a BPEL workflow, or a WebCenter Spaces application that can send messages from a web interface.
See Figure 11-1 for more context on the UMS Server.
Figure 11-1 The User Messaging Server in Context
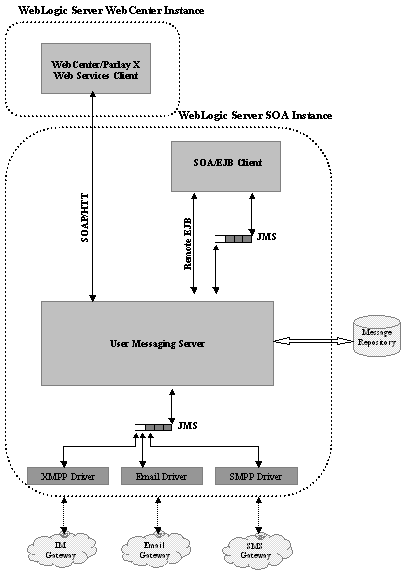
Description of "Figure 11-1 The User Messaging Server in Context"
UMS supports various messaging channels such as Email, SMS, Instant Messaging, and Voice. UMS provides a messaging proxy between the Oracle BPEL or Mediator products and the external world. The User Messaging Service provides two-way messaging: Inbound and Outbound messaging, and provides robust message delivery, including delivering delivery status, and message resend through Enterprise Messages. UMS also provides support for failover address. In summary, the UMS provides a scalable, highly available solution to communication between users and applications.
For additional information on the User Messaging Service, see Configuring Oracle User Messaging Service in Administering Oracle User Messaging Service.
11.1.2 Oracle UMS Adapter Architecture
The User Messaging Service Adapter implements the Java Enterprise Edition Connector Architecture (JCA) version 1.5. The UMS Adapter, in effect, wraps the User Messaging Service, thus enabling communication over messaging channels that include Email.
The UMS Adapter is part of the overall Adapter architecture.J2EE Applications, Mediator and BPEL processes communicate with the Oracle WebLogic Server. See the following diagram.
Figure 11-2 The UMS Adapter as Part of the Adapter Architecture
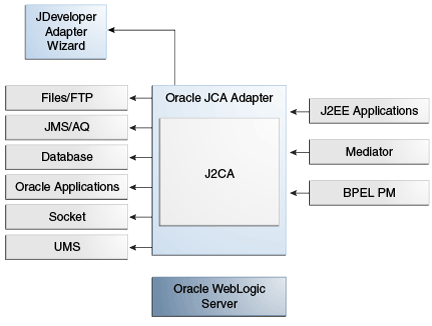
Description of "Figure 11-2 The UMS Adapter as Part of the Adapter Architecture"
11.1.3 UMS Adapter Message Concepts
The UMS Adapter enables you to provide different message formats.
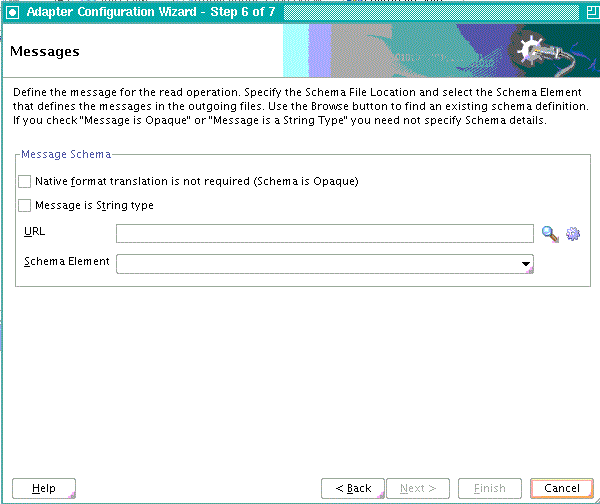
For many of your email use cases, you might not want to specify a schema as the message payload could be plain text and you want it received as is. In that case, you can then select the Message is String type checkbox on the Messages Screen.
XSD files are required for translation of messages. If you want to define a new schema or convert an existing data type definition (DTD) or COBOL Copybook you must select Define Schema for Native Format to supply an XSD file.
Selecting Define Schema for Native Format starts the Native Format Builder wizard. This wizard guides you through the creation of a native schema file from file formats that include comma-separated value (CSV), fixed-length, DTD, and COBOL Copybook.
After the native schema file is created, the Messages page is displayed, with the Schema File URL and Schema Element fields filled in. For more information, see Creating Native Schema Files with the Native Format Builder Wizard.
Unlike other adapters, the UMS Adapter uses a predefined Message Schema to represent the message it uses.
An example of the Message Schema that the UMS Adapter uses follows.
<?xml version= "1.0" encoding= "UTF-8" ?>
<xsd:schema xmlns:xsd="http://www.w3.org/2001/XMLSchema"
            xmlns="http://platform.integration.oracle/blocks
                    /adapter/fw/metadata/Inbound_UMS"
            targetNamespace="http://platform.integration.oracle/
                   blocks/adapter/              fw/metadata/Inbound_UMS"
            xmlns:imp1="http://xmlns.oracle.com/pcbpel/adapter/opaque/"
            elementFormDefault="qualified"
                attributeFormDefault="unqualified">
<xsd:import namespace="http://xmlns.oracle.com/pcbpel/adapter/opaque/"   schemaLocation="opaque.xsd"/>
    <xsd:complexType name="MessageType">
        <xsd:sequence>
            <xsd:element ref="imp1:opaqueElement"/>
            <xsd:element name="attachment"
            type="AttachmentType" minOccurs="0"                  maxOccurs="unbounded"/>
        </xsd:sequence>
    </xsd:complexType>
    <xsd:complexType name="AttachmentType">
        <xsd:attribute name="href" type="xsd:string"/>
    </xsd:complexType>
    <xsd:complexType name="ResponseType">
        <xsd:sequence>
            <xsd:element name="MessageId"
             type="xsd:string"/>
        </xsd:sequence>
    </xsd:complexType>
    <xsd:element name="message" type="MessageType"/>
    <xsd:element name="response" type="ResponseType"/>
</xsd:schema>Status OpenFixedClosed
You define the schema according to your translation requirement through the UMS Adapter Configuration Wizard Message screen, and as defined for the message body content). The UMS Adapter imports the xsd you specify into the message schema used by the UMS Adapter.
For example, see the schema snippet in the following example, where the user-defined schema singleString.xsd is imported through the UMS Adapter Configuration Wizard and refers to the element singleString, which is defined under singleString.xsd through the UMS Adapter Configuration Wizard.
Example - Schema Snippet for SingleString.xsd
<?xml version= '1.0' encoding= 'UTF-8' ?>
<xsd:schema attributeFormDefault="unqualified"
            elementFormDefault="qualified"
            targetNamespace="http://xmlns.oracle.com
                /singleString"
            xmlns="http://xmlns.oracle.com/singleString"
            xmlns:xsd="http://www.w3.org/2001/XMLSchema"
            xmlns:nxsd="http://xmlns.oracle.com/pcbpel/nxsd"
            nxsd:encoding="US-ASCII" nxsd:
                useArrayIdentifiers="true"
            nxsd:stream="chars" nxsd:version="NXSD">
    <xsd:complexType name="singleString">
        <xsd:sequence>
            <xsd:element name="input" type="xsd:string"
                         nxsd:style="terminated"
                         nxsd:terminatedBy=";"/>
        </xsd:sequence>
    </xsd:complexType>
    <xsd:element name="payload" type="singleString"/>
</xsd:schema
11.1.3.1 Custom Java Callout
On the Java Callout Screen you can specify a custom Java class with custom logic that can be invoked before the Email, SMS, or IM message is processed by the UMS Adapter.
11.1.3.1.1 Use Cases for Custom Java Callout
One simple use case of the Custom Java Callout is to match the sender address with an address in the LDAP or that resides in a staging area and which has been recorded earlier. To provide this use case, you must implement the interface oracle.tip.pc.services.translation.util.ICustomCallout.
This interface defines a single method execute with a return value of boolean. Depending on the return value, the message is either processed or rejected:
public Interface CustomCallout{
  public boolean execute (Message message) throws exception;
}
Where Message is the Message class from the UMS Session Description Protocol (SDP) Java API, a well-defined Java API provided by the UMS Server, which can be found at $MW_HOME./oracle_common/modules/oracle.sdp.client_12.1.2/messaging-api.jar. The Boolean value returned indicates whether to accept and process the message or to reject the message.
package oracle.adapter.custom;

import java.io.File;
import oracle.sdp.messaging.Message;
import oracle.tip.pc.services.translation.
             util.ICustomCallout;

public class UMSAdapter_CustomCall implements          ICustomCallout{

        @Override
        public boolean execute(Message message)              throws exception {
        String emailFromAddress = message.
        getSenders()[0].getValue();

String fileName = "/tmp/OracleStore/staging/".
concat(emailFromAddress).concat(".usr");
                File file = new File(fileName);
                if(file.exists()) {
                        return true;
                }
                return false;
        }
}
In another use case, a user with the email ID of
scott.tiger@example.com registers through an
internet store web site. The user would be recorded under a staging area by
using a file name scott.tiger@example.com.
An email is sent to the user's email ID to reply to the sent email.
If the user replies to the email, the UMS Adapter picks the email. You can subsequently use a Java Callout to check the user file under the staging area and ensure that the user is registered through the web site.
11.1.3.1.2 Using the Custom Callout Facility
To use the Custom Callout facility, you must
- Indicate the name of the class on the Java Callout Screen in the UMS Adapter Configuration Wizard.
- Bundle the class and other required custom classes as a jar file.
- Place the jar file under your Composite Application, under the
SCA-INF/libdirectory. - Ensure that the compiled Java class (.class file) is directly placed under the Composite Project Folder
\SCA-INF\classes:
11.1.4 Transaction Support
The UMS Adapter, by default, uses an XA Transaction with an Inbound Scenario for both polling and listener mode. For this purpose, the Adapter configures a connection factory instance with the property XATransaction set to true.A default JNDI instance is available, by default, which is configured to use XA. The name of this default JNDI instance is eis/ums/UMSAdapterInbound.For outbound scenarios, the UMS Adapter leverages the XA support from the UMS. UMS will participate in a global transaction if one is already started, for example through BPELYou can choose to define your own JNDI instances and use them, but you should keep in mind this discussion.
11.1.4.1 Inbound Error Handling
The UMS Adapter uses the default rejection handling mechanism on the Inbound side of the Adapter for rejecting bad messages. For example, any translation-related errors result in message rejection. Refer to Creating Fault Policies in this Guide for more information on fault policies and adapters.
Under retriable error conditions, and when you specify retry-related endpoint properties, the UMS Adapter tries to re-publish the Inbound message for the configured number of retries before rejecting the message. Transactions are then set for rollback under XA, per the previous JNDI and XA discussion.
11.1.4.2 Outbound Error Handling
The UMS Adapter throws an exception for transient (recoverable) error conditions
such as connection errors. For retriable errors, you can use a retry policy supported by
the Adapter framework; to do this, you can set the binding property
jca.retry.count to a retry count you want. Again, as with other adapters,
if you do not set the property, the retry is carried through according to the fault
policy.
You can define non-retriable connection errors for outbound transactions through a
fault policy. The maximum number of reconnection attempts can be defined through
fault-policy.xml.
Adapters translate data from Native representation to standard XML format and back based on the metadata captured by your work at design time, through the Adapter Configuration Wizard. A translation error is thrown when there is an exception thrown by carrying out the translation, and a corresponding binding fault is also thrown.
You can set endpoint properties related to outbound retriable errors, as shown in Table 11-1.
Table 11-1 UMS Adapter Outbound Endpoint Properties
| Property | Description |
|---|---|
|
|
Indicates the maximum number of retries before throwing retriable error conditions back to the invoking service engine. |
|
|
Indicates the time interval between retries, measured in seconds. |
|
|
Indicates the retry interval growth factor, measured in positive integers. |
|
|
Indicates the maximum value of retry interval; that is a cap if the value is greater than 1. |
|
|
Indicates the maximum total retry period. Retries do not occur longer than the value specified in the parameter. |
11.1.4.2.1 Retry Mechanism for Failed Outgoing Notifications with Status Reporting
The UMS Adapter makes use of the existing infrastructure provided by UMS for retrying failed outgoing exceptions. Currently, the UMS Server supports the viewing of failed notifications from Fusion Middleware Control, in addition to the resending of messages.
11.1.4.2.2 Inbound Receive Notification in a Cluster (Through Polling or Through a Listener)
The UMS API supports an environment where the UMS Server and its clients are deployed in a cluster environment.The UMS Adapter also supports high availability in an active-active setup.
The configuration details for UMS Adapter to work properly in a clustered environment follows. UMS deployment in a cluster must look the same. On a node in the cluster, you have the UMS adapter, the UMS server EAR and all driver EARs. They must all co-exist on the node.Note that in, for example, the Adapter Configuration Wizard when you create a cluster, you do target the UMS adapter and all UMS to the cluster. In a later step, in the Configuration Wizard you list all servers that are to be part of the cluster.
All UMS Adapter activations of the same composite application use the same unique ApplicationName configuration parameters. The UMS Adapter synthesizes the application name parameter from the Inbox address on which the specific endpoint is to listen.
This synthesis enables all activations of a specific composite in a cluster to share all configuration and artifacts such as Access Points and Message Filters
The ApplicationInstanceName configuration parameter is synthesized automatically through the UMS API implementation and the UMS Adapter depends on that synthesis.
Additionally, the UMS Adapter API implementation guarantees that in a cluster environment no two applications will receive the same message.
The UMS Adapter also supports active fail-over of an Inbound service that is active-passive in a clustered environment. You can enable this active fail-over for UMS Adapter support through a JCA service binding property (composite.xml)singleton, set to true.
Listening and Polling work the same way using a UMS adapter in a clustered environment as they do in a non-clustered environment.
11.1.4.2.3 UMS Adapter Properties and Mime Type Configuration
There are several properties associated with the UMS Adapter that you can use to provide additional configuration. Some of these are already set for you when you use the UMS Adapter Configuration Adapter Wizard. All applicable Internet Mail Headers and Mime headers can be configured through normalized message properties/headers.
Table 11-2 lists the Activation Spec properties applicable to the UMS Adapter.
Table 11-2 UMS Adapter Activation Spec Properties
| Property Name | Description |
|---|---|
|
|
Name of the Java class that defines custom logic for a message filtering or any other check. This class is a concrete implementation of the ICustomCallout interface. |
|
|
Specifies how the adapter will receive messages from UMS. Set to poller for polling mode Or set to listener for listener mode. |
|
|
Address from which to receive incoming messages. One or more comma separated IM, SMS, or Email addresses for the IM, SMS, or Email delivery type. |
|
|
Email support is provided for receiving and sending outgoing messages. |
|
|
Polling interval in seconds for poller consume mode. |
|
|
Specify one or more message filters. A single filter would comprise of a Java Pattern String to match the incoming message against, along with the field type and the action (Accept or reject) to be taken. |
Table 11-3 provides a list of interaction specification properties available.
Table 11-3 UMS Adapter Interaction Specification Properties
| Property Name | Description |
|---|---|
|
|
Email, IM and SMS support for receive and sending outgoing messages. |
|
|
Subject of Outgoing Message. |
|
|
Sender addresses of outgoing message. |
|
|
One or more recipient addresses. |
|
|
Reply-To address. |
|
|
One or more cc addresses for email delivery. |
|
|
One or more Bcc addresses for email delivery. |
|
|
|
The UMS Adapter exposes all applicable internet messages headers and Mime message headers and mime part headers (within a multipart construct.)
Mime headers are applicable only for the first body part of the message that is the UMS Adapter payload.
Mime headers for attachments are stored along with the attachment as normalized message properties that can be manipulated from within a BPEL process.
Table 11-4 describes all the applicable headers defined by the internet message format along with mapping and corresponding adapter header.
Table 11-4 Message Headers
| Header Field Name | Minimum Occurrence | Maximum Occurrence |
|---|---|---|
|
|
0 |
1 |
|
|
0 |
unlimited |
|
|
0 |
unlimited |
|
|
0 |
unlimited |
|
|
0 |
1 |
|
|
0 |
unlimited |
|
|
0 |
unlimited |
|
|
0 |
unlimited |
|
|
0 |
unlimited |
|
|
1 |
unlimited |
|
|
1 |
unlimited |
|
|
0 |
1 |
|
|
0 |
1 |
|
|
0 |
1 |
|
Cc |
0 |
1 |
|
Bcc |
0 |
1 |
|
|
0 |
1 |
|
|
0 |
1 |
|
|
0 |
1 |
|
|
0 |
1 |
|
|
0 |
unlimited |
|
|
0 |
unlimited |
Note:
You can often use the BPEL Invoke activity's property tab to select jca.properties to set a value from the Invoke activity. However, you cannot set jca.ums.message-id, as these message IDs are auto-generated.
Table 11-5 describes all applicable Mime message headers.
For the outbound UMS Adapter, you can use the property JCA.UMS.MSG.CONTENT-TYPE, which can be used for specifying encoding. But if you do not set the value, the outbound UMS adapter uses UTF-8 encoding for email by default.
Table 11-5 Mime-Part Message Headers
| Header Field Name | Mapped Adapter Header Field Name | Notes |
|---|---|---|
|
Content-Type |
|
- |
|
Content-Transfer-Encoding |
|
- |
|
Content-ID |
|
- |
|
Content-Description |
|
- |
|
Content-Disposition |
|
- |
|
Content-Language |
j |
- |
|
Mime-Extension-field |
|
Any other mime header field hat begins with the string “Content-“. You can add more than one header as
|
11.1.4.2.4 Proprietary Headers
The UMS Adapter enables you to add any proprietary headers, as shown in Table 11-6.
Table 11-6 Proprietary Headers
| Header Name | Notes |
|---|---|
|
|
More than one proprietary header can be added in the following format:
where
|
11.1.4.3 Email Attachments
The UMS Message XML can contain a list of Attachment elements that have an href attribute. The Attachment Manager stores other mime details associated with the attachment as MimeType, Content ID along with a stream object (which is the attachment content).
Currently, the UMS Adapter supports both inbound and outbound attachments.
See the following example for a sample XML Message with attachment element.
Example - Sample XML Message with Attachment Element
<Receive1_ReceiveEmail_InputVariable>
<part name="body" >
  <Email>
    <payload>This is a test mail.-Sagar</payload>
      <attachment href=
          "0DF86C104BF511EoAF5977BAA7C7CFD9"/>
  </Email>
  </part>
</Receive1_ReceiveEmail_InputVariable>
On the inbound side, the UMS Adapter sets all mime details before passing the attachment to the Attachment Manager. The Attachment Manager is a fabric attachment manager internal component, responsible for storing attachment contents and MIME headers to the database. This functionality enables you to pass attachments as links/href ids between different SOA components.
11.1.4.4 Mail Attachment Handling
The UMS Adapter uses the Fabric Attachment Manager to store and retrieve attachments.
The UMS Message schema defines Attachment element with a href attribute:
Example - UMS Message Schema Defines Attachment Element with href Element
<Receive1_ReceiveEmail_InputVariable>
<part name="body" >
  <Email>
    <payload>This is a test mail.-Sagar</payload>
      <attachment href=
           "0DF86C104BF511EoAF5977BAA7C7CFD9"/>
  </Email>
  </part>
</Receive1_ReceiveEmail_InputVariable>
The UMS Message XML can have list of attachment elements with a href attribute. The The Attachment manager stores other mime details associated with attachment as MimeType; Content ID and others, in addition to a stream object (attachment content). Sample XML Message with attachment element
On the inbound side, the UMS adapter sets all mime details before passing attachment to Attachment Manager, while on the outbound, the UMS Adapter extracts any mime details received along with attachment object and uses them while creating the outgoing SDP message notification.
The Fabric Attachment Manager updates the href attribute with a key after storing the attachment to the database. You can use this key later to retrieve attachment content.
The sample Normalized Message payload map has an XML structure having attachment element, which is passed from UMS Adapter to BPEL/Mediator service engine.
A sample XML Message with attachment element follows:
<Receive1_ReceiveEmail_InputVariable>
<part name="body" >
  <Email>
    <payload>This is a test mail</payload>
    <attachment href=
         "0DF86C104BF511EoAF5977BAA7C7CFD9"/>
  </Email>
  </part>
</Receive1_ReceiveEmail_InputVariable>
11.1.4.4.1 Retrieving Mime Information Associated with an Attachment in BPEL
The following example shows how attachments can be retrieved in BPEL. First, obtain the Mime Information associated with the attachment.
Example - Obtaining the Mime Information Associated with an Attachment
<copy>
  <from
expressionLanguage="urn:oasis:names:tc:wsbpel:2.0:sublang:xpath1.0">ora:readBi
naryFromFileWithMimeHeaders('/home/testuser/test.txt','one','text/plain','atta
chment; filename="test.txt"','7bit','text file','en')</from>
 <to
expressionLanguage="urn:oasis:names:tc:wsbpel:2.0:sublang:xpath1.0">$Invoke1_S
endNotification_InputVariable.body/ns2:attachment[1]</to>
</copy>
<copy>
  <from
expressionLanguage="urn:oasis:names:tc:wsbpel:2.0:sublang:xpath1.0">ora:readBi
naryFromFileWithMimeHeaders('/home/testuser/oracle_logo.gif','two','image/gif'
,'attachment; filename="oracle_logo.gif"','7bit','oracle
logo','en/ja')</from>
 <to
expressionLanguage="urn:oasis:names:tc:wsbpel:2.0:sublang:xpath1.0">$Invoke1_S
endNotification_InputVariable.body/ns2:attachment[2]</to>
</copy>
In the example, the BPEL XPath Extension Function readBinaryFromFileWithMimeHeaders(...) returns the content of a binary file with MIME headers. The signature of this function is ora:readBinaryFromFileWithMimeHeaders(fileName, contentId, contentType, contentDisposition, contentTransferEncoding, contentDescription, contentLanguage.
You can also copy the href directly and use jca.ums.part.content-disposition to set the content-disposition for single attachments. For example if the attachment content is obtained using Oracle File Adapter SynchRead Read File As Attachment operation, use the following BPEL code to copy the attachment and invoke the UMS Adapter Outbound Send Notification operation.
        <assign name="Assign1">
            <copy>
                <from>$Invoke2_SynchRead_OutputVariable.attach/@href</from>
                <to
expressionLanguage="urn:oasis:names:tc:wsbpel:2.0:sublang:xpath1.0">$Invoke1_S
endNotification_InputVariable.body/ns2:attachment/@href</to>
            </copy>
            <copy>
                <from>'This is a test message.'</from>
                <to
expressionLanguage="urn:oasis:names:tc:wsbpel:2.0:sublang:xpath1.0">$Invoke1_S
endNotification_InputVariable.body/ns2:payload</to>
            </copy>
        </assign>
        <invoke name="Invoke1" partnerLink="umsReference"
                portType="ns1:SendNotification_ptt"
operation="SendNotification"
                inputVariable="Invoke1_SendNotification_InputVariable"
bpelx:invokeAsDetail="no">
            <bpelx:toProperties>
                <bpelx:toProperty
name="jca.ums.part.content-disposition">'attachment;
filename="test.txt"'</bpelx:toProperty>
            </bpelx:toProperties>
        </invoke>
11.1.4.4.2 Setting Mime Information for Multiple Attachments in BPEL
The following snippet shows how you can set Mime Information for multiple attachments in BPEL.
<copy>
  <from
expressionLanguage="urn:oasis:names:tc:wsbpel:2.0:sublang:xpath1.0">ora:readBi
naryFromFileWithMimeHeaders('/home/testuser/test.txt','one','text/plain','atta
chment; filename="test.txt"','7bit','text file','en')</from>
 <to
expressionLanguage="urn:oasis:names:tc:wsbpel:2.0:sublang:xpath1.0">$Invoke1_S
endNotification_InputVariable.body/ns2:attachment[1]</to>
</copy>
<copy>
  <from
expressionLanguage="urn:oasis:names:tc:wsbpel:2.0:sublang:xpath1.0">ora:readBi
naryFromFileWithMimeHeaders('/home/testuser/oracle_logo.gif','two','image/gif'
,'attachment; filename="oracle_logo.gif"','7bit','oracle
logo','en/ja')</from>
 <to
expressionLanguage="urn:oasis:names:tc:wsbpel:2.0:sublang:xpath1.0">$Invoke1_S
endNotification_InputVariable.body/ns2:attachment[2]</to>
</copy>
In the example, the BPEL XPath Extension Function readBinaryFromFileWithMimeHeaders(...) returns the content of a binary file with MIME headers. The signature of this function is ora:readBinaryFromFileWithMimeHeaders(fileName, contentId, contentType, contentDisposition, contentTransferEncoding, contentDescription, contentLanguage.
11.1.4.5 UMS Adapter Inbound and Outbound Operations
Operations you configure using the UMS Adapter Configuration Wizard include the following inbound and outbound operations:
-
Inbound Receive Notification -
Outbound Send Notification -
Outbound Send Notification(Receive Message id as reply) -
Outbound Get Message Status(an outbound synchronous request reply where you provide message ID and optional recipient information to receive the message delivery status information from the UMS)
11.1.4.5.1 Oracle UMS Adapter Inbound ReceiveNotification Concepts
In this scenario, the UMS Adapter registers an access point on the UMS Server to consume and process incoming notifications. This section provides an overview of different configurations and concepts associated with Oracle UMS Adapter Inbound Receive Notification.
11.1.4.5.2 Oracle UMS Outbound Send Notification Concepts
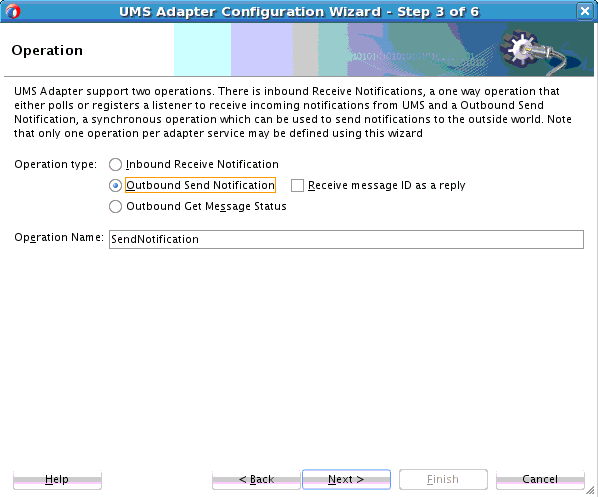
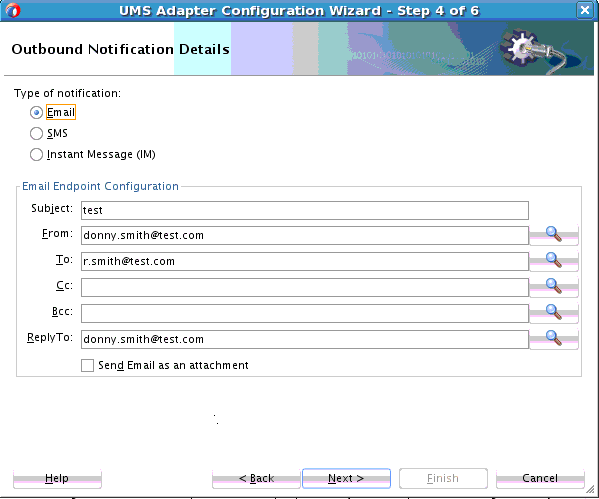
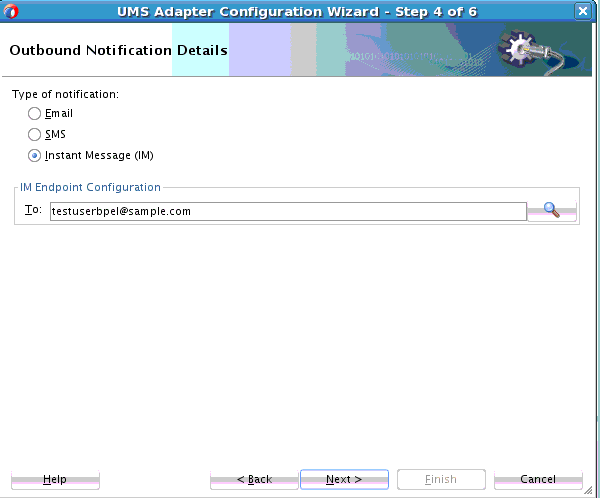
In this scenario, the UMS Adapter processes outgoing send notifications. This section provides an overview of different configurations and concepts associated with the Oracle UMS Adapter Outbound send notification, of which there are two types, the normal send and the send with Receive Message id as reply request.
11.1.4.5.3 Receive Message id as reply request
A type of outbound synchronous request is the Receive Message id as reply request. It is a variation of the one way invoke; however, with Receive Message id as reply request, a unique message ID is replied back from the UMS Server. You can use this type of request if you want to get this message id to check message delivery status information. UMS stores all delivery-related status information received from messaging gateways. The Message id can be used to retrieve this status information, using Fusion Middleware Control.
If you choose to use this type of request, you select the Receive Message Id as a reply request checkbox when selecting an Operation.
11.2 Oracle UMS Adapter Features
Get an overview of outbound and inbound features of Oracle UMS Adapter.
The UMS Adapter includes the following Outbound features
-
Support of Email Messaging, IM and SMS Channels.
-
Use of Message Filters-the UMS Adapter enables you to filter IM and SMS messages using Content, Recipient, Sender and Subject.
-
Sending Email messages with Subject and Body and one or more attachments. The user can also send out IM, SMS messages.
-
Receive message delivery status information from UMS.
-
Translation Support for the message body.
-
SSL/TLS security for the outbound SMTP server (this availability is provided through the Java Messaging Service).
-
XA or global transaction support for outbound transactions.
The UMS Adapter provides the following Inbound features:
-
Support for Email, IM and SMS Messaging channels.
-
Use of Message Filters-the UMS Adapter enables you to filter email messages in two ways:
-
Establishing Message filters through the Adapter Configuration Wizard Messages Filter Screen. These include Message filters, Blacklist and Whitelist filters. Message Filters provide the ability to filter incoming messages based on the Email To address, From address, CC address, Subject, and Mail Headers. Mails can similarly be ignored using this filtering. Note: there is no filtering available on the BCC address.
-
Writing and packaging a Java Callout, and providing the name of the callout through the Adapter Configuration Wizard. Refer to Custom Java Callout for more information.
-
-
Reception of messages with Subject, Body and one or more attachments along with internet mail and mime headers.
-
A Polling/Listener interface. The UMS Adapter polls mailboxes for incoming email on various schedules you establish, which can be both sequential and parallel.
-
Translation support for the message body.
-
XA or global transaction support for inbound(applicable to both polling and listener mode) s. Note that if the UMS Adapter flow is Outbound, and even if the UMS Adapter is set for XA Transactions to False, if the flow is part of an-already initiated Transaction from BPEL or from an Inbound Adapter, then the same Outbound UMS Adapter behaves as if it were performing XA transactions.
-
IMAP/POP3 servers with SSL (available through the UMS Server)
Note:
You cannot set and get headers with Keyword headers when you use the MS-2010 Mail server with the UMS Adapter
11.3 Configuring the Oracle UMS Adapter
You configure the User Message Service using the Fusion Middleware Control Console and the Email Adapter Configuration Wizard in JDeveloper when you configure the UMS Adapter.
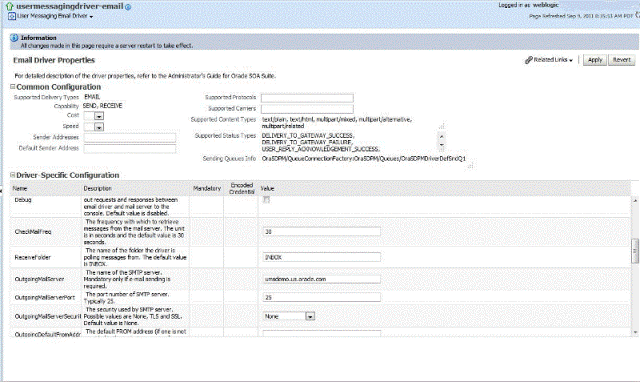
To configure the User Messaging service drivers, use the Fusion Middleware Control Console. Specifically, to use the email messaging channel, you must configure specific properties.
For details on configuring SMPP, XMPP and VoiceXML driver, see Configuring Oracle User Messaging Service in Administering Oracle User Messaging Service.
The following sections provide information on configuring the UMS Adapter:
- Configuring the Email Driver for the UMS Adapter - Outbound Connectivity
- Configuring the Email Driver for UMS Adapter - Inbound Connectivity
- Configuring the Email Driver for the UMS Adapter - Google OAuth 2.0
- Configuring the Email Driver for the UMS Adapter - Microsoft Azure AD OAuth 2.0
- Configuring the User Messaging XMPP Driver
- Configuring the User Messaging SMPP Driver
- Configuring the HTTP Proxy for Firewall traversal
- Designing the Adapter Service and the BPEL Process for Inbound Connectivity
- Designing the Adapter Service and the BPEL Process for Outbound Connectivity
11.3.1 Configuring the Email Driver for the UMS Adapter - Outbound Connectivity
In this procedure, you provide the necessary input to setup the UMS Email Driver for outbound connectivity with the email server.
11.3.2 Configuring the Email Driver for UMS Adapter - Inbound Connectivity
The following is the minimum configuration required to set up the UMS email driver for inbound scenarios:
11.3.3 Configuring the Email Driver for the UMS Adapter - Google OAuth 2.0
You can configure the email driver for the UMS adapter to connect to Google email servers using OAuth 2.0, which significantly increases the security of the email driver.
Note:
To follow these steps, you must first install patch 31340781. Sign into My Oracle Support and
search for the patch number to locate and download the patch.Note:
If you need to modify the email driver, you must edit theOracle_Home/user_projects/domains/WLS_SOA/config/fmwconfig/usermessagingconfig.xml
file directly. The property names in usermessagingconfig.xml generally match their
equivalent field labels in the Fusion Middleware Control Console, but with spaces omitted between words. You can also hover over the
field labels in Fusion Middleware Control to see
the corresponding xml property name.
To make changes in the Fusion Middleware Control Console, you need to delete the existing email driver and create a new one.
11.3.4 Configuring the Email Driver for the UMS Adapter - Microsoft Azure AD OAuth 2.0
You can configure the email driver for the UMS adapter to connect to Microsoft Azure Active Directory email servers using OAuth 2.0, which significantly increases the security of the email driver.
Note:
To follow these steps, you must first install patch 31340781. Sign into My Oracle Support and
search for the patch number to locate and download the patch.The O365 refresh token regularly expires every 30 to 90 days. Upon expiration, you will need to generate a new token and update the email driver.
Note:
If you need to modify the email driver, you must edit theOracle_Home/user_projects/domains/WLS_SOA/config/fmwconfig/usermessagingconfig.xml file directly. The property names in usermessagingconfig.xml generally match their equivalent field labels in theFusion Middleware Control Console, but with spaces omitted between words. You can also hover over the field labels in Fusion Middleware Control to see the corresponding xml property name.
To make changes in the Fusion Middleware Control Console, you need to delete the existing email driver and create a new one.
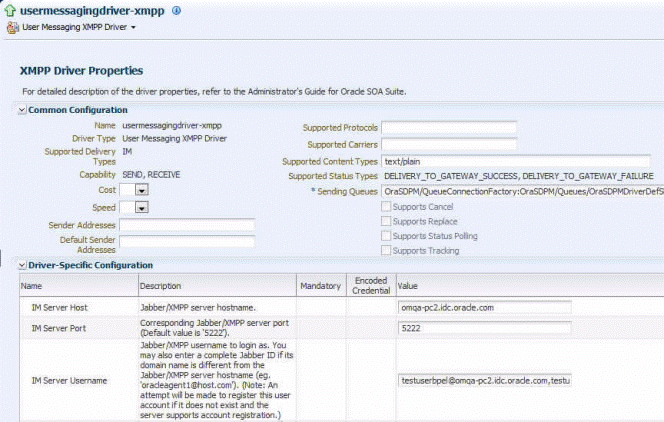
11.3.5 Configuring the User Messaging XMPP Driver
On the UMS side, you must configure the XMPP driver from the Fusion Middleware Control Console, as in Figure 11-4.
Figure 11-4 Configuring the User Messaging XMPP Driver
Description of "Figure 11-4 Configuring the User Messaging XMPP Driver"
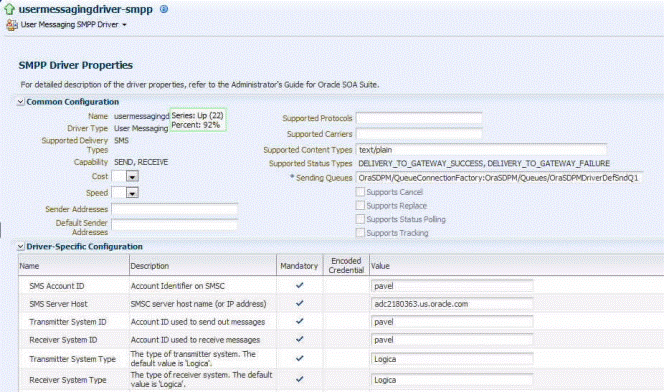
11.3.6 Configuring the User Messaging SMPP Driver
On the UMS side, you must configure the SMPP driver from the Fusion Middleware Control Console, as below.
Figure 11-5 Configuring the User Messaging SMPP Driver
Description of "Figure 11-5 Configuring the User Messaging SMPP Driver"
11.3.7 Configuring the HTTP Proxy for Firewall traversal
If your Email/XMPP or SMPP Server is outside your firewall and requires an HTTP Proxy configuration, traversal should be configured outside of configuring the UMS Adapter.
For example, such traversal could be configured as JVM arguments in the setDomainEnv.sh. file. For example,
JAVA_OPTIONS="${JAVA_OPTIONS} -Dhttp.proxySet=true
 -Dhttp.proxyHost=www.proxy.myserver.com  -Dhttp.proxyPort=80
11.3.8 Designing the Adapter Service and the BPEL Process for Inbound Connectivity
Use the UMS Adapter Configuration Wizard within JDeveloper to design the inbound UMS Adapter reference.
-
Drag and drop the UMS Adapter from the Components window to the External References swim lane. The Adapter Configuration Wizard Welcome page is displayed. The UMS Adapter also displays a Service or Reference name, which you can modify.
-
On the UMS Adapter Connection page, enter the Connection JNDI Name. Here,
eis/ums/UMSAdapterInboundis specified as the JNDI name, which is the default JNDI name for Inbound Connections. You can modify the default JNDI name. -
On the Operation Type screen of the UMS Adapter Configuration wizard, select the operation to perform. Based on your selection, different adapter configuration wizard pages appear and prompt you for configuration information. For Inbound connectivity, on the Operation screen, select
Inbound Receive Notificationas the operation type and click Next. -
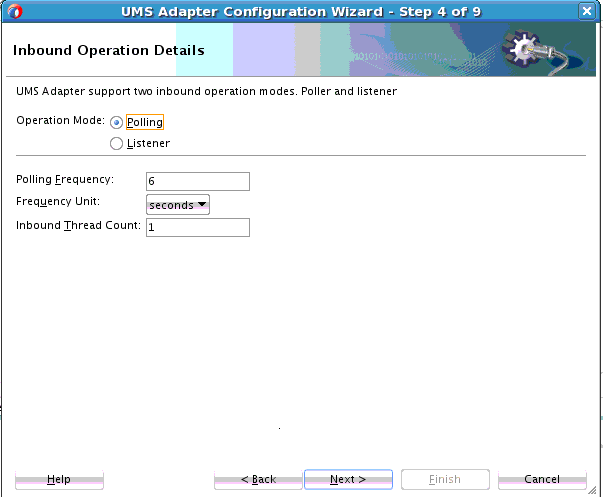
The Inbound Operation Details page of the Adapter Configuration Wizard enables you to specify the mode,
PollingorListener,in which to receive incoming notifications from the UMS Server.Figure 11-6 UMS Adapter Configuration Wizard Notification Details Screen
Description of "Figure 11-6 UMS Adapter Configuration Wizard Notification Details Screen" -
Selecting the Polling mode enables you to specify inbound polling parameters:
-
Polling Frequency. The frequency with which to poll the UMS for new notifications to retrieve. The default values displayed for Polling Frequency = 6, the Frequency Unit =seconds, and the InboundThreadCount=1 .
-
Frequency unit. Specify seconds, minutes, hours, days or weeks as the unit for frequency.
-
Inbound Thread Count. Specify the number of polling threads.
The UMS Adapter receives messages until the messages are available in the Inbox. When there are no more messages, and only then, the UMS Adapter sleeps for the polling interval you specify on this screen. This sleeping activity avoids mounting large number of messages in the Inbox, within high-incoming message volume scenarios. Each polling thread retrieves one message at a time, processes it and then publishes it.
-
-
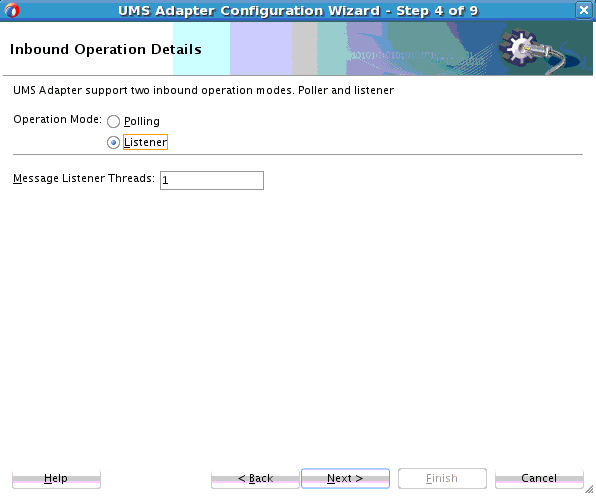
Selecting the Listener Mode enables you to specify the number of Message Listener Threads. This property controls the number of listener worker threads on the UMS Server side. The default value is 1. Specifying this property means the UMS Server will provide multi-threaded asynchronous receiving of incoming notifications.
Note that Polling Mode is a pull mechanism, which you can use to fetch messages intermittently. You can use Listening Mode to get messages in real time, as and when they arrive. Your use of either depends on your business implementation scenario.
Figure 11-7 UMS Adapter Configuration Wizard Notification Details with Listener Mode Selected
Description of "Figure 11-7 UMS Adapter Configuration Wizard Notification Details with Listener Mode Selected" -
The Inbound Notification Details of the UMS Adapter configuration wizard enables you select the type of notification to receive with the Notification Endpoint Configuration. It configures the end point attributes after selecting the type of Notification as Email, SMS, or IM. For example, selecting Email, users enters other attribute details as one or more incoming mail addresses. You can specify more than one comma-separated email mail box address from which you want to receive email notifications.
Figure 11-8 The UMS Adapter Configuration Wizard Inbound Notification Details Screen, Second Page
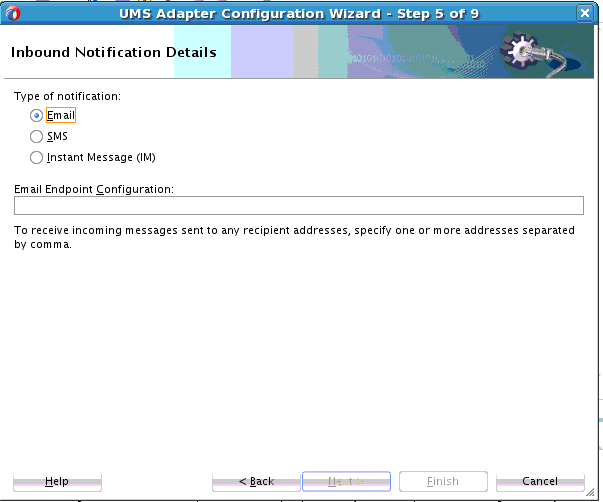
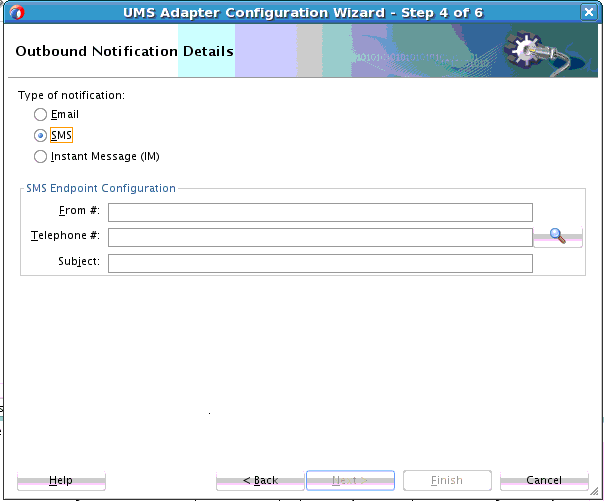
Description of "Figure 11-8 The UMS Adapter Configuration Wizard Inbound Notification Details Screen, Second Page"If you choose SMS, the recipient address is a mobile number. You can also specify a mobile number range, for example “16501230000, 16501234999" means all numbers from 16501230000 to 16501234999 (inclusive).
Figure 11-9 Inbound Notification Details Screen with SMS Selected
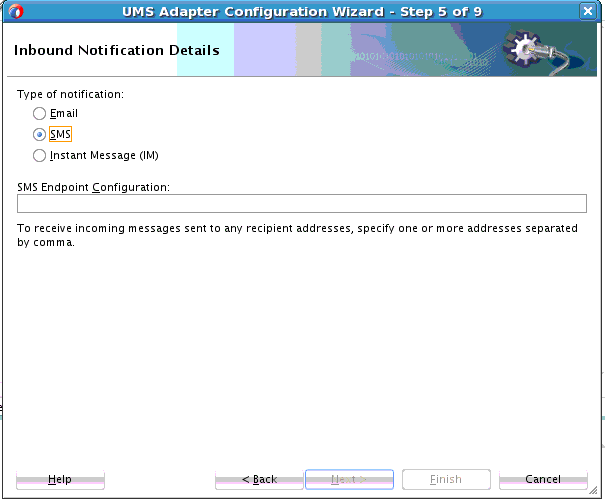
Description of "Figure 11-9 Inbound Notification Details Screen with SMS Selected"For Instant Messaging inbound notification, you can indicate an instant messaging id.
Figure 11-10 Inbound Notification Details with Instant Messaging Selected
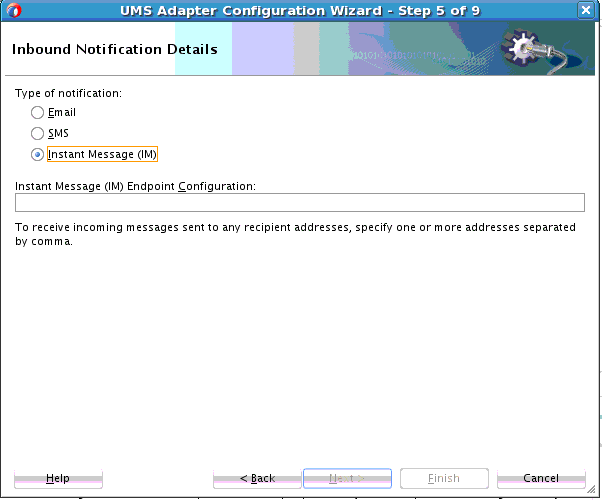
Description of "Figure 11-10 Inbound Notification Details with Instant Messaging Selected" -
Click Next to continue, or Finish to complete using the UMS Adapter Configuration Wizard without configuring message filters against incoming messages.
-
You can use message filters against incoming messages. A message filter contains a matching criterion and an action. You can register a series of message filters. They are applied in order against an incoming (received) message; if the specified criterion matches the message, the action is taken.
For example, you can implement any required blacklists, by rejecting all messages from a given sender address.
You can specify three different types of filters on this screen. (For more information on Java Patterns, or Regular Expressions, see http://download.oracle.com/javase/7/docs/api/java/util/regex/Pattern.html and the tutorial at http://download.oracle.com/javase/tutorial/essential/regex).
-
Blacklist Filter-Blacklist filters match against an incoming message's sender address, and reject the message if the sender address matches the given Java pattern. (That is, a Java regular expression).
-
Whitelist Filter-Whitelist filters match against an incoming message's sender address and accepts the message if the sender address matches the given Java pattern.
-
Message Filter-A Message Filter matches against any of the fields you indicate with a given pattern and accepts or rejects the messages depending upon the action you specify. These fields include:
CONTENT,HEADER,RECIPIENT,REPLYTO,SENDER,SUBJECT
There are only two types of Actions that apply to the Message Filters, either
ACCEPTorREJECTthe message. Message Filters are applied in the same order in which you define them on the Message Filter page.Click Finish to complete the configuration through the Wizard, or click Next to proceed to the Java Callout Screen to specify a Java class through which you can apply additional filtering.
Figure 11-11 UMS Adapter Message Filters Screen
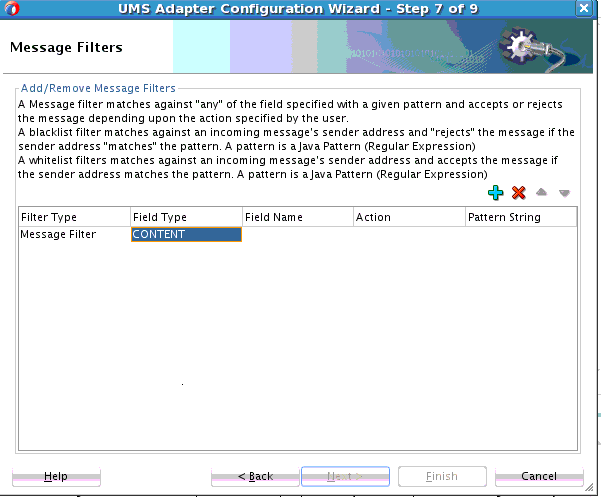
Description of "Figure 11-11 UMS Adapter Message Filters Screen " -
-
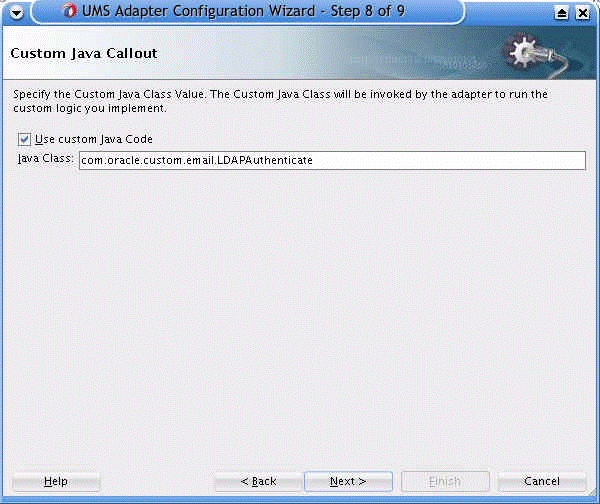
On the Java Callout page, specify the name of the Java class you want the UMS Adapter to invoke and which will run custom logic you provide.
Figure 11-12 UMS Adapter Configuration Wizard Custom Java Callout Screen
Description of "Figure 11-12 UMS Adapter Configuration Wizard Custom Java Callout Screen" -
If you want to provide a custom Java callout, select the checkbox and provide a classname in the text box. See the description in the custom Java Callout class section in this chapter.
-
Click Next. The JCA Endpoint Properties screen is displayed.
JCA Endpoint Properties screen appears for inbound if you have selected Reference Configuration option. For more information, see JCA Endpoint Properties in the Adapter Configuration Wizard.
-
Click Finish on the page below to complete configuring the UMS Adapter service. When you finish configuring the Oracle UMS Adapter, a JCA file is generated for the inbound service. The file is named after the service name you specified on the Service Name page of the Adapter Configuration Wizard. You can rerun the Wizard later to change your operation definitions.
11.3.9 Designing the Adapter Service and the BPEL Process for Outbound Connectivity
Use the UMS Adapter Configuration Wizard within JDeveloper to design the outbound UMS Adapter reference.
Note:
Within Fusion Middleware Control, you can use Monitoring reports for the UMS Adapter as you would with other deployed Adapters. Note, however that for UMS Adapter in Fusion Middleware Control, the EIS connection shows as connected though in fact the connection is down.
