2 Getting Started with Developing SOA Composite Applications
This chapter includes the following sections:
2.1 Creating a SOA Application
The first steps in building a new application are to assign it a name and to specify the directory in which to save source files. When you install the Oracle SOA Suite Quick Start, the Oracle SOA Suite extensions are automatically installed in Oracle JDeveloper. This differs from previous releases in which you manually imported the Oracle SOA Suite extensions into Oracle JDeveloper. For information about the Oracle SOA Suite Quick Start installation, see Installing SOA Suite and Business Process Management Suite Quick Start for Developers.
2.1.1 Create a SOA Application and Project
-
Start Oracle JDeveloper Studio Edition.
-
If Oracle JDeveloper is running for the first time, specify the location for the Java JDK and the user role in which to run Oracle JDeveloper. The JDK version must be later than or equal to 1.7.0_15.
-
Create a SOA application in any of the following ways:
-
From the File main menu:
-
Select New > Application.
The New Gallery opens, where you can select different application components to create.
-
In the Categories tree, select General > Applications.
-
In the Items pane, select SOA Application, and click OK.
-
-
From the Application main menu:
-
Select New.
The New Gallery opens, where you can select different application components to create.
-
In the Categories tree, select General > Applications.
-
In the Items pane, select SOA Application, and click OK.
-
-
From the Application menu in the Applications window:
-
In the Applications window in the upper left, select New Application from the Applications dropdown list.
-
-
-
In the Name your application page, you can optionally change the name and location for your application. If this is your first application, from Application Template, select SOA Application. Accept the defaults for the package prefix, and click Next.
Note:
Note the following application naming conventions:
-
Do not create an application name with spaces.
-
Do not create applications and projects in directory paths that have spaces (for example,
c:\Program Files). -
On a UNIX operating system, it is highly recommended that you enable Unicode support by setting the
LANGandLC_Allenvironment variables to a locale with the UTF-8 character set. This action enables the operating system to process any character in Unicode. SOA technologies are based on Unicode. If the operating system is configured to use non-UTF-8 encoding, SOA components may function in an unexpected way. For example, a non-ASCII file name can make the file inaccessible and cause an error. Oracle does not support problems caused by operating system constraints.In a design-time environment, if you are using Oracle JDeveloper, select Tools > Preferences > Environment > Encoding > UTF-8 to enable Unicode support. This setting is also applicable for runtime environments.
-
-
In the Name your project page, you can optionally change the name and location for your SOA project. By default, Oracle JDeveloper adds the SOA project technology, the
composite.xmlfile that describes the SOA composite application, and the necessary libraries to your model project. -
Click Next.
Note:
Composite and component names cannot exceed 500 characters.
A project deployed to the same infrastructure must have a unique name across SOA composite applications. The uniqueness of a composite is determined by its project name. For example, do not perform the actions described in Table 2-1. During deployment, the second deployed project (composite) overwrites the first deployed project (composite).
Table 2-1 Restrictions on Naming a SOA Project
Create an Application Named... With a SOA Project Named... Application1Project1Application2Project1The Project SOA Settings page of the Create SOA Application wizard appears.
-
In the Configure SOA Settings page, click Empty Composite for this example, and click Finish. Table 2-2 describes all of the options on this page.
Table 2-2 Configure SOA Settings Page
Element Description Empty Composite
Creates an empty SOA composite application. This type is selected by default.
Composite With BPEL Process
Automatically opens the Create BPEL Process dialog to guide you through creation of an initial BPEL process. A BPEL process enables you to design a business process that integrates a series of business activities and services into an end-to-end process flow.
Composite With Mediator
Automatically opens the Create Mediator dialog to guide you through creation of an initial Oracle Mediator service component. Oracle Mediator enables you to route events (messages) between different components.
Composite With Human Task
Automatically opens the Create Human Task dialog to guide you through creation of an initial human task service component. A human task component enables you to model a workflow that describes the tasks for users or groups to perform as part of an end-to-end business process flow. The tasks are accessed through Oracle BPM Worklist during process runtime.
Composite With Subprocess
Automatically creates a SOA composite application with a subprocess. A subprocess is a fragment of BPEL code that can be reused within a particular processor by separate processes.
Composite With Business Rule
Automatically opens the Create Business Rules dialog to guide you through creation of an initial business rule service component. A business rule enables you to design a business decision based on rules.
Composite With Spring
Automatically opens the Create Spring dialog to guide you through creation of a spring context service component. A spring context service component enables you to integrate components that use Java interfaces instead of WSDL files into SOA composite applications. You can also integrate components that use Java interfaces with components that use WSDL files in the same SOA composite application.
-
From the File main menu, select Save All.
2.1.2 What Happens When You Create a SOA Application and Project
When you create a SOA application, Oracle JDeveloper creates a project that contains all the source files related to your application. You can then use Oracle JDeveloper to create additional projects needed for your application.
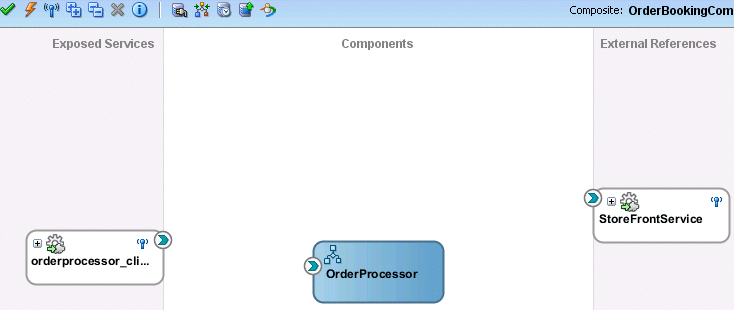
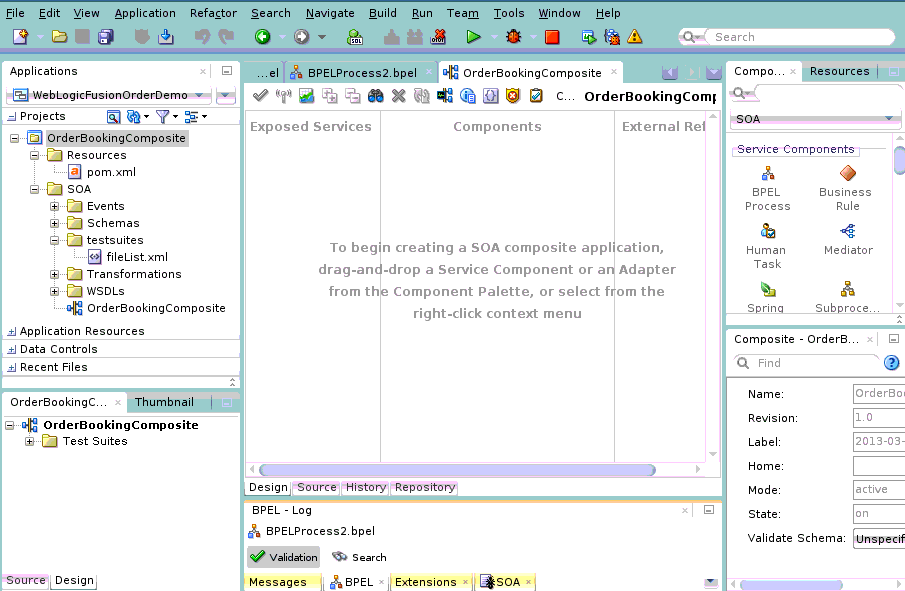
Figure 2-1 shows the SOA Composite Editor for a project named OrderBookingComposite.
Figure 2-1 New Workspace for a SOA Composite Application
Description of "Figure 2-1 New Workspace for a SOA Composite Application"
Table 2-3 describes the SOA Composite Editor.
Table 2-3 SOA Composite Editor
| Element | Description |
|---|---|
|
Applications Window (Upper left) |
Displays the key directories and files for the specific service components included in the SOA project. You can change the structure as necessary for your environment. The only limitation is that all files must be located under the SOA directory.
|
|
Structure Window (Lower left) |
The Structure window provides a structural view of the data in the document currently selected in the active window. |
|
Designer (middle) |
You drag service components, services, and references from the Components window into the composite in the designer. When you drag and drop a service component into the designer, a corresponding property editor is invoked for performing configuration tasks related to that service component. For example, when you drag and drop the Oracle Mediator service component into the designer, the Mediator Editor is displayed for configuring the Oracle Mediator service component. For all subsequent editing sessions, you double-click these service components to re-open their editors. |
|
Project Name (Above the designer) |
Displays the project name of the SOA composite application. |
|
Left Swimlane (Exposed Services) |
The left swimlane is for services (such as web services, REST adapters, or JCA adapters) that provide an entry point to the SOA composite application. |
|
Right Swimlane (External References) |
The right swimlane is for references that send messages to external services in the outside world, such as web services or JCA adapters. |
|
Components Window (Upper right - Components tab) |
The Components window provides the various resources that you can use in a SOA composite. It contains the following service components and adapters:
|
|
Resources window (Upper right - Resources tab) |
The Resources window provides a single dialog from which you can browse both local and remote resources. For example, you can access the following resources:
You select these resources for the SOA composite application through the WSDL Chooser dialog. This dialog is accessible through a variety of methods. For example, when you select the WSDL file to use with a service binding component or an Oracle Mediator service component or select the schema file to use in a BPEL process, the SOA Resource Browser dialog appears. Click Resources at the top of this dialog to access available resources. |
|
Log Window (Lower middle) |
The Log window displays messages about application compilation, validation, and deployment. |
|
Property Inspector (Lower right) |
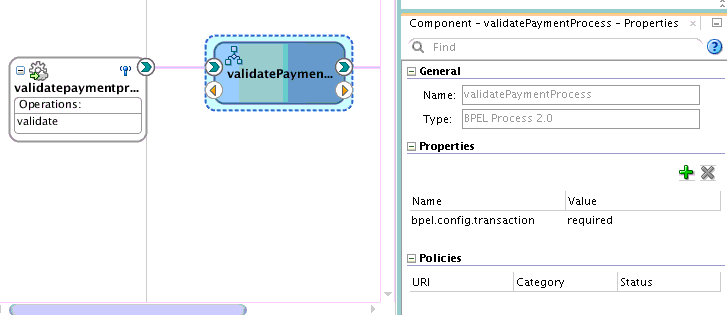
The Property Inspector displays properties for the selected service component, service, or reference. You can also edit BPEL activity properties and define deployment descriptor properties for a BPEL process service component. For more information, see How to Edit BPEL Activities in the Property Inspector. and How to Define Deployment Descriptor Properties in the Property Inspector. |
|
Application View |
The Application View shows the artifacts for the SOA composite application. |
The composite_name file (also known as the composite.xml file) displays as a tab in the designer and as a file in the Applications window. This file is automatically created when you create a new SOA project. This file describes the entire composite assembly of services, service components, and references. There is one composite.xml file for each SOA project.
When you work with the composite.xml file, you mostly use the designer, the Structure window, and the Property Inspector, as shown in Figure 2-1. The designer enables you to view many of your files in a WYSIWYG environment, or you can view a file in an overview editor where you can declaratively make changes, or you can view the source code for the file. The Structure window shows the structure of the currently selected file. You can select objects in this window, and then edit the properties for the selection in the Property Inspector.
2.2 Adding Service Components
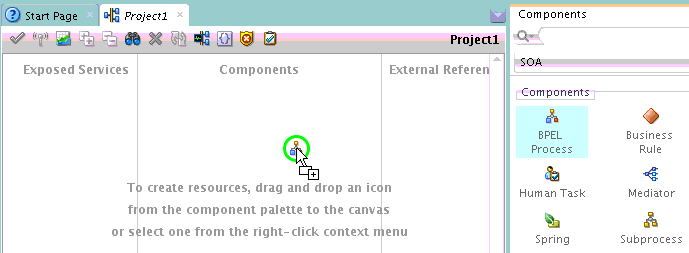
Once you create your application, the next step is typically to add service components that implement the business logic or processing rules of your application. You can use the Components window in the SOA Composite Editor to drag and drop service components into the composite.
2.2.2 What You May Need to Know About Adding and Deleting a Service Component
Note the following details about adding service components:
-
Create a service component from either the SOA Composite Editor or the designer of another component. For example, you can create a human task component from the SOA Composite Editor or the Oracle BPEL Designer.
-
Use the Resources window to browse for service components defined in the SOA Composite Editor, and those deployed.
Note the following details about deleting service components:
-
You can delete a service component by right-clicking it and selecting Delete from the context menu.
-
When a service component is deleted, all references pointing to it are invalidated and all wires are removed. The service component is also removed from the Applications window.
-
A service component created from within another service component can be deleted. For example, a human task created within the BPEL process service component of Oracle JDeveloper can be deleted from the SOA Composite Editor. In addition, the partner link to the task can be deleted. Deleting the partner link removes the reference interface and removes the wire to the task.
2.3 Adding Service Binding Components
You add a service binding component to act as the entry point to the SOA composite application from the outside world.
2.3.1 How to Add a Service Binding Component
Note:
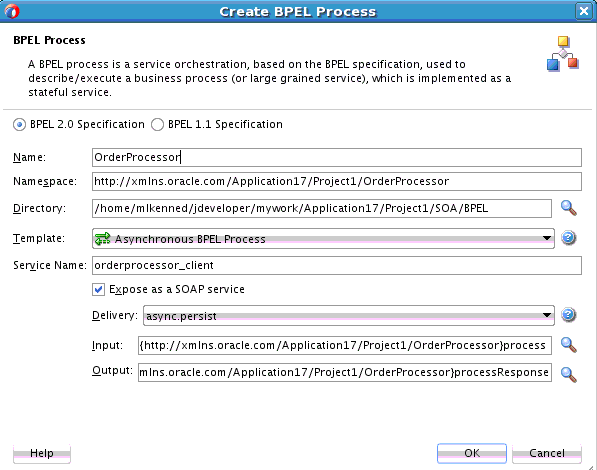
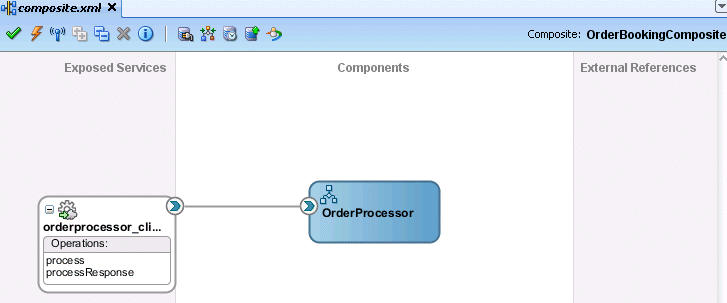
This section describes how to manually create a service binding component. You can also automatically create a service binding component by selecting Expose as a SOAP Service when you create a service component. This selection creates an inbound web service binding component that is automatically connected to your BPEL process, human task service, or Oracle Mediator service component.
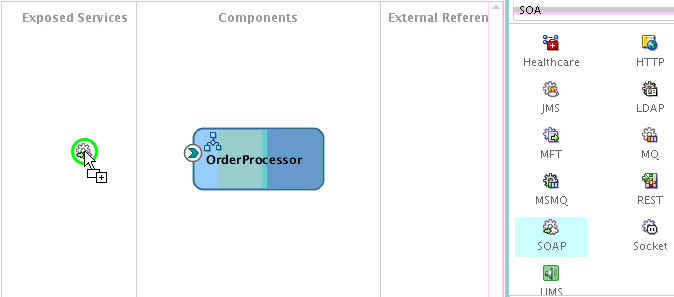
You can use the Components window in the SOA Composite Editor to drag and drop service binding components to the composite.
To add a service binding component:
2.3.2 How to Define the Interface (WSDL) for a Web Service
As described in How to Add a Service Binding Component, a web service is a type of binding component that you can add to a SOA composite application. You must define the interface (WSDL) file for the web service.
To define the interface (WSDL) for a web service:
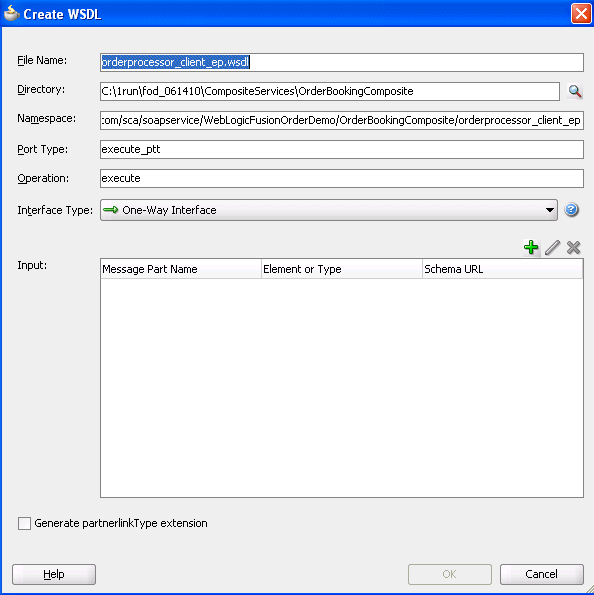
2.3.2.1 Defining a New WSDL Using a Schema
Define a new WSDL using an existing schema or define a new schema.
2.3.2.2 Selecting an Existing WSDL
Select a WSDL created when defining a component interface. The WSDL can be selected from the project/application browser.
-
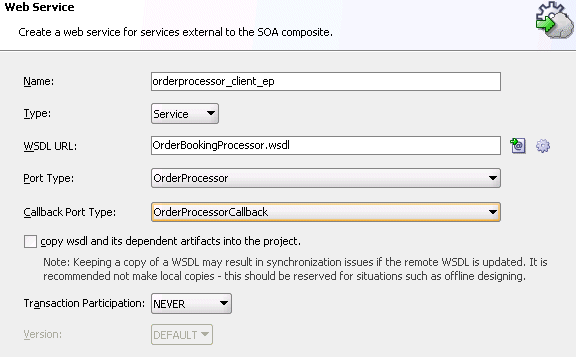
To the right of the WSDL URL field, click the Find existing WSDLs (first) icon.
-
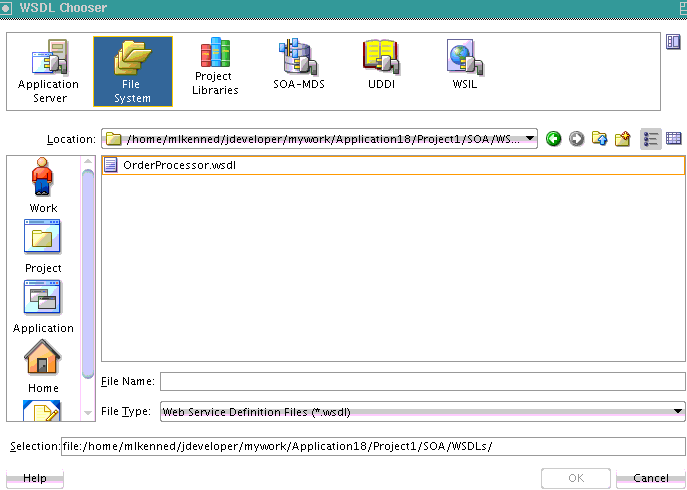
At the top, click SOA-MDS. This action enables you to use existing WSDL files from other applications.
2.3.3 How to View Schemas
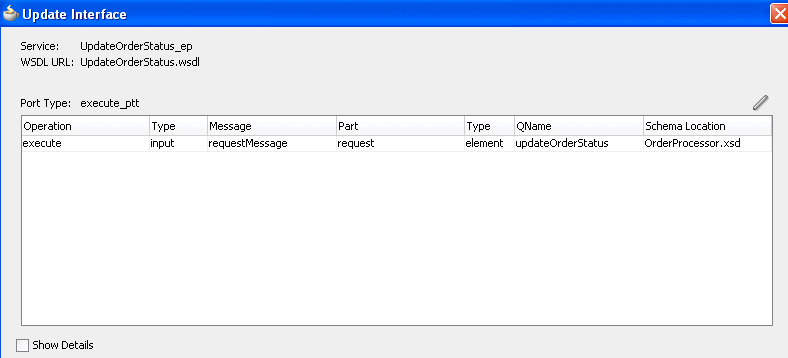
You can view all schemas used by the interface's WSDL file and, if you want, choose a new message schema for a selected message part in the Update Interface dialog.
To view schemas:
2.3.4 How to Edit a Service Binding Component
After initially creating a service, you can edit its contents at a later time. Double-click the component icon to display its appropriate editor or wizard. Table 2-9 provides an overview.
Table 2-9 Starting Service Wizards and Dialogs
| Double-Click This Service... | To... |
|---|---|
|
SOAP |
Display the Update Service dialog. |
|
Adapters |
Re-enter the Adapter Configuration Wizard. |
|
ADF-BC |
Display the Update Service dialog. |
|
B2B |
Re-enter the B2B Configuration Wizard. |
|
Healthcare |
Re-enter the Healthcare Configuration Wizard. |
|
EJB Service |
Display the Update Service dialog. |
|
HTTP |
Re-enter the HTTP Binding Wizard. |
|
Direct |
Re-enter the Update Service dialog. |
|
REST |
Re-enter the REST Binding dialog. |
|
MFT |
Re-enter the MFT Configuration Wizard. |
2.3.5 What You May Need to Know About Adding and Deleting Services
Note the following detail about adding services:
-
When a new service is added for a service component, the service component is notified so that it can make appropriate metadata changes. For example, when a new service is added to a BPEL service component, the BPEL service component is notified to create a partner link that can be connected to a receive or an on-message activity.
Note the following detail about deleting services:
-
When a service provided by a service component is deleted, all references to that service component are invalidated and the wires are removed.
2.3.6 What You May Need to Know About Using the Same Namespace in Different WSDL Files in the Same Composite
Having two different WSDL files with the same fully-qualified namespace in the same SOA composite application is ambiguous and not supported. This causes the application to fail during compilation with duplicate definition errors. Ensure that you use unique namespaces for every WSDL file.
2.3.7 What You May Need to Know About WSDL Browsing in the Resources Window When the SOA Infrastructure Uses Both Internal and External Oracle HTTP Servers
When the SOA Infrastructure is configured in the Server URL field of the SOA Infrastructure Common Properties page in Oracle Enterprise Manager Fusion Middleware Control to use both internal and external Oracle HTTP servers, you cannot browse for WSDL URLs using the Resources window. However, you can paste the correct WSDL URL in the WSDL URL field of the Update Service dialog for the web service binding component. Figure 2-12 provides details.
2.4 Adding Reference Binding Components
You add reference binding components that enable the SOA composite application to send messages to external services in the outside world.
2.4.1 How to Add a Reference Binding Component
You can use the Components window from the SOA Composite Editor to drag and drop reference binding components into the composite.
To add a reference binding component:
2.4.2 What You May Need to Know About Adding and Deleting References
Note the following detail about adding references:
-
The only way to add a new reference in the SOA Composite Editor is by wiring the service component to the necessary target service component. When a new reference is added, the service component is notified and makes appropriate changes. For example, when a reference is added to a BPEL service component, the BPEL service component is notified to add a partner link that can then be used in an invoke activity.
Note the following details about deleting references:
-
When a reference for a service component is deleted, the associated wire is also deleted and the service component is notified so that it can update its metadata. For example, when a reference is deleted from a BPEL service component, the service component is notified to delete the partner link in its BPEL metadata.
-
Deleting a reference connected to a wire clears the reference and the wire.
2.4.3 What You May Need to Know About WSDL References
A WSDL file is added to the SOA composite application whenever you create a new component that has a WSDL (for example, a service binding component, service component (for example, Oracle Mediator, BPEL process, and so on), or reference binding component). When you delete a component, any WSDL imports used by that component are removed only if not used by another component. The WSDL import is always removed when the last component that uses it is deleted.
When a service or reference binding component is updated to use a new WSDL, it is handled as if the interface was deleted and a new one was added. Therefore, the old WSDL import is only removed if it is not used by another component.
If a service or reference binding component is updated to use the same WSDL (porttype qname), but from a new location, the WSDL import and any other WSDL reference (for example, the BPEL process WSDL that imports an external reference WSDL) are automatically updated to reference the new location.
Simply changing the WSDL location in the source view of the composite_name (composite.xml) file's import is not sufficient. Other WSDL references in the metadata are required by the user interface (see the ui:wsdlLocation attribute in the composite services and references). There can also be other WSDL references required by runtime (for example, a WSDL that imports another WSDL, such as the BPEL process WSDL). Ensure that you change the following places in this file where a WSDL URL is referenced:
-
User interface location - used only in Oracle JDeveloper.
-
Import: Used during deployment.
-
WSDL location in the reference definition: Used at runtime.
Always modify the WSDL location though the dialogs of the SOA Composite Editor in which a WSDL location is specified (for example, a web service, BPEL partner link, and so on). Changing the URL's host address is the exact case in which the SOA Composite Editor automatically updates all WSDL references.
2.4.4 What You May Need to Know About Mixed Message Types in a WSDL File
If a BPEL process has multiple WSDL messages declared in its WSDL file and one or more messages have their parts defined to be of some type, whereas other messages have their parts defined to be of some element, runtime behavior can become unpredictable. This is because these WSDLs are considered to have mixed type messages. For example, assume there are multiple copy actions within an assign activity. These copy actions attempt to populate an output variable that has multiple parts:
-
Part 1 is declared as an
xsd:stringtype. -
Part 2 is declared as an
xsd:inttype. -
Part 3 is declared as an element of a custom-designed complex type.
This behavior is not supported.
2.4.5 What You May Need to Know About Invoking the Default Revision of a Composite
A WSDL URL that does not contain a revision number is processed by the default composite application. This action enables you to always call the default revision of the called service without having to make other changes in the calling composite.
Select the default WSDL to use in the WSDL Chooser dialog in Oracle JDeveloper.
To invoke the default revision of a composite:
2.5 Adding Wires
You wire (connect) services, service components, and references. For this example, you wire the web service and service component. Note the following:
-
Since a web service is an inbound service, a reference handle displays on the right side. Web services that are outbound references do not have a reference handle on the right side.
-
You can drag a defined interface to an undefined interface in either direction (reference to service or service to reference). The undefined interface then inherits the defined interface. There are several exceptions to this rule:
-
A component has the right to reject a new interface. For example, an Oracle Mediator can only have one inbound service. Therefore, it rejects attempts to create a second service.
-
You cannot drag an outbound service (external reference) to a business rule, because business rules do not support references. When dragging a wire, the user interface highlights the interfaces that are valid targets.
-
-
The port type and the namespace are used to uniquely identify an interface.
-
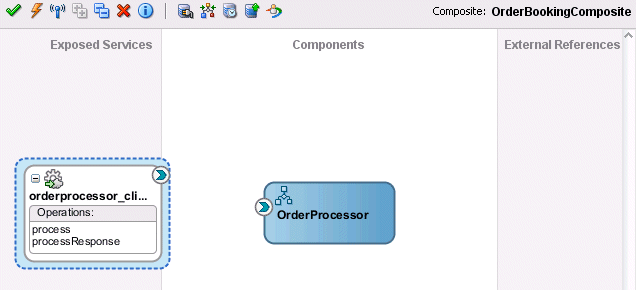
You cannot wire services and composites that have different interfaces. For example, you cannot connect a web service configured with a synchronous WSDL file to an asynchronous BPEL process. Figure 2-17 provides details.
Figure 2-17 Limitations on Wiring Services and Composites with Different Interfaces
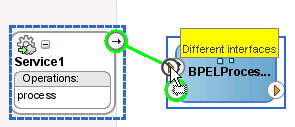
Description of "Figure 2-17 Limitations on Wiring Services and Composites with Different Interfaces"The service and reference must match, meaning the interface and the callback must be the same. If you have two services that have different interfaces, you can place an Oracle Mediator between the two services and perform a transformation between the interfaces.
2.5.1 How to Wire a Service and a Service Component
You can wire a service binding component to a service component from the SOA Composite Editor.
To wire a service and a service component:
2.5.2 How to Wire a Service Component and a Reference
You can wire a service component to a reference binding component from the SOA Composite Editor.
To wire a service component and a reference:
2.5.3 What You May Need to Know About Adding and Deleting Wires
Note the following details about adding wires:
-
A service component can be wired to another service component if its reference matches the service of the target service component. Note that the match implies the same interface and callback interface.
-
Adding the following wiring between two Oracle Mediator service components causes an infinite loop:
-
Create a business event.
-
Create an Oracle Mediator service component and subscribe to the event.
-
Create a second Oracle Mediator service component to publish the same event.
-
Wire the first Oracle Mediator to the second Oracle Mediator component service.
If you remove the wire between the two Oracle Mediators, then for every message, the second Oracle Mediator can publish the event and the first Oracle Mediator can subscribe to it.
-
Note the following details about deleting wires:
-
When a wire is deleted, the component's outbound reference is automatically deleted and the component is notified so that it can clean up (delete the partner link, clear routing rules, and so on). However, the component's service interface is never deleted. All Oracle SOA Suite services are defined by their WSDL interface. When a component's interface is defined, there is no automatic deletion of the service interface in the SOA Composite Editor.
If you want to change the service WSDL interface, there are several workarounds:
-
In most cases, you just want to change the schema instead of the inbound service definition. In the SOA Composite Editor, click any interface icon that uses the WSDL. For example, you can click the web service interface icon or the Oracle Mediator service icon. This invokes the Update Interface dialog, which enables you to change the schema for any WSDL message.
-
If you are using an Oracle Mediator service component, the Refresh operations from WSDL icon of the Oracle Mediator Editor enables you to refresh (after adding new operations) or replace the Oracle Mediator WSDL. However, you are warned if the current operations are to be deleted. If you change the WSDL to the new inbound service WSDL using this icon, the wire typically breaks because the interface has changed. You can then wire Oracle Mediator to the new service.
-
In many cases, a new service requires a completely new Oracle Mediator. Delete the old Oracle Mediator, create a new one, and wire it to the new service.
-
If you are using a BPEL process service component, select a new WSDL through the Edit Partner Link dialog.
See How to View Schemas for details about the Update Interface dialog.
-
2.6 Adding Descriptions to SOA Composite Applications
You can add a description of the SOA composite application that is displayed when you place your cursor over the TODO Tasks icon above the composite. The description can describe the actions of the services, references, and service components in the SOA composite application.
2.7 Renaming, Deleting, and Moving Components and Artifacts
You can rename, delete, and move some components (also known as refactoring) and artifacts in the following sections of Oracle JDeveloper.
-
SOA Composite Editor
Enables you to rename and delete components. These actions impact Oracle SOA Suite metadata (and not necessarily specific artifacts).
-
Applications window
Enables you to rename, delete, and move artifacts such as WSDLs, schemas, and so on. These actions impact Oracle JDeveloper artifacts.
Note:
Do not perform refactoring tasks with Oracle BPEL Designer, Human Task Editor, and other editors open. If you do, ensure that you then close and reopen the editors after refactoring. For example, assume you have a BPEL process open, then rename the BPEL process WSDL file in the Applications window. This changes the underlying BPEL file, but Oracle BPEL Designer does not reflect this change and becomes unsynchronized unless you completely exit it. Close and then reopen Oracle BPEL Designer. The changes are then synchronized.
2.7.1 How to Rename and Delete Components in the SOA Composite Editor
Table 2-11 describes the refactoring tasks that you can perform in the SOA Composite Editor, along with known limitations. Carefully review these restrictions before using this feature.
Table 2-11 Refactoring Components
| Action | SOA Composite Editor Steps |
|---|---|
|
Rename a service component or binding component |
Note the following restrictions:
|
|
Delete a service component, binding component, or BPEL subprocess |
|
|
Move a service component or binding component to another folder |
You cannot perform this task from the SOA Composite Editor. |
2.7.2 How to Rename, Move, and Delete Artifacts in the Applications Window
Table 2-12 describes the refactoring tasks that you can perform in the Applications window, along with known limitations. Carefully review these restrictions before using this feature.
Table 2-12 Refactoring Component Artifacts
| Action | Applications Window Steps |
|---|---|
|
Rename a service component or binding component artifact |
Note the following restrictions:
|
|
Delete a service component, binding component, or BPEL subprocess artifact |
Note the following restrictions:
|
|
Move a service component or binding component to another folder |
Note the following restrictions:
|
2.8 Viewing Component Details in the Property Inspector
The Property Inspector displays details about the selected service component or binding component in the SOA Composite Editor.
To view properties in the Property Inspector:
2.9 Adding Security Policies
As you create your SOA composite application, you can secure web services by attaching policies to service binding components, service components, and reference binding components. For more information about implementing policies, see Enabling Security with Policies and Message Encryption.
2.10 Deploying a SOA Composite Application
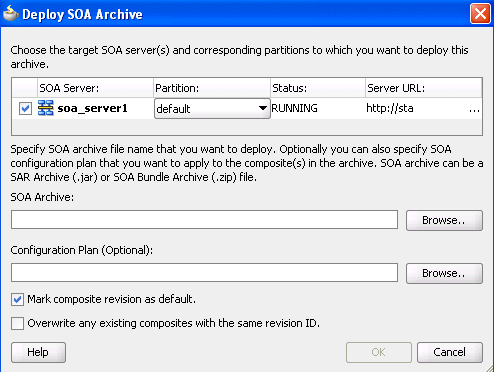
Deploying a SOA composite application involves creating a connection to an Oracle WebLogic Server and deploying an archive of the SOA composite application to an Oracle WebLogic Server managed server. For more information about deploying SOA composite applications, see Deploying SOA Composite Applications.
2.10.1 How to Invoke Deployed SOA Composite Applications
You can invoke deployed SOA composite applications from your SOA composite application.
To invoke deployed SOA composite applications:
-
Create a web service or partner link through one of the following methods.
-
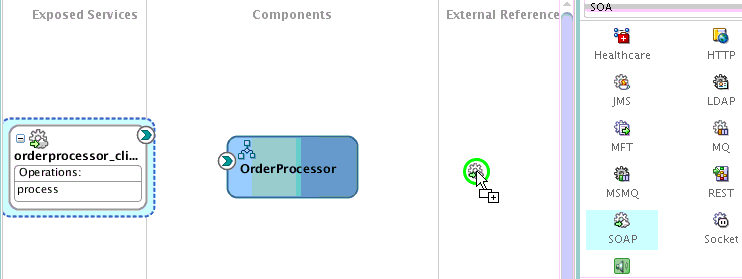
In the SOA Composite Editor, drag a SOAP icon from the Components window to the External References swimlane.
-
In Oracle BPEL Designer, drag a Partner Link from the BPEL Constructs section of the Components window to the right swimlane.
-
-
Access the SOA Resource Browser dialog based on the type of service you created.
-
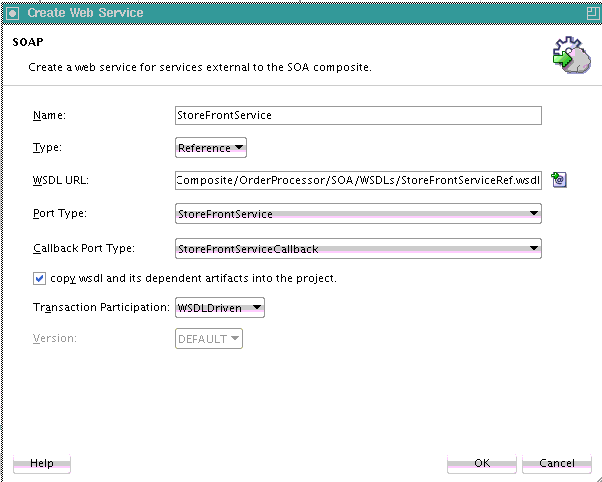
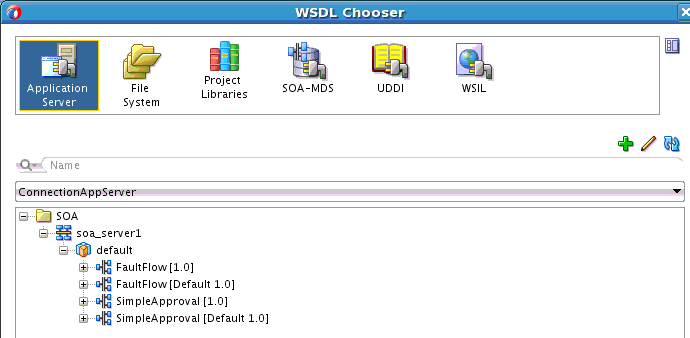
From the Create Web Service dialog, click the Find existing WSDLs icon. The Application Server section of the WSDL Chooser dialog is displayed.
-
From the Edit Partner Link dialog, click the SOA Resource Browser icon. The Application Server section of the WSDL Chooser dialog is displayed.
-
-
Select Application Server if it is not selected.
-
Expand the tree to display the application server connection to the server on which the SOA composite application is deployed.
-
Expand the application server connection.
-
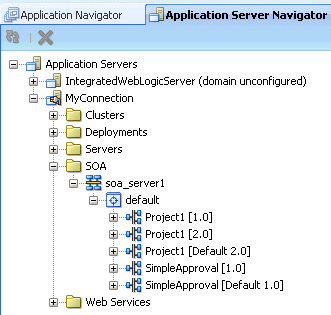
Expand the SOA folder and partition. Figure 2-25 provides details.
Figure 2-25 Browse for a SOA Composite Application
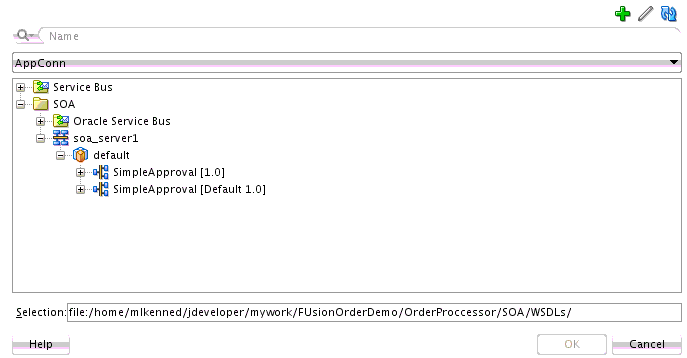
Description of "Figure 2-25 Browse for a SOA Composite Application" -
Select the composite service.
-
Click OK.
For information about creating an application server connection, see Creating an Application Server Connection.
2.11 Managing and Testing a SOA Composite Application
As you build and deploy a SOA composite application, you manage and test it using a combination of Oracle JDeveloper and Oracle Enterprise Manager Fusion Middleware Control.
2.11.1 How to Manage Deployed SOA Composite Applications in Oracle JDeveloper
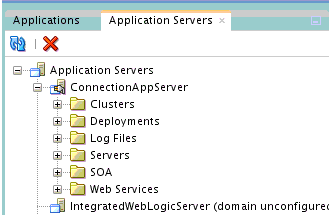
You can manage deployed SOA composite applications from the Application Server Navigator in Oracle JDeveloper. Management tasks consist of undeploying, activating, retiring, turning on, and turning off SOA composite application revisions.
Note:
These instructions assume you have created an application server connection to an Oracle WebLogic Administration Server on which the SOA Infrastructure is deployed. Creating a connection to an Oracle WebLogic Administration Server enables you to browse for managed Oracle WebLogic Servers or clustered Oracle WebLogic Servers in the same domain. From the File main menu, select New > Application > Connections > Application Server Connection to create a connection.
For more information, see the following documentation:
-
Deploying SOA Composite Applications for details about creating a deployment profile and a configuration plan and deploying an existing SOA archive
-
Administering Oracle SOA Suite and Oracle Business Process Management Suite for details about managing deployed SOA composite applications from Oracle Enterprise Manager Fusion Middleware Control.
2.11.2 How to Test and Debug a Deployed SOA Composite Application
After you deploy a SOA composite application, you can initiate a test instance of it from the Test Web Service page in Oracle Enterprise Manager Fusion Middleware Control to verify the XML payload data. For more information about initiating a test instance, see the Administering Oracle SOA Suite and Oracle Business Process Management Suite.
In addition to creating a test instance, you can also perform the following testing and debugging tasks in Oracle JDeveloper:
-
Simulate the interaction between a SOA composite application and its web service partners before deployment in a production environment. This helps to ensure that a process interacts with web service partners as expected by the time it is ready for deployment to a production environment. For more information about creating a unit test, see Automating Testing of SOA Composite Applications.
-
Test and debug SOA composite applications with the SOA debugger in Oracle JDeveloper. The SOA debugger reduces the development cycle for a SOA composite application by providing a troubleshooting environment within Oracle JDeveloper. This eliminates the lengthy process of building a SOA composite application in Oracle JDeveloper, deploying it to the SOA Infrastructure, starting Oracle Enterprise Manager Fusion Middleware Control to test or view audit trails and flow traces, and then returning to Oracle JDeveloper to repeat the exercise. For more information, see Debugging and Auditing SOA Composite Applications .
