13 Working with Libraries
This chapter has the following sections:
13.1 About Document Libraries
Libraries and folders provide the context of a document, helping to determine what metadata fields are associated with a document and in some cases assigning values to the metadata automatically. Organizing documents in libraries helps to ensure documents are secure, can be shared, and are easily found by yourself and others. For detailed information on Libraries and Folders, see Understanding Libraries and Understanding Folders.
There are two types of libraries:
-
Enterprise Libraries, created by individuals to provide flexible security and comprehensive document management used by an entire organization.
-
System Libraries, created and managed by Oracle WebCenter Content to organize documents that are in one of the following system processes:
-
Checked-Out Content (content locked for editing.)
-
Expired Content (documents that are no longer actively managed by Oracle WebCenter Content. Expired content can be filtered to also display documents set to expire within a specified date range.)
-
Work In Progress (documents that are in a conversion or indexing process and not yet ready for release.)
-
Content In Workflow (documents that are in one or more workflows.)
System libraries offer the ability to quickly find documents that are not currently released. You cannot upload documents to a system library.
-
Note:
The permissions you have to a library determine the options available to you when working with that library.
13.2 Creating an Enterprise Library
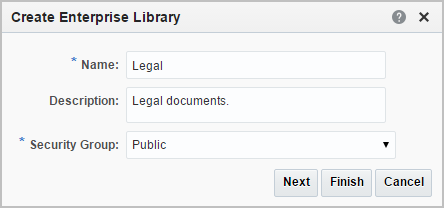
Enterprise libraries provide flexible security and comprehensive document management used by an entire organization. To create an enterprise library:
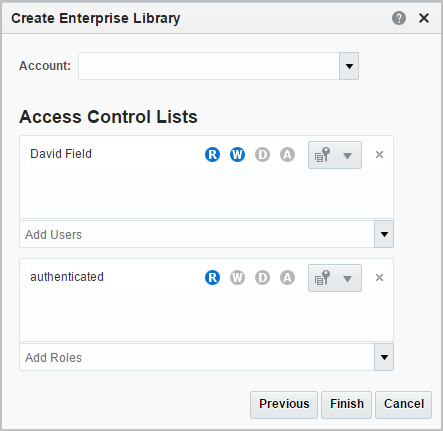
Figure 13-2 Create Enterprise Library Optional Security Options

13.3 Viewing and Editing Document Library Properties
Libraries are owned by the people who create them, however:
-
Enterprise library owners can transfer ownership to someone else, as can anyone with admin permissions to the library, even if they are not the owner.
-
Enterprise library properties can usually be edited by anyone with Delete permission to the library, or the library owner if they have Read and Write permissions. If access control lists are used, then a person must have admin permission in the access control list. See your system administrator if you have questions regarding your permissions.
-
System libraries are created by Oracle WebCenter Content and cannot have their properties edited.
Limited property information such as the library owner and description is displayed on a results list next to the library listing, or by clicking the Information icon (![]() ) next to a library in Thumbnail view.
) next to a library in Thumbnail view.
To view or edit additional library properties, use the Library Properties window.
Table 13-1 Library Property Options
| Tab | Page Options |
|---|---|
|
General |
|
|
Security |
|
|
Metadata |
Note that library property metadata options and folder property metadata options are alike except for the following two options, which are available only for folders:
|
|
Shortcuts |
Displays a list of shortcuts pointing to the library. This information cannot be modified. |
|
Advanced |
Displays system information about a library that cannot be modified, such as the Library ID and the creation date. |
To view and edit library properties:
13.4 Propagating Library Metadata
If you move or copy documents or folders from a library into a different enterprise library with predefined values for metadata, you may want to change or add the metadata values associated with the item to the default values of the new library.
Note:
While propagating metadata, all subfolders and documents in subfolders are affected. However, propagation does not affect shortcuts, saved searches, and cloud folders.
To propagate metadata and security values to items in a library:
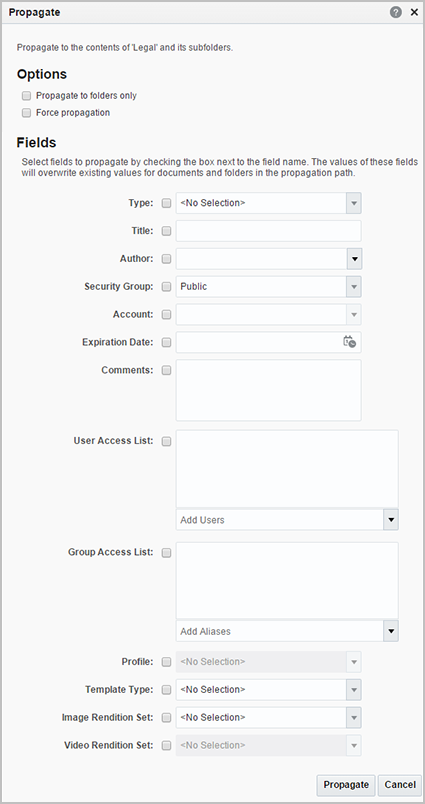
Figure 13-3 Propagate Window

13.5 Sharing Document Libraries
To share enterprise libraries you must have Read, Write, and Delete permissions to the library, or be the library owner and have Read and Write permissions. Set access using security groups, optional accounts, and access control lists. For detailed information about these items, see Understanding Document Security.
Share access to enterprise libraries using the library properties window:
13.6 Following Document Libraries
You can follow a document library and be notified when the library is modified. To follow a document library, do one of the following:
-
Select the library on a results list and choose Follow from the More menu in the List toolbar.
-
Right-click a library on a results list or in the Folders list of the side bar and select Follow from the contextual menu.
13.7 Creating Library Shortcuts
Create shortcuts to libraries to make navigating Oracle WebCenter Content easier. Library shortcuts can be added to any folder or other library and are displayed in the folders section of the side bar.
To create a library shortcut:
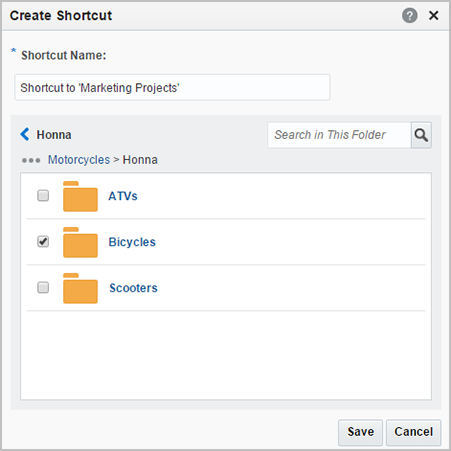
Figure 13-4 Create Shortcut Window

Note:
If the Auto Suggest feature is disabled, the Folder or Library Search Box isn’t displayed within the Create Shortcut dialog. Contact your system administrator to enable this feature.13.8 Using System Libraries to Find Content
System libraries offer the ability to quickly find documents that are not currently released or are checked out and locked for editing. There are several system libraries in Oracle WebCenter Content:
-
Checked-Out Content (content locked for editing).
-
Expired Content (documents that are no longer actively managed by Oracle WebCenter Content. Expired content can be filtered to also display documents set to expire within a specified date range).
-
Work In Progress (documents that are in a conversion or indexing process and not yet ready for release).
-
Content In Workflow (documents that are in a workflow process, initially filtered by those documents assigned to you.
To search for documents in a system library:
- Click Browse in the side bar.
- Click the Filter icon next to the search box and select the System Libraries filter from the Library type list. This filters the library results list so that only system libraries are displayed.
- Open the system library that contains the documents in the desired process state. For example, you would open the Checked-Out Content library if you are looking for documents you have checked out.
- Filter your results using the filter menu to refine your search.
Note:
By default, Checked-Out Content and Work In Progress libraries filter the results to include only documents checked out or authored by you. Similarly, the Content in Workflow library filters results by default to workflow content assigned to you. To expand the results list to include other documents to which you have rights, clear the filter by closing the appropriate filter tag in the search box.
The Expired Content library lists all expired content by default. Use the filter menu to display documents expired or set to expire within a specified date range.
If searching for content in workflow assigned to you, go directly to a filtered list by clicking the workflow notification icon (![]() ) in the banner. If no filter notification icon is displayed in the banner, then you do not have pending workflows assigned to you.
) in the banner. If no filter notification icon is displayed in the banner, then you do not have pending workflows assigned to you.
Figure 13-5 Expired Content Filter Options

