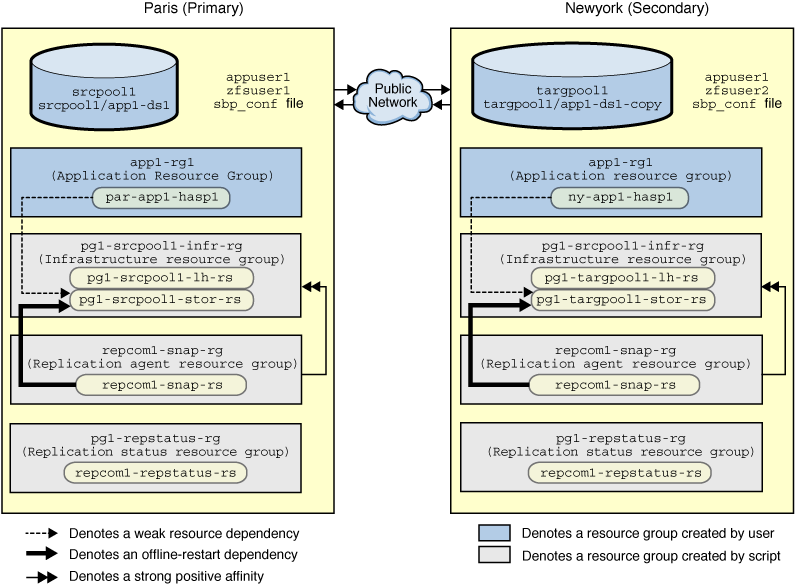
Use Case: Configuring Oracle Solaris ZFS Snapshot Replication With Zpools for Globally Mounted ZFS Filesystems
If you are using zpools for globally mounted ZFS filesystems to configure Oracle Solaris ZFS snapshot replication, the configuration is similar to the use Use Case: Configuring Oracle Solaris ZFS Snapshot Replication When Both Partner Clusters Are Global Zones. As the zpool is global, you would have already configured the device group and is visible with the cldg list command. The application resource group would already have an HAStoragePlus resource to manage the zpool used by the application. The replication module does not use the ZpoolsExportOnStop property on the resource.
An application can be configured as failover or scalable with the zpool for globally mounted ZFS filesystems.
Figure 5 Scalable Application Configured with Zpool for Globally Mounted ZFS Filesystems

You can perform the following steps to configure the Oracle Solaris ZFS snapshot replication by using the zfs_snap_geo_register script:
-
Decide the hostname to use on each cluster as replication-related logical hostname. For this example, assume that the logical hostname on the paris cluster is paris-lh. The logical hostname on the newyork cluster is newyork-lh.
Add the logical hostname entries for paris-lh in the /etc/hosts file on both the nodes of the paris cluster. Similarly, add the logical hostname entries for newyork-lh in the /etc/hosts file on both the nodes of the newyork cluster.
-
Create the replication user and SSH setup. For information about the step for creating the replication user and SSH setup, see Use Case: Setting Up Replication User and SSH.
-
Provide ZFS permissions to replication user on both clusters. You must import the ZFS storage pool to provide permissions. If the zpool is imported, log in as the root user on the node where the zpool is imported. Else if the zpool is not imported on any cluster node, import the zpool using the cldg online zpoolname command and type the ZFS commands on that node.
Type the following commands on the node of the paris cluster where srcpool1 is imported:
# /sbin/zfs allow zfsuser1 create,destroy,hold,mount,receive,release,send,rollback,snapshot \
srcpool1/app1-ds1
# /sbin/zfs allow srcpool1/app1-ds1
---- Permissions on srcpool1/app1-ds1 ---------------------------------
Local+Descendent permissions:
user zfsuser1 create,destroy,hold,mount,receive,release,rollback,send,snapshot
#
Type the following commands on the node of the newyork cluster where targpool1 is imported:
# /sbin/zfs allow zfsuser2 create,destroy,hold,mount,receive,release,send,rollback,snapshot \
targpool1/app1-ds1-copy
# /sbin/zfs allow targpool1/app1-ds1-copy
---- Permissions on targpool1/app1-ds1-copy ---------------------------------
Local+Descendent permissions:
user zfsuser2 create,destroy,hold,mount,receive,release,rollback,send,snapshot
#
Note that the replication user on each cluster must have the above Local+Descendent ZFS permissions on the ZFS dataset used on that cluster. If you brought the device group online, take it offline using the cldg offline zpoolname command.
-
Suppose you create a file /var/tmp/geo/zfs_snapshot/sbp_conf file to use as the script-based plugin configuration file on both clusters to specify replication component node lists and evaluation rules. Add the following entry in the /var/tmp/geo/zfs_snapshot/sbp_conf file on each node of the paris cluster :
repcom1|any|paris-node-1,paris-node-2
Add the following entry in the /var/tmp/geo/zfs_snapshot/sbp_conf file on each node of the newyork cluster :
repcom1|any|newyork-node-1,newyork-node-2
-
Copy /opt/ORCLscgrepzfssnap/etc/zfs_snap_geo_config to create a parameters file /var/tmp/geo/zfs_snapshot/repcom1_conf for the replication component. Type the configuration parameters in the configuration file.
PS=paris-newyork
PG=pg1
REPCOMP=repcom1
REPRS=repcom1-repstatus-rs
REPRG=pg1-repstatus-rg
DESC="Protect app1-rg1 using ZFS snapshot replication"
APPRG=app1-rg1
CONFIGFILE=/var/tmp/geo/zfs_snapshot/sbp_conf
LOCAL_REP_USER=zfsuser1
REMOTE_REP_USER=zfsuser2
LOCAL_PRIV_KEY_FILE=
REMOTE_PRIV_KEY_FILE=/export/home/zfsuser2/.ssh/zfsrep1
LOCAL_ZPOOL_RS=par-app1-hasp1
REMOTE_ZPOOL_RS=ny-app1-hasp1
LOCAL_LH=paris-lh
REMOTE_LH=newyork-lh
LOCAL_DATASET=srcpool1/app1-ds1
REMOTE_DATASET=targpool1/app1-ds1-copy
REPLICATION_INTERVAL=120
NUM_OF_SNAPSHOTS_TO_STORE=2
REPLICATION_STREAM_PACKAGE=false
SEND_PROPERTIES=true
INTERMEDIARY_SNAPSHOTS=false
RECURSIVE=true
MODIFY_PASSPHRASE=false
-
Execute the zfs_snap_geo_register script using the replication configuration file as parameter from any one node of paris cluster. specify the SSH passphrase for zfsuser1 of paris cluster at the Password for property local_service_password prompt and the SSH passphrase for zfsuser2 of newyork cluster at the Password for property remote_service_password prompt
# /opt/ORCLscgrepzfssnap/util/zfs_snap_geo_register -f /var/tmp/geo/zfs_snapshot/repcom1_conf
Password for property local_service_password :
Password for property remote_service_password :
This setup action performed by the zfs_snap_geo_register script creates the following components in the primary cluster, as shown in Example Setup of Oracle Solaris ZFS Snapshot Replication in the Global Zone on Both the Partner Clusters:
-
Protection group pg1
-
Replication component repcom1
-
Infrastructure resource group pg1-srcpool1-infr-rg and its resources as shown in the figure
-
Replication resource group repcom1-snap-rg which contains the resource repcom1-snap-rs
-
Replication status resource group pg1-repstatus-rg and replication status resource repcom1-repstatus-rs
-
-
On any node of the paris cluster, check that the protection group and replication component is created successfully.
# /usr/cluster/bin/geopg show pg1
# /usr/cluster/bin/geopg status pg1
-
On any node of the newyork cluster, get the protection group that is created on the primary cluster.
# /usr/cluster/bin/geopg get -s paris-newyork pg1
This command creates the resource groups and resources in the secondary cluster, as shown in Example Setup of Oracle Solaris ZFS Snapshot Replication in the Global Zone on Both the Partner Clusters.
-
From any node of the newyork cluster, check that the protection group and replication components are available. Ensure that the protection group synchronization status between paris and newyork cluster shows OK.
# /usr/cluster/bin/geopg show pg1
# /usr/cluster/bin/geopg status pg1
Similarly, check status from any node of paris cluster:
# /usr/cluster/bin/geopg show pg1
# /usr/cluster/bin/geopg status pg1
-
Activate the protection group to start the Oracle Solaris ZFS snapshot replication.
$ /usr/cluster/bin/geopg start -e global pg1
-
Type the following command from one node of either partner cluster to confirm whether the protection group started on both clusters.
# geopg status pg1
Note - With zpools for globally mounted ZFS filesystems, an application can be configured as failover or scalable. For failover applications, administration steps remain the same. Only resource group and resource structure changes. The Oracle Solaris Cluster Geographic Edition software sets a strong positive affinity with failover delegation from the application resource group to the infrastructure resource group and an offline-restart resource dependency from the application's HAStoragePlus resource managing the zpool to the replication infrastructure HAStoragePlus resource for the same zpool.