12 Servicing Processors (FRU)

The following section describes how to service processors. Processors are field-replaceable units (FRUs). For more information about FRUs, see Illustrated Parts Breakdown and Field-Replaceable Units.

Caution:

Processors must be removed and replaced only by authorized Oracle Service personnel.

Caution:

Ensure that all power is removed from the server before removing or installing a processor. You must disconnect the power cables from the system before performing these procedures.

Caution:

These procedures require that you handle components that are sensitive to electrostatic discharge. This sensitivity can cause the component to fail. To avoid damage, ensure that you follow electrostatic discharge safety measures and antistatic practices. See Electrostatic Discharge Safety.

Note:

On single-processor systems, processor socket 1 (P1) is shipped without a heatsink and processor filler cover. To protect the delicate processor socket pins, do not remove the processor cover that was installed on the motherboard.

This section covers the following topics:

Identify and Remove a Processor

Caution:

Whenever you remove a processor, replace it with another processor and reinstall the processor heatsink; otherwise, the server might overheat due to improper airflow. See Install a Processor.
  • Use an antistatic wrist strap and a work space with an antistatic mat.

    See Electrostatic Discharge Safety.

  • Use ESD (not latex or vinyl) gloves, if possible, when handling the processor.

  • Be careful not to touch the processor socket pins.

    Caution:

    The processor socket pins are very fragile. A light touch can bend the processor socket pins beyond repair.
  • Obtain a medium flat blade screwdriver

  • Obtain a T30 Torx driver or bit

  1. Prepare the server for service.
    1. Power off the server and disconnect the power cords from the power supplies.
    2. Attach an antistatic wrist strap to your wrist, and then to a metal area on the chassis.
    3. Extend the server to the maintenance position.
    4. Remove the server top cover.
    5. Remove the air baffle.
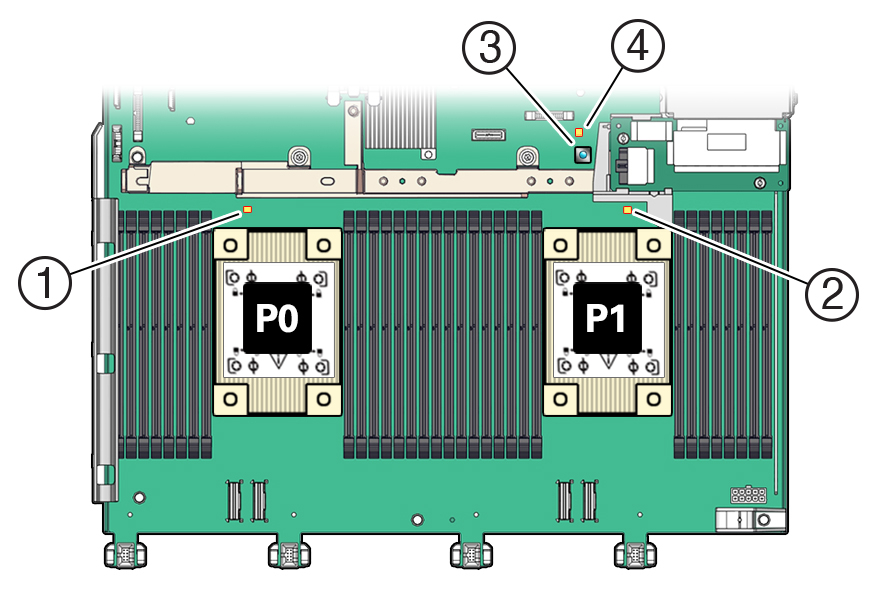
  2. Identify the location of the failed processor by pressing the Fault Remind button on the motherboard I/O card. Fault Remind button identifying failed processors buttons Fault Remind Fault Remind button location processors identifying faulty processor fault identification processors processors Fault Remind button

    Note:

    When you press the Fault Remind button, an LED located next to the Fault Remind button lights green, which indicates that there is sufficient voltage in the fault remind circuit to light any fault LEDs that were lit due to a failure. If this LED fails to light when you press the Fault Remind button, it is likely that the capacitor powering the fault remind circuit lost its charge. This can happen if you press the Fault Remind button for a long time with fault LEDs lit, or if power was removed from the server for more than 15 minutes.

    The processor fault LED for the failed processor lights. The processor fault LEDs are located next to the processors. See Motherboard Status Indicators.

    • If the processor fault LED is off, the processor is operating properly.

    • If the processor fault LED is on (amber), the processor failed and must be replaced.


    Figure showing how to identify a failed processor by pressing the Fault Remind button.
    Callout Description

    1

    Processor 0 fault LED

    2

    Processor 1 fault LED

    3

    Fault Remind button

    4

    Fault Remind Circuit Good LED

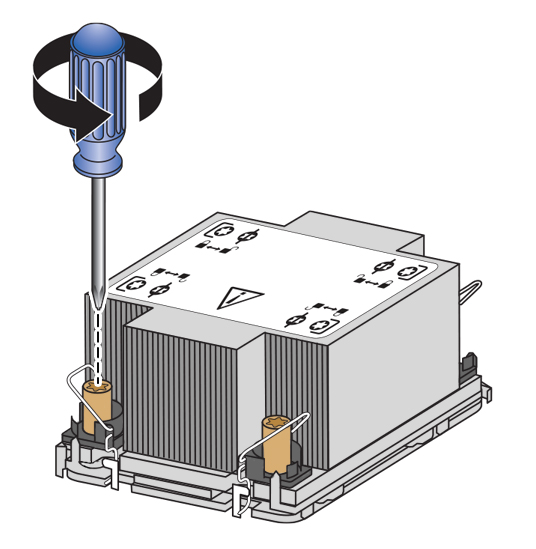
  3. Using a Torx T30 screwdriver, loosen the four captive load nuts that secure the processor-heatsink module to the socket. The nuts can be loosened in any order.

    Do not attempt to remove the processor-heatsink with the anti-tilt wires locked.


    Figure showing the captive load nuts being loosened on the processor-heatsink module.
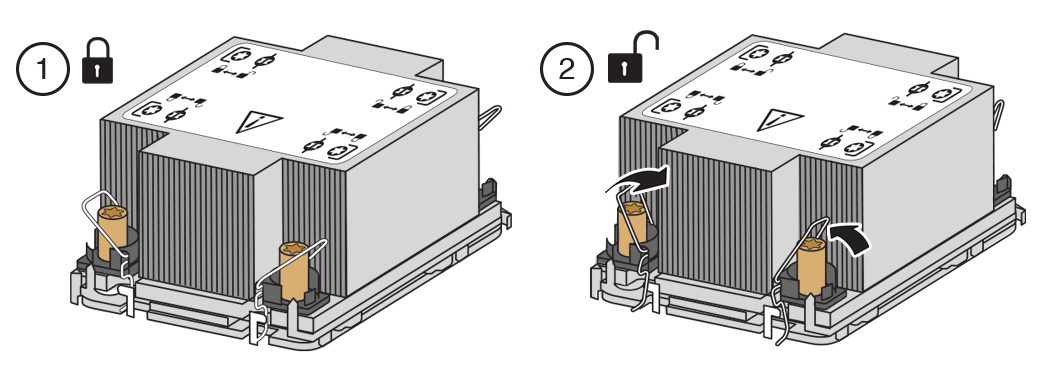
  4. Pivot the anti-tilt wire around each of the four captive heatsink load nuts to the unlocked position.

    Leave the anti-tilt wires in the unlocked position until installation.


    Figure showing the processor-heatsink module anti-tilt wires being set to the unlocked position.
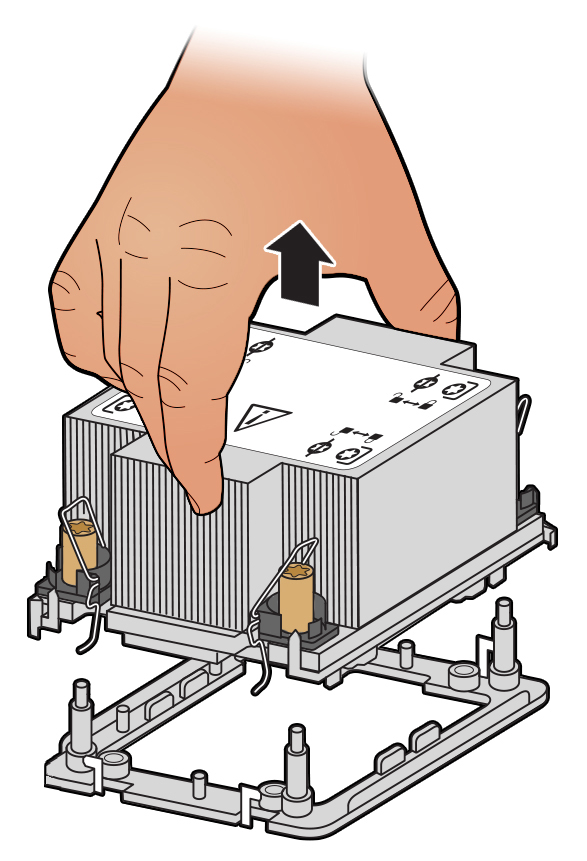
  5. Lift the processor-heatsink module straight up from the socket.

    Note:

    Always hold the processor-heatsink module along the axis of the fins to prevent damage.

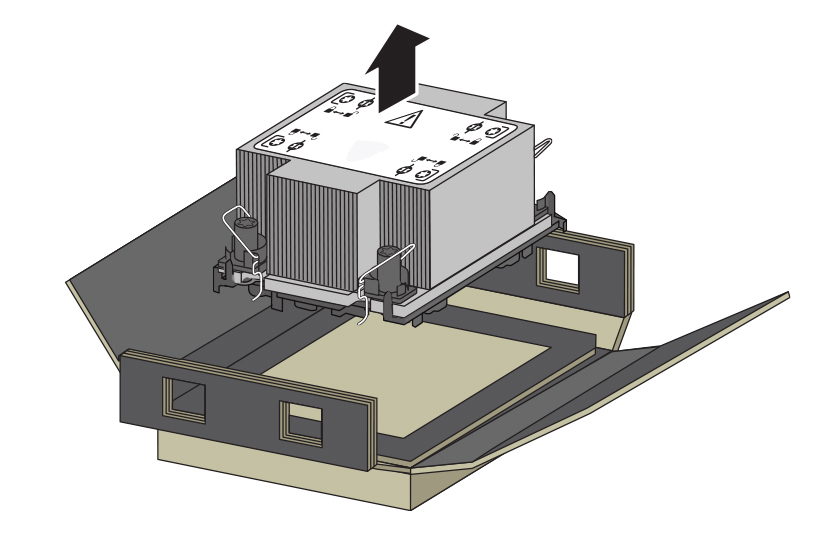
    Figure showing processor-heatsink module being removed from the socket.
  6. Separate the processor from the heatsink.
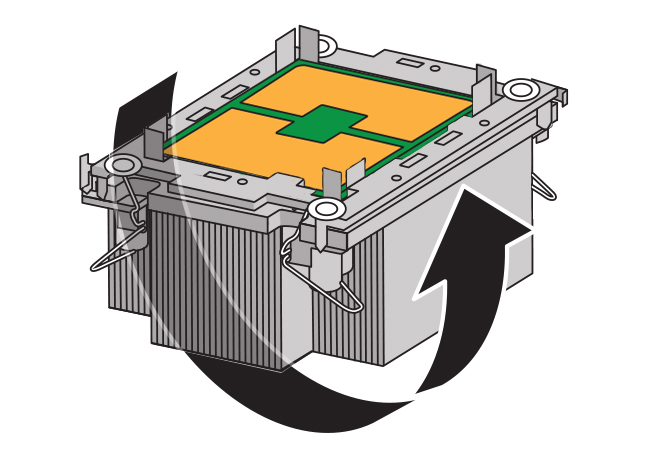
    1. Flip over the processor-heatsink module, place it on a flat surface, and locate the thermal interface material (TIM) breaker slot.

      Figure showing the processor-heatsink module being flipped over.
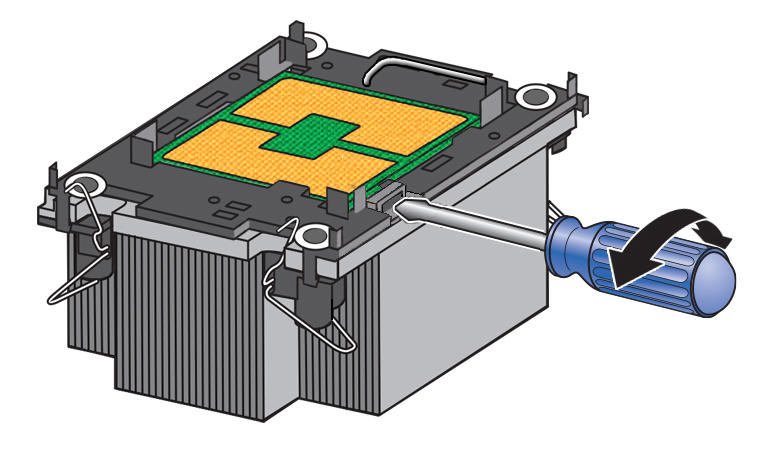
    2. While holding down the heatsink by its edges, insert a flat blade screwdriver into the TIM breaker slot. Using a rocking motion, gently pry the corner of the processor carrier away from the heatsink.

      Note:

      The blade of the screwdriver should go in to the slot between the heatsink and processor carrier, not the processor and processor carrier.

      Figure showing how to use a screwdriver to break the TIM adhesive between the processor carrier and the heatsink.

      Caution:

      There is a thin layer of thermal grease between the heatsink and the processor. Do not allow the thermal grease to contaminate the work space or other components.
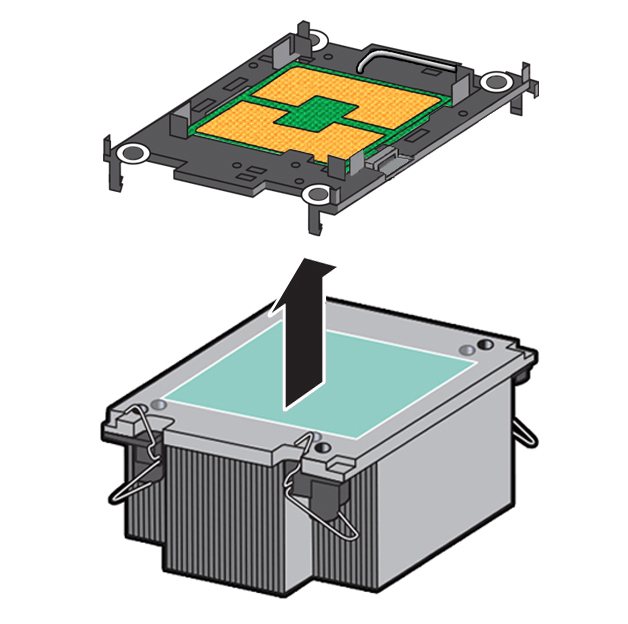
    3. Remove the processor carrier (with processor still attached) from the heatsink. The carrier has plastic latch tabs that attach it to the heatsink, pry or pinch the tabs as appropriate to detach the carrier from the heatsink.

      Figure showing the processor carrier being removed from the heatsink.
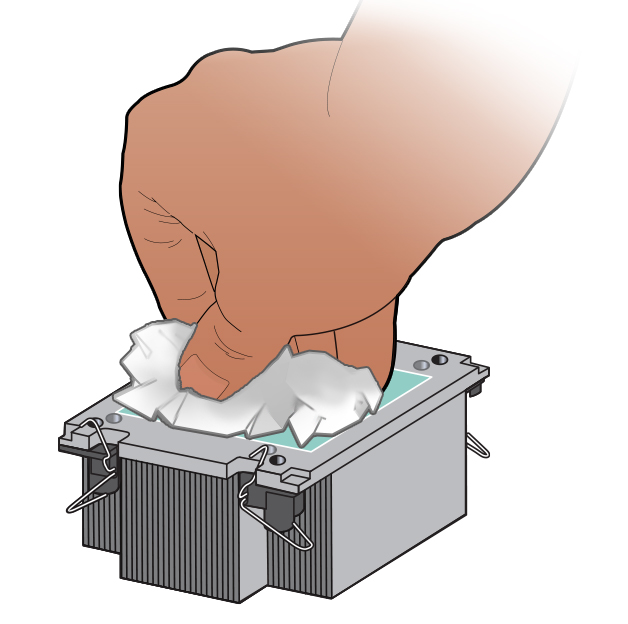
  7. If you plan on reusing either the heatsink or processor, clean off the thermal interface material (TIM) using the supplied alcohol wipes. If reusing a processor, do not remove it from the processor carrier.

    Figure showing TIM being cleaned off a heatsink.

    Caution:

    Failure to clean thermal grease from the heatsink could result in the accidental contamination of the processor socket or other components. Also, be careful not to get the grease on your fingers, as this could result in contamination of components.

Install a Processor

  • Use an antistatic wrist strap and a work space with an antistatic mat.

    See Electrostatic Discharge Safety.

  • Use ESD (not latex or vinyl) gloves, if possible, when handling the processor.

  • Be careful not to touch the processor socket pins.

    Caution:

    The processor socket pins are very fragile. A light touch can bend the processor socket pins beyond repair.
  • Obtain a preset or adjustable torque driver set to 8 in-lbf (inch-pound force) with a T30 Torx bit.

    Caution:

    Using an incorrect torque setting or driver can damage a processor-heatsink module.
  • If you are replacing a processor, ensure that the replacement processor is identical to the processor that was removed. For a list of supported processors, see Product Description.
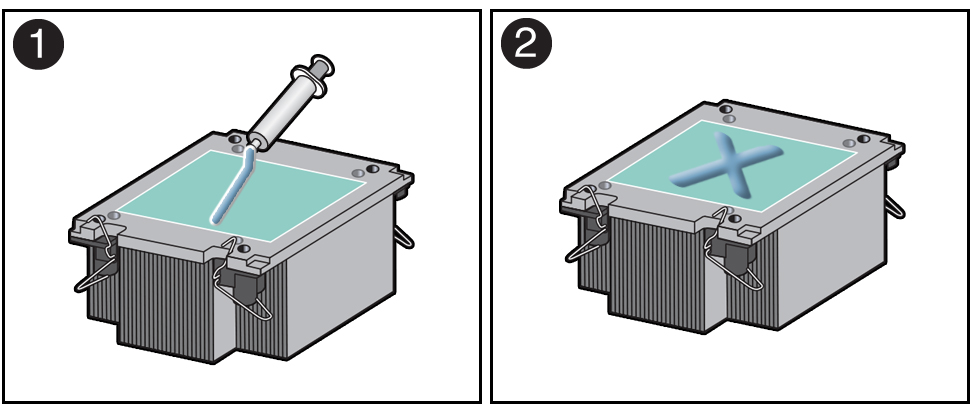
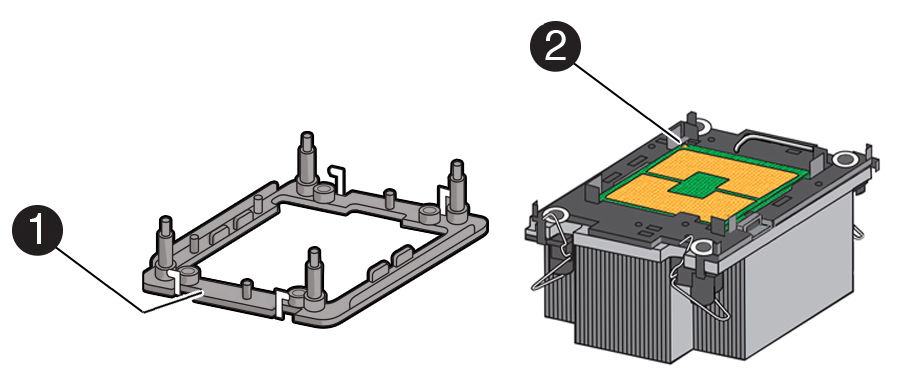
  1. Use the syringe supplied with the new or replacement processor [1] to apply all of thermal interface material (TIM) in an "X" pattern to the processor contact area of the heatsink [2].

    Figure showing thermal grease being applied to the heatsink.

    Note:

    Do not spread the TIM all over the processor contact area of the heatsink; the pressure of the heatsink will do so for you when you install the heatsink.
  2. Install the new processor.
    1. Open the box that contains the new processor but do not remove it from its ESD-safe packaging tray.
    2. Place the heatsink (TIM adhesive side down) onto the processor carrier until the latch tabs at each corner of the processor carrier attach to the heatsink [1].

      Note:

      There is a die-cut triangle in the processor carrier that points to the pin 1 corner of the processor.

      Figure showing the heatsink being attached to processor/processor carrier.
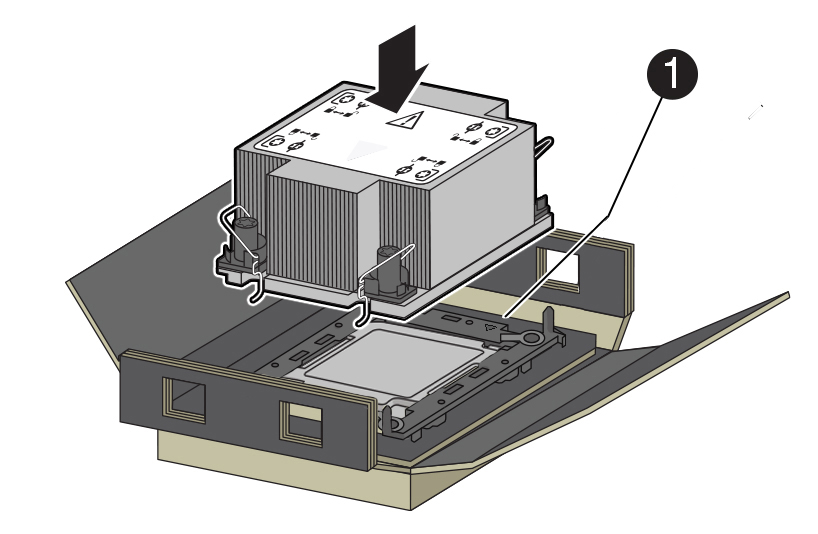
    3. Lift the assembled processor-heatsink module out of the packaging tray.

      Figure showing the processor-heatsink module being lifted from packaging tray.
    4. Align the processor-heatsink module with the processor socket bolster plate on the motherboard by matching up the pin 1 corner of the processor (indicated by a gold triangle on the underside of the processor [2]) with the pin 1 corner (indicated by an etched triangle) of the bolster plate [1].

      Figure showing the socket with callout to Pin 1.
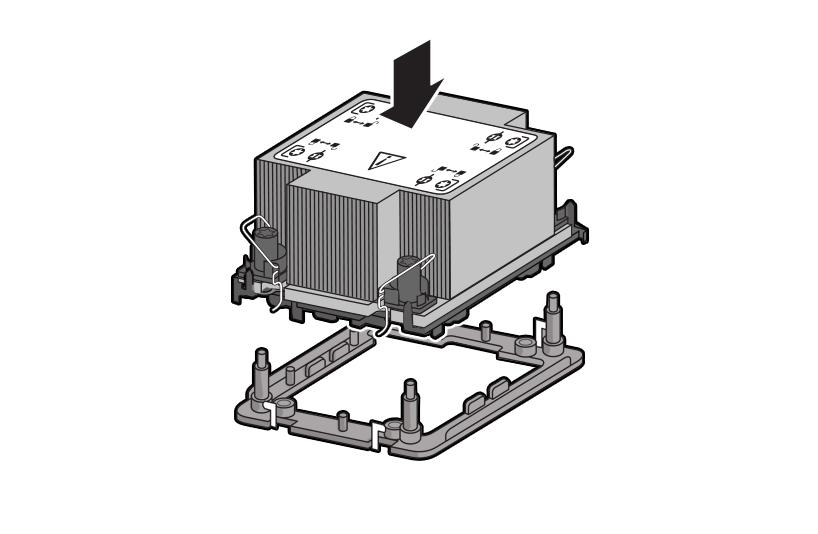
    5. Carefully, place the processor-heatsink module on the socket bolster plate on the motherboard. The bolster plate has four threaded posts, one at each corner to ensure proper alignment.

      Figure showing the processor-heatsink module being lowered onto the socket.
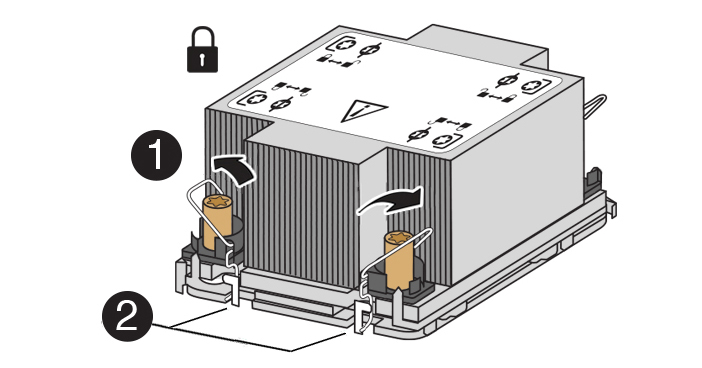
    6. Pivot the anti-tilt wire around each of the four captive heatsink load nuts to the locked position [1] away from the heatsink, engaging the wire with the lock tab on the bolster plate [2].

      Figure showing the processor-heatsink module anti-tilt wires set to the locked position.
    7. Using a torque driver adjusted to 8 in-lbf with a Torx T30 bit, tighten the four processor heatsink captive load nuts in any order.
  3. Return the server to operation.
    1. Install the air baffle.
    2. Install the server top cover.
    3. Return the server to the normal rack position.
    4. Reconnect the power cords to the power supplies, and power on the server.
    5. Verify that the power supply AC OK LED is lit.
  4. Use Oracle ILOM to clear the server processor faults.
    1. To show server faults, log in to Oracle ILOM as root. Using the Oracle ILOM CLI, type the following command to list all known faults on the server:

      -> show /SP/faultmgmt

      The server lists all known faults, for example:

      -> show /SP/faultmgmt
        Targets:
            shell
            0 (/SYS/MB/P0)
        Properties:
        Commands:
            cd
            show
      

      Alternatively, log in to the Oracle ILOM service processor from the Oracle ILOM Fault Management Shell and issue the fmadm faulty command. For more information about how to use the Oracle ILOM Fault Management Shell and supported commands, see the Oracle ILOM User's Guide for System Monitoring and Diagnostics at Oracle Integrated Lights Out Manager (ILOM) 5.0 Documentation.

    2. To clear the fault, type the following command:

      -> set /SYS/MB/P0 clear_fault_action=true

      For example:

      -> set /SYS/MB/P0 clear_fault_action=true
      Are you sure you want to clear /SYS/MB/P0 (y/n)? y
      Set ‘clear_fault_action’ to ‘true’
      

      For more information about how to use the Oracle ILOM Fault Management Shell and supported commands, see the Oracle ILOM User's Guide for System Monitoring and Diagnostics at Oracle Integrated Lights Out Manager (ILOM) 5.0 Documentation.