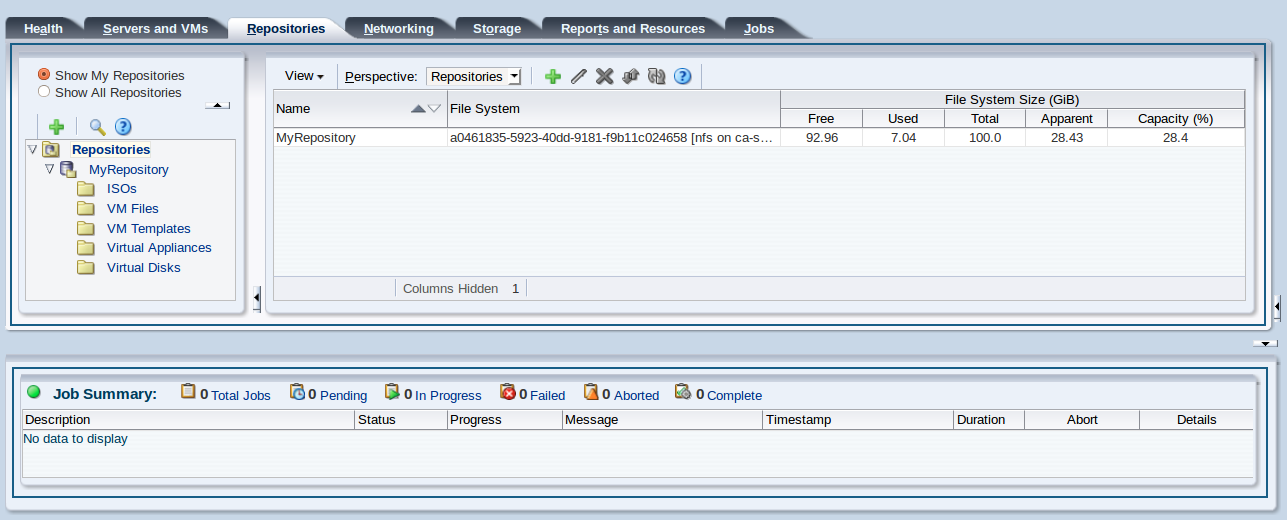
Chapter 4 Repositories Tab
Use the Repositories tab to create and configure storage repositories and their content; virtual appliances, virtual machine templates, ISO files (CDROMs), virtual disks and to display virtual machine configuration files.
Figure 4.1, “Repositories tab” shows the Repositories tab.
The Repositories tab contains the Perspectives set out in Table 4.1, “Repositories Tab Perspective”. The Perspectives available in any particular view vary depending on the item selected in the navigation tree. This table provides a quick reference for all of the available perspectives in the Repositories tab. Each perspective provides a different view of your configuration and also includes its own toolbar.
|
Management Pane Perspective |
Description |
|---|---|
Displays information about the storage repositories, and the resources in each repository. Use this tab to view, create, edit, present/unpresent, refresh and delete storage repositories. You can also use this tab to create and manage the contents of storage repositories; virtual appliances, ISO files, template files, virtual disks and virtual machine configuration files. To view the contents of each storage repository, select it in the navigation tree, and then select Repositories in the Perspective drop-down list. See Understanding Repositories in the Oracle VM Concepts Guide for more information on managing storage repositories. |
|
| Info | Displays a high-level view of the selected object. The Info pane contents change to reflect information about the object selected in the navigation tree. You can use this pane to view information about repositories in your environment. Select Info in the Perspective drop-down list to display the Info pane. |
|
Events are displayed for each object in the navigation tree and displays events related to that object. Select Events in the Perspective drop-down list to display the Events pane. |
4.1 Toolbar
The navigation pane includes its own toolbar that provides quick access to the most commonly used configuration tools for the Repositories tab. Clicking on any of the icons provided in the toolbar opens a dialog or wizard that can guide you through the configuration process for that item. The toolbar icons included in the Repositories navigation pane are:
The toolbar also includes a filter that controls which repositories are represented within the navigation tree and within the perspectives available in the management pane. The filter includes two radio buttons:
-
Show My Repositories: Filters the content to only show repositories that are currently under the ownership of this Oracle VM Manager instance.
-
Show All Repositories: Filters the content to show all repositories that have been discovered by this Oracle VM Manager instance, regardless of whether or not they are owned by the current Oracle VM Manager instance .
If you release ownership of a repository and it is not displayed
on this tab, you should check that the filter is not set to
Show My Repositories if you wish to perform an
action on the repository.
4.1.1 Create New Repository
A storage repository should be at least 10 GB in size. In addition to this minimum size requirement, you should include enough storage space for virtual machines, templates, ISO files and other virtual machine resources.
-
Select the Repositories tab.
-
Click Create New Repository
 in the toolbar.
-
In the Create a Repository dialog box, enter the following information:
-
Repository Name: The name you wish to use to identify the repository.
-
Repository Location: Either a network file server or a physical disk.
-
-
If you selected Network File Server as location, click Search
 to select a location in the Select Network
File System dialog box:
to select a location in the Select Network
File System dialog box:
-
Select a Network File Server from the list. The available file systems appear. Note that only a refreshed file system can be used.
-
Select the file system you wish to install the storage repository on. Click OK.
NoteWhen searching for a file system, there is an option to provide a Name Filter. You can use this filter to specify search criteria to limit the objects displayed. See Section 1.16, “Name Filters” for more information.
-
-
Optionally provide this additional information:
-
Share Path: Path to a subdirectory on the selected file system.
-
Description: Information you would like to add about this storage repository.
-
-
If you selected Physical Disk as the Repository Location, click Search
to select a location in the Select
Physical Disk dialog box:
-
Select a Storage Array and, if applicable, a Volume Group from the respective lists. The available disks appear.
-
Select the physical disk you wish to install the storage repository on. Click OK.
NoteWhen searching for a physical disk, there is an option to provide a Name Filter. You can use this filter to specify search criteria to limit the objects displayed. See Section 1.16, “Name Filters” for more information.
-
-
Select from the list to which Server Pool this storage repository should be provided, or alternatively select
Noneif you are creating a repository on a local disk for use on a single Oracle VM Server. Optionally enter additional information about this storage repository in the Description field.NoteWhen you create a storage repository on a LUN, only clustered server pools can be selected. If a non-clustered server pool or no server pool is selected, then you must specify a physical disk in local storage to create the repository.
-
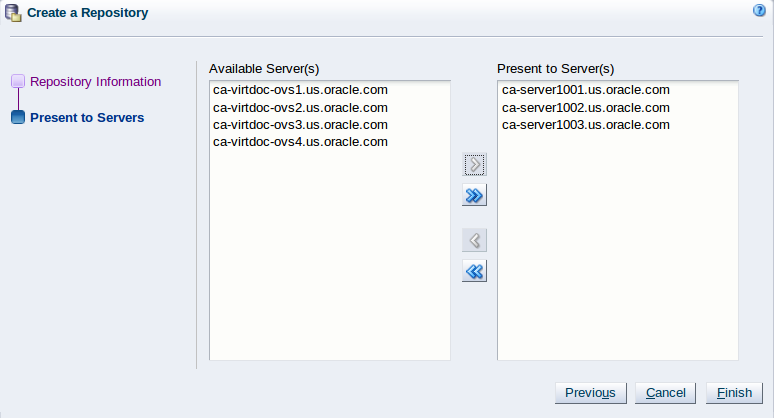
Click Next to proceed to the second section of the wizard: Present to Servers.
When the storage repository is prepared and created, it must also be made available for use by your Oracle VM Servers before it can be populated. Typically you present the storage repository to all the Oracle VM Servers in the server pool. However, should you wish to set up storage differently, Oracle VM Manager allows you to present a repository to a selection of Oracle VM Servers instead of the entire server pool. See also Section 4.3.1.4, “Present or Unpresent Repository”
-
In the Present to Servers dialog box, use the arrow buttons to move the required Oracle VM Servers from the left to the right pane.
-
Click Finish to create the new storage repository and present it to the selected Oracle VM Servers. The new storage repository is displayed in the Repositories table in the management pane.


At this point, the storage repository has been created, Oracle VM Manager has taken ownership, and the selected Oracle VM Servers have access in order to store virtual machines, ISO files, templates and so on. To modify the configuration of servers with access to the storage repository, see Section 4.3.1.4, “Present or Unpresent Repository”.
4.3 Repositories Folder
The Repositories navigation folder contains each storage repository that has been configured within the environment. The structure of the navigation provided in the navigation tree is discussed in more detail in Section 4.2, “Summary”.
Clicking on the Repositories navigation folder in the navigation tree allows you to access different perspectives in the management pane. Each perspective provides its own view of all of the storage repositories within Oracle VM Manager. Most of the perspectives also include separate perspective toolbars that enable you to perform various configuration or management tasks specific to the view currently displayed within the management pane. The Repositories navigation folder offers the following perspectives within the management pane:
4.3.1 Repositories Perspective
The Repositories perspective lists the different storage repositories configured in your environment. The following columns are displayed in the management pane:
-
Name: The name that has been configured for the repository.
-
File System: The UUID and path location to the storage repository file system.
-
File System Size: Displays the following attributes of the storage repository file system:
-
Free: Amount of available space on the file system, in GiB.
-
Used: Amount of space that is in use on the file system, in GiB.
-
Total: Capacity of the file system, in GiB.
-
Apparent: Apparent size, in GiB. The apparent size is the total size of the entire repository.
NoteOracle VM Manager uses a separate interval to collect the apparent size of the repository. That interval is longer than the interval at which other file system statistics are collected. For this reason, when changes to the contents of the repository file system occur, you might notice that it takes several minutes for the apparent size statistic to update after other file system statistics are updated.
-
Capacity (%): Percentage of the file system that is allocated. If the value is 100%, then all available disk space is allocated. If the value is greater than 100%, then the disk space is oversubscribed. For example, the repository contains several virtual disks that are sparsely allocated. If all of the virtual disks reach the maximum size, then the capacity exceeds the available disk space.
-
This perspective includes a toolbar that consists of the following options:
|
Toolbar Icon Option |
Icon |
Description |
|---|---|---|
|
|
Displays the Create a Data Repository wizard. Use this option to create a storage repository. |
|
|
|
Displays the Edit Repository wizard. Use this option to edit a storage repository. |
|
|
|
Displays the Delete Confirmation dialog box. Use this option to delete the selected storage repository. |
|
|
|
Displays the Present this Repository to Server(s) dialog box. Use this option to present or unpresent the repository to an entire server pool or to and from individual Oracle VM Servers. |
|
|
|
Refreshes one or more selected storage repositories. Oracle VM Manager re-checks the disk contents of the selected repositories. Any detected changes are reflected in the various content tabs (Virtual Appliances, ISO files, ...) of the storage repository. |
|
|
|
Displays context sensitive help. |
4.3.1.1 Create New Repository
A storage repository should be at least 10 GB in size. In addition to this minimum size requirement, you should include enough storage space for virtual machines, templates, ISO files and other virtual machine resources.
-
Select the Repositories tab.
-
Click Create New Repository
in the toolbar.
-
In the Create a Repository dialog box, enter the following information:
-
Repository Name: The name you wish to use to identify the repository.
-
Repository Location: Either a network file server or a physical disk.
-
-
If you selected Network File Server as location, click Search
to select a location in the Select Network
File System dialog box:
-
Select a Network File Server from the list. The available file systems appear. Note that only a refreshed file system can be used.
-
Select the file system you wish to install the storage repository on. Click OK.
NoteWhen searching for a file system, there is an option to provide a Name Filter. You can use this filter to specify search criteria to limit the objects displayed. See Section 1.16, “Name Filters” for more information.
-
-
Optionally provide this additional information:
-
Share Path: Path to a subdirectory on the selected file system.
-
Description: Information you would like to add about this storage repository.
-
-
If you selected Physical Disk as the Repository Location, click Search
to select a location in the Select
Physical Disk dialog box:
-
Select a Storage Array and, if applicable, a Volume Group from the respective lists. The available disks appear.
-
Select the physical disk you wish to install the storage repository on. Click OK.
NoteWhen searching for a physical disk, there is an option to provide a Name Filter. You can use this filter to specify search criteria to limit the objects displayed. See Section 1.16, “Name Filters” for more information.
-
-
Select from the list to which Server Pool this storage repository should be provided, or alternatively select
Noneif you are creating a repository on a local disk for use on a single Oracle VM Server. Optionally enter additional information about this storage repository in the Description field.NoteWhen you create a storage repository on a LUN, only clustered server pools can be selected. If a non-clustered server pool or no server pool is selected, then you must specify a physical disk in local storage to create the repository.
-
Click Next to proceed to the second section of the wizard: Present to Servers.
When the storage repository is prepared and created, it must also be made available for use by your Oracle VM Servers before it can be populated. Typically you present the storage repository to all the Oracle VM Servers in the server pool. However, should you wish to set up storage differently, Oracle VM Manager allows you to present a repository to a selection of Oracle VM Servers instead of the entire server pool. See also Section 4.3.1.4, “Present or Unpresent Repository”
-
In the Present to Servers dialog box, use the arrow buttons to move the required Oracle VM Servers from the left to the right pane.
-
Click Finish to create the new storage repository and present it to the selected Oracle VM Servers. The new storage repository is displayed in the Repositories table in the management pane.
At this point, the storage repository has been created, Oracle VM Manager has taken ownership, and the selected Oracle VM Servers have access in order to store virtual machines, ISO files, templates and so on. To modify the configuration of servers with access to the storage repository, see Section 4.3.1.4, “Present or Unpresent Repository”.
4.3.1.2 Edit Repository
-
Select the repository in the tree view in the navigation pane and click Edit Selected Repository
 in the toolbar.
Note
in the toolbar.
NoteThe Edit Repository dialog box is only editable if the repository is owned by the current Oracle VM Manager instance. If the repository is owned by another Oracle VM Manager instance, this dialog box is read-only.
-
In the Edit Repository dialog box you can make the following changes:
Repository Name: Edit the name of the selected repository.
Server Pool: This option is available if your repository location is a Physical Disk. It allows you to change the server pool that the repository is associated with. This option makes it simple to move OCFS2 repositories from one server pool to another. Usually after changing server pool association, you should change the Oracle VM Servers or server pool where the repository is presented. See Section 4.3.1.4, “Present or Unpresent Repository” for more information on presenting a repository to Oracle VM Servers.
Description: Optionally enter a more elaborate description of the selected repository.
Release Ownership: This check box is displayed if the repository is currently under ownership of the current Oracle VM Manager instance. Select this check box to allow the repository to be used by another Oracle VM Manager.
Take Ownership: This check box is displayed if the repository is not under the ownership of the current Oracle VM Manager instance. Select this check box to take ownership of the repository. The repository should first be released from the ownership of any other Oracle VM Manager instance.
By clicking on the Present Repository tab, you can easily change the servers or server pools on which the repository is presented. See Section 4.3.1.4, “Present or Unpresent Repository” for more information on this.
NoteThe Present Repository tab is only available if the repository is owned by the current Oracle VM Manager instance.
-
Click OK to save the changes to the storage repository.
4.3.1.3 Delete Repository
It is possible to delete a storage repository entirely, removing the entire directory structure from the file system where it is hosted.
-
Make sure that all content has been removed from the storage repository you wish to delete.
-
Select one or more repositories in the table in the management pane and click Delete Selected Repository
 in the toolbar.
-
Confirm that you wish to delete the storage repository: click OK to continue.
It is also possible to remove a storage repository from the current Oracle VM Manager instance without actually removing any of its contents. This can be useful if you intend to make use of the repository within an alternate Oracle VM Manager instance.
-
Select the repository in the table in the management pane and click Present/Unpresent
 in the toolbar.
-
In the Present Repository dialog box, unpresent the storage repository from all Oracle VM Servers. Click OK.
-
Select the repository in the tree view in the navigation pane and click Edit Selected Repository
in the toolbar. Select the
Release
Ownership check box and click
OK.
-
Select the now unowned repository in the table and click Delete.
-
Confirm that you wish to delete this storage repository: click OK to continue.
4.3.1.4 Present or Unpresent Repository
-
Select the Repositories tab and select the repository of your choice in the navigation pane.
-
Click Present/Unpresent
in the toolbar to change the list of servers the
repository is presented to.
-
In the Present this Repository to Server(s) dialog box, use the check box to select whether to present individual Oracle VM Servers, or all Oracle VM Servers in one or more server pools. Then use the arrow buttons to move the required Oracle VM Servers or server pools between the panes.
If you present a repository to a server pool, this has the same effect as selecting all of the Oracle VM Servers within the server pool and presenting the repository to them individually. If you add or remove servers from a server pool after you have presented the repository to a server pool, the configuration is not updated automatically. The option to present the repository to a server pool is a convenience and simply presents the repository to all servers that belong to a particular server pool at the time that you perform the action.
-
Click OK to present the storage repository to the selected Oracle VM Servers.
4.3.1.5 Refresh Repository
Refreshing a repository allows Oracle VM Manager to update the information that it has about the contents of a repository's file system and also refreshes information about the size and available free space on the file system where the repository is located. This is useful if manual changes have been made directly to the file system where the repository is located.
-
Select one or more repositories in the table in the management pane and click Refresh Selected Repository
 in the toolbar. Note that a repository refresh, does not
automatically refresh the contents of a virtual appliance.
To do this, refer to
Section 4.8.1.5, “Refresh Virtual Appliance”.
in the toolbar. Note that a repository refresh, does not
automatically refresh the contents of a virtual appliance.
To do this, refer to
Section 4.8.1.5, “Refresh Virtual Appliance”.
4.4 Repository Item
Each storage repository configured within the environment is displayed as a repository navigation item within the Repositories navigation folder. These repository navigation items are labelled according to the repository name that is configured within Oracle VM Manager. If a name is not available or not configured properly within Oracle VM Manager, the repository UUID is allocated as the repository name. The structure of the navigation provided in the navigation tree is discussed in more detail in Section 4.2, “Summary”.
Clicking on a repository navigation item in the navigation tree allows you to access different perspectives in the management pane. Each perspective provides its own view of the repository within Oracle VM Manager. Most of the perspectives also include separate perspective toolbars that enable you to perform various configuration or management tasks specific to the view currently displayed within the management pane. A repository navigation item offers the following perspectives within the management pane:
4.4.1 Info Perspective
The Info perspective is common to many elements within the Oracle VM Manager Web Interface. This perspective always shows the individually configured parameters for an item that is currently selected in the navigation tree. Some of these configured parameters may be automatically populated through a discovery process, while others may have been configured manually during the creation of the object that is selected.
The Info perspective or dialog contains a perspective toolbar with the following options:
|
Toolbar Icon Option |
Icon |
Description |
|---|---|---|
|
|
Displays context sensitive help. |
This perspective includes the following information:
-
Repository Name: The configured name for the repository.
-
Ownership: The owner of the repository.
-
Path: The path to the file system that is used for the repository file system.
-
Share Path: The path to a subdirectory on the repository file system.
-
File System Size (GiB): The total size of the file system.
-
File System Used (GiB): The amount of file system that is in use.
-
Used (%): The amount of file system that is in use as a percentage.
-
Apparent Size (GiB): The apparent size in GiB. The apparent size is the total size of the entire repository.
NoteOracle VM Manager uses a separate interval to collect the apparent size of the repository. That interval is longer than the interval at which other file system statistics are collected. For this reason, when changes to the contents of the repository file system occur, you might notice that it takes several minutes for the apparent size statistic to update after other file system statistics are updated.
-
Capacity (%): The percentage of the file system that is allocated. If the value is 100%, then all available disk space is allocated. If the value is greater than 100%, then the disk space is oversubscribed. For example, the repository contains several virtual disks that are sparsely allocated. If all of the virtual disks reach the maximum size, then the capacity exceeds the available disk space.
-
ID: The ID for the repository.
-
Description: The description provided for the repository when it was created or edited.
-
Presented to Servers: A list of the servers to which the repository has been presented.
4.4.2 Events Perspective
The Events perspective is common to many elements within the Oracle VM Manager Web Interface. The Events perspective generally appears as an option within the Perspectives drop-down menu on the management pane of tabs that include a navigation tree. In this case, the Events perspective displays events specific to the item selected in the navigation tree and presents these in the management pane.
The Events perspective may also appear within a dialog that is
triggered from a Display Selected
Events... ![]() perspective toolbar option. In this case,
the Events perspective dialog displays events specific to one
or more elements selected in the management pane.
perspective toolbar option. In this case,
the Events perspective dialog displays events specific to one
or more elements selected in the management pane.
If an object has an error event associated with it you must acknowledge the event to clear the error and return the object to normal operations. For example, this can occur if an Oracle VM Server or virtual machine appear as Stopped (Error) in the status. The object in error is flagged with a red icon in the navigation tree. Oracle VM Servers, virtual machines, repositories and storage objects can have error events associated with them.
Since Oracle VM Manager attempts to resolve issues automatically as much as possible, not all events can be acknowledged by a user within the Oracle VM Manager Web Interface. Therefore, a flag is set for events that are user acknowledgeable. If an event does not have this flag set, you are unable to acknowledge it, since it is handled internally by Oracle VM Manager.
The Events perspective or dialog contains a table with the following columns of information for each event:
-
Severity: The severity level assigned to the event.
-
Timestamp: The date and time that the event occurred.
-
Modify Time: The last recorded date and time that the event was modified.
-
Type: The type of event according to Oracle VM Manager's event categorization model.
-
Summary: A summary description of the event.
-
Acknowledged: Whether an error event has been acknowledged.
-
User Acknowledgeable: Whether or not an event can be acknowledged by the user.
Event Descriptions
An arrow displays next to each event in the table. Click the arrow to expand and view the Description section that provides additional details for the event.
The Events perspective or dialog contains a perspective toolbar with the following options:
|
Toolbar Icon Option |
Icon |
Description |
|---|---|---|
|
Acknowledge |
|
Acknowledge a selected error event to clear the error and return the object to normal operations. Note that this option is only available for user acknowledgeable events. |
|
Acknowledge All |
|
Acknowledge all error events associated with an object to clear the errors and return the object to normal operations. Note that only user acknowledgeable events are cleared. This button is always clickable, even if there are no user acknowledgeable events. Clicking it when there are no user acknowledgeable events results in an error dialog. |
|
Display Count |
A drop-down menu that allows you to select the number of events that should be displayed in the management pane, while you are currently in this perspective. |
Acknowledging Events/Errors
If an object has an error event associated with it you must acknowledge the event to clear the error and return the object to normal operations. For example, this can occur if an Oracle VM Server or virtual machine appear as Stopped (Error) in the status. The object in error is flagged with a red icon in the navigation tree. Oracle VM Servers, virtual machines, repositories and storage objects can have error events associated with them. The following procedures show you how to clear errors and return the object to normal operations.
-
Click the Servers and VMs tab.
-
Select the Oracle VM Server in the navigation tree.
-
Select Events from the Perspective drop-down list in the management pane.
-
Select the user acknowledgeable error event and click Acknowledge
 , or click
Acknowledge All
, or click
Acknowledge All
 to clear all user acknowledgeable
errors.
to clear all user acknowledgeable
errors.
-
Click the Servers and VMs tab.
-
Select the server pool, or Oracle VM Server on which the virtual machine resides in the navigation tree.
-
Select Virtual Machines from the Perspective drop-down list in the management pane.
-
Select the virtual machine in the management pane table. Click Display Selected VM Events...
 .
.
-
The Events dialog box is displayed. Select the user acknowledgeable error event and click Acknowledge
, or click
Acknowledge All
to clear all user acknowledgeable
errors. Click
Close.
-
Click the Repositories tab.
-
Select the repository in the navigation tree.
-
Select Events from the Perspective drop-down list in the management pane.
-
Select the error event and click Acknowledge
, or click
Acknowledge All
to clear all errors.
-
Click the Storage tab.
-
Select File Servers, SAN Servers, or a storage server in the navigation tree.
-
Select Events from the Perspective drop-down list in the management pane.
-
Select the user acknowledgeable error event and click Acknowledge
, or click
Acknowledge All
to clear all user acknowledgeable
errors.
4.5 ISOs Item
The management pane includes the default ISO perspective, and toolbars that enable you to perform various configuration or management tasks specific to ISOs.
4.5.1 ISOs Perspective
The ISOs perspective lists the ISO files (CDROMs) configured in your environment. The following columns are displayed in the management pane:
-
Name: The name that has been configured for the ISO file.
-
Size (GiB): The size of the ISO file.
-
Description: The description of the ISO file.
An arrow displays next to each ISO file in the table. Click the arrow to expand the view and display the name of the resource that uses the ISO file.
This perspective includes a toolbar that consists of the following options:
|
Toolbar Icon Option |
Icon |
Description |
|---|---|---|
|
|
Displays the Import ISO dialog box. Use this option to import an ISO file. |
|
|
|
Displays the Edit ISO dialog box. Use this option to edit an ISO file. |
|
|
|
Displays the Delete Confirmation dialog box. Use this option to delete the selected ISO file. |
|
|
|
Clones (creates a copy of) an ISO file. |
|
|
|
Displays context sensitive help. |
4.5.1.1 Import ISO
-
Click the Repositories tab. Select the repository in which to store the ISO file. Select ISOs in the navigation tree.
-
Select Import ISO...
 in the toolbar in the management pane.
-
The Import ISO dialog box is displayed. Select or edit the following:
-
ISO download location: The URL for the ISO file. The URL schemes supported are HTTP, HTTPS, and FTP. For example:
http://example.com/isos/myiso.iso
-
Proxy: The IP address or hostname of an optional proxy server to use when importing the ISO file.
Click OK to import the ISO file. When the import job is complete, the new ISO is displayed in the table in the management pane.
-
4.5.1.2 Edit ISO
-
Click the Repositories tab. Select the repository in which the ISO file is located. Select ISOs in the navigation tree.
-
Select the ISO in the table in the management pane. Click Edit Selected ISO
in the management pane toolbar.
-
The Edit ISO dialog box is displayed. Edit the ISO Name or Description. Click OK.
4.5.1.3 Delete ISO
To delete an ISO file, it must not be in use by any virtual machines.
-
Click the Repositories tab. Select the repository in which the ISO files are located. Select ISOs in the navigation tree.
-
Select one or more ISO files in the table in the management pane. Click Delete Selected ISO
in the management pane toolbar.
-
The Delete Confirmation dialog box is displayed. Click OK.
4.5.1.4 Clone ISO
To copy an ISO file to the same repository, another repository, a file system, or a storage array, you clone the ISO file. To clone an ISO file, it must not be in use by any running virtual machines or other clone job.
-
Click the Repositories tab. Select the repository in which the ISO is located. Select ISOs in the navigation tree.
-
Select the ISO in the table in the management pane. Click Clone ISO
 in the management pane toolbar.
-
The Clone ISO dialog box is displayed. Select or edit the following:
-
Clone Target Type: The destination storage type for the cloned ISO, either:
-
Repository
-
Physical Disk
-
Storage Array
-
-
Clone Target: The destination location for the cloned ISO. Click Search Clone Target
 to select the destination.
The Search Clone Target dialog box is displayed. Select the location on which to clone the ISO and click OK.
-
Clone Type: Whether to use a Sparse Copy or Non-sparse Copy. Sparse Copy creates a sparse disk, so the size of the disk is smaller than the original. Sparse copy is faster than using Non-Sparse Copy. Non-Sparse Copy copies the entire ISO, and so is slower than creating a sparse disk.
Click OK to clone the ISO file.
-
4.7 VM Templates Item
The management pane includes the default VM Templates perspective, and toolbars that enable you to perform various configuration or management tasks specific to virtual machine templates.
4.7.1 VM Templates Perspective
The VM Templates perspective lists the virtual machine templates configured in your environment. The following columns are displayed in the management pane:
-
Name: The name that has been configured for the template.
-
Domain Type: The domain type.
-
Max. Memory (MB): The maximum memory that can be allocated.
-
Memory (MB): The memory that is allocated.
-
Max. Processors: The maximum number of CPUs that can be allocated.
-
Processors: The number of CPUs that are allocated.
-
Operating System: The operating system type.
-
Description: The description of the template.
An arrow displays next to each virtual machine template in the table. Click the arrow to expand the view and display the Configuration, Networks, and Disks tabs. These tabs display the following information:
-
Name: The name that has been configured for the virtual machine.
-
Operating System: The operating system type.
-
Max. Processors: The maximum number of CPUs that can be allocated.
-
Processors: The number of CPUs that are allocated.
-
Max. Memory (MB): The maximum memory that can be allocated.
-
Memory (MB): The memory that is allocated.
-
Processor Cap: The percentage value configured for the processor cap.
-
Priority: The CPU priority allocated for the virtual machine.
-
Mouse Type: The mouse type configured for the virtual machine.
-
Domain Type: The hypervisor and virtual machine type configured for the virtual machine.
-
High Availability: Whether or not the High Availability flag is set for the virtual machine.
-
Huge Pages: Whether or not the Huge Pages flag is set for the virtual machine.
-
Boot Order: The configured boot order for disks attached to the virtual machine
-
Network Boot Path: The network boot path configured for the virtual machine.
-
Restart Action On Crash: The configured restart action in the instance that the virtual machine crashes.
-
Restart Action On Power Off: The configured restart action in the instance that the virtual machine receives the power-off signal.
-
Restart Action On Restart: The configured restart action in the instance that the virtual machine receives the restart signal.
-
ID: The ID allocated by Oracle VM Manager for the virtual machine.
-
Origin: The URL that was used to import the virtual machine or template, if it was imported.
-
Description: The description of the virtual machine.
-
Config File Absolute Path: The absolute path to the virtual machine configuration file.
-
Config File Mounted Path: The mount point where the virtual machine configuration file is located on an Oracle VM Server.
-
VNIC: The name of a VNIC configured for the virtual machine.
-
Ethernet Network: The name of the ethernet network that the VNIC is attached to.
-
IP Addresses: IP addresses configured for the VNIC.
-
Slot: The slot number for the disk.
-
Disk Type: The type of disk that is attached.
-
Name: The name of the disk within Oracle VM Manager.
-
Size (GiB): The size of the disk.
-
Repository: The repository where the disk is located.
-
Absolute Path: The absolute path to the location of the disk.
-
Mounted Path: The mount point where the disk is located on an Oracle VM Server.
-
Location: The location of the disk as reported by Oracle VM Manager.
This perspective includes a toolbar that consists of the following options:
|
Toolbar Icon Option |
Icon |
Description |
|---|---|---|
|
|
Displays the Import VM Template dialog box. Use this option to import a virtual machine template. |
|
|
|
Displays the Edit VM Template dialog box. Use this option to edit a virtual machine template. |
|
|
|
Displays the Delete Confirmation dialog box. Use this option to delete the selected virtual machine template. |
|
|
|
Displays the Clone Template wizard. Use this option to clone, or create a copy of, a virtual machine template. |
|
|
|
Displays the Move Template wizard. Use this option to move the disks and configuration file to another storage repository. |
|
|
|
Displays the Manage Clone Customizers for VM dialog box. Use this option to manage the clone customizers for a virtual machine template. |
|
|
|
Displays the VM Config File Content dialog box. Displays a read-only view of the configuration file for the selected virtual machine. Use this option to view the content of the virtual machine configuration file. |
|
|
|
Displays context sensitive help. |
4.7.1.1 Import Template
-
The Oracle VM template should be accessible to your Oracle VM environment from a location that can be reached using HTTP, HTTPS or FTP.
-
Click the Repositories tab. Select the repository in which to store the template. Select VM Templates in the navigation tree.
-
Select Import VM Template...
in the toolbar in the management pane.
-
The Import VM Template dialog box is displayed. Select or edit the following:
-
VM Template URLs: The URLs for the templates. The URL schemes supported are HTTP, HTTPS, and FTP. For example:
http://example.com/mytemplate.tgz
To import a template using FTP, use the standard FTP syntax:
ftp://
user:password@server/path/filename.tgzIf your template files are split into multiple compressed files [1] , concatenate those files and enter the URL for the concatenated file, for example to concatenate a number of compressed files to one compressed file, enter
$ cat template.tgz.1of3 template.tgz.2of3 template.tgz.3of3 > template.tgz
Then enter the URL to the single compressed template file, in this case, template.tgz.
To import a template that is not compressed as a single file, each component must be a complete file (if not, concatenate them to one file), for example to enter a virtual disk image and a virtual machine configuration file that together make up a complete template, you could enter:
http://myexample.com/System-sda.img
http://myexample.com/vm.cfg
Each template component should be listed on a new line. Each URL must be a reference to a complete file.
Alternatively, you can place all the files in the same directory on a web server, and import the vm.cfg file, and all the supporting virtual disk files are also imported.
-
Proxy: The IP address or hostname of an optional proxy server to use when importing the template.
Click OK to import the template. When the import job is complete, the new template is displayed in the table in the management pane. Expand the table row to see more information about the template.
-
4.7.1.2 Edit Template
You can edit a virtual machine template to change the configuration, networking, disks and boot order.
-
Click the Repositories tab. Select the repository in which the template is saved. Click VM Templates in the navigation tree.
-
Select the template to edit in the table in the management pane and click Edit Selected VM Template...
.
-
The Edit VM Template dialog box is displayed. The dialog has four separate tabs:
-
Configuration: This tab allows you to edit the following information:
-
VM Template Name: The name of the template. The maximum name length is 256 characters and may contain any character. The name need not be unique.
-
Enable Huge Pages: Whether to enable HugePages. If you enable HugePages, you must disable support for HugePages in the guest operating system. This option is not available for virtual machines in SPARC-based server pools.
-
Description: An optional description of the template.
-
Operating System: The guest operating system of the virtual machine in the template. This setting enables or disables certain virtual machine settings that your guest operating system may require.
-
Mouse Device Type: The mouse type to use for the template. This option is ignored if using a SPARC-based server pool.
-
Domain Type: The domain type of the virtual machine. Oracle recommends you create paravirtualized virtual machines if possible, as the performance of a paravirtualized virtual machine is superior to that of a hardware virtualized machine guest. This option is not available for virtual machines in SPARC-based server pools.
-
XEN_HVM: Hardware virtualization, or fully virtualized. When you select this option you must supply an ISO file in a repository (in the Arrange Disks step of the wizard) from which to create the virtual machine. See Section 4.5.1.1, “Import ISO” for information on importing an ISO file into a repository.
-
XEN_HVM_PV DRIVERS: Identical to XEN_HVM, but with additional paravirtualized drivers for improved performance of the virtual machine. See What are Virtualization Modes or Domain Types? in the Oracle VM Concepts Guide for more information about using paravirtualized drivers. This domain type is used to run Microsoft Windows guest operating systems with an acceptable performance level.
-
XEN_PVM: Paravirtualized. Enables you to select a location for the mounted ISO file from which to create the virtual machine. Before you create the virtual machine using the paravirtualized method, mount the ISO file on an NFS share, or HTTP or FTP server. You supply the location of the mounted ISO file in the Network Boot Path field in the Boot Options step of the wizard. For information on creating a mounted ISO file, see Provisioning ISO Files for PVM Guest Installations in the Oracle VM Administrator's Guide.
-
OVM/SPARC: This domain type should be selected if the server pool and hypervisors use Oracle VM Server for SPARC as the hypervisor instead of Oracle VM Server for x86.
-
Unknown: This hypervisor should be selected if the domain type is unknown.
-
-
Max. Memory (MB): The maximum size of the memory the virtual machine is to be allocated. When you edit a running virtual machine, this is the maximum amount of memory that can be allocated. This value must be between 32 and 2000000. For x86-based virtual machines, this value is incremented by 32 each time you click the up arrow, and, conversely, decreased by 32 if you click the down arrow. For SPARC-based virtual machines, the up arrow adds 512, and the down arrow subtracts 512.
-
Memory (MB): The size of the memory the virtual machine is to be allocated. This is the memory allocation to use when starting the virtual machine. This value must be between 32 and 2000000. For x86-based virtual machines, this value is incremented by 32 each time you click the up arrow, and, conversely, decreased by 32 if you click the down arrow. For SPARC-based virtual machines, the up arrow adds 512, and the down arrow subtracts 512. You can change this when editing a running virtual machine, up to the value of the maximum memory set in the previous field. For HVM guests, increasing or decreasing the memory requires a restart of the virtual machine. For PVM guest, no restart is required.
-
Max Processors: The maximum number of processors to be used by the virtual machine. The number of processors is expressed in number of physical CPU cores. The maximum number of processors depends on the domain type, as follows:
-
PVM: 256.
-
HVM: 128.
-
PVHVM: 128; or 32 if using Oracle VM Paravirtual Drivers for Microsoft Windows.
-
OVM/SPARC: Equivalent to the number of available CPUs on the server.
You cannot change the maximum number of processors if the virtual machine is running. To edit this value, you must first stop the virtual machine.
-
-
Processors: The number of processors to be used by the virtual machine. The number of processors is expressed in number of physical CPU cores, up to the value of Max. Processors.
You can change the number of processors if the virtual machine is running.
-
Priority: The CPU priority of the virtual machine. You can select a high (100), intermediate (50), or low (1) priority for the virtual CPUs, or a self-defined priority, by moving the slider. The higher the priority, the more physical CPU cycles are given to the virtual machine.
This option is ignored if using a SPARC-based server pool.
-
Processor Cap %: Increase or decrease the percentage to which the virtual CPUs can receive scheduled time. This parameter defines the maximum percentage to which the virtual CPUs can receive scheduled time. You can select a high (100), intermediate (50), or low (1) percentage of scheduled time for the virtual CPUs, or a custom percentage, by moving the slider. Use this parameter to keep low priority virtual machines from consuming too many CPU cycles on a virtual machine server.
This option is ignored if using a SPARC-based server pool.
The Priority and Processor Cap% parameters are passed to the Xen hypervisor for use by the credit scheduler, which automatically load balances guest VCPUs across all available physical CPUs using an algorithm that combines these two parameters. Therefore, these parameters are a key factor for the performance of the virtual machine on x86 hardware.
On SPARC, each virtual machine uses dedicated physical CPU threads and CPUs are not shared between virtual machines, being exclusively assigned to a single virtual machine.
-
Restart Action on Crash: The action to perform if a virtual machine crashes. This option is only available for virtual machines that are running on the Xen hypervisor and that have been configured to run on a particular Oracle VM Server, otherwise, this option is ignored. Options include the following:
-
Restart: Restarts the virtual machine operating system.
-
Stop: Stops the virtual machine. If Enable High Availability is selected, this option is not available.
-
Restart After Dump: Restarts the virtual machine operating system after first creating a core dump file for the virtual machine.
-
Stop After Dump: Stops the virtual machine after first creating a core dump file for the virtual machine. If Enable High Availability is selected, this option is not available.
Core dump files are saved to
/var/xen/dumpon the Oracle VM Server where the virtual machine is hosted. Each core dump file is named uniquely so that files are not overwritten. This can use up disk space rapidly. You must make sure there is either enough disk space available at this path on the Oracle VM Server where the virtual machine will run; or you should mount additional storage at this path to avoid using up disk space required to host dom0. -
-
-
Networks: This tab allows you to manage which networks to use. Use the arrow buttons to move the networks between the Available Ethernet Networks field and the Selected Ethernet Networks field. If no networks are available, you must first create a network with the virtual machine role as a dedicated network for virtual machine traffic is required. See Section 5.1.1, “Create New Network” for information on creating a network.
-
Disks: This tab allows you to edit the storage configuration of your template, such as virtual disk, physical disks, and ISO files. On a separate slot, add one or more of the following disk types:
-
Empty: An empty slot.
-
Virtual Disk: This allows you to add or create a virtual disk. Virtual disks may be shared by virtual machines, or only available to a single virtual machine.
-
Physical Disk: The physical disks are the disks in a storage array. Physical disks may be shared by virtual machines.
-
CD/DVD: This adds an ISO file in a storage repository and can be used to create HVM and PVHVM virtual machines. When creating a virtual machine from an ISO file, you must use a single file. Installations that span multiple ISO files are not supported. ISO files cannot be used to create PVM virtual machines.
Add or create any virtual disks to use as the virtual machine's hard disk, select any physical disks to add, and select any ISO files to use to create the virtual machine. Add the disks in the order they should appear in the virtual machine. The disk with the boot partition or installation media should be the first disk listed. An HVM guest can have up to four disks, including empty CD/DVD drives. A PVM guest can have up to 104 disks. A PVHVM guest can have up to 107 disks. An OVM/SPARC guest can have up to 1024 disks. Only one slot can contain an empty CD/DVD.
To create or add a virtual disk:-
To create a virtual disk, select Virtual Disk from the Disk Type drop-down list and click Create a Virtual Disk
.
-
The Create Virtual Disk dialog box is displayed. Enter or select the following to create a virtual disk:
-
Repository: The repository in which the virtual disk is to be created.
-
Virtual Disk Name: The name of the virtual disk to be created and made available to the virtual machine. See How are Virtual Disks Managed? in the Oracle VM Concepts Guide for more information about using virtual disks.
-
Size (GiB): The disk size of the virtual disk, in GiB.
-
Description: A description of the virtual disk.
-
Shareable: Whether the virtual disk should be shareable (read/write) with other virtual machines.
-
Allocation Type: Whether to use a Sparse Allocation or Non-sparse Allocation. Sparse Allocation creates a sparse disk, so the size of the disk is initially small and increases as it is used. Sparse allocation is faster than using Non-Sparse Allocation when creating a virtual machine. Non-Sparse Allocation creates the entire disk when the virtual machine is created, and so is slower than creating a sparse disk. This information is not persistent and is not stored within Oracle VM Manager, so it is not possible to determine what allocation type was used to create a virtual disk in the future.
Click OK.
-
-
To search for an existing virtual disk to add to the virtual machine, click Select a Virtual Machine Disk
. The Select a Virtual
Machine Disk dialog box is displayed.
Select the virtual disk to use and Click
OK.
NoteIf your virtual machine needs more than one disk, you can create the disk(s) afterwards in the repository, and add them to the virtual machine. See Section 4.9.1.1, “Create Virtual Disk” and Section 3.5.2.1, “Edit Virtual Machine” for more information on creating a virtual disk and editing a virtual machine.
To add a physical disk:-
To add a physical disk to the virtual machine, select Physical Disk from the Disk Type drop-down list. Click Select a Virtual Machine Disk
. The Select a Physical
Disk dialog box is displayed. Select a
physical disk from the list of available disks. If
you want to leave the slot empty, select
Leave
Slot Empty. Click
OK.
To add an ISO file:-
To add an ISO file to the virtual machine, select CD/DVD from the Disk Type drop-down list. Click Select a Virtual Machine Disk
. The Select an
ISO dialog box is displayed. Select a
Iso file from the list of available files. If you
want to leave the slot empty, select
Leave Slot Empty.
Click OK.
NoteWhen adding an ISO file to an existing virtual machine, the ISO file is available to the operating system, but may not be mounted. To access the ISO file, you may need to mount it, for example:
# mkdir /cdrom
# mount -o loop /dev/xvdb /cdrom
-
-
Boot Order: This tab allows you to edit the boot media order for your virtual machine.
Select the boot media order for your virtual machine.
If you are creating a hardware virtualized machine virtual machine (HVM), you can choose the PXE boot option. If so, remember to put PXE first in the Select your boot options field, and change the boot order again after installation and before rebooting the virtual machine. To use PXE, you must configure a PXE/tftp environment to offer the necessary boot media and instructions to the virtual machine.
If you are creating a paravirtualized virtual machine (PVM), you also have the Network option available (not shown in here). If so, specify Network to be at the top of the right-hand-side column, and enter the location of the mounted ISO file from which to perform the operating system installation in the Network Boot Path field (also not shown in here), for example
http://example.com/Enterprise-R6-U1-Server-x86_64-dvd.iso/
For information on creating a mounted ISO file, see Provisioning ISO Files for PVM Guest Installations in the Oracle VM Administrator's Guide.
You cannot use the Network Boot Path field to boot a virtual machine using PXE. This field can only be used to specify the path to a mounted ISO file to use when installing a PVM guest.
-
-
When you have finished editing the virtual machine template, click OK to save the changes, or Cancel to exit out of the dialog without saving any changes.
4.7.1.3 Delete Template
You can delete a virtual machine template, and the virtual disk associated with it.
-
Click the Repositories tab. Select the repository in which the template is saved. Click VM Templates in the navigation tree.
-
Select one or more templates in the table in the management pane and click Delete Selected VM Template...
.
-
The Delete Confirmation dialog box is displayed. Select the virtual disks associated with the templates you want to delete, if any. Click OK to delete the templates.
4.7.1.4 Clone a Virtual Machine or Template
Cloning a virtual machine or a template means making a copy of it, so that you can create multiple virtual machines or templates from the original.
A clone can also be performed using two other file copy methods: sparse copy, and non-sparse copy. These two cloning methods can be used when cloning from and to different repositories, and when the storage used for the storage repository uses a generic Oracle VM Storage Connect plug-in. These cloning methods are slower than thin cloning, but more versatile.
The virtual machine cloning procedure below uses the same dialog box to clone a virtual machine and a template.
-
Select the virtual machine or template to clone and display the Clone dialog box. You display this dialog box from different locations, depending on whether you are cloning a virtual machine or a template.
-
Virtual Machine: Click the Servers and VMs tab. Select the server pool on which the virtual machine resides in the navigation tree. Select Virtual Machines from the Perspective drop-down list. Select the virtual machine to clone in the management pane, and click Clone Virtual Machine
 .
.
-
Virtual Machine Template: Click the Repositories tab. In the navigation tree, select the repository in which the template resides, then VM Templates. Select the template in the management pane and click Clone Template
.
-
-
The Clone (Virtual Machine or Template) dialog box is displayed.
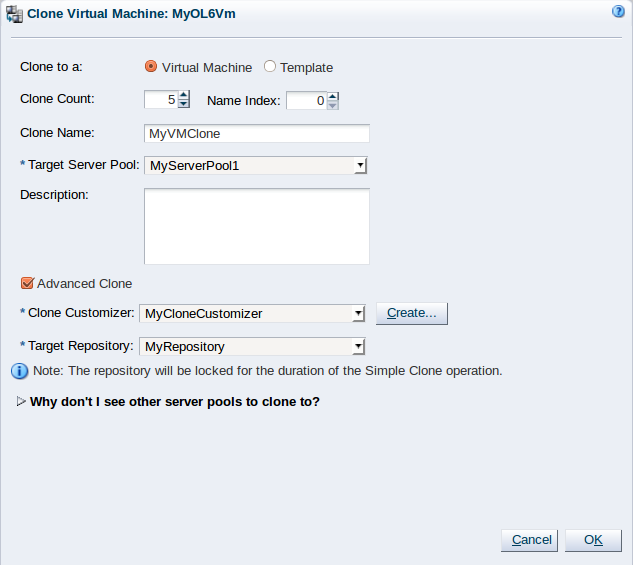
Select or enter the following:
-
Clone to a: Select the clone type, either Virtual Machine or Template, to specify the objects to create from the clone.
-
Clone Count: The number of clones to create.
-
Name Index: The start index number to use for the clone name suffix. The default is
0. This is used in conjunction with the Clone Name field to create the name for each clone. -
Clone Name: An optional name for the virtual machines or templates. The maximum name length is 256 characters and may contain any character. The name need not be unique. If no value is given, the default is the name of the virtual machine or template being cloned. Each clone is suffixed with a dot (.) and the clone index number, starting with the value for the Name Index field. For example, if the Clone Name field is set to
MyVM, and the Name Index field is set to1, the resulting clones would be namedMyVM.1,MyVM.2and so on. -
Target Server Pool: The server pool on which the clone is to be deployed.
NoteThe list of server pools that are available in the drop-down is limited to valid server pools that are capable of handling the cloning process correctly. This helps you to prevent cloning to a server pool that may fail to process the request. If this list is empty, you should refer to the table presented under the Why don't I see other server pools to clone to? element in this dialog.
-
Description: A description for the virtual machines or templates.
-
Advanced Clone: Whether to use a clone customizer to set preferences for the clone operation.
-
Clone Customizer: The clone customizer to create the clones. This is used to set virtual disk mappings to enable you to copy disks to other storage locations. It also allows you to create network mappings so you can use new VNICs and other networks for the clone. Click Create... to create a new clone customizer. See Section 3.5.2.14, “Manage Clone Customizers” for information on creating a clone customizer. This field is enabled if Advanced Clone is checked.
-
Target Repository: The repository to store the cloned virtual machine configuration file. This does not affect any clone disk mappings you set using a clone customizer; this option is only for the virtual machine configuration file. This field is enabled if Advanced Clone is checked.
-
Why don't I see other server pools to clone to? A collapsed window element, providing a table of server pools that do not meet the requirements to accept a clone request. Expanding any of the entries in this table displays the reason that the server pool does not qualify.
TipIf you clone a virtual machine or template without using a clone customizer, the storage repository is locked for the duration of the cloning job; this may be some time in some circumstances. To quickly create clones and not lock the storage repository, use a clone customizer.
Click OK.
-
The virtual machines are created and deployed to the server pool. The templates are created in the storage repository.
It is important to understand that older templates may use a different device type to attach virtual disks. This may affect your ability to attach new virtual disks, such as a virtual CDROM device. There are some limitations on mixing virtual disks of differing device types on a virtual machine. See How are Virtual Disks Managed? in the Oracle VM Concepts Guide for more information about how device types are allocated to virtual disks and what you may need to do to solve any issues surrounding this problem.
4.7.1.5 Move a Template
You can move a virtual machine template's resources, such as the virtual disk and virtual machine configuration files, to a different storage repository, or change the location of the disks and network used in the template. You can change the location of disks and the network to use when you move a virtual machine template using a clone customizer.
-
Click the Repositories tab. Select the repository in which the template is saved. Click VM Templates in the navigation tree.
-
Select the template to move in the table in the management pane and click Move Template
 .
.
-
The Move Template dialog box is displayed.
Select a clone customizer from the Clone Customizer drop-down list. If no clone customizers are displayed or you want to create a new one, click Create. See Create a Clone Customizer for information on creating a clone customizer.
Select the repository to which you want to move the template's virtual machine configuration from the Target Repository drop-down list.
Click Finish to move the template.
4.7.1.6 Manage Clone Customizers
Cloning a virtual machine or template means making a copy of it, so that you can create multiple virtual machines or templates from the original. You can create a clone customizer to set up the clone parameters, such as networking, and the virtual disk, and ISO resources. A clone customizer is also used when moving a virtual machine or template.
Create a Clone Customizer
-
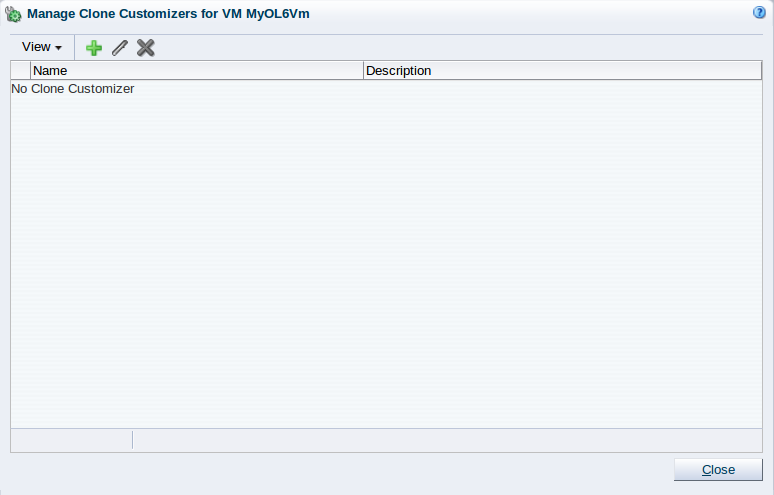
Select the virtual machine or template and display the Manage Clone Customizers for (Virtual Machine or Template) dialog box by:
-
Virtual Machine: Click the Servers and VMs tab. Select the server pool on which the virtual machine resides in the navigation tree. Select Virtual Machines from the Perspective drop-down list. Select the virtual machine to clone in the management pane, and click Manage Clone Customizers...
 .
.
-
Virtual Machine Template: Click the Repositories tab. In the navigation tree, select the repository in which the template resides, then VM Templates. Select the template in the management pane and click Manage Clone Customizers
.
-
-
Select Create Clone Customizer...
 .
.
-
The Create a Clone Customizer wizard is displayed.
In the Name and Description step of the wizard, enter a Name and Description for the clone customizer, and click Next.
-
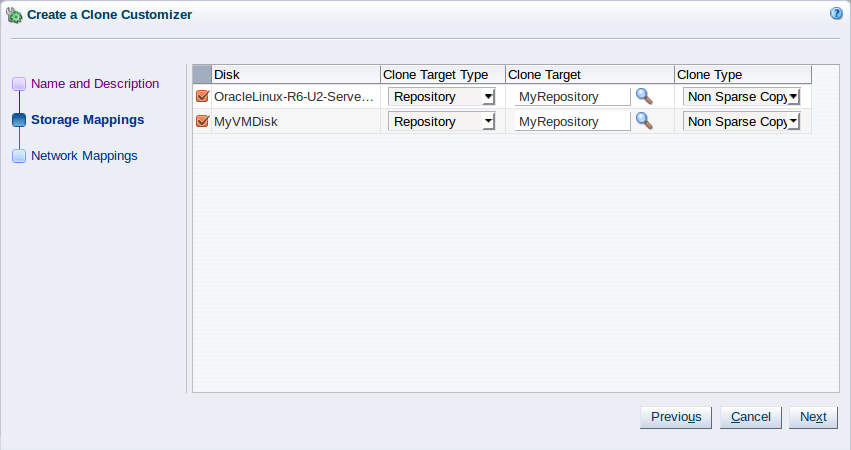
The Storage Mappings step of the wizard is displayed.
Select the following storage mappings:
-
Disk: The disks to include in the clone.
-
Clone Target Type: The type of storage location where the disk is to be created, either a Repository or a Physical Disk.
-
Clone Target: The location on the storage type where the disk is to be created.
-
Clone Type: Whether to use a sparse or non-sparse files for the disk.
CautionWhen sparse virtual disk space allocation is used, the available space in a repository can be over-subscribed. Sparse allocation is useful to increase virtual machine density. However, errors occur if the space allocated to a storage repository becomes exhausted, so the administrator must carefully monitor disk space.
Click Next.
-
-
The Network Mappings step of the wizard is displayed.
Select the Virtual NICss to include in the clone customizer, and the Ethernet Network to which they should belong.
NoteThe network configuration is not changed when moving a virtual machine or template. It is only used when cloning a virtual machine or template.
Click Finish.

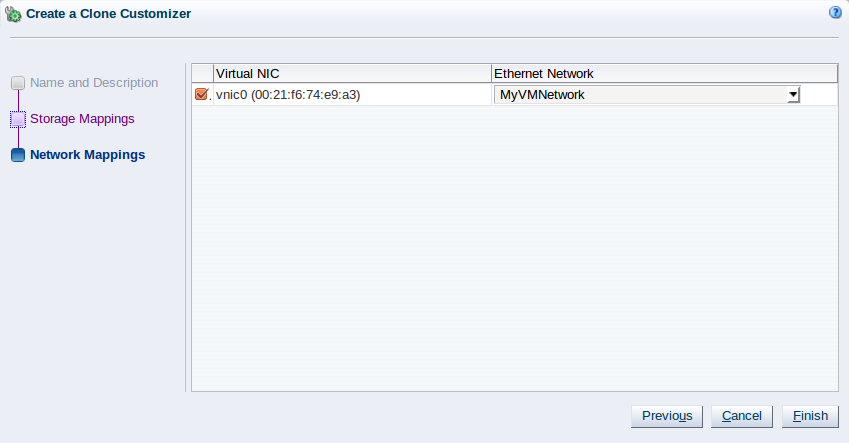
The clone customizer is now available to use to create a virtual machine, or template. See Section 4.7.1.4, “Clone a Virtual Machine or Template” for information on using the clone customizer to create a virtual machine or template.
Edit a Clone Customizer
-
Select the object to which the clone customizer belongs, either a virtual machine, or a virtual machine template. Click Manage Clone Customizers...
.
-
The Manage Clone Customizers for (VM or Template) dialog box is displayed. Select the clone customizer to edit and click Edit Clone Customizer...
.
-
The Edit Clone Customizer dialog box is displayed. Edit the clone customizer.
Click OK. The changes to the clone customizer are saved.
Delete a Clone Customizer
-
Select the object to which the clone customizer belongs, either a virtual machine, or a virtual machine template. Click Manage Clone Customizers...
.
-
The Manage Clone Customizers for (VM or Template) dialog box is displayed. Select the clone customizer to delete and click Delete Clone Customizer
.
-
A dialog box is displayed to confirm you want to delete the clone customizer. Confirm you want to delete the clone customizer and click OK. The clone customizer is deleted.
4.7.1.7 View Virtual Machine Configuration File
You can view the content of a virtual machine configuration file. The content is not editable but you can view and copy the text according to your needs.
-
Click the Repositories tab.
-
Select the repository in which the virtual machines is located in the navigation tree.
-
Select the virtual machine to which the configuration file belongs in the table in the management pane. Click VM Config File Content...
 .
. -
The VM Config File Content dialog box is displayed with the content of the virtual machine configuration file. You can view and copy the text according to your needs.
-
Click OK to close the dialog.
4.8 Virtual Appliances Item
The management pane includes the default Virtual Appliances perspective, and toolbars that enable you to perform various configuration or management tasks specific to virtual appliances.
4.8.1 Virtual Appliances Perspective
The Virtual Appliances perspective lists the virtual appliances configured in your environment. The following columns are displayed in the management pane:
-
Name: The name that has been configured for the virtual appliance.
-
Origin: The origin of the virtual appliance which is the URL from which this virtual appliance was imported.
-
Description: The description of the virtual appliance.
-
ID: The unique identifier for this object within Oracle VM Manager
An arrow displays next to each virtual appliance in the table. Click the arrow to expand the view and display the virtual machines and virtual disks that the virtual appliance contains. Each of these is displayed in its own subtab.
On the Virtual Machines subtab, it is possible to see a list of virtual machines contained within the virtual appliance. These are displayed in tabular format with the following columns:
-
Name: The name that has been configured for the virtual machine within the virtual appliance.
-
Description: The description that has been configured for the virtual machine within the virtual appliance.
On the Virtual Disks subtab, it is possible to see a list of the virtual disks contained within the virtual appliance. These are displayed in tabular format with the following columns:
-
Name: The name that has been configured for the virtual disk within the virtual appliance.
-
VM(s): A comma separated list of virtual machines within the virtual appliance that are configured to use the virtual disk.
-
Format: The format of the virtual disk image file.
-
Capacity: The capacity of the virtual disk in gibibytes (GiB).
-
Populated Size: The populated size of the virtual disk image file in gibibytes (GiB).
This perspective includes a toolbar that consists of the following options:
|
Toolbar Icon Option |
Icon |
Description |
|---|---|---|
|
|
Displays the Import Virtual Appliance dialog box. Use this option to import a virtual appliance. |
|
|
|
Displays the Create Virtual Machine dialog box. Use this option to create a virtual machine from a virtual appliance. | |
|
|
Displays the Edit Virtual Appliance dialog box. Use this option to edit a virtual appliance. |
|
|
|
Displays the Delete Confirmation dialog box. Use this option to delete the selected virtual appliance. |
|
|
|
Refreshes one or more selected virtual appliances. |
|
|
|
Displays context sensitive help. |
4.8.1.1 Import Virtual Appliance
-
Create or locate a virtual appliance file. This should be a single .ova file, which contains the .ovf descriptive file(s), and disk image file(s) for the virtual appliance.
NoteOVF files in the version 0.9 format (as used by ESX 3.5) are not supported. If the virtual appliance uses an unsupported format, you can attempt to convert it to a newer version with a tool such as VMware's Converter or OVF Tool, or you can use qemu-img to convert the vmdk files to raw disk files and recreate the virtual machine manually.
-
Place the virtual appliance in a location accessible from your Oracle VM Manager host computer.
NoteSupported URL schemes are HTTP, HTTPS, and FTP.
-
Click the Repositories tab. Select the repository in which to store the virtual appliance. Select Virtual Appliances in the navigation tree.
-
Select Import Virtual Appliance...
in the toolbar in the management pane.
-
The Import Virtual Appliance dialog box is displayed. Select or edit the following fields:
-
Virtual Appliance download location: URL for the virtual appliance; for example: http://example.com/appliances/myvirtappliance.ova
-
Proxy: Optional IP address or hostname of a proxy server.
-
Create VM: Option to create the virtual machine(s) that the virtual appliance contains during the import.
If the virtual appliance contains more than virtual machine, Oracle VM Manager creates a separate virtual machine for each one in the virtual appliance.
-
Server Pool: Option to deploy the virtual machine(s) to a specific server pool after creation.
Click OK to import the virtual appliance. When the import job is complete, the new virtual appliance is displayed in the table in the management pane.
If you selected the option to create virtual machines from the virtual appliance, the virtual machines are located in the server pool that you specified or the Unassigned Virtual Machines folder on the Servers and VMs tab.
-
4.8.1.2 Create Virtual Machine
-
Click the Repositories tab. Select the repository in which the virtual appliance is located. Select Virtual Appliances in the navigation tree.
-
Select Create Virtual Machine...
 in the toolbar in the management pane.
-
The Create Virtual Machine dialog box is displayed. Select the virtual machine you want to create in the Available Virtual Appliance VM(s): column and move it to the Selected Virtual Appliance VM(s): column.
You can select multiple virtual machines if the virtual appliance contains more than one. Oracle VM Manager creates a separate virtual machine for each one that you select.
-
Optionally select the server pool in which to deploy the virtual machine(s) from the Server Pool drop-down menu. If you do not select a server pool, the virtual machines are deployed to the Unassigned Virtual Machines folder on the Servers and VMs tab.
-
Click OK. Oracle VM Manager creates the selected virtual machines from the virtual appliance and deploys them to the server pool that you specified or the Unassigned Virtual Machines folder.
4.8.1.3 Edit Virtual Appliance
-
Click the Repositories tab. Select the repository in which the virtual appliance is located. Select Virtual Appliances in the navigation tree.
-
Select the virtual appliance in the table in the management pane. Click Edit Selected Virtual Appliance...
in the management pane toolbar.
-
Edit the Name or Description. Click OK.
4.8.1.4 Delete Virtual Appliance
-
Click the Repositories tab. Select the repository in which the virtual appliances are located. Select Virtual Appliances in the navigation tree.
-
Select one or more virtual appliances in the table in the management pane. Click Delete Selected Virtual Appliance
in the management pane toolbar.
-
The Delete Confirmation dialog box is displayed. Click OK.
4.8.1.5 Refresh Virtual Appliance
The contents of virtual appliances are not automatically refreshed when you refresh a repository. For this reason, you must refresh the virtual appliance to see the contents of a new or modified virtual appliance.
-
Click the Repositories tab. Select the repository in which the virtual appliances are located. Select Virtual Appliances in the navigation tree.
-
Select one or more virtual appliances in the table in the management pane. Click Refresh Selected Virtual Appliance
in the management pane toolbar.
-
The contents of the virtual appliances are refreshed from the storage repository.
4.9 Virtual Disks Item
The management pane includes the default Virtual Disks perspective, and toolbars that enable you to perform various configuration or management tasks specific to virtual disks.
4.9.1 Virtual Disks Perspective
The Virtual Disks perspective lists the virtual disks in your environment. The following columns are displayed in the management pane:
-
Name: The name that has been configured for the virtual disk.
-
Used (GiB): The amount of disk used.
-
Max. (GiB): The maximum allocated disk size that may be used.
-
Shareable: Whether the disk is shareable with other virtual machines.
-
Absolute Path: The absolute path to where the virtual disk is located.
-
Mounted Path: The mount point where the virtual disk is located when it is mounted on a server.
-
File: The location path in the storage repository.
-
Description: The description of the virtual disk.
An arrow displays next to each virtual disk in the table. Click the arrow to expand the view and display the name of the virtual machine that uses the virtual disk.
This perspective includes a toolbar that consists of the following options:
|
Toolbar Icon Option |
Icon |
Description |
|---|---|---|
|
|
Displays the Create Virtual Disk dialog box. Use this option to create a new virtual disk. |
|
|
|
Displays the Import Virtual Disk dialog box. Use this option to import a virtual disk. |
|
|
|
Displays the Edit Virtual Disk dialog box. Use this option to edit an virtual disk. |
|
|
|
Displays the Delete Confirmation dialog box. Use this option to delete the selected virtual disk. |
|
|
|
Displays the Clone Virtual Disk dialog box. Use this option to clone (create a copy of) a virtual disk. |
|
|
|
Displays context sensitive help. |
4.9.1.1 Create Virtual Disk
-
Click the Repositories tab. Select the repository in which to store the virtual disk. Select Virtual Disks in the navigation tree.
-
Click Create Virtual Disk...
in the management pane toolbar.
-
The Create Virtual Disk dialog box is displayed. Enter or select the following:
-
Virtual Disk Name: A name for the virtual disk.
-
Size (GiB): The size of the disk, in GiB.
-
Description: A description of the virtual disk.
-
Shareable: Whether the virtual disk is shareable. Shareable disks have read/write privileges in multiple virtual machines and should be used with caution.
-
Allocation Type: Whether to use a Sparse Allocation or Non-sparse Allocation. Sparse Allocation creates a sparse disk, so the size of the disk is initially small and increases as it is used. Sparse allocation is faster than using Non-Sparse Allocation when creating a virtual machine. Non-Sparse Allocation creates the entire disk when the virtual machine is created, and so is slower than creating a sparse disk. This information is not persistent and is not stored within Oracle VM Manager, so it is not possible to determine what allocation type was used to create a virtual disk in the future.
CautionWhen sparse virtual disk space allocation is used, the available space in a repository can be over-subscribed. Sparse allocation is useful to increase virtual machine density. However, errors occur if the space allocated to a storage repository becomes exhausted, so the administrator must carefully monitor disk space.
-
-
Click OK to create the new disk. To display which virtual machines use a disk, expand the table row in the management pane.
4.9.1.2 Import Virtual Disk
-
Click the Repositories tab. Select the repository in which to store the virtual disk. Select Virtual Disks in the navigation tree.
-
Click Import Virtual Disk...
in the management pane toolbar.
-
The Import Virtual Disk dialog box is displayed. Select or edit the following:
-
Virtual Disk download location: The URL for the virtual disk file. The URL schemes supported are HTTP, HTTPS, and FTP. For example:
http://example.com/vdisks/myvdisk.img
-
Proxy: The IP address or hostname of an optional proxy server to use when importing the virtual disk.
Click OK to import the virtual disk file. When the import job is complete, the new virtual disk is displayed in the table in the management pane.
-
4.9.1.3 Edit Virtual Disk
-
Click the Repositories tab. Select the repository in which the virtual disk is located. Select Virtual Disks in the navigation tree.
-
Select the virtual disk in the table in the management pane. Click Edit Virtual Disk...
in the management pane toolbar.
-
The Edit Virtual Disk dialog box is displayed. Enter or select the following:
-
Virtual Disk Name: A name for the virtual disk.
-
Size (GiB): The size of the disk, in GiB.
-
Resize Action: Whether the virtual disk should use sparse or non-sparse allocation. This drop-down selector does not default to the allocation type that was used when the disk was created, as this information is not stored within Oracle VM Manager. The allocation type specified here only applies to any additional disk space that is allocated in the case that the virtual disk size is increased. This information is not persistent and is not stored within Oracle VM Manager, so it is not possible to determine what allocation type was used for a virtual disk in the future.
-
Description: A description of the virtual disk.
-
Shareable: Whether the virtual disk is shareable. Shareable disks have read/write privileges in multiple virtual machines and should be used with caution.
NoteThe actual virtual disk image file is saved with a filename that contains the UUID for the virtual disk image. This is displayed in the ID field at the top of the dialog. This field is not editable.
Click OK to save the changes.
WarningWhen resizing a disk there is always a risk of data corruption. Also, the file system on the virtual disk may not be aware of the resize operation, so you may have to perform operating specific procedures to make the guest virtual machine aware of the change in disk size. Usually, after resizing a virtual disk, you may need to shutdown and then restart the guest virtual machine that is making use of the disk before it is able to register the new disk size.
-
4.9.1.4 Delete Virtual Disk
-
Click the Repositories tab. Select the repository in which the virtual disks are located. Select Virtual Disks in the navigation tree.
-
Select one or more virtual disks in the table in the management pane. Click Delete Selected Virtual Disk
in the management pane toolbar.
-
The Delete Confirmation dialog box is displayed. Click OK.
4.9.1.5 Clone Virtual Disk
-
Click the Repositories tab. Select the repository in which the virtual disk is located. Select Virtual Disks in the navigation tree.
-
Select the virtual disk in the table in the management pane. Click Clone Virtual Disk
in the management pane toolbar.
-
The Clone Virtual Disk dialog box is displayed. Select or edit the following:
-
Clone Target Type: The destination storage type for the cloned virtual disk, either:
-
Repository
-
Physical Disk
-
Storage Array
-
-
Clone Target: The destination location for the cloned virtual disk. Click Search Clone Target
to select the destination.
The Search Clone Target dialog box is displayed. Select the location on which to clone the virtual disk and click OK.
-
Clone Type: Whether to use a Sparse Copy or Non-sparse Copy. Sparse Copy creates a sparse disk, so the size of the disk is smaller than the original. Sparse copy is faster than using Non-Sparse Copy. Non-Sparse Copy copies the entire virtual disk, and so is slower than creating a sparse disk.
Click OK to clone the virtual disk.
-
[1] Templates can get very large, so it is not unusual that they are split into manageable chunks. This splitting is done without any attempt at preserving the structure, so the structure must be reconstructed by amalgamating the various files together again before import.