Chapter 3 Servers and VMs Tab
- 3.1 Toolbar
- 3.2 Summary
- 3.3 Server Pools Folder
- 3.4 Server Pool Item
-
3.5 Server Item
- 3.5.1 Info Perspective
- 3.5.2 Virtual Machines Perspective
- 3.5.3 CPUs Perspective
- 3.5.4 Ethernet Ports Perspective
- 3.5.5 Bond Ports Perspective
- 3.5.6 Physical Disks Perspective
- 3.5.7 Storage Initiators Perspective
- 3.5.8 Control Domains Perspective
- 3.5.9 Repository Exports Perspective
- 3.5.10 Events Perspective
- 3.6 Unassigned Servers Folder
- 3.7 Unassigned Virtual Machines Folder
Use the Servers and VMs tab to discover Oracle VM Servers, create and manage server pools and virtual machines, assign Oracle VM Servers to server pools, and create and configure virtual machines in server pools.
Figure 3.1, “Servers and VMs tab” shows the Servers and VMs tab.
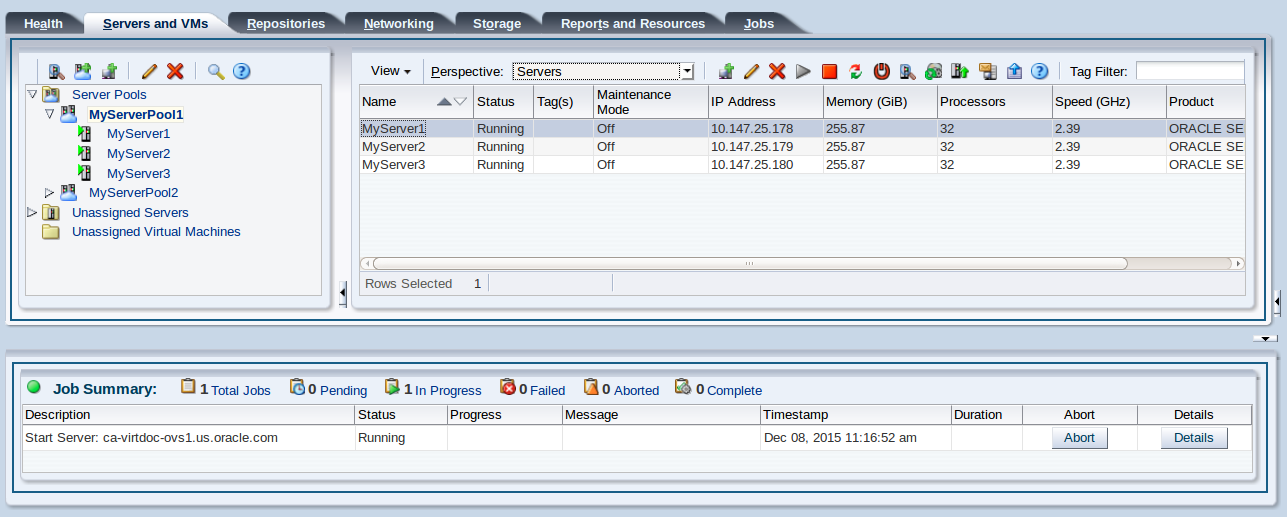
The Servers and VMs tab contains the Perspectives set out in Table 3.1, “Servers and VMs Tab Perspective”. The Perspectives available in any particular view vary depending on the item selected in the navigation tree. This table provides a quick reference for all of the available perspectives in the Servers and VMs tab. Each perspective provides a different view of your configuration and also includes its own toolbar.
|
Management Pane Perspective |
Description |
|---|---|
Displays information about the server pools. Use this tab to edit server pool policies, add or remove Oracle VM Servers from a server pool, edit information about a server pool, and delete a server pool. Select the Server Pools folder in the navigation tree and then select Server Pool in the Perspective drop-down list to display this pane. For more information about managing server pool, see Section 3.3.1, “Server Pools Perspective” . |
|
| Server Processor Compatibility | Displays information about the server processor compatibility groups defined for selected Oracle VM Servers with compatible processors for virtual machine migration. You can perform actions on the server processor compatibility groups using the tab's toolbar, such as create, edit and delete. Select the Server Pools folder in the navigation tree and then select Server Processor Compatibility in the Perspective drop-down list to display this pane. See Section 3.3.2, “Server Processor Compatibility Perspective” for information on server processor compatibility groups. |
| Servers | Lists the Oracle VM Servers in the server pool. You can perform actions on the Oracle VM Servers using the tab's toolbar, such as start, stop, and edit. You can also use the tab's toolbar to discover an Oracle VM Server and create a virtual machine on a selected Oracle VM Server. When an Oracle VM Server is discovered, it is listed in the Unassigned Servers folder. When an Oracle VM Server is added to a server pool, it is listed in the Server Pools folder. Select a server pool in the navigation tree and then select Servers in the Perspective drop-down list to display this pane. |
Displays information about the virtual machines in the server pool, or on the Oracle VM Server. You can perform actions on the virtual machines using the tab's toolbar, such as start, stop, edit, migrate and clone. Use the Name Filter input field to specify search criteria to filter the displayed results. See Section 1.16, “Name Filters” for more information. Select a server pool or Oracle VM Server in the navigation tree and then select Virtual Machines in the Perspective drop-down list to display this pane. The Virtual Machines pane is also displayed when you select the Unassigned Virtual Machines folder in the navigation tree. |
|
Displays information about the anti-affinity groups defined to keep selected virtual machines on separate Oracle VM Servers. You can perform actions on the anti-affinity groups using the tab's toolbar, such as create, edit and delete. Select a server pool in the navigation tree and then select Anti-Affinity Group in the Perspective drop-down list to display this pane. See Section 3.4.4, “Anti-Affinity Groups Perspective” for information on anti-affinity groups. |
|
Displays information about server pool power and resource management policies; Distributed Resource Scheduler (DRS), or Distributed Power Management (DPM). You can define or edit a policy for the server pool using the tab's toolbar. Select a server pool in the navigation tree and then select Policies in the Perspective drop-down list to display this pane. See What are Server Pool Policies? in the Oracle VM Concepts Guide for more information on these server pool policies. |
|
Displays information about the update repositories to update the software on Oracle VM Servers. These repositories override the global repositories set in the Tools and Resources tab. You can perform actions on the update repositories using the tab's toolbar, such as create, edit and delete. Select a server pool in the navigation tree and then select Server Update Repositories in the Perspective drop-down list to display this pane. See Section 3.4.6, “Server Update Repositories Perspective” for information on using the update repositories to override the global repositories. See Section 7.3, “Server Update Groups” for information on the global repositories. |
|
Lists the Ethernet ports on the selected Oracle VM Server that can be used for network bridges. Use this tab to edit the type of addressing (none, DHCP or static IP address) used for the Ethernet port. Select an Oracle VM Server in the navigation tree and then select Ethernet Ports in the Perspective drop-down list to display this pane. For more information on network bridges, see Network Bridges in the Oracle VM Concepts Guide. |
|
Lists the bonded Ethernet ports on the selected Oracle VM Server. Use this tab to create, edit and delete bonds on Ethernet ports. Note While Oracle VM Manager uses the Linux terminology, Oracle Solaris users should understand port bonding to be equivalent to data link aggregation. Select an Oracle VM Server in the navigation tree and then select Bond Ports in the Perspective drop-down list to display this pane. For more information on network bonding, see How is Network Bonding Used in Oracle VM? in the Oracle VM Concepts Guide. |
|
| Physical Disks | Lists the local storage available on the selected Oracle VM Server. Use this tab to edit, rescan, clone, refresh, delete, display servers using a physical disk, and display events for local storage. You can also use this tab to create or delete an OCFS2 file system on local storage. Use the Name Filter input field to specify search criteria to filter the displayed results. See Section 1.16, “Name Filters” for more information. Select an Oracle VM Server in the navigation tree and then select Physical Disks in the Perspective drop-down list to display this pane. For more information on local storage, see Local Storage in the Oracle VM Concepts Guide. |
| Storage Initiators | Lists the storage initiators available on the Oracle VM Server in your environment. Use this tab to view access groups for selected storage initiators. Select an Oracle VM Server in the navigation tree and then select Storage Initiators in the Perspective drop-down list to display this pane. |
| Control Domains | Displays information about the control domain, such as CPU, memory, operating system and Oracle VM Agent version. A control domain is an Oracle Solaris concept, and is also known as dom0 on an x86 host. You can also use this tab to view which version of Oracle VM Server the server is running before and after an upgrade using the server update repository. Select an Oracle VM Server in the navigation tree and then select Control Domains in the Perspective drop-down list to display this pane. See Section 3.4.2.10, “Update Server” for more information on Oracle VM Server update management. |
| Repository Exports | List the export file servers used by backup and restore applications to access OCFS2 file systems. Use this tab to create, edit and delete repository export file servers. Select an Oracle VM Server in the navigation tree and then select Repository Exports in the Perspective drop-down list to display this pane.
|
| Info | Displays a high-level view of the selected object. The Info pane contents change to reflect information about the object selected in the navigation tree. You can use this pane to view information about repositories in your environment. Select Info in the Perspective drop-down list to display the Info pane. |
Events are displayed for each object in the navigation tree and displays event related to that object. Select Events in the Perspective drop-down list to display the Events pane. |
3.1 Toolbar
The navigation pane includes its own toolbar that provides quick access to the most commonly used configuration tools for the Servers and VMs tab. Clicking on any of the icons provided in the toolbar opens a dialog or wizard that can guide you through the configuration process for that item. The following tools are available in this toolbar:
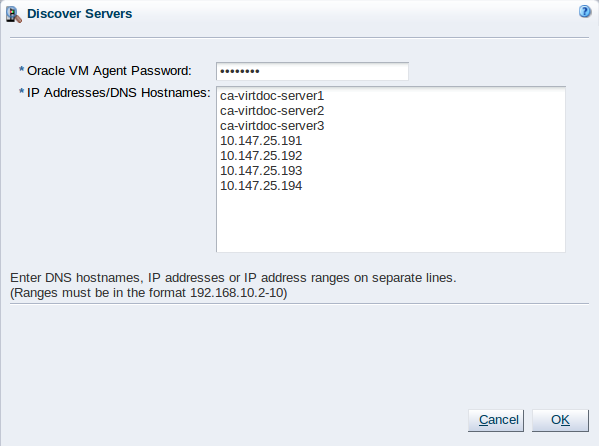
3.1.1 Discover Servers
When an Oracle VM Server is installed and starts up, it listens for Oracle VM Manager server pool discovery events. Before you can add an Oracle VM Server to a server pool, it must first be discovered.
The Discover Servers
![]() icon is available on the Servers and
VMs tab and is used to open the
Discover Servers wizard that
guides you through the server discovery process.
icon is available on the Servers and
VMs tab and is used to open the
Discover Servers wizard that
guides you through the server discovery process.
-
Click Discover Servers
 in the toolbar. The Discover
Servers dialog box is displayed.
in the toolbar. The Discover
Servers dialog box is displayed.
-
Enter information about the Oracle VM Server(s) to be discovered:
-
Oracle VM Agent Password: The password to connect to the Oracle VM Agent. It is advisable that the password is the same on all Oracle VM Servers to avoid authentication issues for the Oracle VM Manager.
An incorrect password results in an error message, notifying you of an 'Unauthorized access attempt'.
-
IP Addresses/DNS Hostnames: Enter the IP address(es), IP ranges or DNS hostnames of the Oracle VM Server(s) to be discovered. You can paste a list of multiple IP addresses or multiple DNS hostnames. If you enter an IP range it must be in the format 192.168.10.2-10. For example, if you enter 192.168.10.2-4 Oracle VM Manager performs discovery for 192.168.10.2, 192.168.10.3 and 192.168.10.4. IP addresses, IP ranges and DNS host names must be entered on separate lines.
NoteInvalid entries may result in a job that fails to complete and may need to be aborted. See Section 8.1.5, “Abort Jobs” for information on aborting a job. Servers are discovered sequentially, even when you have listed multiple IP addresses or an entire range. This operation is performed as a serial process.
ImportantDo not use Oracle VM Manager Release 3.4 to discover or interact with any instances of Oracle VM Server earlier than Release 3.2.10.
If you discover an instance of Oracle VM Server that is earlier than Release 3.2.10 with Oracle VM Manager Release 3.4, an error message is returned for the job and conflicts occur between the databases that Oracle VM Manager requires for maintaining synchronization between internal components.
Click OK.
-
The Oracle VM Servers are discovered and added to the Unassigned Servers folder. The newly discovered Oracle VM Server contains some basic information about itself, and about any immediate connectivity to a shared SAN, but it is considered to be in an unconfigured state. The Oracle VM Server cannot be used to perform any virtual machine, or active cluster operations. Physical network and storage configuration can be performed, and any subsequent storage discovery operations may also be performed.
The Utilization % column in the Servers perspective in the management pane does not report the utilization statistics of an Oracle VM Server that is in the Unassigned Servers folder. This field does not report utilization statistics unless an Oracle VM Server is included in a server pool.
When an Oracle VM Server has been discovered, it can be added to a server pool.
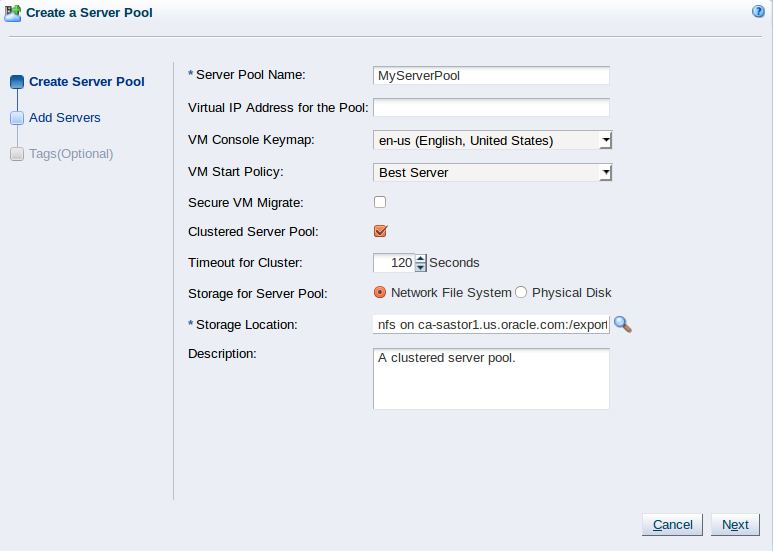
3.1.2 Create Server Pool
-
Click Create Server Pool
 in the toolbar to start the
Create Server Pool wizard.
in the toolbar to start the
Create Server Pool wizard.
-
The Create Server Pool step is displayed in the wizard.
Enter the server pool information:
-
Server Pool Name: The name of the server pool. The maximum length of a server pool name is 256 characters and may contain any character.
-
Virtual IP Address for the Pool: This option is deprecated, but is available for backward compatibility purposes. See What is a Master Server and a Virtual IP Address? in the Oracle VM Concepts Guide for more information on this parameter.
-
VM Console Keymap: The key mapping to be used when connecting to a virtual machine's console.
-
VM Start Policy: For each server pool you can define the default start-up policy for all of your virtual machines. It is possible to override the default policy within the configuration of each virtual machine. See Section 3.1.3, “Create Virtual Machine” for information on setting the start policy for an individual virtual machine. Note that as of Release 3.4, the VM Start Policy also applies to the VM Resume operation. Select one of:
-
Best Server: This is the legacy algorithm that optimizes virtual machine placement on Oracle VM Servers that are in use before moving to unused servers in the pool.
-
Balance Server: This algorithm distributes virtual machines across all the available Oracle VM Servers in the server pool, starting with the least utilized Oracle VM Server first. CPU and memory utilization statistics are used to balance the virtual machine distribution across the server pool, with CPU utilization taking precedence over memory utilization.
-
Current Server: The virtual machine is started on the current Oracle VM Server to which it is assigned.
NoteIf the VM start policy for a server pool is set to Current Server, and the server pool contains a VM that has not been assigned to a particular server yet, then that VM is started on one of the available servers according to the Best Server policy.
-
-
Secure VM Migrate: Select whether to enable encrypted migration of virtual machines. When Secure VM Migrate is checked, virtual machines are migrated using SSL to protect the data during the migration process. Secure migration of a virtual machine may effect the time taken to perform the migration as the encryption and decryption of data requires more system resources and time.
-
Clustered Server Pool: Select whether to enable clustering of the Oracle VM Servers in the server pool to enable HA. See How do Server Pool Clusters Work? and How does High Availability (HA) Work?in the Oracle VM Concepts Guide for more information on server pool clustering and on HA support and policies.
ImportantIf the Oracle VM Servers in your server pool are SPARC-based, you should be aware that clustering can only function if the distributed lock manager package is installed on all of the Oracle VM Servers that you intend to add to the server pool, as described in Installing the Distributed Lock Manager (DLM) Package in the Oracle VM Installation and Upgrade Guide. Furthermore, clustering is not supported for servers that have multiple control domains (shadow domains). Clustering for SPARC is only supported using NFS storage for the cluster file system. Failure to meet these requirements results in an error when attempting to create the clustered server pool, notifying you that the server lacks the ability to perform clustering.
-
Timeout for cluster: If clustering is enabled for the server pool, this option allows you to set the timeout parameter. The maximum cluster timeout setting is 300 seconds. The minimum cluster timeout is 30 seconds. The default cluster timeout is 120 seconds. The Disk heartbeat and network heartbeat are automatically derived from the cluster timeout value. The cluster timeout determines how long a server should be unavailable within the cluster before failover occurs. Setting this value too low can cause false positives, where failover may occur due to a brief network outage or a sudden load spike. Setting the cluster timeout to a higher value can mean that a server is unavailable for a lengthier period before failover occurs.
The cluster timeout can only be changed when there are no servers in the server pool, therefore it is usually good to set this during the creation of your server pool. See Clustering for x86 Server Pools in Oracle VM Concepts Guide for more information.
SPARC-based server pools do not recognize the cluster timeout parameter. Setting this value for a server pool consisting of SPARC servers has no effect and the parameter is ignored by the Oracle VM Agent for SPARC.
NoteThis option is greyed out if the Clustered Server Pool check box is unchecked.
-
Storage for Server Pool: Select the file system type to use for the server pool, either a Network File System, or a Physical Disk. The server pool file system is used to hold the server pool cluster data, and is also used for cluster heartbeating. Oracle recommends that you create this storage with a size of at least 12 GB, as a NAS export or LUN. Note that if you are creating a SPARC-based server pool, only NFS is supported for a server pool file system.
A server pool file system is exclusive, just like other storage. That is, in the same way that you cannot create two storage repositories on the same export path, the server pool file system cannot be shared with other server pools, or with storage repositories. Each fully qualified export path (for example, /export/myexport/one, /export/myexport/two) must be used for one, and only one, purpose, that is, for a storage repository, or a server pool file system.
NoteThis option is greyed out if the Clustered Server Pool check box is unchecked.
For information on creating storage, see Chapter 6, Storage Tab.
-
Network File System: The file system to use as the pool file system. Click Search
 in the Storage
Location field to search for a network file
system. This field is displayed if you select Network File
System in the previous field.
in the Storage
Location field to search for a network file
system. This field is displayed if you select Network File
System in the previous field.
-
Physical Disk: The file system to use as the pool file system. Click Search
in the Storage
Location field to search for a physical disk.
This field is displayed if you select Physical Disk in the
previous field.
-
Description: A description of the server pool. This field is optional.
Click Next.
-
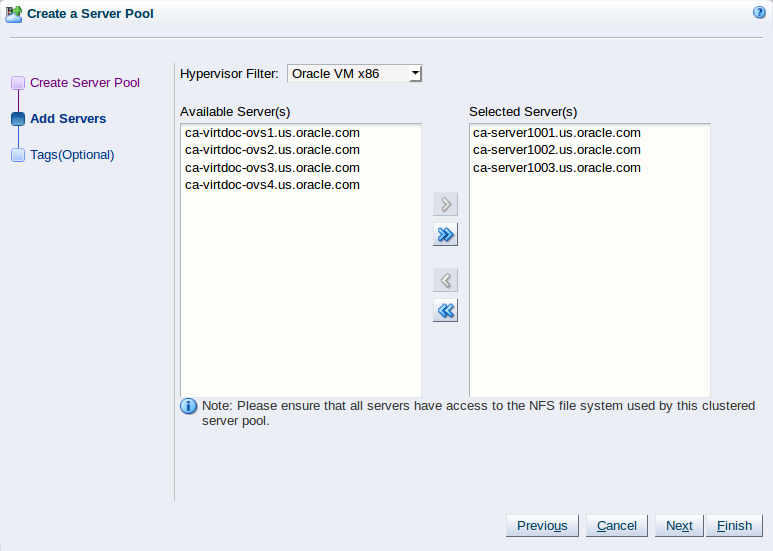
-
The Add Servers step is displayed in the wizard.
The Hypervisor Filter field allows you to specify the hypervisor type to use for the server pool. Selecting the
Oracle VM x86hypervisor, limits the available servers to show only x86 systems; while selecting theOracle VM SPARChypervisor, limits the available servers to show only SPARC systems within your environment. If your environment does not contain systems of more than one hypervisor, the filter is greyed out and is automatically set to the hypervisor available within your environment. It is not possible to create a server pool consisting of servers that use different hypervisors.Select the Oracle VM Servers to add to the server pool from the Available Servers column and move them to the Selected Servers column.
If you have defined tags and wish to add any to the server pool, click Next. Otherwise, click Finish.
-
The Tags step is optional and displays in the wizard if you clicked Next in the previous step.
If you have defined tags previously, they appear in the Available Tags column. You can select the tags that you wish to apply to the server pool and move them to the Selected Tags column.
See Section 1.17, “Tags and Tag Filters” for more information on creating and managing tags.
Click Finish.

The server pool is created.
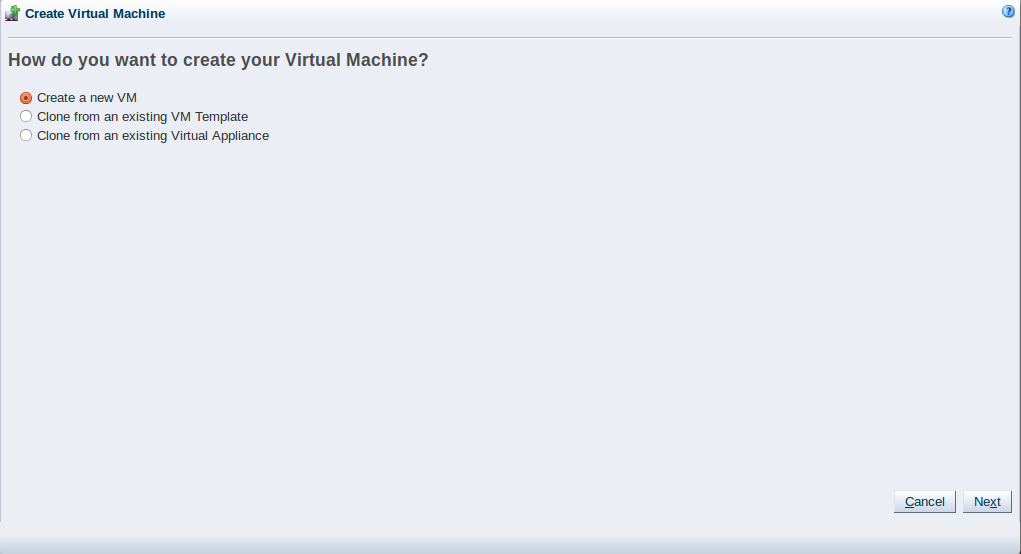
3.1.3 Create Virtual Machine
This section explains how to create a virtual machine using a template, and creating a virtual machine from an ISO file, or from physical or virtual disks.
-
Click the Servers and VMs tab.
-
Click Create Virtual Machine
 in the toolbar.
-
The Create Virtual Machine wizard is displayed.
Select the Clone from an existing VM Template option and then click Next.
-
The Create Virtual Machine wizard prompts you to specify details for the virtual machine.
Enter or select the following details:
-
Clone Count: The number of virtual machines to create from the template.
-
Name Index: The start index number to use for the clone name suffix. The default is
0. This is used in conjunction with the VM Name field to create the name for each clone. -
Repository: The repository in which to create the virtual machine configuration files.
-
VM Template: The template to use to create the virtual machines.
-
VM Name: An optional name for the virtual machines. The maximum name length is 256 characters and may contain any character. The name need not be unique. If no value is given, the default is the name of the virtual machine template being cloned. Each clone is suffixed with a dot (.) and the clone index number, starting with the value for the Name Index field. For example, if the VM Name field is set to
MyVM, and the Name Index field is set to1, the resulting clones would be namedMyVM.1,MyVM.2and so on. -
Server Pool: The server pool in which to deploy the virtual machines.
-
Description: An optional description of the virtual machines.
-
-
Click Finish. The virtual machines are created and deployed to the server pool.
-
Click the Servers and VMs tab.
-
Click Create Virtual Machine
in the toolbar.
-
The Create Virtual Machine wizard is displayed.
Click the Clone from an existing Virtual Appliance option and then click Next.
-
The Create Virtual Machine wizard prompts you to specify details for the virtual machine.
Enter or select the following details:
-
Repository: The repository in which to create the virtual machine configuration files.
-
Virtual Appliance: The virtual appliance from which you want to create the virtual machines.
-
Server Pool: The server pool in which to deploy the virtual machines.
If you select None, the virtual machines are deployed into the Unassigned Virtual Machines folder.
-
Available Virtual Appliance VM(s): The virtual machines that are available to create from the virtual appliance.
-
Selected Virtual Appliance VM(s): The virtual machines to create from the virtual appliance.
You can select multiple virtual machines if the virtual appliance contains more than one. Oracle VM Manager creates a separate virtual machine for each one that you select.
-
-
Click Finish.
Oracle VM Manager creates the selected virtual machines from the virtual appliance and deploys them to the server pool you specified.
You can then migrate each virtual machine to a compatible server or server pool.
-
Click the Servers and VMs tab.
-
Click Create Virtual Machine
in the toolbar.
The Create Virtual Machine wizard is displayed.
-
Click the Create a new VM option and then click Next.
-
The Create Virtual Machine step is displayed in the wizard.
Enter or select the following details:
-
Server Pool: The server pool on which to create the virtual machine.
-
Server: The server that the virtual machine should be created on. The default option is
Any, but the drop-down selection lists the servers that exist in the server pool that you have selected. Selecting a particular server forces the virtual machine to be created on that server. This has implications for the Start Policy discussed later. -
Repository: The repository in which to create the virtual machine configuration file.
-
Name: A name for the virtual machine. The maximum name length is 256 characters and may contain any character. The name need not be unique.
-
Enable High Availability: Whether to enable High Availability (HA). See How does High Availability (HA) Work? in the Oracle VM Concepts Guide for more information on HA.
-
Enable Huge Pages: Whether to enable HugePages.
-
The HugePages feature is deprecated for virtual machines with a domain type of PVM in Oracle VM Release 3.4.1. You should not enable HugePages when creating or editing virtual machines. This feature will be removed in a future release of Oracle VM.
If you have HugePages enabled for any PVM guests, Oracle recommends that you change the domain type for virtual machines from Paravirtualized (PVM) to Hardware virtualized, with paravirtualized drivers (PVHVM). If you cannot change the domain type for a virtual machine, you should disable the HugePages setting and then restart the virtual machine.
-
Huge Page support is enabled by default for virtual machines with a domain type of HVM or PVHVM. You cannot set this parameter for those virtual machines.
-
This option does not take effect on virtual machines deployed on SPARC-based server pools. Virtual machines running on SPARC-based servers can access the page sizes that the server platform supports, regardless of this setting.
See How is the HugePages Feature Enabled for Virtual Machines?, in the Oracle VM Concepts Guide, for more information on Huge Page support.
-
-
Description: An optional description of the virtual machine.
-
Operating System: The operating system of the virtual machine. This setting enables or disables certain virtual machine settings that the guest operating system may require.
-
Enable Viridian: Whether to enable Viridian.
-
Viridian support enables the exposure of Windows virtualization compatible entitlements to Microsoft Windows guest operating systems. Enabling viridian support is strongly recommended to ensure improved performance for Microsoft Windows guest operating systems.
-
Enabling viridian support is permitted for all Microsoft Windows guest operating system types. However, it is only effective from Microsoft Windows Vista and Microsoft Windows Server 2008 onwards.
-
Viridian support is enabled by default when creating virtual machines running Microsoft Windows guest operating systems.
-
-
Mouse Device Type: The mouse type to use for the virtual machine. This option is not available for virtual machines in SPARC-based server pools.
-
Keymap: The keyboard mapping to use for the virtual machine. This option is not available for virtual machines in SPARC-based server pools.
-
Domain Type: The domain type of the virtual machine.
-
Xen HVM: Hardware virtualization, or fully virtualized. When you select this option you can supply an ISO file in a repository (in the Arrange Disks step of the wizard) from which to install an operating system on the virtual machine. See Section 4.5.1.1, “Import ISO” for information on importing an ISO file into a repository. Alternatively, you may consider setting up an environment to perform a network installation for the virtual machine.
-
Xen HVM PV Drivers: Identical to Xen HVM, but with additional paravirtualized drivers for improved performance of the virtual machine. See What are Virtualization Modes or Domain Types? in the Oracle VM Concepts Guide for more information about using paravirtualized drivers. This domain type is typically used to run Microsoft Windows guest operating systems with an acceptable performance level. Installation of the guest operating system is usually performed either using an ISO file in a repository or via a network installation.
-
Xen PVM: Paravirtualized. Enables you to select a location for the mounted ISO file from which to create the virtual machine. Before you create the virtual machine using the paravirtualized method, mount the ISO file on an NFS share, or HTTP or FTP server. You supply the location of the mounted ISO file in the Network Boot Path field in the Boot Options step of the wizard. For information on creating a mounted ISO file, see Provisioning ISO Files for PVM Guest Installations in the Oracle VM Administrator's Guide. Do not select this option if the virtual machine Operating System is set to either Oracle Linux 7 or RedHat Enterprise Linux 7. These operating systems do not support the Xen PVM domain type.
ImportantAs of Oracle VM Release 3.4.6, support for PVM guests is removed. For more information, see Disabling Paravirtualized Guests on Oracle VM Server in the Oracle VM Administrator's Guide.
-
OVM/SPARC: Specifies that the virtual machine is deployed on a server pool running on Oracle VM Server for SPARC.
-
Unknown: This option is informational in the event that Oracle VM Manager is unable to determine the domain type for an existing virtual machine. It is not possible to actually set a virtual machine's domain type to this value. Attempting to do so generates a rule violation when you try to save the virtual machine settings and an error message is returned.
-
-
Start Policy: The policy that should be used to start the virtual machine. Select one of:
-
Best Server: This is the legacy algorithm that optimizes virtual machine placement on Oracle VM Servers that are in use before moving to unused servers in the pool.
-
Balance Server: This algorithm distributes virtual machines across all the available Oracle VM Servers in the server pool, starting with the least utilized Oracle VM Server first. CPU and memory utilization statistics are used to balance the virtual machine distribution across the server pool, with CPU utilization taking precedence over memory utilization.
-
Current Server: The virtual machine is started on the Oracle VM Server to which it is assigned. If you selected a particular server to create the virtual machine on, then it is started on this server.
-
Use Pool Policy: The virtual machine is started using the start policy defined for the entire server pool. See Section 3.1.2, “Create Server Pool” for more information on setting the start policy for a server pool.
-
-
Max. Memory (MB): The maximum memory size the virtual machine can be allocated. This value must be between 32 and 512000. The default is 512.
For x86-based virtual machines, this value is incremented by 32 each time you click the up arrow, and, conversely, decreased by 32 if you click the down arrow. For SPARC-based virtual machines, the up arrow adds 512, and the down arrow subtracts 512. If you have enabled Huge Pages, the value must be a multiple of 2 MB.
NoteFor HVM and PVHVM guests, the maximum memory size value must equal the memory size value. If these values are different, the following job failure message is generated for HVM/PVHVM guests: "The memory limit cannot be different than the current memory size on an HVM/PVHVM Virtual Machine."
-
Memory (MB): The memory size the virtual machine is allocated. When creating a virtual machine, this is the memory allocation used when starting the virtual machine. This value must be between 32 and 512000. The default is 512.
For x86-based virtual machines, this value is incremented by 32 each time you click the up arrow, and, conversely, decreased by 32 if you click the down arrow. For SPARC-based virtual machines, the up arrow adds 512, and the down arrow subtracts 512. If you have enabled Huge Pages, the value must be a multiple of 2 MB.
You can change the memory allocated to a running virtual machine without the need to restart the virtual machine if the domain type is PVM or PVHVM and where the guest is running a Linux OS on an x86-based platform or an Oracle Solaris OS on a SPARC-based platform.
NoteFor x86-based PVHVM guests running on Oracle Solaris OS, you cannot change the memory if the virtual machine is running.
See the Oracle VM Paravirtual Drivers for Microsoft Windows documentation for information about the availability of hot memory modification on PVHVM guests that are running a Microsoft Windows OS. You must use a Windows PV Driver that supports hot memory modification or you must stop the guest before you modify the memory.
-
Max. Processors: The maximum number of processors the virtual machine can be allocated. The number of processors is expressed in number of physical CPU cores. The maximum number of processors depends on the domain type, as follows:
-
PVM: 256.
ImportantAs of Oracle VM Release 3.4.6, support for PVM guests is removed. For more information, see Disabling Paravirtualized Guests on Oracle VM Server in the Oracle VM Administrator's Guide.
-
HVM: 128; or 32 for Microsoft Windows guests.
NoteAs of Release 3.4.6, the HVM limit is
64for Microsoft Windows guests. -
PVHVM: 128; or 32 if using Oracle VM Paravirtual Drivers for Microsoft Windows.
NoteAs of Release 3.4.6, the PVHVM limit is
64if using Oracle VM Paravirtual Drivers for Microsoft Windows. -
OVM/SPARC: Equivalent to the number of available CPUs on the server.
-
-
Processors: The number of processors the virtual machine is allocated. The number of processors is expressed in number of physical CPU cores, up to the value of Max. Processors.
-
Priority: The CPU priority of the virtual machine. The higher the priority value, the more physical CPU cycles are given to the virtual machine. This option is not available for virtual machines in SPARC-based server pools. This should be a number between 1 and 100. The default priority is set at 1.
-
Processor Cap %: Increase or decrease the percentage to which the virtual CPUs can receive scheduled time. This parameter defines the maximum percentage to which the virtual CPUs can receive scheduled time. Use this parameter to keep low priority virtual machines from consuming too many CPU cycles on a Virtual Machine Server. This option is not available for virtual machines in SPARC-based server pools.
-
Restart Action on Crash: The action to perform if a virtual machine crashes. This option is only available for virtual machines that are running on the Xen hypervisor and that have been configured to run on a particular Oracle VM Server. Options include the following:
-
Restart: Restarts the virtual machine operating system.
-
Stop: Stops the virtual machine. If Enable High Availability is selected, this option is not available.
-
Restart After Dump: Restarts the virtual machine operating system after first creating a core dump file for the virtual machine.
-
Stop After Dump: Stops the virtual machine after first creating a core dump file for the virtual machine. If Enable High Availability is selected, this option is not available.
Core dump files are saved to
/var/xen/dumpon the Oracle VM Server where the virtual machine is hosted. Each core dump file is named uniquely so that files are not overwritten. This can use up disk space rapidly. You must make sure there is either enough disk space available at this path on the Oracle VM Server where the virtual machine will run; or you should mount additional storage at this path to avoid using up disk space required to host dom0.This option cannot be modified for a running virtual machine. You must stop the virtual machine before you are able to change this option, if you select to edit the virtual machine later.
-
The Priority and Processor Cap% parameters are passed to the Xen hypervisor for use by the credit scheduler, which automatically load balances guest VCPUs across all available physical CPUs, using an algorithm that combines these two parameters. Therefore, these parameters are a key factor for the performance of the virtual machine on x86 hardware.
NoteFor information on performance optimization goals and techniques for Oracle VM Server for x86, see Optimizing Oracle VM Server for x86 Performance, on Oracle Technology Network at: http://www.oracle.com/technetwork/server-storage/vm/ovm-performance-2995164.pdf.
On SPARC, each virtual machine uses dedicated physical CPU threads, and CPUs are not shared between virtual machines, being exclusively assigned to a single virtual machine.
Click Next.
-
-
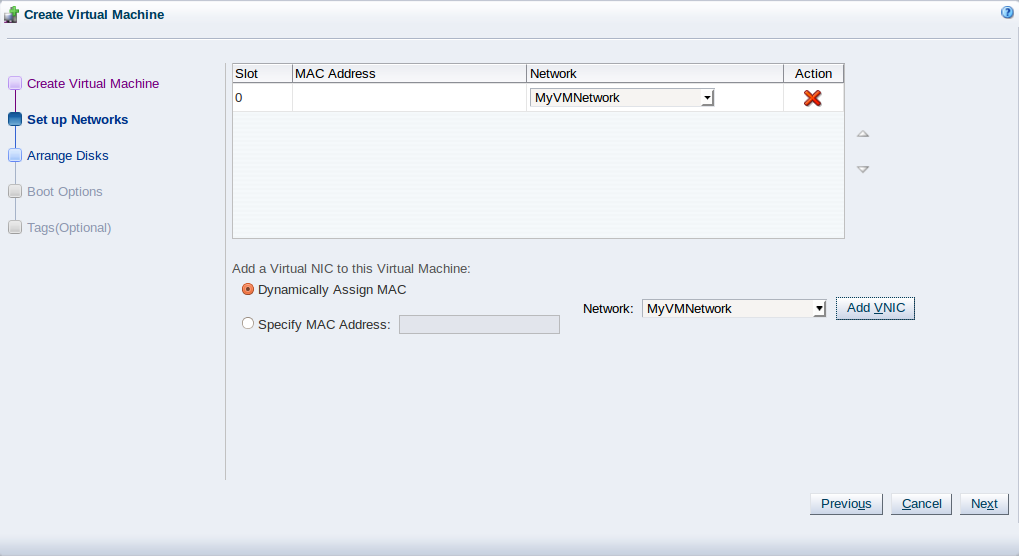
The Set up Networks step is displayed in the wizard.
This step of the wizard allows you to add VNICs to the virtual machine.
-
To specify the MAC address for a VNIC, select Specify MAC Address and enter the MAC address. Otherwise, leave the default Dynamically Assign MAC.
-
Select a network with the virtual machine role from the Network drop-down list.
If no networks are available, you must first create a network with the virtual machine role as a dedicated network for virtual machine traffic. See Section 5.1.1, “Create New Network” for information on creating a network.
-
Click Add VNIC.
-
The VNIC order specified determines the order in which the VNICs are presented to the virtual machine. You can control the ordering of the VNICs using the up and down arrows on the right of the table.
-
If you are editing the networking of an existing stopped virtual machine, you can change the network to which the VNIC belongs using the Network drop-down list in the table. It is important that the VNIC belongs to a network already associated with the Oracle VM Servers on which it can run, or you cannot start the virtual machine. See Section 5.1.1, “Create New Network” and Section 5.1.2, “Edit Existing Network” for more information on associating Oracle VM Servers with networks.
-
If you are editing an existing running virtual machine, you can add VNICs to the virtual machine, but you cannot remove VNICs that are already in use. You also cannot reorder VNICs on a running virtual machine. If you choose to add a VNIC to a running machine you must ensure that the VNIC belongs to a virtual machine network already associated with the Oracle VM Servers on which it can run, by selecting the appropriate network from the Network drop-down list.
-
A virtual machine can have up to eight (8) VNICs for HVM guests and up to 31 for PVM guests. A PVM guest requires network connectivity to perform the operating system install and must have at least one VNIC.
-
-
Click Next.
-
-
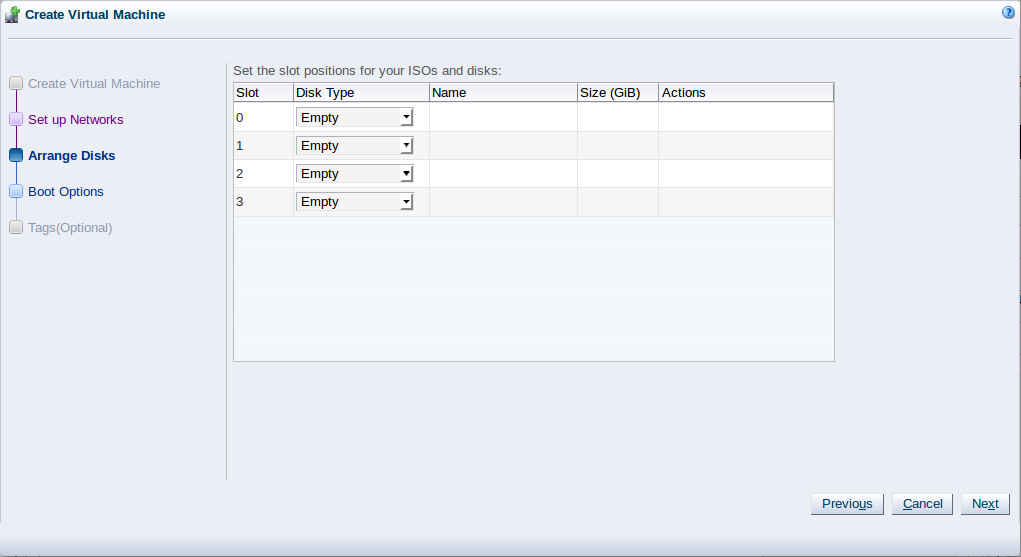
The Arrange Disks step of the wizard is displayed.
Select the desired storage configuration of your virtual machine, such as virtual disks, physical disks, and ISO files. On a separate slot, add one or more of the following disk types:
-
Empty: An empty slot.
-
Virtual Disk: This allows you to add or create a virtual disk. Virtual disks may be shared by virtual machines, or only available to a single virtual machine.
-
Physical Disk: The physical disks are the disks in a storage array. Physical disks may be shared by virtual machines.
-
CD/DVD: This adds an ISO file in a storage repository and can be used to create HVM and PVHVM virtual machines. When creating a virtual machine from an ISO file, you must use a single file. Installations that span multiple ISO files are not supported. ISO files cannot be used to create PVM virtual machines. You cannot add an empty CDROM on a SPARC-based server.
NoteAdding or removing a CD/DVD device can only be done when a virtual machine is powered off. Once the VM is running again, the CD/DVD device is always available for use as needed, much like a physical CD/DVD device on a physical server.
After the virtual machine is powered on, the only actions that are supported while the virtual machine is running are:
-
Selecting an .iso for a CD/DVD slot in an "Empty" state.
-
Hot-swapping the .iso currently in use.
-
Ejecting the .iso from the CD/DVD slot, leaving the device in an "Empty" state.
-
Add or create any virtual disks to use as the virtual machine's hard disk, select any physical disks to add, and select any ISO files to use to create the virtual machine. Add the disks in the order they should appear in the virtual machine. The disk with the boot partition or installation media should be the first disk listed. An HVM guest can have up to four disks, including empty CD/DVD drives. A PVM guest can have up to 104 disks. A PVHVM guest can have up to 107 disks. An OVM/SPARC guest can have up to 1024 disks. Only one slot can contain an empty CD/DVD.
TipWhen editing a running virtual machine, you can change the CD/DVD using this dialog box and the CD/DVD is mounted in the operating system.
To create or add a virtual disk:-
To create a virtual disk, select Virtual Disk from the Disk Type drop-down list and click Create a Virtual Disk
 .
.
-
The Create Virtual Disk dialog box is displayed. Enter or select the following to create a virtual disk:
-
Repository: The repository in which the virtual disk is to be created.
-
Virtual Disk Name: The name of the virtual disk to be created and made available to the virtual machine. See How are Virtual Disks Managed? in the Oracle VM Concepts Guide for more information about using virtual disks.
-
Size (GiB): The disk size of the virtual disk, in GiB.
-
Description: A description of the virtual disk.
-
Shareable: Whether the virtual disk should be shareable (read/write) with other virtual machines.
-
Allocation Type: Whether to use a Sparse Allocation or Non-sparse Allocation. Sparse Allocation creates a sparse disk, so the size of the disk is initially small and increases as it is used. Sparse allocation is faster than using Non-Sparse Allocation when creating a virtual machine. Non-Sparse Allocation creates the entire disk when the virtual machine is created, and so is slower than creating a sparse disk.
Click OK.
-
-
To search for an existing virtual disk to add to the virtual machine, click Select a Virtual Machine Disk
. The Select a
Virtual Machine Disk dialog box is displayed. The
dialog box lists the available virtual disks in a table that
indicates the following information:
-
Selected: Whether or not the disk has been selected. This is indicated using radio button.
-
Name: The name of the virtual disk as stored in Oracle VM Manager.
-
Size (GiB): The disk size of the virtual disk, in GiB.
-
Repository: The repository in which the virtual disk is located.
-
Shareable: Whether the virtual disk is configured to be shareable (read/write) with other virtual machines.
-
VM(s): A comma separated list of the names of any virtual machines that may already be using this virtual disk.
Select the virtual disk to use and Click OK.
NoteIf your virtual machine needs more than one disk, you can create the disk(s) afterwards in the repository, and add them to the virtual machine. See Section 4.9.1.1, “Create Virtual Disk” and Section 3.5.2.1, “Edit Virtual Machine” for more information on creating a virtual disk and editing a virtual machine. There are some limitations on mixing virtual disks of differing device types on a virtual machine. See How are Virtual Disks Managed? in the Oracle VM Concepts Guide for more information about how device types are allocated to virtual disks and what you may need to do to solve any issues surrounding this problem.
-
To add a physical disk:-
To add a physical disk to the virtual machine, select Physical Disk from the Disk Type drop-down list. Click Select a Virtual Machine Disk
. The Select a
Physical Disk dialog box is displayed. The dialog
box lists the available physical disks in a table that
provides the following information:
-
Selected: Whether or not the disk has been selected. This is indicated using radio button.
-
Name: The name of the physical disk as stored in Oracle VM Manager.
-
Size (GiB): The disk size of the physical disk, in GiB.
-
SAN Server: The SAN Server where the physical disk is located.
-
Volume Group: The volume group that the physical disk belongs to.
-
Shareable: Whether the physical disk is configured to be shareable (read/write) with other virtual machines.
-
VM(s): A comma separated list of the names of any virtual machines that may already be using this physical disk.
Select a physical disk from the list of available disks. If you want to leave the slot empty, select Leave Slot Empty. Click OK.
-
To add an ISO file:-
To add an ISO file to the virtual machine, select CD/DVD from the Disk Type drop-down list. Click Select a Virtual Machine Disk
. The Select an
ISO dialog box is displayed. Select a Iso file
from the list of available files. If you want to leave the
slot empty, select Leave Slot
Empty. Click
OK.
NoteWhen adding an ISO file to an existing virtual machine, the ISO file is available to the operating system, but may not be mounted. To access the ISO file, you may need to mount it, for example:
# mkdir /cdrom
# mount -o loop /dev/xvdb /cdrom
When you have set up the virtual machine's disks, click Next.
-
-
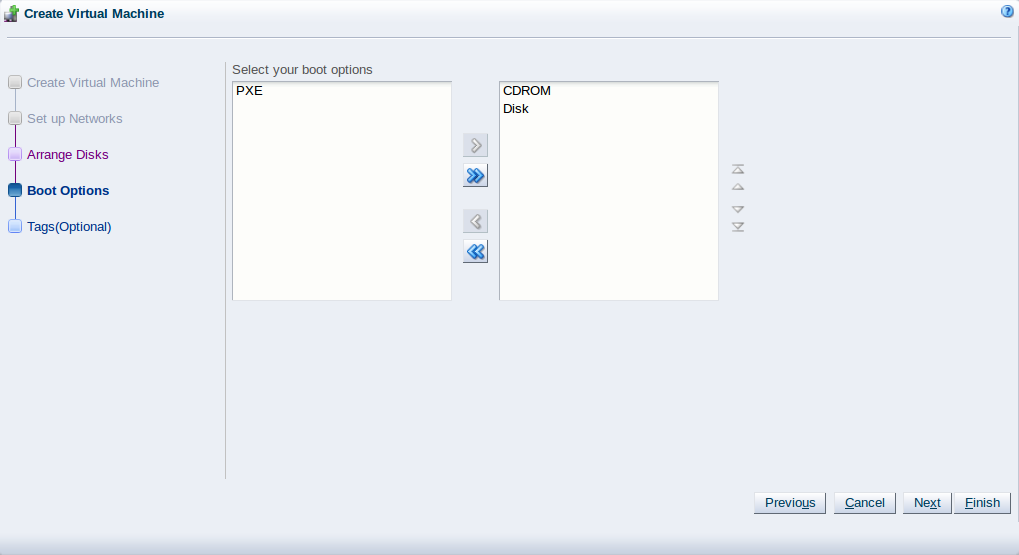
The Boot Options step is displayed in the wizard.
Select the boot media order for your virtual machine.
If you are creating a hardware virtualized machine virtual machine (HVM), you can choose the PXE boot option. If so, remember to put PXE first in the Select your boot options field, and change the boot order again after installation and before rebooting the virtual machine. To use PXE, you must configure a PXE/tftp environment to offer the necessary boot media and instructions to the virtual machine.
If you are creating a paravirtualized virtual machine (PVM), you also have the PXE option available. In this case, the PXE option refers to a network style boot. If the PXE option appears in the right-hand-side column, you must enter the location of the mounted ISO file from which to perform the operating system installation in the Network Boot Path field that is shown when editing or creating a PVM, for example
http://example.com/EL6-x86
For information on creating a mounted ISO file, see Provisioning ISO Files for PVM Guest Installations in the Oracle VM Administrator's Guide.
You cannot use the Network Boot Path field to boot a virtual machine using PXE. This field can only be used to specify the path to a mounted ISO file to use when installing a PVM guest.
If you have defined tags and want to add any to this virtual machine, click Next. Otherwise, click Finish to create and deploy the virtual machine to the server pool.
-
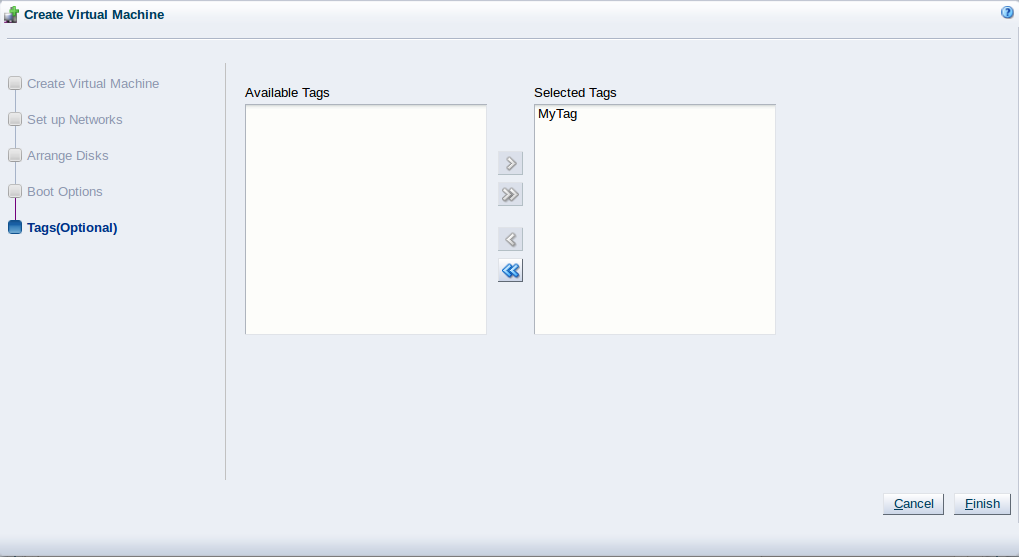
The Tags step is optional and displays in the wizard if you clicked Next in the previous step.
NoteThe virtual machine has already been created and deployed to the server pool at this point. This step is entirely optional. Cancelling the operation within this dialog does not prevent the virtual machine from being created.
If you have previously created tags, they appear in the Available Tags column. Select the tags you want to apply to the virtual machine and move them to the Selected Tags column. See Section 1.17, “Tags and Tag Filters” for more information on creating and managing tags. Click Finish.
If you created a PVM, there are some steps you should take after the operating system installation is completed:
-
Stop the virtual machine. See Section 3.5.2.4, “Stop Virtual Machines” for information on stopping a virtual machine.
-
Edit the virtual machine and remove PXE from the Boot Order column in the Boot Options step of the Edit Virtual Machine wizard. See Section 3.5.2.1, “Edit Virtual Machine” for information on editing a virtual machine.
-
Start the virtual machine and complete the installation if necessary. See Section 3.5.2.3, “Start Virtual Machines” for information on starting a virtual machine.
To edit the virtual machine configuration information, see Section 3.5.2.1, “Edit Virtual Machine”.
3.3 Server Pools Folder
The Server Pools navigation folder contains each server pool that has been configured within the environment. The structure of the navigation provided in the navigation tree is discussed in more detail in Section 3.2, “Summary”.
Clicking on the Server Pools navigation folder in the navigation tree allows you to access different perspectives in the management pane. Each perspective provides its own view of all of the server pools within Oracle VM Manager. Most of the perspectives also include separate perspective toolbars that enable you to perform various configuration or management tasks specific to the view currently displayed within the management pane. The Server Pools navigation folder offers the following perspectives within the management pane:
3.3.1 Server Pools Perspective
- 3.3.1.1 Refresh All
- 3.3.1.2 Create Server Pool
- 3.3.1.3 Create Virtual Machine
- 3.3.1.4 Import Virtual Machine
- 3.3.1.5 Edit Server Pool
- 3.3.1.6 Delete Server Pool
- 3.3.1.7 Change Oracle VM Agent Passwords on Oracle VM Servers
- 3.3.1.8 Define or Edit Server Pool Policies
- 3.3.1.9 Send VM Messages
- 3.3.1.10 Generate Report
The Server Pools perspective lists the different server pools configured in your environment. The following columns are displayed in the management pane:
-
Name: The name that has been configured for the server pool.
-
Tag(s): Any tags that have been applied to the server pool.
-
Keymap: The configured keymap for the server pool.
-
Pool File System: The path location to the server pool file system.
-
Secure VM Migrate: Whether or not the server pool is configured to support secure virtual machine migration.
-
Description: A description entered for the server pool when it was created or edited.
This perspective includes a toolbar that consists of the following options:
|
Toolbar Icon Option |
Icon |
Description |
|---|---|---|
|
|
Rediscovers all Oracle VM Server instances, file servers, and SAN servers. Use this to refresh information about all Oracle VM Server instances Use this option after rebuilding your database, to ensure that all information stored within the database is up to date. |
|
|
|
Displays the Create a Server Pool wizard. Use this option to create a server pool for Oracle VM Servers. |
|
|
|
Displays the Create Virtual Machine wizard. Use this option to create a virtual machine in the selected server pool. |
|
|
|
Displays the Import Virtual Machine dialog box. Use this option to import a virtual machine into Oracle VM Manager and optionally deploy it to an Oracle VM Server or server pools. |
|
|
|
Displays the Edit Server Pool wizard. Use this option to edit a server pool. |
|
|
|
Displays the Delete Confirmation dialog box. Use this option to delete the selected server pool. |
|
|
|
Displays the Change Servers Agent Password dialog box. Use this option to change the Oracle VM Agent password used by all of the Oracle VM Servers in the selected server pool. Note that the Oracle VM Agent password is only used during the process of taking ownership of an Oracle VM Server, thereafter certificate based authentication is used. |
|
|
|
Displays the Configure DRS/DPM wizard. Use this option to set or edit resource policies for the server pool. |
|
|
|
Send one or more virtual machines a message. Use this option to send messages to virtual machines that have the Oracle VM Guest Additions installed. |
|
|
|
Generate an XML report on one or more server pools. |
|
|
|
Displays context sensitive help. |
3.3.1.1 Refresh All
If there are either changes to the physical state of an Oracle VM Server or its attached storage, you should discover it again to update the configuration information in Oracle VM Manager. In order to cut load time within Oracle VM Manager, Oracle VM Server rediscovery is not performed at start-up, therefore there may be cases where you want to update the configuration information for all Oracle VM Server instances within the Oracle VM Manager. Note that in larger deployments this may be a resource consuming action.
The Refresh All function does not pick up the contents of file systems that have never been refreshed before. Furthermore, it does not refresh repositories that are not already presented on at least one server. It is important to keep this in mind if you have restored a configuration from a backup, since some items may not have been refreshed before at the time that the backup was created.
-
On the Servers and VMs tab click on the Server Pools folder in the navigation pane.
-
Select the Server Pools perspective from the drop-down selector.
-
Click Refresh All
 in the perspective toolbar.
The configuration information about all Oracle VM Server instances is updated in Oracle VM Manager.
3.3.1.2 Create Server Pool
-
Click Create Server Pool
in the toolbar to start the
Create Server Pool wizard.
-
The Create Server Pool step is displayed in the wizard.
Enter the server pool information:
-
Server Pool Name: The name of the server pool. The maximum length of a server pool name is 256 characters and may contain any character.
-
Virtual IP Address for the Pool: This option is deprecated, but is available for backward compatibility purposes. See What is a Master Server and a Virtual IP Address? in the Oracle VM Concepts Guide for more information on this parameter.
-
VM Console Keymap: The key mapping to be used when connecting to a virtual machine's console.
-
VM Start Policy: For each server pool you can define the default start-up policy for all of your virtual machines. It is possible to override the default policy within the configuration of each virtual machine. See Section 3.1.3, “Create Virtual Machine” for information on setting the start policy for an individual virtual machine. Note that as of Release 3.4, the VM Start Policy also applies to the VM Resume operation. Select one of:
-
Best Server: This is the legacy algorithm that optimizes virtual machine placement on Oracle VM Servers that are in use before moving to unused servers in the pool.
-
Balance Server: This algorithm distributes virtual machines across all the available Oracle VM Servers in the server pool, starting with the least utilized Oracle VM Server first. CPU and memory utilization statistics are used to balance the virtual machine distribution across the server pool, with CPU utilization taking precedence over memory utilization.
-
Current Server: The virtual machine is started on the current Oracle VM Server to which it is assigned.
NoteIf the VM start policy for a server pool is set to Current Server, and the server pool contains a VM that has not been assigned to a particular server yet, then that VM is started on one of the available servers according to the Best Server policy.
-
-
Secure VM Migrate: Select whether to enable encrypted migration of virtual machines. When Secure VM Migrate is checked, virtual machines are migrated using SSL to protect the data during the migration process. Secure migration of a virtual machine may effect the time taken to perform the migration as the encryption and decryption of data requires more system resources and time.
-
Clustered Server Pool: Select whether to enable clustering of the Oracle VM Servers in the server pool to enable HA. See How do Server Pool Clusters Work? and How does High Availability (HA) Work?in the Oracle VM Concepts Guide for more information on server pool clustering and on HA support and policies.
ImportantIf the Oracle VM Servers in your server pool are SPARC-based, you should be aware that clustering can only function if the distributed lock manager package is installed on all of the Oracle VM Servers that you intend to add to the server pool, as described in Installing the Distributed Lock Manager (DLM) Package in the Oracle VM Installation and Upgrade Guide. Furthermore, clustering is not supported for servers that have multiple control domains (shadow domains). Clustering for SPARC is only supported using NFS storage for the cluster file system. Failure to meet these requirements results in an error when attempting to create the clustered server pool, notifying you that the server lacks the ability to perform clustering.
-
Timeout for cluster: If clustering is enabled for the server pool, this option allows you to set the timeout parameter. The maximum cluster timeout setting is 300 seconds. The minimum cluster timeout is 30 seconds. The default cluster timeout is 120 seconds. The Disk heartbeat and network heartbeat are automatically derived from the cluster timeout value. The cluster timeout determines how long a server should be unavailable within the cluster before failover occurs. Setting this value too low can cause false positives, where failover may occur due to a brief network outage or a sudden load spike. Setting the cluster timeout to a higher value can mean that a server is unavailable for a lengthier period before failover occurs.
The cluster timeout can only be changed when there are no servers in the server pool, therefore it is usually good to set this during the creation of your server pool. See Clustering for x86 Server Pools in Oracle VM Concepts Guide for more information.
SPARC-based server pools do not recognize the cluster timeout parameter. Setting this value for a server pool consisting of SPARC servers has no effect and the parameter is ignored by the Oracle VM Agent for SPARC.
NoteThis option is greyed out if the Clustered Server Pool check box is unchecked.
-
Storage for Server Pool: Select the file system type to use for the server pool, either a Network File System, or a Physical Disk. The server pool file system is used to hold the server pool cluster data, and is also used for cluster heartbeating. Oracle recommends that you create this storage with a size of at least 12 GB, as a NAS export or LUN. Note that if you are creating a SPARC-based server pool, only NFS is supported for a server pool file system.
A server pool file system is exclusive, just like other storage. That is, in the same way that you cannot create two storage repositories on the same export path, the server pool file system cannot be shared with other server pools, or with storage repositories. Each fully qualified export path (for example, /export/myexport/one, /export/myexport/two) must be used for one, and only one, purpose, that is, for a storage repository, or a server pool file system.
NoteThis option is greyed out if the Clustered Server Pool check box is unchecked.
For information on creating storage, see Chapter 6, Storage Tab.
-
Network File System: The file system to use as the pool file system. Click Search
in the Storage
Location field to search for a network file
system. This field is displayed if you select Network File
System in the previous field.
-
Physical Disk: The file system to use as the pool file system. Click Search
in the Storage
Location field to search for a physical disk.
This field is displayed if you select Physical Disk in the
previous field.
-
Description: A description of the server pool. This field is optional.
Click Next.
-
-
The Add Servers step is displayed in the wizard.
The Hypervisor Filter field allows you to specify the hypervisor type to use for the server pool. Selecting the
Oracle VM x86hypervisor, limits the available servers to show only x86 systems; while selecting theOracle VM SPARChypervisor, limits the available servers to show only SPARC systems within your environment. If your environment does not contain systems of more than one hypervisor, the filter is greyed out and is automatically set to the hypervisor available within your environment. It is not possible to create a server pool consisting of servers that use different hypervisors.Select the Oracle VM Servers to add to the server pool from the Available Servers column and move them to the Selected Servers column.
If you have defined tags and wish to add any to the server pool, click Next. Otherwise, click Finish.
-
The Tags step is optional and displays in the wizard if you clicked Next in the previous step.
If you have defined tags previously, they appear in the Available Tags column. You can select the tags that you wish to apply to the server pool and move them to the Selected Tags column.
See Section 1.17, “Tags and Tag Filters” for more information on creating and managing tags.
Click Finish.
The server pool is created.
3.3.1.3 Create Virtual Machine
This section explains how to create a virtual machine using a template, and creating a virtual machine from an ISO file, or from physical or virtual disks.
-
Click the Servers and VMs tab.
-
Click Create Virtual Machine
in the toolbar.
-
The Create Virtual Machine wizard is displayed.
Select the Clone from an existing VM Template option and then click Next.
-
The Create Virtual Machine wizard prompts you to specify details for the virtual machine.
Enter or select the following details:
-
Clone Count: The number of virtual machines to create from the template.
-
Name Index: The start index number to use for the clone name suffix. The default is
0. This is used in conjunction with the VM Name field to create the name for each clone. -
Repository: The repository in which to create the virtual machine configuration files.
-
VM Template: The template to use to create the virtual machines.
-
VM Name: An optional name for the virtual machines. The maximum name length is 256 characters and may contain any character. The name need not be unique. If no value is given, the default is the name of the virtual machine template being cloned. Each clone is suffixed with a dot (.) and the clone index number, starting with the value for the Name Index field. For example, if the VM Name field is set to
MyVM, and the Name Index field is set to1, the resulting clones would be namedMyVM.1,MyVM.2and so on. -
Server Pool: The server pool in which to deploy the virtual machines.
-
Description: An optional description of the virtual machines.
-
-
Click Finish. The virtual machines are created and deployed to the server pool.
-
Click the Servers and VMs tab.
-
Click Create Virtual Machine
in the toolbar.
-
The Create Virtual Machine wizard is displayed.
Click the Clone from an existing Virtual Appliance option and then click Next.
-
The Create Virtual Machine wizard prompts you to specify details for the virtual machine.
Enter or select the following details:
-
Repository: The repository in which to create the virtual machine configuration files.
-
Virtual Appliance: The virtual appliance from which you want to create the virtual machines.
-
Server Pool: The server pool in which to deploy the virtual machines.
If you select None, the virtual machines are deployed into the Unassigned Virtual Machines folder.
-
Available Virtual Appliance VM(s): The virtual machines that are available to create from the virtual appliance.
-
Selected Virtual Appliance VM(s): The virtual machines to create from the virtual appliance.
You can select multiple virtual machines if the virtual appliance contains more than one. Oracle VM Manager creates a separate virtual machine for each one that you select.
-
-
Click Finish.
Oracle VM Manager creates the selected virtual machines from the virtual appliance and deploys them to the server pool you specified.
You can then migrate each virtual machine to a compatible server or server pool.
-
Click the Servers and VMs tab.
-
Click Create Virtual Machine
in the toolbar.
The Create Virtual Machine wizard is displayed.
-
Click the Create a new VM option and then click Next.
-
The Create Virtual Machine step is displayed in the wizard.
Enter or select the following details:
-
Server Pool: The server pool on which to create the virtual machine.
-
Server: The server that the virtual machine should be created on. The default option is
Any, but the drop-down selection lists the servers that exist in the server pool that you have selected. Selecting a particular server forces the virtual machine to be created on that server. This has implications for the Start Policy discussed later. -
Repository: The repository in which to create the virtual machine configuration file.
-
Name: A name for the virtual machine. The maximum name length is 256 characters and may contain any character. The name need not be unique.
-
Enable High Availability: Whether to enable High Availability (HA). See How does High Availability (HA) Work? in the Oracle VM Concepts Guide for more information on HA.
-
Enable Huge Pages: Whether to enable HugePages.
-
The HugePages feature is deprecated for virtual machines with a domain type of PVM in Oracle VM Release 3.4.1. You should not enable HugePages when creating or editing virtual machines. This feature will be removed in a future release of Oracle VM.
If you have HugePages enabled for any PVM guests, Oracle recommends that you change the domain type for virtual machines from Paravirtualized (PVM) to Hardware virtualized, with paravirtualized drivers (PVHVM). If you cannot change the domain type for a virtual machine, you should disable the HugePages setting and then restart the virtual machine.
-
Huge Page support is enabled by default for virtual machines with a domain type of HVM or PVHVM. You cannot set this parameter for those virtual machines.
-
This option does not take effect on virtual machines deployed on SPARC-based server pools. Virtual machines running on SPARC-based servers can access the page sizes that the server platform supports, regardless of this setting.
See How is the HugePages Feature Enabled for Virtual Machines?, in the Oracle VM Concepts Guide, for more information on Huge Page support.
-
-
Description: An optional description of the virtual machine.
-
Operating System: The operating system of the virtual machine. This setting enables or disables certain virtual machine settings that the guest operating system may require.
-
Enable Viridian: Whether to enable Viridian.
-
Viridian support enables the exposure of Windows virtualization compatible entitlements to Microsoft Windows guest operating systems. Enabling viridian support is strongly recommended to ensure improved performance for Microsoft Windows guest operating systems.
-
Enabling viridian support is permitted for all Microsoft Windows guest operating system types. However, it is only effective from Microsoft Windows Vista and Microsoft Windows Server 2008 onwards.
-
Viridian support is enabled by default when creating virtual machines running Microsoft Windows guest operating systems.
-
-
Mouse Device Type: The mouse type to use for the virtual machine. This option is not available for virtual machines in SPARC-based server pools.
-
Keymap: The keyboard mapping to use for the virtual machine. This option is not available for virtual machines in SPARC-based server pools.
-
Domain Type: The domain type of the virtual machine.
-
Xen HVM: Hardware virtualization, or fully virtualized. When you select this option you can supply an ISO file in a repository (in the Arrange Disks step of the wizard) from which to install an operating system on the virtual machine. See Section 4.5.1.1, “Import ISO” for information on importing an ISO file into a repository. Alternatively, you may consider setting up an environment to perform a network installation for the virtual machine.
-
Xen HVM PV Drivers: Identical to Xen HVM, but with additional paravirtualized drivers for improved performance of the virtual machine. See What are Virtualization Modes or Domain Types? in the Oracle VM Concepts Guide for more information about using paravirtualized drivers. This domain type is typically used to run Microsoft Windows guest operating systems with an acceptable performance level. Installation of the guest operating system is usually performed either using an ISO file in a repository or via a network installation.
-
Xen PVM: Paravirtualized. Enables you to select a location for the mounted ISO file from which to create the virtual machine. Before you create the virtual machine using the paravirtualized method, mount the ISO file on an NFS share, or HTTP or FTP server. You supply the location of the mounted ISO file in the Network Boot Path field in the Boot Options step of the wizard. For information on creating a mounted ISO file, see Provisioning ISO Files for PVM Guest Installations in the Oracle VM Administrator's Guide. Do not select this option if the virtual machine Operating System is set to either Oracle Linux 7 or RedHat Enterprise Linux 7. These operating systems do not support the Xen PVM domain type.
ImportantAs of Oracle VM Release 3.4.6, support for PVM guests is removed. For more information, see Disabling Paravirtualized Guests on Oracle VM Server in the Oracle VM Administrator's Guide.
-
OVM/SPARC: Specifies that the virtual machine is deployed on a server pool running on Oracle VM Server for SPARC.
-
Unknown: This option is informational in the event that Oracle VM Manager is unable to determine the domain type for an existing virtual machine. It is not possible to actually set a virtual machine's domain type to this value. Attempting to do so generates a rule violation when you try to save the virtual machine settings and an error message is returned.
-
-
Start Policy: The policy that should be used to start the virtual machine. Select one of:
-
Best Server: This is the legacy algorithm that optimizes virtual machine placement on Oracle VM Servers that are in use before moving to unused servers in the pool.
-
Balance Server: This algorithm distributes virtual machines across all the available Oracle VM Servers in the server pool, starting with the least utilized Oracle VM Server first. CPU and memory utilization statistics are used to balance the virtual machine distribution across the server pool, with CPU utilization taking precedence over memory utilization.
-
Current Server: The virtual machine is started on the Oracle VM Server to which it is assigned. If you selected a particular server to create the virtual machine on, then it is started on this server.
-
Use Pool Policy: The virtual machine is started using the start policy defined for the entire server pool. See Section 3.1.2, “Create Server Pool” for more information on setting the start policy for a server pool.
-
-
Max. Memory (MB): The maximum memory size the virtual machine can be allocated. This value must be between 32 and 512000. The default is 512.
For x86-based virtual machines, this value is incremented by 32 each time you click the up arrow, and, conversely, decreased by 32 if you click the down arrow. For SPARC-based virtual machines, the up arrow adds 512, and the down arrow subtracts 512. If you have enabled Huge Pages, the value must be a multiple of 2 MB.
NoteFor HVM and PVHVM guests, the maximum memory size value must equal the memory size value. If these values are different, the following job failure message is generated for HVM/PVHVM guests: "The memory limit cannot be different than the current memory size on an HVM/PVHVM Virtual Machine."
-
Memory (MB): The memory size the virtual machine is allocated. When creating a virtual machine, this is the memory allocation used when starting the virtual machine. This value must be between 32 and 512000. The default is 512.
For x86-based virtual machines, this value is incremented by 32 each time you click the up arrow, and, conversely, decreased by 32 if you click the down arrow. For SPARC-based virtual machines, the up arrow adds 512, and the down arrow subtracts 512. If you have enabled Huge Pages, the value must be a multiple of 2 MB.
You can change the memory allocated to a running virtual machine without the need to restart the virtual machine if the domain type is PVM or PVHVM and where the guest is running a Linux OS on an x86-based platform or an Oracle Solaris OS on a SPARC-based platform.
NoteFor x86-based PVHVM guests running on Oracle Solaris OS, you cannot change the memory if the virtual machine is running.
See the Oracle VM Paravirtual Drivers for Microsoft Windows documentation for information about the availability of hot memory modification on PVHVM guests that are running a Microsoft Windows OS. You must use a Windows PV Driver that supports hot memory modification or you must stop the guest before you modify the memory.
-
Max. Processors: The maximum number of processors the virtual machine can be allocated. The number of processors is expressed in number of physical CPU cores. The maximum number of processors depends on the domain type, as follows:
-
PVM: 256.
ImportantAs of Oracle VM Release 3.4.6, support for PVM guests is removed. For more information, see Disabling Paravirtualized Guests on Oracle VM Server in the Oracle VM Administrator's Guide.
-
HVM: 128; or 32 for Microsoft Windows guests.
NoteAs of Release 3.4.6, the HVM limit is
64for Microsoft Windows guests. -
PVHVM: 128; or 32 if using Oracle VM Paravirtual Drivers for Microsoft Windows.
NoteAs of Release 3.4.6, the PVHVM limit is
64if using Oracle VM Paravirtual Drivers for Microsoft Windows. -
OVM/SPARC: Equivalent to the number of available CPUs on the server.
-
-
Processors: The number of processors the virtual machine is allocated. The number of processors is expressed in number of physical CPU cores, up to the value of Max. Processors.
-
Priority: The CPU priority of the virtual machine. The higher the priority value, the more physical CPU cycles are given to the virtual machine. This option is not available for virtual machines in SPARC-based server pools. This should be a number between 1 and 100. The default priority is set at 1.
-
Processor Cap %: Increase or decrease the percentage to which the virtual CPUs can receive scheduled time. This parameter defines the maximum percentage to which the virtual CPUs can receive scheduled time. Use this parameter to keep low priority virtual machines from consuming too many CPU cycles on a Virtual Machine Server. This option is not available for virtual machines in SPARC-based server pools.
-
Restart Action on Crash: The action to perform if a virtual machine crashes. This option is only available for virtual machines that are running on the Xen hypervisor and that have been configured to run on a particular Oracle VM Server. Options include the following:
-
Restart: Restarts the virtual machine operating system.
-
Stop: Stops the virtual machine. If Enable High Availability is selected, this option is not available.
-
Restart After Dump: Restarts the virtual machine operating system after first creating a core dump file for the virtual machine.
-
Stop After Dump: Stops the virtual machine after first creating a core dump file for the virtual machine. If Enable High Availability is selected, this option is not available.
Core dump files are saved to
/var/xen/dumpon the Oracle VM Server where the virtual machine is hosted. Each core dump file is named uniquely so that files are not overwritten. This can use up disk space rapidly. You must make sure there is either enough disk space available at this path on the Oracle VM Server where the virtual machine will run; or you should mount additional storage at this path to avoid using up disk space required to host dom0.This option cannot be modified for a running virtual machine. You must stop the virtual machine before you are able to change this option, if you select to edit the virtual machine later.
-
The Priority and Processor Cap% parameters are passed to the Xen hypervisor for use by the credit scheduler, which automatically load balances guest VCPUs across all available physical CPUs, using an algorithm that combines these two parameters. Therefore, these parameters are a key factor for the performance of the virtual machine on x86 hardware.
NoteFor information on performance optimization goals and techniques for Oracle VM Server for x86, see Optimizing Oracle VM Server for x86 Performance, on Oracle Technology Network at: http://www.oracle.com/technetwork/server-storage/vm/ovm-performance-2995164.pdf.
On SPARC, each virtual machine uses dedicated physical CPU threads, and CPUs are not shared between virtual machines, being exclusively assigned to a single virtual machine.
Click Next.
-
-
The Set up Networks step is displayed in the wizard.
This step of the wizard allows you to add VNICs to the virtual machine.
-
To specify the MAC address for a VNIC, select Specify MAC Address and enter the MAC address. Otherwise, leave the default Dynamically Assign MAC.
-
Select a network with the virtual machine role from the Network drop-down list.
If no networks are available, you must first create a network with the virtual machine role as a dedicated network for virtual machine traffic. See Section 5.1.1, “Create New Network” for information on creating a network.
-
Click Add VNIC.
-
The VNIC order specified determines the order in which the VNICs are presented to the virtual machine. You can control the ordering of the VNICs using the up and down arrows on the right of the table.
-
If you are editing the networking of an existing stopped virtual machine, you can change the network to which the VNIC belongs using the Network drop-down list in the table. It is important that the VNIC belongs to a network already associated with the Oracle VM Servers on which it can run, or you cannot start the virtual machine. See Section 5.1.1, “Create New Network” and Section 5.1.2, “Edit Existing Network” for more information on associating Oracle VM Servers with networks.
-
If you are editing an existing running virtual machine, you can add VNICs to the virtual machine, but you cannot remove VNICs that are already in use. You also cannot reorder VNICs on a running virtual machine. If you choose to add a VNIC to a running machine you must ensure that the VNIC belongs to a virtual machine network already associated with the Oracle VM Servers on which it can run, by selecting the appropriate network from the Network drop-down list.
-
A virtual machine can have up to eight (8) VNICs for HVM guests and up to 31 for PVM guests. A PVM guest requires network connectivity to perform the operating system install and must have at least one VNIC.
-
-
Click Next.
-
-
The Arrange Disks step of the wizard is displayed.
Select the desired storage configuration of your virtual machine, such as virtual disks, physical disks, and ISO files. On a separate slot, add one or more of the following disk types:
-
Empty: An empty slot.
-
Virtual Disk: This allows you to add or create a virtual disk. Virtual disks may be shared by virtual machines, or only available to a single virtual machine.
-
Physical Disk: The physical disks are the disks in a storage array. Physical disks may be shared by virtual machines.
-
CD/DVD: This adds an ISO file in a storage repository and can be used to create HVM and PVHVM virtual machines. When creating a virtual machine from an ISO file, you must use a single file. Installations that span multiple ISO files are not supported. ISO files cannot be used to create PVM virtual machines. You cannot add an empty CDROM on a SPARC-based server.
NoteAdding or removing a CD/DVD device can only be done when a virtual machine is powered off. Once the VM is running again, the CD/DVD device is always available for use as needed, much like a physical CD/DVD device on a physical server.
After the virtual machine is powered on, the only actions that are supported while the virtual machine is running are:
-
Selecting an .iso for a CD/DVD slot in an "Empty" state.
-
Hot-swapping the .iso currently in use.
-
Ejecting the .iso from the CD/DVD slot, leaving the device in an "Empty" state.
-
Add or create any virtual disks to use as the virtual machine's hard disk, select any physical disks to add, and select any ISO files to use to create the virtual machine. Add the disks in the order they should appear in the virtual machine. The disk with the boot partition or installation media should be the first disk listed. An HVM guest can have up to four disks, including empty CD/DVD drives. A PVM guest can have up to 104 disks. A PVHVM guest can have up to 107 disks. An OVM/SPARC guest can have up to 1024 disks. Only one slot can contain an empty CD/DVD.
TipWhen editing a running virtual machine, you can change the CD/DVD using this dialog box and the CD/DVD is mounted in the operating system.
To create or add a virtual disk:-
To create a virtual disk, select Virtual Disk from the Disk Type drop-down list and click Create a Virtual Disk
.
-
The Create Virtual Disk dialog box is displayed. Enter or select the following to create a virtual disk:
-
Repository: The repository in which the virtual disk is to be created.
-
Virtual Disk Name: The name of the virtual disk to be created and made available to the virtual machine. See How are Virtual Disks Managed? in the Oracle VM Concepts Guide for more information about using virtual disks.
-
Size (GiB): The disk size of the virtual disk, in GiB.
-
Description: A description of the virtual disk.
-
Shareable: Whether the virtual disk should be shareable (read/write) with other virtual machines.
-
Allocation Type: Whether to use a Sparse Allocation or Non-sparse Allocation. Sparse Allocation creates a sparse disk, so the size of the disk is initially small and increases as it is used. Sparse allocation is faster than using Non-Sparse Allocation when creating a virtual machine. Non-Sparse Allocation creates the entire disk when the virtual machine is created, and so is slower than creating a sparse disk.
Click OK.
-
-
To search for an existing virtual disk to add to the virtual machine, click Select a Virtual Machine Disk
. The Select a
Virtual Machine Disk dialog box is displayed. The
dialog box lists the available virtual disks in a table that
indicates the following information:
-
Selected: Whether or not the disk has been selected. This is indicated using radio button.
-
Name: The name of the virtual disk as stored in Oracle VM Manager.
-
Size (GiB): The disk size of the virtual disk, in GiB.
-
Repository: The repository in which the virtual disk is located.
-
Shareable: Whether the virtual disk is configured to be shareable (read/write) with other virtual machines.
-
VM(s): A comma separated list of the names of any virtual machines that may already be using this virtual disk.
Select the virtual disk to use and Click OK.
NoteIf your virtual machine needs more than one disk, you can create the disk(s) afterwards in the repository, and add them to the virtual machine. See Section 4.9.1.1, “Create Virtual Disk” and Section 3.5.2.1, “Edit Virtual Machine” for more information on creating a virtual disk and editing a virtual machine. There are some limitations on mixing virtual disks of differing device types on a virtual machine. See How are Virtual Disks Managed? in the Oracle VM Concepts Guide for more information about how device types are allocated to virtual disks and what you may need to do to solve any issues surrounding this problem.
-
To add a physical disk:-
To add a physical disk to the virtual machine, select Physical Disk from the Disk Type drop-down list. Click Select a Virtual Machine Disk
. The Select a
Physical Disk dialog box is displayed. The dialog
box lists the available physical disks in a table that
provides the following information:
-
Selected: Whether or not the disk has been selected. This is indicated using radio button.
-
Name: The name of the physical disk as stored in Oracle VM Manager.
-
Size (GiB): The disk size of the physical disk, in GiB.
-
SAN Server: The SAN Server where the physical disk is located.
-
Volume Group: The volume group that the physical disk belongs to.
-
Shareable: Whether the physical disk is configured to be shareable (read/write) with other virtual machines.
-
VM(s): A comma separated list of the names of any virtual machines that may already be using this physical disk.
Select a physical disk from the list of available disks. If you want to leave the slot empty, select Leave Slot Empty. Click OK.
-
To add an ISO file:-
To add an ISO file to the virtual machine, select CD/DVD from the Disk Type drop-down list. Click Select a Virtual Machine Disk
. The Select an
ISO dialog box is displayed. Select a Iso file
from the list of available files. If you want to leave the
slot empty, select Leave Slot
Empty. Click
OK.
NoteWhen adding an ISO file to an existing virtual machine, the ISO file is available to the operating system, but may not be mounted. To access the ISO file, you may need to mount it, for example:
# mkdir /cdrom
# mount -o loop /dev/xvdb /cdrom
When you have set up the virtual machine's disks, click Next.
-
-
The Boot Options step is displayed in the wizard.
Select the boot media order for your virtual machine.
If you are creating a hardware virtualized machine virtual machine (HVM), you can choose the PXE boot option. If so, remember to put PXE first in the Select your boot options field, and change the boot order again after installation and before rebooting the virtual machine. To use PXE, you must configure a PXE/tftp environment to offer the necessary boot media and instructions to the virtual machine.
If you are creating a paravirtualized virtual machine (PVM), you also have the PXE option available. In this case, the PXE option refers to a network style boot. If the PXE option appears in the right-hand-side column, you must enter the location of the mounted ISO file from which to perform the operating system installation in the Network Boot Path field that is shown when editing or creating a PVM, for example
http://example.com/EL6-x86
For information on creating a mounted ISO file, see Provisioning ISO Files for PVM Guest Installations in the Oracle VM Administrator's Guide.
You cannot use the Network Boot Path field to boot a virtual machine using PXE. This field can only be used to specify the path to a mounted ISO file to use when installing a PVM guest.
If you have defined tags and want to add any to this virtual machine, click Next. Otherwise, click Finish to create and deploy the virtual machine to the server pool.
-
The Tags step is optional and displays in the wizard if you clicked Next in the previous step.
NoteThe virtual machine has already been created and deployed to the server pool at this point. This step is entirely optional. Cancelling the operation within this dialog does not prevent the virtual machine from being created.
If you have previously created tags, they appear in the Available Tags column. Select the tags you want to apply to the virtual machine and move them to the Selected Tags column. See Section 1.17, “Tags and Tag Filters” for more information on creating and managing tags. Click Finish.
If you created a PVM, there are some steps you should take after the operating system installation is completed:
-
Stop the virtual machine. See Section 3.5.2.4, “Stop Virtual Machines” for information on stopping a virtual machine.
-
Edit the virtual machine and remove PXE from the Boot Order column in the Boot Options step of the Edit Virtual Machine wizard. See Section 3.5.2.1, “Edit Virtual Machine” for information on editing a virtual machine.
-
Start the virtual machine and complete the installation if necessary. See Section 3.5.2.3, “Start Virtual Machines” for information on starting a virtual machine.
To edit the virtual machine configuration information, see Section 3.5.2.1, “Edit Virtual Machine”.
3.3.1.4 Import Virtual Machine
You can import a virtual machine into Oracle VM Manager and have it deployed to a server pool, or placed in the Unassigned Virtual Machines folder if you do not want to deploy it. The virtual machine must be located on an FTP or web server, either as separate files, or compressed into a single archive file (for example, a .tgz or .zip file). As an archive of a virtual machine is also known as a virtual machine template, you can also use this process to import older style Oracle VM virtual machine templates. This process does not work for the newer OVF/OVA style templates.
When you import a virtual machine into a server pool, you have the option of saving it to any storage repository that is presented to at least one Oracle VM Server in the server pool. When you import a virtual machine to the Unassigned Virtual Machines folder, you can save it into any storage repository.
-
Place the files that make up a virtual machine, or an archive of those files, in a location accessible by Oracle VM Manager using any of these protocols: HTTP, HTTPS or FTP.
-
Click the Servers and VMs tab.
-
If you want to import and deploy the virtual machine to a server pool, select Server Pools in the navigation tree, then select the server pool in the management pane table.
If you do not want to deploy the virtual machine, select the Unassigned Virtual Machines folder.
-
Select Import Virtual Machine...
 in the toolbar in the management pane.
-
The Import Virtual Machine dialog box is displayed. Select or edit the following:
-
Destination Repository: The storage repository in which to save the virtual machine.
-
VM URLs: The URLs for the virtual machine. The URL schemes supported are HTTP, HTTPS, and FTP. For example:
http://example.com/mytemplate.tgz
To import a virtual machine using FTP, use the standard FTP syntax, for example:
ftp://
user:password@server/path/filename.tgzEach virtual machine component should be listed on a new line. Each URL must be a reference to a complete file. If your virtual machine files are split into multiple compressed files, concatenate those files and enter the URL for the concatenated file, for example to concatenate a number of compressed files to one compressed file, enter:
$ cat vm.tgz.1of3 vm.tgz.2of3 vm.tgz.3of3 > vm.tgz
Then enter the URL to the single compressed virtual machine file, in this case, vm.tgz.
To import a virtual machine that is not compressed as a single file, each component must be a complete file (if not, concatenate them to one file), for example to enter a virtual disk image and a virtual machine configuration file that together make up a complete virtual machine, you could enter:
http://myexample.com/System-sda.img
http://myexample.com/vm.cfg
-
Proxy: The IP address or hostname of an optional proxy server to use when importing the virtual machine.
Click OK to import the virtual machine. The virtual machine is deployed to the server pool in the stopped state. Alternatively, the virtual machine is imported to the Unassigned Virtual Machines folder.
-
See Section 3.5.2.3, “Start Virtual Machines” for information on starting a virtual machine, and Section 3.5.2.1, “Edit Virtual Machine” for information on editing a virtual machine.
3.3.1.5 Edit Server Pool
You can edit the configuration information of a server pool, including the server pool name, description, key mapping and secure migration of virtual machines.
-
Click the Servers and VMs tab.
-
Select the Server Pools folder in the navigation pane. Ensure that you are in the Server Pools perspective. Click Edit Selected Server Pool...
 in the toolbar.
-
The Edit Server Pool dialog box is displayed. Edit the server pool information:
-
Server Pool Name: The name of the server pool. The maximum length of a server pool name is 256 characters and may contain any character.
-
Description: A description of the server pool.
-
Virtual IP Address for the Pool: This deprecated field is not displayed if a virtual IP address was not configured when the server pool was created. The field is greyed out, as it is not possible to edit the virtual IP address for a server pool after it has been created.
-
Master Server: This deprecated option is not displayed if a virtual IP address was not configured when the server pool was created. In the case where a virtual IP address exists for a server pool, the option to select an Oracle VM Server within the server pool to take the role of the master server is available. This option is only significant if configuring a server pool that consists of Oracle VM Servers running software prior to the 3.4 release. Please see What is a Master Server and a Virtual IP Address? in the Oracle VM Concepts Guide for more information.
-
Pool File System: This field cannot be modified.
-
VM Console Keymap: The key mapping to use in the consoles for all virtual machines in the server pool.
-
VM Start Policy: Define the default start-up policy for all of your virtual machines handled by this server pool. It is possible to override the default policy within the configuration of each virtual machine. See Section 3.1.3, “Create Virtual Machine” for information on setting the start policy for an individual virtual machine.
-
Secure VM Migrate: Select whether to enable encrypted migration of virtual machines.
-
Override Global Server Update Group: Select whether to enable overriding of the global update repository. See Section 7.3, “Server Update Groups” and Section 3.4.6, “Server Update Repositories Perspective” for more information on update repositories.
-
Timeout for cluster: If clustering is enabled for the server pool, this option allows you to set the timeout parameter. The maximum cluster timeout setting is 300 seconds. The minimum cluster timeout is 12 seconds. The default cluster timeout is 120 seconds. The disk heartbeat and network heartbeat are automatically derived from the cluster timeout value.
The cluster timeout can only be changed when there are no servers in the server pool, therefore it is usually good to set this during the creation of your server pool.
-
-
To edit the Oracle VM Servers in the server pool, click the Servers tab. Using the controls provided, you can add or remove Oracle VM Servers that comprise the server pool.
-
To edit the tags associated with the server pool, click the Tags tab. Using the controls provided, you can add or remove tags that can be used to identify the server pool and to group it with other objects within Oracle VM Manager. See Section 1.17, “Tags and Tag Filters” for more information on creating and managing tags.
-
Click OK to apply your changes.
3.3.1.6 Delete Server Pool
Before you can delete a server pool, you must delete or remove all virtual machines and remove all Oracle VM Servers from the server pool.
-
Click the Servers and VMs tab.
-
Select the Server Pools folder in the navigation tree.
-
Select Server Pools from the Perspective drop-down list.
-
Select one or more server pools in the table in the management pane. Click Delete
 in the toolbar.
 -
The Delete Confirmation dialog box is displayed. Click OK to delete the server pools.
The server pools are deleted.
To delete a server pool which is HA-enabled, you must have an admin server assigned to any NFS file server-based storage.
3.3.1.7 Change Oracle VM Agent Passwords on Oracle VM Servers
Oracle VM Manager allows you to change the password for the Oracle VM Agent running on each Oracle VM Server. However, you must change the Oracle VM Agent password for all Oracle VM Servers in a server pool. This is why the password change can only be executed at the server pool level and is applied to all Oracle VM Servers in the server pool at the same time.
-
Select the Server Pools folder in the navigation tree.
-
Select Server Pools from the Perspective drop-down list.
-
Select one or more server pools in the table in the management pane. Click Change Servers Agent Password
 in the toolbar.
 -
The Change Agent Password for All Servers within the Server Pool dialog box is displayed. Enter the current password first. Then enter a new password and confirm it in the respective fields.
-
Click OK to complete the operation. Oracle VM Manager logs into each Oracle VM Server in the server pool and changes the Oracle VM Agent password.
3.3.1.8 Define or Edit Server Pool Policies
It is possible to define server pool policies to improve power and resource usage across the servers within your server pool. The two policies you can set are for:
-
Distributed Resource Scheduling (DRS): Optimizes virtual machine resource utilization in a server pool.
-
Distributed Power Management (DPM): Increases the consolidation ratio to use fewer Oracle VM Servers during periods of relative low resource utilization.
The policy is also able to be set for networks used in a server pool. You can set the server pool to use either DRS, or DPM, but not both at the same time.
See What are Server Pool Policies? in the Oracle VM Concepts Guide for more information on these server pool policies.
-
Click the Servers and VMs tab.
-
Select the server pool in the Server Pools folder in the navigation pane.
-
From the Perspective field in the management pane, select Policies from the drop-down list. Click Edit
in the toolbar. The Configure
Policy step of the Configure
DRS/DPM wizard is displayed.
Enter the server pool policy information:
-
Policy Control:
-
Policy Type: You can choose from either DRS, DPM, or none. You cannot set both DRS and DPM to be active at the same time.
-
Time Period (Minutes): The time period for the policy job to run. This sets the policy job to run every n minutes, for example, 10 sets the policy job to run every 10 minutes. You can enter a number between 2 and 60.
-
-
Server CPU:
-
Enable: Set whether to enable or disable logging of CPU performance and utilization.
-
Threshold (%): The maximum amount of CPU percentage usage allowed before the policy must be enacted. You can enter a number between 25 and 99.
NoteThe Enable check box must be selected before a value can be specified for the Threshold (%) field.
-
-
Servers: Select the Oracle VM Servers for which the policy is to be enabled by moving the selected Oracle VM Servers from the Available Servers to the Selected Servers shuttle box.
Click Next.
-
-
The Select Networks step of the Configure DRS/DPM wizard is displayed.
Select the networks to be included in the policy. Click Next.
-
The Network Settings step of the Configure DRS/DPM wizard is displayed.
Select whether to enable the policy on the network, and select the threshold at which the policy is to be enacted for the network. Click Finish.
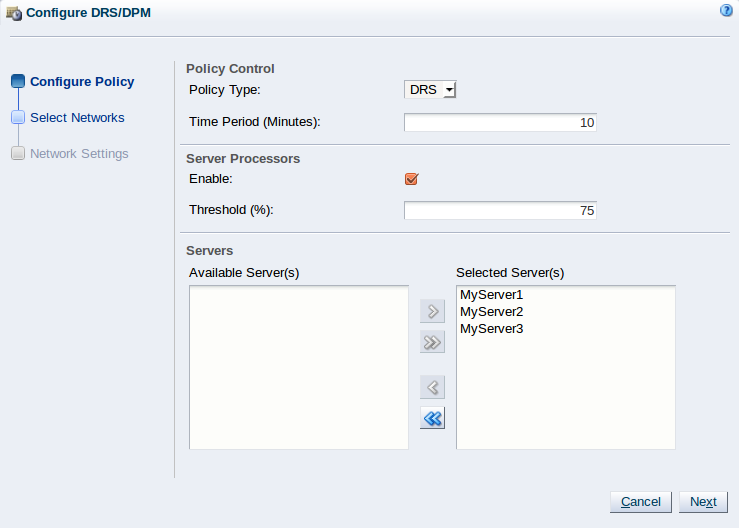
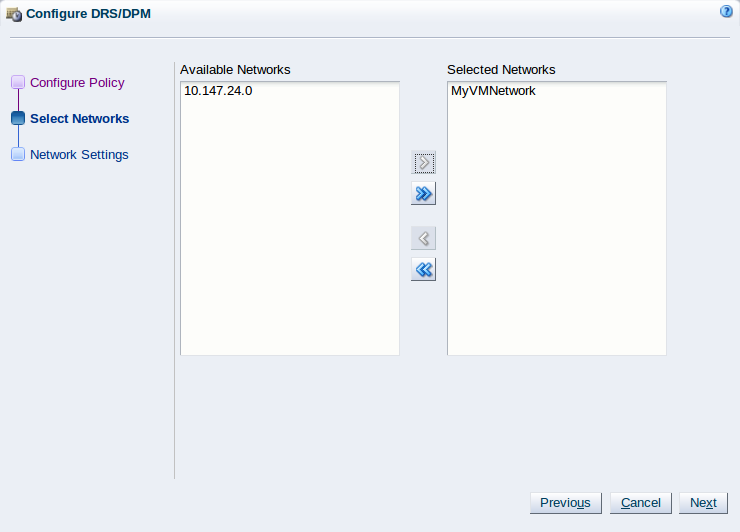
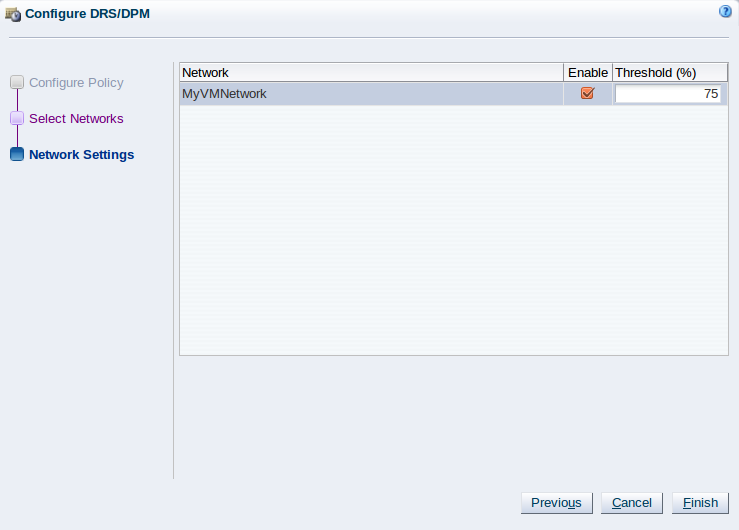
The policy is set for the server pool.
3.3.1.9 Send VM Messages
You can select one or more virtual machines, Oracle VM Servers or server pools, to select which running virtual machines are populated in the dialog box used to send messages to virtual machines.
To send a virtual machine a message you must have first installed the Oracle VM Guest Additions in the virtual machine. For information on installing the Oracle VM Guest Additions, and a more detailed description of the virtual machine messaging mechanism and its uses, see the Oracle VM Administrator's Guide.
-
Click the Servers and VMs tab.
-
Determine the grouping of virtual machines that you wish to send a message to:
-
If you wish to send a message to virtual machines distributed across one or more server pools, click on the Server Pools folder in the navigation pane. Select Server Pools from the Perspective drop-down list. Select one or more server pools in the management pane.
-
If you wish to send a message to virtual machines distributed across one or more servers in a particular server pool, expand the Server Pools folder in the navigation pane and select the server pool where the servers reside. Select Servers from the Perspective drop-down list. Select one or more servers in the management pane.
-
If you wish to send a message to one or more virtual machines on a particular server, expand the Server Pools folder in the navigation pane and select the server pool where the servers reside. Select Virtual Machines from the Perspective drop-down list. Select one or more virtual machines in the management pane.
-
-
Click Send VM Messages...
 in the perspective toolbar.
The Send Messages to Virtual Machines dialog box is displayed.
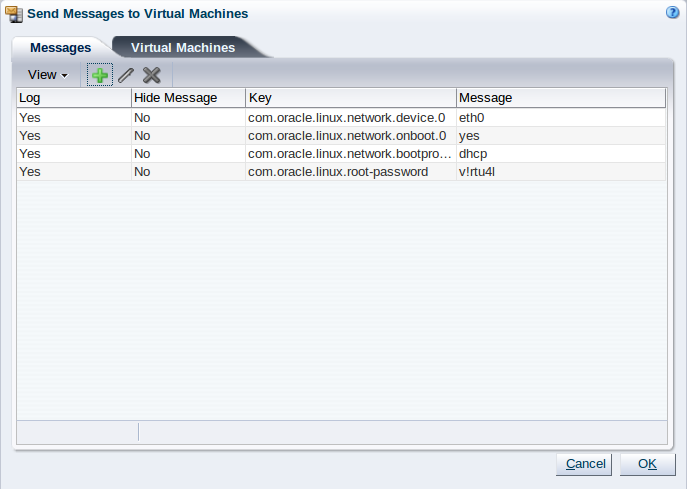
-
To create a message, click Create Message...
in the perspective toolbar to display the
Create VM
Message dialog box.
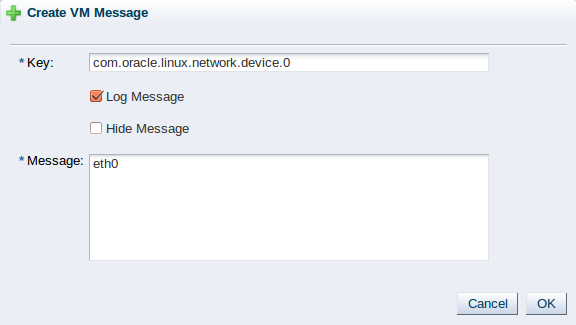
Enter the message key value pair in the Key and Message fields. Check the Log Message field to retain a log of the message. Check the Hide Message field to hide the message of the key/value pair in the user interface. Click OK to save the message and return to the Send Messages to Virtual Machines dialog box.
-
To edit a message, select the message and click Edit...
in the dialog box toolbar. To delete a message, select it and
click Delete
in the dialog box toolbar.
-
Select the Virtual Machines tab to select which running virtual machines are to receive the messages.
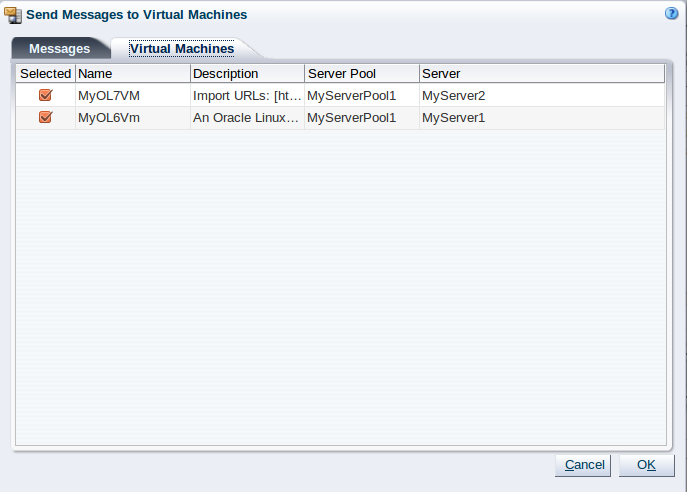
Click OK to send the messages to the virtual machines.
3.3.1.10 Generate Report
You can generate an XML report on one or more server pools. For more information about object reporting, see Section 7.1, “Reports”.
-
Select the Server Pools folder in the navigation pane.
-
Select one or more server pools in the management pane table.
-
Click
 Generate Report in the
management pane toolbar.
Generate Report in the
management pane toolbar.
-
The report is generated and sent to the browser.
3.3.2 Server Processor Compatibility Perspective
The Server Processor Compatibility perspective lists the different server processor compatibility groups configured in your environment. The following columns are displayed in the management pane:
-
Name: The name that has been configured for the server processor compatibility group.
-
Description: A description entered for the server processor compatibility group when it was created or edited.
-
Servers: A comma-separated list of servers that belong to the server processor compatibility group.
This perspective includes a toolbar that consists of the following options:
|
Toolbar Icon Option |
Icon |
Description |
|---|---|---|
|
|
Displays the Create a Server Processor Compatibility Group wizard. Use this option, after adding servers to a server pool, to define which servers have processors belonging to the same family. This helps to improve the success of live virtual machine migration. |
|
|
|
Displays the Edit Server Processor Compatibility Group wizard. Use this option to edit a server processor compatibility group. |
|
|
|
Displays the Delete Confirmation dialog box. Use this option to delete the selected server processor compatibility group. |
|
|
|
Displays context sensitive help. |
3.3.2.1 Create Server Processor Compatibility Group
It is critical that all of the members of a server processor compatibility group have compatible processors. If you create a group that contains members with incompatible processor families or models, live migration and other migration related functions may fail.
-
Click the Servers and VMs tab. Select Server Pools in the navigation pane.
-
From the Perspective field in the management pane, select Server Processor Compatibility from the drop-down list. Click Create New Server Processor Compatibility...
 in the perspective toolbar.
-
The Create a Server Processor Compatibility Group wizard is displayed.
Enter the server processor compatibility group information:
-
Group Name: Enter the name of the server processor compatibility group.
-
Description: A description of the server processor compatibility group.
Click Next.
-
-
The Select Servers step of the Create a Server Processor Compatibility Group wizard is displayed.
Select the servers to include in the server processor compatibility group and move them from the Available Servers column to the Selected Servers column.
Click Finish.
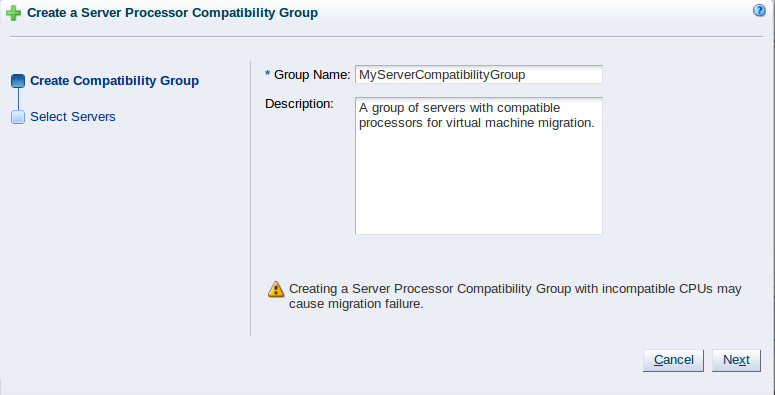
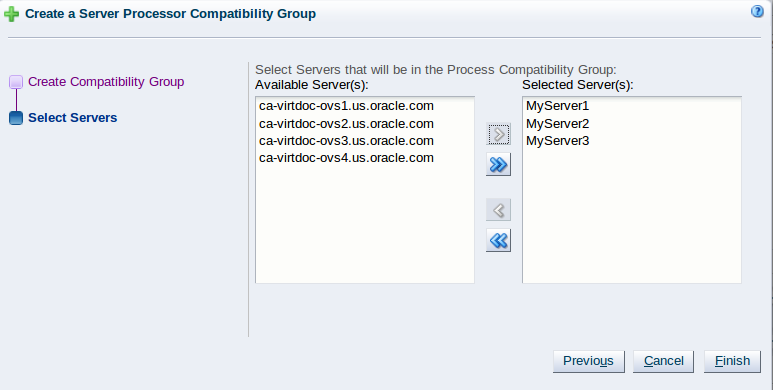
The server processor compatibility group is created and listed in the Server Processor Compatibility Group table in the management pane.
3.3.2.2 Edit Server Processor Compatibility Group
You should not edit the default server processor compatibility groups created during Oracle VM Server discovery. You should also be aware that if you add members to a processor compatibility group, the server processor family and model must match the other members of the group or live migration and other migration related functions may fail.
-
In the Servers and VMs tab, select Server Pools in the navigation pane.
-
From the Perspective field in the management pane, select Server Processor Compatibility from the drop-down list. Select the server processor compatibility group in the Server Processor Compatibility table and click Edit Server Processor Compatibility...
in the perspective toolbar.
-
The Edit Server Processor Compatibility Group dialog box is displayed. Edit the server processor compatibility group as required. To edit the Oracle VM Servers in the server processor compatibility group, click the Servers tab.
Click OK.
The server processor compatibility group is edited and displayed in the Server Processor Compatibility Group table in the management pane.
3.3.2.3 Delete Server Processor Compatibility Group
-
In the Servers and VMs tab, select Server Pools in the navigation pane.
-
From the Perspective field in the management pane, select Server Processor Compatibility from the drop-down list. Select the server processor compatibility group in the Server Processor Compatibility table and click Delete Server Processor Compatibility
in the perspective toolbar.
-
A confirmation dialog box is displayed. Click OK to delete the server processor compatibility group.
The server processor compatibility group is deleted.
3.4 Server Pool Item
Each server pool configured within the environment is displayed as a server pool navigation item within the Server Pools navigation folder. These server pool navigation items are labelled according to the server pool name that is configured within Oracle VM Manager. If a name is not available or not configured properly within Oracle VM Manager, the server pool UUID is allocated as the server pool name. The structure of the navigation provided in the navigation tree is discussed in more detail in Section 3.2, “Summary”.
Clicking on a server pool navigation item in the navigation tree allows you to access different perspectives in the management pane. Each perspective provides its own view of the server pool within Oracle VM Manager. Most of the perspectives also include separate perspective toolbars that enable you to perform various configuration or management tasks specific to the view currently displayed within the management pane. A server pool navigation item offers the following perspectives within the management pane:
3.4.1 Info Perspective
The Info perspective is common to many elements within the Oracle VM Manager Web Interface. This perspective always shows the individually configured parameters for an item that is currently selected in the navigation tree. Some of these configured parameters may be automatically populated through a discovery process, while others may have been configured manually during the creation of the object that is selected.
The Info perspective or dialog contains a perspective toolbar with the following options:
|
Toolbar Icon Option |
Icon |
Description |
|---|---|---|
|
|
Displays context sensitive help. |
This perspective includes the following information:
-
Server Pool Name: The configured name for the server pool.
-
Server Count: The number of Oracle VM Servers that belong to the server pool.
-
Clustered: Whether or not the server pool is configured as a cluster.
-
Timeout for Cluster: The number of seconds before a server in the cluster times out.
-
ID: The UUID for this server pool.
-
Description: The description provided for the server pool when it was created or edited.
-
Pool File System: The path to the file system that is used for the server pool file system.
-
Pool File System Type: The type of file system where the server pool file system is stored.
-
Pool File System Storage Device: The device used for the pool file system.
-
NFS/NAS File System: The NFS mount path for the pool file system if NFS is used.
-
VM Console Keymap: The configured keymap for the virtual machine console.
-
VM Start Policy: The virtual machine start-up policy selected for the server pool.
-
File Servers: A list of file servers that are currently presented to the server pool.
-
Secure VM Migrate: Whether or not the server pool is configured to support secure migrations of virtual machines.
-
Override Global Server Update Group: Whether or not the server pool is configured to override any global server update group.
This perspective includes a toolbar that consists of the following options:
|
Toolbar Icon Option |
Icon |
Description |
|---|---|---|
|
|
Displays context sensitive help. |
3.4.2 Servers Perspective
The Servers perspective lists the different servers that belong to either a server pool or the Unassigned Servers folder, depending on the item selected in the navigation pane. The following columns are displayed in the management pane:
-
Name: The name that has been configured for the server.
-
Status: The running status of the server.
-
Tag(s): Any tags that have been applied to the server.
-
Maintenance Mode: Whether or not the server is configured to be in maintenance mode.
-
IP Address: The IP address that is used by Oracle VM Manager to access the server on the management network channel.
-
Memory (GiB): The available memory, in GiB, on the server.
-
Processors: The number of processors that the server contains.
-
Speed (GHz): The speed that the processors for the server are configured to run at.
-
Product: The physical host brand and type reported by the server bios.
-
Owned: Whether or not the server is owned by the current Oracle VM Manager instance.
-
Update Required: Whether or not a server update is available for the server from its server update repository.
This perspective includes a toolbar that consists of the following options:
|
Toolbar Icon Option |
Icon |
Description |
|---|---|---|
|
|
Displays the Create Virtual Machine wizard. Use this option to create a virtual machine in the selected server pool. |
|
|
|
Displays the Edit Server dialog box. Use this option to edit the name and description for an Oracle VM Server. This is also used to put the Oracle VM Server into maintenance mode, take ownership of it, and to configure remote management of the Oracle VM Server using IPMI (Intelligent Platform Management Interface).
Note that placing an Oracle VM Server in maintenance mode is
indicated in the navigation pane with this icon:
|
|
|
|
Displays the Delete Confirmation dialog box. Use this option to delete the selected Oracle VM Server. | |
|
|
Starts a stopped Oracle VM Server. |
|
|
|
Stops a running Oracle VM Server. | |
|
|
Restarts a running Oracle VM Server. | |
|
|
Powers off an Oracle VM Server. This is the equivalent of physically pushing the Off button on the hardware. |
|
|
|
Rediscovers the Oracle VM Server. Use this to refresh information about the Oracle VM Server. |
|
|
|
Rescans the local storage on an Oracle VM Server. Use this option to rescan the storage presented to an Oracle VM Server when the storage configuration is changed, for example, a new storage array is added. | |
|
|
Updates or upgrades the Oracle VM Server if an update is available in the server update repository. |
|
|
|
Send one or more virtual machines a message. Use this option to send messages to virtual machines that have the Oracle VM Guest Additions installed. This option is not available in the Unassigned Servers folder. Virtual machines must be running on a server to receive messages. |
|
|
|
Generate an XML report on one or more Oracle VM Servers. |
|
|
|
Displays context sensitive help. |
3.4.2.1 Create Virtual Machine
This section explains how to create a virtual machine using a template, and creating a virtual machine from an ISO file, or from physical or virtual disks.
-
Click the Servers and VMs tab.
-
Click Create Virtual Machine
in the toolbar.
-
The Create Virtual Machine wizard is displayed.
Select the Clone from an existing VM Template option and then click Next.
-
The Create Virtual Machine wizard prompts you to specify details for the virtual machine.
Enter or select the following details:
-
Clone Count: The number of virtual machines to create from the template.
-
Name Index: The start index number to use for the clone name suffix. The default is
0. This is used in conjunction with the VM Name field to create the name for each clone. -
Repository: The repository in which to create the virtual machine configuration files.
-
VM Template: The template to use to create the virtual machines.
-
VM Name: An optional name for the virtual machines. The maximum name length is 256 characters and may contain any character. The name need not be unique. If no value is given, the default is the name of the virtual machine template being cloned. Each clone is suffixed with a dot (.) and the clone index number, starting with the value for the Name Index field. For example, if the VM Name field is set to
MyVM, and the Name Index field is set to1, the resulting clones would be namedMyVM.1,MyVM.2and so on. -
Server Pool: The server pool in which to deploy the virtual machines.
-
Description: An optional description of the virtual machines.
-
-
Click Finish. The virtual machines are created and deployed to the server pool.
-
Click the Servers and VMs tab.
-
Click Create Virtual Machine
in the toolbar.
-
The Create Virtual Machine wizard is displayed.
Click the Clone from an existing Virtual Appliance option and then click Next.
-
The Create Virtual Machine wizard prompts you to specify details for the virtual machine.
Enter or select the following details:
-
Repository: The repository in which to create the virtual machine configuration files.
-
Virtual Appliance: The virtual appliance from which you want to create the virtual machines.
-
Server Pool: The server pool in which to deploy the virtual machines.
If you select None, the virtual machines are deployed into the Unassigned Virtual Machines folder.
-
Available Virtual Appliance VM(s): The virtual machines that are available to create from the virtual appliance.
-
Selected Virtual Appliance VM(s): The virtual machines to create from the virtual appliance.
You can select multiple virtual machines if the virtual appliance contains more than one. Oracle VM Manager creates a separate virtual machine for each one that you select.
-
-
Click Finish.
Oracle VM Manager creates the selected virtual machines from the virtual appliance and deploys them to the server pool you specified.
You can then migrate each virtual machine to a compatible server or server pool.
-
Click the Servers and VMs tab.
-
Click Create Virtual Machine
in the toolbar.
The Create Virtual Machine wizard is displayed.
-
Click the Create a new VM option and then click Next.
-
The Create Virtual Machine step is displayed in the wizard.
Enter or select the following details:
-
Server Pool: The server pool on which to create the virtual machine.
-
Server: The server that the virtual machine should be created on. The default option is
Any, but the drop-down selection lists the servers that exist in the server pool that you have selected. Selecting a particular server forces the virtual machine to be created on that server. This has implications for the Start Policy discussed later. -
Repository: The repository in which to create the virtual machine configuration file.
-
Name: A name for the virtual machine. The maximum name length is 256 characters and may contain any character. The name need not be unique.
-
Enable High Availability: Whether to enable High Availability (HA). See How does High Availability (HA) Work? in the Oracle VM Concepts Guide for more information on HA.
-
Enable Huge Pages: Whether to enable HugePages.
-
The HugePages feature is deprecated for virtual machines with a domain type of PVM in Oracle VM Release 3.4.1. You should not enable HugePages when creating or editing virtual machines. This feature will be removed in a future release of Oracle VM.
If you have HugePages enabled for any PVM guests, Oracle recommends that you change the domain type for virtual machines from Paravirtualized (PVM) to Hardware virtualized, with paravirtualized drivers (PVHVM). If you cannot change the domain type for a virtual machine, you should disable the HugePages setting and then restart the virtual machine.
-
Huge Page support is enabled by default for virtual machines with a domain type of HVM or PVHVM. You cannot set this parameter for those virtual machines.
-
This option does not take effect on virtual machines deployed on SPARC-based server pools. Virtual machines running on SPARC-based servers can access the page sizes that the server platform supports, regardless of this setting.
See How is the HugePages Feature Enabled for Virtual Machines?, in the Oracle VM Concepts Guide, for more information on Huge Page support.
-
-
Description: An optional description of the virtual machine.
-
Operating System: The operating system of the virtual machine. This setting enables or disables certain virtual machine settings that the guest operating system may require.
-
Enable Viridian: Whether to enable Viridian.
-
Viridian support enables the exposure of Windows virtualization compatible entitlements to Microsoft Windows guest operating systems. Enabling viridian support is strongly recommended to ensure improved performance for Microsoft Windows guest operating systems.
-
Enabling viridian support is permitted for all Microsoft Windows guest operating system types. However, it is only effective from Microsoft Windows Vista and Microsoft Windows Server 2008 onwards.
-
Viridian support is enabled by default when creating virtual machines running Microsoft Windows guest operating systems.
-
-
Mouse Device Type: The mouse type to use for the virtual machine. This option is not available for virtual machines in SPARC-based server pools.
-
Keymap: The keyboard mapping to use for the virtual machine. This option is not available for virtual machines in SPARC-based server pools.
-
Domain Type: The domain type of the virtual machine.
-
Xen HVM: Hardware virtualization, or fully virtualized. When you select this option you can supply an ISO file in a repository (in the Arrange Disks step of the wizard) from which to install an operating system on the virtual machine. See Section 4.5.1.1, “Import ISO” for information on importing an ISO file into a repository. Alternatively, you may consider setting up an environment to perform a network installation for the virtual machine.
-
Xen HVM PV Drivers: Identical to Xen HVM, but with additional paravirtualized drivers for improved performance of the virtual machine. See What are Virtualization Modes or Domain Types? in the Oracle VM Concepts Guide for more information about using paravirtualized drivers. This domain type is typically used to run Microsoft Windows guest operating systems with an acceptable performance level. Installation of the guest operating system is usually performed either using an ISO file in a repository or via a network installation.
-
Xen PVM: Paravirtualized. Enables you to select a location for the mounted ISO file from which to create the virtual machine. Before you create the virtual machine using the paravirtualized method, mount the ISO file on an NFS share, or HTTP or FTP server. You supply the location of the mounted ISO file in the Network Boot Path field in the Boot Options step of the wizard. For information on creating a mounted ISO file, see Provisioning ISO Files for PVM Guest Installations in the Oracle VM Administrator's Guide. Do not select this option if the virtual machine Operating System is set to either Oracle Linux 7 or RedHat Enterprise Linux 7. These operating systems do not support the Xen PVM domain type.
ImportantAs of Oracle VM Release 3.4.6, support for PVM guests is removed. For more information, see Disabling Paravirtualized Guests on Oracle VM Server in the Oracle VM Administrator's Guide.
-
OVM/SPARC: Specifies that the virtual machine is deployed on a server pool running on Oracle VM Server for SPARC.
-
Unknown: This option is informational in the event that Oracle VM Manager is unable to determine the domain type for an existing virtual machine. It is not possible to actually set a virtual machine's domain type to this value. Attempting to do so generates a rule violation when you try to save the virtual machine settings and an error message is returned.
-
-
Start Policy: The policy that should be used to start the virtual machine. Select one of:
-
Best Server: This is the legacy algorithm that optimizes virtual machine placement on Oracle VM Servers that are in use before moving to unused servers in the pool.
-
Balance Server: This algorithm distributes virtual machines across all the available Oracle VM Servers in the server pool, starting with the least utilized Oracle VM Server first. CPU and memory utilization statistics are used to balance the virtual machine distribution across the server pool, with CPU utilization taking precedence over memory utilization.
-
Current Server: The virtual machine is started on the Oracle VM Server to which it is assigned. If you selected a particular server to create the virtual machine on, then it is started on this server.
-
Use Pool Policy: The virtual machine is started using the start policy defined for the entire server pool. See Section 3.1.2, “Create Server Pool” for more information on setting the start policy for a server pool.
-
-
Max. Memory (MB): The maximum memory size the virtual machine can be allocated. This value must be between 32 and 512000. The default is 512.
For x86-based virtual machines, this value is incremented by 32 each time you click the up arrow, and, conversely, decreased by 32 if you click the down arrow. For SPARC-based virtual machines, the up arrow adds 512, and the down arrow subtracts 512. If you have enabled Huge Pages, the value must be a multiple of 2 MB.
NoteFor HVM and PVHVM guests, the maximum memory size value must equal the memory size value. If these values are different, the following job failure message is generated for HVM/PVHVM guests: "The memory limit cannot be different than the current memory size on an HVM/PVHVM Virtual Machine."
-
Memory (MB): The memory size the virtual machine is allocated. When creating a virtual machine, this is the memory allocation used when starting the virtual machine. This value must be between 32 and 512000. The default is 512.
For x86-based virtual machines, this value is incremented by 32 each time you click the up arrow, and, conversely, decreased by 32 if you click the down arrow. For SPARC-based virtual machines, the up arrow adds 512, and the down arrow subtracts 512. If you have enabled Huge Pages, the value must be a multiple of 2 MB.
You can change the memory allocated to a running virtual machine without the need to restart the virtual machine if the domain type is PVM or PVHVM and where the guest is running a Linux OS on an x86-based platform or an Oracle Solaris OS on a SPARC-based platform.
NoteFor x86-based PVHVM guests running on Oracle Solaris OS, you cannot change the memory if the virtual machine is running.
See the Oracle VM Paravirtual Drivers for Microsoft Windows documentation for information about the availability of hot memory modification on PVHVM guests that are running a Microsoft Windows OS. You must use a Windows PV Driver that supports hot memory modification or you must stop the guest before you modify the memory.
-
Max. Processors: The maximum number of processors the virtual machine can be allocated. The number of processors is expressed in number of physical CPU cores. The maximum number of processors depends on the domain type, as follows:
-
PVM: 256.
ImportantAs of Oracle VM Release 3.4.6, support for PVM guests is removed. For more information, see Disabling Paravirtualized Guests on Oracle VM Server in the Oracle VM Administrator's Guide.
-
HVM: 128; or 32 for Microsoft Windows guests.
NoteAs of Release 3.4.6, the HVM limit is
64for Microsoft Windows guests. -
PVHVM: 128; or 32 if using Oracle VM Paravirtual Drivers for Microsoft Windows.
NoteAs of Release 3.4.6, the PVHVM limit is
64if using Oracle VM Paravirtual Drivers for Microsoft Windows. -
OVM/SPARC: Equivalent to the number of available CPUs on the server.
-
-
Processors: The number of processors the virtual machine is allocated. The number of processors is expressed in number of physical CPU cores, up to the value of Max. Processors.
-
Priority: The CPU priority of the virtual machine. The higher the priority value, the more physical CPU cycles are given to the virtual machine. This option is not available for virtual machines in SPARC-based server pools. This should be a number between 1 and 100. The default priority is set at 1.
-
Processor Cap %: Increase or decrease the percentage to which the virtual CPUs can receive scheduled time. This parameter defines the maximum percentage to which the virtual CPUs can receive scheduled time. Use this parameter to keep low priority virtual machines from consuming too many CPU cycles on a Virtual Machine Server. This option is not available for virtual machines in SPARC-based server pools.
-
Restart Action on Crash: The action to perform if a virtual machine crashes. This option is only available for virtual machines that are running on the Xen hypervisor and that have been configured to run on a particular Oracle VM Server. Options include the following:
-
Restart: Restarts the virtual machine operating system.
-
Stop: Stops the virtual machine. If Enable High Availability is selected, this option is not available.
-
Restart After Dump: Restarts the virtual machine operating system after first creating a core dump file for the virtual machine.
-
Stop After Dump: Stops the virtual machine after first creating a core dump file for the virtual machine. If Enable High Availability is selected, this option is not available.
Core dump files are saved to
/var/xen/dumpon the Oracle VM Server where the virtual machine is hosted. Each core dump file is named uniquely so that files are not overwritten. This can use up disk space rapidly. You must make sure there is either enough disk space available at this path on the Oracle VM Server where the virtual machine will run; or you should mount additional storage at this path to avoid using up disk space required to host dom0.This option cannot be modified for a running virtual machine. You must stop the virtual machine before you are able to change this option, if you select to edit the virtual machine later.
-
The Priority and Processor Cap% parameters are passed to the Xen hypervisor for use by the credit scheduler, which automatically load balances guest VCPUs across all available physical CPUs, using an algorithm that combines these two parameters. Therefore, these parameters are a key factor for the performance of the virtual machine on x86 hardware.
NoteFor information on performance optimization goals and techniques for Oracle VM Server for x86, see Optimizing Oracle VM Server for x86 Performance, on Oracle Technology Network at: http://www.oracle.com/technetwork/server-storage/vm/ovm-performance-2995164.pdf.
On SPARC, each virtual machine uses dedicated physical CPU threads, and CPUs are not shared between virtual machines, being exclusively assigned to a single virtual machine.
Click Next.
-
-
The Set up Networks step is displayed in the wizard.
This step of the wizard allows you to add VNICs to the virtual machine.
-
To specify the MAC address for a VNIC, select Specify MAC Address and enter the MAC address. Otherwise, leave the default Dynamically Assign MAC.
-
Select a network with the virtual machine role from the Network drop-down list.
If no networks are available, you must first create a network with the virtual machine role as a dedicated network for virtual machine traffic. See Section 5.1.1, “Create New Network” for information on creating a network.
-
Click Add VNIC.
-
The VNIC order specified determines the order in which the VNICs are presented to the virtual machine. You can control the ordering of the VNICs using the up and down arrows on the right of the table.
-
If you are editing the networking of an existing stopped virtual machine, you can change the network to which the VNIC belongs using the Network drop-down list in the table. It is important that the VNIC belongs to a network already associated with the Oracle VM Servers on which it can run, or you cannot start the virtual machine. See Section 5.1.1, “Create New Network” and Section 5.1.2, “Edit Existing Network” for more information on associating Oracle VM Servers with networks.
-
If you are editing an existing running virtual machine, you can add VNICs to the virtual machine, but you cannot remove VNICs that are already in use. You also cannot reorder VNICs on a running virtual machine. If you choose to add a VNIC to a running machine you must ensure that the VNIC belongs to a virtual machine network already associated with the Oracle VM Servers on which it can run, by selecting the appropriate network from the Network drop-down list.
-
A virtual machine can have up to eight (8) VNICs for HVM guests and up to 31 for PVM guests. A PVM guest requires network connectivity to perform the operating system install and must have at least one VNIC.
-
-
Click Next.
-
-
The Arrange Disks step of the wizard is displayed.
Select the desired storage configuration of your virtual machine, such as virtual disks, physical disks, and ISO files. On a separate slot, add one or more of the following disk types:
-
Empty: An empty slot.
-
Virtual Disk: This allows you to add or create a virtual disk. Virtual disks may be shared by virtual machines, or only available to a single virtual machine.
-
Physical Disk: The physical disks are the disks in a storage array. Physical disks may be shared by virtual machines.
-
CD/DVD: This adds an ISO file in a storage repository and can be used to create HVM and PVHVM virtual machines. When creating a virtual machine from an ISO file, you must use a single file. Installations that span multiple ISO files are not supported. ISO files cannot be used to create PVM virtual machines. You cannot add an empty CDROM on a SPARC-based server.
NoteAdding or removing a CD/DVD device can only be done when a virtual machine is powered off. Once the VM is running again, the CD/DVD device is always available for use as needed, much like a physical CD/DVD device on a physical server.
After the virtual machine is powered on, the only actions that are supported while the virtual machine is running are:
-
Selecting an .iso for a CD/DVD slot in an "Empty" state.
-
Hot-swapping the .iso currently in use.
-
Ejecting the .iso from the CD/DVD slot, leaving the device in an "Empty" state.
-
Add or create any virtual disks to use as the virtual machine's hard disk, select any physical disks to add, and select any ISO files to use to create the virtual machine. Add the disks in the order they should appear in the virtual machine. The disk with the boot partition or installation media should be the first disk listed. An HVM guest can have up to four disks, including empty CD/DVD drives. A PVM guest can have up to 104 disks. A PVHVM guest can have up to 107 disks. An OVM/SPARC guest can have up to 1024 disks. Only one slot can contain an empty CD/DVD.
TipWhen editing a running virtual machine, you can change the CD/DVD using this dialog box and the CD/DVD is mounted in the operating system.
To create or add a virtual disk:-
To create a virtual disk, select Virtual Disk from the Disk Type drop-down list and click Create a Virtual Disk
.
-
The Create Virtual Disk dialog box is displayed. Enter or select the following to create a virtual disk:
-
Repository: The repository in which the virtual disk is to be created.
-
Virtual Disk Name: The name of the virtual disk to be created and made available to the virtual machine. See How are Virtual Disks Managed? in the Oracle VM Concepts Guide for more information about using virtual disks.
-
Size (GiB): The disk size of the virtual disk, in GiB.
-
Description: A description of the virtual disk.
-
Shareable: Whether the virtual disk should be shareable (read/write) with other virtual machines.
-
Allocation Type: Whether to use a Sparse Allocation or Non-sparse Allocation. Sparse Allocation creates a sparse disk, so the size of the disk is initially small and increases as it is used. Sparse allocation is faster than using Non-Sparse Allocation when creating a virtual machine. Non-Sparse Allocation creates the entire disk when the virtual machine is created, and so is slower than creating a sparse disk.
Click OK.
-
-
To search for an existing virtual disk to add to the virtual machine, click Select a Virtual Machine Disk
. The Select a
Virtual Machine Disk dialog box is displayed. The
dialog box lists the available virtual disks in a table that
indicates the following information:
-
Selected: Whether or not the disk has been selected. This is indicated using radio button.
-
Name: The name of the virtual disk as stored in Oracle VM Manager.
-
Size (GiB): The disk size of the virtual disk, in GiB.
-
Repository: The repository in which the virtual disk is located.
-
Shareable: Whether the virtual disk is configured to be shareable (read/write) with other virtual machines.
-
VM(s): A comma separated list of the names of any virtual machines that may already be using this virtual disk.
Select the virtual disk to use and Click OK.
NoteIf your virtual machine needs more than one disk, you can create the disk(s) afterwards in the repository, and add them to the virtual machine. See Section 4.9.1.1, “Create Virtual Disk” and Section 3.5.2.1, “Edit Virtual Machine” for more information on creating a virtual disk and editing a virtual machine. There are some limitations on mixing virtual disks of differing device types on a virtual machine. See How are Virtual Disks Managed? in the Oracle VM Concepts Guide for more information about how device types are allocated to virtual disks and what you may need to do to solve any issues surrounding this problem.
-
To add a physical disk:-
To add a physical disk to the virtual machine, select Physical Disk from the Disk Type drop-down list. Click Select a Virtual Machine Disk
. The Select a
Physical Disk dialog box is displayed. The dialog
box lists the available physical disks in a table that
provides the following information:
-
Selected: Whether or not the disk has been selected. This is indicated using radio button.
-
Name: The name of the physical disk as stored in Oracle VM Manager.
-
Size (GiB): The disk size of the physical disk, in GiB.
-
SAN Server: The SAN Server where the physical disk is located.
-
Volume Group: The volume group that the physical disk belongs to.
-
Shareable: Whether the physical disk is configured to be shareable (read/write) with other virtual machines.
-
VM(s): A comma separated list of the names of any virtual machines that may already be using this physical disk.
Select a physical disk from the list of available disks. If you want to leave the slot empty, select Leave Slot Empty. Click OK.
-
To add an ISO file:-
To add an ISO file to the virtual machine, select CD/DVD from the Disk Type drop-down list. Click Select a Virtual Machine Disk
. The Select an
ISO dialog box is displayed. Select a Iso file
from the list of available files. If you want to leave the
slot empty, select Leave Slot
Empty. Click
OK.
NoteWhen adding an ISO file to an existing virtual machine, the ISO file is available to the operating system, but may not be mounted. To access the ISO file, you may need to mount it, for example:
# mkdir /cdrom
# mount -o loop /dev/xvdb /cdrom
When you have set up the virtual machine's disks, click Next.
-
-
The Boot Options step is displayed in the wizard.
Select the boot media order for your virtual machine.
If you are creating a hardware virtualized machine virtual machine (HVM), you can choose the PXE boot option. If so, remember to put PXE first in the Select your boot options field, and change the boot order again after installation and before rebooting the virtual machine. To use PXE, you must configure a PXE/tftp environment to offer the necessary boot media and instructions to the virtual machine.
If you are creating a paravirtualized virtual machine (PVM), you also have the PXE option available. In this case, the PXE option refers to a network style boot. If the PXE option appears in the right-hand-side column, you must enter the location of the mounted ISO file from which to perform the operating system installation in the Network Boot Path field that is shown when editing or creating a PVM, for example
http://example.com/EL6-x86
For information on creating a mounted ISO file, see Provisioning ISO Files for PVM Guest Installations in the Oracle VM Administrator's Guide.
You cannot use the Network Boot Path field to boot a virtual machine using PXE. This field can only be used to specify the path to a mounted ISO file to use when installing a PVM guest.
If you have defined tags and want to add any to this virtual machine, click Next. Otherwise, click Finish to create and deploy the virtual machine to the server pool.
-
The Tags step is optional and displays in the wizard if you clicked Next in the previous step.
NoteThe virtual machine has already been created and deployed to the server pool at this point. This step is entirely optional. Cancelling the operation within this dialog does not prevent the virtual machine from being created.
If you have previously created tags, they appear in the Available Tags column. Select the tags you want to apply to the virtual machine and move them to the Selected Tags column. See Section 1.17, “Tags and Tag Filters” for more information on creating and managing tags. Click Finish.
If you created a PVM, there are some steps you should take after the operating system installation is completed:
-
Stop the virtual machine. See Section 3.5.2.4, “Stop Virtual Machines” for information on stopping a virtual machine.
-
Edit the virtual machine and remove PXE from the Boot Order column in the Boot Options step of the Edit Virtual Machine wizard. See Section 3.5.2.1, “Edit Virtual Machine” for information on editing a virtual machine.
-
Start the virtual machine and complete the installation if necessary. See Section 3.5.2.3, “Start Virtual Machines” for information on starting a virtual machine.
To edit the virtual machine configuration information, see Section 3.5.2.1, “Edit Virtual Machine”.
3.4.2.2 Edit Server
You can edit the configuration information for an Oracle VM Server to change the name, description, any server pool roles, and to take it off-line to perform system maintenance. You can always edit the name and description of an Oracle VM Server, even if it is not owned by the Oracle VM Manager instance. You cannot edit any other information if the Oracle VM Server, is not owned by the Oracle VM Manager instance. If you want to edit these other options, you should first take ownership of the server using the Take Ownership of Server field as described in the procedure below.
-
Click the Servers and VMs tab.
-
Select the Oracle VM Server in the navigation pane. Click Edit Server
in the toolbar.
-
The Edit Server dialog box is displayed. In the Configuration tab, edit the information about the Oracle VM Server:
-
Name: The name of the Oracle VM Server.
-
Description: A description of the Oracle VM Server.
-
NTP Server(s): Allows you to specify the NTP server settings for each individual Oracle VM Server. You can add multiple NTP servers using a comma-separated list.
NoteIf you need to batch edit the NTP servers for a large number of Oracle VM Servers in your environment, you should use the Oracle VM Manager Command Line Interface, edit Server, or the Oracle VM Web Services API to do this programmatically.
-
Server in Maintenance Mode: Select whether to place the Oracle VM Server in maintenance mode.
An Oracle VM Server can be placed into maintenance mode to perform hardware or software maintenance. When an Oracle VM Server is placed in maintenance mode, it is not possible to start any new virtual machines on the server. Furthermore, any virtual machines running on the Oracle VM Server are automatically migrated to other Oracle VM Servers in the server pool, if they are available. If any of these automatic processes fail, check the Oracle VM Server event log (Section 3.5.10, “Events Perspective”) for reasons why the failure occurred.
Note-
When a virtual machine is migrated to an alternate Oracle VM Server, no checks are performed to detect whether the target Oracle VM Server is configured correctly or capable of running the virtual machine correctly. It is up to you to ensure that the Oracle VM Servers within a server pool have consistent configurations.
-
It is possible that some virtual machines fail to migrate if no target Oracle VM Server is found. In this case, maintenance mode may be set, but some virtual machines may continue to run on the Oracle VM Server.
-
If a virtual machine relies on local storage, then no target Oracle VM Server is identified as the migration target. These virtual machines should be manually migrated using the Storage Live Migration feature. For more information, see Section 3.5.2.11, “Migrate or Move Virtual Machines”
You must determine the appropriate course of action for these virtual machines and perform the required actions manually using the tools provided within Oracle VM Manager.
When an Oracle VM Server is placed into maintenance mode its icon:
 is updated in the navigation pane.
When you have finished performing maintenance on the
Oracle VM Server and you are ready for it to rejoin the server
pool, ensure that the Maintenance
Mode check box is unchecked.
is updated in the navigation pane.
When you have finished performing maintenance on the
Oracle VM Server and you are ready for it to rejoin the server
pool, ensure that the Maintenance
Mode check box is unchecked.
-
-
Take Ownership of Server: Select to take ownership of the Oracle VM Server. Server rediscovery is performed as part of this process, so that Oracle VM Manager can correctly determine whether or not the server is in an unowned state and the action can be completed successfully.
NoteConfiguration of NTP for each Oracle VM Server takes place when a server changes ownership. If you release ownership of a server, its NTP configuration is updated to point locally to itself. When Oracle VM Manager takes ownership of a server, the server's NTP configuration is usually automatically updated to point to the Oracle VM Manager instance. This may only be evident after the server has been refreshed. You can find out more about the configuration of NTP in Configure the NTP Service on the Oracle VM Manager Host in the Oracle VM Installation and Upgrade Guide.
TipYou cannot edit the ownership of an Oracle VM Server if it is included in a server pool or if a repository is presented to it.
-
Inbound Migration Locked: Select whether to allow additional virtual machines to run on the Oracle VM Server. Selecting this option prevents new or migrated virtual machines to run on the Oracle VM Server. See How Can I Protect Virtual Machines? for more information on inbound migration lock.
NoteIf you have HA configured for a server, this option does not protect a server from inbound migrations when failover occurs.
-
Oracle VM Agent password: The password to connect to the Oracle VM Agent. The value for this field is required if you select to take ownership of the Oracle VM Server.
-
Utility Server: Select to designate the Oracle VM Server to perform utility functions such as importing, cloning and storage refresh.
-
VM Server: The virtual machine role is required to run virtual machines.
-
-
In the IPMI tab, select the Enable Server IPMI check box to enable the Intelligent Platform Management Interface (IPMI). IPMI allows you to remotely power on or power off an Oracle VM Server. If IPMI is either not available or not enabled on the Oracle VM Server, Oracle VM Manager may still be able to remotely power on an Oracle VM Server using a Wake on LAN message without having to physically press the power button, and it may be able to send a system power off message to shut it down. Select the Change IPMI Password check box if your IPMI setup requires a password to change the configuration. The Change IPMI Password check box is automatically selected when you enable IPMI.
To configure IPMI enter the following information in the fields:
-
IP Address: The IP address of the IPMI.
-
Access Username: The optional user name for the IPMI.
-
Password: The optional password for the IPMI. Note that this field is always blank, regardless of whether the password has been set or not.
-
-
To edit the tags associated with the server, click the Tags tab. Using the controls provided, you can add or remove tags that can be used to identify the server and to group it with other objects within Oracle VM Manager. See Section 1.17, “Tags and Tag Filters” for more information on creating and managing tags.
Click OK. The Oracle VM Server is updated.
Batch Editing Oracle VM Servers
You can edit the information for more than one Oracle VM Server at a
time by using the
multi-select
functionality provided within the Oracle VM Manager interface to
select multiple items before clicking on the
Edit Server
![]() icon in the toolbar.
icon in the toolbar.
When editing a group of Oracle VM Servers in batch mode the options available to you are limited to actions that can be applied to all selected items. The following options are available:
-
Server in Maintenance Mode: Checking this check box sets all selected items into Maintenance Mode.
-
Take Ownership of Server: Checking this check box allows Oracle VM Manager to take ownership of all of the selected items.
-
Oracle VM Agent password: The password to connect to the Oracle VM Agent. The value for this field is required if you select to take ownership of the selected items.
-
Utility Server: Checking this check box changes the role of all selected items to Utility Servers.
-
VM Server: Checking this check box changes the role of all selected items to Virtual Machine Servers.
If the values set for the options provided vary across the selected servers, the dialog displays the values for the first server in the selection. Clicking OK updates all of the selected servers to have the same status.
3.4.2.3 Delete Server
When you delete an Oracle VM Server, it is removed from the Oracle VM Manager repository and becomes unmanaged. The Oracle VM Server is not stopped, nor is anything physically done to the Oracle VM Server.
Before you can delete an Oracle VM Server, you must stop any running virtual machines, or place the Oracle VM Server into maintenance mode to automatically migrate the running virtual machines.
-
Stop or migrate any running virtual machines. To stop the virtual machines see Section 3.5.2.4, “Stop Virtual Machines”. To automatically migrate the virtual machines to other Oracle VM Servers in the server pool, place the Oracle VM Server into maintenance mode, see Section 3.4.2.2, “Edit Server”.
-
Click the Servers and VMs tab.
-
Select the Unassigned Servers folder in the navigation tree. Select Servers from the Perspective drop-down list.
-
Select one or more Oracle VM Servers in the management pane. Click Delete
in the perspective toolbar. -
The Delete Confirmation dialog box is displayed. Click OK to delete the Oracle VM Servers.
The Oracle VM Servers are deleted from Oracle VM Manager.
3.4.2.4 Start Server
When you start an Oracle VM Server, it is started using the Intelligent Platform Management Interface (IPMI), or Wake-on-LAN (WOL). If neither IPMI nor WOL have been configured, the job to start the Oracle VM Server cannot be completed and may need to be aborted. The Oracle VM Server must then be powered on manually. See Section 3.4.2.2, “Edit Server” for information on configuring IPMI. See Section 8.1.5, “Abort Jobs” for information on aborting a hanging job.
To start Oracle VM Servers:
-
Click the Servers and VMs tab.
-
Select the server pool in which the Oracle VM Server resides in the navigation tree.
-
Select Servers from the Perspective drop-down list. Select one or more Oracle VM Servers in the management pane, and click Start Server
 in the perspective toolbar.
The Oracle VM Servers are started.
3.4.2.5 Stop Server
When you stop an Oracle VM Server, it is stopped using the Intelligent Platform Management Interface (IPMI), or a system power off command. Before you can stop an Oracle VM Server, you must stop any running virtual machines, or place the Oracle VM Server into maintenance mode to automatically migrate the running virtual machines.
Make sure that the IPMI is properly configured on the Oracle VM Server, otherwise it cannot be started again remotely. See Section 3.4.2.2, “Edit Server” for IPMI configuration. Alternatively, make sure that you activate the Wake-on-LAN (WOL) feature in the Oracle VM Server BIOS and that you have tested that it is properly working. If an Oracle VM Server cannot start through IPMI or WOL, it must be power-cycled manually.
-
Stop or migrate any running virtual machines. To stop the virtual machines see Section 3.5.2.4, “Stop Virtual Machines”. To automatically migrate the virtual machines to other Oracle VM Servers in the server pool, place the Oracle VM Servers into maintenance mode , see Section 3.4.2.2, “Edit Server” .
-
Click the Servers and VMs tab.
-
Select the server pool in which the Oracle VM Server resides in the navigation tree.
-
Select Servers from the Perspective drop-down list. Select one or more Oracle VM Servers in the management pane, and click Stop Server
 in the perspective toolbar.
The Oracle VM Servers are powered off.
3.4.2.6 Restart Server
When you restart an Oracle VM Server, an operating system restart command is sent and the Oracle VM Server is restarted. Before you can restart an Oracle VM Server, you must stop any running virtual machines, or place the Oracle VM Server into maintenance mode to automatically migrate the running virtual machines.
When the Oracle VM Server is restarted and rejoins the server pool, any pending HA operations in the server pool are initiated. When Oracle VM Manager is notified that the Oracle VM Server is online and available, any pending state changes are reconciled before any policy actions are resumed.
There is more information on the implications of restarting servers covered in Rebooting and Changing Power State of Oracle VM Servers in the Oracle VM Concepts Guide.
-
Stop or migrate any running virtual machines. To stop the virtual machines see Section 3.5.2.4, “Stop Virtual Machines”. To automatically migrate the virtual machines to other Oracle VM Servers in the server pool, place the Oracle VM Servers into maintenance mode , see Section 3.4.2.2, “Edit Server” .
-
Click the Servers and VMs tab.
-
Select the server pool in which the Oracle VM Server resides in the navigation tree.
-
Select Servers from the Perspective drop-down list. Select one or more Oracle VM Servers in the management pane, and click Restart
 in the perspective toolbar.
The Oracle VM Servers are restarted.
3.4.2.7 Kill Server
To kill an Oracle VM Server is equivalent to performing a power off of an Oracle VM Server, similar to unplugging the power cable from the physical machine. This is not the recommended method of shutting down an Oracle VM Server, but may be used if the shut down command fails to shut down the Oracle VM Server.
-
Click the Servers and VMs tab.
-
Select the server pool in which the Oracle VM Server resides in the navigation tree.
-
Select Servers from the Perspective drop-down list. Select one or more Oracle VM Servers in the management pane, and click Kill
 in the perspective toolbar. Click OK in the Confirmation dialog.
The Oracle VM Servers are powered off.
3.4.2.8 Rediscover Server
If there are either changes to the physical state of an Oracle VM Server or its attached storage, you should discover it again to update the configuration information in Oracle VM Manager.
-
Click the Servers and VMs tab.
-
Select the server pool in which the Oracle VM Servers reside in the navigation tree.
-
Select Servers from the Perspective drop-down list. Select one or more Oracle VM Servers in the management pane, and click Rediscover Server
in the perspective toolbar.
The configuration and storage information about the Oracle VM Servers is updated in Oracle VM Manager.
3.4.2.9 Rescan Physical Disks
You can rescan the physical disks available to an Oracle VM Server to determine if any disks have been changed, added, or removed.
-
Click the Servers and VMs tab, and select the server pool in which the Oracle VM Servers reside in the navigation tree. Select Servers in the Perspective drop-down list in the management pane. Select the Oracle VM Servers in the management pane table.
Alternatively, on the Servers and VMs tab, expand the Server Pools or Unassigned Servers folder, to select a particular server in the navigation tree. Select the Physical Disks option in the Perspective drop-down list.
-
Click Rescan Physical Disks
 in the perspective toolbar.
-
A confirmation dialog box is displayed. Click OK.
3.4.2.10 Update Server
Software updates and upgrades to Oracle VM Servers can be performed using the global server update repository configured in the Server Updates subtab of the Reports and Resources tab. See Section 7.3, “Server Update Groups” for information on configuring a global server update repository. A repository can be overridden for a server pool if required. See Section 3.4.6, “Server Update Repositories Perspective” for information on overriding a global update repository for a server pool.
To see which version of the Oracle VM Server software is installed before and after an upgrade, click the Servers and VMs tab, select the Oracle VM Server in the navigation tree, and then select Control Domains in the Perspective drop-down list. See Section 3.5.8, “Control Domains Perspective” for information on control domains.
When an Oracle VM Server update is available, an
event is posted to the
Oracle VM Server and Yes is displayed in the
Update Required column in
the Servers perspective in the
management pane.

Before upgrading Oracle VM Servers using the Oracle VM Manager Web Interface you should refer to
the Oracle VM Installation and Upgrade Guide. The
Oracle VM Manager Web Interface can only be used to perform upgrades for servers that are
running Oracle VM Server 3.3.x and up.
To update an Oracle VM Server, the virtual machines on the Oracle VM Server must first be stopped or migrated to another Oracle VM Server. You can manually stop or migrate the virtual machines, or, if you prefer, have the upgrade server job perform the virtual machine migrate automatically.
-
Click the Servers and VMs tab, and select the server pool in which the Oracle VM Servers reside in the navigation tree.
-
Select Servers in the Perspective drop-down list in the management pane.
-
Select the Oracle VM Servers in the management pane table and click Update Server
 from the perspective toolbar.
A confirmation dialog is displayed. Click OK. Each Oracle VM Server is placed into maintenance mode, and the update performed. Any virtual machines on the Oracle VM Servers are automatically migrated to another Oracle VM Server when it is put into maintenance mode. When the update is complete the Oracle VM Server is restarted and remains in maintenance mode.
-
To have the Oracle VM Servers rejoin the server pool as a fully functioning member, edit each the Oracle VM Server and take it out of maintenance mode.
For information on manually migrating virtual machines, see Section 3.5.2.11, “Migrate or Move Virtual Machines”. For information on taking an Oracle VM Server out of maintenance mode, see Section 3.4.2.2, “Edit Server”.
Note that you can upgrade multiple Oracle VM Servers in a server pool by using the multi-select functionality described in Section 1.15, “Multi-Select Functionality”.
3.4.2.11 Send VM Messages
You can select one or more virtual machines, Oracle VM Servers or server pools, to select which running virtual machines are populated in the dialog box used to send messages to virtual machines.
To send a virtual machine a message you must have first installed the Oracle VM Guest Additions in the virtual machine. For information on installing the Oracle VM Guest Additions, and a more detailed description of the virtual machine messaging mechanism and its uses, see the Oracle VM Administrator's Guide.
-
Click the Servers and VMs tab.
-
Determine the grouping of virtual machines that you wish to send a message to:
-
If you wish to send a message to virtual machines distributed across one or more server pools, click on the Server Pools folder in the navigation pane. Select Server Pools from the Perspective drop-down list. Select one or more server pools in the management pane.
-
If you wish to send a message to virtual machines distributed across one or more servers in a particular server pool, expand the Server Pools folder in the navigation pane and select the server pool where the servers reside. Select Servers from the Perspective drop-down list. Select one or more servers in the management pane.
-
If you wish to send a message to one or more virtual machines on a particular server, expand the Server Pools folder in the navigation pane and select the server pool where the servers reside. Select Virtual Machines from the Perspective drop-down list. Select one or more virtual machines in the management pane.
-
-
Click Send VM Messages...
in the perspective toolbar.
The Send Messages to Virtual Machines dialog box is displayed.
-
To create a message, click Create Message...
in the perspective toolbar to display the
Create VM
Message dialog box.
Enter the message key value pair in the Key and Message fields. Check the Log Message field to retain a log of the message. Check the Hide Message field to hide the message of the key/value pair in the user interface. Click OK to save the message and return to the Send Messages to Virtual Machines dialog box.
-
To edit a message, select the message and click Edit...
in the dialog box toolbar. To delete a message, select it and
click Delete
in the dialog box toolbar.
-
Select the Virtual Machines tab to select which running virtual machines are to receive the messages.
Click OK to send the messages to the virtual machines.
3.4.2.12 Generate Report
You can generate an XML report on one or more Oracle VM Servers. For more information about object reporting, see Section 7.1, “Reports”.
-
Select a server pool in the Server Pools folder in the navigation pane.
-
Select the Servers perspective in the management pane.
-
Select one or more Oracle VM Servers in the management pane table.
-
Click
Generate Report in the
management pane toolbar.
-
The report is generated and sent to the browser.
3.4.3 Virtual Machines Perspective
- 3.4.3.1 Edit Virtual Machine
- 3.4.3.2 Delete Virtual Machines
- 3.4.3.3 Start Virtual Machines
- 3.4.3.4 Stop Virtual Machines
- 3.4.3.5 Launch Console
- 3.4.3.6 Launch Serial Console
- 3.4.3.7 Restart Virtual Machines
- 3.4.3.8 Kill Virtual Machines
- 3.4.3.9 Suspend Virtual Machines
- 3.4.3.10 Resume Virtual Machine
- 3.4.3.11 Migrate or Move Virtual Machines
- 3.4.3.12 Clone a Virtual Machine or Template
- 3.4.3.13 Export a Virtual Machine
- 3.4.3.14 Manage Clone Customizers
- 3.4.3.15 Send VM Messages
- 3.4.3.16 View Virtual Machine Configuration File
- 3.4.3.17 Display VM Hierarchy Viewer
- 3.4.3.18 View Virtual Machine Events
- 3.4.3.19 Generate Report
The Virtual Machines perspective lists the different virtual machines that belong to either a server pool or a server or the Unassigned Virtual Machines folder, depending on the item selected in the navigation pane. Note that this perspective is not available for server items listed off the Unassigned Servers folder, since virtual machines cannot be assigned to servers that do not belong to a server pool. The following columns are displayed in the management pane:
-
Name: The name that has been configured for the virtual machine.
-
Status: The running status of the virtual machine.
-
Tag(s): Any tags that have been applied to the virtual machine.
-
Event Severity: What event severity level is currently indicated for the virtual machine.
-
Server: The actual Oracle VM Server that the virtual machine is currently residing on.
-
Max. Memory (MB): The maximum available memory (in megabytes) that the virtual machine is able to consume.
-
Memory (MB): The amount of memory (in megabytes) that the virtual machine is currently consuming.
-
Max. Processors: The number of processors that the virtual machine is allowed to make use of.
-
Processors: The number of processors that the virtual machine is currently using.
-
Keymap: The character keymap that has been configured for the virtual machine.
-
Operating System: The operating system that the virtual machine is running.
Clicking on the arrow to the left of a virtual machine in the table displays a set of subtabs that show more detailed information about the virtual machine. These tabs are Configuration, Networks, and Disks. Click on a tab to display the information:
-
Name: The name that has been configured for the virtual machine.
-
Status: The running status of the virtual machine.
-
Operating System: The operating system type.
-
Keymap: The character keymap that has been configured for the virtual machine.
-
Max. Processors: The maximum number of CPUs that can be allocated.
-
Processors: The number of CPUs that are allocated.
-
Processor Cap: The percentage value configured for the processor cap.
-
Max. Memory (MB): The maximum memory that can be allocated.
-
Memory (MB): The memory that is allocated.
-
Priority: The CPU priority allocated for the virtual machine.
-
Mouse Type: The mouse type configured for the virtual machine.
-
Domain Type: The hypervisor and virtual machine type configured for the virtual machine.
-
Start policy: The start policy configured for the virtual machine.
-
High Availability: Whether or not the High Availability flag is set for the virtual machine.
-
Repository for Configuration File: The repository where the configuration file for the virtual machine is stored.
-
Huge Pages: Whether or not the Huge Pages flag is set for the virtual machine.
-
Boot Order: The configured boot order for disks attached to the virtual machine
-
Network Boot Path: The network boot path configured for the virtual machine.
-
Restart Action On Crash: The configured restart action in the instance that the virtual machine crashes.
-
Restart Action On Power Off: The configured restart action in the instance that the virtual machine receives the power-off signal.
-
Restart Action On Restart: The configured restart action in the instance that the virtual machine receives the restart signal.
-
ID: The ID allocated by Oracle VM Manager for the virtual machine.
-
Origin: The URL that was used to import the virtual machine or template, if it was imported.
-
Description: The description of the virtual machine.
-
Config File Absolute Path: The absolute path to the virtual machine configuration file.
-
Config File Mounted Path: The mount point where the virtual machine configuration file is located on an Oracle VM Server.
-
VNIC: The name of a VNIC configured for the virtual machine.
-
Ethernet Network: The name of the ethernet network that the VNIC is attached to.
-
IP Addresses: IP addresses configured for the VNIC. Note that the virtual machine must be running Oracle VM Guest Additions for this information to be populated. If no IP address is configured for this VNIC, the IP address is displayed as 0.0.0.0.
-
Slot: The slot number for the disk.
-
Disk Type: The type of disk that is attached.
-
Name: The name of the disk within Oracle VM Manager.
-
Size (GiB): The size of the disk.
-
Repository: The repository where the disk is located.
-
Absolute Path: The absolute path to the location of the disk.
-
Mounted Path: The mount point where the disk is located on an Oracle VM Server.
-
Location: The location of the disk as reported by Oracle VM Manager.
If this perspective is viewed from the Unassigned Virtual Machines folder, some of the toolbar icons that are usually available for this perspective are not included in the toolbar. The table below lists all of the toolbar icons that are available for this perspective and indicates the items that are not available when the perspective is viewed from the Unassigned Virtual Machines folder.
|
Toolbar Icon Option |
Icon |
Description |
|---|---|---|
|
|
Displays the Import Virtual Machine dialog box. Use this option to import a virtual machine into Oracle VM Manager. This option is only available for Unassigned Virtual Machines. |
|
|
|
Displays the Edit Virtual Machine wizard. Use this option to edit a virtual machine. |
|
| Delete |
|
Displays the Delete Confirmation dialog box. Use this option to delete the selected virtual machines. |
|
|
Starts up a stopped virtual machine. Not available for Unassigned Virtual Machines. |
|
|
|
Shuts down a virtual machine. Not available for Unassigned Virtual Machines. |
|
|
|
Launches the virtual machine VNC console in an x86-based server pool, which enables access to the virtual machine. Use this option to connect to a virtual machine's console and access the virtual machine directly. Not available for virtual machines in the Unassigned Virtual Machines folder, or virtual machines in a server pool, but not assigned to an Oracle VM Server. |
|
|
|
Launches the virtual machine serial console, which enables access to the virtual machine. Use this option to connect to a virtual machine's serial console and access the virtual machine directly. This service is commonly used for virtual machines running in a SPARC-based server pool, but is also available for virtual machines running on x86-based server pools. Not available for Unassigned Virtual Machines. |
|
|
|
Restarts a running virtual machine. Not available for Unassigned Virtual Machines. |
|
|
|
Shuts down a running virtual machine. Not available for Unassigned Virtual Machines. |
|
|
|
Suspends (pauses) a running virtual machine. Not available for Unassigned Virtual Machines. |
|
|
|
Resumes (unpauses) a suspended virtual machine. Not available for Unassigned Virtual Machines. |
|
|
|
Migrates a virtual machine to another Oracle VM Server, or moves the configuration and virtual disks for a virtual machine to an alternate repository. |
|
|
|
Displays the Clone Virtual Machine dialog box. Use this option to clone a virtual machine to create another virtual machine. |
|
|
|
Displays the Export to Virtual Appliance dialog box. Use this option to export a virtual machine as a virtual appliance. |
|
|
|
Displays the Export Virtual Machine(s) to OCI dialog box. Use this option to export a virtual machine to Oracle Cloud Infrastructure. |
|
|
|
Displays the Manage Clone Customizer dialog box. The clone customizer lets you set up clone parameters, such as networking, disks and ISO resources. Use this option to create, edit or delete a clone customizer. |
|
|
|
Send one or more virtual machines a message. Use this option to send messages to virtual machines that have the Oracle VM Guest Additions installed. Not available for Unassigned Virtual Machines. |
|
|
|
Displays the VM Config File Content dialog box. Displays a read-only view of the configuration file for the selected virtual machine. Use this option to view the content of the virtual machine configuration file. |
|
|
|
Displays a graphical report on a virtual machine. |
|
|
|
Displays the Events dialog box. Displays events for the selected virtual machine. Use this option to view or acknowledge error events for the virtual machine. |
|
|
|
Generate an XML report on one or more virtual machines. |
|
|
|
Displays context sensitive help. |
3.4.3.1 Edit Virtual Machine
Editing a virtual machine to changes the virtual machine configuration. If the virtual machine is running, you cannot edit specific settings such as the mouse device type, domain type, maximum amount of memory, maximum number of processors, restart action on crash, or huge pages support. To edit these settings, the virtual machine must be stopped so that the hypervisor can reload the virtual machine configuration when the virtual machine starts.
-
Click the Servers and VMs tab.
-
Select the server pool on which the virtual machine resides in the navigation tree.
-
Select Virtual Machines from the Perspective drop-down list. Select the virtual machine in the management pane, and click Edit...
in the management pane toolbar
-
The Edit Virtual Machine dialog box is displayed. Select each tab to edit the virtual machine configuration. See Section 3.1.3, “Create Virtual Machine” for the details of each tab. Click OK to save the changes.
NoteIt is not possible to dynamically change resources such as the number or processors or allocated memory for an Oracle Solaris virtual machine without first enabling the drd service on the virtual machine itself. To allow for these changes, connect to the virtual machine and make sure that the drd service is enabled:
# svcadm enable -s drd
# svcs drd
These commands should notify you that the service is online. When you have performed these actions, you are able to use Oracle VM Manager to dynamically change the allocation of resources.
NoteIt is not possible to change the number of virtual network interfaces or virtual disks for a virtual machine while the virtual machine is in a suspended state. Attempting to add or remove such a device results in an exception and an error is returned.
NoteIt is not possible to remove a virtual CD-ROM from a running virtual machine. Doing so results in an exception and an error is returned. To remove virtual CD-ROMs from running virtual machines, you must first stop the virtual machine and then remove the virtual CD-ROM.
3.4.3.2 Delete Virtual Machines
When you delete a virtual machine, all the files and data associated with this virtual machine are removed from Oracle VM Manager. Before deleting a virtual machine, make sure you do not need it any longer. You can only delete a virtual machine when the virtual machine status is Stopped or Error.
-
Click the Servers and VMs tab.
-
Select the server pool on which the virtual machines reside in the navigation tree.
-
Select Virtual Machines from the Perspective drop-down list. Select one or more virtual machines in the management pane, and click Delete
in the management pane toolbar.
-
The Delete Confirmation dialog box is displayed. Select any virtual disks associated with the virtual machines to delete. The virtual machine's physical disks are listed if the storage on which they reside uses a non-generic Oracle VM Storage Connect plug-in. Before any physical disks are deleted, they are removed from any access groups. Click OK to delete the virtual machines and the selected virtual and physical disks.
3.4.3.3 Start Virtual Machines
After a virtual machine is created, you can start it. Starting a virtual machine is analogous to starting a computer by pressing the Power On button.
-
Click the Servers and VMs tab.
-
Select the server pool on which the virtual machines reside in the navigation tree.
-
Select Virtual Machines from the Perspective drop-down list. Select one or more virtual machines in the management pane, and click Start
.
The virtual machines are started.
3.4.3.4 Stop Virtual Machines
When a virtual machine is not in use, you should shut it down to release system resources. Stopping a virtual machine is analogous to a normal shutdown of a physical computer.
If you want to save the state of the virtual machine, you should suspend it. See Section 3.5.2.9, “Suspend Virtual Machines” for information on suspending virtual machines.
In some situations you may not be able to stop a virtual machine, for example, if you have tried to stop it while another job is in progress on the virtual machine such as a start virtual machine job. To resolve this type of situation, you should abort the job that is in progress, then kill the virtual machine. See Section 8.1.5, “Abort Jobs” for information on aborting jobs, and Section 3.5.2.8, “Kill Virtual Machines” for information on killing a virtual machine.
-
Click the Servers and VMs tab.
-
Select the server pool on which the virtual machines reside in the navigation tree.
-
Select Virtual Machines from the Perspective drop-down list. Select one or more virtual machines in the management pane, and click Stop
.
You can also shut down a virtual machine from within the virtual machine, the same way you shut down a physical computer.
After issuing the stop command, the status of the virtual machine is changed to Stopped. However, this only indicates that the command was acknowledged. There is no guarantee that the virtual machine is effectively shut down correctly. This is expected behavior since an operating system running on a physical PC may also hang during the shutdown sequence.
If the virtual machine fails to shut down, you can power it off using the kill virtual machine option, which is similar to unplugging the power cable from a physical machine. To perform a power off (kill) of virtual machines, see Section 3.5.2.8, “Kill Virtual Machines”.
3.4.3.5 Launch Console
The VNC Console can only be used to connect to virtual machines
running on an x86 Oracle VM Server. If you are attempting to connect to
a virtual machine running on Oracle VM Server for SPARC you should use the
serial console. The Launch
Console
![]() is greyed out when Oracle VM Manager detects that the virtual machine is
running on an LDOM hypervisor. See
Section 3.5.2.6, “Launch Serial Console”.
is greyed out when Oracle VM Manager detects that the virtual machine is
running on an LDOM hypervisor. See
Section 3.5.2.6, “Launch Serial Console”.
The VNC Console makes use of noVNC, that uses HTML5 (WebSockets, Canvas) to render a web-based VNC client accessible from any browser that properly supports HTML5. You can find out more about noVNC at http://kanaka.github.io/noVNC/.
The VNC Console is not available for virtual machines in the Unassigned Virtual Machines folder, or virtual machines in a server pool, but not assigned to an Oracle VM Server.
The key mapping for each VNC session is set when you create or edit a virtual machine, in the Keymap field. See Section 3.1.3, “Create Virtual Machine” and Section 3.5.2.1, “Edit Virtual Machine” for information on creating and editing a virtual machine.
-
Click the Servers and VMs tab.
-
Select the server pool on which the virtual machine resides in the navigation tree.
-
Select Virtual Machines from the Perspective drop-down list. Select the virtual machine in the management pane, and click Launch Console
 in the perspective toolbar
-
A new browser window or tab is opened.
TipIf the console does not start, check that your web browser allows pop-ups to be displayed. If you are using Microsoft Internet Explorer, add the base URL of Oracle VM Manager (for example,
http://example.com) to the list of trusted sites in the security settings. You may also need to downgrade the security level from medium to medium-low for the Trusted sites zone.If the virtual machine's console is in use by another user, a message is displayed asking if you want to take over the connection. If you take over the connection, the other user's session is disconnected and the VNC session is started on your client computer. If the VNC client has trouble taking over the connection, you may need to close it and launch the VNC console again.
The virtual machine console is displayed. Log in and interact with the virtual machine as you would through any other VNC session.
Note that, if you open a virtual machine console to a running virtual machine and use the Ctrl-Alt-Delete button to restart the virtual machine, the virtual machine restarts and the console reconnects but the control buttons for the console move out of the visible area in the dialog. This is expected behavior, related to the size of the VNC display returned by Oracle VM Server and the way in which HTML5 canvases work.
To view the control buttons for the virtual machine console after the virtual machine has restarted, you may either extend the right side of dialog, or close the dialog and open it again.
3.4.3.6 Launch Serial Console
You must use the serial console to connect to virtual machines on a SPARC-based server pool instead of the VNC console.
For virtual machines running on x86-based server pools, you should use the VNC console instead of the serial console. Output from the serial console is read-only and non-interactive when you use it to connect to virtual machines running on an x86-based server pool. Additionally, virtual machines running on an x86-based server pool must support, and be configured for, redirecting serial output. See Section 3.4.3.5, “Launch Console” for more information about using the VNC console.
-
Click the Servers and VMs tab.
-
Select the server pool on which the virtual machine resides in the navigation tree.
-
Select Virtual Machines from the Perspective drop-down list. Select the virtual machine in the management pane, and click Launch Serial Console
 in the management pane toolbar
-
A new browser window or tab is opened.
TipIf the console does not start, check that your web browser allows pop-ups to be displayed. If you are using Microsoft Internet Explorer, add the base URL of Oracle VM Manager (for example,
http://example.com) to the list of trusted sites in the security settings. You may also need to downgrade the security level from medium to medium-low for the Trusted sites zone.If the virtual machine's console is in use by another user, a message is displayed asking if you want to take over the connection. If you take over the connection, the other user's session is disconnected and the terminal session is started on your client computer. If the terminal emulator has trouble taking over the connection, you may need to close it and launch the serial console again.
The virtual machine console is displayed. Log in and interact with the virtual machine as you would through any other console session. If required, enter the user name and password of the guest operating system to log in to the operating system.
3.4.3.7 Restart Virtual Machines
Restarting a virtual machine is analogous to rebooting a computer. You may need to restart a virtual machine if an operating system update requires you to restart the virtual machine, for example Microsoft Windows™ updates.
-
Click the Servers and VMs tab.
-
Select the server pool on which the virtual machines reside in the navigation tree.
-
Select Virtual Machines from the Perspective drop-down list. Select one or more virtual machines in the management pane, and click Restart
.
The virtual machines are restarted.
If a virtual machine has not fully started, a restart request may not succeed as the virtual machine may not be ready to initiate the request. In this case, you may need to abort the restart job and try again later. Alternately, kill the virtual machine and start it again.
3.4.3.8 Kill Virtual Machines
Killing a virtual machine is equivalent to performing a power off of a virtual machine, similar to unplugging the power cable from a physical machine. This is not the recommended method of shutting down a virtual machine, but may be used if the shut down command fails to shut down the virtual machine.
-
Click the Servers and VMs tab.
-
Select the server pool on which the virtual machine resides in the navigation tree.
-
Select Virtual Machines from the Perspective drop-down list. Select one or more virtual machines in the management pane, and click Kill
.
The virtual machines are powered off.
3.4.3.9 Suspend Virtual Machines
Suspending a virtual machine is analogous to putting a computer into sleep mode. When a virtual machine is suspended, the current state of the operating system, and applications is saved, and the virtual machine put into a suspended mode. When you resume the virtual machine, the operating system and applications continue from the same point you suspended the virtual machine.
You cannot suspend virtual machines on SPARC-based server pools.
-
Click the Servers and VMs tab.
-
Select the server pool on which the virtual machine resides in the navigation tree.
-
Select Virtual Machines from the Perspective drop-down list. Select one or more virtual machines in the management pane, and click Suspend
 .
.
The virtual machine state is saved and the virtual machines suspended.
To resume the virtual machine, see Section 3.5.2.10, “Resume Virtual Machine”.
3.4.3.10 Resume Virtual Machine
Resuming a suspended virtual machine is analogous to waking up a computer that has been in sleep mode. When you resume a suspended virtual machine, the operating system and applications continue from the same point you suspended the virtual machine.
You cannot resume virtual machines on SPARC-based server pools.
-
Click the Servers and VMs tab.
-
Select the server pool on which the virtual machine resides in the navigation tree.
-
Select Virtual Machines from the Perspective drop-down list. Select the virtual machine to start in the management pane, and click Resume
 .
.
The virtual machine state is retrieved and the virtual machine started according to the VM Start Policy defined for the server pool.
3.4.3.11 Migrate or Move Virtual Machines
The Migrate or Move
![]() option allows you to migrate and move virtual machines by opening
the Migrate or Move Virtual
Machine wizard that allows you to select and perform
the appropriate actions depending on your requirements and the
state of the virtual machine.
option allows you to migrate and move virtual machines by opening
the Migrate or Move Virtual
Machine wizard that allows you to select and perform
the appropriate actions depending on your requirements and the
state of the virtual machine.
It is important to understand that migrating a virtual machine changes the Oracle VM Server or server pool where the virtual machine runs, while moving a virtual machine changes the repository where the virtual machine configuration or virtual disks are located.
A stopped virtual machine can be migrated to any Oracle VM Server, server pool, or to the Unassigned Virtual Machines folder. A running virtual machine can be migrated to any Oracle VM Server within the same server pool.
The steps below assume the virtual machine is deployed to an Oracle VM Server. If the virtual machine is located in the Unassigned Virtual Machines folder, select it in that folder to perform the migration.
-
Click the Servers and VMs tab.
-
Select the server pool on which the virtual machine resides in the navigation tree.
-
Select Virtual Machines from the Perspective drop-down list. Select the virtual machine to migrate in the management pane, and click Migrate or Move
 .
.
The Migrate or Move Virtual Machine dialog box is displayed.
-
Choose the appropriate option from the Migrate or Move Virtual Machine dialog box. Different options are available, depending on if the virtual machine is running or stopped.
If the virtual machine is running, you can select from the following options:
-
Migrate a running VM to a different Server within the
          same Server Pool
This option changes the server where the virtual machine runs. The destination server must be within the same server pool as the source server. Likewise, the destination server must be able to access the virtual machine configuration and storage. You should choose this option to migrate virtual machines between servers within a server pool that use a shared repository.
Select this option and then click Next to proceed as follows:
-
Select the destination server to which you want to migrate the virtual machine from the
Specified
              Server
drop-down list.NoteSome options are disabled because they apply only if you are migrating a virtual machine that is stopped.
-
Click Finish to complete the migration.
-
-
Migrate a running VM, and migrate its local storage,
          to a different Server within the same Server Pool
This option changes the server where the virtual machine runs and moves its local storage. You can choose this option to migrate virtual machines between servers within the same server pool when:
-
At least one virtual disk resides in a repository that is local to the source server.
-
The destination repository is local to the destination server.
NoteIf the virtual machine configuration file resides in a repository that is local to the source server only, the configuration file is copied to the destination repository. If the configuration file resides in a shared repository, it is not copied.
Select this option and then click Next to proceed as follows:
-
Select the destination server to which you want to migrate the virtual machine from the
Server to Migrate
              to
drop-down list. -
Select the destination repository to which you want to move the virtual machine configuration and storage from the
Target Repositorydrop-down list.NoteYou can select only repositories that are hosted on an OCFS2 file system.
-
Click Finish to complete the migration and move the virtual machine configuration and storage.
-
-
Move this VM to a different RepositoryThis option changes the location of the virtual machine.
NoteBeginning in Oracle VM Manager 3.4.6, this option is available when the Migrate or Move Virtual Machine dialog box is displayed for a running virtual machine. This option makes it possible to move a
vm.cfgfile from one repository to another while the virtual machine is in running state by creating an empty clone customizer.ImportantWhen moving a running virtual machine, be sure to create an empty clone customer with no storage mappings attached. If a clone customizer is created with an attached virtual disk that is actively being used by the virtual machine, an error message is returned.
Select this option and then click Next to proceed as follows:
-
Click
Createto create a new empty clone customizer with no storage mappings attached. -
Select the destination repository to which you want to move the virtual machine configuration from the
Target Repositorydrop-down list. -
Click Finish to move the virtual machine.
-
If the virtual machine is stopped, you can select from the following options:
-
Migrate a VM to a different Server, Server Pool, or
          Unassigned State
This option lets you change the virtual machine destination to either the Unassigned Virtual Machines folder or unassigned in the current server pool. This option also lets you change the server or server pool where the virtual machine runs as well as the location of the virtual machine configuration and storage.
Select this option and then click Next to proceed as follows:
-
Select one of the following destinations for the virtual machine:
-
Unassigned Virtual Machines Folder: Removes the virtual machine from the server pool and moves it to the Unassigned Virtual Machines folder.
-
Unassigned in Current Server Pool: Removes the virtual machine from the Oracle VM Server. The virtual machine stays in the same server pool; it is removed from the Oracle VM Server only.
-
Specified Server: Moves the virtual machine to the selected Oracle VM Server. Stopped virtual machines can be migrated to Oracle VM Servers in other server pools that share the same repository, so Oracle VM Servers from other server pools might be listed here.
-
Server Pool: Moves the virtual machine to the selected server pool. Stopped virtual machines can be migrated to other server pools. The virtual machine is not deployed to a particular Oracle VM Server within the destination pool; you must start the virtual machine in the destination server pool to deploy it to an Oracle VM Server.
-
-
Click Finish to complete the migration.
-
-
Move this VM to a different RepositoryThis option changes the location where the virtual machine, and its configuration and local storage, reside. You should choose this option to move the virtual machine between servers in different server pools.
-
Select this option and then click Next to proceed as follows:
-
Select a clone customer from the
Clone Customizerdrop-down list or clickCreateto create a new clone customizer.Clone customizers can be used to determine storage mappings for the virtual machine so that you can define where the virtual disks for a virtual machine should be located.
If you create a new clone customizer, the Create Clone Customizer wizard is displayed. You can read more on the options provided by this wizard in Create a Clone Customizer.
-
Select the destination repository to which you want to move the virtual machine configuration and storage from the
Target Repositorydrop-down list. -
Click Finish to move the virtual machine.
-
-
-
Click the Servers and VMs tab.
-
Select the server pool on which the virtual machines reside in the navigation tree.
-
Select Virtual Machines from the Perspective drop-down list. Select the virtual machines to migrate in the management pane and drag and drop them to the Oracle VM Server, server pool or the Unassigned Virtual Machines folder in the navigation tree to which you want to migrate the virtual machines. See Section 1.13, “Drag and Drop” for information on using the drag and drop feature.
-
The virtual machines are migrated.
3.4.3.12 Clone a Virtual Machine or Template
Cloning a virtual machine or a template means making a copy of it, so that you can create multiple virtual machines or templates from the original.
A clone can also be performed using two other file copy methods: sparse copy, and non-sparse copy. These two cloning methods can be used when cloning from and to different repositories, and when the storage used for the storage repository uses a generic Oracle VM Storage Connect plug-in. These cloning methods are slower than thin cloning, but more versatile.
The virtual machine cloning procedure below uses the same dialog box to clone a virtual machine and a template.
-
Select the virtual machine or template to clone and display the Clone dialog box. You display this dialog box from different locations, depending on whether you are cloning a virtual machine or a template.
-
Virtual Machine: Click the Servers and VMs tab. Select the server pool on which the virtual machine resides in the navigation tree. Select Virtual Machines from the Perspective drop-down list. Select the virtual machine to clone in the management pane, and click Clone Virtual Machine
 .
.
-
Virtual Machine Template: Click the Repositories tab. In the navigation tree, select the repository in which the template resides, then VM Templates. Select the template in the management pane and click Clone Template
.
-
-
The Clone (Virtual Machine or Template) dialog box is displayed.
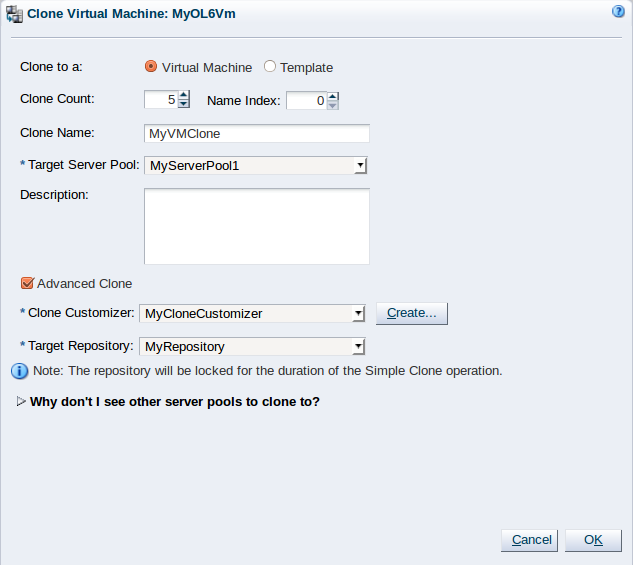
Select or enter the following:
-
Clone to a: Select the clone type, either Virtual Machine or Template, to specify the objects to create from the clone.
-
Clone Count: The number of clones to create.
-
Name Index: The start index number to use for the clone name suffix. The default is
0. This is used in conjunction with the Clone Name field to create the name for each clone. -
Clone Name: An optional name for the virtual machines or templates. The maximum name length is 256 characters and may contain any character. The name need not be unique. If no value is given, the default is the name of the virtual machine or template being cloned. Each clone is suffixed with a dot (.) and the clone index number, starting with the value for the Name Index field. For example, if the Clone Name field is set to
MyVM, and the Name Index field is set to1, the resulting clones would be namedMyVM.1,MyVM.2and so on. -
Target Server Pool: The server pool on which the clone is to be deployed.
NoteThe list of server pools that are available in the drop-down is limited to valid server pools that are capable of handling the cloning process correctly. This helps you to prevent cloning to a server pool that may fail to process the request. If this list is empty, you should refer to the table presented under the Why don't I see other server pools to clone to? element in this dialog.
-
Description: A description for the virtual machines or templates.
-
Advanced Clone: Whether to use a clone customizer to set preferences for the clone operation.
-
Clone Customizer: The clone customizer to create the clones. This is used to set virtual disk mappings to enable you to copy disks to other storage locations. It also allows you to create network mappings so you can use new VNICs and other networks for the clone. Click Create... to create a new clone customizer. See Section 3.5.2.14, “Manage Clone Customizers” for information on creating a clone customizer. This field is enabled if Advanced Clone is checked.
-
Target Repository: The repository to store the cloned virtual machine configuration file. This does not affect any clone disk mappings you set using a clone customizer; this option is only for the virtual machine configuration file. This field is enabled if Advanced Clone is checked.
-
Why don't I see other server pools to clone to? A collapsed window element, providing a table of server pools that do not meet the requirements to accept a clone request. Expanding any of the entries in this table displays the reason that the server pool does not qualify.
TipIf you clone a virtual machine or template without using a clone customizer, the storage repository is locked for the duration of the cloning job; this may be some time in some circumstances. To quickly create clones and not lock the storage repository, use a clone customizer.
Click OK.
-
The virtual machines are created and deployed to the server pool. The templates are created in the storage repository.
It is important to understand that older templates may use a different device type to attach virtual disks. This may affect your ability to attach new virtual disks, such as a virtual CDROM device. There are some limitations on mixing virtual disks of differing device types on a virtual machine. See How are Virtual Disks Managed? in the Oracle VM Concepts Guide for more information about how device types are allocated to virtual disks and what you may need to do to solve any issues surrounding this problem.
3.4.3.13 Export a Virtual Machine
Exporting a virtual machine lets you reuse virtual machines with other instances of Oracle VM, or with other virtualization environments that support the Open Virtualization Format (OVA).
Export to Virtual Appliance
Exporting a virtual appliance lets you reuse virtual machines with other instances of Oracle VM, or with other virtualization environments that support the Open Virtualization Format (OVA).
You can export one or more virtual machines to a virtual appliance. Exporting a virtual machine to a virtual appliance creates an OVA file in the storage repository. The OVA file contains the virtual disk file(s) in VMDK format, an OVF file that holds the virtual machine(s) configuration, and other files such as a manifest and certificate.
-
Click the Servers and VMs tab. Select the server pool on which the virtual machine resides in the navigation tree. Select Virtual Machines from the Perspective drop-down list.
-
Make sure each virtual machine to export is in the Stopped state.
See Section 3.5.2.4, “Stop Virtual Machines” for more information on stopping virtual machines.
-
Select the virtual machine(s) to export in the management pane, and click Export to Virtual Appliance
 .
. -
The Export Virtual Machine(s) to Virtual Appliance dialog box is displayed.

Specify a name for the virtual appliance in the Virtual Appliance Name field and select the storage repository to which you want to save the virtual appliance from the Destination Repository menu and then click OK.
The virtual appliance is located under the Assemblies directory on
the Oracle VM Server instance where the storage repository is presented to, as follows:
/OVS/Repositories/.
See the Chapter 4, Repositories Tab for information about obtaining the repository
and virtual appliance ID. repository_id/Assemblies/virtual-appliance_id/package.ova
Export to Oracle Cloud Infrastructure Using Oracle VM Exporter Appliance
Exporting an Oracle VM virtual machine using the Oracle VM Exporter Appliance transfers the virtual machine to Oracle Cloud Infrastructure. Exporting a virtual machine does not remove the virtual machine from Oracle VM. You can export a virtual machine to other places in Oracle Cloud Infrastructure.
Before using the Oracle VM Exporter Appliance, you must first download and configure the Oracle VM Exporter Appliance Open Virtual Appliance (OVA) and make sure the Oracle VM Exporter Appliance virtual machine is running. For more information, see Installing and Configuring the Oracle VM Exporter Appliance
You can start, one after another, up to four virtual machine exports to run simultaneously (they will not start simultaneously) with a single Oracle VM Exporter Appliance. If you start a fifth export operation for one Oracle VM Exporter Appliance, the export is queued until one of the running exports completes. If you need to run more than four exports at the same time, you can add another Oracle VM Exporter Appliance to the virtual machines. You can only export a stopped virtual machine. A virtual machine being exported by the Oracle VM Exporter Appliance cannot be started.
Before Windows VMs can be exported to OCI, they have to be shutdown without fast restart. To shutdown without fast restart:
-
Use the
shutdown /scommand, or -
Click the Windows Start Button (or Windows symbol button or the Start Menu), then click Power and then press the Shift key while clicking on Shutdown option.
Export a Virtual Machine to Oracle Cloud Infrastructure
-
Click the tab.
-
Select the server pool on which the virtual machine resides in the navigation tree.
-
Select from the drop-down list. You can also select the virtual machine directly if the virtual machine is on the screen.
NoteWindows virtual machines need to have virtio-win drivers installed before exporting to Oracle Cloud Infrastructure. For more information see https://docs.oracle.com/en/operating-systems/oracle-linux/kvm-user/.
-
Stop the virtual machine.
See Section 3.5.2.4, “Stop Virtual Machines” for more information on stopping virtual machines.
-
With the stopped virtual machine highlighted, click the Export to OCI icon (
 ) in the task icon bar
or right-click on the stopped virtual machine and select .
) in the task icon bar
or right-click on the stopped virtual machine and select .The wizard displays information about the Oracle VM Exporter Appliance virtual machine.
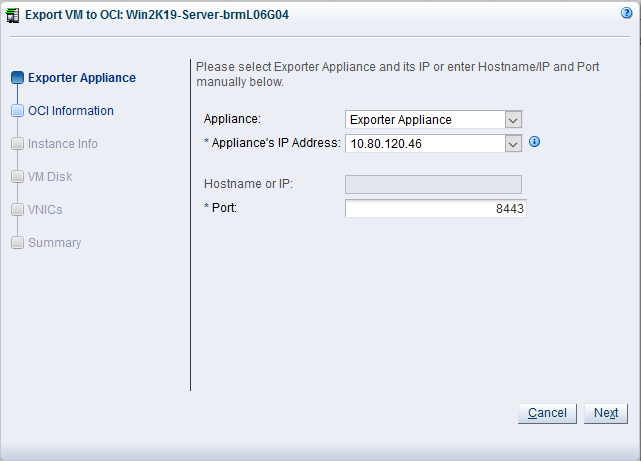
-
Select or enter the following Exporter Appliance information:
-
From the drop-down list, select the name of the Oracle VM Exporter Appliance.
NoteIf you named the Oracle VM Exporter Appliance Exporter Appliance, that name is already filled in. If you have changed the name, you have to select it from a list of virtual machines. One of the choices is , which is an option to enter the information.
-
From the drop-down list, select the IP address of the Oracle VM Exporter Appliance.
NoteThe IP address for the eth0 interface is pre-selected, if it exists. There might be more than one IP address assigned to the Oracle VM Exporter Appliance. Make sure you select the correct one.
If you selected Please Select for the Appliance name, the Appliance's IP Address defaults to .
-
If you selected from the drop-down list, enter the hostname or IP address for the Oracle VM Exporter Appliance.
-
Enter a port number if you have changed the default port number that the Oracle VM Exporter Appliance uses to receive packets.
NoteBe aware that if you change the default port number of 8443 can complicate Oracle VM Exporter Appliance communications.
-
-
Click .
The options display.
-
If the Oracle VM Exporter Appliance has been set up correctly, the and fields display the public key and fingerprint of the Oracle VM Exporter Appliance selected for the export. This public key must be uploaded to Oracle Cloud Infrastructure or the export authentication fails.
The other fields may contain values from previous export operations. These fields contain Oracle Cloud Infrastructure user ID (), Oracle Cloud Infrastructure region (), and Oracle Cloud Infrastructure tenancy ID (). These values are all obtained from an Oracle Cloud Infrastructure tenancy account. For more information on these fields, see Installing and Configuring the Oracle VM Exporter Appliance.
Enter the following Oracle Cloud Infrastructure information:
-
Enter the .
-
Enter the where you want to upload the exported virtual machine.
-
Enter the .
-
-
Click .
Before the options display, the Oracle VM Exporter Appliance validates the information provided with Oracle Cloud Infrastructure account.
NoteIf you get an error here, validate all Oracle Cloud Infrastructure information.
-
Enter information about Oracle Cloud Infrastructure instance.
-
(Optional) Enter a new .
NoteBy default, the instance name is the same as the virtual machine name, but you can enter a customized name between 1 and 255 characters long.
-
Select the from the drop-down list.
-
Select the from the drop-down list.
-
Enter the .
-
-
Click . The options display.
-
Enter additional information about the virtual machine disks exported with the virtual machine to Oracle Cloud Infrastructure.
-
Select the from the drop-down list.
-
Select the from the drop-down list.
-
Select the from the drop-down list.
NoteThe rest of the items are determined by local information.
-
Select the from the drop-down list.
-
(Optional) Change the from the default size. The range for a Linux VM is from 50 GiB to 32 TiB. The range for the Windows VM is from 256 GiB to 32 TiB.
NoteIf the boot volume size entered is less then the actual virtual machine system image (boot disk) size, the export fails in the instance creation phase.
-
(Optional) Check the box next to each disk in the list you want to upload.
NoteYou can select up to 32 disks to upload. ISO images attached to the virtual machine are not uploaded.
The Oracle VM Exporter Appliance lets you select and upload the same shared disk when exporting two or more virtual machines that share the disks. You need to select the shared disk for upload only once when exporting one of the virtual machines that shares the disk. If you select the same shared disk for each virtual machine, you create multiple copies of the same shared disk.
-
-
Click .
The options display.
-
Select or enter the following information about the virtual NICs (vNICs) created and used by Oracle Cloud Infrastructure for the Virtual Cloud Network (VCN) when the export operation has completed.
NoteThe and information is supplied by Oracle VM and cannot be changed.
-
-
Click .
The of your choices display.
-
Once you have entered all the required information, the Oracle VM Exporter Appliance displays a summary of the key information supplied during the wizard navigation. If all information in the summary is correct, click to begin the export operation.
Tracking the Export Operation
The export is a multi-stage operation tracked by an Oracle VM job listed in the running and completed task section of the Oracle VM Manager. You can track the progress of the export to make sure it completes successfully.
-
Once the export process has ended, you can check the details in the Oracle VM Manager virtual machine perspective.
NoteYou can also log into the Oracle VM Exporter Appliance and tail the
vmexporterlog using the following command:$ tail -f /var/log/vmexporter/vmexporter.log -
Even after the export job completes successfully, be sure to check the tab in to make sure the Successfully exported OVM VM to OCI result appears and to see if any other related steps are needed. For example, additional steps are needed to connect a data Block Volume to the exported virtual machine.
-
If you need to connect a data block volume, the directions are listed in the job summary. The steps are different for exported Windows and Linux virtual machines.
Windows virtual machine example:
Successfully exported OVM VM to OCI

OVM VM ID          : <ovm-vm-id>

OCI Instance ID    : <oci-instance-id>
OCI Instance Name  : <oci-instance-name>
OCI Compartment ID : <oci-compartment-id>
OCI OS Type        : Windows - Server 2019 Standard

Additional Disk Data:

One or more data disks have been uploaded to OCI Object Storage as a disk image.
To get your data on the disk block volume, this disk image has to be
    transferred to OCI Instance and written to disk block volume.
Please ensure you have sufficient space to transfer the disk image.


Object Storage Bucket         : <object-storage-bucket-name>
Object Name                   : <object-name>
Object Size                   : 2.0GB
Pre-Authenticated Request URL : <url>
Block Volume ID               : <block-volume-id>
Block Volume Attachment ID    : <block-volume-attachment-id>
Block Volume Attachment Access: READ/WRITE

1. Run these commands in the OCI Instance as an administrator in Windows Powershell
     to connect to the attached block volume.

        Set-Service -Name msiscsi -StartupType Automatic
        Start-Service msiscsi
        iscsicli.exe QAddTargetPortal <ip>
        iscsicli.exe QLoginTarget <iqn>
        iscsicli.exe PersistentLoginTarget <iqn> * * * * * * * * * * * *

2. Download the disk image: <disk-image-location> to the OCI Instance.
3. Go to Disk Management and mark Disk 2 "Online."
4. Write the downloaded disk image to Disk 2 using a Windows Disk Image Writer
     program such as NetBSD Rawrite32.
5. Delete the downloaded disk image from OCI Instance.
6. Delete the disk image '<disk-image-name>'
     from OCI Object Storage.


Object Storage Bucket         : <object-storage-bucket>
Object Name                   : <object-name>
Object Size                   : 1.0GB
Pre-Authenticated Request URL : <url>
Block Volume ID               : <block-volume-id>
Block Volume Attachment ID    : <block-volume-attachment-id>
Block Volume Attachment Access: READ/WRITE

1. Run these commands in the OCI Instance as an administrator in Windows Powershell
     to connect to the attached block volume.

        Set-Service -Name msiscsi -StartupType Automatic
        Start-Service msiscsi
        iscsicli.exe QAddTargetPortal <ip>
        iscsicli.exe QLoginTarget <iqn>
        iscsicli.exe PersistentLoginTarget <iqn> * * * * * * * * * * * * * *

2. Download the disk image: <disk-image-location> to the OCI Instance.
3. Go to Disk Management and mark Disk 3 "Online."
4. Write the downloaded disk image to Disk 3 using a Windows Disk Image Writer program
     such as NetBSD Rawrite32.
5. Delete the downloaded disk image from OCI Instance.
6. Delete the disk image '<disk-image-name>' from
     OCI Object Storage.
Linux virtual machine example:
Successfully exported OVM VM to OCI

OVM VM ID          : <ovm-vm-id>

OCI Instance ID    : <oci-instance-id>
OCI Instance Name  : <oci-instance-name>
OCI Compartment ID : <oci-compartment-id>
OCI OS Type        : Linux

Additional Disk Data:

One or more data disks have been uploaded to OCI Object Storage as a disk image.  To get
     your data on the disk block volume, please install 'iscsi-initiator-utils' and
    'wget' yum packages on your Instance, if not already installed, and do the following:


Object Storage Bucket         : <object-storage-bucket>
Object Name                   : <object-name>
Object Size                   : 2.0GB
Pre-Authenticated Request URL : <url>
Block Volume ID               : <block-volume-id>
Block Volume Attachment ID    : <block-volume-attachment-id>
Block Volume Attachment Access: READ/WRITE

1. Run these commands to connect to the attached block volume:
        sudo iscsiadm -m node -o new -T <iqn> -p <ip:port>
        sudo iscsiadm -m node -o update -T <iqn> -n node.startup -v automatic
        sudo iscsiadm -m node -T <iqn> -p <ip:port> -l
2. Run the following command:
        sudo wget <url> -O /dev/sdb
3. If disk mount in /etc/fstab is with UUID, the disk can be mounted at its mount point.
     If UUID is not used, please update /etc/fstab to use UUID or use /dev/sdb.
4. Reboot the instance and check data in disk block volume. Reboot can be deferred until all
     data disks have been processed.
5. Delete the disk image '<disk-image-name>' from OCI Object
     Storage.


Object Storage Bucket         : <object-storage-bucket>
Object Name                   : <object-name>
Object Size                   : 1.0GB
Pre-Authenticated Request URL : <url>
Block Volume ID               : <block-volume-id>
Block Volume Attachment ID    : <block-volume-attachment-id>
Block Volume Attachment Access: READ/WRITE

1. Run these commands to connect to the attached block volume:
        sudo iscsiadm -m node -o new -T <iqn> -p <ip:port>
        sudo iscsiadm -m node -o update -T <iqn> -n node.startup -v automatic
        sudo iscsiadm -m node -T <iqn> -p <ip:port> -l60 -l
2. Run the following command:
        sudo wget <yrl> -O /dev/sdc
3. If disk mount in /etc/fstab is with UUID, the disk can be mounted at its mount point.
     If UUID is not used, please update /etc/fstab to use UUID or use /dev/sdc.
4. Reboot the instance and check data in disk block volume. Reboot can be deferred until
     all data disks have been processed.
5. Delete the disk image '<disk-image-name>' from OCI
     Object Storage.
You are prompted once for each data disk that the Oracle VM Exporter Appliance has exported.
-
If you have exported a virtual machine with multiple VNICs, there are additional steps needed because of the way that Oracle Cloud Infrastructure handles new virtual machines with multiple VNICs. For more information on this issue and solutions, see https://docs.cloud.oracle.com/en-us/iaas/Content/Network/Tasks/managingVNICs.htm
Connecting a Shared Block Volume to Exported Virtual Machines
You can use the Oracle VM Export to OCI function to export two or more virtual machines that share disks (for example, an OCFS2 cluster) to Oracle Cloud Infrastructure. However, after successful creation of the virtual machine instances in Oracle Cloud Infrastructure, additional steps must be followed to connect the shared Oracle Cloud Infrastructure block volumes and, in the case of an OCFS2 cluster, restart the cluster services.
If you export two or more Oracle VM virtual machines sharing one or more disks (such as an OCFS2 cluster), you should avoid creating duplicate copies of the shared disk in Oracle Cloud Infrastructure. Although you only have to upload the shared disks once with an exported virtual machine, you must attach the shared disks, which are now block volumes in Oracle Cloud Infrastructure, to the other virtual machines after the export succeeds.
The Oracle VM Exporter Appliance does not prevent you from selecting and uploading the same shared disk when exporting two or more virtual machines that share the disks. You need to select the shared disk only once when exporting one of the virtual machines to Oracle Cloud Infrastructure or duplicate, unnecessary copies are created.
As an example of this process, consider a set of three Oracle VM virtual machines (VM1, VM2, and VM3) sharing two disks (Shared Disk1 and Shared Disk2).
You export this group as three virtual machines, but upload the shared disks only once with one of the virtual machines. To avoid duplicated effort and results, these virtual machines and shared disks are exported to Oracle Cloud Infrastructure as two types of export: one virtual machine with the upload of the shared disks, and two virtual machines without any uploaded disks.
So, VM1 has Shared Disk1 and Shared Disk2 attached, but the exported VM2 and VM3 do not.
Because the goal is to establish the original configuration from Oracle VM in Oracle Cloud Infrastructure, the shared disks from Oracle VM, which are now block volumes in Oracle Cloud Infrastructure, must be re-attached to the exported virtual machine instances in Oracle Cloud Infrastructure.
In this case, Shared Disk1 and Shared Disk2 are to be attached to the exported virtual machine instances VM2 and VM3 in Oracle Cloud Infrastructure.
Only VM1's Export Summary of the Export to OCI job has the details to attach Oracle Cloud Infrastructure block volumes to an instance. VM2 and VM3 do not have this information because the shared disks were not exported with VM2 and VM3, only with VM1. However, the same steps listed for VM1 must be repeated for VM2 and VM3.
Once all exports have completed successfully, the following are the high-level steps for connecting an Oracle Cloud Infrastructure shared block volume to an exported virtual machine instance. Some steps have to be repeated for each disk or virtual machine instance:
-
In Oracle Cloud Infrastructure, attach the same set of shared block volumes to the virtual machine instances that share them in Oracle Cloud Infrastructure.
-
For VM1, follow the instructions in the Export Summary (under the Jobs tab) in Oracle VM for a successful export with uploaded shared disks.
-
For VM2 and VM3, follow the instructions in the Export Summary (under the Jobs tab) in Oracle VM for a successful export of virtual machines without uploaded shared disks.
If you have OCFS2 disks attached to the virtual machines you have exported, there are two additional steps to take:
-
In Oracle Cloud Infrastructure, re-establish the cluster and make modifications to the
cluster.conffile for each virtual machine instance that is part of the cluster. This step is necessary because the IP address and hostname are changed when the virtual machine is exported. -
In Oracle Cloud Infrastructure, mount the data disk on the virtual machine instances in the cluster.
Detailed Example
There are three general steps to follow when connecting exported disks to virtual machine instances on Oracle Cloud Infrastructure.
-
In Oracle Cloud Infrastructure, attach the same set of shared block volumes to the virtual machine instances that share them in Oracle Cloud Infrastructure. Information about the block volumes to attach can be found in one of the following ways:
-
In the Export Summary of VM1’s export Job in Oracle VM
-
In the Attached Block Volumes of VM1’s Oracle Cloud Infrastructure instance.
Repeat the following steps for each of the shared volumes (Shared Disk1 and Shared Disk2) that need to be attached to a virtual machine instance (VM2 and VM3):
-
Click on Compute.
-
Click on Instances.
-
Click on the hyperlink for the virtual machine Instance.
-
Click on the Attached Block Volumes in the Resources column.
-
Click on the Attach Block Volume blue button.
-
Enter the applicable information on the Attach Block Volume page:
-
: iSCSI (this is the default).
-
Make sure is selected (this is the default)
-
Make sure the Block Volume from Step 1 above is correct in the drop-down.
NoteFor the drop-down list , make sure you select the same uploaded shared block volume (Shared Disk1 and Shared Disk2) that was attached to the virtual machine sharing the disks (VM1) before the export.
-
: Select
Read/Write -
                    Shareable
-
-
-
If you have not already done so, follow the instructions in the Additional Disk Data section under the Export Summary tab in Job Details of a successful export Job of VM1 in Oracle VM. These instructions are included in the Tracking the Export Operation section above.
NoteFor more information on finding jobs and job details, see Job Details...
-
On VM2 and VM3, which have block volumes that were not uploaded with the virtual machine instance, you must manually attach the shared disks uploaded from Oracle VM.
For Linux-based virtual machine instances, do the following:
-
Run the commands listed under Step 1: Run these commands to connect to the attached block volume under the
Additional Disk
                Data
in the for VM1 in Oracle VM. Shared disks are those with a Block Volume Attachment Access set toRead/Write - Shareable. -
Reboot
For Windows-based virtual machine instances, do the following:
-
Run the commands listed under Step 1: Run these commands in the OCI Instance as an administrator in Windows Powershell to connect to the attached block volume under the
Additional Disk Datain the for VM1 in Oracle VM. Shared disks are those with a Block Volume Attachment Access set toRead/Write - Shareable. -
Go to and mark the disk
Online
-
Detailed Example for OCFS2
There are two more OCFS2-specific steps to follow when connecting exported disks to virtual machine instances on Oracle Cloud Infrastructure. These steps only apply to OCFS2.
-
For OCFS2, in Oracle Cloud Infrastructure, re-establish the cluster and make modifications to the
cluster.conffile for each virtual machine instance that is part of the cluster. This is necessary because the IP address and hostname are changed when the virtual machine is exported.To recreate or re-establish the cluster configuration, do the following:
-
Set the hostname if it is not already set:
$
nmcli general hostname<Fully Qualified Domain Name>$systemct1 restart systemd-hostnamed$vi /etc/hosts<add new hostname and IP address on primary VNIC> -
Verify that the OCFS2 cluster is set to
offline:$
o2cb cluster-status -
Verify that the volumes, labels, and UUIDs are listed.
$
mountd.ocfs2-d -
Perform the next two commands on only one virtual machine instance.
Using the editor, modify the
cluster.conffile to change each node's IP address and hostname to reflect the new IP address (the IP address used for the cluster connection) and hostname of the exported virtual machine instance.$
vi /etc/ocfs2/cluster.confCopy the updated
/etc/ocfs2/cluster.conffile to all other nodes or virtual machine instances that were originally part of the cluster.$
scp /etc/ocfs2/cluster.conf root@<vm_clusterIP>:/etc/ocfs2/ -
Perform the next three commands on all virtual machines in the cluster.
Ping each node or virtual machine cluster IP address from each virtual machine in the cluster. Verify that the ping succeeds, then put the cluster back online.
$
ping$<vm1_cluster_ip...vmN_cluster_ip>/sbin/o2cb.init startVerify that the cluster is back online, the heartbeat is set to
active, and, if the cluster is using global heartbeat, that theUIDof the device being used is the one listed in the output of themountd.ocfs2 -dcommand above.$
/sbin/o2cb.init status
-
-
For OCFS2, in Oracle Cloud Infrastructure, mount the data disk on the virtual machine instances in the cluster.
For each virtual machine instance in the cluster, do the following:
-
Check the
/etc/fstabto verify that the correct device is used to mount the shared block volumes (see the Export Summary above). -
Mount the cluster file systems:
$
mount -d$dfVerify that the shared block volumes are mounted on the cluster file system, and that the files created in Oracle VM still exist, intact, and are the same on all cluster nodes.
-
Once these steps are completed, the OCFS2 disks have been successfully exported from Oracle VM to Oracle Cloud Infrastructure and re-attached.
Accessing the Exported Virtual Machine Serial Console
After exporting a virtual machine with the Oracle VM Exporter Appliance, in some cases you must modify the exported virtual machine's GRUB bootloader to access the serial console.
For Oracle Linux 7 or Oracle Linux 8, which include GRUB2, do the following:
-
Update the
/etc/default/grubfile to include the following:GRUB_TIMEOUT=5 GRUB_DISTRIBUTOR="$(sed 's, release .*$,,g' /etc/system-release)" GRUB_DEFAULT=saved GRUB_DISABLE_SUBMENU=true GRUB_TERMINAL_OUTPUT="console" GRUB_TERMINAL="serial" GRUB_SERIAL_COMMAND="serial --speed=9600 --unit=0 --word=8 --parity=no --stop=1" GRUB_CMDLINE_LINUX="resume=/dev/mapper/ol-swap rd.lvm.lv=ol/root rd.lvm.lv=ol/swap console=ttyS0,9600n8 console=tty0" GRUB_DISABLE_RECOVERY="true" GRUB_ENABLE_BLSCFG=true
-
Regenerate the
grub.cfgfile by running the command$ grub2-mkconfig -o /boot/grub2/grub.cfg
-
Reboot the exported virtual machine to connect it to the serial console.
For information about virtual machine serial console access in Oracle Linux 6, which shipped with GRUB, see My Oracle Support (MOS) article 1505124.1 at http://metalink.oracle.com.
For more information about virtual machine issues, see https://docs.oracle.com/en/virtualization/oracle-vm/3.4/admin/vmadm-tshoot-vmachines.html
Resuming a Failed or Aborted Export Operation
The export operation using the Oracle VM Exporter Appliance is a lengthy process and is tracked in the virtual machine Jobs tab like any other operation. You can resume a failed or aborted export operation attempted by the Oracle VM Exporter Appliance.
When resuming an export operation, you should not change these Oracle Cloud Infrastructure parameters:
-
Tenancy
-
Region
-
Instance Name
-
Storage-related Compartments
To resume an export operation that has failed or been aborted:
-
Make sure you select the virtual machine that has failed or been aborted.
NoteIf the previous export failure was due to a quota limit, a custom image for the virtual machine might exist, depending on when the quota limit was reached. If you delete this custom image, you cannot resume the export operation. However, the custom image is deleted automatically after a successful export operation.
-
Click on the Export to OCI icon from the or right-click the highlighted virtual machine to export, then choose .
The dialog displays.
-
Click .
The or messages display.
-
For a export operation, a window displays the following information:
Previous export attempt of VM <vm-name> failed while
<previous-status-from-returned-data>.
Message: <message-text>
Continuing here will retry from the failed step and resume export operation.
Any changes to Instance configuration will be applied for remainder of the steps.
Changes that pertain to previously completed steps will be ignored.
To discard progress and restart export from beginning, check the checkbox below.

[] Discard state and restart export from beginning
-
Check the option to start the process from the beginning and then click .
From the pop-up window confirm that you want to delete the saved export information by answering
Click to return to the window.
Click to delete the export information and advance to the step to enter new information for the export.
-
Do NOT check the option to start the process from the point of failure and then click .
NoteThe wizard takes you to the step where the previous entries from the failed export have been saved and filled in. You still have the option to make some modifications.
-
-
For an export operation, the window or the window opens and displays the following information:
-
A previous export operation for virtual machine <vm-name> is being
aborted in the backend.
It can take some time to fully abort. A new export operation cannot be started until
the previous export is fully aborted.
Please try again later.
Click to dismiss this message.
-
Message: VM export aborted.
Continuing here will retry from the failed step and resume export operation.
Any changes to Instance configuration will be applied for remainder of the steps.
Changes that pertain to previously completed steps will be ignored.
To discard progress and restart export from beginning, check the checkbox below.

[] Discard state and restart export from beginning
-
Check the option to start the process from the beginning and then click .
From the pop-up window confirm that you want to delete the saved export information by answering
Click to return to the window.
Click to delete the export information and advance to the step to enter new information for the export.
-
Do NOT check the option to start the process from the point where it aborted and then click .
NoteThe wizard takes you to the wizard step where the previous entries from the failed export have been saved and filled in throughout the wizard dialog steps. You still have the option to make modifications.
-
-
-
3.4.3.14 Manage Clone Customizers
Cloning a virtual machine or template means making a copy of it, so that you can create multiple virtual machines or templates from the original. You can create a clone customizer to set up the clone parameters, such as networking, and the virtual disk, and ISO resources. A clone customizer is also used when moving a virtual machine or template.
Create a Clone Customizer
-
Select the virtual machine or template and display the Manage Clone Customizers for (Virtual Machine or Template) dialog box by:
-
Virtual Machine: Click the Servers and VMs tab. Select the server pool on which the virtual machine resides in the navigation tree. Select Virtual Machines from the Perspective drop-down list. Select the virtual machine to clone in the management pane, and click Manage Clone Customizers...
 .
.
-
Virtual Machine Template: Click the Repositories tab. In the navigation tree, select the repository in which the template resides, then VM Templates. Select the template in the management pane and click Manage Clone Customizers
.
-
-
Select Create Clone Customizer...
.
-
The Create a Clone Customizer wizard is displayed.
In the Name and Description step of the wizard, enter a Name and Description for the clone customizer, and click Next.
-
The Storage Mappings step of the wizard is displayed.
Select the following storage mappings:
-
Disk: The disks to include in the clone.
-
Clone Target Type: The type of storage location where the disk is to be created, either a Repository or a Physical Disk.
-
Clone Target: The location on the storage type where the disk is to be created.
-
Clone Type: Whether to use a sparse or non-sparse files for the disk.
CautionWhen sparse virtual disk space allocation is used, the available space in a repository can be over-subscribed. Sparse allocation is useful to increase virtual machine density. However, errors occur if the space allocated to a storage repository becomes exhausted, so the administrator must carefully monitor disk space.
Click Next.
-
-
The Network Mappings step of the wizard is displayed.
Select the Virtual NICss to include in the clone customizer, and the Ethernet Network to which they should belong.
NoteThe network configuration is not changed when moving a virtual machine or template. It is only used when cloning a virtual machine or template.
Click Finish.
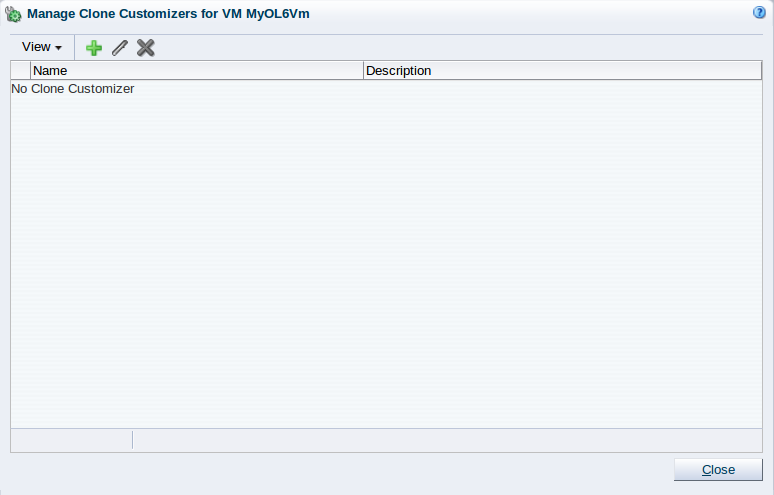

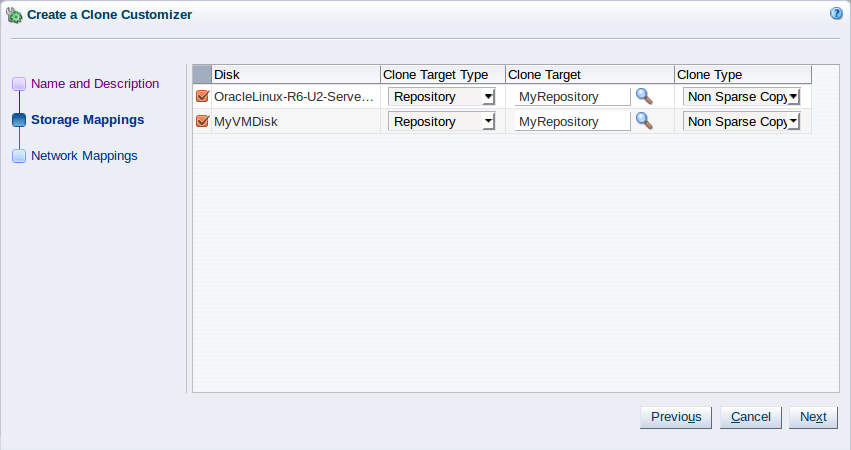
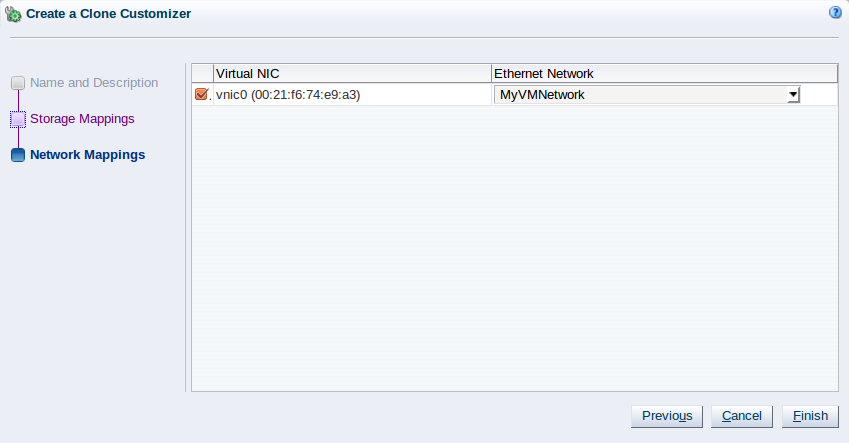
The clone customizer is now available to use to create a virtual machine, or template. See Section 4.7.1.4, “Clone a Virtual Machine or Template” for information on using the clone customizer to create a virtual machine or template.
Edit a Clone Customizer
-
Select the object to which the clone customizer belongs, either a virtual machine, or a virtual machine template. Click Manage Clone Customizers...
.
-
The Manage Clone Customizers for (VM or Template) dialog box is displayed. Select the clone customizer to edit and click Edit Clone Customizer...
.
-
The Edit Clone Customizer dialog box is displayed. Edit the clone customizer.
Click OK. The changes to the clone customizer are saved.
Delete a Clone Customizer
-
Select the object to which the clone customizer belongs, either a virtual machine, or a virtual machine template. Click Manage Clone Customizers...
.
-
The Manage Clone Customizers for (VM or Template) dialog box is displayed. Select the clone customizer to delete and click Delete Clone Customizer
.
-
A dialog box is displayed to confirm you want to delete the clone customizer. Confirm you want to delete the clone customizer and click OK. The clone customizer is deleted.
3.4.3.15 Send VM Messages
You can select one or more virtual machines, Oracle VM Servers or server pools, to select which running virtual machines are populated in the dialog box used to send messages to virtual machines.
To send a virtual machine a message you must have first installed the Oracle VM Guest Additions in the virtual machine. For information on installing the Oracle VM Guest Additions, and a more detailed description of the virtual machine messaging mechanism and its uses, see the Oracle VM Administrator's Guide.
-
Click the Servers and VMs tab.
-
Determine the grouping of virtual machines that you wish to send a message to:
-
If you wish to send a message to virtual machines distributed across one or more server pools, click on the Server Pools folder in the navigation pane. Select Server Pools from the Perspective drop-down list. Select one or more server pools in the management pane.
-
If you wish to send a message to virtual machines distributed across one or more servers in a particular server pool, expand the Server Pools folder in the navigation pane and select the server pool where the servers reside. Select Servers from the Perspective drop-down list. Select one or more servers in the management pane.
-
If you wish to send a message to one or more virtual machines on a particular server, expand the Server Pools folder in the navigation pane and select the server pool where the servers reside. Select Virtual Machines from the Perspective drop-down list. Select one or more virtual machines in the management pane.
-
-
Click Send VM Messages...
in the perspective toolbar.
The Send Messages to Virtual Machines dialog box is displayed.
-
To create a message, click Create Message...
in the perspective toolbar to display the
Create VM
Message dialog box.
Enter the message key value pair in the Key and Message fields. Check the Log Message field to retain a log of the message. Check the Hide Message field to hide the message of the key/value pair in the user interface. Click OK to save the message and return to the Send Messages to Virtual Machines dialog box.
-
To edit a message, select the message and click Edit...
in the dialog box toolbar. To delete a message, select it and
click Delete
in the dialog box toolbar.
-
Select the Virtual Machines tab to select which running virtual machines are to receive the messages.
Click OK to send the messages to the virtual machines.
3.4.3.16 View Virtual Machine Configuration File
You can view the content of a virtual machine configuration file. The content is not editable but you can view and copy the text according to your needs.
-
Click the Servers and VMs tab.
-
Select the server pool on which the virtual machines reside in the navigation tree.
-
Select Virtual Machines from the Perspective drop-down list. Select the virtual machine to which the configuration file belongs. Click VM Config File Content...
 .
.
-
The VM Config File Content dialog box is displayed with the content of the virtual machine configuration file. You can view and copy the text according to your needs.
-
Click OK to close the dialog.
3.4.3.17 Display VM Hierarchy Viewer
You can generate a graphical report on a virtual machine. For more information about object reporting, see Section 7.1, “Reports”.
-
Select a server pool in the Server Pools folder in the navigation pane.
-
Select the Virtual Machines perspective in the management pane.
-
Select a virtual machine in the management pane table.
-
Click
 Display VM Hierarchy Viewer in
the management pane toolbar.
Display VM Hierarchy Viewer in
the management pane toolbar.
The VM Hierarchy Viewer window is displayed. This window contains some extra controls to manipulate the report display. These controls are described in the following table.
Table 3.8 Virtual machine graphical report controlsControl
Purpose

Reposition the hierarchy viewer component within the viewport.

Zoom a hierarchy viewer component so that all nodes are visible within the viewport.

Zoom the hierarchy viewer component.

Hide or show the control panel.

Change the layout of the hierarchy viewer component from the layout you defined to one of the layout options.
-
To create an XML report of the graphical report, click Generate Report. The report is generated and sent to the browser.
3.4.3.18 View Virtual Machine Events
The Events perspective is common to many elements within the Oracle VM Manager Web Interface. The Events perspective generally appears as an option within the Perspectives drop-down menu on the management pane of tabs that include a navigation tree. In this case, the Events perspective displays events specific to the item selected in the navigation tree and presents these in the management pane.
The Events perspective may also appear within a dialog that is
triggered from a Display Selected
Events... ![]() perspective toolbar option. In this case,
the Events perspective dialog displays events specific to one
or more elements selected in the management pane.
perspective toolbar option. In this case,
the Events perspective dialog displays events specific to one
or more elements selected in the management pane.
If an object has an error event associated with it you must acknowledge the event to clear the error and return the object to normal operations. For example, this can occur if an Oracle VM Server or virtual machine appear as Stopped (Error) in the status. The object in error is flagged with a red icon in the navigation tree. Oracle VM Servers, virtual machines, repositories and storage objects can have error events associated with them.
Since Oracle VM Manager attempts to resolve issues automatically as much as possible, not all events can be acknowledged by a user within the Oracle VM Manager Web Interface. Therefore, a flag is set for events that are user acknowledgeable. If an event does not have this flag set, you are unable to acknowledge it, since it is handled internally by Oracle VM Manager.
The Events perspective or dialog contains a table with the following columns of information for each event:
-
Severity: The severity level assigned to the event.
-
Timestamp: The date and time that the event occurred.
-
Modify Time: The last recorded date and time that the event was modified.
-
Type: The type of event according to Oracle VM Manager's event categorization model.
-
Summary: A summary description of the event.
-
Acknowledged: Whether an error event has been acknowledged.
-
User Acknowledgeable: Whether or not an event can be acknowledged by the user.
Event Descriptions
An arrow displays next to each event in the table. Click the arrow to expand and view the Description section that provides additional details for the event.
The Events perspective or dialog contains a perspective toolbar with the following options:
|
Toolbar Icon Option |
Icon |
Description |
|---|---|---|
|
Acknowledge |
|
Acknowledge a selected error event to clear the error and return the object to normal operations. Note that this option is only available for user acknowledgeable events. |
|
Acknowledge All |
|
Acknowledge all error events associated with an object to clear the errors and return the object to normal operations. Note that only user acknowledgeable events are cleared. This button is always clickable, even if there are no user acknowledgeable events. Clicking it when there are no user acknowledgeable events results in an error dialog. |
|
Display Count |
A drop-down menu that allows you to select the number of events that should be displayed in the management pane, while you are currently in this perspective. |
Acknowledging Events/Errors
If an object has an error event associated with it you must acknowledge the event to clear the error and return the object to normal operations. For example, this can occur if an Oracle VM Server or virtual machine appear as Stopped (Error) in the status. The object in error is flagged with a red icon in the navigation tree. Oracle VM Servers, virtual machines, repositories and storage objects can have error events associated with them. The following procedures show you how to clear errors and return the object to normal operations.
-
Click the Servers and VMs tab.
-
Select the Oracle VM Server in the navigation tree.
-
Select Events from the Perspective drop-down list in the management pane.
-
Select the user acknowledgeable error event and click Acknowledge
 , or click
Acknowledge All
, or click
Acknowledge All
 to clear all user acknowledgeable
errors.
to clear all user acknowledgeable
errors.
-
Click the Servers and VMs tab.
-
Select the server pool, or Oracle VM Server on which the virtual machine resides in the navigation tree.
-
Select Virtual Machines from the Perspective drop-down list in the management pane.
-
Select the virtual machine in the management pane table. Click Display Selected VM Events...
 .
.
-
The Events dialog box is displayed. Select the user acknowledgeable error event and click Acknowledge
, or click
Acknowledge All
to clear all user acknowledgeable
errors. Click
Close.
-
Click the Repositories tab.
-
Select the repository in the navigation tree.
-
Select Events from the Perspective drop-down list in the management pane.
-
Select the error event and click Acknowledge
, or click
Acknowledge All
to clear all errors.
-
Click the Storage tab.
-
Select File Servers, SAN Servers, or a storage server in the navigation tree.
-
Select Events from the Perspective drop-down list in the management pane.
-
Select the user acknowledgeable error event and click Acknowledge
, or click
Acknowledge All
to clear all user acknowledgeable
errors.
3.4.3.19 Generate Report
You can generate an XML report on one or more virtual machines. For more information about object reporting, see Section 7.1, “Reports”.
-
Select a server pool in the Server Pools folder in the navigation pane.
-
Select the Virtual Machines perspective in the management pane.
-
Select one or more virtual machines in the management pane table.
-
Click
Generate Report in the
management pane toolbar.
-
The report is generated and sent to the browser.
3.4.4 Anti-Affinity Groups Perspective
The Anti-Affinity Groups perspective lists the different anti-affinity groups that have been created and the virtual machines that belong to them.
Anti-affinity groups specify that specific virtual machines should never run on the same Oracle VM Server. An anti-affinity group applies to all the Oracle VM Servers in a server pool. You may want to set up anti-affinity groups when you want to build-in redundancy or load balancing of specific applications in your environment.
If you add a virtual machine to an anti-affinity group that already has a virtual machine in the group running on the same Oracle VM Server, the job is aborted and the virtual machine is not added to the group. To add the virtual machine to the anti-affinity group, migrate it to another Oracle VM Server, then add it to the group.
The following columns are displayed in the management pane:
-
Name: The name that has been configured for the anti-affinity group.
-
Description: The description that has been configured for the anti-affinity group.
-
Virtual Machines: A comma-separated list of the virtual machines that belong to the anti-affinity group.
This perspective includes a toolbar that consists of the following options:
|
Toolbar Icon Option |
Icon |
Description |
|---|---|---|
|
|
Displays the Create Anti-Affinity Group wizard. Use this option to create a new anti-affinity group. |
|
|
|
Displays the Edit Create Anti-Affinity Group dialog box. Use this option to change the configuration for an anti-affinity group. |
|
|
|
Displays the Delete Confirmation dialog box. Use this option to delete the selected anti-affinity group.. | |
|
|
Displays context sensitive help. |
3.4.4.1 Create Anti-Affinity Group
-
Click the Servers and VMs tab. Select a server pool in the navigation pane.
-
From the Perspective field in the management pane, select Anti-Affinity Group from the drop-down list. Click Create New Anti-Affinity Group...
in the perspective toolbar.
-
The Create Anti-Affinity Group wizard is displayed.
Enter the anti-affinity group information:
-
Anti-Affinity Group Name: Enter the name of the anti-affinity group.
-
Description: A description of the anti-affinity group.
Click Next.
-
-
The Select Virtual Machines step of the Create Anti-Affinity Group wizard is displayed.
Select the virtual machines to include in the anti-affinity group and move them from the Available Virtual Machines column to the Selected Virtual Machines column.
Click Finish.
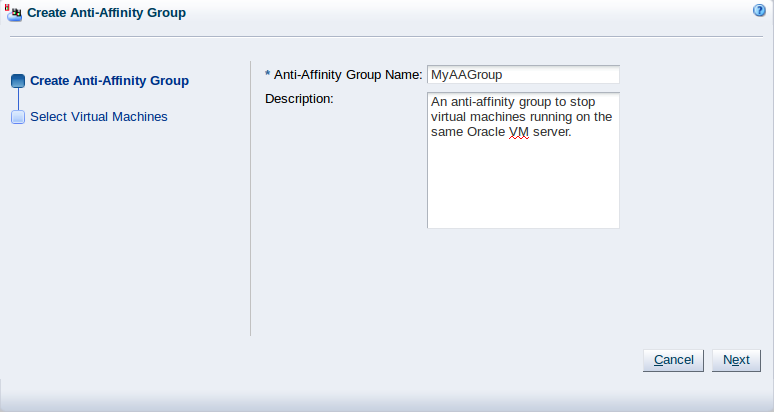
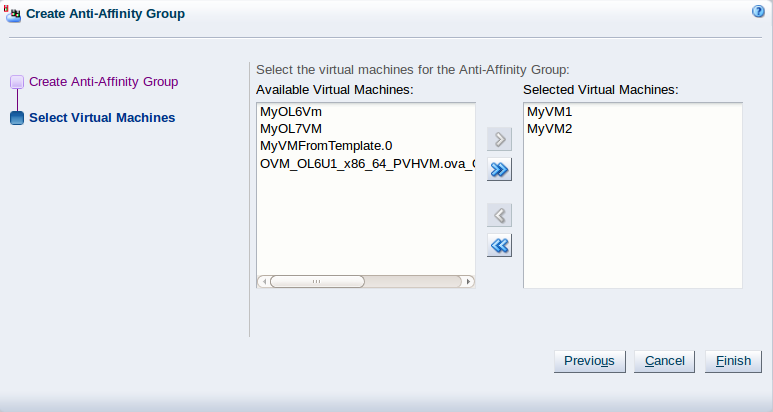
The anti-affinity group is created and listed in the Anti-Affinity Group table in the management pane.
3.4.4.2 Edit Anti-Affinity Group
-
In the Servers and VMs tab, select the server pool to which the anti-affinity group belongs in the navigation pane.
-
From the Perspective field in the management pane, select Anti-Affinity Group from the drop-down list. Select the anti-affinity group in the Anti-Affinity Group table and click Edit Anti-Affinity Group...
in the perspective toolbar.
-
The Edit Anti-Affinity Group dialog box is displayed. Edit the anti-affinity group as required. To edit the virtual machines in the anti-affinity group, click the Virtual Machines tab. For more information on the tabs in this wizard, see Section 3.4.4.1, “Create Anti-Affinity Group”.
Click OK.
The anti-affinity group is edited and displayed in the Anti-Affinity Group table in the management pane.
3.4.4.3 Delete Anti-Affinity Group
-
In the Servers and VMs tab, select the server pool to which the anti-affinity group belongs in the navigation pane.
-
From the Perspective field in the management pane, select Anti-Affinity Group from the drop-down list. Select the anti-affinity group in the Anti-Affinity Group table and click Delete Anti-Affinity Group...
in the perspective toolbar.
-
A confirmation dialog box is displayed. Click OK to delete the anti-affinity group.
The anti-affinity group is deleted.
3.4.5 Policies Perspective
The Policies perspective provides information about the policies that are currently configured for a server pool. These policies define how virtual machines are managed across the server pool depending on power or resource consumption. Policies also apply to network availability and are applied here as well.
The following information is available in this perspective:
-
Policy Control
-
Policy Type: If a policy is set, this field indicates the type of policy applied (either DRS or DPM).
-
Time Period (minutes): The number of minutes between policy job runs.
-
-
Server Processors
-
Enable: Whether or not CPU performance and utilization are logged for policy enactment.
-
Threshold (%): The maximum amount of CPU percentage usage allowed before the policy must be enacted. You can enter a number between 25 and 99.
-
-
Servers
-
Servers: A comma-separated list of the servers to which the policy applies.
-
-
Networks: Displays a table of networks and how the policy applies. The following columns are included in the table:
-
Network: The name of the network that the policy applies to.
-
Enable: Whether the policy is enabled on the network.
-
Threshold (%): The percentage threshold of network usage that triggers the policy. You can enter a number between 25 and 99.
-
This perspective includes a toolbar that consists of the following options:
3.4.5.1 Define or Edit Server Pool Policies
It is possible to define server pool policies to improve power and resource usage across the servers within your server pool. The two policies you can set are for:
-
Distributed Resource Scheduling (DRS): Optimizes virtual machine resource utilization in a server pool.
-
Distributed Power Management (DPM): Increases the consolidation ratio to use fewer Oracle VM Servers during periods of relative low resource utilization.
The policy is also able to be set for networks used in a server pool. You can set the server pool to use either DRS, or DPM, but not both at the same time.
See What are Server Pool Policies? in the Oracle VM Concepts Guide for more information on these server pool policies.
-
Click the Servers and VMs tab.
-
Select the server pool in the Server Pools folder in the navigation pane.
-
From the Perspective field in the management pane, select Policies from the drop-down list. Click Edit
in the toolbar. The Configure
Policy step of the Configure
DRS/DPM wizard is displayed.
Enter the server pool policy information:
-
Policy Control:
-
Policy Type: You can choose from either DRS, DPM, or none. You cannot set both DRS and DPM to be active at the same time.
-
Time Period (Minutes): The time period for the policy job to run. This sets the policy job to run every n minutes, for example, 10 sets the policy job to run every 10 minutes. You can enter a number between 2 and 60.
-
-
Server CPU:
-
Enable: Set whether to enable or disable logging of CPU performance and utilization.
-
Threshold (%): The maximum amount of CPU percentage usage allowed before the policy must be enacted. You can enter a number between 25 and 99.
NoteThe Enable check box must be selected before a value can be specified for the Threshold (%) field.
-
-
Servers: Select the Oracle VM Servers for which the policy is to be enabled by moving the selected Oracle VM Servers from the Available Servers to the Selected Servers shuttle box.
Click Next.
-
-
The Select Networks step of the Configure DRS/DPM wizard is displayed.
Select the networks to be included in the policy. Click Next.
-
The Network Settings step of the Configure DRS/DPM wizard is displayed.
Select whether to enable the policy on the network, and select the threshold at which the policy is to be enacted for the network. Click Finish.
The policy is set for the server pool.
3.4.6 Server Update Repositories Perspective
The Server Update Repositories perspective provides the facilities to add, edit and delete server update (YUM or IPS) repositories for a server pool. These repositories override any repositories for Oracle VM Servers set up in the Server Updates Group subtab of the Reports and Resources tab (seeSection 7.3, “Server Update Groups”). Before you can create a server update group for a server pool, make sure the server pool allows the global repositories to be overridden using the Override Global Server Update Group check box in the Edit Server Pool dialog box. See Section 3.3.1.5, “Edit Server Pool” for information on editing a server pool.
These options can be accessed using the toolbar at the top of the tab when you click on an item within the management pane table.
The following columns are displayed in the management pane:
-
Name: The name that has been configured for the repository.
-
Repository Name: The unique name that has been configured for the repository.
-
Enabled: Whether the repository is enabled.
-
Package Signature Type: The type of verification signature for the repository.
-
URL: The URL for the repository.
-
Description: The description that has been configured for the repository.
This perspective includes a toolbar that consists of the following options:
|
Toolbar Icon Option |
Icon |
Description |
|---|---|---|
|
|
Displays the Create Server Update Repository dialog box. Use this option to create a new server update repository. |
|
|
|
Displays the Edit Server Update Repository dialog box. Use this option to edit an existing server update repository. |
|
|
|
Displays the Delete Confirmation dialog box. Use this option to delete the selected server update repository. |
|
|
|
Displays context sensitive help. |
3.4.6.1 Create Server Update Repository
-
Click the Servers and VMs tab. Select a server pool in the navigation pane.
-
From the Perspective field in the management pane, select Server Update Repositories from the drop-down list.
-
Click Create New Server Update Repository
in the toolbar to display the Create
Server Update Repository dialog box. Enter or select
the fields as described in
Section 7.3.1, “Create New Server Update Repository” to create the
server update repository. Click
OK.
The server update repository is created.
3.4.6.2 Edit Server Update Repository
-
Click the Servers and VMs tab. Select a server pool in the navigation pane.
-
From the Perspective field in the management pane, select Server Update Repositories from the drop-down list.
-
Select a repository from the table in the management pane.
-
Click Edit Server Update Repository
in the toolbar to display the Edit Server
Update Repository dialog box. Enter or select the
fields as described in
Section 7.3.1, “Create New Server Update Repository” to edit the
server update repository. Click
OK.
The server update repository is updated.
3.4.6.3 Delete Server Update Repository
-
Click the Servers and VMs tab. Select a server pool in the navigation pane.
-
From the Perspective field in the management pane, select Server Update Repositories from the drop-down list.
-
Select a repository from the table in the management pane.
-
Click Delete Server Update Repository
. -
A confirmation dialog is displayed. Click OK to delete the repository.
The server update repository is deleted.
3.4.7 Events Perspective
The Events perspective is common to many elements within the Oracle VM Manager Web Interface. The Events perspective generally appears as an option within the Perspectives drop-down menu on the management pane of tabs that include a navigation tree. In this case, the Events perspective displays events specific to the item selected in the navigation tree and presents these in the management pane.
The Events perspective may also appear within a dialog that is
triggered from a Display Selected
Events... ![]() perspective toolbar option. In this case,
the Events perspective dialog displays events specific to one
or more elements selected in the management pane.
perspective toolbar option. In this case,
the Events perspective dialog displays events specific to one
or more elements selected in the management pane.
If an object has an error event associated with it you must acknowledge the event to clear the error and return the object to normal operations. For example, this can occur if an Oracle VM Server or virtual machine appear as Stopped (Error) in the status. The object in error is flagged with a red icon in the navigation tree. Oracle VM Servers, virtual machines, repositories and storage objects can have error events associated with them.
Since Oracle VM Manager attempts to resolve issues automatically as much as possible, not all events can be acknowledged by a user within the Oracle VM Manager Web Interface. Therefore, a flag is set for events that are user acknowledgeable. If an event does not have this flag set, you are unable to acknowledge it, since it is handled internally by Oracle VM Manager.
The Events perspective or dialog contains a table with the following columns of information for each event:
-
Severity: The severity level assigned to the event.
-
Timestamp: The date and time that the event occurred.
-
Modify Time: The last recorded date and time that the event was modified.
-
Type: The type of event according to Oracle VM Manager's event categorization model.
-
Summary: A summary description of the event.
-
Acknowledged: Whether an error event has been acknowledged.
-
User Acknowledgeable: Whether or not an event can be acknowledged by the user.
Event Descriptions
An arrow displays next to each event in the table. Click the arrow to expand and view the Description section that provides additional details for the event.
The Events perspective or dialog contains a perspective toolbar with the following options:
|
Toolbar Icon Option |
Icon |
Description |
|---|---|---|
|
Acknowledge |
|
Acknowledge a selected error event to clear the error and return the object to normal operations. Note that this option is only available for user acknowledgeable events. |
|
Acknowledge All |
|
Acknowledge all error events associated with an object to clear the errors and return the object to normal operations. Note that only user acknowledgeable events are cleared. This button is always clickable, even if there are no user acknowledgeable events. Clicking it when there are no user acknowledgeable events results in an error dialog. |
|
Display Count |
A drop-down menu that allows you to select the number of events that should be displayed in the management pane, while you are currently in this perspective. |
Acknowledging Events/Errors
If an object has an error event associated with it you must acknowledge the event to clear the error and return the object to normal operations. For example, this can occur if an Oracle VM Server or virtual machine appear as Stopped (Error) in the status. The object in error is flagged with a red icon in the navigation tree. Oracle VM Servers, virtual machines, repositories and storage objects can have error events associated with them. The following procedures show you how to clear errors and return the object to normal operations.
-
Click the Servers and VMs tab.
-
Select the Oracle VM Server in the navigation tree.
-
Select Events from the Perspective drop-down list in the management pane.
-
Select the user acknowledgeable error event and click Acknowledge
, or click
Acknowledge All
to clear all user acknowledgeable
errors.
-
Click the Servers and VMs tab.
-
Select the server pool, or Oracle VM Server on which the virtual machine resides in the navigation tree.
-
Select Virtual Machines from the Perspective drop-down list in the management pane.
-
Select the virtual machine in the management pane table. Click Display Selected VM Events...
.
-
The Events dialog box is displayed. Select the user acknowledgeable error event and click Acknowledge
, or click
Acknowledge All
to clear all user acknowledgeable
errors. Click
Close.
-
Click the Repositories tab.
-
Select the repository in the navigation tree.
-
Select Events from the Perspective drop-down list in the management pane.
-
Select the error event and click Acknowledge
, or click
Acknowledge All
to clear all errors.
-
Click the Storage tab.
-
Select File Servers, SAN Servers, or a storage server in the navigation tree.
-
Select Events from the Perspective drop-down list in the management pane.
-
Select the user acknowledgeable error event and click Acknowledge
, or click
Acknowledge All
to clear all user acknowledgeable
errors.
3.5 Server Item
- 3.5.1 Info Perspective
- 3.5.2 Virtual Machines Perspective
- 3.5.3 CPUs Perspective
- 3.5.4 Ethernet Ports Perspective
- 3.5.5 Bond Ports Perspective
- 3.5.6 Physical Disks Perspective
- 3.5.7 Storage Initiators Perspective
- 3.5.8 Control Domains Perspective
- 3.5.9 Repository Exports Perspective
- 3.5.10 Events Perspective
Each server configured within the environment is displayed as a server navigation item belonging to either a particular server pool navigation item, or to the Unassigned Servers folder. These server navigation items are labelled according to the server name that is configured within Oracle VM Manager. The structure of the navigation provided in the navigation tree is discussed in more detail in Section 3.2, “Summary”.
Clicking on a server navigation item in the navigation tree allows you to access different perspectives in the management pane. Each perspective provides its own view of the server within Oracle VM Manager. Most of the perspectives also include separate perspective toolbars that enable you to perform various configuration or management tasks specific to the view currently displayed within the management pane. A server navigation item offers the following perspectives within the management pane:
3.5.1 Info Perspective
The Info perspective is common to many elements within the Oracle VM Manager Web Interface. This perspective always shows the individually configured parameters for an item that is currently selected in the navigation tree. Some of these configured parameters may be automatically populated through a discovery process, while others may have been configured manually during the creation of the object that is selected.
The Info perspective or dialog contains a perspective toolbar with the following options:
|
Toolbar Icon Option |
Icon |
Description |
|---|---|---|
|
|
Displays context sensitive help. |
This perspective includes the following information:
-
Server Name: The configured name for the server.
-
Host Name: The hostname of the server on the management network channel.
-
Status: The running status of the server. If the status is
UNKNOWN, this may be because the server is not owned by the instance of Oracle VM Manager. To take ownership of an Oracle VM Server, see Section 3.4.2.2, “Edit Server”. -
Processors: The number of processors on the server.
-
Ethernet Ports: The number of Ethernet ports detected on the server.
-
Maintenance Mode: Whether or not the server is configured in maintenance mode.
-
Inbound Migration Locked: Whether or not the server allows additional virtual machines to run.
-
Ownership: Whether or not the server is owned by the current Oracle VM Manager instance.
-
Server Pool: The name of the server pool that the server belongs to.
-
Roles: Whether the server has the Utility Server role, VM Server role, or both.
-
NTP Servers: A list of NTP servers that are configured for the server.
-
Description: The description provided for the server when it was created or edited.
-
IP Address: The configured IP address for the server.
-
Processor Speed (GHz): The speed of the processors on the server.
-
Memory (GiB): The memory on the server in GiB.
-
Bond Ports: The number of bond ports that are configured on the server.
-
CPU Compatibility Group: The name of the server processor compatibility group that the server belongs to.
-
Processor Type: The processor type used for the server.
-
Hypervisor Type: The hypervisor used for the server.
-
Up To Date: Whether or not the server has the most recent update from the server update repository.
-
Version: The version number of the Oracle VM Server software on the server.
-
Advanced:
-
ID: The UUID assigned to the server by Oracle VM Manager.
-
Manufacturer: The manufacturer of the server reported by the server BIOS.
-
Serial Number: The serial number of the server reported by the server BIOS.
-
Product Name: The product name of the server reported by the server BIOS.
-
Processor Family: The processor family reported by the server BIOS.
-
Processor Model: The processor model reported by the server BIOS.
-
Cache Size (KB): The processor cache size reported by the server BIOS.
-
BIOS Version: The BIOS version number for the server.
-
BIOS Release Date: The BIOS version release date for the server.
-
Sockets Filled: The number of processor sockets that are in use on the server.
-
Manager UUID: The UUID of the Oracle VM Manager instance that owns this server.
-
-
Server Abilities:
-
Cluster: Whether or not the server supports clustering.
-
Nfs: Whether or not the server is capable of mounting NFS shares.
-
iSCSI: Whether or not the server is capable of mounting iSCSI LUNs.
-
Fibre Channel: Whether or not the server is capable of mounting Fibre Channel LUNs.
-
HighAvailability: Whether or not the server supports high availability for virtual machines.
-
VMSuspend: Whether or not the server supports suspending a virtual machine.
-
Per VM CPUOverSubscribe: Whether or not each virtual machine can be configured to perform CPU over-subscription.
-
All VM CPUOverSubscribe: Whether or not all virtual machines on the server can be configured to perform CPU over-subscription.
-
Bondmode Active Backup: Whether or not the server supports active backup network bonds.
-
Bondmode Link Aggregation: Whether or not the server supports link aggregation network bonds.
-
Bondmode Load Balanced: Whether or not the server supports load balancing for a network bonds.
-
Mtu Configuration: Whether or not MTU settings for network interfaces can be configured on the server.
-
Local Storage Element: Whether or not a local disk be used for storage on a server.
-
VM Memory Alignment: The size of the data alignment block that is used for offsetting memory requirements for each virtual machine to ensure better performance.
-
Vnc Console: Whether or not the server supports VNC.
-
Serial Console: Whether or not the server supports Serial Console.
-
Migration Setup: An internal facility to perform setup requirements for virtual machine migration, typically used for SPARC deployments.
-
Vm Live Storage Migration: Whether or not the server supports migration of virtual machines that have virtual disks located on a repository hosted on local storage.
-
HVM Max Vnics: The maximum number of VNICs that can be assigned to a hardware virtualized virtual machine.
-
Server Package Update: Whether or not the server supports package updates.
-
PowerOn WOL: Whether or not the server supports Wake On LAN.
-
Repo On SharedDisk: Whether or not the server supports a repository on a shared disk, such as iSCSI or Fibre Channel.
-
Repo On LocalDisk: Whether or not the server supports a repository on a local disk.
-
ClusterFs On PhysicalDisk: Whether or not the server is capable of creating an OCFS2 file system on a physical disk, such as an iSCSI LUN or Fibre Channel LUN.
-
VmEmptyCdrom: Whether or not the server supports an empty virtual CDROM on a virtual machine. SPARC servers do not support an empty virtual CDROM.
-
Vm Restart Actions: Whether or not the server supports different restart actions in the event that a virtual machine crashes.
-
Vm Live Storage Migration: Whether or not the server supports migrating a running virtual machine and virtual disks from one local repository to another.
-
This perspective includes a toolbar that consists of the following options:
|
Toolbar Icon Option |
Icon |
Description |
|---|---|---|
|
|
Displays context sensitive help. |
3.5.2 Virtual Machines Perspective
- 3.5.2.1 Edit Virtual Machine
- 3.5.2.2 Delete Virtual Machines
- 3.5.2.3 Start Virtual Machines
- 3.5.2.4 Stop Virtual Machines
- 3.5.2.5 Launch Console
- 3.5.2.6 Launch Serial Console
- 3.5.2.7 Restart Virtual Machines
- 3.5.2.8 Kill Virtual Machines
- 3.5.2.9 Suspend Virtual Machines
- 3.5.2.10 Resume Virtual Machine
- 3.5.2.11 Migrate or Move Virtual Machines
- 3.5.2.12 Clone a Virtual Machine or Template
- 3.5.2.13 Export a Virtual Machine
- 3.5.2.14 Manage Clone Customizers
- 3.5.2.15 Send VM Messages
- 3.5.2.16 View Virtual Machine Configuration File
- 3.5.2.17 Display VM Hierarchy Viewer
- 3.5.2.18 View Virtual Machine Events
- 3.5.2.19 Generate Report
The Virtual Machines perspective lists the different virtual machines that belong to either a server pool or a server or the Unassigned Virtual Machines folder, depending on the item selected in the navigation pane. Note that this perspective is not available for server items listed off the Unassigned Servers folder, since virtual machines cannot be assigned to servers that do not belong to a server pool. The following columns are displayed in the management pane:
-
Name: The name that has been configured for the virtual machine.
-
Status: The running status of the virtual machine.
-
Tag(s): Any tags that have been applied to the virtual machine.
-
Event Severity: What event severity level is currently indicated for the virtual machine.
-
Server: The actual Oracle VM Server that the virtual machine is currently residing on.
-
Max. Memory (MB): The maximum available memory (in megabytes) that the virtual machine is able to consume.
-
Memory (MB): The amount of memory (in megabytes) that the virtual machine is currently consuming.
-
Max. Processors: The number of processors that the virtual machine is allowed to make use of.
-
Processors: The number of processors that the virtual machine is currently using.
-
Keymap: The character keymap that has been configured for the virtual machine.
-
Operating System: The operating system that the virtual machine is running.
Clicking on the arrow to the left of a virtual machine in the table displays a set of subtabs that show more detailed information about the virtual machine. These tabs are Configuration, Networks, and Disks. Click on a tab to display the information:
-
Name: The name that has been configured for the virtual machine.
-
Status: The running status of the virtual machine.
-
Operating System: The operating system type.
-
Keymap: The character keymap that has been configured for the virtual machine.
-
Max. Processors: The maximum number of CPUs that can be allocated.
-
Processors: The number of CPUs that are allocated.
-
Processor Cap: The percentage value configured for the processor cap.
-
Max. Memory (MB): The maximum memory that can be allocated.
-
Memory (MB): The memory that is allocated.
-
Priority: The CPU priority allocated for the virtual machine.
-
Mouse Type: The mouse type configured for the virtual machine.
-
Domain Type: The hypervisor and virtual machine type configured for the virtual machine.
-
Start policy: The start policy configured for the virtual machine.
-
High Availability: Whether or not the High Availability flag is set for the virtual machine.
-
Repository for Configuration File: The repository where the configuration file for the virtual machine is stored.
-
Huge Pages: Whether or not the Huge Pages flag is set for the virtual machine.
-
Boot Order: The configured boot order for disks attached to the virtual machine
-
Network Boot Path: The network boot path configured for the virtual machine.
-
Restart Action On Crash: The configured restart action in the instance that the virtual machine crashes.
-
Restart Action On Power Off: The configured restart action in the instance that the virtual machine receives the power-off signal.
-
Restart Action On Restart: The configured restart action in the instance that the virtual machine receives the restart signal.
-
ID: The ID allocated by Oracle VM Manager for the virtual machine.
-
Origin: The URL that was used to import the virtual machine or template, if it was imported.
-
Description: The description of the virtual machine.
-
Config File Absolute Path: The absolute path to the virtual machine configuration file.
-
Config File Mounted Path: The mount point where the virtual machine configuration file is located on an Oracle VM Server.
-
VNIC: The name of a VNIC configured for the virtual machine.
-
Ethernet Network: The name of the ethernet network that the VNIC is attached to.
-
IP Addresses: IP addresses configured for the VNIC. Note that the virtual machine must be running Oracle VM Guest Additions for this information to be populated. If no IP address is configured for this VNIC, the IP address is displayed as 0.0.0.0.
-
Slot: The slot number for the disk.
-
Disk Type: The type of disk that is attached.
-
Name: The name of the disk within Oracle VM Manager.
-
Size (GiB): The size of the disk.
-
Repository: The repository where the disk is located.
-
Absolute Path: The absolute path to the location of the disk.
-
Mounted Path: The mount point where the disk is located on an Oracle VM Server.
-
Location: The location of the disk as reported by Oracle VM Manager.
If this perspective is viewed from the Unassigned Virtual Machines folder, some of the toolbar icons that are usually available for this perspective are not included in the toolbar. The table below lists all of the toolbar icons that are available for this perspective and indicates the items that are not available when the perspective is viewed from the Unassigned Virtual Machines folder.
|
Toolbar Icon Option |
Icon |
Description |
|---|---|---|
|
|
Displays the Import Virtual Machine dialog box. Use this option to import a virtual machine into Oracle VM Manager. This option is only available for Unassigned Virtual Machines. |
|
|
|
Displays the Edit Virtual Machine wizard. Use this option to edit a virtual machine. |
|
| Delete |
|
Displays the Delete Confirmation dialog box. Use this option to delete the selected virtual machines. |
|
|
Starts up a stopped virtual machine. Not available for Unassigned Virtual Machines. |
|
|
|
Shuts down a virtual machine. Not available for Unassigned Virtual Machines. |
|
|
|
Launches the virtual machine VNC console in an x86-based server pool, which enables access to the virtual machine. Use this option to connect to a virtual machine's console and access the virtual machine directly. Not available for virtual machines in the Unassigned Virtual Machines folder, or virtual machines in a server pool, but not assigned to an Oracle VM Server. |
|
|
|
Launches the virtual machine serial console, which enables access to the virtual machine. Use this option to connect to a virtual machine's serial console and access the virtual machine directly. This service is commonly used for virtual machines running in a SPARC-based server pool, but is also available for virtual machines running on x86-based server pools. Not available for Unassigned Virtual Machines. |
|
|
|
Restarts a running virtual machine. Not available for Unassigned Virtual Machines. |
|
|
|
Shuts down a running virtual machine. Not available for Unassigned Virtual Machines. |
|
|
|
Suspends (pauses) a running virtual machine. Not available for Unassigned Virtual Machines. |
|
|
|
Resumes (unpauses) a suspended virtual machine. Not available for Unassigned Virtual Machines. |
|
|
|
Migrates a virtual machine to another Oracle VM Server, or moves the configuration and virtual disks for a virtual machine to an alternate repository. |
|
|
|
Displays the Clone Virtual Machine dialog box. Use this option to clone a virtual machine to create another virtual machine. |
|
|
|
Displays the Export to Virtual Appliance dialog box. Use this option to export a virtual machine as a virtual appliance. |
|
|
|
Displays the Export Virtual Machine(s) to OCI dialog box. Use this option to export a virtual machine to Oracle Cloud Infrastructure. |
|
|
|
Displays the Manage Clone Customizer dialog box. The clone customizer lets you set up clone parameters, such as networking, disks and ISO resources. Use this option to create, edit or delete a clone customizer. |
|
|
|
Send one or more virtual machines a message. Use this option to send messages to virtual machines that have the Oracle VM Guest Additions installed. Not available for Unassigned Virtual Machines. |
|
|
|
Displays the VM Config File Content dialog box. Displays a read-only view of the configuration file for the selected virtual machine. Use this option to view the content of the virtual machine configuration file. |
|
|
|
Displays a graphical report on a virtual machine. |
|
|
|
Displays the Events dialog box. Displays events for the selected virtual machine. Use this option to view or acknowledge error events for the virtual machine. |
|
|
|
Generate an XML report on one or more virtual machines. |
|
|
|
Displays context sensitive help. |
3.5.2.1 Edit Virtual Machine
Editing a virtual machine to changes the virtual machine configuration. If the virtual machine is running, you cannot edit specific settings such as the mouse device type, domain type, maximum amount of memory, maximum number of processors, restart action on crash, or huge pages support. To edit these settings, the virtual machine must be stopped so that the hypervisor can reload the virtual machine configuration when the virtual machine starts.
-
Click the Servers and VMs tab.
-
Select the server pool on which the virtual machine resides in the navigation tree.
-
Select Virtual Machines from the Perspective drop-down list. Select the virtual machine in the management pane, and click Edit...
in the management pane toolbar
-
The Edit Virtual Machine dialog box is displayed. Select each tab to edit the virtual machine configuration. See Section 3.1.3, “Create Virtual Machine” for the details of each tab. Click OK to save the changes.
NoteIt is not possible to dynamically change resources such as the number or processors or allocated memory for an Oracle Solaris virtual machine without first enabling the drd service on the virtual machine itself. To allow for these changes, connect to the virtual machine and make sure that the drd service is enabled:
# svcadm enable -s drd
# svcs drd
These commands should notify you that the service is online. When you have performed these actions, you are able to use Oracle VM Manager to dynamically change the allocation of resources.
NoteIt is not possible to change the number of virtual network interfaces or virtual disks for a virtual machine while the virtual machine is in a suspended state. Attempting to add or remove such a device results in an exception and an error is returned.
NoteIt is not possible to remove a virtual CD-ROM from a running virtual machine. Doing so results in an exception and an error is returned. To remove virtual CD-ROMs from running virtual machines, you must first stop the virtual machine and then remove the virtual CD-ROM.
3.5.2.2 Delete Virtual Machines
When you delete a virtual machine, all the files and data associated with this virtual machine are removed from Oracle VM Manager. Before deleting a virtual machine, make sure you do not need it any longer. You can only delete a virtual machine when the virtual machine status is Stopped or Error.
-
Click the Servers and VMs tab.
-
Select the server pool on which the virtual machines reside in the navigation tree.
-
Select Virtual Machines from the Perspective drop-down list. Select one or more virtual machines in the management pane, and click Delete
in the management pane toolbar.
-
The Delete Confirmation dialog box is displayed. Select any virtual disks associated with the virtual machines to delete. The virtual machine's physical disks are listed if the storage on which they reside uses a non-generic Oracle VM Storage Connect plug-in. Before any physical disks are deleted, they are removed from any access groups. Click OK to delete the virtual machines and the selected virtual and physical disks.
3.5.2.3 Start Virtual Machines
After a virtual machine is created, you can start it. Starting a virtual machine is analogous to starting a computer by pressing the Power On button.
-
Click the Servers and VMs tab.
-
Select the server pool on which the virtual machines reside in the navigation tree.
-
Select Virtual Machines from the Perspective drop-down list. Select one or more virtual machines in the management pane, and click Start
.
The virtual machines are started.
3.5.2.4 Stop Virtual Machines
When a virtual machine is not in use, you should shut it down to release system resources. Stopping a virtual machine is analogous to a normal shutdown of a physical computer.
If you want to save the state of the virtual machine, you should suspend it. See Section 3.5.2.9, “Suspend Virtual Machines” for information on suspending virtual machines.
In some situations you may not be able to stop a virtual machine, for example, if you have tried to stop it while another job is in progress on the virtual machine such as a start virtual machine job. To resolve this type of situation, you should abort the job that is in progress, then kill the virtual machine. See Section 8.1.5, “Abort Jobs” for information on aborting jobs, and Section 3.5.2.8, “Kill Virtual Machines” for information on killing a virtual machine.
-
Click the Servers and VMs tab.
-
Select the server pool on which the virtual machines reside in the navigation tree.
-
Select Virtual Machines from the Perspective drop-down list. Select one or more virtual machines in the management pane, and click Stop
.
You can also shut down a virtual machine from within the virtual machine, the same way you shut down a physical computer.
After issuing the stop command, the status of the virtual machine is changed to Stopped. However, this only indicates that the command was acknowledged. There is no guarantee that the virtual machine is effectively shut down correctly. This is expected behavior since an operating system running on a physical PC may also hang during the shutdown sequence.
If the virtual machine fails to shut down, you can power it off using the kill virtual machine option, which is similar to unplugging the power cable from a physical machine. To perform a power off (kill) of virtual machines, see Section 3.5.2.8, “Kill Virtual Machines”.
3.5.2.5 Launch Console
The VNC Console can only be used to connect to virtual machines
running on an x86 Oracle VM Server. If you are attempting to connect to
a virtual machine running on Oracle VM Server for SPARC you should use the
serial console. The Launch
Console
![]() is greyed out when Oracle VM Manager detects that the virtual machine is
running on an LDOM hypervisor. See
Section 3.5.2.6, “Launch Serial Console”.
is greyed out when Oracle VM Manager detects that the virtual machine is
running on an LDOM hypervisor. See
Section 3.5.2.6, “Launch Serial Console”.
The VNC Console makes use of noVNC, that uses HTML5 (WebSockets, Canvas) to render a web-based VNC client accessible from any browser that properly supports HTML5. You can find out more about noVNC at http://kanaka.github.io/noVNC/.
The VNC Console is not available for virtual machines in the Unassigned Virtual Machines folder, or virtual machines in a server pool, but not assigned to an Oracle VM Server.
The key mapping for each VNC session is set when you create or edit a virtual machine, in the Keymap field. See Section 3.1.3, “Create Virtual Machine” and Section 3.5.2.1, “Edit Virtual Machine” for information on creating and editing a virtual machine.
-
Click the Servers and VMs tab.
-
Select the server pool on which the virtual machine resides in the navigation tree.
-
Select Virtual Machines from the Perspective drop-down list. Select the virtual machine in the management pane, and click Launch Console
in the perspective toolbar
-
A new browser window or tab is opened.
TipIf the console does not start, check that your web browser allows pop-ups to be displayed. If you are using Microsoft Internet Explorer, add the base URL of Oracle VM Manager (for example,
http://example.com) to the list of trusted sites in the security settings. You may also need to downgrade the security level from medium to medium-low for the Trusted sites zone.If the virtual machine's console is in use by another user, a message is displayed asking if you want to take over the connection. If you take over the connection, the other user's session is disconnected and the VNC session is started on your client computer. If the VNC client has trouble taking over the connection, you may need to close it and launch the VNC console again.
The virtual machine console is displayed. Log in and interact with the virtual machine as you would through any other VNC session.
Note that, if you open a virtual machine console to a running virtual machine and use the Ctrl-Alt-Delete button to restart the virtual machine, the virtual machine restarts and the console reconnects but the control buttons for the console move out of the visible area in the dialog. This is expected behavior, related to the size of the VNC display returned by Oracle VM Server and the way in which HTML5 canvases work.
To view the control buttons for the virtual machine console after the virtual machine has restarted, you may either extend the right side of dialog, or close the dialog and open it again.
3.5.2.6 Launch Serial Console
You must use the serial console to connect to virtual machines on a SPARC-based server pool instead of the VNC console.
For virtual machines running on x86-based server pools, you should use the VNC console instead of the serial console. Output from the serial console is read-only and non-interactive when you use it to connect to virtual machines running on an x86-based server pool. Additionally, virtual machines running on an x86-based server pool must support, and be configured for, redirecting serial output. See Section 3.4.3.5, “Launch Console” for more information about using the VNC console.
-
Click the Servers and VMs tab.
-
Select the server pool on which the virtual machine resides in the navigation tree.
-
Select Virtual Machines from the Perspective drop-down list. Select the virtual machine in the management pane, and click Launch Serial Console
in the management pane toolbar
-
A new browser window or tab is opened.
TipIf the console does not start, check that your web browser allows pop-ups to be displayed. If you are using Microsoft Internet Explorer, add the base URL of Oracle VM Manager (for example,
http://example.com) to the list of trusted sites in the security settings. You may also need to downgrade the security level from medium to medium-low for the Trusted sites zone.If the virtual machine's console is in use by another user, a message is displayed asking if you want to take over the connection. If you take over the connection, the other user's session is disconnected and the terminal session is started on your client computer. If the terminal emulator has trouble taking over the connection, you may need to close it and launch the serial console again.
The virtual machine console is displayed. Log in and interact with the virtual machine as you would through any other console session. If required, enter the user name and password of the guest operating system to log in to the operating system.
3.5.2.7 Restart Virtual Machines
Restarting a virtual machine is analogous to rebooting a computer. You may need to restart a virtual machine if an operating system update requires you to restart the virtual machine, for example Microsoft Windows™ updates.
-
Click the Servers and VMs tab.
-
Select the server pool on which the virtual machines reside in the navigation tree.
-
Select Virtual Machines from the Perspective drop-down list. Select one or more virtual machines in the management pane, and click Restart
.
The virtual machines are restarted.
If a virtual machine has not fully started, a restart request may not succeed as the virtual machine may not be ready to initiate the request. In this case, you may need to abort the restart job and try again later. Alternately, kill the virtual machine and start it again.
3.5.2.8 Kill Virtual Machines
Killing a virtual machine is equivalent to performing a power off of a virtual machine, similar to unplugging the power cable from a physical machine. This is not the recommended method of shutting down a virtual machine, but may be used if the shut down command fails to shut down the virtual machine.
-
Click the Servers and VMs tab.
-
Select the server pool on which the virtual machine resides in the navigation tree.
-
Select Virtual Machines from the Perspective drop-down list. Select one or more virtual machines in the management pane, and click Kill
.
The virtual machines are powered off.
3.5.2.9 Suspend Virtual Machines
Suspending a virtual machine is analogous to putting a computer into sleep mode. When a virtual machine is suspended, the current state of the operating system, and applications is saved, and the virtual machine put into a suspended mode. When you resume the virtual machine, the operating system and applications continue from the same point you suspended the virtual machine.
You cannot suspend virtual machines on SPARC-based server pools.
-
Click the Servers and VMs tab.
-
Select the server pool on which the virtual machine resides in the navigation tree.
-
Select Virtual Machines from the Perspective drop-down list. Select one or more virtual machines in the management pane, and click Suspend
.
The virtual machine state is saved and the virtual machines suspended.
To resume the virtual machine, see Section 3.5.2.10, “Resume Virtual Machine”.
3.5.2.10 Resume Virtual Machine
Resuming a suspended virtual machine is analogous to waking up a computer that has been in sleep mode. When you resume a suspended virtual machine, the operating system and applications continue from the same point you suspended the virtual machine.
You cannot resume virtual machines on SPARC-based server pools.
-
Click the Servers and VMs tab.
-
Select the server pool on which the virtual machine resides in the navigation tree.
-
Select Virtual Machines from the Perspective drop-down list. Select the virtual machine to start in the management pane, and click Resume
.
The virtual machine state is retrieved and the virtual machine started according to the VM Start Policy defined for the server pool.
3.5.2.11 Migrate or Move Virtual Machines
The Migrate or Move
![]() option allows you to migrate and move virtual machines by opening
the Migrate or Move Virtual
Machine wizard that allows you to select and perform
the appropriate actions depending on your requirements and the
state of the virtual machine.
option allows you to migrate and move virtual machines by opening
the Migrate or Move Virtual
Machine wizard that allows you to select and perform
the appropriate actions depending on your requirements and the
state of the virtual machine.
It is important to understand that migrating a virtual machine changes the Oracle VM Server or server pool where the virtual machine runs, while moving a virtual machine changes the repository where the virtual machine configuration or virtual disks are located.
A stopped virtual machine can be migrated to any Oracle VM Server, server pool, or to the Unassigned Virtual Machines folder. A running virtual machine can be migrated to any Oracle VM Server within the same server pool.
The steps below assume the virtual machine is deployed to an Oracle VM Server. If the virtual machine is located in the Unassigned Virtual Machines folder, select it in that folder to perform the migration.
-
Click the Servers and VMs tab.
-
Select the server pool on which the virtual machine resides in the navigation tree.
-
Select Virtual Machines from the Perspective drop-down list. Select the virtual machine to migrate in the management pane, and click Migrate or Move
.
The Migrate or Move Virtual Machine dialog box is displayed.
-
Choose the appropriate option from the Migrate or Move Virtual Machine dialog box. Different options are available, depending on if the virtual machine is running or stopped.
If the virtual machine is running, you can select from the following options:
-
Migrate a running VM to a different Server within the
          same Server Pool
This option changes the server where the virtual machine runs. The destination server must be within the same server pool as the source server. Likewise, the destination server must be able to access the virtual machine configuration and storage. You should choose this option to migrate virtual machines between servers within a server pool that use a shared repository.
Select this option and then click Next to proceed as follows:
-
Select the destination server to which you want to migrate the virtual machine from the
Specified
              Server
drop-down list.NoteSome options are disabled because they apply only if you are migrating a virtual machine that is stopped.
-
Click Finish to complete the migration.
-
-
Migrate a running VM, and migrate its local storage,
          to a different Server within the same Server Pool
This option changes the server where the virtual machine runs and moves its local storage. You can choose this option to migrate virtual machines between servers within the same server pool when:
-
At least one virtual disk resides in a repository that is local to the source server.
-
The destination repository is local to the destination server.
NoteIf the virtual machine configuration file resides in a repository that is local to the source server only, the configuration file is copied to the destination repository. If the configuration file resides in a shared repository, it is not copied.
Select this option and then click Next to proceed as follows:
-
Select the destination server to which you want to migrate the virtual machine from the
Server to Migrate
              to
drop-down list. -
Select the destination repository to which you want to move the virtual machine configuration and storage from the
Target Repositorydrop-down list.NoteYou can select only repositories that are hosted on an OCFS2 file system.
-
Click Finish to complete the migration and move the virtual machine configuration and storage.
-
-
Move this VM to a different RepositoryThis option changes the location of the virtual machine.
NoteBeginning in Oracle VM Manager 3.4.6, this option is available when the Migrate or Move Virtual Machine dialog box is displayed for a running virtual machine. This option makes it possible to move a
vm.cfgfile from one repository to another while the virtual machine is in running state by creating an empty clone customizer.ImportantWhen moving a running virtual machine, be sure to create an empty clone customer with no storage mappings attached. If a clone customizer is created with an attached virtual disk that is actively being used by the virtual machine, an error message is returned.
Select this option and then click Next to proceed as follows:
-
Click
Createto create a new empty clone customizer with no storage mappings attached. -
Select the destination repository to which you want to move the virtual machine configuration from the
Target Repositorydrop-down list. -
Click Finish to move the virtual machine.
-
If the virtual machine is stopped, you can select from the following options:
-
Migrate a VM to a different Server, Server Pool, or
          Unassigned State
This option lets you change the virtual machine destination to either the Unassigned Virtual Machines folder or unassigned in the current server pool. This option also lets you change the server or server pool where the virtual machine runs as well as the location of the virtual machine configuration and storage.
Select this option and then click Next to proceed as follows:
-
Select one of the following destinations for the virtual machine:
-
Unassigned Virtual Machines Folder: Removes the virtual machine from the server pool and moves it to the Unassigned Virtual Machines folder.
-
Unassigned in Current Server Pool: Removes the virtual machine from the Oracle VM Server. The virtual machine stays in the same server pool; it is removed from the Oracle VM Server only.
-
Specified Server: Moves the virtual machine to the selected Oracle VM Server. Stopped virtual machines can be migrated to Oracle VM Servers in other server pools that share the same repository, so Oracle VM Servers from other server pools might be listed here.
-
Server Pool: Moves the virtual machine to the selected server pool. Stopped virtual machines can be migrated to other server pools. The virtual machine is not deployed to a particular Oracle VM Server within the destination pool; you must start the virtual machine in the destination server pool to deploy it to an Oracle VM Server.
-
-
Click Finish to complete the migration.
-
-
Move this VM to a different RepositoryThis option changes the location where the virtual machine, and its configuration and local storage, reside. You should choose this option to move the virtual machine between servers in different server pools.
-
Select this option and then click Next to proceed as follows:
-
Select a clone customer from the
Clone Customizerdrop-down list or clickCreateto create a new clone customizer.Clone customizers can be used to determine storage mappings for the virtual machine so that you can define where the virtual disks for a virtual machine should be located.
If you create a new clone customizer, the Create Clone Customizer wizard is displayed. You can read more on the options provided by this wizard in Create a Clone Customizer.
-
Select the destination repository to which you want to move the virtual machine configuration and storage from the
Target Repositorydrop-down list. -
Click Finish to move the virtual machine.
-
-
-
Click the Servers and VMs tab.
-
Select the server pool on which the virtual machines reside in the navigation tree.
-
Select Virtual Machines from the Perspective drop-down list. Select the virtual machines to migrate in the management pane and drag and drop them to the Oracle VM Server, server pool or the Unassigned Virtual Machines folder in the navigation tree to which you want to migrate the virtual machines. See Section 1.13, “Drag and Drop” for information on using the drag and drop feature.
-
The virtual machines are migrated.
3.5.2.12 Clone a Virtual Machine or Template
Cloning a virtual machine or a template means making a copy of it, so that you can create multiple virtual machines or templates from the original.
A clone can also be performed using two other file copy methods: sparse copy, and non-sparse copy. These two cloning methods can be used when cloning from and to different repositories, and when the storage used for the storage repository uses a generic Oracle VM Storage Connect plug-in. These cloning methods are slower than thin cloning, but more versatile.
The virtual machine cloning procedure below uses the same dialog box to clone a virtual machine and a template.
-
Select the virtual machine or template to clone and display the Clone dialog box. You display this dialog box from different locations, depending on whether you are cloning a virtual machine or a template.
-
Virtual Machine: Click the Servers and VMs tab. Select the server pool on which the virtual machine resides in the navigation tree. Select Virtual Machines from the Perspective drop-down list. Select the virtual machine to clone in the management pane, and click Clone Virtual Machine
.
-
Virtual Machine Template: Click the Repositories tab. In the navigation tree, select the repository in which the template resides, then VM Templates. Select the template in the management pane and click Clone Template
.
-
-
The Clone (Virtual Machine or Template) dialog box is displayed.
Select or enter the following:
-
Clone to a: Select the clone type, either Virtual Machine or Template, to specify the objects to create from the clone.
-
Clone Count: The number of clones to create.
-
Name Index: The start index number to use for the clone name suffix. The default is
0. This is used in conjunction with the Clone Name field to create the name for each clone. -
Clone Name: An optional name for the virtual machines or templates. The maximum name length is 256 characters and may contain any character. The name need not be unique. If no value is given, the default is the name of the virtual machine or template being cloned. Each clone is suffixed with a dot (.) and the clone index number, starting with the value for the Name Index field. For example, if the Clone Name field is set to
MyVM, and the Name Index field is set to1, the resulting clones would be namedMyVM.1,MyVM.2and so on. -
Target Server Pool: The server pool on which the clone is to be deployed.
NoteThe list of server pools that are available in the drop-down is limited to valid server pools that are capable of handling the cloning process correctly. This helps you to prevent cloning to a server pool that may fail to process the request. If this list is empty, you should refer to the table presented under the Why don't I see other server pools to clone to? element in this dialog.
-
Description: A description for the virtual machines or templates.
-
Advanced Clone: Whether to use a clone customizer to set preferences for the clone operation.
-
Clone Customizer: The clone customizer to create the clones. This is used to set virtual disk mappings to enable you to copy disks to other storage locations. It also allows you to create network mappings so you can use new VNICs and other networks for the clone. Click Create... to create a new clone customizer. See Section 3.5.2.14, “Manage Clone Customizers” for information on creating a clone customizer. This field is enabled if Advanced Clone is checked.
-
Target Repository: The repository to store the cloned virtual machine configuration file. This does not affect any clone disk mappings you set using a clone customizer; this option is only for the virtual machine configuration file. This field is enabled if Advanced Clone is checked.
-
Why don't I see other server pools to clone to? A collapsed window element, providing a table of server pools that do not meet the requirements to accept a clone request. Expanding any of the entries in this table displays the reason that the server pool does not qualify.
TipIf you clone a virtual machine or template without using a clone customizer, the storage repository is locked for the duration of the cloning job; this may be some time in some circumstances. To quickly create clones and not lock the storage repository, use a clone customizer.
Click OK.
-
The virtual machines are created and deployed to the server pool. The templates are created in the storage repository.
It is important to understand that older templates may use a different device type to attach virtual disks. This may affect your ability to attach new virtual disks, such as a virtual CDROM device. There are some limitations on mixing virtual disks of differing device types on a virtual machine. See How are Virtual Disks Managed? in the Oracle VM Concepts Guide for more information about how device types are allocated to virtual disks and what you may need to do to solve any issues surrounding this problem.
3.5.2.13 Export a Virtual Machine
Exporting a virtual machine lets you reuse virtual machines with other instances of Oracle VM, or with other virtualization environments that support the Open Virtualization Format (OVA).
Export to Virtual Appliance
Exporting a virtual appliance lets you reuse virtual machines with other instances of Oracle VM, or with other virtualization environments that support the Open Virtualization Format (OVA).
You can export one or more virtual machines to a virtual appliance. Exporting a virtual machine to a virtual appliance creates an OVA file in the storage repository. The OVA file contains the virtual disk file(s) in VMDK format, an OVF file that holds the virtual machine(s) configuration, and other files such as a manifest and certificate.
-
Click the Servers and VMs tab. Select the server pool on which the virtual machine resides in the navigation tree. Select Virtual Machines from the Perspective drop-down list.
-
Make sure each virtual machine to export is in the Stopped state.
See Section 3.5.2.4, “Stop Virtual Machines” for more information on stopping virtual machines.
-
Select the virtual machine(s) to export in the management pane, and click Export to Virtual Appliance
. -
The Export Virtual Machine(s) to Virtual Appliance dialog box is displayed.
Specify a name for the virtual appliance in the Virtual Appliance Name field and select the storage repository to which you want to save the virtual appliance from the Destination Repository menu and then click OK.
The virtual appliance is located under the Assemblies directory on
the Oracle VM Server instance where the storage repository is presented to, as follows:
/OVS/Repositories/.
See the Chapter 4, Repositories Tab for information about obtaining the repository
and virtual appliance ID. repository_id/Assemblies/virtual-appliance_id/package.ova
Export to Oracle Cloud Infrastructure Using Oracle VM Exporter Appliance
Exporting an Oracle VM virtual machine using the Oracle VM Exporter Appliance transfers the virtual machine to Oracle Cloud Infrastructure. Exporting a virtual machine does not remove the virtual machine from Oracle VM. You can export a virtual machine to other places in Oracle Cloud Infrastructure.
Before using the Oracle VM Exporter Appliance, you must first download and configure the Oracle VM Exporter Appliance Open Virtual Appliance (OVA) and make sure the Oracle VM Exporter Appliance virtual machine is running. For more information, see Installing and Configuring the Oracle VM Exporter Appliance
You can start, one after another, up to four virtual machine exports to run simultaneously (they will not start simultaneously) with a single Oracle VM Exporter Appliance. If you start a fifth export operation for one Oracle VM Exporter Appliance, the export is queued until one of the running exports completes. If you need to run more than four exports at the same time, you can add another Oracle VM Exporter Appliance to the virtual machines. You can only export a stopped virtual machine. A virtual machine being exported by the Oracle VM Exporter Appliance cannot be started.
Before Windows VMs can be exported to OCI, they have to be shutdown without fast restart. To shutdown without fast restart:
-
Use the
shutdown /scommand, or -
Click the Windows Start Button (or Windows symbol button or the Start Menu), then click Power and then press the Shift key while clicking on Shutdown option.
Export a Virtual Machine to Oracle Cloud Infrastructure
-
Click the tab.
-
Select the server pool on which the virtual machine resides in the navigation tree.
-
Select from the drop-down list. You can also select the virtual machine directly if the virtual machine is on the screen.
NoteWindows virtual machines need to have virtio-win drivers installed before exporting to Oracle Cloud Infrastructure. For more information see https://docs.oracle.com/en/operating-systems/oracle-linux/kvm-user/.
-
Stop the virtual machine.
See Section 3.5.2.4, “Stop Virtual Machines” for more information on stopping virtual machines.
-
With the stopped virtual machine highlighted, click the Export to OCI icon (
) in the task icon bar
or right-click on the stopped virtual machine and select .The wizard displays information about the Oracle VM Exporter Appliance virtual machine.
-
Select or enter the following Exporter Appliance information:
-
From the drop-down list, select the name of the Oracle VM Exporter Appliance.
NoteIf you named the Oracle VM Exporter Appliance Exporter Appliance, that name is already filled in. If you have changed the name, you have to select it from a list of virtual machines. One of the choices is , which is an option to enter the information.
-
From the drop-down list, select the IP address of the Oracle VM Exporter Appliance.
NoteThe IP address for the eth0 interface is pre-selected, if it exists. There might be more than one IP address assigned to the Oracle VM Exporter Appliance. Make sure you select the correct one.
If you selected Please Select for the Appliance name, the Appliance's IP Address defaults to .
-
If you selected from the drop-down list, enter the hostname or IP address for the Oracle VM Exporter Appliance.
-
Enter a port number if you have changed the default port number that the Oracle VM Exporter Appliance uses to receive packets.
NoteBe aware that if you change the default port number of 8443 can complicate Oracle VM Exporter Appliance communications.
-
-
Click .
The options display.
-
If the Oracle VM Exporter Appliance has been set up correctly, the and fields display the public key and fingerprint of the Oracle VM Exporter Appliance selected for the export. This public key must be uploaded to Oracle Cloud Infrastructure or the export authentication fails.
The other fields may contain values from previous export operations. These fields contain Oracle Cloud Infrastructure user ID (), Oracle Cloud Infrastructure region (), and Oracle Cloud Infrastructure tenancy ID (). These values are all obtained from an Oracle Cloud Infrastructure tenancy account. For more information on these fields, see Installing and Configuring the Oracle VM Exporter Appliance.
Enter the following Oracle Cloud Infrastructure information:
-
Enter the .
-
Enter the where you want to upload the exported virtual machine.
-
Enter the .
-
-
Click .
Before the options display, the Oracle VM Exporter Appliance validates the information provided with Oracle Cloud Infrastructure account.
NoteIf you get an error here, validate all Oracle Cloud Infrastructure information.
-
Enter information about Oracle Cloud Infrastructure instance.
-
(Optional) Enter a new .
NoteBy default, the instance name is the same as the virtual machine name, but you can enter a customized name between 1 and 255 characters long.
-
Select the from the drop-down list.
-
Select the from the drop-down list.
-
Enter the .
-
-
Click . The options display.
-
Enter additional information about the virtual machine disks exported with the virtual machine to Oracle Cloud Infrastructure.
-
Select the from the drop-down list.
-
Select the from the drop-down list.
-
Select the from the drop-down list.
NoteThe rest of the items are determined by local information.
-
Select the from the drop-down list.
-
(Optional) Change the from the default size. The range for a Linux VM is from 50 GiB to 32 TiB. The range for the Windows VM is from 256 GiB to 32 TiB.
NoteIf the boot volume size entered is less then the actual virtual machine system image (boot disk) size, the export fails in the instance creation phase.
-
(Optional) Check the box next to each disk in the list you want to upload.
NoteYou can select up to 32 disks to upload. ISO images attached to the virtual machine are not uploaded.
The Oracle VM Exporter Appliance lets you select and upload the same shared disk when exporting two or more virtual machines that share the disks. You need to select the shared disk for upload only once when exporting one of the virtual machines that shares the disk. If you select the same shared disk for each virtual machine, you create multiple copies of the same shared disk.
-
-
Click .
The options display.
-
Select or enter the following information about the virtual NICs (vNICs) created and used by Oracle Cloud Infrastructure for the Virtual Cloud Network (VCN) when the export operation has completed.
NoteThe and information is supplied by Oracle VM and cannot be changed.
-
-
Click .
The of your choices display.
-
Once you have entered all the required information, the Oracle VM Exporter Appliance displays a summary of the key information supplied during the wizard navigation. If all information in the summary is correct, click to begin the export operation.
Tracking the Export Operation
The export is a multi-stage operation tracked by an Oracle VM job listed in the running and completed task section of the Oracle VM Manager. You can track the progress of the export to make sure it completes successfully.
-
Once the export process has ended, you can check the details in the Oracle VM Manager virtual machine perspective.
NoteYou can also log into the Oracle VM Exporter Appliance and tail the
vmexporterlog using the following command:$ tail -f /var/log/vmexporter/vmexporter.log -
Even after the export job completes successfully, be sure to check the tab in to make sure the Successfully exported OVM VM to OCI result appears and to see if any other related steps are needed. For example, additional steps are needed to connect a data Block Volume to the exported virtual machine.
-
If you need to connect a data block volume, the directions are listed in the job summary. The steps are different for exported Windows and Linux virtual machines.
Windows virtual machine example:
Successfully exported OVM VM to OCI

OVM VM ID          : <ovm-vm-id>

OCI Instance ID    : <oci-instance-id>
OCI Instance Name  : <oci-instance-name>
OCI Compartment ID : <oci-compartment-id>
OCI OS Type        : Windows - Server 2019 Standard

Additional Disk Data:

One or more data disks have been uploaded to OCI Object Storage as a disk image.
To get your data on the disk block volume, this disk image has to be
    transferred to OCI Instance and written to disk block volume.
Please ensure you have sufficient space to transfer the disk image.


Object Storage Bucket         : <object-storage-bucket-name>
Object Name                   : <object-name>
Object Size                   : 2.0GB
Pre-Authenticated Request URL : <url>
Block Volume ID               : <block-volume-id>
Block Volume Attachment ID    : <block-volume-attachment-id>
Block Volume Attachment Access: READ/WRITE

1. Run these commands in the OCI Instance as an administrator in Windows Powershell
     to connect to the attached block volume.

        Set-Service -Name msiscsi -StartupType Automatic
        Start-Service msiscsi
        iscsicli.exe QAddTargetPortal <ip>
        iscsicli.exe QLoginTarget <iqn>
        iscsicli.exe PersistentLoginTarget <iqn> * * * * * * * * * * * *

2. Download the disk image: <disk-image-location> to the OCI Instance.
3. Go to Disk Management and mark Disk 2 "Online."
4. Write the downloaded disk image to Disk 2 using a Windows Disk Image Writer
     program such as NetBSD Rawrite32.
5. Delete the downloaded disk image from OCI Instance.
6. Delete the disk image '<disk-image-name>'
     from OCI Object Storage.


Object Storage Bucket         : <object-storage-bucket>
Object Name                   : <object-name>
Object Size                   : 1.0GB
Pre-Authenticated Request URL : <url>
Block Volume ID               : <block-volume-id>
Block Volume Attachment ID    : <block-volume-attachment-id>
Block Volume Attachment Access: READ/WRITE

1. Run these commands in the OCI Instance as an administrator in Windows Powershell
     to connect to the attached block volume.

        Set-Service -Name msiscsi -StartupType Automatic
        Start-Service msiscsi
        iscsicli.exe QAddTargetPortal <ip>
        iscsicli.exe QLoginTarget <iqn>
        iscsicli.exe PersistentLoginTarget <iqn> * * * * * * * * * * * * * *

2. Download the disk image: <disk-image-location> to the OCI Instance.
3. Go to Disk Management and mark Disk 3 "Online."
4. Write the downloaded disk image to Disk 3 using a Windows Disk Image Writer program
     such as NetBSD Rawrite32.
5. Delete the downloaded disk image from OCI Instance.
6. Delete the disk image '<disk-image-name>' from
     OCI Object Storage.
Linux virtual machine example:
Successfully exported OVM VM to OCI

OVM VM ID          : <ovm-vm-id>

OCI Instance ID    : <oci-instance-id>
OCI Instance Name  : <oci-instance-name>
OCI Compartment ID : <oci-compartment-id>
OCI OS Type        : Linux

Additional Disk Data:

One or more data disks have been uploaded to OCI Object Storage as a disk image.  To get
     your data on the disk block volume, please install 'iscsi-initiator-utils' and
    'wget' yum packages on your Instance, if not already installed, and do the following:


Object Storage Bucket         : <object-storage-bucket>
Object Name                   : <object-name>
Object Size                   : 2.0GB
Pre-Authenticated Request URL : <url>
Block Volume ID               : <block-volume-id>
Block Volume Attachment ID    : <block-volume-attachment-id>
Block Volume Attachment Access: READ/WRITE

1. Run these commands to connect to the attached block volume:
        sudo iscsiadm -m node -o new -T <iqn> -p <ip:port>
        sudo iscsiadm -m node -o update -T <iqn> -n node.startup -v automatic
        sudo iscsiadm -m node -T <iqn> -p <ip:port> -l
2. Run the following command:
        sudo wget <url> -O /dev/sdb
3. If disk mount in /etc/fstab is with UUID, the disk can be mounted at its mount point.
     If UUID is not used, please update /etc/fstab to use UUID or use /dev/sdb.
4. Reboot the instance and check data in disk block volume. Reboot can be deferred until all
     data disks have been processed.
5. Delete the disk image '<disk-image-name>' from OCI Object
     Storage.


Object Storage Bucket         : <object-storage-bucket>
Object Name                   : <object-name>
Object Size                   : 1.0GB
Pre-Authenticated Request URL : <url>
Block Volume ID               : <block-volume-id>
Block Volume Attachment ID    : <block-volume-attachment-id>
Block Volume Attachment Access: READ/WRITE

1. Run these commands to connect to the attached block volume:
        sudo iscsiadm -m node -o new -T <iqn> -p <ip:port>
        sudo iscsiadm -m node -o update -T <iqn> -n node.startup -v automatic
        sudo iscsiadm -m node -T <iqn> -p <ip:port> -l60 -l
2. Run the following command:
        sudo wget <yrl> -O /dev/sdc
3. If disk mount in /etc/fstab is with UUID, the disk can be mounted at its mount point.
     If UUID is not used, please update /etc/fstab to use UUID or use /dev/sdc.
4. Reboot the instance and check data in disk block volume. Reboot can be deferred until
     all data disks have been processed.
5. Delete the disk image '<disk-image-name>' from OCI
     Object Storage.
You are prompted once for each data disk that the Oracle VM Exporter Appliance has exported.
-
If you have exported a virtual machine with multiple VNICs, there are additional steps needed because of the way that Oracle Cloud Infrastructure handles new virtual machines with multiple VNICs. For more information on this issue and solutions, see https://docs.cloud.oracle.com/en-us/iaas/Content/Network/Tasks/managingVNICs.htm
Connecting a Shared Block Volume to Exported Virtual Machines
You can use the Oracle VM Export to OCI function to export two or more virtual machines that share disks (for example, an OCFS2 cluster) to Oracle Cloud Infrastructure. However, after successful creation of the virtual machine instances in Oracle Cloud Infrastructure, additional steps must be followed to connect the shared Oracle Cloud Infrastructure block volumes and, in the case of an OCFS2 cluster, restart the cluster services.
If you export two or more Oracle VM virtual machines sharing one or more disks (such as an OCFS2 cluster), you should avoid creating duplicate copies of the shared disk in Oracle Cloud Infrastructure. Although you only have to upload the shared disks once with an exported virtual machine, you must attach the shared disks, which are now block volumes in Oracle Cloud Infrastructure, to the other virtual machines after the export succeeds.
The Oracle VM Exporter Appliance does not prevent you from selecting and uploading the same shared disk when exporting two or more virtual machines that share the disks. You need to select the shared disk only once when exporting one of the virtual machines to Oracle Cloud Infrastructure or duplicate, unnecessary copies are created.
As an example of this process, consider a set of three Oracle VM virtual machines (VM1, VM2, and VM3) sharing two disks (Shared Disk1 and Shared Disk2).
You export this group as three virtual machines, but upload the shared disks only once with one of the virtual machines. To avoid duplicated effort and results, these virtual machines and shared disks are exported to Oracle Cloud Infrastructure as two types of export: one virtual machine with the upload of the shared disks, and two virtual machines without any uploaded disks.
So, VM1 has Shared Disk1 and Shared Disk2 attached, but the exported VM2 and VM3 do not.
Because the goal is to establish the original configuration from Oracle VM in Oracle Cloud Infrastructure, the shared disks from Oracle VM, which are now block volumes in Oracle Cloud Infrastructure, must be re-attached to the exported virtual machine instances in Oracle Cloud Infrastructure.
In this case, Shared Disk1 and Shared Disk2 are to be attached to the exported virtual machine instances VM2 and VM3 in Oracle Cloud Infrastructure.
Only VM1's Export Summary of the Export to OCI job has the details to attach Oracle Cloud Infrastructure block volumes to an instance. VM2 and VM3 do not have this information because the shared disks were not exported with VM2 and VM3, only with VM1. However, the same steps listed for VM1 must be repeated for VM2 and VM3.
Once all exports have completed successfully, the following are the high-level steps for connecting an Oracle Cloud Infrastructure shared block volume to an exported virtual machine instance. Some steps have to be repeated for each disk or virtual machine instance:
-
In Oracle Cloud Infrastructure, attach the same set of shared block volumes to the virtual machine instances that share them in Oracle Cloud Infrastructure.
-
For VM1, follow the instructions in the Export Summary (under the Jobs tab) in Oracle VM for a successful export with uploaded shared disks.
-
For VM2 and VM3, follow the instructions in the Export Summary (under the Jobs tab) in Oracle VM for a successful export of virtual machines without uploaded shared disks.
If you have OCFS2 disks attached to the virtual machines you have exported, there are two additional steps to take:
-
In Oracle Cloud Infrastructure, re-establish the cluster and make modifications to the
cluster.conffile for each virtual machine instance that is part of the cluster. This step is necessary because the IP address and hostname are changed when the virtual machine is exported. -
In Oracle Cloud Infrastructure, mount the data disk on the virtual machine instances in the cluster.
Detailed Example
There are three general steps to follow when connecting exported disks to virtual machine instances on Oracle Cloud Infrastructure.
-
In Oracle Cloud Infrastructure, attach the same set of shared block volumes to the virtual machine instances that share them in Oracle Cloud Infrastructure. Information about the block volumes to attach can be found in one of the following ways:
-
In the Export Summary of VM1’s export Job in Oracle VM
-
In the Attached Block Volumes of VM1’s Oracle Cloud Infrastructure instance.
Repeat the following steps for each of the shared volumes (Shared Disk1 and Shared Disk2) that need to be attached to a virtual machine instance (VM2 and VM3):
-
Click on Compute.
-
Click on Instances.
-
Click on the hyperlink for the virtual machine Instance.
-
Click on the Attached Block Volumes in the Resources column.
-
Click on the Attach Block Volume blue button.
-
Enter the applicable information on the Attach Block Volume page:
-
: iSCSI (this is the default).
-
Make sure is selected (this is the default)
-
Make sure the Block Volume from Step 1 above is correct in the drop-down.
NoteFor the drop-down list , make sure you select the same uploaded shared block volume (Shared Disk1 and Shared Disk2) that was attached to the virtual machine sharing the disks (VM1) before the export.
-
: Select
Read/Write -
                    Shareable
-
-
-
If you have not already done so, follow the instructions in the Additional Disk Data section under the Export Summary tab in Job Details of a successful export Job of VM1 in Oracle VM. These instructions are included in the Tracking the Export Operation section above.
NoteFor more information on finding jobs and job details, see Job Details...
-
On VM2 and VM3, which have block volumes that were not uploaded with the virtual machine instance, you must manually attach the shared disks uploaded from Oracle VM.
For Linux-based virtual machine instances, do the following:
-
Run the commands listed under Step 1: Run these commands to connect to the attached block volume under the
Additional Disk
                Data
in the for VM1 in Oracle VM. Shared disks are those with a Block Volume Attachment Access set toRead/Write - Shareable. -
Reboot
For Windows-based virtual machine instances, do the following:
-
Run the commands listed under Step 1: Run these commands in the OCI Instance as an administrator in Windows Powershell to connect to the attached block volume under the
Additional Disk Datain the for VM1 in Oracle VM. Shared disks are those with a Block Volume Attachment Access set toRead/Write - Shareable. -
Go to and mark the disk
Online
-
Detailed Example for OCFS2
There are two more OCFS2-specific steps to follow when connecting exported disks to virtual machine instances on Oracle Cloud Infrastructure. These steps only apply to OCFS2.
-
For OCFS2, in Oracle Cloud Infrastructure, re-establish the cluster and make modifications to the
cluster.conffile for each virtual machine instance that is part of the cluster. This is necessary because the IP address and hostname are changed when the virtual machine is exported.To recreate or re-establish the cluster configuration, do the following:
-
Set the hostname if it is not already set:
$
nmcli general hostname<Fully Qualified Domain Name>$systemct1 restart systemd-hostnamed$vi /etc/hosts<add new hostname and IP address on primary VNIC> -
Verify that the OCFS2 cluster is set to
offline:$
o2cb cluster-status -
Verify that the volumes, labels, and UUIDs are listed.
$
mountd.ocfs2-d -
Perform the next two commands on only one virtual machine instance.
Using the editor, modify the
cluster.conffile to change each node's IP address and hostname to reflect the new IP address (the IP address used for the cluster connection) and hostname of the exported virtual machine instance.$
vi /etc/ocfs2/cluster.confCopy the updated
/etc/ocfs2/cluster.conffile to all other nodes or virtual machine instances that were originally part of the cluster.$
scp /etc/ocfs2/cluster.conf root@<vm_clusterIP>:/etc/ocfs2/ -
Perform the next three commands on all virtual machines in the cluster.
Ping each node or virtual machine cluster IP address from each virtual machine in the cluster. Verify that the ping succeeds, then put the cluster back online.
$
ping$<vm1_cluster_ip...vmN_cluster_ip>/sbin/o2cb.init startVerify that the cluster is back online, the heartbeat is set to
active, and, if the cluster is using global heartbeat, that theUIDof the device being used is the one listed in the output of themountd.ocfs2 -dcommand above.$
/sbin/o2cb.init status
-
-
For OCFS2, in Oracle Cloud Infrastructure, mount the data disk on the virtual machine instances in the cluster.
For each virtual machine instance in the cluster, do the following:
-
Check the
/etc/fstabto verify that the correct device is used to mount the shared block volumes (see the Export Summary above). -
Mount the cluster file systems:
$
mount -d$dfVerify that the shared block volumes are mounted on the cluster file system, and that the files created in Oracle VM still exist, intact, and are the same on all cluster nodes.
-
Once these steps are completed, the OCFS2 disks have been successfully exported from Oracle VM to Oracle Cloud Infrastructure and re-attached.
Accessing the Exported Virtual Machine Serial Console
After exporting a virtual machine with the Oracle VM Exporter Appliance, in some cases you must modify the exported virtual machine's GRUB bootloader to access the serial console.
For Oracle Linux 7 or Oracle Linux 8, which include GRUB2, do the following:
-
Update the
/etc/default/grubfile to include the following:GRUB_TIMEOUT=5 GRUB_DISTRIBUTOR="$(sed 's, release .*$,,g' /etc/system-release)" GRUB_DEFAULT=saved GRUB_DISABLE_SUBMENU=true GRUB_TERMINAL_OUTPUT="console" GRUB_TERMINAL="serial" GRUB_SERIAL_COMMAND="serial --speed=9600 --unit=0 --word=8 --parity=no --stop=1" GRUB_CMDLINE_LINUX="resume=/dev/mapper/ol-swap rd.lvm.lv=ol/root rd.lvm.lv=ol/swap console=ttyS0,9600n8 console=tty0" GRUB_DISABLE_RECOVERY="true" GRUB_ENABLE_BLSCFG=true
-
Regenerate the
grub.cfgfile by running the command$ grub2-mkconfig -o /boot/grub2/grub.cfg
-
Reboot the exported virtual machine to connect it to the serial console.
For information about virtual machine serial console access in Oracle Linux 6, which shipped with GRUB, see My Oracle Support (MOS) article 1505124.1 at http://metalink.oracle.com.
For more information about virtual machine issues, see https://docs.oracle.com/en/virtualization/oracle-vm/3.4/admin/vmadm-tshoot-vmachines.html
Resuming a Failed or Aborted Export Operation
The export operation using the Oracle VM Exporter Appliance is a lengthy process and is tracked in the virtual machine Jobs tab like any other operation. You can resume a failed or aborted export operation attempted by the Oracle VM Exporter Appliance.
When resuming an export operation, you should not change these Oracle Cloud Infrastructure parameters:
-
Tenancy
-
Region
-
Instance Name
-
Storage-related Compartments
To resume an export operation that has failed or been aborted:
-
Make sure you select the virtual machine that has failed or been aborted.
NoteIf the previous export failure was due to a quota limit, a custom image for the virtual machine might exist, depending on when the quota limit was reached. If you delete this custom image, you cannot resume the export operation. However, the custom image is deleted automatically after a successful export operation.
-
Click on the Export to OCI icon from the or right-click the highlighted virtual machine to export, then choose .
The dialog displays.
-
Click .
The or messages display.
-
For a export operation, a window displays the following information:
Previous export attempt of VM <vm-name> failed while
<previous-status-from-returned-data>.
Message: <message-text>
Continuing here will retry from the failed step and resume export operation.
Any changes to Instance configuration will be applied for remainder of the steps.
Changes that pertain to previously completed steps will be ignored.
To discard progress and restart export from beginning, check the checkbox below.

[] Discard state and restart export from beginning
-
Check the option to start the process from the beginning and then click .
From the pop-up window confirm that you want to delete the saved export information by answering
Click to return to the window.
Click to delete the export information and advance to the step to enter new information for the export.
-
Do NOT check the option to start the process from the point of failure and then click .
NoteThe wizard takes you to the step where the previous entries from the failed export have been saved and filled in. You still have the option to make some modifications.
-
-
For an export operation, the window or the window opens and displays the following information:
-
A previous export operation for virtual machine <vm-name> is being
aborted in the backend.
It can take some time to fully abort. A new export operation cannot be started until
the previous export is fully aborted.
Please try again later.
Click to dismiss this message.
-
Message: VM export aborted.
Continuing here will retry from the failed step and resume export operation.
Any changes to Instance configuration will be applied for remainder of the steps.
Changes that pertain to previously completed steps will be ignored.
To discard progress and restart export from beginning, check the checkbox below.

[] Discard state and restart export from beginning
-
Check the option to start the process from the beginning and then click .
From the pop-up window confirm that you want to delete the saved export information by answering
Click to return to the window.
Click to delete the export information and advance to the step to enter new information for the export.
-
Do NOT check the option to start the process from the point where it aborted and then click .
NoteThe wizard takes you to the wizard step where the previous entries from the failed export have been saved and filled in throughout the wizard dialog steps. You still have the option to make modifications.
-
-
-
3.5.2.14 Manage Clone Customizers
Cloning a virtual machine or template means making a copy of it, so that you can create multiple virtual machines or templates from the original. You can create a clone customizer to set up the clone parameters, such as networking, and the virtual disk, and ISO resources. A clone customizer is also used when moving a virtual machine or template.
Create a Clone Customizer
-
Select the virtual machine or template and display the Manage Clone Customizers for (Virtual Machine or Template) dialog box by:
-
Virtual Machine: Click the Servers and VMs tab. Select the server pool on which the virtual machine resides in the navigation tree. Select Virtual Machines from the Perspective drop-down list. Select the virtual machine to clone in the management pane, and click Manage Clone Customizers...
.
-
Virtual Machine Template: Click the Repositories tab. In the navigation tree, select the repository in which the template resides, then VM Templates. Select the template in the management pane and click Manage Clone Customizers
.
-
-
Select Create Clone Customizer...
.
-
The Create a Clone Customizer wizard is displayed.
In the Name and Description step of the wizard, enter a Name and Description for the clone customizer, and click Next.
-
The Storage Mappings step of the wizard is displayed.
Select the following storage mappings:
-
Disk: The disks to include in the clone.
-
Clone Target Type: The type of storage location where the disk is to be created, either a Repository or a Physical Disk.
-
Clone Target: The location on the storage type where the disk is to be created.
-
Clone Type: Whether to use a sparse or non-sparse files for the disk.
CautionWhen sparse virtual disk space allocation is used, the available space in a repository can be over-subscribed. Sparse allocation is useful to increase virtual machine density. However, errors occur if the space allocated to a storage repository becomes exhausted, so the administrator must carefully monitor disk space.
Click Next.
-
-
The Network Mappings step of the wizard is displayed.
Select the Virtual NICss to include in the clone customizer, and the Ethernet Network to which they should belong.
NoteThe network configuration is not changed when moving a virtual machine or template. It is only used when cloning a virtual machine or template.
Click Finish.
The clone customizer is now available to use to create a virtual machine, or template. See Section 4.7.1.4, “Clone a Virtual Machine or Template” for information on using the clone customizer to create a virtual machine or template.
Edit a Clone Customizer
-
Select the object to which the clone customizer belongs, either a virtual machine, or a virtual machine template. Click Manage Clone Customizers...
.
-
The Manage Clone Customizers for (VM or Template) dialog box is displayed. Select the clone customizer to edit and click Edit Clone Customizer...
.
-
The Edit Clone Customizer dialog box is displayed. Edit the clone customizer.
Click OK. The changes to the clone customizer are saved.
Delete a Clone Customizer
-
Select the object to which the clone customizer belongs, either a virtual machine, or a virtual machine template. Click Manage Clone Customizers...
.
-
The Manage Clone Customizers for (VM or Template) dialog box is displayed. Select the clone customizer to delete and click Delete Clone Customizer
.
-
A dialog box is displayed to confirm you want to delete the clone customizer. Confirm you want to delete the clone customizer and click OK. The clone customizer is deleted.
3.5.2.15 Send VM Messages
You can select one or more virtual machines, Oracle VM Servers or server pools, to select which running virtual machines are populated in the dialog box used to send messages to virtual machines.
To send a virtual machine a message you must have first installed the Oracle VM Guest Additions in the virtual machine. For information on installing the Oracle VM Guest Additions, and a more detailed description of the virtual machine messaging mechanism and its uses, see the Oracle VM Administrator's Guide.
-
Click the Servers and VMs tab.
-
Determine the grouping of virtual machines that you wish to send a message to:
-
If you wish to send a message to virtual machines distributed across one or more server pools, click on the Server Pools folder in the navigation pane. Select Server Pools from the Perspective drop-down list. Select one or more server pools in the management pane.
-
If you wish to send a message to virtual machines distributed across one or more servers in a particular server pool, expand the Server Pools folder in the navigation pane and select the server pool where the servers reside. Select Servers from the Perspective drop-down list. Select one or more servers in the management pane.
-
If you wish to send a message to one or more virtual machines on a particular server, expand the Server Pools folder in the navigation pane and select the server pool where the servers reside. Select Virtual Machines from the Perspective drop-down list. Select one or more virtual machines in the management pane.
-
-
Click Send VM Messages...
in the perspective toolbar.
The Send Messages to Virtual Machines dialog box is displayed.
-
To create a message, click Create Message...
in the perspective toolbar to display the
Create VM
Message dialog box.
Enter the message key value pair in the Key and Message fields. Check the Log Message field to retain a log of the message. Check the Hide Message field to hide the message of the key/value pair in the user interface. Click OK to save the message and return to the Send Messages to Virtual Machines dialog box.
-
To edit a message, select the message and click Edit...
in the dialog box toolbar. To delete a message, select it and
click Delete
in the dialog box toolbar.
-
Select the Virtual Machines tab to select which running virtual machines are to receive the messages.
Click OK to send the messages to the virtual machines.
3.5.2.16 View Virtual Machine Configuration File
You can view the content of a virtual machine configuration file. The content is not editable but you can view and copy the text according to your needs.
-
Click the Servers and VMs tab.
-
Select the server pool on which the virtual machines reside in the navigation tree.
-
Select Virtual Machines from the Perspective drop-down list. Select the virtual machine to which the configuration file belongs. Click VM Config File Content...
.
-
The VM Config File Content dialog box is displayed with the content of the virtual machine configuration file. You can view and copy the text according to your needs.
-
Click OK to close the dialog.
3.5.2.17 Display VM Hierarchy Viewer
You can generate a graphical report on a virtual machine. For more information about object reporting, see Section 7.1, “Reports”.
-
Select a server pool in the Server Pools folder in the navigation pane.
-
Select the Virtual Machines perspective in the management pane.
-
Select a virtual machine in the management pane table.
-
Click
Display VM Hierarchy Viewer in
the management pane toolbar.
The VM Hierarchy Viewer window is displayed. This window contains some extra controls to manipulate the report display. These controls are described in the following table.
Table 3.17 Virtual machine graphical report controlsControl
Purpose
Reposition the hierarchy viewer component within the viewport.
Zoom a hierarchy viewer component so that all nodes are visible within the viewport.
Zoom the hierarchy viewer component.
Hide or show the control panel.
Change the layout of the hierarchy viewer component from the layout you defined to one of the layout options.
-
To create an XML report of the graphical report, click Generate Report. The report is generated and sent to the browser.
3.5.2.18 View Virtual Machine Events
The Events perspective is common to many elements within the Oracle VM Manager Web Interface. The Events perspective generally appears as an option within the Perspectives drop-down menu on the management pane of tabs that include a navigation tree. In this case, the Events perspective displays events specific to the item selected in the navigation tree and presents these in the management pane.
The Events perspective may also appear within a dialog that is
triggered from a Display Selected
Events... ![]() perspective toolbar option. In this case,
the Events perspective dialog displays events specific to one
or more elements selected in the management pane.
perspective toolbar option. In this case,
the Events perspective dialog displays events specific to one
or more elements selected in the management pane.
If an object has an error event associated with it you must acknowledge the event to clear the error and return the object to normal operations. For example, this can occur if an Oracle VM Server or virtual machine appear as Stopped (Error) in the status. The object in error is flagged with a red icon in the navigation tree. Oracle VM Servers, virtual machines, repositories and storage objects can have error events associated with them.
Since Oracle VM Manager attempts to resolve issues automatically as much as possible, not all events can be acknowledged by a user within the Oracle VM Manager Web Interface. Therefore, a flag is set for events that are user acknowledgeable. If an event does not have this flag set, you are unable to acknowledge it, since it is handled internally by Oracle VM Manager.
The Events perspective or dialog contains a table with the following columns of information for each event:
-
Severity: The severity level assigned to the event.
-
Timestamp: The date and time that the event occurred.
-
Modify Time: The last recorded date and time that the event was modified.
-
Type: The type of event according to Oracle VM Manager's event categorization model.
-
Summary: A summary description of the event.
-
Acknowledged: Whether an error event has been acknowledged.
-
User Acknowledgeable: Whether or not an event can be acknowledged by the user.
Event Descriptions
An arrow displays next to each event in the table. Click the arrow to expand and view the Description section that provides additional details for the event.
The Events perspective or dialog contains a perspective toolbar with the following options:
|
Toolbar Icon Option |
Icon |
Description |
|---|---|---|
|
Acknowledge |
|
Acknowledge a selected error event to clear the error and return the object to normal operations. Note that this option is only available for user acknowledgeable events. |
|
Acknowledge All |
|
Acknowledge all error events associated with an object to clear the errors and return the object to normal operations. Note that only user acknowledgeable events are cleared. This button is always clickable, even if there are no user acknowledgeable events. Clicking it when there are no user acknowledgeable events results in an error dialog. |
|
Display Count |
A drop-down menu that allows you to select the number of events that should be displayed in the management pane, while you are currently in this perspective. |
Acknowledging Events/Errors
If an object has an error event associated with it you must acknowledge the event to clear the error and return the object to normal operations. For example, this can occur if an Oracle VM Server or virtual machine appear as Stopped (Error) in the status. The object in error is flagged with a red icon in the navigation tree. Oracle VM Servers, virtual machines, repositories and storage objects can have error events associated with them. The following procedures show you how to clear errors and return the object to normal operations.
-
Click the Servers and VMs tab.
-
Select the Oracle VM Server in the navigation tree.
-
Select Events from the Perspective drop-down list in the management pane.
-
Select the user acknowledgeable error event and click Acknowledge
, or click
Acknowledge All
to clear all user acknowledgeable
errors.
-
Click the Servers and VMs tab.
-
Select the server pool, or Oracle VM Server on which the virtual machine resides in the navigation tree.
-
Select Virtual Machines from the Perspective drop-down list in the management pane.
-
Select the virtual machine in the management pane table. Click Display Selected VM Events...
.
-
The Events dialog box is displayed. Select the user acknowledgeable error event and click Acknowledge
, or click
Acknowledge All
to clear all user acknowledgeable
errors. Click
Close.
-
Click the Repositories tab.
-
Select the repository in the navigation tree.
-
Select Events from the Perspective drop-down list in the management pane.
-
Select the error event and click Acknowledge
, or click
Acknowledge All
to clear all errors.
-
Click the Storage tab.
-
Select File Servers, SAN Servers, or a storage server in the navigation tree.
-
Select Events from the Perspective drop-down list in the management pane.
-
Select the user acknowledgeable error event and click Acknowledge
, or click
Acknowledge All
to clear all user acknowledgeable
errors.
3.5.2.19 Generate Report
You can generate an XML report on one or more virtual machines. For more information about object reporting, see Section 7.1, “Reports”.
-
Select a server pool in the Server Pools folder in the navigation pane.
-
Select the Virtual Machines perspective in the management pane.
-
Select one or more virtual machines in the management pane table.
-
Click
Generate Report in the
management pane toolbar.
-
The report is generated and sent to the browser.
3.5.3 CPUs Perspective
The CPUs perspective lists the CPUs configured on a server. The following columns are displayed in the management pane:
-
CPU Number: The CPU number as reported by the BIOS for each CPU on the server.
-
Level Two Cache Size: The amount of memory in the level two cache.
-
Model Name: The model and name of the CPU as reported by the BIOS.
-
Name: The name of the CPU as an object within Oracle VM Manager.
-
Description: The description of the CPU object as stored in Oracle VM Manager.
This perspective includes a toolbar that consists of the following options:
|
Toolbar Icon Option |
Icon |
Description |
|---|---|---|
| Edit Selected CPU... |
|
Displays the Edit CPU dialog box. Use this option to edit the selected CPU. |
|
|
Displays context sensitive help. |
3.5.3.1 Edit CPUs
-
Click the Servers and VMs tab.
-
In the navigation pane, select the Oracle VM Server on which you want to edit the CPUs. If the Oracle VM Server is already part of a server pool, it is listed under Server Pools. Otherwise, find and select the Oracle VM Server in the Unassigned Servers folder.
-
Select CPUs from the Perspective drop-down list in the management pane.
-
Select the CPU to edit in the table in the management pane and click Edit Selected CPU...
in the toolbar.
-
The Edit CPU dialog box is displayed. You can edit the name and the description of the CPU.
-
Click OK to save and apply your changes.
3.5.4 Ethernet Ports Perspective
The Ethernet Ports perspective lists the different Ethernet ports or physical NICs configured on a server. The following columns are displayed in the management pane:
-
Port: The port device name detected on the server.
-
Status: The interface status (whether the port is up or down).
-
Interface Name: The name of the interface as detected on the server.
-
MAC Address: The MAC address for the network port.
-
MTU: The MTU size set for the port.
-
Addressing:
-
Type: How the interface is configured to obtain an IP address (for example, DHCP).
-
IP Address: The current IP address configured on the interface.
-
Netmask: The netmask for the network that is configured on the interface.
-
-
Bond Name: The name of the network bond that this interface is attached to (if any).
-
Network: The name of the network that this interface belongs to (if any):
This perspective includes a toolbar that consists of the following options:
|
Toolbar Icon Option |
Icon |
Description |
|---|---|---|
|
|
Displays the Edit Port dialog box. Use this option to edit the configuration of an Ethernet port on a server. |
|
|
|
Displays context sensitive help. |
3.5.4.1 Edit Port
-
Select the Servers and VMs tab.
-
In the navigation pane, select the Oracle VM Server on which the Ethernet port is to be edited. If the Oracle VM Server is already part of a server pool, it is listed under Server Pools. Otherwise, find and select the Oracle VM Server in the Unassigned Servers folder.
-
In the management pane, set the Perspective to Ethernet Ports and select the Ethernet port to edit. Click Edit Selected Port
in the toolbar. The Edit Port
dialog box is displayed.
-
You can set or change the IP addressing, the mask, the MTU or the description. The Addressing field provides a drop-down selector that allows you to choose either
None,StaticorDynamicto specify how IP Addressing should be configured on this interface or port. If you selectStatichere, the IP Address and Mask fields become available to edit, otherwise they remain uneditable. Setting the Addressing field toNonedeletes any previous IP addressing configured for the port.NoteThe IP addressing must either be set to Dynamic or Static (and the IP addressing information completed) if you intend to use the network port for an Oracle VM network channel, such as for "Server Management", "Live Migrate","Cluster Heartbeat" or "Storage".
-
Click OK to save and apply your changes.
3.5.5 Bond Ports Perspective
The Bond Ports perspective lists the different network bonds configured for the ports on a server. The following columns are displayed in the management pane:
-
Port: The bond port device name detected on the server.
-
Status: The bond interface status (whether the bond port is up or down).
-
Interface Name: The name of the bond interface as detected on the server.
-
MAC Address: The MAC address for the network bond port.
-
MTU: The MTU size set for the bond port.
-
Addressing:
-
Type: How the interface is configured to obtain an IP address (for example, DHCP).
-
IP Address: The current IP address configured on the interface.
-
Netmask: The netmask for the network that is configured on the interface.
-
-
Networking:
-
Network: The name of the network that this bond port belongs to (if any).
-
Bond Name: The name of the bond in the bond port.
-
This perspective includes a toolbar that consists of the following options:
|
Toolbar Icon Option |
Icon |
Description |
|---|---|---|
|
|
Displays the Create Bond Port wizard. Use this option to create a new bond port consisting of a number of physical Ethernet ports on a server. |
|
|
|
Displays the Edit Bond Port dialog box. Use this option to change the configuration of the selected bond port on a server. |
|
|
|
Displays the Delete Confirmation dialog box. Use this option to delete the selected bond port on a server. | |
|
|
Displays context sensitive help. |
3.5.5.1 Create Bond Port
The management port on each Oracle VM Server is specified at installation time and is automatically configured as a bonded interface. You create additional bonds to add redundancy and if desired, load-balancing to your network environment. Once created, these bonds can be used as building blocks when building VLAN Interfaces or networks. This section discusses managing bonded interfaces.
-
Select the Servers and VMs tab.
-
In the navigation pane, select the Oracle VM Server on which the bond port is to be created. If the Oracle VM Server is already part of a server pool, it is listed under Server Pools. Otherwise, find and select the Oracle VM Server in the Unassigned Servers folder.
-
In the management pane, set the Perspective to Ethernet Ports. Make sure that the selected Oracle VM Server's ports to be used for the bond port are not part of an existing bond, network or VLAN group. Verify that the ports are available. You cannot add a port to a bond if the port has an IP address.
-
In the management pane, set the Perspective to Bond Ports. Click Create Bond Port
in the toolbar.
-
The Create Bond Port dialog box is displayed.
Enter or select the following:
-
Server: The name of the Oracle VM Server. You cannot edit this field.
-
Interface Name: An optional name for the bond in the format
bond, for exampleNbond1, orbond2. If you do not enter a name, the default ofbondis used, whereNNis the next available bond number. This cannot be changed after the bond is created. -
Addressing: The IP addressing type to use for the bond, either Dynamic (DHCP) or Static. You can assign an IP address to this bond now, or wait to assign an IP address later, when using the bond to create VLAN Interfaces or networks.
-
IP Address: The IP address to use for the bond. This is available if using Static addressing.
-
Mask: The netmask to use for the bond. This is available if using Static addressing.
-
MTU: The Maximum Transfer Unit size. If your network supports jumbo frames, increase the MTU value to the required size. The MTU is set to
1500by default, and can be between1500and9000for a 1GbE NIC, and1500and64000for a 10GbE NIC. Setting the MTU field sets the maximum transmission rate, so a packet size of 5000 can be sent and received if the MTU is set to 9000 for a 1GbE NIC.NoteIf configuring a port on SPARC system, changing the MTU value may require that the interface is not currently in use. If you attempt to change the MTU value on an interface that is currently in use, an error message may be returned.
-
Description: An optional description for the bond.
-
Bonding: The bonding mode, either Active Passive, Link Aggregation, or Load Balanced. See How is Network Bonding Used in Oracle VM? in the Oracle VM Concepts Guide, for more information about network bonding modes.
-
Available Ports: The available Ethernet ports on the Oracle VM Server. Select the ports to use from here and move them to the Selected Ports column.
-
Selected Ports: The ports to use for the bond.
Click OK to create the bond.
-
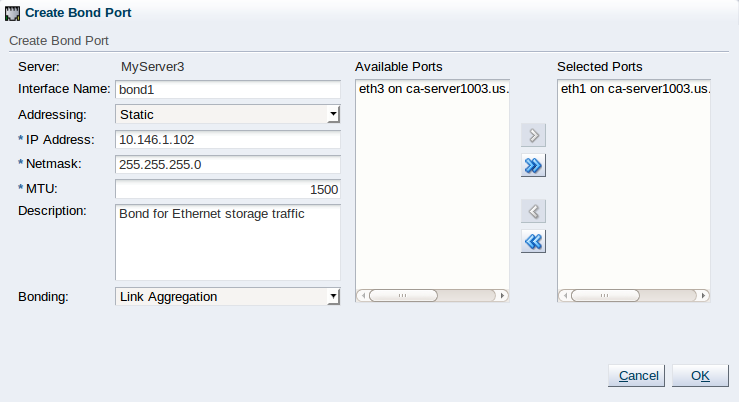
When you have created the bond port, you can make changes to its configuration. You can update its bonding mode, and add or remove ports as well as changing its description and IP addressing.
3.5.5.2 Edit Bond Port
-
Select the Servers and VMs tab.
-
In the navigation pane, select the Oracle VM Server on which the bond port is to be edited. If the Oracle VM Server is already part of a server pool, it is listed under Server Pools. Otherwise, find and select the Oracle VM Server in the Unassigned Servers folder.
-
In the management pane, set the Perspective to Bond Ports and select the bond to edit. Click Edit Selected Port
in the toolbar. The Edit Port
dialog box is displayed.
-
You can set or change the bonding mode, the IP addressing, the mask, the MTU, the description, or the ports that are part of the bond. The Addressing field provides a drop-down selector that allows you to choose either
None,StaticorDynamicto specify how IP Addressing should be configured on this bond. If you selectStatichere, the IP Address and Mask fields become available to edit, otherwise they remain uneditable. Setting the Addressing field toNonedeletes any previous IP addressing configured for the bond.NoteThe IP addressing must either be set to Dynamic or Static (and the IP addressing information completed) if you intend to use the network bond for an Oracle VM network channel, such as for "Server Management", "Live Migrate","Cluster Heartbeat" or "Storage".
-
Click OK to save and apply your changes.
3.5.5.3 Delete Bond Port
-
Select the Servers and VMs tab.
-
In the navigation pane, select the Oracle VM Server on which the bond port is to be deleted. If the Oracle VM Server is already part of a server pool, it is listed under Server Pools. Otherwise, find and select the Oracle VM Server in the Unassigned Servers folder.
-
In the management pane, set the Perspective to Bond Ports and select the bond to delete. Click Delete Selected Port
in the toolbar.
-
In the Delete Confirmation dialog box, click OK to delete the bond port.
3.5.6 Physical Disks Perspective
The Physical Disks perspective displays a list of the physical disks accessible by the Oracle VM Server in the table in the management pane. The following information is available:
-
Name: The name of the physical disk entry.
-
Event Severity: The current event severity status for the physical disk.
-
Size (GiB): The size, in GiB, of the physical disk.
-
Volume Group: The volume group that the physical disk belongs to.
-
SAN Server: The SAN server that the physical disk belongs to (if local storage, this is also indicated).
-
Type: The type of storage that the physical disk is a part of (for example, LUN, iSCSI, Fibre Channel, or Unknown).
-
File System: The name of the file system that is installed on the disk, if any.
-
Storage Plugin: The Oracle VM Storage Connect plug-in that is used to access this physical disk.
-
Description: A configured description for the physical disk.
-
VM(s): Virtual machines using the physical disk.
An arrow displays next to each physical disk entry in the table. Click the arrow to expand the view for each entry and display the following information:
-
Name: The user-specified alias for the physical disk. The name can be changed without changing the name of the physical disk on the storage array.
-
User Friendly Name: The name of the physical disk on the storage array. The name was specified when the disk was created and cannot be changed.
-
Status: The status of the physical disk (whether or not the disk is online).
-
Shareable: Whether or not the physical disk can be shared.
-
Thin Provision: Whether or not thin provisioning is supported by the physical disk.
-
Reserved by Server(s): Whether or not the physical disk is unavailable for use by Oracle VM Manager.
-
Storage Targets: The endpoint provided by the storage server through which the server may direct commands to the physical disk. The storage target provides access to the physical disk.
-
Server Pool: The server pool that the physical disk belongs to.
-
Repository: The repository that the physical disk belongs to.
-
VM(s): Virtual machines using the physical disk.
-
ID: The UUID for the physical disk.
-
Page83 ID: The unique identifier for the physical disk.
-
Access Groups: The access groups that the physical disk belongs to.
-
Extra Information: Information that is passed to and from the Oracle VM Storage Connect plug-in for use internally by the plug-in.
-
Absolute Path: The absolute path to the location of the disk.
The management functions you can perform on the disk are available as icons in the perspective toolbar. Some management options are only available to SAN server disks that use a non-generic Oracle VM Storage Connect plug-in.
|
Toolbar Icon Option |
Icon |
Description |
|---|---|---|
|
|
Request an update of the all the physical disks available to the Oracle VM Server to determine if any disks have been changed, added, or removed. |
|
|
|
Change the name, description and extra information of the physical disk, or make it shareable. |
|
|
|
Stop using the selected physical disk in your Oracle VM environment. Warning If you effectively delete a LUN from a registered storage array, make sure that you delete it in Oracle VM Manager first, before you physically delete it from the storage server. If you do not respect this order of operations, the system goes into an unknown state, which can only be resolved by rebooting the Oracle VM Servers the deleted LUN is connected to. |
|
|
|
Create a thin clone, sparse copy or non-sparse copy of the physical disk on the selected target. |
|
|
|
Delete one or more file systems and contents of the physical disks. |
|
|
|
Request an update of one or more physical disks to see if changes have been made to the size and configuration. |
|
|
|
Display the Events dialog box which contains the job event associated with the physical disk. |
|
|
|
Displays context sensitive help. |
3.5.6.1 Rescan Physical Disks
You can rescan the physical disks available to an Oracle VM Server to determine if any disks have been changed, added, or removed.
-
Click the Servers and VMs tab, and select the server pool in which the Oracle VM Servers reside in the navigation tree. Select Servers in the Perspective drop-down list in the management pane. Select the Oracle VM Servers in the management pane table.
Alternatively, on the Servers and VMs tab, expand the Server Pools or Unassigned Servers folder, to select a particular server in the navigation tree. Select the Physical Disks option in the Perspective drop-down list.
-
Click Rescan Physical Disks
in the perspective toolbar.
-
A confirmation dialog box is displayed. Click OK.
3.5.6.2 Edit Physical Disk
It is possible to edit the configuration for a physical disk either available on a SAN server or as local or shared storage. The steps and options to do so are described below.
-
On the Storage tab, expand the SAN Servers folder in the navigation tree, select a SAN server item contained within the folder. Select the Physical Disks option in the Perspective drop-down list. Select the physical disk that you wish to edit in the table presented in the management pane.
To edit the physical disk configuration for a physical disk used by a particular server, on the Servers and VMs tab, expand the Server Pools or Unassigned Servers folder, to select a particular server in the navigation tree. Select the Physical Disks option in the Perspective drop-down list. Select the physical disk that you wish to edit in the table presented in the management pane.
-
Click on the
Edit Physical Disk icon in
the toolbar.
-
A dialog opens to allow you to reconfigure the Physical Disk. The dialog has the following options:
-
ID: A non-editable field containing the physical disk's UUID as it is stored within Oracle VM Manager.
-
Name: A field to change the name of the physical disk within Oracle VM Manager.
-
Current Size(GiB): A non-editable field containing the physical disk's current size, in GiB.
-
New Size(GiB): A field to change the size, in GiB, of the physical disk. The size of the physical disk can only be increased in size.
-
Description: A text field allowing a description of the physical disk.
-
Shareable: A check box that determines whether or not the disk can be shared.
-
Thin Provision: A non-editable field describing whether or not thin provisioning is supported by the disk.
-
-
When you have finished editing the physical disk, click OK to save the changes, or Cancel to exit out of the dialog without saving any changes.
3.5.6.3 Delete Physical Disk
It is possible to delete an existing physical disk if it is no longer used in your Oracle VM environment and the Oracle VM Storage Connect plug-in that you are using supports this operation. Two types of physical disks are used in an Oracle VM environment:
-
Local physical disk - A physical disk installed locally on a specific Oracle VM Server.
-
SAN Server physical disk - A physical disk that is made available to the SAN Server during the discovery process.
Each physical disk type can be deleted using the Oracle VM Manager Web Interface.
-
There are two options available that you can use to delete a physical disk from your Oracle VM environment:
-
To delete a local physical disk:
Expand the Servers and VMs tab, expand the Server Pools or Unassigned Servers folder, and select a particular server in the navigation tree. Select the Physical Disks option in the Perspective drop-down list. Select the physical disk that you want to delete in the table presented in the management pane.
-
To delete a SAN Server physical disk:
Use the instructions in step a or alternatively, expand the Storage tab, expand the SAN Servers folder in the navigation tree, and select a SAN server item contained within the folder. Select the Physical Disks option in the Perspective drop-down list. Select the physical disk that you wish to delete in the table presented in the management pane.
-
-
Click on the
Delete Physical
Disk icon in the toolbar.
-
The Delete Confirmation dialog box is displayed. Click OK to delete the physical disk.
3.5.6.4 Clone Physical Disk
It is possible to clone a physical disk. The steps and options to do so are described below.
-
On the Storage tab, expand the SAN Servers folder in the navigation tree, select a SAN server item contained within the folder. Select the Physical Disks option in the Perspective drop-down list. Select the physical disk that you wish to clone in the table presented in the management pane.
To clone a physical disk used by a particular server, on the Servers and VMs tab, expand the Server Pools or Unassigned Servers folder, to select a particular server in the navigation tree. Select the Physical Disks option in the Perspective drop-down list. Select the physical disk that you wish to clone in the table presented in the management pane.
-
Click on the
 Clone Physical Disk icon in
the toolbar.
Clone Physical Disk icon in
the toolbar.
-
A dialog opens to allow you to clone the Physical Disk. The dialog has the following options:
-
Name: A field to set the name of the physical disk clone that you are going to create within Oracle VM Manager.
-
Clone Target Type: A drop-down menu allowing you to select the type of storage to be used for the physical disk clone:
-
Physical Disk: Copies the data from one physical disk to another.
-
Repository: Copies the data from the physical disk into a virtual disk image in an existing repository.
-
-
Clone Target: A searchable field to allow you to select the target location where the clone is to be stored.
-
Clone Type: A drop-down menu allowing you to select the type of clone to create:
-
Sparse Copy: Copies only the written data from the physical disk to the target clone.
-
Non-sparse Copy: Performs a block copy of the physical disk to the target clone.
-
-
-
When you have finished setting the clone parameters for the physical disk, click OK to begin the clone job, or Cancel to exit out of the dialog without saving any changes.
3.5.6.5 Delete File System
It is possible to delete the file system on local and shared storage devices, and on a physical disk attached to an Oracle VM Server.
-
Select the Storage tab.
-
Click on either the Local File Systems or Shared File Systems folder in the navigation tree.
-
Select the file system to delete in the table in the management pane.
-
Click the
Delete File System icon in
the toolbar. If the icon is greyed out it means that the file
system is used by a repository and it cannot be deleted. You
must first delete the repository. See
Section 4.3.1.3, “Delete Repository”.
-
The Delete Confirmation dialog box is displayed. Click OK to delete the file system.
-
Select the Servers and VMs tab.
-
Select the Oracle VM Server in the navigation tree.
-
Select Physical Disks in the Perspective drop-down list.
-
Select the physical disk in the table in the management pane.
-
Click on the
 Delete File System icon in
the toolbar. If the icon is greyed out, there is no file
system on the disk so it cannot be deleted.
Delete File System icon in
the toolbar. If the icon is greyed out, there is no file
system on the disk so it cannot be deleted.
-
The Delete Confirmation dialog box is displayed. Click OK to delete the file system.
3.5.6.6 Refresh Physical Disk
When changes are made to the physical disks on a SAN server or Oracle VM Server, it is useful to refresh the configuration of your physical disks to make Oracle VM Manager aware of the changes.
-
Expand the SAN Servers folder in the navigation tree, select a SAN server item contained within the folder. Select the Physical Disks option in the Perspective drop-down list. Select the physical disk or disks that you wish to refresh in the table presented in the management pane.
To refresh physical disks used by a particular server, on the Servers and VMs tab, expand the Server Pools or Unassigned Servers folder, to select a particular server in the navigation tree. Select the Physical Disks option in the Perspective drop-down list. Select the physical disk that you wish to refresh in the table presented in the management pane.
-
Click on the
 Refresh Physical Disk option
in the toolbar.
Refresh Physical Disk option
in the toolbar.
-
The selected physical disks are refreshed and their configurations are updated within Oracle VM Manager.
If you encounter an error, when refreshing a physical disk with a repository located on it, similar to the following:
OVMAPI_7281E Cannot perform operation on file system...
You may need to ensure that the repository is under the ownership of the Oracle VM Manager instance that you are using. See Section 4.3.1.2, “Edit Repository” for more information.
3.5.6.7 View Physical Disk Events
The Events perspective is common to many elements within the Oracle VM Manager Web Interface. The Events perspective generally appears as an option within the Perspectives drop-down menu on the management pane of tabs that include a navigation tree. In this case, the Events perspective displays events specific to the item selected in the navigation tree and presents these in the management pane.
The Events perspective may also appear within a dialog that is
triggered from a Display Selected
Events... ![]() perspective toolbar option. In this case,
the Events perspective dialog displays events specific to one
or more elements selected in the management pane.
perspective toolbar option. In this case,
the Events perspective dialog displays events specific to one
or more elements selected in the management pane.
If an object has an error event associated with it you must acknowledge the event to clear the error and return the object to normal operations. For example, this can occur if an Oracle VM Server or virtual machine appear as Stopped (Error) in the status. The object in error is flagged with a red icon in the navigation tree. Oracle VM Servers, virtual machines, repositories and storage objects can have error events associated with them.
Since Oracle VM Manager attempts to resolve issues automatically as much as possible, not all events can be acknowledged by a user within the Oracle VM Manager Web Interface. Therefore, a flag is set for events that are user acknowledgeable. If an event does not have this flag set, you are unable to acknowledge it, since it is handled internally by Oracle VM Manager.
The Events perspective or dialog contains a table with the following columns of information for each event:
-
Severity: The severity level assigned to the event.
-
Timestamp: The date and time that the event occurred.
-
Modify Time: The last recorded date and time that the event was modified.
-
Type: The type of event according to Oracle VM Manager's event categorization model.
-
Summary: A summary description of the event.
-
Acknowledged: Whether an error event has been acknowledged.
-
User Acknowledgeable: Whether or not an event can be acknowledged by the user.
Event Descriptions
An arrow displays next to each event in the table. Click the arrow to expand and view the Description section that provides additional details for the event.
The Events perspective or dialog contains a perspective toolbar with the following options:
|
Toolbar Icon Option |
Icon |
Description |
|---|---|---|
|
Acknowledge |
|
Acknowledge a selected error event to clear the error and return the object to normal operations. Note that this option is only available for user acknowledgeable events. |
|
Acknowledge All |
|
Acknowledge all error events associated with an object to clear the errors and return the object to normal operations. Note that only user acknowledgeable events are cleared. This button is always clickable, even if there are no user acknowledgeable events. Clicking it when there are no user acknowledgeable events results in an error dialog. |
|
Display Count |
A drop-down menu that allows you to select the number of events that should be displayed in the management pane, while you are currently in this perspective. |
Acknowledging Events/Errors
If an object has an error event associated with it you must acknowledge the event to clear the error and return the object to normal operations. For example, this can occur if an Oracle VM Server or virtual machine appear as Stopped (Error) in the status. The object in error is flagged with a red icon in the navigation tree. Oracle VM Servers, virtual machines, repositories and storage objects can have error events associated with them. The following procedures show you how to clear errors and return the object to normal operations.
-
Click the Servers and VMs tab.
-
Select the Oracle VM Server in the navigation tree.
-
Select Events from the Perspective drop-down list in the management pane.
-
Select the user acknowledgeable error event and click Acknowledge
, or click
Acknowledge All
to clear all user acknowledgeable
errors.
-
Click the Servers and VMs tab.
-
Select the server pool, or Oracle VM Server on which the virtual machine resides in the navigation tree.
-
Select Virtual Machines from the Perspective drop-down list in the management pane.
-
Select the virtual machine in the management pane table. Click Display Selected VM Events...
.
-
The Events dialog box is displayed. Select the user acknowledgeable error event and click Acknowledge
, or click
Acknowledge All
to clear all user acknowledgeable
errors. Click
Close.
-
Click the Repositories tab.
-
Select the repository in the navigation tree.
-
Select Events from the Perspective drop-down list in the management pane.
-
Select the error event and click Acknowledge
, or click
Acknowledge All
to clear all errors.
-
Click the Storage tab.
-
Select File Servers, SAN Servers, or a storage server in the navigation tree.
-
Select Events from the Perspective drop-down list in the management pane.
-
Select the user acknowledgeable error event and click Acknowledge
, or click
Acknowledge All
to clear all user acknowledgeable
errors.
3.5.7 Storage Initiators Perspective
The Storage Initiators perspective lists the different storage initiators available on a server. It also allows you to add storage initiators to different access groups. The following columns are displayed in the management pane:
-
Name: The name of the storage initiator on the selected server.
-
Description: The configured description for the storage initiator.
This perspective includes a toolbar that consists of the following options:
|
Toolbar Icon Option |
Icon |
Description |
|---|---|---|
|
|
Displays the View Access Groups for Initiator dialog box. Use this option to add storage initiators on a particular server to any existing access groups that you have configured. |
|
|
|
Displays context sensitive help. |
3.5.7.1 View Access Groups for Selected Initiator
In order to access SAN server storage, an access group must be created, and a storage initiator configured on the Oracle VM Server. Storage initiators are added to an Oracle VM Server during discovery, based on your storage configuration. You configure access groups to bind storage initiators to physical disks. For information on creating access groups, see Section 6.6.4, “Access Groups Perspective”. You can also view and configure existing storage initiators for a particular Oracle VM Server.
-
Click the Servers and VMs tab, and select the Oracle VM Server in the navigation tree.
-
Select Storage Initiators in the Perspective drop-down list in the management pane. The storage initiators configured on the Oracle VM Server are listed in the management pane table.
-
Select a storage initiator in the table, and click View access groups for selected initiator
 .
.
-
The View Access Groups for Initiator dialog box is displayed. Select the SAN Server and Access Groups from the drop-down lists and click Add. Click OK.
See Section 6.6.4, “Access Groups Perspective” for more information on managing SAN server access groups.
3.5.8 Control Domains Perspective
The Control Domains perspective displays information about the control domain (dom0), running on the Oracle VM Server, in the table in the management pane. The following information is available:
-
Name: The name of the domain
-
Processors: The number of processors available for use by the control domain.
-
Memory (MB): The amount of memory (in megabytes) used by the control domain.
-
Host OS Name: The host operating system name running within the control domain.
-
Host OS Type: The type of operating system running in the control domain (for example, Linux or Solaris).
-
OVM Version: The version number reported by the Oracle VM software running in the control domain.
An arrow displays next to each control domain entry in the table. Click the arrow to expand the view for each entry and display the following information:
-
Host OS Major Version: The major version number for the operating system version.
-
Host OS Minor Version: The minor version number for the operating system version.
-
Agent Version: The version number of the Oracle VM Agent software running in the control domain.
-
Kernel Release: The kernel version release numbering for the operating system running in the control domain.
This perspective includes a toolbar that consists of the following options:
|
Toolbar Icon Option |
Icon |
Description |
|---|---|---|
|
|
Displays context sensitive help. |
3.5.9 Repository Exports Perspective
An Oracle VM Server can be configured to enable third party applications to perform a back up of the contents of a storage repository. To enable this, an Oracle VM Server is configured to provide an NFS share that a third party back up tool can use to access the contents of the repository. Only local or shared OCFS2-based storage repositories can be exported as an NFS share.
You cannot create a repository export for an NFS storage repository. When creating a repository export, you can only select an OCFS2 storage repository. An NFS storage repository is also an NFS share and can be exported without using the repository export functionality.
When you have created a repository export, use the Repository Path (displayed in the management pane table) and the Oracle VM Server hostname or IP address to connect to the NFS mount point from the third party back up software.
This perspective lists the currently available repository exports. The following columns are presented in the table within the management pane:
-
Client IP/Host Name: The IP address or hostname of the computer which has been granted access to the repository
-
Options: Additional NFS mount parameters
-
Repository: The repository being exported
This perspective includes a toolbar that consists of the following options:
|
Toolbar Icon Option |
Icon |
Description |
|---|---|---|
|
|
Displays the Create a Repository Export wizard. Use this option to create repository exports to backup your repositories. |
|
|
|
Displays the Edit Repository Export wizard. Use this option to edit the NFS parameters for a repository export. |
|
|
|
Displays the Delete Confirmation dialog box. Use this option to delete the selected repository export. |
|
|
|
Displays context sensitive help. |
3.5.9.1 Create Repository Export
-
Click the Servers and VMs tab.
-
In the navigation pane, select the Oracle VM Server on which you want to create the repository export location.
-
Select Repository Exports from the Perspective drop-down list in the management pane.
-
Click Create Repository Export..
in the toolbar.
-
The Create Repository Export dialog box is displayed. Enter or select the following:
-
Client IP/Host Name: The IP address or hostname of the computer for which to grant access to the repository contents. This is likely to be the machine on which the third party back up and restore software is running.
-
Repository: An OCFS2 storage repository presented to the Oracle VM Server. This is the repository you want to back up.
NoteYou cannot create a repository export for an NFS storage repository. When creating a repository export, you can only select an OCFS2 storage repository. An NFS storage repository is also an NFS share and can be exported without using the repository export functionality.
-
Options: The parameters to include in the NFS mount configuration, for example:
rw, async, no_root_squash
Click OK.
-
3.5.9.2 Edit Repository Export
-
Click the Servers and VMs tab.
-
In the navigation pane, select the Oracle VM Server on which you want to edit the repository export parameters.
-
Select Repository Exports from the Perspective drop-down list in the management pane.
-
To edit a repository export, select the entry in the table in the management pane and click Edit Repository Export..
in the toolbar.
-
The Edit Repository Export dialog box is displayed. Enter or select the following:
-
Client IP/Host Name: The IP address or hostname of the computer for which to grant access to the repository contents. This is likely to be the machine on which the third party back up and restore software is running. (Not editable)
-
Repository: An OCFS2 storage repository presented to the Oracle VM Server. This is the repository you want to back up. (Not editable)
-
Options: The parameters to include in the NFS mount configuration, for example:
rw, async, no_root_squash
Click OK.
-
3.5.9.3 Delete Repository Export
-
Click the Servers and VMs tab.
-
In the navigation pane, select the Oracle VM Server for which you want to delete the repository export.
-
Select Repository Exports from the Perspective drop-down list in the management pane.
-
To delete a repository export, select the entry in the table in the management pane and click Delete Repository Export
in the toolbar.
-
A confirmation dialog is displayed. Click OK to delete the repository export.
3.5.10 Events Perspective
The Events perspective is common to many elements within the Oracle VM Manager Web Interface. The Events perspective generally appears as an option within the Perspectives drop-down menu on the management pane of tabs that include a navigation tree. In this case, the Events perspective displays events specific to the item selected in the navigation tree and presents these in the management pane.
The Events perspective may also appear within a dialog that is
triggered from a Display Selected
Events... ![]() perspective toolbar option. In this case,
the Events perspective dialog displays events specific to one
or more elements selected in the management pane.
perspective toolbar option. In this case,
the Events perspective dialog displays events specific to one
or more elements selected in the management pane.
If an object has an error event associated with it you must acknowledge the event to clear the error and return the object to normal operations. For example, this can occur if an Oracle VM Server or virtual machine appear as Stopped (Error) in the status. The object in error is flagged with a red icon in the navigation tree. Oracle VM Servers, virtual machines, repositories and storage objects can have error events associated with them.
Since Oracle VM Manager attempts to resolve issues automatically as much as possible, not all events can be acknowledged by a user within the Oracle VM Manager Web Interface. Therefore, a flag is set for events that are user acknowledgeable. If an event does not have this flag set, you are unable to acknowledge it, since it is handled internally by Oracle VM Manager.
The Events perspective or dialog contains a table with the following columns of information for each event:
-
Severity: The severity level assigned to the event.
-
Timestamp: The date and time that the event occurred.
-
Modify Time: The last recorded date and time that the event was modified.
-
Type: The type of event according to Oracle VM Manager's event categorization model.
-
Summary: A summary description of the event.
-
Acknowledged: Whether an error event has been acknowledged.
-
User Acknowledgeable: Whether or not an event can be acknowledged by the user.
Event Descriptions
An arrow displays next to each event in the table. Click the arrow to expand and view the Description section that provides additional details for the event.
The Events perspective or dialog contains a perspective toolbar with the following options:
|
Toolbar Icon Option |
Icon |
Description |
|---|---|---|
|
Acknowledge |
|
Acknowledge a selected error event to clear the error and return the object to normal operations. Note that this option is only available for user acknowledgeable events. |
|
Acknowledge All |
|
Acknowledge all error events associated with an object to clear the errors and return the object to normal operations. Note that only user acknowledgeable events are cleared. This button is always clickable, even if there are no user acknowledgeable events. Clicking it when there are no user acknowledgeable events results in an error dialog. |
|
Display Count |
A drop-down menu that allows you to select the number of events that should be displayed in the management pane, while you are currently in this perspective. |
Acknowledging Events/Errors
If an object has an error event associated with it you must acknowledge the event to clear the error and return the object to normal operations. For example, this can occur if an Oracle VM Server or virtual machine appear as Stopped (Error) in the status. The object in error is flagged with a red icon in the navigation tree. Oracle VM Servers, virtual machines, repositories and storage objects can have error events associated with them. The following procedures show you how to clear errors and return the object to normal operations.
-
Click the Servers and VMs tab.
-
Select the Oracle VM Server in the navigation tree.
-
Select Events from the Perspective drop-down list in the management pane.
-
Select the user acknowledgeable error event and click Acknowledge
, or click
Acknowledge All
to clear all user acknowledgeable
errors.
-
Click the Servers and VMs tab.
-
Select the server pool, or Oracle VM Server on which the virtual machine resides in the navigation tree.
-
Select Virtual Machines from the Perspective drop-down list in the management pane.
-
Select the virtual machine in the management pane table. Click Display Selected VM Events...
.
-
The Events dialog box is displayed. Select the user acknowledgeable error event and click Acknowledge
, or click
Acknowledge All
to clear all user acknowledgeable
errors. Click
Close.
-
Click the Repositories tab.
-
Select the repository in the navigation tree.
-
Select Events from the Perspective drop-down list in the management pane.
-
Select the error event and click Acknowledge
, or click
Acknowledge All
to clear all errors.
-
Click the Storage tab.
-
Select File Servers, SAN Servers, or a storage server in the navigation tree.
-
Select Events from the Perspective drop-down list in the management pane.
-
Select the user acknowledgeable error event and click Acknowledge
, or click
Acknowledge All
to clear all user acknowledgeable
errors.
3.6 Unassigned Servers Folder
The Unassigned Servers navigation folder in the navigation tree contains the Oracle VM Servers that are not a member of a server pool within Oracle VM Manager. The structure of the navigation provided in the navigation tree is discussed in more detail in Section 3.2, “Summary”.
Clicking on the Unassigned Servers folder in the navigation tree allows you to access different perspectives in the management pane. Each perspective provides its own view of all of the unassigned Oracle VM Servers within Oracle VM Manager. Most of the perspectives also include separate toolbars that enable you to perform various configuration or management tasks specific to the view currently displayed in the management pane. The Unassigned Servers folder offers the following perspectives in the management pane:
Within the Unassigned Servers navigation folder, individual Oracle VM Server navigation items are displayed if there are Oracle VM Servers in your environment that have not been assigned to a server pool. Each Oracle VM Server item has the same associated perspectives and toolbars available as an Oracle VM Server item listed in a server pool. For information on the perspectives and toolbars associated with an Oracle VM Server navigation item, see Section 3.5, “Server Item”.
3.6.1 Servers Perspective
The Servers perspective lists the different servers that belong to either a server pool or the Unassigned Servers folder, depending on the item selected in the navigation pane. The following columns are displayed in the management pane:
-
Name: The name that has been configured for the server.
-
Status: The running status of the server.
-
Tag(s): Any tags that have been applied to the server.
-
Maintenance Mode: Whether or not the server is configured to be in maintenance mode.
-
IP Address: The IP address that is used by Oracle VM Manager to access the server on the management network channel.
-
Memory (GiB): The available memory, in GiB, on the server.
-
Processors: The number of processors that the server contains.
-
Speed (GHz): The speed that the processors for the server are configured to run at.
-
Product: The physical host brand and type reported by the server bios.
-
Owned: Whether or not the server is owned by the current Oracle VM Manager instance.
-
Update Required: Whether or not a server update is available for the server from its server update repository.
This perspective includes a toolbar that consists of the following options:
|
Toolbar Icon Option |
Icon |
Description |
|---|---|---|
|
|
Displays the Create Virtual Machine wizard. Use this option to create a virtual machine in the selected server pool. |
|
|
|
Displays the Edit Server dialog box. Use this option to edit the name and description for an Oracle VM Server. This is also used to put the Oracle VM Server into maintenance mode, take ownership of it, and to configure remote management of the Oracle VM Server using IPMI (Intelligent Platform Management Interface).
Note that placing an Oracle VM Server in maintenance mode is
indicated in the navigation pane with this icon:
|
|
|
|
Displays the Delete Confirmation dialog box. Use this option to delete the selected Oracle VM Server. | |
|
|
Starts a stopped Oracle VM Server. |
|
|
|
Stops a running Oracle VM Server. | |
|
|
Restarts a running Oracle VM Server. | |
|
|
Powers off an Oracle VM Server. This is the equivalent of physically pushing the Off button on the hardware. |
|
|
|
Rediscovers the Oracle VM Server. Use this to refresh information about the Oracle VM Server. |
|
|
|
Rescans the local storage on an Oracle VM Server. Use this option to rescan the storage presented to an Oracle VM Server when the storage configuration is changed, for example, a new storage array is added. | |
|
|
Updates or upgrades the Oracle VM Server if an update is available in the server update repository. |
|
|
|
Send one or more virtual machines a message. Use this option to send messages to virtual machines that have the Oracle VM Guest Additions installed. This option is not available in the Unassigned Servers folder. Virtual machines must be running on a server to receive messages. |
|
|
|
Generate an XML report on one or more Oracle VM Servers. |
|
|
|
Displays context sensitive help. |
3.6.1.1 Create Virtual Machine
This section explains how to create a virtual machine using a template, and creating a virtual machine from an ISO file, or from physical or virtual disks.
-
Click the Servers and VMs tab.
-
Click Create Virtual Machine
in the toolbar.
-
The Create Virtual Machine wizard is displayed.
Select the Clone from an existing VM Template option and then click Next.
-
The Create Virtual Machine wizard prompts you to specify details for the virtual machine.
Enter or select the following details:
-
Clone Count: The number of virtual machines to create from the template.
-
Name Index: The start index number to use for the clone name suffix. The default is
0. This is used in conjunction with the VM Name field to create the name for each clone. -
Repository: The repository in which to create the virtual machine configuration files.
-
VM Template: The template to use to create the virtual machines.
-
VM Name: An optional name for the virtual machines. The maximum name length is 256 characters and may contain any character. The name need not be unique. If no value is given, the default is the name of the virtual machine template being cloned. Each clone is suffixed with a dot (.) and the clone index number, starting with the value for the Name Index field. For example, if the VM Name field is set to
MyVM, and the Name Index field is set to1, the resulting clones would be namedMyVM.1,MyVM.2and so on. -
Server Pool: The server pool in which to deploy the virtual machines.
-
Description: An optional description of the virtual machines.
-
-
Click Finish. The virtual machines are created and deployed to the server pool.
-
Click the Servers and VMs tab.
-
Click Create Virtual Machine
in the toolbar.
-
The Create Virtual Machine wizard is displayed.
Click the Clone from an existing Virtual Appliance option and then click Next.
-
The Create Virtual Machine wizard prompts you to specify details for the virtual machine.
Enter or select the following details:
-
Repository: The repository in which to create the virtual machine configuration files.
-
Virtual Appliance: The virtual appliance from which you want to create the virtual machines.
-
Server Pool: The server pool in which to deploy the virtual machines.
If you select None, the virtual machines are deployed into the Unassigned Virtual Machines folder.
-
Available Virtual Appliance VM(s): The virtual machines that are available to create from the virtual appliance.
-
Selected Virtual Appliance VM(s): The virtual machines to create from the virtual appliance.
You can select multiple virtual machines if the virtual appliance contains more than one. Oracle VM Manager creates a separate virtual machine for each one that you select.
-
-
Click Finish.
Oracle VM Manager creates the selected virtual machines from the virtual appliance and deploys them to the server pool you specified.
You can then migrate each virtual machine to a compatible server or server pool.
-
Click the Servers and VMs tab.
-
Click Create Virtual Machine
in the toolbar.
The Create Virtual Machine wizard is displayed.
-
Click the Create a new VM option and then click Next.
-
The Create Virtual Machine step is displayed in the wizard.
Enter or select the following details:
-
Server Pool: The server pool on which to create the virtual machine.
-
Server: The server that the virtual machine should be created on. The default option is
Any, but the drop-down selection lists the servers that exist in the server pool that you have selected. Selecting a particular server forces the virtual machine to be created on that server. This has implications for the Start Policy discussed later. -
Repository: The repository in which to create the virtual machine configuration file.
-
Name: A name for the virtual machine. The maximum name length is 256 characters and may contain any character. The name need not be unique.
-
Enable High Availability: Whether to enable High Availability (HA). See How does High Availability (HA) Work? in the Oracle VM Concepts Guide for more information on HA.
-
Enable Huge Pages: Whether to enable HugePages.
-
The HugePages feature is deprecated for virtual machines with a domain type of PVM in Oracle VM Release 3.4.1. You should not enable HugePages when creating or editing virtual machines. This feature will be removed in a future release of Oracle VM.
If you have HugePages enabled for any PVM guests, Oracle recommends that you change the domain type for virtual machines from Paravirtualized (PVM) to Hardware virtualized, with paravirtualized drivers (PVHVM). If you cannot change the domain type for a virtual machine, you should disable the HugePages setting and then restart the virtual machine.
-
Huge Page support is enabled by default for virtual machines with a domain type of HVM or PVHVM. You cannot set this parameter for those virtual machines.
-
This option does not take effect on virtual machines deployed on SPARC-based server pools. Virtual machines running on SPARC-based servers can access the page sizes that the server platform supports, regardless of this setting.
See How is the HugePages Feature Enabled for Virtual Machines?, in the Oracle VM Concepts Guide, for more information on Huge Page support.
-
-
Description: An optional description of the virtual machine.
-
Operating System: The operating system of the virtual machine. This setting enables or disables certain virtual machine settings that the guest operating system may require.
-
Enable Viridian: Whether to enable Viridian.
-
Viridian support enables the exposure of Windows virtualization compatible entitlements to Microsoft Windows guest operating systems. Enabling viridian support is strongly recommended to ensure improved performance for Microsoft Windows guest operating systems.
-
Enabling viridian support is permitted for all Microsoft Windows guest operating system types. However, it is only effective from Microsoft Windows Vista and Microsoft Windows Server 2008 onwards.
-
Viridian support is enabled by default when creating virtual machines running Microsoft Windows guest operating systems.
-
-
Mouse Device Type: The mouse type to use for the virtual machine. This option is not available for virtual machines in SPARC-based server pools.
-
Keymap: The keyboard mapping to use for the virtual machine. This option is not available for virtual machines in SPARC-based server pools.
-
Domain Type: The domain type of the virtual machine.
-
Xen HVM: Hardware virtualization, or fully virtualized. When you select this option you can supply an ISO file in a repository (in the Arrange Disks step of the wizard) from which to install an operating system on the virtual machine. See Section 4.5.1.1, “Import ISO” for information on importing an ISO file into a repository. Alternatively, you may consider setting up an environment to perform a network installation for the virtual machine.
-
Xen HVM PV Drivers: Identical to Xen HVM, but with additional paravirtualized drivers for improved performance of the virtual machine. See What are Virtualization Modes or Domain Types? in the Oracle VM Concepts Guide for more information about using paravirtualized drivers. This domain type is typically used to run Microsoft Windows guest operating systems with an acceptable performance level. Installation of the guest operating system is usually performed either using an ISO file in a repository or via a network installation.
-
Xen PVM: Paravirtualized. Enables you to select a location for the mounted ISO file from which to create the virtual machine. Before you create the virtual machine using the paravirtualized method, mount the ISO file on an NFS share, or HTTP or FTP server. You supply the location of the mounted ISO file in the Network Boot Path field in the Boot Options step of the wizard. For information on creating a mounted ISO file, see Provisioning ISO Files for PVM Guest Installations in the Oracle VM Administrator's Guide. Do not select this option if the virtual machine Operating System is set to either Oracle Linux 7 or RedHat Enterprise Linux 7. These operating systems do not support the Xen PVM domain type.
ImportantAs of Oracle VM Release 3.4.6, support for PVM guests is removed. For more information, see Disabling Paravirtualized Guests on Oracle VM Server in the Oracle VM Administrator's Guide.
-
OVM/SPARC: Specifies that the virtual machine is deployed on a server pool running on Oracle VM Server for SPARC.
-
Unknown: This option is informational in the event that Oracle VM Manager is unable to determine the domain type for an existing virtual machine. It is not possible to actually set a virtual machine's domain type to this value. Attempting to do so generates a rule violation when you try to save the virtual machine settings and an error message is returned.
-
-
Start Policy: The policy that should be used to start the virtual machine. Select one of:
-
Best Server: This is the legacy algorithm that optimizes virtual machine placement on Oracle VM Servers that are in use before moving to unused servers in the pool.
-
Balance Server: This algorithm distributes virtual machines across all the available Oracle VM Servers in the server pool, starting with the least utilized Oracle VM Server first. CPU and memory utilization statistics are used to balance the virtual machine distribution across the server pool, with CPU utilization taking precedence over memory utilization.
-
Current Server: The virtual machine is started on the Oracle VM Server to which it is assigned. If you selected a particular server to create the virtual machine on, then it is started on this server.
-
Use Pool Policy: The virtual machine is started using the start policy defined for the entire server pool. See Section 3.1.2, “Create Server Pool” for more information on setting the start policy for a server pool.
-
-
Max. Memory (MB): The maximum memory size the virtual machine can be allocated. This value must be between 32 and 512000. The default is 512.
For x86-based virtual machines, this value is incremented by 32 each time you click the up arrow, and, conversely, decreased by 32 if you click the down arrow. For SPARC-based virtual machines, the up arrow adds 512, and the down arrow subtracts 512. If you have enabled Huge Pages, the value must be a multiple of 2 MB.
NoteFor HVM and PVHVM guests, the maximum memory size value must equal the memory size value. If these values are different, the following job failure message is generated for HVM/PVHVM guests: "The memory limit cannot be different than the current memory size on an HVM/PVHVM Virtual Machine."
-
Memory (MB): The memory size the virtual machine is allocated. When creating a virtual machine, this is the memory allocation used when starting the virtual machine. This value must be between 32 and 512000. The default is 512.
For x86-based virtual machines, this value is incremented by 32 each time you click the up arrow, and, conversely, decreased by 32 if you click the down arrow. For SPARC-based virtual machines, the up arrow adds 512, and the down arrow subtracts 512. If you have enabled Huge Pages, the value must be a multiple of 2 MB.
You can change the memory allocated to a running virtual machine without the need to restart the virtual machine if the domain type is PVM or PVHVM and where the guest is running a Linux OS on an x86-based platform or an Oracle Solaris OS on a SPARC-based platform.
NoteFor x86-based PVHVM guests running on Oracle Solaris OS, you cannot change the memory if the virtual machine is running.
See the Oracle VM Paravirtual Drivers for Microsoft Windows documentation for information about the availability of hot memory modification on PVHVM guests that are running a Microsoft Windows OS. You must use a Windows PV Driver that supports hot memory modification or you must stop the guest before you modify the memory.
-
Max. Processors: The maximum number of processors the virtual machine can be allocated. The number of processors is expressed in number of physical CPU cores. The maximum number of processors depends on the domain type, as follows:
-
PVM: 256.
ImportantAs of Oracle VM Release 3.4.6, support for PVM guests is removed. For more information, see Disabling Paravirtualized Guests on Oracle VM Server in the Oracle VM Administrator's Guide.
-
HVM: 128; or 32 for Microsoft Windows guests.
NoteAs of Release 3.4.6, the HVM limit is
64for Microsoft Windows guests. -
PVHVM: 128; or 32 if using Oracle VM Paravirtual Drivers for Microsoft Windows.
NoteAs of Release 3.4.6, the PVHVM limit is
64if using Oracle VM Paravirtual Drivers for Microsoft Windows. -
OVM/SPARC: Equivalent to the number of available CPUs on the server.
-
-
Processors: The number of processors the virtual machine is allocated. The number of processors is expressed in number of physical CPU cores, up to the value of Max. Processors.
-
Priority: The CPU priority of the virtual machine. The higher the priority value, the more physical CPU cycles are given to the virtual machine. This option is not available for virtual machines in SPARC-based server pools. This should be a number between 1 and 100. The default priority is set at 1.
-
Processor Cap %: Increase or decrease the percentage to which the virtual CPUs can receive scheduled time. This parameter defines the maximum percentage to which the virtual CPUs can receive scheduled time. Use this parameter to keep low priority virtual machines from consuming too many CPU cycles on a Virtual Machine Server. This option is not available for virtual machines in SPARC-based server pools.
-
Restart Action on Crash: The action to perform if a virtual machine crashes. This option is only available for virtual machines that are running on the Xen hypervisor and that have been configured to run on a particular Oracle VM Server. Options include the following:
-
Restart: Restarts the virtual machine operating system.
-
Stop: Stops the virtual machine. If Enable High Availability is selected, this option is not available.
-
Restart After Dump: Restarts the virtual machine operating system after first creating a core dump file for the virtual machine.
-
Stop After Dump: Stops the virtual machine after first creating a core dump file for the virtual machine. If Enable High Availability is selected, this option is not available.
Core dump files are saved to
/var/xen/dumpon the Oracle VM Server where the virtual machine is hosted. Each core dump file is named uniquely so that files are not overwritten. This can use up disk space rapidly. You must make sure there is either enough disk space available at this path on the Oracle VM Server where the virtual machine will run; or you should mount additional storage at this path to avoid using up disk space required to host dom0.This option cannot be modified for a running virtual machine. You must stop the virtual machine before you are able to change this option, if you select to edit the virtual machine later.
-
The Priority and Processor Cap% parameters are passed to the Xen hypervisor for use by the credit scheduler, which automatically load balances guest VCPUs across all available physical CPUs, using an algorithm that combines these two parameters. Therefore, these parameters are a key factor for the performance of the virtual machine on x86 hardware.
NoteFor information on performance optimization goals and techniques for Oracle VM Server for x86, see Optimizing Oracle VM Server for x86 Performance, on Oracle Technology Network at: http://www.oracle.com/technetwork/server-storage/vm/ovm-performance-2995164.pdf.
On SPARC, each virtual machine uses dedicated physical CPU threads, and CPUs are not shared between virtual machines, being exclusively assigned to a single virtual machine.
Click Next.
-
-
The Set up Networks step is displayed in the wizard.
This step of the wizard allows you to add VNICs to the virtual machine.
-
To specify the MAC address for a VNIC, select Specify MAC Address and enter the MAC address. Otherwise, leave the default Dynamically Assign MAC.
-
Select a network with the virtual machine role from the Network drop-down list.
If no networks are available, you must first create a network with the virtual machine role as a dedicated network for virtual machine traffic. See Section 5.1.1, “Create New Network” for information on creating a network.
-
Click Add VNIC.
-
The VNIC order specified determines the order in which the VNICs are presented to the virtual machine. You can control the ordering of the VNICs using the up and down arrows on the right of the table.
-
If you are editing the networking of an existing stopped virtual machine, you can change the network to which the VNIC belongs using the Network drop-down list in the table. It is important that the VNIC belongs to a network already associated with the Oracle VM Servers on which it can run, or you cannot start the virtual machine. See Section 5.1.1, “Create New Network” and Section 5.1.2, “Edit Existing Network” for more information on associating Oracle VM Servers with networks.
-
If you are editing an existing running virtual machine, you can add VNICs to the virtual machine, but you cannot remove VNICs that are already in use. You also cannot reorder VNICs on a running virtual machine. If you choose to add a VNIC to a running machine you must ensure that the VNIC belongs to a virtual machine network already associated with the Oracle VM Servers on which it can run, by selecting the appropriate network from the Network drop-down list.
-
A virtual machine can have up to eight (8) VNICs for HVM guests and up to 31 for PVM guests. A PVM guest requires network connectivity to perform the operating system install and must have at least one VNIC.
-
-
Click Next.
-
-
The Arrange Disks step of the wizard is displayed.
Select the desired storage configuration of your virtual machine, such as virtual disks, physical disks, and ISO files. On a separate slot, add one or more of the following disk types:
-
Empty: An empty slot.
-
Virtual Disk: This allows you to add or create a virtual disk. Virtual disks may be shared by virtual machines, or only available to a single virtual machine.
-
Physical Disk: The physical disks are the disks in a storage array. Physical disks may be shared by virtual machines.
-
CD/DVD: This adds an ISO file in a storage repository and can be used to create HVM and PVHVM virtual machines. When creating a virtual machine from an ISO file, you must use a single file. Installations that span multiple ISO files are not supported. ISO files cannot be used to create PVM virtual machines. You cannot add an empty CDROM on a SPARC-based server.
NoteAdding or removing a CD/DVD device can only be done when a virtual machine is powered off. Once the VM is running again, the CD/DVD device is always available for use as needed, much like a physical CD/DVD device on a physical server.
After the virtual machine is powered on, the only actions that are supported while the virtual machine is running are:
-
Selecting an .iso for a CD/DVD slot in an "Empty" state.
-
Hot-swapping the .iso currently in use.
-
Ejecting the .iso from the CD/DVD slot, leaving the device in an "Empty" state.
-
Add or create any virtual disks to use as the virtual machine's hard disk, select any physical disks to add, and select any ISO files to use to create the virtual machine. Add the disks in the order they should appear in the virtual machine. The disk with the boot partition or installation media should be the first disk listed. An HVM guest can have up to four disks, including empty CD/DVD drives. A PVM guest can have up to 104 disks. A PVHVM guest can have up to 107 disks. An OVM/SPARC guest can have up to 1024 disks. Only one slot can contain an empty CD/DVD.
TipWhen editing a running virtual machine, you can change the CD/DVD using this dialog box and the CD/DVD is mounted in the operating system.
To create or add a virtual disk:-
To create a virtual disk, select Virtual Disk from the Disk Type drop-down list and click Create a Virtual Disk
.
-
The Create Virtual Disk dialog box is displayed. Enter or select the following to create a virtual disk:
-
Repository: The repository in which the virtual disk is to be created.
-
Virtual Disk Name: The name of the virtual disk to be created and made available to the virtual machine. See How are Virtual Disks Managed? in the Oracle VM Concepts Guide for more information about using virtual disks.
-
Size (GiB): The disk size of the virtual disk, in GiB.
-
Description: A description of the virtual disk.
-
Shareable: Whether the virtual disk should be shareable (read/write) with other virtual machines.
-
Allocation Type: Whether to use a Sparse Allocation or Non-sparse Allocation. Sparse Allocation creates a sparse disk, so the size of the disk is initially small and increases as it is used. Sparse allocation is faster than using Non-Sparse Allocation when creating a virtual machine. Non-Sparse Allocation creates the entire disk when the virtual machine is created, and so is slower than creating a sparse disk.
Click OK.
-
-
To search for an existing virtual disk to add to the virtual machine, click Select a Virtual Machine Disk
. The Select a
Virtual Machine Disk dialog box is displayed. The
dialog box lists the available virtual disks in a table that
indicates the following information:
-
Selected: Whether or not the disk has been selected. This is indicated using radio button.
-
Name: The name of the virtual disk as stored in Oracle VM Manager.
-
Size (GiB): The disk size of the virtual disk, in GiB.
-
Repository: The repository in which the virtual disk is located.
-
Shareable: Whether the virtual disk is configured to be shareable (read/write) with other virtual machines.
-
VM(s): A comma separated list of the names of any virtual machines that may already be using this virtual disk.
Select the virtual disk to use and Click OK.
NoteIf your virtual machine needs more than one disk, you can create the disk(s) afterwards in the repository, and add them to the virtual machine. See Section 4.9.1.1, “Create Virtual Disk” and Section 3.5.2.1, “Edit Virtual Machine” for more information on creating a virtual disk and editing a virtual machine. There are some limitations on mixing virtual disks of differing device types on a virtual machine. See How are Virtual Disks Managed? in the Oracle VM Concepts Guide for more information about how device types are allocated to virtual disks and what you may need to do to solve any issues surrounding this problem.
-
To add a physical disk:-
To add a physical disk to the virtual machine, select Physical Disk from the Disk Type drop-down list. Click Select a Virtual Machine Disk
. The Select a
Physical Disk dialog box is displayed. The dialog
box lists the available physical disks in a table that
provides the following information:
-
Selected: Whether or not the disk has been selected. This is indicated using radio button.
-
Name: The name of the physical disk as stored in Oracle VM Manager.
-
Size (GiB): The disk size of the physical disk, in GiB.
-
SAN Server: The SAN Server where the physical disk is located.
-
Volume Group: The volume group that the physical disk belongs to.
-
Shareable: Whether the physical disk is configured to be shareable (read/write) with other virtual machines.
-
VM(s): A comma separated list of the names of any virtual machines that may already be using this physical disk.
Select a physical disk from the list of available disks. If you want to leave the slot empty, select Leave Slot Empty. Click OK.
-
To add an ISO file:-
To add an ISO file to the virtual machine, select CD/DVD from the Disk Type drop-down list. Click Select a Virtual Machine Disk
. The Select an
ISO dialog box is displayed. Select a Iso file
from the list of available files. If you want to leave the
slot empty, select Leave Slot
Empty. Click
OK.
NoteWhen adding an ISO file to an existing virtual machine, the ISO file is available to the operating system, but may not be mounted. To access the ISO file, you may need to mount it, for example:
# mkdir /cdrom
# mount -o loop /dev/xvdb /cdrom
When you have set up the virtual machine's disks, click Next.
-
-
The Boot Options step is displayed in the wizard.
Select the boot media order for your virtual machine.
If you are creating a hardware virtualized machine virtual machine (HVM), you can choose the PXE boot option. If so, remember to put PXE first in the Select your boot options field, and change the boot order again after installation and before rebooting the virtual machine. To use PXE, you must configure a PXE/tftp environment to offer the necessary boot media and instructions to the virtual machine.
If you are creating a paravirtualized virtual machine (PVM), you also have the PXE option available. In this case, the PXE option refers to a network style boot. If the PXE option appears in the right-hand-side column, you must enter the location of the mounted ISO file from which to perform the operating system installation in the Network Boot Path field that is shown when editing or creating a PVM, for example
http://example.com/EL6-x86
For information on creating a mounted ISO file, see Provisioning ISO Files for PVM Guest Installations in the Oracle VM Administrator's Guide.
You cannot use the Network Boot Path field to boot a virtual machine using PXE. This field can only be used to specify the path to a mounted ISO file to use when installing a PVM guest.
If you have defined tags and want to add any to this virtual machine, click Next. Otherwise, click Finish to create and deploy the virtual machine to the server pool.
-
The Tags step is optional and displays in the wizard if you clicked Next in the previous step.
NoteThe virtual machine has already been created and deployed to the server pool at this point. This step is entirely optional. Cancelling the operation within this dialog does not prevent the virtual machine from being created.
If you have previously created tags, they appear in the Available Tags column. Select the tags you want to apply to the virtual machine and move them to the Selected Tags column. See Section 1.17, “Tags and Tag Filters” for more information on creating and managing tags. Click Finish.
If you created a PVM, there are some steps you should take after the operating system installation is completed:
-
Stop the virtual machine. See Section 3.5.2.4, “Stop Virtual Machines” for information on stopping a virtual machine.
-
Edit the virtual machine and remove PXE from the Boot Order column in the Boot Options step of the Edit Virtual Machine wizard. See Section 3.5.2.1, “Edit Virtual Machine” for information on editing a virtual machine.
-
Start the virtual machine and complete the installation if necessary. See Section 3.5.2.3, “Start Virtual Machines” for information on starting a virtual machine.
To edit the virtual machine configuration information, see Section 3.5.2.1, “Edit Virtual Machine”.
3.6.1.2 Edit Server
You can edit the configuration information for an Oracle VM Server to change the name, description, any server pool roles, and to take it off-line to perform system maintenance. You can always edit the name and description of an Oracle VM Server, even if it is not owned by the Oracle VM Manager instance. You cannot edit any other information if the Oracle VM Server, is not owned by the Oracle VM Manager instance. If you want to edit these other options, you should first take ownership of the server using the Take Ownership of Server field as described in the procedure below.
-
Click the Servers and VMs tab.
-
Select the Oracle VM Server in the navigation pane. Click Edit Server
in the toolbar.
-
The Edit Server dialog box is displayed. In the Configuration tab, edit the information about the Oracle VM Server:
-
Name: The name of the Oracle VM Server.
-
Description: A description of the Oracle VM Server.
-
NTP Server(s): Allows you to specify the NTP server settings for each individual Oracle VM Server. You can add multiple NTP servers using a comma-separated list.
NoteIf you need to batch edit the NTP servers for a large number of Oracle VM Servers in your environment, you should use the Oracle VM Manager Command Line Interface, edit Server, or the Oracle VM Web Services API to do this programmatically.
-
Server in Maintenance Mode: Select whether to place the Oracle VM Server in maintenance mode.
An Oracle VM Server can be placed into maintenance mode to perform hardware or software maintenance. When an Oracle VM Server is placed in maintenance mode, it is not possible to start any new virtual machines on the server. Furthermore, any virtual machines running on the Oracle VM Server are automatically migrated to other Oracle VM Servers in the server pool, if they are available. If any of these automatic processes fail, check the Oracle VM Server event log (Section 3.5.10, “Events Perspective”) for reasons why the failure occurred.
Note-
When a virtual machine is migrated to an alternate Oracle VM Server, no checks are performed to detect whether the target Oracle VM Server is configured correctly or capable of running the virtual machine correctly. It is up to you to ensure that the Oracle VM Servers within a server pool have consistent configurations.
-
It is possible that some virtual machines fail to migrate if no target Oracle VM Server is found. In this case, maintenance mode may be set, but some virtual machines may continue to run on the Oracle VM Server.
-
If a virtual machine relies on local storage, then no target Oracle VM Server is identified as the migration target. These virtual machines should be manually migrated using the Storage Live Migration feature. For more information, see Section 3.5.2.11, “Migrate or Move Virtual Machines”
You must determine the appropriate course of action for these virtual machines and perform the required actions manually using the tools provided within Oracle VM Manager.
When an Oracle VM Server is placed into maintenance mode its icon:
is updated in the navigation pane.
When you have finished performing maintenance on the
Oracle VM Server and you are ready for it to rejoin the server
pool, ensure that the Maintenance
Mode check box is unchecked.
-
-
Take Ownership of Server: Select to take ownership of the Oracle VM Server. Server rediscovery is performed as part of this process, so that Oracle VM Manager can correctly determine whether or not the server is in an unowned state and the action can be completed successfully.
NoteConfiguration of NTP for each Oracle VM Server takes place when a server changes ownership. If you release ownership of a server, its NTP configuration is updated to point locally to itself. When Oracle VM Manager takes ownership of a server, the server's NTP configuration is usually automatically updated to point to the Oracle VM Manager instance. This may only be evident after the server has been refreshed. You can find out more about the configuration of NTP in Configure the NTP Service on the Oracle VM Manager Host in the Oracle VM Installation and Upgrade Guide.
TipYou cannot edit the ownership of an Oracle VM Server if it is included in a server pool or if a repository is presented to it.
-
Inbound Migration Locked: Select whether to allow additional virtual machines to run on the Oracle VM Server. Selecting this option prevents new or migrated virtual machines to run on the Oracle VM Server. See How Can I Protect Virtual Machines? for more information on inbound migration lock.
NoteIf you have HA configured for a server, this option does not protect a server from inbound migrations when failover occurs.
-
Oracle VM Agent password: The password to connect to the Oracle VM Agent. The value for this field is required if you select to take ownership of the Oracle VM Server.
-
Utility Server: Select to designate the Oracle VM Server to perform utility functions such as importing, cloning and storage refresh.
-
VM Server: The virtual machine role is required to run virtual machines.
-
-
In the IPMI tab, select the Enable Server IPMI check box to enable the Intelligent Platform Management Interface (IPMI). IPMI allows you to remotely power on or power off an Oracle VM Server. If IPMI is either not available or not enabled on the Oracle VM Server, Oracle VM Manager may still be able to remotely power on an Oracle VM Server using a Wake on LAN message without having to physically press the power button, and it may be able to send a system power off message to shut it down. Select the Change IPMI Password check box if your IPMI setup requires a password to change the configuration. The Change IPMI Password check box is automatically selected when you enable IPMI.
To configure IPMI enter the following information in the fields:
-
IP Address: The IP address of the IPMI.
-
Access Username: The optional user name for the IPMI.
-
Password: The optional password for the IPMI. Note that this field is always blank, regardless of whether the password has been set or not.
-
-
To edit the tags associated with the server, click the Tags tab. Using the controls provided, you can add or remove tags that can be used to identify the server and to group it with other objects within Oracle VM Manager. See Section 1.17, “Tags and Tag Filters” for more information on creating and managing tags.
Click OK. The Oracle VM Server is updated.
Batch Editing Oracle VM Servers
You can edit the information for more than one Oracle VM Server at a
time by using the
multi-select
functionality provided within the Oracle VM Manager interface to
select multiple items before clicking on the
Edit Server
![]() icon in the toolbar.
icon in the toolbar.
When editing a group of Oracle VM Servers in batch mode the options available to you are limited to actions that can be applied to all selected items. The following options are available:
-
Server in Maintenance Mode: Checking this check box sets all selected items into Maintenance Mode.
-
Take Ownership of Server: Checking this check box allows Oracle VM Manager to take ownership of all of the selected items.
-
Oracle VM Agent password: The password to connect to the Oracle VM Agent. The value for this field is required if you select to take ownership of the selected items.
-
Utility Server: Checking this check box changes the role of all selected items to Utility Servers.
-
VM Server: Checking this check box changes the role of all selected items to Virtual Machine Servers.
If the values set for the options provided vary across the selected servers, the dialog displays the values for the first server in the selection. Clicking OK updates all of the selected servers to have the same status.
3.6.1.3 Delete Server
When you delete an Oracle VM Server, it is removed from the Oracle VM Manager repository and becomes unmanaged. The Oracle VM Server is not stopped, nor is anything physically done to the Oracle VM Server.
Before you can delete an Oracle VM Server, you must stop any running virtual machines, or place the Oracle VM Server into maintenance mode to automatically migrate the running virtual machines.
-
Stop or migrate any running virtual machines. To stop the virtual machines see Section 3.5.2.4, “Stop Virtual Machines”. To automatically migrate the virtual machines to other Oracle VM Servers in the server pool, place the Oracle VM Server into maintenance mode, see Section 3.4.2.2, “Edit Server”.
-
Click the Servers and VMs tab.
-
Select the Unassigned Servers folder in the navigation tree. Select Servers from the Perspective drop-down list.
-
Select one or more Oracle VM Servers in the management pane. Click Delete
in the perspective toolbar. -
The Delete Confirmation dialog box is displayed. Click OK to delete the Oracle VM Servers.
The Oracle VM Servers are deleted from Oracle VM Manager.
3.6.1.4 Start Server
When you start an Oracle VM Server, it is started using the Intelligent Platform Management Interface (IPMI), or Wake-on-LAN (WOL). If neither IPMI nor WOL have been configured, the job to start the Oracle VM Server cannot be completed and may need to be aborted. The Oracle VM Server must then be powered on manually. See Section 3.4.2.2, “Edit Server” for information on configuring IPMI. See Section 8.1.5, “Abort Jobs” for information on aborting a hanging job.
To start Oracle VM Servers:
-
Click the Servers and VMs tab.
-
Select the server pool in which the Oracle VM Server resides in the navigation tree.
-
Select Servers from the Perspective drop-down list. Select one or more Oracle VM Servers in the management pane, and click Start Server
in the perspective toolbar.
The Oracle VM Servers are started.
3.6.1.5 Stop Server
When you stop an Oracle VM Server, it is stopped using the Intelligent Platform Management Interface (IPMI), or a system power off command. Before you can stop an Oracle VM Server, you must stop any running virtual machines, or place the Oracle VM Server into maintenance mode to automatically migrate the running virtual machines.
Make sure that the IPMI is properly configured on the Oracle VM Server, otherwise it cannot be started again remotely. See Section 3.4.2.2, “Edit Server” for IPMI configuration. Alternatively, make sure that you activate the Wake-on-LAN (WOL) feature in the Oracle VM Server BIOS and that you have tested that it is properly working. If an Oracle VM Server cannot start through IPMI or WOL, it must be power-cycled manually.
-
Stop or migrate any running virtual machines. To stop the virtual machines see Section 3.5.2.4, “Stop Virtual Machines”. To automatically migrate the virtual machines to other Oracle VM Servers in the server pool, place the Oracle VM Servers into maintenance mode , see Section 3.4.2.2, “Edit Server” .
-
Click the Servers and VMs tab.
-
Select the server pool in which the Oracle VM Server resides in the navigation tree.
-
Select Servers from the Perspective drop-down list. Select one or more Oracle VM Servers in the management pane, and click Stop Server
in the perspective toolbar.
The Oracle VM Servers are powered off.
3.6.1.6 Restart Server
When you restart an Oracle VM Server, an operating system restart command is sent and the Oracle VM Server is restarted. Before you can restart an Oracle VM Server, you must stop any running virtual machines, or place the Oracle VM Server into maintenance mode to automatically migrate the running virtual machines.
When the Oracle VM Server is restarted and rejoins the server pool, any pending HA operations in the server pool are initiated. When Oracle VM Manager is notified that the Oracle VM Server is online and available, any pending state changes are reconciled before any policy actions are resumed.
There is more information on the implications of restarting servers covered in Rebooting and Changing Power State of Oracle VM Servers in the Oracle VM Concepts Guide.
-
Stop or migrate any running virtual machines. To stop the virtual machines see Section 3.5.2.4, “Stop Virtual Machines”. To automatically migrate the virtual machines to other Oracle VM Servers in the server pool, place the Oracle VM Servers into maintenance mode , see Section 3.4.2.2, “Edit Server” .
-
Click the Servers and VMs tab.
-
Select the server pool in which the Oracle VM Server resides in the navigation tree.
-
Select Servers from the Perspective drop-down list. Select one or more Oracle VM Servers in the management pane, and click Restart
in the perspective toolbar.
The Oracle VM Servers are restarted.
3.6.1.7 Kill Server
To kill an Oracle VM Server is equivalent to performing a power off of an Oracle VM Server, similar to unplugging the power cable from the physical machine. This is not the recommended method of shutting down an Oracle VM Server, but may be used if the shut down command fails to shut down the Oracle VM Server.
-
Click the Servers and VMs tab.
-
Select the server pool in which the Oracle VM Server resides in the navigation tree.
-
Select Servers from the Perspective drop-down list. Select one or more Oracle VM Servers in the management pane, and click Kill
in the perspective toolbar. Click OK in the Confirmation dialog.
The Oracle VM Servers are powered off.
3.6.1.8 Rediscover Server
If there are either changes to the physical state of an Oracle VM Server or its attached storage, you should discover it again to update the configuration information in Oracle VM Manager.
-
Click the Servers and VMs tab.
-
Select the server pool in which the Oracle VM Servers reside in the navigation tree.
-
Select Servers from the Perspective drop-down list. Select one or more Oracle VM Servers in the management pane, and click Rediscover Server
in the perspective toolbar.
The configuration and storage information about the Oracle VM Servers is updated in Oracle VM Manager.
3.6.1.9 Rescan Physical Disks
You can rescan the physical disks available to an Oracle VM Server to determine if any disks have been changed, added, or removed.
-
Click the Servers and VMs tab, and select the server pool in which the Oracle VM Servers reside in the navigation tree. Select Servers in the Perspective drop-down list in the management pane. Select the Oracle VM Servers in the management pane table.
Alternatively, on the Servers and VMs tab, expand the Server Pools or Unassigned Servers folder, to select a particular server in the navigation tree. Select the Physical Disks option in the Perspective drop-down list.
-
Click Rescan Physical Disks
in the perspective toolbar.
-
A confirmation dialog box is displayed. Click OK.
3.6.1.10 Update Server
Software updates and upgrades to Oracle VM Servers can be performed using the global server update repository configured in the Server Updates subtab of the Reports and Resources tab. See Section 7.3, “Server Update Groups” for information on configuring a global server update repository. A repository can be overridden for a server pool if required. See Section 3.4.6, “Server Update Repositories Perspective” for information on overriding a global update repository for a server pool.
To see which version of the Oracle VM Server software is installed before and after an upgrade, click the Servers and VMs tab, select the Oracle VM Server in the navigation tree, and then select Control Domains in the Perspective drop-down list. See Section 3.5.8, “Control Domains Perspective” for information on control domains.
When an Oracle VM Server update is available, an
event is posted to the
Oracle VM Server and Yes is displayed in the
Update Required column in
the Servers perspective in the
management pane.
Before upgrading Oracle VM Servers using the Oracle VM Manager Web Interface you should refer to
the Oracle VM Installation and Upgrade Guide. The
Oracle VM Manager Web Interface can only be used to perform upgrades for servers that are
running Oracle VM Server 3.3.x and up.
To update an Oracle VM Server, the virtual machines on the Oracle VM Server must first be stopped or migrated to another Oracle VM Server. You can manually stop or migrate the virtual machines, or, if you prefer, have the upgrade server job perform the virtual machine migrate automatically.
-
Click the Servers and VMs tab, and select the server pool in which the Oracle VM Servers reside in the navigation tree.
-
Select Servers in the Perspective drop-down list in the management pane.
-
Select the Oracle VM Servers in the management pane table and click Update Server
from the perspective toolbar.
A confirmation dialog is displayed. Click OK. Each Oracle VM Server is placed into maintenance mode, and the update performed. Any virtual machines on the Oracle VM Servers are automatically migrated to another Oracle VM Server when it is put into maintenance mode. When the update is complete the Oracle VM Server is restarted and remains in maintenance mode.
-
To have the Oracle VM Servers rejoin the server pool as a fully functioning member, edit each the Oracle VM Server and take it out of maintenance mode.
For information on manually migrating virtual machines, see Section 3.5.2.11, “Migrate or Move Virtual Machines”. For information on taking an Oracle VM Server out of maintenance mode, see Section 3.4.2.2, “Edit Server”.
Note that you can upgrade multiple Oracle VM Servers in a server pool by using the multi-select functionality described in Section 1.15, “Multi-Select Functionality”.
3.6.1.11 Generate Report
You can generate an XML report on one or more Oracle VM Servers. For more information about object reporting, see Section 7.1, “Reports”.
-
Select a server pool in the Server Pools folder in the navigation pane.
-
Select the Servers perspective in the management pane.
-
Select one or more Oracle VM Servers in the management pane table.
-
Click
Generate Report in the
management pane toolbar.
-
The report is generated and sent to the browser.
3.6.2 Events Perspective
The Events perspective is common to many elements within the Oracle VM Manager Web Interface. The Events perspective generally appears as an option within the Perspectives drop-down menu on the management pane of tabs that include a navigation tree. In this case, the Events perspective displays events specific to the item selected in the navigation tree and presents these in the management pane.
The Events perspective may also appear within a dialog that is
triggered from a Display Selected
Events... ![]() perspective toolbar option. In this case,
the Events perspective dialog displays events specific to one
or more elements selected in the management pane.
perspective toolbar option. In this case,
the Events perspective dialog displays events specific to one
or more elements selected in the management pane.
If an object has an error event associated with it you must acknowledge the event to clear the error and return the object to normal operations. For example, this can occur if an Oracle VM Server or virtual machine appear as Stopped (Error) in the status. The object in error is flagged with a red icon in the navigation tree. Oracle VM Servers, virtual machines, repositories and storage objects can have error events associated with them.
Since Oracle VM Manager attempts to resolve issues automatically as much as possible, not all events can be acknowledged by a user within the Oracle VM Manager Web Interface. Therefore, a flag is set for events that are user acknowledgeable. If an event does not have this flag set, you are unable to acknowledge it, since it is handled internally by Oracle VM Manager.
The Events perspective or dialog contains a table with the following columns of information for each event:
-
Severity: The severity level assigned to the event.
-
Timestamp: The date and time that the event occurred.
-
Modify Time: The last recorded date and time that the event was modified.
-
Type: The type of event according to Oracle VM Manager's event categorization model.
-
Summary: A summary description of the event.
-
Acknowledged: Whether an error event has been acknowledged.
-
User Acknowledgeable: Whether or not an event can be acknowledged by the user.
Event Descriptions
An arrow displays next to each event in the table. Click the arrow to expand and view the Description section that provides additional details for the event.
The Events perspective or dialog contains a perspective toolbar with the following options:
|
Toolbar Icon Option |
Icon |
Description |
|---|---|---|
|
Acknowledge |
|
Acknowledge a selected error event to clear the error and return the object to normal operations. Note that this option is only available for user acknowledgeable events. |
|
Acknowledge All |
|
Acknowledge all error events associated with an object to clear the errors and return the object to normal operations. Note that only user acknowledgeable events are cleared. This button is always clickable, even if there are no user acknowledgeable events. Clicking it when there are no user acknowledgeable events results in an error dialog. |
|
Display Count |
A drop-down menu that allows you to select the number of events that should be displayed in the management pane, while you are currently in this perspective. |
Acknowledging Events/Errors
If an object has an error event associated with it you must acknowledge the event to clear the error and return the object to normal operations. For example, this can occur if an Oracle VM Server or virtual machine appear as Stopped (Error) in the status. The object in error is flagged with a red icon in the navigation tree. Oracle VM Servers, virtual machines, repositories and storage objects can have error events associated with them. The following procedures show you how to clear errors and return the object to normal operations.
-
Click the Servers and VMs tab.
-
Select the Oracle VM Server in the navigation tree.
-
Select Events from the Perspective drop-down list in the management pane.
-
Select the user acknowledgeable error event and click Acknowledge
, or click
Acknowledge All
to clear all user acknowledgeable
errors.
-
Click the Servers and VMs tab.
-
Select the server pool, or Oracle VM Server on which the virtual machine resides in the navigation tree.
-
Select Virtual Machines from the Perspective drop-down list in the management pane.
-
Select the virtual machine in the management pane table. Click Display Selected VM Events...
.
-
The Events dialog box is displayed. Select the user acknowledgeable error event and click Acknowledge
, or click
Acknowledge All
to clear all user acknowledgeable
errors. Click
Close.
-
Click the Repositories tab.
-
Select the repository in the navigation tree.
-
Select Events from the Perspective drop-down list in the management pane.
-
Select the error event and click Acknowledge
, or click
Acknowledge All
to clear all errors.
-
Click the Storage tab.
-
Select File Servers, SAN Servers, or a storage server in the navigation tree.
-
Select Events from the Perspective drop-down list in the management pane.
-
Select the user acknowledgeable error event and click Acknowledge
, or click
Acknowledge All
to clear all user acknowledgeable
errors.
3.7 Unassigned Virtual Machines Folder
The Unassigned Virtual Machines navigation folder in the navigation tree contains the virtual machines that do not belong to a server pool within Oracle VM Manager. The structure of the navigation provided in the navigation tree is discussed in more detail in Section 3.2, “Summary”.
Clicking on the Unassigned Virtual Machines folder in the navigation tree allows you to access different perspectives in the management pane. Each perspective provides its own view of all of the unassigned virtual machines within Oracle VM Manager. Most of the perspectives also include separate perspective toolbars that enable you to perform various configuration or management tasks specific to the view currently displayed within the management pane. The Unassigned Virtual Machines folder offers the following perspectives within the management pane:
3.7.1 Virtual Machines Perspective
- 3.7.1.1 Import Virtual Machine
- 3.7.1.2 Edit Virtual Machine
- 3.7.1.3 Delete Virtual Machines
- 3.7.1.4 Migrate or Move Virtual Machines
- 3.7.1.5 Clone a Virtual Machine or Template
- 3.7.1.6 Export a Virtual Machine
- 3.7.1.7 Manage Clone Customizers
- 3.7.1.8 View Virtual Machine Configuration File
- 3.7.1.9 Display VM Hierarchy Viewer
- 3.7.1.10 View Virtual Machine Events
- 3.7.1.11 Generate Report
The Virtual Machines perspective lists the different virtual machines that belong to either a server pool or a server or the Unassigned Virtual Machines folder, depending on the item selected in the navigation pane. Note that this perspective is not available for server items listed off the Unassigned Servers folder, since virtual machines cannot be assigned to servers that do not belong to a server pool. The following columns are displayed in the management pane:
-
Name: The name that has been configured for the virtual machine.
-
Status: The running status of the virtual machine.
-
Tag(s): Any tags that have been applied to the virtual machine.
-
Event Severity: What event severity level is currently indicated for the virtual machine.
-
Server: The actual Oracle VM Server that the virtual machine is currently residing on.
-
Max. Memory (MB): The maximum available memory (in megabytes) that the virtual machine is able to consume.
-
Memory (MB): The amount of memory (in megabytes) that the virtual machine is currently consuming.
-
Max. Processors: The number of processors that the virtual machine is allowed to make use of.
-
Processors: The number of processors that the virtual machine is currently using.
-
Keymap: The character keymap that has been configured for the virtual machine.
-
Operating System: The operating system that the virtual machine is running.
Clicking on the arrow to the left of a virtual machine in the table displays a set of subtabs that show more detailed information about the virtual machine. These tabs are Configuration, Networks, and Disks. Click on a tab to display the information:
-
Name: The name that has been configured for the virtual machine.
-
Status: The running status of the virtual machine.
-
Operating System: The operating system type.
-
Keymap: The character keymap that has been configured for the virtual machine.
-
Max. Processors: The maximum number of CPUs that can be allocated.
-
Processors: The number of CPUs that are allocated.
-
Processor Cap: The percentage value configured for the processor cap.
-
Max. Memory (MB): The maximum memory that can be allocated.
-
Memory (MB): The memory that is allocated.
-
Priority: The CPU priority allocated for the virtual machine.
-
Mouse Type: The mouse type configured for the virtual machine.
-
Domain Type: The hypervisor and virtual machine type configured for the virtual machine.
-
Start policy: The start policy configured for the virtual machine.
-
High Availability: Whether or not the High Availability flag is set for the virtual machine.
-
Repository for Configuration File: The repository where the configuration file for the virtual machine is stored.
-
Huge Pages: Whether or not the Huge Pages flag is set for the virtual machine.
-
Boot Order: The configured boot order for disks attached to the virtual machine
-
Network Boot Path: The network boot path configured for the virtual machine.
-
Restart Action On Crash: The configured restart action in the instance that the virtual machine crashes.
-
Restart Action On Power Off: The configured restart action in the instance that the virtual machine receives the power-off signal.
-
Restart Action On Restart: The configured restart action in the instance that the virtual machine receives the restart signal.
-
ID: The ID allocated by Oracle VM Manager for the virtual machine.
-
Origin: The URL that was used to import the virtual machine or template, if it was imported.
-
Description: The description of the virtual machine.
-
Config File Absolute Path: The absolute path to the virtual machine configuration file.
-
Config File Mounted Path: The mount point where the virtual machine configuration file is located on an Oracle VM Server.
-
VNIC: The name of a VNIC configured for the virtual machine.
-
Ethernet Network: The name of the ethernet network that the VNIC is attached to.
-
IP Addresses: IP addresses configured for the VNIC. Note that the virtual machine must be running Oracle VM Guest Additions for this information to be populated. If no IP address is configured for this VNIC, the IP address is displayed as 0.0.0.0.
-
Slot: The slot number for the disk.
-
Disk Type: The type of disk that is attached.
-
Name: The name of the disk within Oracle VM Manager.
-
Size (GiB): The size of the disk.
-
Repository: The repository where the disk is located.
-
Absolute Path: The absolute path to the location of the disk.
-
Mounted Path: The mount point where the disk is located on an Oracle VM Server.
-
Location: The location of the disk as reported by Oracle VM Manager.
If this perspective is viewed from the Unassigned Virtual Machines folder, some of the toolbar icons that are usually available for this perspective are not included in the toolbar. The table below lists all of the toolbar icons that are available for this perspective and indicates the items that are not available when the perspective is viewed from the Unassigned Virtual Machines folder.
|
Toolbar Icon Option |
Icon |
Description |
|---|---|---|
|
|
Displays the Import Virtual Machine dialog box. Use this option to import a virtual machine into Oracle VM Manager. This option is only available for Unassigned Virtual Machines. |
|
|
|
Displays the Edit Virtual Machine wizard. Use this option to edit a virtual machine. |
|
| Delete |
|
Displays the Delete Confirmation dialog box. Use this option to delete the selected virtual machines. |
|
|
Starts up a stopped virtual machine. Not available for Unassigned Virtual Machines. |
|
|
|
Shuts down a virtual machine. Not available for Unassigned Virtual Machines. |
|
|
|
Launches the virtual machine VNC console in an x86-based server pool, which enables access to the virtual machine. Use this option to connect to a virtual machine's console and access the virtual machine directly. Not available for virtual machines in the Unassigned Virtual Machines folder, or virtual machines in a server pool, but not assigned to an Oracle VM Server. |
|
|
|
Launches the virtual machine serial console, which enables access to the virtual machine. Use this option to connect to a virtual machine's serial console and access the virtual machine directly. This service is commonly used for virtual machines running in a SPARC-based server pool, but is also available for virtual machines running on x86-based server pools. Not available for Unassigned Virtual Machines. |
|
|
|
Restarts a running virtual machine. Not available for Unassigned Virtual Machines. |
|
|
|
Shuts down a running virtual machine. Not available for Unassigned Virtual Machines. |
|
|
|
Suspends (pauses) a running virtual machine. Not available for Unassigned Virtual Machines. |
|
|
|
Resumes (unpauses) a suspended virtual machine. Not available for Unassigned Virtual Machines. |
|
|
|
Migrates a virtual machine to another Oracle VM Server, or moves the configuration and virtual disks for a virtual machine to an alternate repository. |
|
|
|
Displays the Clone Virtual Machine dialog box. Use this option to clone a virtual machine to create another virtual machine. |
|
|
|
Displays the Export to Virtual Appliance dialog box. Use this option to export a virtual machine as a virtual appliance. |
|
|
|
Displays the Export Virtual Machine(s) to OCI dialog box. Use this option to export a virtual machine to Oracle Cloud Infrastructure. |
|
|
|
Displays the Manage Clone Customizer dialog box. The clone customizer lets you set up clone parameters, such as networking, disks and ISO resources. Use this option to create, edit or delete a clone customizer. |
|
|
|
Send one or more virtual machines a message. Use this option to send messages to virtual machines that have the Oracle VM Guest Additions installed. Not available for Unassigned Virtual Machines. |
|
|
|
Displays the VM Config File Content dialog box. Displays a read-only view of the configuration file for the selected virtual machine. Use this option to view the content of the virtual machine configuration file. |
|
|
|
Displays a graphical report on a virtual machine. |
|
|
|
Displays the Events dialog box. Displays events for the selected virtual machine. Use this option to view or acknowledge error events for the virtual machine. |
|
|
|
Generate an XML report on one or more virtual machines. |
|
|
|
Displays context sensitive help. |
3.7.1.1 Import Virtual Machine
You can import a virtual machine into Oracle VM Manager and have it deployed to a server pool, or placed in the Unassigned Virtual Machines folder if you do not want to deploy it. The virtual machine must be located on an FTP or web server, either as separate files, or compressed into a single archive file (for example, a .tgz or .zip file). As an archive of a virtual machine is also known as a virtual machine template, you can also use this process to import older style Oracle VM virtual machine templates. This process does not work for the newer OVF/OVA style templates.
When you import a virtual machine into a server pool, you have the option of saving it to any storage repository that is presented to at least one Oracle VM Server in the server pool. When you import a virtual machine to the Unassigned Virtual Machines folder, you can save it into any storage repository.
-
Place the files that make up a virtual machine, or an archive of those files, in a location accessible by Oracle VM Manager using any of these protocols: HTTP, HTTPS or FTP.
-
Click the Servers and VMs tab.
-
If you want to import and deploy the virtual machine to a server pool, select Server Pools in the navigation tree, then select the server pool in the management pane table.
If you do not want to deploy the virtual machine, select the Unassigned Virtual Machines folder.
-
Select Import Virtual Machine...
in the toolbar in the management pane.
-
The Import Virtual Machine dialog box is displayed. Select or edit the following:
-
Destination Repository: The storage repository in which to save the virtual machine.
-
VM URLs: The URLs for the virtual machine. The URL schemes supported are HTTP, HTTPS, and FTP. For example:
http://example.com/mytemplate.tgz
To import a virtual machine using FTP, use the standard FTP syntax, for example:
ftp://
user:password@server/path/filename.tgzEach virtual machine component should be listed on a new line. Each URL must be a reference to a complete file. If your virtual machine files are split into multiple compressed files, concatenate those files and enter the URL for the concatenated file, for example to concatenate a number of compressed files to one compressed file, enter:
$ cat vm.tgz.1of3 vm.tgz.2of3 vm.tgz.3of3 > vm.tgz
Then enter the URL to the single compressed virtual machine file, in this case, vm.tgz.
To import a virtual machine that is not compressed as a single file, each component must be a complete file (if not, concatenate them to one file), for example to enter a virtual disk image and a virtual machine configuration file that together make up a complete virtual machine, you could enter:
http://myexample.com/System-sda.img
http://myexample.com/vm.cfg
-
Proxy: The IP address or hostname of an optional proxy server to use when importing the virtual machine.
Click OK to import the virtual machine. The virtual machine is deployed to the server pool in the stopped state. Alternatively, the virtual machine is imported to the Unassigned Virtual Machines folder.
-
See Section 3.5.2.3, “Start Virtual Machines” for information on starting a virtual machine, and Section 3.5.2.1, “Edit Virtual Machine” for information on editing a virtual machine.
3.7.1.2 Edit Virtual Machine
Editing a virtual machine to changes the virtual machine configuration. If the virtual machine is running, you cannot edit specific settings such as the mouse device type, domain type, maximum amount of memory, maximum number of processors, restart action on crash, or huge pages support. To edit these settings, the virtual machine must be stopped so that the hypervisor can reload the virtual machine configuration when the virtual machine starts.
-
Click the Servers and VMs tab.
-
Select the server pool on which the virtual machine resides in the navigation tree.
-
Select Virtual Machines from the Perspective drop-down list. Select the virtual machine in the management pane, and click Edit...
in the management pane toolbar
-
The Edit Virtual Machine dialog box is displayed. Select each tab to edit the virtual machine configuration. See Section 3.1.3, “Create Virtual Machine” for the details of each tab. Click OK to save the changes.
NoteIt is not possible to dynamically change resources such as the number or processors or allocated memory for an Oracle Solaris virtual machine without first enabling the drd service on the virtual machine itself. To allow for these changes, connect to the virtual machine and make sure that the drd service is enabled:
# svcadm enable -s drd
# svcs drd
These commands should notify you that the service is online. When you have performed these actions, you are able to use Oracle VM Manager to dynamically change the allocation of resources.
NoteIt is not possible to change the number of virtual network interfaces or virtual disks for a virtual machine while the virtual machine is in a suspended state. Attempting to add or remove such a device results in an exception and an error is returned.
NoteIt is not possible to remove a virtual CD-ROM from a running virtual machine. Doing so results in an exception and an error is returned. To remove virtual CD-ROMs from running virtual machines, you must first stop the virtual machine and then remove the virtual CD-ROM.
3.7.1.3 Delete Virtual Machines
When you delete a virtual machine, all the files and data associated with this virtual machine are removed from Oracle VM Manager. Before deleting a virtual machine, make sure you do not need it any longer. You can only delete a virtual machine when the virtual machine status is Stopped or Error.
-
Click the Servers and VMs tab.
-
Select the server pool on which the virtual machines reside in the navigation tree.
-
Select Virtual Machines from the Perspective drop-down list. Select one or more virtual machines in the management pane, and click Delete
in the management pane toolbar.
-
The Delete Confirmation dialog box is displayed. Select any virtual disks associated with the virtual machines to delete. The virtual machine's physical disks are listed if the storage on which they reside uses a non-generic Oracle VM Storage Connect plug-in. Before any physical disks are deleted, they are removed from any access groups. Click OK to delete the virtual machines and the selected virtual and physical disks.
3.7.1.4 Migrate or Move Virtual Machines
The Migrate or Move
![]() option allows you to migrate and move virtual machines by opening
the Migrate or Move Virtual
Machine wizard that allows you to select and perform
the appropriate actions depending on your requirements and the
state of the virtual machine.
option allows you to migrate and move virtual machines by opening
the Migrate or Move Virtual
Machine wizard that allows you to select and perform
the appropriate actions depending on your requirements and the
state of the virtual machine.
It is important to understand that migrating a virtual machine changes the Oracle VM Server or server pool where the virtual machine runs, while moving a virtual machine changes the repository where the virtual machine configuration or virtual disks are located.
A stopped virtual machine can be migrated to any Oracle VM Server, server pool, or to the Unassigned Virtual Machines folder. A running virtual machine can be migrated to any Oracle VM Server within the same server pool.
The steps below assume the virtual machine is deployed to an Oracle VM Server. If the virtual machine is located in the Unassigned Virtual Machines folder, select it in that folder to perform the migration.
-
Click the Servers and VMs tab.
-
Select the server pool on which the virtual machine resides in the navigation tree.
-
Select Virtual Machines from the Perspective drop-down list. Select the virtual machine to migrate in the management pane, and click Migrate or Move
.
The Migrate or Move Virtual Machine dialog box is displayed.
-
Choose the appropriate option from the Migrate or Move Virtual Machine dialog box. Different options are available, depending on if the virtual machine is running or stopped.
If the virtual machine is running, you can select from the following options:
-
Migrate a running VM to a different Server within the
          same Server Pool
This option changes the server where the virtual machine runs. The destination server must be within the same server pool as the source server. Likewise, the destination server must be able to access the virtual machine configuration and storage. You should choose this option to migrate virtual machines between servers within a server pool that use a shared repository.
Select this option and then click Next to proceed as follows:
-
Select the destination server to which you want to migrate the virtual machine from the
Specified
              Server
drop-down list.NoteSome options are disabled because they apply only if you are migrating a virtual machine that is stopped.
-
Click Finish to complete the migration.
-
-
Migrate a running VM, and migrate its local storage,
          to a different Server within the same Server Pool
This option changes the server where the virtual machine runs and moves its local storage. You can choose this option to migrate virtual machines between servers within the same server pool when:
-
At least one virtual disk resides in a repository that is local to the source server.
-
The destination repository is local to the destination server.
NoteIf the virtual machine configuration file resides in a repository that is local to the source server only, the configuration file is copied to the destination repository. If the configuration file resides in a shared repository, it is not copied.
Select this option and then click Next to proceed as follows:
-
Select the destination server to which you want to migrate the virtual machine from the
Server to Migrate
              to
drop-down list. -
Select the destination repository to which you want to move the virtual machine configuration and storage from the
Target Repositorydrop-down list.NoteYou can select only repositories that are hosted on an OCFS2 file system.
-
Click Finish to complete the migration and move the virtual machine configuration and storage.
-
-
Move this VM to a different RepositoryThis option changes the location of the virtual machine.
NoteBeginning in Oracle VM Manager 3.4.6, this option is available when the Migrate or Move Virtual Machine dialog box is displayed for a running virtual machine. This option makes it possible to move a
vm.cfgfile from one repository to another while the virtual machine is in running state by creating an empty clone customizer.ImportantWhen moving a running virtual machine, be sure to create an empty clone customer with no storage mappings attached. If a clone customizer is created with an attached virtual disk that is actively being used by the virtual machine, an error message is returned.
Select this option and then click Next to proceed as follows:
-
Click
Createto create a new empty clone customizer with no storage mappings attached. -
Select the destination repository to which you want to move the virtual machine configuration from the
Target Repositorydrop-down list. -
Click Finish to move the virtual machine.
-
If the virtual machine is stopped, you can select from the following options:
-
Migrate a VM to a different Server, Server Pool, or
          Unassigned State
This option lets you change the virtual machine destination to either the Unassigned Virtual Machines folder or unassigned in the current server pool. This option also lets you change the server or server pool where the virtual machine runs as well as the location of the virtual machine configuration and storage.
Select this option and then click Next to proceed as follows:
-
Select one of the following destinations for the virtual machine:
-
Unassigned Virtual Machines Folder: Removes the virtual machine from the server pool and moves it to the Unassigned Virtual Machines folder.
-
Unassigned in Current Server Pool: Removes the virtual machine from the Oracle VM Server. The virtual machine stays in the same server pool; it is removed from the Oracle VM Server only.
-
Specified Server: Moves the virtual machine to the selected Oracle VM Server. Stopped virtual machines can be migrated to Oracle VM Servers in other server pools that share the same repository, so Oracle VM Servers from other server pools might be listed here.
-
Server Pool: Moves the virtual machine to the selected server pool. Stopped virtual machines can be migrated to other server pools. The virtual machine is not deployed to a particular Oracle VM Server within the destination pool; you must start the virtual machine in the destination server pool to deploy it to an Oracle VM Server.
-
-
Click Finish to complete the migration.
-
-
Move this VM to a different RepositoryThis option changes the location where the virtual machine, and its configuration and local storage, reside. You should choose this option to move the virtual machine between servers in different server pools.
-
Select this option and then click Next to proceed as follows:
-
Select a clone customer from the
Clone Customizerdrop-down list or clickCreateto create a new clone customizer.Clone customizers can be used to determine storage mappings for the virtual machine so that you can define where the virtual disks for a virtual machine should be located.
If you create a new clone customizer, the Create Clone Customizer wizard is displayed. You can read more on the options provided by this wizard in Create a Clone Customizer.
-
Select the destination repository to which you want to move the virtual machine configuration and storage from the
Target Repositorydrop-down list. -
Click Finish to move the virtual machine.
-
-
-
Click the Servers and VMs tab.
-
Select the server pool on which the virtual machines reside in the navigation tree.
-
Select Virtual Machines from the Perspective drop-down list. Select the virtual machines to migrate in the management pane and drag and drop them to the Oracle VM Server, server pool or the Unassigned Virtual Machines folder in the navigation tree to which you want to migrate the virtual machines. See Section 1.13, “Drag and Drop” for information on using the drag and drop feature.
-
The virtual machines are migrated.
3.7.1.5 Clone a Virtual Machine or Template
Cloning a virtual machine or a template means making a copy of it, so that you can create multiple virtual machines or templates from the original.
A clone can also be performed using two other file copy methods: sparse copy, and non-sparse copy. These two cloning methods can be used when cloning from and to different repositories, and when the storage used for the storage repository uses a generic Oracle VM Storage Connect plug-in. These cloning methods are slower than thin cloning, but more versatile.
The virtual machine cloning procedure below uses the same dialog box to clone a virtual machine and a template.
-
Select the virtual machine or template to clone and display the Clone dialog box. You display this dialog box from different locations, depending on whether you are cloning a virtual machine or a template.
-
Virtual Machine: Click the Servers and VMs tab. Select the server pool on which the virtual machine resides in the navigation tree. Select Virtual Machines from the Perspective drop-down list. Select the virtual machine to clone in the management pane, and click Clone Virtual Machine
.
-
Virtual Machine Template: Click the Repositories tab. In the navigation tree, select the repository in which the template resides, then VM Templates. Select the template in the management pane and click Clone Template
.
-
-
The Clone (Virtual Machine or Template) dialog box is displayed.
Select or enter the following:
-
Clone to a: Select the clone type, either Virtual Machine or Template, to specify the objects to create from the clone.
-
Clone Count: The number of clones to create.
-
Name Index: The start index number to use for the clone name suffix. The default is
0. This is used in conjunction with the Clone Name field to create the name for each clone. -
Clone Name: An optional name for the virtual machines or templates. The maximum name length is 256 characters and may contain any character. The name need not be unique. If no value is given, the default is the name of the virtual machine or template being cloned. Each clone is suffixed with a dot (.) and the clone index number, starting with the value for the Name Index field. For example, if the Clone Name field is set to
MyVM, and the Name Index field is set to1, the resulting clones would be namedMyVM.1,MyVM.2and so on. -
Target Server Pool: The server pool on which the clone is to be deployed.
NoteThe list of server pools that are available in the drop-down is limited to valid server pools that are capable of handling the cloning process correctly. This helps you to prevent cloning to a server pool that may fail to process the request. If this list is empty, you should refer to the table presented under the Why don't I see other server pools to clone to? element in this dialog.
-
Description: A description for the virtual machines or templates.
-
Advanced Clone: Whether to use a clone customizer to set preferences for the clone operation.
-
Clone Customizer: The clone customizer to create the clones. This is used to set virtual disk mappings to enable you to copy disks to other storage locations. It also allows you to create network mappings so you can use new VNICs and other networks for the clone. Click Create... to create a new clone customizer. See Section 3.5.2.14, “Manage Clone Customizers” for information on creating a clone customizer. This field is enabled if Advanced Clone is checked.
-
Target Repository: The repository to store the cloned virtual machine configuration file. This does not affect any clone disk mappings you set using a clone customizer; this option is only for the virtual machine configuration file. This field is enabled if Advanced Clone is checked.
-
Why don't I see other server pools to clone to? A collapsed window element, providing a table of server pools that do not meet the requirements to accept a clone request. Expanding any of the entries in this table displays the reason that the server pool does not qualify.
TipIf you clone a virtual machine or template without using a clone customizer, the storage repository is locked for the duration of the cloning job; this may be some time in some circumstances. To quickly create clones and not lock the storage repository, use a clone customizer.
Click OK.
-
The virtual machines are created and deployed to the server pool. The templates are created in the storage repository.
It is important to understand that older templates may use a different device type to attach virtual disks. This may affect your ability to attach new virtual disks, such as a virtual CDROM device. There are some limitations on mixing virtual disks of differing device types on a virtual machine. See How are Virtual Disks Managed? in the Oracle VM Concepts Guide for more information about how device types are allocated to virtual disks and what you may need to do to solve any issues surrounding this problem.
3.7.1.6 Export a Virtual Machine
Exporting a virtual machine lets you reuse virtual machines with other instances of Oracle VM, or with other virtualization environments that support the Open Virtualization Format (OVA).
Export to Virtual Appliance
Exporting a virtual appliance lets you reuse virtual machines with other instances of Oracle VM, or with other virtualization environments that support the Open Virtualization Format (OVA).
You can export one or more virtual machines to a virtual appliance. Exporting a virtual machine to a virtual appliance creates an OVA file in the storage repository. The OVA file contains the virtual disk file(s) in VMDK format, an OVF file that holds the virtual machine(s) configuration, and other files such as a manifest and certificate.
-
Click the Servers and VMs tab. Select the server pool on which the virtual machine resides in the navigation tree. Select Virtual Machines from the Perspective drop-down list.
-
Make sure each virtual machine to export is in the Stopped state.
See Section 3.5.2.4, “Stop Virtual Machines” for more information on stopping virtual machines.
-
Select the virtual machine(s) to export in the management pane, and click Export to Virtual Appliance
. -
The Export Virtual Machine(s) to Virtual Appliance dialog box is displayed.
Specify a name for the virtual appliance in the Virtual Appliance Name field and select the storage repository to which you want to save the virtual appliance from the Destination Repository menu and then click OK.
The virtual appliance is located under the Assemblies directory on
the Oracle VM Server instance where the storage repository is presented to, as follows:
/OVS/Repositories/.
See the Chapter 4, Repositories Tab for information about obtaining the repository
and virtual appliance ID. repository_id/Assemblies/virtual-appliance_id/package.ova
Export to Oracle Cloud Infrastructure Using Oracle VM Exporter Appliance
Exporting an Oracle VM virtual machine using the Oracle VM Exporter Appliance transfers the virtual machine to Oracle Cloud Infrastructure. Exporting a virtual machine does not remove the virtual machine from Oracle VM. You can export a virtual machine to other places in Oracle Cloud Infrastructure.
Before using the Oracle VM Exporter Appliance, you must first download and configure the Oracle VM Exporter Appliance Open Virtual Appliance (OVA) and make sure the Oracle VM Exporter Appliance virtual machine is running. For more information, see Installing and Configuring the Oracle VM Exporter Appliance
You can start, one after another, up to four virtual machine exports to run simultaneously (they will not start simultaneously) with a single Oracle VM Exporter Appliance. If you start a fifth export operation for one Oracle VM Exporter Appliance, the export is queued until one of the running exports completes. If you need to run more than four exports at the same time, you can add another Oracle VM Exporter Appliance to the virtual machines. You can only export a stopped virtual machine. A virtual machine being exported by the Oracle VM Exporter Appliance cannot be started.
Before Windows VMs can be exported to OCI, they have to be shutdown without fast restart. To shutdown without fast restart:
-
Use the
shutdown /scommand, or -
Click the Windows Start Button (or Windows symbol button or the Start Menu), then click Power and then press the Shift key while clicking on Shutdown option.
Export a Virtual Machine to Oracle Cloud Infrastructure
-
Click the tab.
-
Select the server pool on which the virtual machine resides in the navigation tree.
-
Select from the drop-down list. You can also select the virtual machine directly if the virtual machine is on the screen.
NoteWindows virtual machines need to have virtio-win drivers installed before exporting to Oracle Cloud Infrastructure. For more information see https://docs.oracle.com/en/operating-systems/oracle-linux/kvm-user/.
-
Stop the virtual machine.
See Section 3.5.2.4, “Stop Virtual Machines” for more information on stopping virtual machines.
-
With the stopped virtual machine highlighted, click the Export to OCI icon (
) in the task icon bar
or right-click on the stopped virtual machine and select .The wizard displays information about the Oracle VM Exporter Appliance virtual machine.
-
Select or enter the following Exporter Appliance information:
-
From the drop-down list, select the name of the Oracle VM Exporter Appliance.
NoteIf you named the Oracle VM Exporter Appliance Exporter Appliance, that name is already filled in. If you have changed the name, you have to select it from a list of virtual machines. One of the choices is , which is an option to enter the information.
-
From the drop-down list, select the IP address of the Oracle VM Exporter Appliance.
NoteThe IP address for the eth0 interface is pre-selected, if it exists. There might be more than one IP address assigned to the Oracle VM Exporter Appliance. Make sure you select the correct one.
If you selected Please Select for the Appliance name, the Appliance's IP Address defaults to .
-
If you selected from the drop-down list, enter the hostname or IP address for the Oracle VM Exporter Appliance.
-
Enter a port number if you have changed the default port number that the Oracle VM Exporter Appliance uses to receive packets.
NoteBe aware that if you change the default port number of 8443 can complicate Oracle VM Exporter Appliance communications.
-
-
Click .
The options display.
-
If the Oracle VM Exporter Appliance has been set up correctly, the and fields display the public key and fingerprint of the Oracle VM Exporter Appliance selected for the export. This public key must be uploaded to Oracle Cloud Infrastructure or the export authentication fails.
The other fields may contain values from previous export operations. These fields contain Oracle Cloud Infrastructure user ID (), Oracle Cloud Infrastructure region (), and Oracle Cloud Infrastructure tenancy ID (). These values are all obtained from an Oracle Cloud Infrastructure tenancy account. For more information on these fields, see Installing and Configuring the Oracle VM Exporter Appliance.
Enter the following Oracle Cloud Infrastructure information:
-
Enter the .
-
Enter the where you want to upload the exported virtual machine.
-
Enter the .
-
-
Click .
Before the options display, the Oracle VM Exporter Appliance validates the information provided with Oracle Cloud Infrastructure account.
NoteIf you get an error here, validate all Oracle Cloud Infrastructure information.
-
Enter information about Oracle Cloud Infrastructure instance.
-
(Optional) Enter a new .
NoteBy default, the instance name is the same as the virtual machine name, but you can enter a customized name between 1 and 255 characters long.
-
Select the from the drop-down list.
-
Select the from the drop-down list.
-
Enter the .
-
-
Click . The options display.
-
Enter additional information about the virtual machine disks exported with the virtual machine to Oracle Cloud Infrastructure.
-
Select the from the drop-down list.
-
Select the from the drop-down list.
-
Select the from the drop-down list.
NoteThe rest of the items are determined by local information.
-
Select the from the drop-down list.
-
(Optional) Change the from the default size. The range for a Linux VM is from 50 GiB to 32 TiB. The range for the Windows VM is from 256 GiB to 32 TiB.
NoteIf the boot volume size entered is less then the actual virtual machine system image (boot disk) size, the export fails in the instance creation phase.
-
(Optional) Check the box next to each disk in the list you want to upload.
NoteYou can select up to 32 disks to upload. ISO images attached to the virtual machine are not uploaded.
The Oracle VM Exporter Appliance lets you select and upload the same shared disk when exporting two or more virtual machines that share the disks. You need to select the shared disk for upload only once when exporting one of the virtual machines that shares the disk. If you select the same shared disk for each virtual machine, you create multiple copies of the same shared disk.
-
-
Click .
The options display.
-
Select or enter the following information about the virtual NICs (vNICs) created and used by Oracle Cloud Infrastructure for the Virtual Cloud Network (VCN) when the export operation has completed.
NoteThe and information is supplied by Oracle VM and cannot be changed.
-
-
Click .
The of your choices display.
-
Once you have entered all the required information, the Oracle VM Exporter Appliance displays a summary of the key information supplied during the wizard navigation. If all information in the summary is correct, click to begin the export operation.
Tracking the Export Operation
The export is a multi-stage operation tracked by an Oracle VM job listed in the running and completed task section of the Oracle VM Manager. You can track the progress of the export to make sure it completes successfully.
-
Once the export process has ended, you can check the details in the Oracle VM Manager virtual machine perspective.
NoteYou can also log into the Oracle VM Exporter Appliance and tail the
vmexporterlog using the following command:$ tail -f /var/log/vmexporter/vmexporter.log -
Even after the export job completes successfully, be sure to check the tab in to make sure the Successfully exported OVM VM to OCI result appears and to see if any other related steps are needed. For example, additional steps are needed to connect a data Block Volume to the exported virtual machine.
-
If you need to connect a data block volume, the directions are listed in the job summary. The steps are different for exported Windows and Linux virtual machines.
Windows virtual machine example:
Successfully exported OVM VM to OCI

OVM VM ID          : <ovm-vm-id>

OCI Instance ID    : <oci-instance-id>
OCI Instance Name  : <oci-instance-name>
OCI Compartment ID : <oci-compartment-id>
OCI OS Type        : Windows - Server 2019 Standard

Additional Disk Data:

One or more data disks have been uploaded to OCI Object Storage as a disk image.
To get your data on the disk block volume, this disk image has to be
    transferred to OCI Instance and written to disk block volume.
Please ensure you have sufficient space to transfer the disk image.


Object Storage Bucket         : <object-storage-bucket-name>
Object Name                   : <object-name>
Object Size                   : 2.0GB
Pre-Authenticated Request URL : <url>
Block Volume ID               : <block-volume-id>
Block Volume Attachment ID    : <block-volume-attachment-id>
Block Volume Attachment Access: READ/WRITE

1. Run these commands in the OCI Instance as an administrator in Windows Powershell
     to connect to the attached block volume.

        Set-Service -Name msiscsi -StartupType Automatic
        Start-Service msiscsi
        iscsicli.exe QAddTargetPortal <ip>
        iscsicli.exe QLoginTarget <iqn>
        iscsicli.exe PersistentLoginTarget <iqn> * * * * * * * * * * * *

2. Download the disk image: <disk-image-location> to the OCI Instance.
3. Go to Disk Management and mark Disk 2 "Online."
4. Write the downloaded disk image to Disk 2 using a Windows Disk Image Writer
     program such as NetBSD Rawrite32.
5. Delete the downloaded disk image from OCI Instance.
6. Delete the disk image '<disk-image-name>'
     from OCI Object Storage.


Object Storage Bucket         : <object-storage-bucket>
Object Name                   : <object-name>
Object Size                   : 1.0GB
Pre-Authenticated Request URL : <url>
Block Volume ID               : <block-volume-id>
Block Volume Attachment ID    : <block-volume-attachment-id>
Block Volume Attachment Access: READ/WRITE

1. Run these commands in the OCI Instance as an administrator in Windows Powershell
     to connect to the attached block volume.

        Set-Service -Name msiscsi -StartupType Automatic
        Start-Service msiscsi
        iscsicli.exe QAddTargetPortal <ip>
        iscsicli.exe QLoginTarget <iqn>
        iscsicli.exe PersistentLoginTarget <iqn> * * * * * * * * * * * * * *

2. Download the disk image: <disk-image-location> to the OCI Instance.
3. Go to Disk Management and mark Disk 3 "Online."
4. Write the downloaded disk image to Disk 3 using a Windows Disk Image Writer program
     such as NetBSD Rawrite32.
5. Delete the downloaded disk image from OCI Instance.
6. Delete the disk image '<disk-image-name>' from
     OCI Object Storage.
Linux virtual machine example:
Successfully exported OVM VM to OCI

OVM VM ID          : <ovm-vm-id>

OCI Instance ID    : <oci-instance-id>
OCI Instance Name  : <oci-instance-name>
OCI Compartment ID : <oci-compartment-id>
OCI OS Type        : Linux

Additional Disk Data:

One or more data disks have been uploaded to OCI Object Storage as a disk image.  To get
     your data on the disk block volume, please install 'iscsi-initiator-utils' and
    'wget' yum packages on your Instance, if not already installed, and do the following:


Object Storage Bucket         : <object-storage-bucket>
Object Name                   : <object-name>
Object Size                   : 2.0GB
Pre-Authenticated Request URL : <url>
Block Volume ID               : <block-volume-id>
Block Volume Attachment ID    : <block-volume-attachment-id>
Block Volume Attachment Access: READ/WRITE

1. Run these commands to connect to the attached block volume:
        sudo iscsiadm -m node -o new -T <iqn> -p <ip:port>
        sudo iscsiadm -m node -o update -T <iqn> -n node.startup -v automatic
        sudo iscsiadm -m node -T <iqn> -p <ip:port> -l
2. Run the following command:
        sudo wget <url> -O /dev/sdb
3. If disk mount in /etc/fstab is with UUID, the disk can be mounted at its mount point.
     If UUID is not used, please update /etc/fstab to use UUID or use /dev/sdb.
4. Reboot the instance and check data in disk block volume. Reboot can be deferred until all
     data disks have been processed.
5. Delete the disk image '<disk-image-name>' from OCI Object
     Storage.


Object Storage Bucket         : <object-storage-bucket>
Object Name                   : <object-name>
Object Size                   : 1.0GB
Pre-Authenticated Request URL : <url>
Block Volume ID               : <block-volume-id>
Block Volume Attachment ID    : <block-volume-attachment-id>
Block Volume Attachment Access: READ/WRITE

1. Run these commands to connect to the attached block volume:
        sudo iscsiadm -m node -o new -T <iqn> -p <ip:port>
        sudo iscsiadm -m node -o update -T <iqn> -n node.startup -v automatic
        sudo iscsiadm -m node -T <iqn> -p <ip:port> -l60 -l
2. Run the following command:
        sudo wget <yrl> -O /dev/sdc
3. If disk mount in /etc/fstab is with UUID, the disk can be mounted at its mount point.
     If UUID is not used, please update /etc/fstab to use UUID or use /dev/sdc.
4. Reboot the instance and check data in disk block volume. Reboot can be deferred until
     all data disks have been processed.
5. Delete the disk image '<disk-image-name>' from OCI
     Object Storage.
You are prompted once for each data disk that the Oracle VM Exporter Appliance has exported.
-
If you have exported a virtual machine with multiple VNICs, there are additional steps needed because of the way that Oracle Cloud Infrastructure handles new virtual machines with multiple VNICs. For more information on this issue and solutions, see https://docs.cloud.oracle.com/en-us/iaas/Content/Network/Tasks/managingVNICs.htm
Connecting a Shared Block Volume to Exported Virtual Machines
You can use the Oracle VM Export to OCI function to export two or more virtual machines that share disks (for example, an OCFS2 cluster) to Oracle Cloud Infrastructure. However, after successful creation of the virtual machine instances in Oracle Cloud Infrastructure, additional steps must be followed to connect the shared Oracle Cloud Infrastructure block volumes and, in the case of an OCFS2 cluster, restart the cluster services.
If you export two or more Oracle VM virtual machines sharing one or more disks (such as an OCFS2 cluster), you should avoid creating duplicate copies of the shared disk in Oracle Cloud Infrastructure. Although you only have to upload the shared disks once with an exported virtual machine, you must attach the shared disks, which are now block volumes in Oracle Cloud Infrastructure, to the other virtual machines after the export succeeds.
The Oracle VM Exporter Appliance does not prevent you from selecting and uploading the same shared disk when exporting two or more virtual machines that share the disks. You need to select the shared disk only once when exporting one of the virtual machines to Oracle Cloud Infrastructure or duplicate, unnecessary copies are created.
As an example of this process, consider a set of three Oracle VM virtual machines (VM1, VM2, and VM3) sharing two disks (Shared Disk1 and Shared Disk2).
You export this group as three virtual machines, but upload the shared disks only once with one of the virtual machines. To avoid duplicated effort and results, these virtual machines and shared disks are exported to Oracle Cloud Infrastructure as two types of export: one virtual machine with the upload of the shared disks, and two virtual machines without any uploaded disks.
So, VM1 has Shared Disk1 and Shared Disk2 attached, but the exported VM2 and VM3 do not.
Because the goal is to establish the original configuration from Oracle VM in Oracle Cloud Infrastructure, the shared disks from Oracle VM, which are now block volumes in Oracle Cloud Infrastructure, must be re-attached to the exported virtual machine instances in Oracle Cloud Infrastructure.
In this case, Shared Disk1 and Shared Disk2 are to be attached to the exported virtual machine instances VM2 and VM3 in Oracle Cloud Infrastructure.
Only VM1's Export Summary of the Export to OCI job has the details to attach Oracle Cloud Infrastructure block volumes to an instance. VM2 and VM3 do not have this information because the shared disks were not exported with VM2 and VM3, only with VM1. However, the same steps listed for VM1 must be repeated for VM2 and VM3.
Once all exports have completed successfully, the following are the high-level steps for connecting an Oracle Cloud Infrastructure shared block volume to an exported virtual machine instance. Some steps have to be repeated for each disk or virtual machine instance:
-
In Oracle Cloud Infrastructure, attach the same set of shared block volumes to the virtual machine instances that share them in Oracle Cloud Infrastructure.
-
For VM1, follow the instructions in the Export Summary (under the Jobs tab) in Oracle VM for a successful export with uploaded shared disks.
-
For VM2 and VM3, follow the instructions in the Export Summary (under the Jobs tab) in Oracle VM for a successful export of virtual machines without uploaded shared disks.
If you have OCFS2 disks attached to the virtual machines you have exported, there are two additional steps to take:
-
In Oracle Cloud Infrastructure, re-establish the cluster and make modifications to the
cluster.conffile for each virtual machine instance that is part of the cluster. This step is necessary because the IP address and hostname are changed when the virtual machine is exported. -
In Oracle Cloud Infrastructure, mount the data disk on the virtual machine instances in the cluster.
Detailed Example
There are three general steps to follow when connecting exported disks to virtual machine instances on Oracle Cloud Infrastructure.
-
In Oracle Cloud Infrastructure, attach the same set of shared block volumes to the virtual machine instances that share them in Oracle Cloud Infrastructure. Information about the block volumes to attach can be found in one of the following ways:
-
In the Export Summary of VM1’s export Job in Oracle VM
-
In the Attached Block Volumes of VM1’s Oracle Cloud Infrastructure instance.
Repeat the following steps for each of the shared volumes (Shared Disk1 and Shared Disk2) that need to be attached to a virtual machine instance (VM2 and VM3):
-
Click on Compute.
-
Click on Instances.
-
Click on the hyperlink for the virtual machine Instance.
-
Click on the Attached Block Volumes in the Resources column.
-
Click on the Attach Block Volume blue button.
-
Enter the applicable information on the Attach Block Volume page:
-
: iSCSI (this is the default).
-
Make sure is selected (this is the default)
-
Make sure the Block Volume from Step 1 above is correct in the drop-down.
NoteFor the drop-down list , make sure you select the same uploaded shared block volume (Shared Disk1 and Shared Disk2) that was attached to the virtual machine sharing the disks (VM1) before the export.
-
: Select
Read/Write -
                    Shareable
-
-
-
If you have not already done so, follow the instructions in the Additional Disk Data section under the Export Summary tab in Job Details of a successful export Job of VM1 in Oracle VM. These instructions are included in the Tracking the Export Operation section above.
NoteFor more information on finding jobs and job details, see Job Details...
-
On VM2 and VM3, which have block volumes that were not uploaded with the virtual machine instance, you must manually attach the shared disks uploaded from Oracle VM.
For Linux-based virtual machine instances, do the following:
-
Run the commands listed under Step 1: Run these commands to connect to the attached block volume under the
Additional Disk
                Data
in the for VM1 in Oracle VM. Shared disks are those with a Block Volume Attachment Access set toRead/Write - Shareable. -
Reboot
For Windows-based virtual machine instances, do the following:
-
Run the commands listed under Step 1: Run these commands in the OCI Instance as an administrator in Windows Powershell to connect to the attached block volume under the
Additional Disk Datain the for VM1 in Oracle VM. Shared disks are those with a Block Volume Attachment Access set toRead/Write - Shareable. -
Go to and mark the disk
Online
-
Detailed Example for OCFS2
There are two more OCFS2-specific steps to follow when connecting exported disks to virtual machine instances on Oracle Cloud Infrastructure. These steps only apply to OCFS2.
-
For OCFS2, in Oracle Cloud Infrastructure, re-establish the cluster and make modifications to the
cluster.conffile for each virtual machine instance that is part of the cluster. This is necessary because the IP address and hostname are changed when the virtual machine is exported.To recreate or re-establish the cluster configuration, do the following:
-
Set the hostname if it is not already set:
$
nmcli general hostname<Fully Qualified Domain Name>$systemct1 restart systemd-hostnamed$vi /etc/hosts<add new hostname and IP address on primary VNIC> -
Verify that the OCFS2 cluster is set to
offline:$
o2cb cluster-status -
Verify that the volumes, labels, and UUIDs are listed.
$
mountd.ocfs2-d -
Perform the next two commands on only one virtual machine instance.
Using the editor, modify the
cluster.conffile to change each node's IP address and hostname to reflect the new IP address (the IP address used for the cluster connection) and hostname of the exported virtual machine instance.$
vi /etc/ocfs2/cluster.confCopy the updated
/etc/ocfs2/cluster.conffile to all other nodes or virtual machine instances that were originally part of the cluster.$
scp /etc/ocfs2/cluster.conf root@<vm_clusterIP>:/etc/ocfs2/ -
Perform the next three commands on all virtual machines in the cluster.
Ping each node or virtual machine cluster IP address from each virtual machine in the cluster. Verify that the ping succeeds, then put the cluster back online.
$
ping$<vm1_cluster_ip...vmN_cluster_ip>/sbin/o2cb.init startVerify that the cluster is back online, the heartbeat is set to
active, and, if the cluster is using global heartbeat, that theUIDof the device being used is the one listed in the output of themountd.ocfs2 -dcommand above.$
/sbin/o2cb.init status
-
-
For OCFS2, in Oracle Cloud Infrastructure, mount the data disk on the virtual machine instances in the cluster.
For each virtual machine instance in the cluster, do the following:
-
Check the
/etc/fstabto verify that the correct device is used to mount the shared block volumes (see the Export Summary above). -
Mount the cluster file systems:
$
mount -d$dfVerify that the shared block volumes are mounted on the cluster file system, and that the files created in Oracle VM still exist, intact, and are the same on all cluster nodes.
-
Once these steps are completed, the OCFS2 disks have been successfully exported from Oracle VM to Oracle Cloud Infrastructure and re-attached.
Accessing the Exported Virtual Machine Serial Console
After exporting a virtual machine with the Oracle VM Exporter Appliance, in some cases you must modify the exported virtual machine's GRUB bootloader to access the serial console.
For Oracle Linux 7 or Oracle Linux 8, which include GRUB2, do the following:
-
Update the
/etc/default/grubfile to include the following:GRUB_TIMEOUT=5 GRUB_DISTRIBUTOR="$(sed 's, release .*$,,g' /etc/system-release)" GRUB_DEFAULT=saved GRUB_DISABLE_SUBMENU=true GRUB_TERMINAL_OUTPUT="console" GRUB_TERMINAL="serial" GRUB_SERIAL_COMMAND="serial --speed=9600 --unit=0 --word=8 --parity=no --stop=1" GRUB_CMDLINE_LINUX="resume=/dev/mapper/ol-swap rd.lvm.lv=ol/root rd.lvm.lv=ol/swap console=ttyS0,9600n8 console=tty0" GRUB_DISABLE_RECOVERY="true" GRUB_ENABLE_BLSCFG=true
-
Regenerate the
grub.cfgfile by running the command$ grub2-mkconfig -o /boot/grub2/grub.cfg
-
Reboot the exported virtual machine to connect it to the serial console.
For information about virtual machine serial console access in Oracle Linux 6, which shipped with GRUB, see My Oracle Support (MOS) article 1505124.1 at http://metalink.oracle.com.
For more information about virtual machine issues, see https://docs.oracle.com/en/virtualization/oracle-vm/3.4/admin/vmadm-tshoot-vmachines.html
Resuming a Failed or Aborted Export Operation
The export operation using the Oracle VM Exporter Appliance is a lengthy process and is tracked in the virtual machine Jobs tab like any other operation. You can resume a failed or aborted export operation attempted by the Oracle VM Exporter Appliance.
When resuming an export operation, you should not change these Oracle Cloud Infrastructure parameters:
-
Tenancy
-
Region
-
Instance Name
-
Storage-related Compartments
To resume an export operation that has failed or been aborted:
-
Make sure you select the virtual machine that has failed or been aborted.
NoteIf the previous export failure was due to a quota limit, a custom image for the virtual machine might exist, depending on when the quota limit was reached. If you delete this custom image, you cannot resume the export operation. However, the custom image is deleted automatically after a successful export operation.
-
Click on the Export to OCI icon from the or right-click the highlighted virtual machine to export, then choose .
The dialog displays.
-
Click .
The or messages display.
-
For a export operation, a window displays the following information:
Previous export attempt of VM <vm-name> failed while
<previous-status-from-returned-data>.
Message: <message-text>
Continuing here will retry from the failed step and resume export operation.
Any changes to Instance configuration will be applied for remainder of the steps.
Changes that pertain to previously completed steps will be ignored.
To discard progress and restart export from beginning, check the checkbox below.

[] Discard state and restart export from beginning
-
Check the option to start the process from the beginning and then click .
From the pop-up window confirm that you want to delete the saved export information by answering
Click to return to the window.
Click to delete the export information and advance to the step to enter new information for the export.
-
Do NOT check the option to start the process from the point of failure and then click .
NoteThe wizard takes you to the step where the previous entries from the failed export have been saved and filled in. You still have the option to make some modifications.
-
-
For an export operation, the window or the window opens and displays the following information:
-
A previous export operation for virtual machine <vm-name> is being
aborted in the backend.
It can take some time to fully abort. A new export operation cannot be started until
the previous export is fully aborted.
Please try again later.
Click to dismiss this message.
-
Message: VM export aborted.
Continuing here will retry from the failed step and resume export operation.
Any changes to Instance configuration will be applied for remainder of the steps.
Changes that pertain to previously completed steps will be ignored.
To discard progress and restart export from beginning, check the checkbox below.

[] Discard state and restart export from beginning
-
Check the option to start the process from the beginning and then click .
From the pop-up window confirm that you want to delete the saved export information by answering
Click to return to the window.
Click to delete the export information and advance to the step to enter new information for the export.
-
Do NOT check the option to start the process from the point where it aborted and then click .
NoteThe wizard takes you to the wizard step where the previous entries from the failed export have been saved and filled in throughout the wizard dialog steps. You still have the option to make modifications.
-
-
-
3.7.1.7 Manage Clone Customizers
Cloning a virtual machine or template means making a copy of it, so that you can create multiple virtual machines or templates from the original. You can create a clone customizer to set up the clone parameters, such as networking, and the virtual disk, and ISO resources. A clone customizer is also used when moving a virtual machine or template.
Create a Clone Customizer
-
Select the virtual machine or template and display the Manage Clone Customizers for (Virtual Machine or Template) dialog box by:
-
Virtual Machine: Click the Servers and VMs tab. Select the server pool on which the virtual machine resides in the navigation tree. Select Virtual Machines from the Perspective drop-down list. Select the virtual machine to clone in the management pane, and click Manage Clone Customizers...
.
-
Virtual Machine Template: Click the Repositories tab. In the navigation tree, select the repository in which the template resides, then VM Templates. Select the template in the management pane and click Manage Clone Customizers
.
-
-
Select Create Clone Customizer...
.
-
The Create a Clone Customizer wizard is displayed.
In the Name and Description step of the wizard, enter a Name and Description for the clone customizer, and click Next.
-
The Storage Mappings step of the wizard is displayed.
Select the following storage mappings:
-
Disk: The disks to include in the clone.
-
Clone Target Type: The type of storage location where the disk is to be created, either a Repository or a Physical Disk.
-
Clone Target: The location on the storage type where the disk is to be created.
-
Clone Type: Whether to use a sparse or non-sparse files for the disk.
CautionWhen sparse virtual disk space allocation is used, the available space in a repository can be over-subscribed. Sparse allocation is useful to increase virtual machine density. However, errors occur if the space allocated to a storage repository becomes exhausted, so the administrator must carefully monitor disk space.
Click Next.
-
-
The Network Mappings step of the wizard is displayed.
Select the Virtual NICss to include in the clone customizer, and the Ethernet Network to which they should belong.
NoteThe network configuration is not changed when moving a virtual machine or template. It is only used when cloning a virtual machine or template.
Click Finish.
The clone customizer is now available to use to create a virtual machine, or template. See Section 4.7.1.4, “Clone a Virtual Machine or Template” for information on using the clone customizer to create a virtual machine or template.
Edit a Clone Customizer
-
Select the object to which the clone customizer belongs, either a virtual machine, or a virtual machine template. Click Manage Clone Customizers...
.
-
The Manage Clone Customizers for (VM or Template) dialog box is displayed. Select the clone customizer to edit and click Edit Clone Customizer...
.
-
The Edit Clone Customizer dialog box is displayed. Edit the clone customizer.
Click OK. The changes to the clone customizer are saved.
Delete a Clone Customizer
-
Select the object to which the clone customizer belongs, either a virtual machine, or a virtual machine template. Click Manage Clone Customizers...
.
-
The Manage Clone Customizers for (VM or Template) dialog box is displayed. Select the clone customizer to delete and click Delete Clone Customizer
.
-
A dialog box is displayed to confirm you want to delete the clone customizer. Confirm you want to delete the clone customizer and click OK. The clone customizer is deleted.
3.7.1.8 View Virtual Machine Configuration File
You can view the content of a virtual machine configuration file. The content is not editable but you can view and copy the text according to your needs.
-
Click the Servers and VMs tab.
-
Select the server pool on which the virtual machines reside in the navigation tree.
-
Select Virtual Machines from the Perspective drop-down list. Select the virtual machine to which the configuration file belongs. Click VM Config File Content...
.
-
The VM Config File Content dialog box is displayed with the content of the virtual machine configuration file. You can view and copy the text according to your needs.
-
Click OK to close the dialog.
3.7.1.9 Display VM Hierarchy Viewer
You can generate a graphical report on a virtual machine. For more information about object reporting, see Section 7.1, “Reports”.
-
Select a server pool in the Server Pools folder in the navigation pane.
-
Select the Virtual Machines perspective in the management pane.
-
Select a virtual machine in the management pane table.
-
Click
Display VM Hierarchy Viewer in
the management pane toolbar.
The VM Hierarchy Viewer window is displayed. This window contains some extra controls to manipulate the report display. These controls are described in the following table.
Table 3.31 Virtual machine graphical report controlsControl
Purpose
Reposition the hierarchy viewer component within the viewport.
Zoom a hierarchy viewer component so that all nodes are visible within the viewport.
Zoom the hierarchy viewer component.
Hide or show the control panel.
Change the layout of the hierarchy viewer component from the layout you defined to one of the layout options.
-
To create an XML report of the graphical report, click Generate Report. The report is generated and sent to the browser.
3.7.1.10 View Virtual Machine Events
The Events perspective is common to many elements within the Oracle VM Manager Web Interface. The Events perspective generally appears as an option within the Perspectives drop-down menu on the management pane of tabs that include a navigation tree. In this case, the Events perspective displays events specific to the item selected in the navigation tree and presents these in the management pane.
The Events perspective may also appear within a dialog that is
triggered from a Display Selected
Events... ![]() perspective toolbar option. In this case,
the Events perspective dialog displays events specific to one
or more elements selected in the management pane.
perspective toolbar option. In this case,
the Events perspective dialog displays events specific to one
or more elements selected in the management pane.
If an object has an error event associated with it you must acknowledge the event to clear the error and return the object to normal operations. For example, this can occur if an Oracle VM Server or virtual machine appear as Stopped (Error) in the status. The object in error is flagged with a red icon in the navigation tree. Oracle VM Servers, virtual machines, repositories and storage objects can have error events associated with them.
Since Oracle VM Manager attempts to resolve issues automatically as much as possible, not all events can be acknowledged by a user within the Oracle VM Manager Web Interface. Therefore, a flag is set for events that are user acknowledgeable. If an event does not have this flag set, you are unable to acknowledge it, since it is handled internally by Oracle VM Manager.
The Events perspective or dialog contains a table with the following columns of information for each event:
-
Severity: The severity level assigned to the event.
-
Timestamp: The date and time that the event occurred.
-
Modify Time: The last recorded date and time that the event was modified.
-
Type: The type of event according to Oracle VM Manager's event categorization model.
-
Summary: A summary description of the event.
-
Acknowledged: Whether an error event has been acknowledged.
-
User Acknowledgeable: Whether or not an event can be acknowledged by the user.
Event Descriptions
An arrow displays next to each event in the table. Click the arrow to expand and view the Description section that provides additional details for the event.
The Events perspective or dialog contains a perspective toolbar with the following options:
|
Toolbar Icon Option |
Icon |
Description |
|---|---|---|
|
Acknowledge |
|
Acknowledge a selected error event to clear the error and return the object to normal operations. Note that this option is only available for user acknowledgeable events. |
|
Acknowledge All |
|
Acknowledge all error events associated with an object to clear the errors and return the object to normal operations. Note that only user acknowledgeable events are cleared. This button is always clickable, even if there are no user acknowledgeable events. Clicking it when there are no user acknowledgeable events results in an error dialog. |
|
Display Count |
A drop-down menu that allows you to select the number of events that should be displayed in the management pane, while you are currently in this perspective. |
Acknowledging Events/Errors
If an object has an error event associated with it you must acknowledge the event to clear the error and return the object to normal operations. For example, this can occur if an Oracle VM Server or virtual machine appear as Stopped (Error) in the status. The object in error is flagged with a red icon in the navigation tree. Oracle VM Servers, virtual machines, repositories and storage objects can have error events associated with them. The following procedures show you how to clear errors and return the object to normal operations.
-
Click the Servers and VMs tab.
-
Select the Oracle VM Server in the navigation tree.
-
Select Events from the Perspective drop-down list in the management pane.
-
Select the user acknowledgeable error event and click Acknowledge
, or click
Acknowledge All
to clear all user acknowledgeable
errors.
-
Click the Servers and VMs tab.
-
Select the server pool, or Oracle VM Server on which the virtual machine resides in the navigation tree.
-
Select Virtual Machines from the Perspective drop-down list in the management pane.
-
Select the virtual machine in the management pane table. Click Display Selected VM Events...
.
-
The Events dialog box is displayed. Select the user acknowledgeable error event and click Acknowledge
, or click
Acknowledge All
to clear all user acknowledgeable
errors. Click
Close.
-
Click the Repositories tab.
-
Select the repository in the navigation tree.
-
Select Events from the Perspective drop-down list in the management pane.
-
Select the error event and click Acknowledge
, or click
Acknowledge All
to clear all errors.
-
Click the Storage tab.
-
Select File Servers, SAN Servers, or a storage server in the navigation tree.
-
Select Events from the Perspective drop-down list in the management pane.
-
Select the user acknowledgeable error event and click Acknowledge
, or click
Acknowledge All
to clear all user acknowledgeable
errors.
3.7.1.11 Generate Report
You can generate an XML report on one or more virtual machines. For more information about object reporting, see Section 7.1, “Reports”.
-
Select a server pool in the Server Pools folder in the navigation pane.
-
Select the Virtual Machines perspective in the management pane.
-
Select one or more virtual machines in the management pane table.
-
Click
Generate Report in the
management pane toolbar.
-
The report is generated and sent to the browser.