Release 9.0.2
Part Number A95995-01
 Contents |
 Index |
| Oracle Internet File System Setup and Administration Guide Release 9.0.2 Part Number A95995-01 |
|
This chapter describes how to migrate content and users from legacy systems to Oracle Internet File System (Oracle 9iFS) and from one instance of Oracle 9iFS to another. It also discusses basic backup and recovery features. Topics include:
Ideally, migration to Oracle Internet File System (Oracle 9iFS) goes so smoothly that end users initially don't notice the change. Many Oracle 9iFS administrators accomplish this goal by scheduling downtime for the weekend, when file system usage is at a low point. The administrator can then perform the migration, shut down the old server, and give the new server the same IP address, name, and other characteristics of the old system. When users arrive on Monday morning, they see the same file, e-mail, FTP, or Web server they saw before. The only difference they notice is when the administrator shows them how to use the advanced features of Oracle 9iFS, such as versioning or multiple foldering.
When migrating from other file servers to Oracle 9iFS, you need to think about how to move:
The first task in moving to a new Oracle 9iFS is creating the user list. Currently, there is no automatic way to copy the user list from an existing Windows or UNIX file server, so you need to use one of three options for creating users:
For details on all three methods, consult "Step 2: Create Users and Groups" in Chapter 4, "Setting Up Oracle Internet File System".
Keep in mind that, when you create a user, you need to not only create the unique username and password, but also the e-mail ID for the user.
If your file system's management tools provide a way of dumping the user list to a tab- or comma-delimited file or similar format, you could then write a simple script that would translate this user information into a set of XML files, following the format required for XML-based user creation in Oracle 9iFS. You could then load the files into your new Oracle 9iFS through one of the protocol servers (most likely the Command Line Utilities, since it was designed for this kind of scripted administrator activity).
Recreating the groups requires creating the groups, then adding the users to them. Since Oracle 9iFS supports nested groups, you can add a group to another group during this step. For details on creating groups and adding members, see "Step 2: Create Users and Groups" in Chapter 4, "Setting Up Oracle Internet File System".
If your management tools let you export group information to a file, you could then write a translation script to convert the groups into XML format and then load them into Oracle 9iFS.
After creating users and groups, the next step is to move the files and folders into Oracle 9iFS.
What actually gets moved? The files and folders themselves, as well as the basic metadata about them that any Copy command would support during a copy operation through FTP, Windows networking, or some other protocol. The filename, size, and date last modified are the key attributes that get copied along with the content.
However, there may be content that you cannot migrate from the old system to Oracle 9iFS. For example, if your old file system or document repository stores owner information, this type of metadata may not be copied with the file. The owner in this case becomes the Oracle 9iFS user copying the file, not the original owner in the old system.
Similarly, if applications running on the old system maintain metadata about files, this information will not be copied with the files. For example, a document management system may point to files in the old file system and add attributes to these files. Since this information is intrinsic to the document management system, not the file system, the extra metadata will not get copied along with the files.
When copying the files, you'll be using one of the network protocols:
Moving e-mail is a slightly different process. Since there is no native copy interface between e-mail servers in the way, for example, you can easily copy from one Windows NT or 2000 file server to another. Therefore, when copying e-mail, you must either do it through an e-mail client, or write a copy utility that speaks to the different ports running IMAP on the old and new systems.
When you copy e-mail, be sure to copy it to the users' Mail directory, or any subdirectories (such as Inbox) underneath them. Since the IMAP protocol server points to the mail directory, users will not be able to see e-mail in other folders through IMAP.
The trickiest part of the migration will probably be moving the applications running on the old system to the new one. Effectively, there are three types of application migrations:
Moving Oracle 9iFS applications from one system to another really depends on whether the developers followed best practices when designing how to deploy the application. Ideally, the developers wrote scripts that copy the different application components to the correct directories in the correct order, so that recreating the application on a new system requires pointing the scripts at a different system.
An Oracle 9iFS application may include some or all of the different parts of the Oracle 9iFS SDK:
For a complete list of application components and what they do, consult the Oracle Internet File System Developer Reference.
Undoubtedly the most difficult situation for application migration occurs when you have a server-side application already running. For example, you may have deployed a document or knowledge management system with its own custom metadata, security, business logic, and user interfaces, all designed for the old operating system.
These sorts of applications, if they can run remotely from the actual document repository, may still work. If they can connect to the file server via one of the standard network protocols, then the application can continue to work. The only complication may occur if changes on Oracle 9iFS, such as users applying restrictive ACLs, somehow interfere with the application.
Otherwise, you will need to rewrite the application, using the Oracle 9iFS SDK. The Oracle 9iFS Java API exposes all the capabilities of the file system, including versioning, check-in/check-out, and searching. Since these content management capabilities are provided as pre-existing components, rewriting a content management application may only require adding additional business logic and the user interface.
Lastly, you might have executables stored on a file server, run by users accessing the application across the network. In these cases, Oracle 9iFS imposes no special restrictions. If you could run it from your old file server, you will be able to run it from the new one.
An increasing number of applications, such as Sun's Star Portal or Microsoft Access, are designed for remote execution from a client. Since Oracle 9iFS is designed for scalability, you can better accommodate the remote execution of these applications by a growing number of users by hosting them on Oracle 9iFS.
Using the Import/Export utility, you can automate the migration of content and users from one instance of Oracle 9iFS to another without losing versioning information, multiple links, and custom subclassing information.
To do this, you first export the data to an "ExportSet," then import the data from the ExportSet into a different Oracle 9iFS instance. The Import/Export utility retains both the content and its structure, enabling you to export an entire folder hierarchy including metadata.
Using a similar technique, the import and export process can be used to migrate user definitions from one Oracle 9iFS instance to another.
The first step is to create the ExportSet.
ifsexportcontent
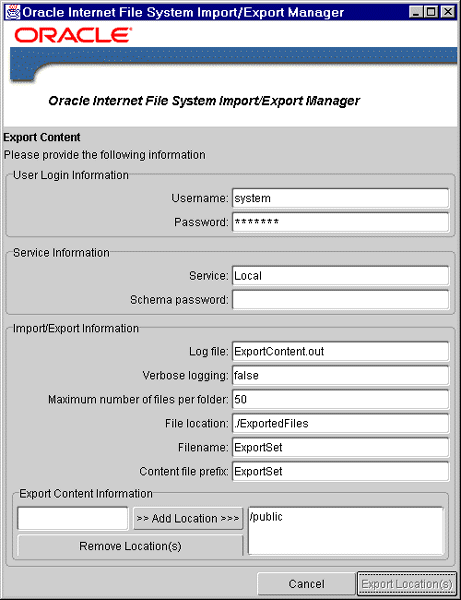
Refer to Table 8-1, "Export Options" for a description of each field and a sample entry.
Table 8-1 Export Options
The second step is to import the ExportSet into the second Oracle 9iFS instance.
ifsimportcontent
This script must be located in $ORACLE_HOME/9ifs/bin.
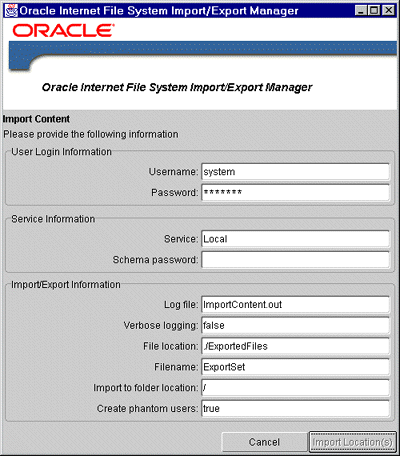
Refer to Table 8-2, "Import Content Options" for a description of each field and a sample entry.
Table 8-2 Import Content OptionsIf there is a directory user in the ExportSet that doesn't exist in the import system, the import fails unless you create "phantom" users. Phantom users are users added to the import system, without user profiles or group membership information (hence the name, phantom). After the import is complete, you can turn the phantoms into real users by importing the users explicitly or deleting them.
A phantom user can become a real user by importing the user from a UserExportSet. To add the profile, export the user from the system where the user exists and import it into this one. See "Exporting and Importing Users".
You can delete undesired phantom users on the Phantom User Handler screen (see Figure 8-3, "Phantom User Handler Screen").
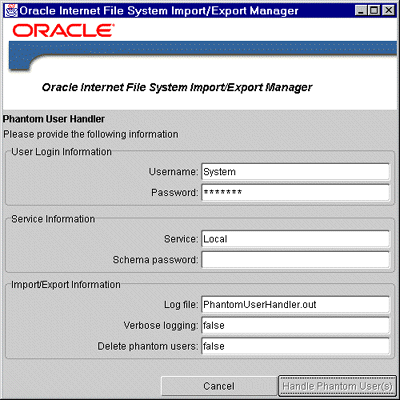
ifsphantomuserhandler
Exporting and importing users also requires the creation of an ExportSet, called the UserExportSet in this case, that is then imported into the second Oracle 9iFS instance. In addition, when importing users it is necessary to migrate their passwords.
ifsexportusers
The information you enter on this screen is identical to the information you enter on the Export Content screen, except Export User has two more options and the Export User option replaces the Export Location option.
The additional options are:
To specify which users to include in the UserExportSet, you identify them in the Export User(s) Information section of the screen (see Figure 8-4). Type the user name in the text box and click the Add User button.
For details about the other options, see Table 8-1, "Export Options".

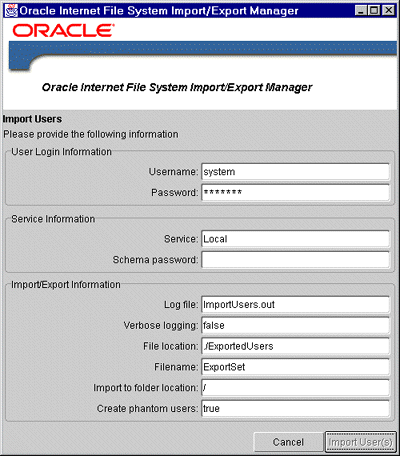
ifsimportusers
This script must be located in $ORACLE_HOME/9ifs/bin.
Refer to Table 8-2, "Import Content Options" for a description of each field and a sample entry.
At this point, the users are unable to log into that second schema, as credential information does not yet exist.
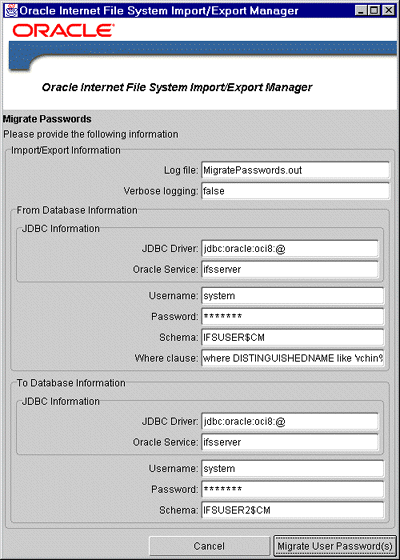
If the users use the Oracle 9iFS Credential Manager, migrate credential information for the users to the second schema's credential management tables.
ifsmigratepasswords
As the administrator, you have entered this information before, when connecting to the Oracle 9iFS repository. For more information, see Chapter 3, "Working with Oracle 9iFS Manager". This information is being used to connect to the Credential Manager table. For more information on the credential manager, see "Credential Manager Users" in Chapter 4, "Setting Up Oracle Internet File System".
All Oracle 9iFS data is currently stored inside the database, which allows you to rely on the usual backup and recovery mechanisms used for all other Oracle data. This is an important step when migrating data; if you use FTP to migrate data, all versioning, ACLs, ownership of files, and extended attributes will be lost. It is highly recommended that you back up your data before you migrate your data.
For more information on using Oracle's backup and recovery mechanism, see the Oracle9i Recovery Manager User's Guide and the Oracle9i Recovery Manager Reference. This guide explains what to do for the different possible scenarios, what software is required, and what to set up.
When saving files, there is no way of restoring a single document from a backup. The database is saved in a way which does not allow you to restore complete data files or to restore until a defined point in time, to save the document with all repository data describing it, or to restore this information back into the system.
The Import/Export utility can be used to back up and restore a subset of the Oracle 9iFS repository, rather than the entire database, while retaining data such as versioning, security, and custom attribute information.
A detailed description of how to use the Import/Export Utility is provided in "Migrating Data and Users from One Instance of Oracle 9iFS to Another".
|
 Copyright © 1999, 2002 Oracle Corporation. All Rights Reserved. |
|

