3
Working with Oracle 9iFS Manager
Oracle 9iFS Manager is the primary tool used to administer Oracle 9iFS. This chapter introduces Oracle 9iFS Manager and describes how to use it. Topics include:
Oracle 9iFS Manager: An Overview
Oracle 9iFS Manager is an administration application that manages Oracle 9iFS-specific system objects and processes. It is also an Oracle Enterprise Manager -integrated application that can also be used in a standalone mode to manage the local repository (see Appendix H, "Domain Administration with the Java-based Oracle Enterprise Manager Console" for more information).
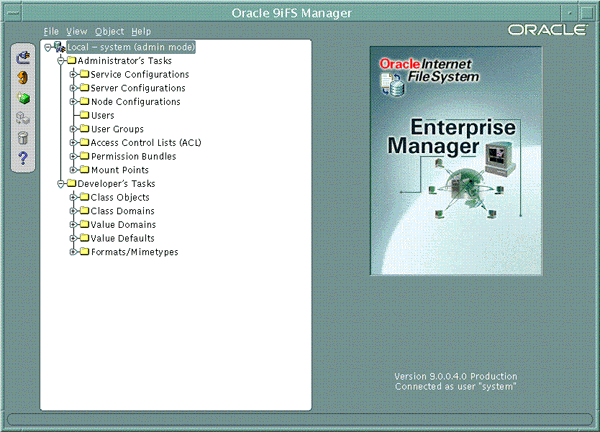
Oracle 9iFS Manager provides a powerful and easy-to-use graphical interface, and is divided between administration tasks and development tasks (see Figure 3-1).
Figure 3-1 Main Oracle 9iFS Manager Window
Text description of the illustration 1newifsm.gif
Administrative Tasks
Administrative tasks include viewing, creating and modifying:
- Service Configurations--Service configurations are templates for starting Oracle 9iFS services. A service configuration defines various service properties, such as cache sizing.
- Server Configurations--Server configurations are templates for starting Oracle 9iFS servers. A server configuration defines various server properties, such as port numbers.
- Node Configurations--Node configurations specify on which hosts the Oracle 9iFS processes execute. In addition to specifying its host, a node configuration defines the default services and servers for that node.
- Users--Users are the end users who use Oracle 9iFS as a file management system.
- User Groups--By assigning users to groups, administration and maintenance is easier. Instead of adding a set of users one at a time to an ACL applied to a folder or file, you can add the set of users to a group and add the group to the ACL.
- Access Control Lists--Security for all objects, including folders and files, is maintained through ACLs. An ACL specifies the permissions granted to or revoked for a particular user or group.
- Permission Bundles--A permission bundle is a collection of permissions. Permission bundles are convenient because you do not have to specify the individual permissions. A permission bundle can be granted to a user or group, or revoked from a user or group when it is added to an Access Control Entry (ACE).
- Mount Points--Mount points in Oracle Internet File System are named directories which can be accessed through Windows (SMB) and the Web interface.
Development Tasks
Development tasks include creating and modifying:
- Class Objects--A class object represents a class with instances that are persistently stored and managed by the Oracle 9iFS server. Through the administrative interfaces, you can add attributes to the class objects. You cannot (and should not) make other modifications.
- Class domains--A class domain limits the class type an object type attribute can be to only those specific classes, or subclasses, enumerated by the class domain.
- Value domains--A value domain specifies valid attribute values. A value domain can be a list or a range.
- Value defaults--A value default specifies an initial value for an attribute if none is given.
- Formats/Mime types--The format of a document specifies the way the document information is stored, and whether Oracle 9iFS indexes it.
- Register parsers--A custom parser, a custom XML parser, and a class selection parser can be registered to a file extension.
- Register renderers--A custom renderer can be registered to a specific class.
- Register Java Server Page (JSP) Lookups--A custom Java Server Page (JSP) can be registered to a specific class.
You Must Have Administrative Permissions
To log into Oracle 9iFS Manager, you must be an administrator. All tasks are performed in administrator mode; these tasks are not restricted by ACL-based security checking. For example, to create a user, you must be an administrator. A developer with administrative permissions can also use Oracle 9iFS Manager.
Parts of the Oracle 9iFS Manager Window
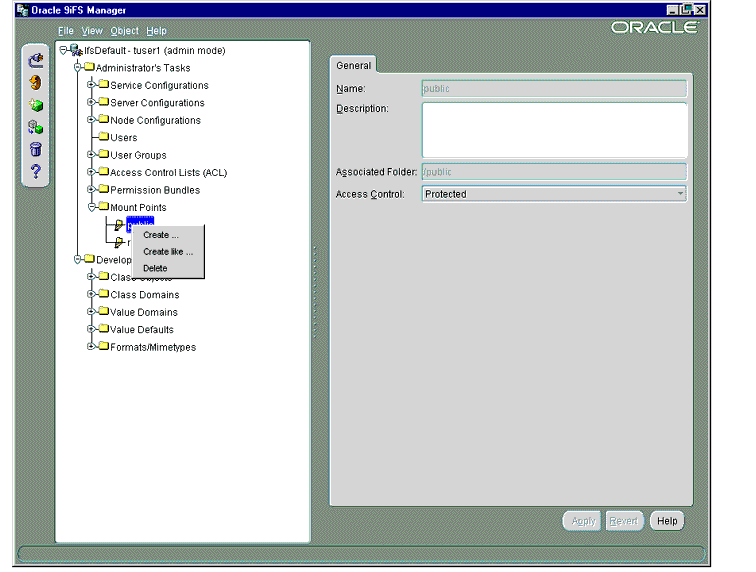
The main Oracle 9iFS Manager window has the following parts (see Figure 3-2):
Figure 3-2 Parts of the Oracle 9iFS Manager
Text description of the illustration ifsmana4.gif
Menu Bar
The menu bar provides access to all commands and to special features not available using the toolbar or context menus. Click each menu to display its commands. Click a command to execute it. There are four menus:
- File Menu.
- View Menu.
- Object Menu.
- Help Menu.
File Menu. The File menu controls the connection to an Oracle 9iFS instance and provides access to the Oracle 9iFS folder hierarchy. Commands include:
- Connect: Display the current connection to an Oracle 9iFS instance. Administrative tasks can be performed only on an Oracle 9iFS instance connected to Oracle 9iFS Manager.
- Disconnect: Break the connection of an Oracle 9iFS instance.
- Browse: Launch a window to examine the Oracle 9iFS file hierarchy.
- Search: Launch the Search dialog.
- Exit: Leave Oracle 9iFS Manager.
View Menu. From the View menu, you can refresh the information displayed in the Navigator and toggle on and off the display of the toolbar and status bar. Commands include:
- Refresh: Update the items in the Navigator under the selected object to include any changes to the repository during your session of Oracle 9iFS Manager. The Detail View window is also refreshed based on the object selected.
- Show Toolbar: Display the toolbar. Show is the default setting.
- Show Statusbar: Display the status bar. Show is the default setting.
Object Menu. The Object menu provides access to commands you can perform on Oracle 9iFS objects:
- Create: Define a new object. Select the type of object to be created, then complete the property sheet to describe it.
- Create Like: Define a new object based on an existing one. Select the object to be copied, and Oracle 9iFS Manager populates the values in the property sheet for the new object with the values of the object you are copying. Complete the property sheet.
- Delete: Remove the selected object. Oracle 9iFS Manager deletes the object and refreshes the Navigator.
- Register: Register a JSP lookup, parser, or renderer. Select the object type, then fill in the corresponding property sheet.
- Options: Select User Definitions to edit the default values for user creation.
Help Menu. The Help menu provides links to online help.
- Contents: Launch the Help Navigator window. Use the Contents tab to select from the help topics available. Use the Index tab to perform a keyword search. Use the Search tab to perform a full-text search.
- Search for Help On: Launch the Help Navigator window with the Search tab activated.
- Using Help: Also launches the Help Navigator window.
- About Oracle 9iFS Manager: Display version information for Oracle 9iFS Manager.
Toolbar
The toolbar is made up of icons that represent frequently used commands. To display a caption describing the icon, pause the cursor on the icon. The toolbar can be displayed or hidden using the View menu. The following functions are provided:
Table 3-1 Oracle 9iFS Manager Toolbar Functions
Navigator
The Navigator displays a hierarchical tree view of all objects used to administer Oracle 9iFS. The objects are grouped by whether they are administrative or developmental tasks.
Each object type in the Navigator is identified by an icon and name. If there is a '+' to the left of an object's icon and name, the object is a container that can be expanded to display the objects it contains. If there is a '-' , the object is already expanded. A container is represented by a folder icon is a logical grouping of one specific type of object, such as users or groups.
Note:
The tree view in the Navigator is often populated as the result of queries executed over a network. Therefore, there may be a delay when expanding a container.
|
Connection Information
The highest level of the Oracle 9iFS Manager hierarchy shown depends on how Oracle 9iFS Manager was launched.
Context Menus
As in other Windows applications, you can right-click an object to pop up a context menu; that is, a shortcut menu relating to the object right-clicked.
Working with Property Sheets
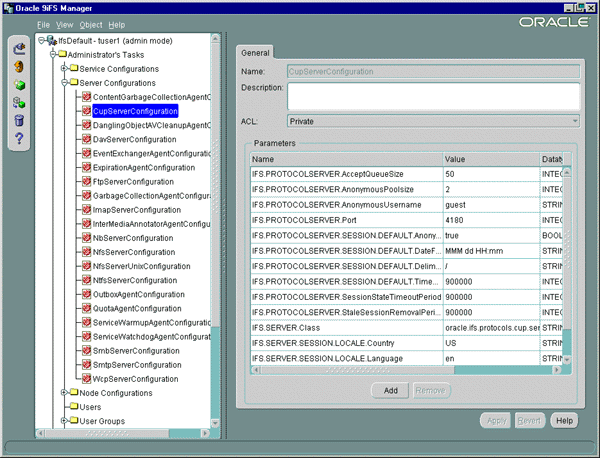
When an object in the Navigator is selected, one or more property sheets display in the Detail View. Use the property sheet to view details about objects or to modify them. See Figure 3-3, "Property Sheets" for an illustration of a property sheet. Information is divided into logical groupings and accessed by tabs. There will always be a General tab.
Figure 3-3 Property Sheets
Text description of the illustration 1servpro.gif
Modifying Objects Using Property Sheets
The following buttons are used when modifying objects using property sheets:
- Apply--Process the modifications made to the object.
- Revert--Cancel the modifications made to the object and reset the property sheet back to the original data.
- Help--Display context-sensitive help about the current property sheet.
Detail View
To the right of the Navigator is the Detail View, composed of one or more tabbed property sheets displaying information about the object selected. Often, these property sheets may be edited.
Status Bar
The status bar, below the Navigator, displays the current state of a process. For example, when a creation dialog is opened for creating a user, the status bar displays "Creating a user...". The status bar can be toggled on and off by selecting the Show Status Bar command on the View menu.
Tools and Utilities Built into Oracle 9iFS Manager
The following tools and utilities are built into Oracle 9iFS Manager:
- Browser--If you select Browse from the File menu, Oracle 9iFS Manager displays a window showing the folder hierarchy of the connected Oracle 9iFS instance. Using the menu bar, you can go to a specific directory.
- Property Inspector--From the context menu in the Browser or the View Properties button on the Search Results screen, you can access the Properties Inspector window to view the properties of a selected object, view categories of certain objects, and view relationships.
- Create and Create Like--Use Create to create an object from scratch. Use Create Like to copy some attributes from the selected object, saving time and increasing consistency between object definitions.
- Searching for Objects--Using the Oracle 9iFS Manager Search feature, you can search for objects using attributes, relationships, and categories associated with the object.
Browser
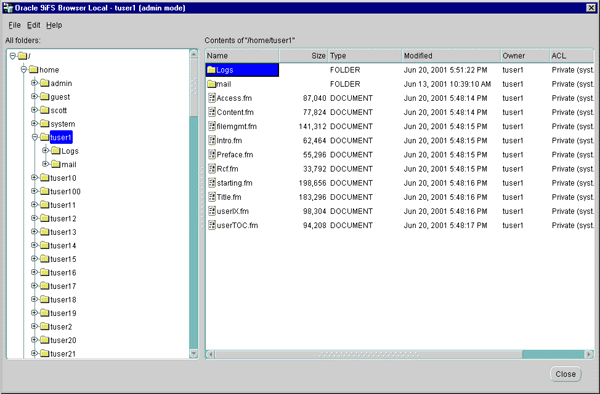
If you select Browse from the File menu, Oracle 9iFS Manager displays a window showing the folder hierarchy of the connected Oracle 9iFS instance. The browser consists of a Navigator, a Detail View, a menu bar, and a context menu that allows you to create new objects (e.g., folders), delete objects, view properties of an object, apply an ACL to an object, rename an object, go to a folder, and launch help. To the right of the Navigator, Oracle 9iFS Manager displays the attributes of folders as you select them in the Navigator. The Browser provides:
- A quick view of the contents of the folder hierarchy.
- An easy way to create new directories.
- A quick view of the attributes of the folders in the folder hierarchy.
- The ability to cut and paste, copy and paste, or paste objects as links.
Figure 3-4 Browser
Text description of the illustration 1browser.gif
Using the Context Menu
You can right-click an object in the Browser to pop up a context menu; that is, a shortcut menu relating to the object right-clicked.
Use the right-click menu in the Browser to complete the following tasks:
- Create new folders.
- Delete objects.
- View properties of an object.
- Apply an ACL to an object.
- Apply an ACL to a folder recursively.
- Rename objects.
See Help for the Oracle 9iFS Manager for detailed instructions.
Using the Edit Menu
You can use the commands on the Edit menu to cut, copy, and paste files and folders.
Property Inspector
From the context menu in the Browser or the View Properties button on the Search Results screen, you can access the Property Inspector window to view the properties of a selected object, view categories of certain objects, and view relationships. The Property Inspector window includes:
- Attributes of the selected object.
- Class Object groupings.
- Categories of the selected object.
- Relationships of the selected object.
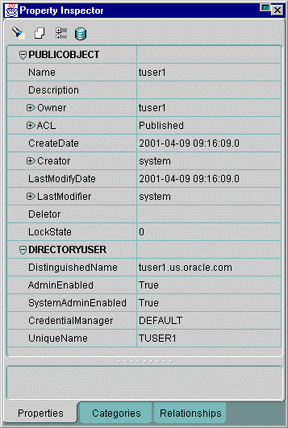
The Property Inspector window consists of three tabs (see Figure 3-5, "The Property Inspector"):
- Properties
- Categories
- Relationships
You can drill-down on each tab to view the specific properties. The Property Inspector is an object viewer. It identifies object and lists attributes. You can further expand some attributes to see additional properties. For example, when expanded, Owner shows attributes of directory user.
Figure 3-5 The Property Inspector
Text description of the illustration 1pimain.gif
Across the top of the Property Inspector is a toolbar containing these functions:
- Find: A simple search function to find properties based on the attribute's name. Buttons allow you to Find Previous and Find Next occurrence of the search string.
- The second icon, union or intersection, is not currently implemented.
- The third icon allows you to toggle between two views of the properties: categorized or sorted. Categorized means grouping the properties by their classes. For example, "Name" is grouped under PublicObject because it is an attribute of PublicObject. "Distinguished Name" is grouped under DirectoryUser because it is an attribute of DirectoryUser. Sorted means sorted alphabetically by property.
- The Properties tab has an extra icon to refresh the values shown.
Viewing the Properties of an Object
Using the Property Inspector, you can search for the attributes of a selected object, drill down to view the attributes of an object, and view descriptions of a selected object. As you select a property, a description displays at the bottom of the window.
Many of the properties shown can be further expanded, enabling you to easily view all the properties associated with the object. The values shown are read-only.
To search for attributes of a selected object:
- To display the Find field and buttons, click any tab on the Property Inspector and click the Find button.
- Type an attribute to search on in the Find field and press the Find Next or Find Previous button.
The next or previous attribute is found depending on which button you selected. When the attribute you searched on is found, it is highlighted and a description of that attribute displays just below the objects and their attributes.
Viewing Categories
Using the Property Inspector, you can view categories of a selected object. For example, a mount point is a type of category. Not all objects have categories, however.
- On the Property Inspector window, select the Categories tab. The name and value of each category displays.
Viewing Object Relationships
Using the Property Inspector, you can view the relationships of a selected object. Note that not all objects have associated relationships. A relationship is how the repository models the file system hierarchy. An object can have many relationships.
To view the relationships of a selected object:
- Select the Relationships tab.
- The leftward relationships and the rightward relationships of the object display. Drill down to view all object listed.
Think of the object as the left part of the relationship and the objects it is related to as the right part of the relationship. A simple example is:
root
Subfolder
Root is the left and subfolder is the right part of the relationship.
One left object can be related to many right objects. For example,
/home
guest
scott
system
.
.
Create and Create Like
Oracle 9iFS Manager offers two ways to create new objects. To create a new object, you can:
- Use Create to create an object from scratch.
- Use Create Like to copy some attributes from the selected object. For example, if you want to create a new ACL with almost identical Access Control Entries (ACEs) as Published, select the Published ACL, and click Create Like on the toolbar. The Create ACL dialog would be initialized with the ACEs from Published ACL.
Using Create to Create an Object from Scratch
- Select Create from the toolbar, context menu, or the Object menu.
- Select the object type to be created from the Select Object Type dialog and click Create. The empty Property Sheet displays.
- Complete the property sheet and click Create.
Use Create Like to Copy Attributes from a Select Object
- Select an existing object.
- Select Create Like from the toolbar, context menu, or the Object option on the menu bar. The property sheet for the selected object displays.
- Complete the property sheet and click Create.
Searching for Objects
Using the Oracle 9iFS Manager Search feature, you can search for objects using attributes, relationships, and categories associated with the object. You can search for anything in the class hierarchy, including custom classes. To construct a search, you start by selecting a class object. This class object is the primary class of the search and, as such, all objects returned are either this class or a subclass of this class. You can also specify attribute constraints to narrow the search. Once the search is executed, the results are appended to the bottom of the Search dialog. General information is displayed for each object found. You can select an object and display detailed information about that object via Property Inspector.
For example, to find all the Word documents created by user "scott", a search is created on the attribute "Document" with its "Name" attribute containing ".doc" and its "Creator" attribute pointing to a DirectoryUser whose "Name" attribute is "scott."
A basic knowledge of how Oracle 9iFS class objects are related is required to perform foreign-key searches such as "Find all groups with the user'tuser1' in them" These types of searches are also referred to as relationship searches.
When searching using Oracle 9iFS Manager, you can create recursive-type constraints between the current object and any of its object-type attributes via additional Attribute Constraint dialogs.
Parts of the Search Dialog
A search-based window consists of two parts (Figure 3-6, "Search Dialog"):
- Selector Pane--The area in which you compose the search. By including a list of attributes associated with the object type you select, simple operators for attributes based on datatype are provided for you to use to construct the search.
- Result Table--A summary of each item in the result set.
Figure 3-6 Search Dialog

Text description of the illustration 1search.gif
Creating a Search
Basically, a search is performed following these four steps:
- From the file menu, select Search.
- In the Selector Pane, select the class object. Notice that the attributes displayed in the Attributes List change according to which object type is selected.
- By selecting attributes and clicking Add, add constraints to the search.
- When the search is defined, click OK to perform the search and display the results.
If you have too many results, the Search utility will return the first 500 and discard the rest. You will want to narrow the search. The results will be shown 20 at a time. Click Next Set to view more results.
Adding Attributes to the Search Using the Search Dialog
The Search dialog presents you with a hierarchical tree of class objects. When you select a class object, the Attribute List is populated with all of the inherited and extended attributes of that class object. To add attributes, select the attribute from the Attribute List and press the right arrow.
Attributes can be removed by clicking on the checkbox next to the attribute(s) to be removed and clicking on the left arrow.
Each attribute is considered added to the next attribute entry with the boolean value of 'and'. The operator field is populated based upon the datatype of the attribute in question, further, the value field is validated against the attribute's datatype as well.
- Primitive-Type Attributes. You can create and perform searches with primitive types of attributes, including strings, numbers, boolean values, and dates. For example, the "Document" class object contains a "NAME" attribute of string type that identifying the name of the object.
- Object-Type Attributes. You can search "into" an attribute that is of an object-type, for example, a public object.
- Attribute Search Constraint. An attribute constraint is a search condition that applies to object attributes to restrict the result set. For attributes with primitive data types, the constraint is defined inline (in the same dialog). For attributes with object data types, the constraint is defined in a new Attribute Constraint dialog. It is possible for an object's attribute to have object data types. Use the Advanced dialog to make relational type queries into the attribute.
Using the Attribute Constraint dialog, a user cannot update the class object. The class object is locked and pre-set to the class object of the previous attribute object. Once you have entered all attribute dependencies and results are delivered, these results are saved internally. You can edit attribute constraints as desired or remove them.
Category Search
A number of category searches may be performed.
- Find all instances of a category and its subclasses.
- Find all instances of CATEGORY (and its subclasses) associated with a FOLDER.
- Find all folders associated with a mount point.
Example 3-1 Find All instances of CATEGORY and its Subclasses
- From the File menu, select Search.
- From the ClassObject drop-down list, select CATEGORY.
Note: By default, 'Include Subclasses' is checked. All instances of the specified ClassObject AND its subclasses will be returned. To keep this example simple, we will select the topmost CATEGORY, ClassObject, and keep this checkbox selected. Alternatively, we could select a subclass of CATEGORY, such as MOUNTPOINT, and de-select the checkbox. This, in turn, would return only instances of the ClassObject MOUNTPOINT.
Notice that once the new ClassObject is selected, the Attribute List is refreshed with all attributes belonging to CATEGORY.
- Press OK.
- Displayed at the bottom of the Search dialog are all instances of CATEGORY located in Oracle 9iFS.
Example 3-2 Find All Instances of CATEGORY (and its Subclasses) Associated with a Word 'Root' Contained in the Name
- Repeat steps 1-2 from example 1.
- In the attribute list, scroll down and select ASSOCIATEDPUBLICOBJECT. Press Add.
- Notice that ASSOCIATEDPUBLICOBJECT and an Advanced button have been added to the right-hand side. The Advanced button allows you to further limit your search by imposing further attribute constraints on the selected attribute. Click Advanced now.
- The Attribute Constraint dialog displays. From the ClassObject drop-down list, select Folder. You may need to resize the dialog, depending on your monitor size, for a better layout.
- From the Attribute List, select the attribute NAME and click the Add button.
- Notice the attribute has been add to the right-hand side. In the blank text field, type "Root" without the quotes.
- Click OK to dismiss this dialog.
- Click OK to execute the search.
Example 3-3 Find All Folders Associated with a Mount Point
- From the File menu, select Search.
- From the ClassObject drop-down list, select MOUNTPOINT.
- In the Attribute List, scroll down and select ASSOCIATEDPUBLICOBJECT. Click the Add button.
- Click the Advanced button.
- In the Attribute Constraint dialog, select FOLDER from the ClassObject drop-down list.
- Select the checkbox, Set Primary Result Class. Selecting this will force the Search to return instances of Folder satisfying the entered Attribute Constraints.
- Click OK. This dismisses the attribute constraint.
- Click OK to execute the search.
Notice that now the search returns folders, as opposed to CATEGORYs in the previous examples.
Example 3-4 Find All FOLDERs in Oracle 9iFS
- From the File menu, select Search.
- From the ClassObject drop-down list, select FOLDER.
- Click OK to execute the search. Every folder in Oracle 9iFS will be returned. This result set is too large to be useful. See Example 2 to see how to narrow this search.
Example 3-5 Find all FOLDERs with a Name that Contains 'tuser' AND Has Subdirectories with 'mail' in the Name
Note: These types of container-like behaviors are modeled in Oracle 9iFS by RELATIONSHIPs. RELATIONSHIPs are the glue associating one object with another (i.e., user contained in a group; document contained in a folder). The object representing the "container" part of the relationship is considered the left object. The object representing the "contained" part of the relationship is considered the right object.
- From the File menu, select Search.
- From the ClassObject drop-down list, select FOLDERPATHRELATIONSHIP.
- In the attribute list, scroll down and select LEFTOBJECT. Click the Add button.
- Click LEFTOBJECT's Advanced button.
- Select FOLDER from the ClassObject drop-down list.
- Select NAME from the Attribute List.
- Enter 'tuser' into the text field. This is the left object.
- Select the checkbox, Set Primary Result Class. Selecting this will force the search to return instances of Folder satisfying the entered attribute constraints. We do this because we want FOLDER instances returned, not FOLDERPATHRELATIONSHIPs.
- Click OK to dismiss this attribute constraint dialog.
- In the Attribute List, scroll down and select RIGHTOBJECT. Click Add.
- Click RIGHTOBJECT's Advanced button.
- Select FOLDER from the ClassObject drop down.
- Select 'NAME' from the Attribute List.
- Enter 'mail' into the text field. This is the right object.
- Click OK to dismiss this attribute constraint dialog.
- Click OK to execute the search. Notice the results have been trimmed down considerably. Each result is an instance of Folder with a subdirectory with mail in the name.
Working with Oracle 9iFS Manager as a Standalone Application
Although launching Oracle 9iFS Manager as a standalone application provides the same repository management functionality, you cannot administer the Oracle 9iFS domain and its nodes from Oracle 9iFS Manager.
You can launch Oracle 9iFS Manager in standalone mode in two ways:
- Connected only to the local Oracle 9iFS repository.
- Connected to any Oracle 9iFS repository on the network.
Connecting to the Local Oracle 9iFS Repository
To connect only to the local Oracle 9iFS repository, you connect from the Connect Information dialog.
Figure 3-7 Standalone Connection Dialog

Text description of the illustration 2noemlog.gif
- Launch Oracle 9iFS Manager from the command line using the
ifsmgr command, usually found in the $ORACLE_HOME/9ifs/bin/ folder.
- On the Connect Information dialog, enter a username and password (the default administrator login is system/manager).
- Notice that the following fields are dimmed because you can connect only to the local Oracle 9iFS repository. They display information for the underlying Oracle 9iFS Service:
- Oracle 9iFS Service--The property settings for the Oracle 9iFS Service. This field is not editable, but you can change it by clicking Change 9iFS Service.
- Database Service--The Oracle database Net8 Service Name. This field is not editable and is determined by the Oracle 9iFS Service field.
- Oracle 9iFS Schema--The Oracle database schema name for the Oracle 9iFS repository. This field is not editable and is determined by the Oracle 9iFS Service field.
- Enter the Oracle 9iFS Schema Password.
- Click OK to complete the login process.
The main window for Oracle 9iFS Manager displays.
Connecting to Any Oracle 9iFS Repository on the Network
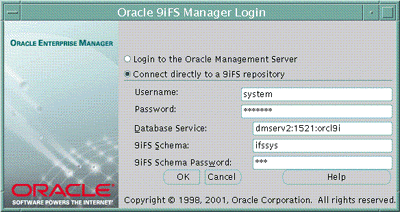
To connect to any Oracle 9iFS repository on the network, you launch Oracle 9iFS Manager and choose the Launch Standalone option from the Login dialog.
Figure 3-8 Connect-to-Any-Repository Login Dialog
Text description of the illustration 2oemstan.gif
- Launch Oracle 9iFS Manager from the Oracle Enterprise Manager Java Console by selecting the domain and choosing Related Tools from the Object menu, or right-clicking the domain and selecting Related Tools from the context menu. From Related Tools, select 9iFS Manager. See Appendix H, "Domain Administration with the Java-based Oracle Enterprise Manager Console" for more information.
Or:
- Launch Oracle 9iFS Manager from the command line using the
oemapp ifsmgr command.
- From the Oracle 9iFS Manager screen, choose Launch Standalone. The login screen displays.
- Make sure you have selected "Connect directly to a 9iFS repository."
- Enter a username and password (the default administrator login is system/manager).
- Specify which Oracle 9iFS repository to connect to.
- Database Service--Enter the Oracle database service information in the format:
<host>:<port>:<sid>
where:
host is the machine name where the database is located.
port is the database listener port address, usually 1521 or 1526.
sid is the database system identifier.
For example:
my_ifs_machine:1521:ifs90
which connects to the ifs90 database using port 1521 on the my_ifs_machine machine.
- Oracle 9iFS Schema--Enter the Oracle database schema name for the Oracle 9iFS repository.
- Enter the Oracle 9iFS Schema Password.
- Click OK to complete the logon process.
The main window for Oracle 9iFS Manager displays.





