Skip Headers

Oracle Internet File System Setup and Administration Guide
Release 9.0.2

Part Number A95995-01
Go To Table Of Contents
Contents
Go To Index
Index

Go to previous page Go to next page

4
Setting Up Oracle Internet File System

This chapter covers planning and setting up Oracle Internet File System. The following topics are included:

Overview

Follow these steps to set up Oracle Internet File System:

  1. Plan your system and the folder hierarchy: Before using Oracle 9iFS, define the structure of the folder hierarchy based on organization structure, information or workflow, or user recommendations.

  2. Create users and groups: Add your users and define groups of users to make user administration and file security easier.

  3. Set up the folder hierarchy and load files into Oracle 9iFS: Migrate your data into Oracle 9iFS from your legacy file systems.

  4. Set up security: Security covers access to the Oracle 9iFS and its various functions, and access to particular folders and files. Identify those users who need administration privileges to manage their department and folder hierarchy. Define the basic ACLs to apply to files. As you add users, you assign passwords.


    Note:

    It is recommended that you change the system user's password because it is published in this guide. Anyone can access the administrator account if the password is not changed.


Step 1: Plan Your System and the Folder Hierarchy

The folder hierarchy is a very important component of Oracle 9iFS. It is a representation of how the files in the repository are organized. It is familiar to all users and makes organizing and browsing information easy. An important prerequisite is to model how you want to organize the file hierarchy. For example:

Home Inbox Correspondence Conferences Oracle Open World Oracle Applications Users Group Plans Presentations Public Product Information Oracle 9iFS Manuals Software Downloads Oracle JDeveloper Oracle8i Server Partners Program Partner Information Program Plan Technical Whitepapers Standards and Procedures Company Policies Procedure Manuals

Folder hierarchies organize the repository so that users can browse through it easily. You can create multiple folder hierarchies to organize information in different ways to make browsing convenient for different types of users. For example, the sales, development, marketing, and consulting departments of a company may use different hierarchies.

Folders in Oracle 9iFS

A folder in Oracle 9iFS is identical to a physical file folder or a computer file folder, and is used to group and organize files or other objects. The organization of the folders is conceptual, not physical. The files and objects are not physically located in the folder; rather, they are in the repository and a folder references the objects that it contains. Because folders do not physically contain their objects:

When Oracle 9iFS is installed, several default objects are created, including a folder hierarchy (described in Table 4-1), commonly used ACLs, and several default users. The 9iFS Manager and Web interface are ready to use to add users and files. XML configuration files may also be used to create users, groups, and additional ACLs.

Table 4-1 Elements of the Default Folder Hierarchy

Folder Description

/ifs

Oracle 9iFS root folder that contains application-specific data and Oracle 9iFS system administrators' folders.

/ifs/system

Administrators' folders.

/ifs/webui

Required files for the Web interface.

/ifs/clients/winui

Contains the setup.exe for the Windows interface.

/ifs/apps

Recommended directory for storing application files.

/ifs/outbox

System-wide applications outbox; used by custom agents to send e-mail.

/ifs/jsp-bin

Java Server Pages (JSPs) that have been approved by the administrator for use. The JSPs will not execute unless they reside in this folder.

/home

By default, all users' home folders are created under this folder.

/public

A folder that all users can access; used to store files that are intended to be shared throughout the system.

Guidelines for Structuring the Folder Hierarchy

Follow these guidelines when planning your folder hierarchy.

Planning Access Requirements

Access Control Lists (ACLs) are associated with each object in the hierarchy. An ACL contains a list of users and groups who can perform certain actions on the folder, such as browsing its contents, or adding or deleting items from that folder.

When designing the access permissions for the folder hierarchy, note the following features:

Default Folder ACLs

Folder security is defined by the ACL applied to it. The ACL applied to any newly created folder is the default ACL specified in the Primary User Profile of the user who created the folder. The ACL for a folder can be changed at any time by its owner once the folder has been created.

Setting Up Folders for Users

If you create a user with Oracle 9iFS Manager, the Web interface, or XML, Oracle 9iFS automatically creates the user, home folder, e-mail folder, Primary User Profile, and e-mail profile.

Folder security is distinct from file security. Folder security defines who can browse the contents of the folder and add or delete folder items. File security defines who can access, modify, and delete attributes and contents of a file. If an ACL is not specified at the time the folder or file is created, then the ACL is determined by the user's default ACL. If a file is placed in a user's home folder, it does not mean the file is associated with the PRIVATE ACL, and if a file is placed in a public folder, it does not mean the file is associated with the PUBLIC ACL. The ACL associated with a folder or file can be modified at any time once it has been created to reflect appropriate access.

Step 2: Create Users and Groups

Before you actually set up the folder hierarchy, create users and groups. Oracle 9iFS users are the end users who use Oracle 9iFS as a file management system. Groups are composed of users that are related in some way. For example, the Marketing group could contain all of the members of the corporate marketing organization.

Most people will use Oracle 9iFS as an enhanced file system. To customize Oracle 9iFS for your organization, some of these users should have administrative permissions.

User and System Administrator Privileges

There are three levels of system privileges:

User Profiles

Oracle 9iFS maintains Oracle 9iFS-specific user information in user profiles. Each active Oracle 9iFS user may have a Primary User Profile, an e-mail user profile, and an extended user profile:

Primary User Profile

Each user has a Primary User Profile. This profile points to the user's home folder location and the user's default ACLs. The default ACLs determine which ACLs should be associated when the user creates different objects, such as folders and documents. By default, Oracle 9iFS sets the non-administrator user's default ACL to PUBLISHED (except for e-mail-related objects, such as messages. These have the PRIVATE ACL as the default), and sets the administrator's default ACL to PRIVATE (except ACL, PropertyBundle, DirectoryObject, VersionSeries, and VerionsDescription, which are PUBLISHED).

A user's home folder is the default directory where a user starts when logging into Oracle 9iFS. Users can use their home folder as their personal workspace and to store their private files. A user's home folder can reside anywhere, so Oracle 9iFS Manager provides a dialog to change the default home folder location. The user's Primary User Profile points to the user's home folder location.

E-mail User Profile

The user's e-mail profile points to the user's e-mail folder location and specifies the user's e-mail address. Oracle 9iFS Manager and the Web interface create the user's e-mail folders under the home folder. For example, /home/jsmith/mail/inbox.

Using Extended User Profiles

In addition to the Primary Profile and Email profile information on the Profile property sheet, an Extended profile section allows you to specify an application name to associate with the user's profile. For example, if you wrote a custom application that displayed the items of a user-specified folder, you could subclass ExtendedUserProfile to create MyAppUserProfile and store the folder path in a custom attribute. Each user would have his/her own MyAppUserProfile. When the user logs into the custom application, the application would look in that user's MyAppUserProfile and display the contents of the specified folder.

Credential Manager Users

Oracle 9iFS uses a credential manager to authenticate users. A credential manager is an extensible authentication mechanism that determines the validity of a credential, such as a user name and password.

Each Oracle 9iFS directory user specifies the name of the credential manager used to authenticate that user, as well as the distinguished name that identifies that user to the credential manager.

When you perform the initial configuration of Oracle 9iFS, a single credential manager is created, which may be either an Oracle 9iFS credential manager or an Oracle Internet Directory credential manager. The credential manager you select becomes the default credential manager. Credential managers may be added, modified, or deleted using the Oracle 9iFS Credential Manager configuration tool. For each Oracle 9iFS user created, for whom you don't explicitly specify the credential manager, a corresponding entry, consisting of the user's distinguished name and password, is stored in this default credential manager. See the Oracle Internet File System Installation and Configuration Guide for more information.

Optionally, the Oracle 9iFS credential manager can be configured to require users to be RDBMS users. If this feature is enabled, the Oracle 9iFS user named "jsmith" could only log into Oracle 9iFS if there was an RDBMS user named "jsmith." The credential manager only checks the user name. The RDBMS password does not have to match the Oracle 9iFS password.

Set the IFS.SERVICE.CREDENTIALMANAGER.Ifs.RdbmsUserMustExist property to True in the service configuration file to enable this setting. This property is located in the following directory:

Platform Directory

UNIX

$ORACLE_HOME/9ifs/settings/oracle/ifs/server/properties

Windows NT

%ORACLE_HOME%\9ifs\settings\oracle\9ifs\ server\properties

Oracle Internet Directory

Oracle Internet Directory offers comprehensive and flexible support for directory access control. This includes entry level, attribute level, and prescriptive access control to provide varying levels of security to meet the specific needs of enterprise and service providers. An administrator can grant or control access to a specific directory object or to an entire directory subtree. Oracle Internet Directory implements three levels of user authentication: anonymous, password-based, and certificate-based using Secure Sockets Layer (SSL) Version 3 for authenticated access and data privacy.

HTTP Authentication

HTTP authentication is a common mechanism for adding security to static Web pages. Oracle 9iFS uses its own security features as the basis for HTTP authentication. Files and folders need to have the PUBLISHED ACL applied for users to use a browser to access these objects without being forced to log in. If they are forced to log in, they must supply their Oracle 9iFS username and password.

Creating Users

Users can be created with most of the Oracle 9iFS administration tools. Oracle recommends that you use Oracle 9iFS Manager or an XML configuration file. These tools create all objects associated with a new users with standardized settings.

Creating users involves two steps:

  1. Set the default user definitions in Oracle 9iFS Manager.

  2. Create the user using Oracle 9iFS Manager or XML.

Setting the Default User Definition: Use Oracle 9iFS Manager

Before creating a user, you can set the default user definitions which will be applied to all users you create. The user definitions provide a uniform way of creating users that is consistent with the various clients. Using Oracle 9iFS Manager, you can edit a small subset of the defined user definitions (see Table 4-2, "User Definitions Reference"). To change the rest of the default user definitions, use XML. See "Creating Users: Using an XML Configuration File".

To set the default user definitions:

  1. From the Object menu on the Menu bar, select Options.

  2. Select User Definitions from the Options menu. The User Definition Dialog displays.

  3. Specify the Home Folder Parent, the directory in which to store the users' home folders. The default is /home.

  4. Specify whether or not users have the ability to change their passwords. You can override this setting on the Create User dialog.

  5. To allocate a specific amount of storage to each user, enable quota control. Type the storage size, in bytes, in the Quota Storage field.

    The default allocated quota storage is 25 megabytes per user. If a user's quota is reached, he or she will be unable to save documents in Oracle 9iFS. If you disable quota, the user has an unlimited quota. Users with administrative permissions usually have an unlimited quota amount.

  6. Specify whether or not to create an e-mail profile. If Yes, type the e-mail address domain and the e-mail folder name in the fields provided. If you select No, these fields are disabled.

  7. Click OK.

Table 4-2 User Definitions Reference
Definition Option Default Value Data Type Description/Purpose

UserName

None

String

Required. A name for the user being created.

Password

None

String

Required. A password for the user being created.

ShouldCreateCredentialManagerUser

TRUE

Boolean

Set to false to use the existing Credential Manager user.

ReplaceCredentialManagerPassword

FALSE

Boolean

If using an existing credential manager user, set true to override old password.

CredentialManager

DEFAULT

String

The credential manager to use for access to the authentication engine.

AdminEnabled

FALSE

Boolean

If user will have administration privileges.

CanChangePassword

TRUE

Boolean

If creating a guest user, this can be set to false.

DirectoryUserDescription

NULL

String

This can be the user's full name or any descriptive information.

EmailFolderRoot

home folder

String

Used to specify desired location of the mail folder.

HasPrimaryUserProfile

TRUE

Boolean

Whether to create a Primary User Profile for this user.

HasHomeFolder

TRUE

Boolean

Whether to create a home folder for this user.

HomeFolderRoot

"/home"

String

Root folder of the user's home folder.

HomeFolderHasPolicyBundle

TRUE

Boolean

If administration privileges required to free home folder.

HasContentQuota

TRUE

Boolean

Whether to implement a content quota for this user.

ContentQuotaAllocatedStorage

25000000

Long

Storage space allocated to user in bytes.

ContentQuotaEnabled

FALSE

Boolean

Whether to enable or disable the implemented content quota.

HasEmail

TRUE

Boolean

Whether to create an e-mail profile for this user.

DistinguishedNameSuffix

The value you enter as the distinguished name during installation is the default value.

String

Suffix of the distinguished name.

PrimaryUserProfileNameSuffix

" Primary Profile"

String

Suffix of the Primary User Profile name.

EmailUserProfileNameSuffix

" Email Profile"

String

Suffix of the e-mail profile name.

EmailAddressSuffix

The value you enter as the distinguished name during installation is the default value with an "@" attached.

String

Suffix of the e-mail address.

ContentQuotaNameSuffix

" Content Quota"

String

Suffix of the content quota name.

HomeFolderNameSuffix

""

String

Suffix of the home folder name.

HomeFolderDescriptionSuffix

"'s home folder"

String

Suffix of the home folder description.

DefaultAclsBundleNameSuffix

" DefaultACLs"

String

Suffix of the default ACL's name.

HomeFolderPolicyBundleNameSuffix

"Policy Bundle for Home folder and Inbox"

String

Suffix of the home folder policy bundle name.

EmailSubfolderName

"mail"

String

Name of the email subfolder.

InboxName

"inbox"

String

Name of the email inbox.

DirectoryUserAcl

Published

SystemAcl

ACL of a directory user.

HomeFolderPolicyBundleAcl

Published

SystemAcl

ACL of the home folder policy bundle.

HomeFolderAcl

Private

SystemAcl

ACL of home folder.

DefaultAclsBundleAcl

Published

SystemAcl

ACL of default ACLs bundle.

ContentQuotaAcl

Private

SystemAcl

ACL of the content quota.

PrimaryUserProfileAcl

Private

SystemAcl

ACL of the Primary User Profile.

EmailUserProfileAcl

Private

SystemAcl

ACL of the e-mail profile.

EmailSubfolderAcl

Private

SystemAcl

ACL of the e-mail subfolder.

InboxAcl

Private

SystemAcl

ACL of the e-mail inbox.

AclBundleAllPublished

AclBundleAllPublished

Property Bundle

An out-of-an-the-box property bundle for the default ACLs of a non-administration user.

AclBundleForAdmin

AclBundleForAdmin

Property Bundle

An out-of-the-box property bundle for the default ACLs of an administration user.

DefaultAcls

AclBundleAllPublished for non-admins.

AclBundleforAdmin for admin users.

String

The property bundle to use for the defaults.

DefaultAclsTable

None

Hashtable

Customizing a property bundle for the default ACLs

ReadIndicationEnabled

FALSE

Boolean

If enabled, documents will be marked as read by a user when read for the first time.

SystemAdminEnabled

FALSE

Boolean

If true, user will have the added capability of managing the Oracle 9iFS domain and nodes, and services and servers running on them.

DistinguishedName

username + DistinguishedNameSuffix

String

The name by which the CredentialManager refers to the user.

PrimaryUserProfileName

username + "Primary Profile"

String

The name of the user's Primary User Profile.

Email UserProfileName

username + "Email Profile"

String

The name of the user's e-mail profile.

ContentQuotaName

username + "Content Quota"

String

The name of the user's content quota object.

HomeFolderName

username

String

The name of the user's home folder.

HomeFolderDescription

username + "'s home folder"

String

The description of the user's home folder.

DefaultAclsBundleName

username + "DefaultAcls"

String

The name of the user's default Acl property bundle.

HomeFolderPolicyBundleName

username + "Policy Bundle for Home folder and Inbox"

String

The name of the user's home folder policy bundle.

EmailAddress

username + "@" + EmailAddressSuffix

String

The e -mail address for the user.


Note:

Oracle 9iFS restricts the use of multi-byte user names. Access through WebDAV (Web Folders and Oracle 9iFS FileSync), HTTP (Oracle 9iFS Web interface or Web browsers), SMB (for Windows 95/98) and IMAP (e-mail) is not available for user names that contain multi-byte characters.


Creating Users: Using Oracle 9iFS Manager

To create an Oracle 9iFS user, you specify general information and profile information about the user and add the user to groups for easier administration.

To specify general user information:

  1. From the toolbar or Object menu, select Create.

  2. Select User from the Select Object Type window and click Create. The Create User dialog displays.

  3. In the Name field, enter the user name for the user you are creating. When you enter a user name, the Home Folder and Mail Folder fields are automatically populated based on the name you entered.

  4. In the Distinguished Name field, enter the fully qualified name in a domain used by Credential Manager for authentication. This field will be inactive if the Create Credential Manager Account is selected (see Step 11).

  5. (Optional) In the Description field, provide a description of the user. You usually enter the user's full name.

  6. In the Credential Manager field, the default credential manager for authentication is displayed. This was set in the default user definitions. If multiple credential managers have been configured, you may override the default credential manager by selecting a different one.

  7. In the Password field, enter the user's password. This can be changed by the user you are creating. Or, you can keep users from changing passwords by checking the box next to User Cannot Change Password.

  8. In the Confirm field, type the user's password a second time.

  9. In the 9iFS Private Password field, enter a password to be used to authenticate users on a protocol-by-protocol basis. For example, since FTP specifies that passwords travel from the FTP client to the FTP server in the clear, you can configure the Oracle 9iFS FTP server to use the Oracle 9iFS-specific password.

  10. Confirm the Oracle 9iFS-specific password by typing it a second time.

  11. If this user account should be created in the credential manager, the Create Credential Manager Account checkbox should be selected. If this checkbox is not selected, it means the user already exists in the credential manager and you need to add an Oracle 9iFS account for the user (also known as enrollment).

  12. If this user is to have administrative permissions (required for run-time domain management), select the Admin Enabled checkbox. This option gives the user access only to the Oracle 9iFS Manager tool to manage objects.

  13. If this user is to have full administrative permissions, select the System Admin-enabled checkbox.

To specify user profile information:

  1. Click the Profile tab.

  2. By default, the Primary Profile is selected. Oracle recommends that you use this feature. Notice that the defaults you specified when setting the default user definitions are displayed. The profile points to the user's home folder location and shows whether the Quota function has been enabled and, if so, the allocated bytes. Change these values if desired.

  3. Specify the user's default document and folder ACLs. The default ACLs determine which ACLs should be associated when the user creates different objects, such as documents and folders. By default, Oracle 9iFS sets the non-administrator user's default ACL to PUBLISHED (except for e-mail-related objects, such as messages. These have the PRIVATE ACL as the default), and sets the administrator's default ACL to PRIVATE (except ACL, PropertyBundle, DirectoryObject, VersionSeries, and VersionDescriptions, which are PUBLISHED).

  4. By default, the Email Profile is enabled. Oracle recommends that you retain these settings. In the Mail Folder field, enter a folder name if it is different from the user name. The user's e-mail profile points to the user's email folder location and specifies the user's email address. Oracle 9iFS Manager and the Web interface create the user's email folders under the home folder. For example, /home/jsmith/mail/inbox.

To add this user to existing groups:

  1. Click the Group tab. The Select Group window displays.

  2. From the Available Groups list, select the groups to which to add the user.

  3. Click the Add button to add the user to the selected group. The groups display in the Selected Groups list.

  4. Click Create.

Use the User Selector to Display Users

Because your system may support hundreds or thousands of users, it is infeasible to display all the users under the Users folder. Instead, a Search utility has been provided to select users based on particular search criteria. You can search by name, group membership, or both.

To find users:

  1. Click the Users folder to display the User Selector.

  2. To search by name, select the checkbox next to Name, specify all or part of a name in the text box and select a logical operator from the pull-down list: contains, is, is not, starts with, ends with.

  3. To search by group membership, select the checkbox next to Member of, choose whether to search for members of or direct members of the group you specify in the Group text box. Direct members are those that have individual membership in the group rather than membership through participation in a group that has been added to the group being searched.

  4. To perform a simple search, click the Get Result button. The search results are displayed and include:

    • The user name.

    • Whether or not the user is admin-enabled.

    • The user's allocated quota.

    • The date the user was created.

    • The owner.

    • The ACL associated with all files the user creates.

    Search results are displayed in sets of 20. You can navigate through the results with the Previous Set and Next Set buttons.

  5. To see additional information about the user and make changes in the user's general information, assign or remove the user from groups, and modify the user's primary or email profile, select the user record and click View/Edit.

To perform a more complex search for users:

  1. Click the Users folder to display the User Selector.

  2. Select the checkbox next to Result of and click the Advanced Search button. The advanced search for users window displays. DirectoryUser will be displayed. Do not change to a different search object to find users.

  3. Make sure the Include Subclasses checkbox is selected. Otherwise, no users will be found.

  4. Narrow the search by adding attributes. For example, you may want to find all users with a particular default ACL. In this case, you would add ACL, then specify the ACL value you are looking for by clicking the Advanced button next to ACL to display the Advanced search for users ->Attribute Constraint window.

Creating Users: Using an XML Configuration File

Creating users can be complicated since many other user-related objects, such as home folders, user profiles, and mail folders are created at the same time. Using the <SimpleUser> tag within the XML file applies all the default definitions found in Table 4-2, "User Definitions Reference". You can change the user default settings in Oracle 9iFS Manager to suit your requirements. You do not need to specify every single value unless you want to override any of the default values. You override the defaults by explicitly setting them in the XML file. The values are case-sensitive.

Creating a single user and all its user-related objects are created in a single transaction. These objects include a Directory User, Primary User Profile, Email Profile, Inbox, and a Home Folder. Therefore, do not include any other objects in your XML file. Also, if you are creating 10 users in a single file, and an error occurs on the 7th user, the previous 6 users and their user-related objects are not rolled back. The file will have to be edited and the definitions for the created users deleted before being able to use it again.

XML Example

The following XML file lists the definitions used to create users with an XML file. When using XML, you really only need to include the username and password, but this example displays other definitions you can include to override the defaults you set using Oracle 9iFS Manager. This example also shows you how to create users by parsing the XML file and checking that the users were created using the Command Line Utilities.

  1. Create your user XML file:

    <SimpleUser>
     
    
    <UserName>gking</UserName>
    <Password>ifs</Password>
    <DistinguishedNameSuffix>.yourcompany.com</DistinguishedNameSuffix>
    <DirectoryUserDescription>Gary King</DirectoryUserDescription>
    <AdminEnabled>true</AdminEnabled>
    <HomeFolderRoot>/home</HomeFolderRoot>
    <EmailAddressSuffix>@yourcompany.com</EmailAddressSuffix>
    
    </SimpleUser>
  2. Create the users by loading the XML file into Oracle 9iFS. Use the following command to load the XML file into Oracle 9iFS using the Command Line Utilities. You must be an administrator.

    $ORACLE_HOME/9ifs/bin/ifsshell
    @ login system/<password>
    put users.xml
    
    
  3. Confirm that the users were created:

    ls -class DirectoryUser
    
    
  4. You can also drag and drop the user file into Oracle 9iFS through the Windows or Web interface and FTP. Oracle 9iFS invokes the XML parser and the users are created. The Parse mode must be On in the protocols.

Creating Groups

By assigning users to groups, you make administration and maintenance easier. Instead of adding each user to an Access Control List for a file or folder--a time consuming task--you can add a group of users all at the same time. Oracle 9iFS is shipped with World, a default group. When users are created, they are automatically added to this group. To create a group, you define the group itself, then populate it. Group names are unique within the owner's set of groups.

The default ACL of the user that created this group is assigned to any new group the user creates. Therefore, a group with the PUBLISHED ACL cannot be edited by any user. When creating groups, it is important to discuss with department managers and other users if they want all Oracle 9iFS users to have read-only access to the groups you are creating for their respective departments. If you need to change the default ACL, you can do so by modifying the ACL for a specific group.

Using Oracle 9iFS Manager, you can modify, view, and delete group. Modifying a group includes such tasks as adding or removing users and group to an existing group and renaming a group.

Creating Groups Using Oracle 9iFS Manager

  1. On the toolbar, click Create.

  2. Select User Group and click Create. The Create User Group window displays.

  3. Type a name for the group. The name should not match (without regard to case) any other group that you already own.

  4. Type an optional description. The description displays only when you modify the group.

  5. Select the ACL for the group from the drop-down list.

    The default ACL of the user who created this group is assigned to any new group you create. Therefore, a group with the PUBLISHED ACL cannot be edited by any user. When creating groups, it is important to discuss with department managers and other users if they want all Oracle 9iFS users to have read-only access to the groups you are creating for their respective departments. If you need to change the default ACL, you can do so by modifying the ACL for a specific group.

  6. From the Available Users/Groups list, select the users and groups to add to the group.

  7. Click the Add button to add the user or group to the group.

  8. Click Create. The new group displays in the Navigator.

Creating Groups Using XML

This example XML file creates groups. You can use this file, although you must modify the name of the group to match the name of the group you are creating. When adding users to the group, the user names must exist. If you use any protocol to load the XML file into Oracle 9iFS, it is parsed and not saved anywhere in Oracle 9iFS.

<DIRECTORYGROUP>
<Name>DemonstrationUsers</Name>
<Members>
 
<MEMBER reftype='name'>msmith</MEMBER>
<MEMBER reftype='name'>mallen</MEMBER>
<MEMBER reftype='name'>sward</MEMBER>
<MEMBER reftype='name'>rjones</MEMBER>
<MEMBER reftype='name'>tmartin</MEMBER>
<MEMBER reftype='name'>dblake</MEMBER>
<MEMBER reftype='name'>eclark</MEMBER>
<MEMBER reftype='name'>sscott</MEMBER>
<MEMBER reftype='name'>gking</MEMBER>
<MEMBER reftype='name'>tturner</MEMBER>
<MEMBER reftype='name'>jadams</MEMBER>
<MEMBER reftype='name'>pjames</MEMBER>
<MEMBER reftype='name'>gford</MEMBER>
<MEMBER reftype='name'>amiller</MEMBER>
</Members> </DIRECTORYGROUP>

Creating Groups with the Web Interface

  1. In the Directory Tree, click the Groups icon. (If there is no Groups icon, see your system administrator.) A list of existing user groups will be displayed at the right.

  2. Click the New icon and choose Group.

  3. In the New Group dialog, enter a name for the group.

  4. Click the Users icon.

  5. In the Users List, click the Select checkbox to the left of each user you want to add to your group.

  6. Click the Edit icon and choose Copy.

  7. In the Directory Tree, click the Groups icon.

  8. Click the name of the group you just created.

  9. Click the Edit icon and choose Paste.

You can add users to the group at any time by following steps 4-9.

Step 3: Set Up the Folder Hierarchy and Load Files into Oracle 9iFS

When you planned your system and folder hierarchy, you should have defined the following:

Create the Folder Hierarchy

Create the folder hierarchy by starting at the root of the tree, adding the folders, then creating each folder's child folders, working downward. You can create folders using Oracle 9iFS Manager, the Web or Windows interfaces, or through the Command Line Utilities.

Creating Folders with Oracle 9iFS Manager

Using Oracle 9iFS Manager, you can only create folders one at a time and only from a single level. To create folders:

  1. Access the Browser by selecting the Browse option from the File menu.

  2. Navigate to the directory where you want to place the new folder and select that directory.

  3. Select New from the toolbar or right-click the directory and select New Object from the context menu.

  4. Type a name for the folder in the Create Object dialog.

  5. Click OK. The new folder displays in the Navigator.

The owner of the folders created is the user who is logged into Oracle 9iFS Manager.

Creating Folders with the Web Interface

  1. Navigate to the directory where you want to create the new folder.

  2. On the toolbar, click the New icon, then Folder.

  3. At the prompt, type the name of the new folder.

  4. Oracle 9iFS adds the folder to the File List.

Note: If you plan to upload a foldered set of documents to the Oracle 9iFS server, create the folders first using this procedure, then upload the files to the proper folders.

Creating Multiple Folders Using XML

Using XML, you can create multiple folders. When creating multiple objects, you must use the <ObjectList> tag. The following code creates multiple folders. This can be used when creating the folder hierarchy.

<ObjectList>
<Folder>
 
<Name> FY 2000 Budgets </Name>
<FolderPath> /managers </FolderPath>
</Folder> <Folder>
<Name> Marketing </Name>
<FolderPath> /managers/FY 2000 Budgets </FolderPath>
</Folder> <Folder>
<Name> Human Resources </Name>
<FolderPath> /managers/FY 2000 Budgets </FolderPath>
</Folder> </ObjectList>

This XML example specifies that the folders are placed under the "Managers" folder; therefore, this folder must already exist in Oracle 9iFS for the other folders to be created.

When using the Windows interface to load this XML file, you may drag and drop the XML file to any directory. In this example, the XML file was placed in /managers. After this XML file has been loaded into Oracle 9iFS, the directory looks like:
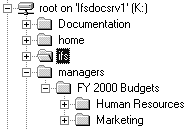
Figure 4-1 Folder Hierarchy

Text description of 3xmlfold.gif follows.

Text description of the illustration 3xmlfold.gif

Generally, creating objects in an objectlist tag is always in a single transaction, meaning, if there is an error, the complete transaction is rolled back, the objects are not created, and a log file is generated in the directory in which the XML file was dropped. You can use this log file to troubleshoot errors.

However, class objects and Directory object creation are implicitly committed. So, if there is an error while creating some of these objects in the objectlist tag, the objects prior to the error are created and committed to the database. The XML file will have to be edited and those object definitions deleted from the XML file before parsing it again.

Creating Folders Using the Command Line Utilities

To create several folders at a time, it is recommended that you use the Command Line Utilities and a batch file. Using the batch file, you create the folders and assign different ACLs.

To create folders:

  1. Write a batch file using a text editor. For example:

    login system/<password>
    cd /public
    mkdir specifications
    mkdir specifications/development
    mkdir specifications/qa
    setattr /public/specifications ACL -avsystemacl public
    setattr /public/specifications/development ACL -avsystemacl public
    setattr /public/specifications/qa ACL -avsystemacl public
    
    
  2. Run the batch file using the following command:

    $ORACLE_HOME/9ifs/bin/ifsshell -i batchfile.txt
    
    
  3. To acknowledge that the folders were created, use any interface and browse to the /public directory. Drill down to see all folders.

Tips

To see if any errors occurred during the execution of your batch file, check the CupServer.log found in the following directory:

Platform Directory

UNIX

$ORACLE_HOME/9ifs/log

Windows NT

%ORACLE_HOME%\9ifs\log

Set the Mount Points

Mount points in Oracle 9iFS are named directories that can be accessed as if they were top-level folders through the Windows and Web interfaces. The important attributes of mount points, especially for your users, are:

As the administrator, you should limit the number of mount points you create because having more than a few dozen makes it very difficult for users to find what they need.

The following mount points are set up by default:

You use mount points for two reasons:

Creating Mount Points with Oracle 9iFS Manager

  1. Click Create on the toolbar.

  2. Select Mount Point from the Select Object Type dialog. You can also use the Create Like option.

  3. Click Create. The Create Mount Point dialog displays.

  4. Enter information in the following fields:

    • Name (required)--A meaningful name for the mount point.

    • Description--A description of the mount point.

    • Associated Folder (required)--The folder referred to by the mount point. For example, for the mount point "public," the associated folder is "/public." You can also click the Browse button to select a folder from the hierarchy.

  5. Select the appropriate ACL for the mount point from the drop-down list.

  6. Click Create.

The new mount point displays in the Navigator.

Migrating Data from Your Legacy Systems

It may be necessary to migrate your data from your legacy systems. This process requires you to manually transfer the data to the new environment. There are five different ways to load files into Oracle 9iFS:

Drag and Drop Files into Oracle 9iFS

In Windows:

  1. Select the files from your local directory.

  2. Drag and drop the files into a folder on the Oracle 9iFS drive.

In the Web interface:

  1. Navigate to the folder where you want to store the file.

  2. Click the Upload icon and choose Via drag and drop. An Upload window is displayed with the current folder information.

  3. Select one or more files, then drag and drop them into the Upload window.

  4. Click OK to confirm that you want to upload the files. If you are uploading multiple files, a progress window appears and lists each file as it is transferred to Oracle 9iFS.

  5. You can continue to drag files into the Current Directory window to transfer additional files. When you are finished uploading files, close the Current Directory window.


    Note:

    You cannot upload folders using this method. You must explicitly create the folders by navigating to where you want the new folder, then clicking the New icon and choosing Folder. In the dialog box, type the name for the new folder.


To retain the file structure:

  1. Log into Oracle 9iFS through Microsoft Windows as an administrator.

  2. Click and drag the entire directory structure from the original file system into Oracle 9iFS,

    -or-

    Drag different parts of the directory tree separately, confirming that each part of the tree has been copied before copying the next one.

  3. Log into Oracle 9iFS through Windows as a test user and verify that all the files and folders are accessible.

  4. From the Start menu, select Oracle 9iFS from the Find option and perform a series of searches--on both filename and contents--to ensure that users can find files easily.

FTP Your Files into Oracle 9iFS

To FTP your files into Oracle 9iFS, the following requirements must be met:

To FTP your files into Oracle 9iFS:

  1. Using an FTP client, log into the Oracle 9iFS server. You can use either the hostname of the Oracle 9iFS server or its IP address.

  2. Navigate to the files on your local machine that you want to load into Oracle 9iFS and use your FTP client's utilities to load the files.


    Note:

    If you have trouble logging into Oracle 9iFS using your FTP client, make sure to enter the correct port, which is chosen during configuration of Oracle 9iFS.


Upload Files via Browse Using the Web Interface

Using the Web interface, you can only load one file at a time:

  1. Navigate to the directory where you want to store the file.

  2. Click the Upload icon and select Via Browse.

  3. In the Upload window, click the Browse button.

  4. Locate the file you want to upload and click Open.

  5. In the Options section, the following options are available:

    • Apply ACL--Select the ACL you want to apply to the file from the drop-down list. You must use an existing ACL. The default document ACL is PUBLISHED, for a non-admin user.

    • Language--Select the language for this file. This option cannot be used to convert from one language to another.

    • Character Set--Select the character set for this file.

  6. In the Upload window, click the Upload button.

Tips

When you want to view a file using the Web interface that is not recognized, a new navigator window is opened and a dialog prompts for you to pick the application, save the file, or cancel this operation.

Upload Files Using the Command Line Utilities

To browse and upload files using the Command Line Utilities:

  1. Login into Oracle 9iFS using the following command:

    @ login system/<password>
    
    
  2. Browse the repository to select the folder to which you want to upload the file. Use the following command:

    cd /public
    
    
  3. Load the selected files. Use the following command:

    put myfile.doc
    

Step 4: Set Up Security

Security in Oracle 9iFS is defined using passwords and Access Control Lists (ACLs).

Password Protection in Oracle 9iFS

Each user possesses an Oracle 9iFS user account which is associated with a User Profile containing the user's preferences for working in the repository (e.g., Home Folder, Default ACL).

When the user logs into an Oracle 9iFS client, the user supplies a password for authentication. Upon receiving the user's credentials, Oracle 9iFS checks the password against the user's specified credential manager. Oracle 9iFS provides a built-in credential manager which manages user accounts and passwords, or users may be authenticated with the Oracle Internet Directory credential manager. The default credential manager is specified during Oracle 9iFS configuration.

Protocols Using the Oracle 9iFS-specific Password

Oracle 9iFS users authenticated by an Oracle Internet Directory credential manager may have, in addition to their Oracle Internet Directory password, a second, Oracle 9iFS-specific password. These two passwords are not synchronized, although administrators can control which password type is used to authenticate users on a protocol-by-protocol basis. For example, since the FTP protocol specifies that passwords travel from the FTP client to the FTP server in the clear, an administrator can configure the Oracle 9iFS FTP server to use the Oracle 9iFS password to prevent interception of users' Oracle Internet Directory passwords.

While requiring a user's Oracle 9iFS-specific password to authenticate with such protocols doesn't prevent a hacker from using a packet sniffer to obtain that password, it mitigates the consequences of that password being compromised, since that Oracle 9iFS-specific password allows access to Oracle 9iFS, only, and not to all OiD/SSO-enabled applications.

You can control which protocols use the Oracle 9iFS-specific password through service configuration. See "Directory Service" in Appendix B, "Service Configuration Properties" for more information.

Oracle recommends that you use the Oracle 9iFS-specific password with the following protocols:

The following protocols use the common OiD (SSO) password:

Access Control Lists (ACLs)

As you set up users and groups and loaded files into Oracle 9iFS, you assigned Access Control Lists (ACLs) to the folders and files involved. When a client establishes a connection to the Oracle 9iFS repository, it maintains a database connection to the Oracle 9iFS schema. The user's access to each document and folder stored in the repository is governed by the ACL for that object. The ACL specifies which users and/or groups have what permissions (e.g., read, modify, delete) on that object.

If the user wants to perform administrative tasks in the repository, the user account will need to be granted administrative privileges.

System Access Control Lists

Four system ACLs are provided to apply to your documents and folders. These ACLs cover the most common security needs in most shared environments. The system ACLs are listed and described in Table 4-3, "System ACLs".

Table 4-3 System ACLs

ACL Description

PRIVATE

Grants no permissions to any other user. Other users cannot view, modify, or delete a user's document in any way, unless changed by the owner.

PROTECTED

For folders only. Enables other users to see the files in the folder, add documents and folders to the folder, and remove documents and folders they have created from the folder, but are not allowed to delete the folder itself.

PUBLIC

Allows full access to the item. All users can make any changes that the owner can make.

PUBLISHED

Allows other users to view the contents, but they are not allowed to modify or delete the document.


Note:

A system administrator has the privilege to modify System ACLs (PUBLIC, PUBLISHED, PROTECTED). The administrator can mistakenly modify a system ACL in a manner that renders it useless by deleting the WORLD Access Control Entry (ACE). Care should be taken when modifying any system ACLs.


All objects may have an associated ACL. If no ACL is assigned, the object is PRIVATE (only the owner has full access to it). If a default ACL is specified in a user's Primary User Profile, that ACL is assigned to the new public object created by that user.

Similar to files, ACLs have an ACL associated with them to manage the users who can use them or modify them. System ACLs can be created and modified by system administrators only.

Access Control Entries (ACEs)

Each ACE is comprised of a:

For each user or group, you need to decide which of the permission bundles will be granted to them. Permission bundles are sets of permissions that are applied to users. The set of permission bundles assigned to a specific user or group is called an Access Control Entry (ACE).

ACLs give you the flexibility to grant the permission bundles your co-workers require while helping to protect your files against accidental modification or unauthorized access.

By setting the permission bundles for an individual or group, you create an Access Control Entry (ACE) in your Access Control List (ACL). It's possible to create a different ACE for every user in your Oracle 9iFS repository for every file you control, but, in most cases, the standard ACLs that come with Oracle 9iFS should meet your needs, and the remaining cases can be handled by creating an ACL.

When you define an ACE, the first choice you must make is whether the ACE you're creating is going to grant the permission bundles you select, or revoke them. If you are going to give only a few permission bundles to a selected user or group, choose Grant, and select only the permission bundles that they will be given. If you are going to give the selected user or group general access with only a few restrictions, choose Revoke. Then explicitly grant those permission bundles to the grantee.

Permission Bundles

A permission bundle is a collection of permissions. Permission bundles are convenient because you do not have to specify the individual permissions. For example, the permission bundle, "All," is a collection of permissions which grants all possible permissions. A permission bundle can be granted to a user or group, or revoked from a user or group. Oracle 9iFS Manager, the Web interface, and the Windows interface support ACLs and ACEs with permission bundles.

Table 4-4, "Permission Bundles Provided in Oracle 9iFS" lists the permission bundles used in Oracle 9iFS and the permissions they contain. The ClassCreate and ClassRestrictedCreation permission bundles are used exclusively for ACLs associated with class objects and are also known as ClassAccessControlLists.

Table 4-4 Permission Bundles Provided in Oracle 9iFS

Permission Bundle Description Permissions

All

All permissions are included.

AddItem, AddMember, AddRelationship, AddVersion, AddVersionSeries, Delete, Discover, GetContent, Grant, Lock, RemoveItem, RemoveMember, RemoveRelationship, RemoveVersion, RemoveVersionSeries, SetAttribute, SetContent, SetDefaultVersion, SetPolicy

Read

User can find and read the content of the object.

Discover, GetContent

Delete

Users can find and delete the object.

Discover, Delete

Modify

Users can find and modify the object.

AddItem, AddMember, AddRelationship, AddVersion, AddVersionSeries, Discover, GetContent, Lock, RemoveItem, RemoveMember, RemoveRelationship, RemoveVersion, RemoveVersionSeries, SetAttribute, SetContent, SetDefaultVersion, SetPolicy

Protected

To be used for folders; users can find the folder and add or delete folder items, but they cannot modify the folder.

Discover, AddItem, RemoveItem

ClassPublic

To be used with class object; users can create instances of this class and search them.

Create, SelectorAccess

ClassRestrictCreation

To be used with class object; users can access instances of this class.

SelectorAccess

The permissions bundled in the above permission bundles are listed and defined in Table 4-5, "The Individual Permissions". "Item" can be either a file or directory, unless stated otherwise.

Table 4-5 The Individual Permissions

Permission Definition

AddItem

Grantee can add an item to a folder.

AddMember

Grantee can add a member to a group.

AddRelationship

Grantee can create a link to the item in another folder.

AddVersion

Grantee can update a versioned file.

AddVersionSeries

Grantee can change a file to a versioned file.

Create

Grantee can create instances of a class object. Applies only to ClassAccessControlLists.

Delete

Grantee can delete the object.

Discover

Grantee can browse to the item through a Directory Tree, and can find the item using Find operations.

GetContent

Grantee can view and copy the content of the file.

Grant

Grantee can modify the ACL assigned to the item to grant additional permissions.

Lock

Grantee can lock and unlock the object.

RemoveItem

Grantee can delete an item from the folder.

RemoveMember

Grantee can remove a member from a group.

RemoveRelationship

Grantee can delete an existing link to the item in another folder.

RemoveVersion

Grantee can remove a version of a versioned file.

RemoveVersionSeries

Grantee can remove a version series from a family. Permission applies to the family.

SelectorAccess

Grantee can search a class in either a search or selector. Applies only to ClassAccessControlLists. Selector access is governed by the class's ClassACL.

SetAttribute

Grantee can change any of the item's attributes.

SetContent

Grantee can change the contents of the file.

SetDefaultVersion

Grantee can change the default version of a version series of a family or version series.

SetPolicy

Grantee can change a policy property bundle associated with a public object. Permission applies to the policy property bundle.

Defining Permission Bundles Using Oracle 9iFS Manager

In a new dialog, the administrator/user can specify the name, a description, and add any or all standard out-of-the-box permissions currently in the repository. Both sets of permissions are present to the user as a scrollable shuttle interface, from which the user can add or remove any number of items.

To define a custom permission bundle:

  1. On the Oracle 9iFS Manager toolbar, click Create.

  2. Select Permission Bundle from the Select Object Type window and click Create. The Create Permission Bundle window displays.

  3. In the Name field, type a name for the permission bundle.

  4. In the Description field, type an optional description for the permission bundle. The description is used to describe the type of permission bundle.

  5. Select the permissions from the Available Standard Permissions list to add to this permission bundle. Hold down the Control key to select multiple items. Click the Add button to add the permissions to the Selected Standard Permissions list.

  6. Click Create. The permission bundle displays in the Navigator.

Users and Groups as Grantees

Groups and ACLs provide a powerful mechanism for managing access to objects. Assume a group is defined as a grantee in an ACE. If the group membership is changed, either by adding or deleting a member, those changes are reflected automatically in access to the object. If the group is granted permissions on an object and a new member is added to the group, that new member automatically has access to the object the on which the group has permission. The order of the ACEs is significant. The ACL is resolved in the order of the ACEs.

Users can also be specified as a grantee in an ACE. For example, if the user "jsmith" is part of the group "ifsdev." The ACL results in everyone in "ifsdev" having full access, except "jsmith," who cannot delete the object.

Primary User Profiles and Default ACLs

Each user has a Primary User Profile. One of the attributes of this profile is a set of default ACLs. These ACLs determine the default ACL associated with all objects the user creates. Default ACLs can be:

Default ACLs are used at the time an object is created, unless the creator specifies a different ACL. The ACL can be changed at any time after the object has been created. The ACL associated with any created object is determined by the user's default ACL as specified in the Primary User Profile. A non-admin-enabled user's default ACL is set to PUBLISHED, except for MailBox, MailDocument, MailFolder, and Message, which are PRIVATE. An admin-enabled user's default ACL is set to PRIVATE, except for the following classes, which are set to PUBLISHED:

When an object has no ACL, the owner and administrator have access to it. Therefore, it is strongly recommended that a Primary User Profile with the default ACLs specified is created for each user. Creating a user with Oracle 9iFS Manager, the Web interface, or XML creates a user profile with the following default ACLs:

Access Control on Created Objects

The ACL associated with any created object is determined by the user's default ACL as specified in the Primary User Profile. A non-admin-enabled user's default ACL is set to PUBLISHED, except for MailBox, MailDocument, MailFolder, and Message, which are PRIVATE. An admin-enabled user's default ACL is set to PRIVATE, except for the following classes, which are set to PUBLISHED:

To change the default ACL applied to a document, access Oracle Internet File System from the Web or Windows interface.

Using Oracle 9iFS Manager to Create an ACL

If you want to create a batch of ACLs, use the Create Like option. This creates an ACL similar to an existing ACL, which you can then customize. To apply an ACL, to a file or folder, use the Oracle 9iFS Manager Browser, or use the Web or the Windows interface.

  1. On the Oracle 9iFS Manager toolbar, click Create.

  2. Select Access Control List from the Select Object Type window and click Create. The Create Access Control List window displays:

  3. In the Name field, type a name for the ACL. The name you select must not match (without regard to case) any other ACL that you already own.

  4. Select the ACL type from the drop-down list. The choices are:

    • AccessControlList--Any custom ACL created.

    • SystemAccessControlList--Generally for system-wide use.

    • ClassAccessControlList--Used only for class objects.

  5. In the Description field, type an optional description for the ACL. The description is used to describe the type of ACL.

  6. Select an ACL for this ACL from the drop-down list. Because the ACL itself is a file, it needs access security.

  7. Select the groups for whom you want to create ACEs. Hold down the Control key to select multiple items. Click the Add button to add the groups to the Selected Users/Groups list.

  8. Select the users for whom you want to create ACEs. Click the Available Users button to display the User Search dialog. Capture the users you want from the results of your search. On the Create Access Control List window, select the users from the Available Users list and click Add to add the users to the Selected Users/Groups list.

  9. Associate a permission bundle with each grantee by selecting the corresponding checkbox.

    Each of the users or groups you selected can have a separate set of ACEs associated with it. For each, select Grant to grant the permission bundles you select. If Grant is not selected, the permission bundles you select are revoked from that user or group. Scroll right to see all of the available permission bundles.

  10. Click Create. The ACL displays in the Navigator.

Using the Web Interface to Create an ACL

  1. Click ACLs in the Directory Tree.

  2. Click the New icon and choose ACL.

  3. In the dialog, enter a name for the ACL and click OK. The ACL is added to the ACL list. Note: The name you select must not match (without regard to case) any other ACL that you already own.

  4. Click the icon or ACL name you just created. The Edit ACL window is displayed.

  5. Select the Users or Groups for whom you want to create ACEs. Hold down the Ctrl key to select multiple users or groups.

  6. Click the Add Access Control Entries button.

    Each of the users or groups you selected has a separate ACE. For each, choose whether the ACE will Grant the privileges you select or Revoke the privileges you select. Scroll right to see all of the available permissions. Set the permissions by selecting the corresponding checkbox.

  7. When you have selected all of the permissions for each of the ACEs, arrange the ACEs in the correct order of precedence. Click the Up arrow at the left edge of the ACE to move it up in the list. Click the Down arrow to move the ACE down. The lowest ACEs in the ACL always take precedence over those ACEs listed above. If a user's permission is revoked in the first ACE but granted in the second ACE, that user will be granted the permission.

  8. When you have set all of the permissions and arranged the ACEs in order of precedence, click the Apply Permission Changes button.

Using the Windows Interface to Create an ACL

  1. Right-click the file to which you want to assign the new ACL.

  2. Select Properties from the context menu.

  3. On the Properties window, click the 9iFS Security tab.

  4. To add an ACE, click the New Entry...button to display the Create Access Control Entry dialog.

  5. In the Add Oracle iFS Access Control Entry dialog, click the Browse button.

  6. Select the permission bundles you want to grant or revoke in this ACE. To grant all selected permission bundles, leave the Revoke selected permission bundle(s) checkbox unchecked. To revoke all selected permission bundles, check the Revoke selected permission bundle(s) checkbox.

  7. Click OK to create the ACE.

  8. Repeat steps 7-10 to create any additional ACEs for this ACL.

  9. Click OK or Apply in the Property window to complete the new ACL creation.

Using XML to Create an ACL

Through XML, you can create an ACL using the existing permission bundles. In addition, you can also create your own custom permission bundle. Once you have created your own permission bundle, you can use Oracle 9iFS Manager, the Web interface, or XML to create ACLs using the custom permission bundle.

Example

To create your own custom permission bundle:

<PermissionBundle>
<Name> MyPermissionBundle </Name> 
 
<AccessLevel> 
 
<Discover> true </Discover> 
<GetContent> true </GetContent> 
<SetContent> false </SetContent> 
</AccessLevel> </PermissionBundle>

To create an ACL using the custom permission bundle:

<AccessControlList>
<Name> MyAcl </Name> 
<Description> Custom ACL using custom permission bundle </Description>
<ACEs> 
 
<AccessControlEntry> 
 
<Grantee classname='directorygroup' Reftype="name"> ifsdev 
</Grantee> 
<Granted> true </Granted> 
<PermissionBundles> 
<PermissionBundle Reftype='name'> MyPermissionBundle 
</PermissionBundle>
</PermissionBundles>
</AccessControlEntry> </ACEs> </AccessControlList>

Using the Oracle 9iFS Manager to Apply ACLs

ACLs are applied to objects through the Browser. To apply an ACL to an object in the Browser:

  1. Select Browse from the File menu. Oracle 9iFS Manager displays the Browser, a window showing the folder hierarchy of the connected Oracle 9iFS instance.

  2. Select an object (file or folder) in the Navigator or the Detail View.

  3. Right-click on the object to display the context menu and select Apply ACL. The Apply ACL dialog displays.

  4. In the Shared ACLs box, select an ACL to apply to the object displayed in the Apply this ACL to field. Only one ACL can be selected at a time.

  5. Optionally, if you are applying the ACL to a folder, select the Apply Recursively checkbox to apply the ACL to all items in the folder.

  6. Click OK.

Using the Web Interface to Apply ACLs

To apply an ACL to a file or folder:

  1. Navigate to the folder or file to which you want to apply the ACL.

  2. Click the Select checkbox to the left of the file or folder. You can select more than one item at a time.

  3. Click Edit and select Apply ACL. A dialog displays with a list of all system ACLs and custom ACLs you have added.

  4. Select the ACL you want to apply to the selected file(s) or folder(s).

  5. Click OK.

    A success message displays to tell you that the ACL has been applied to the items.

  6. Click OK.

Using the Windows Interface to Apply an ACL

To apply an ACL to a file or folder:

  1. Navigate to the file or folder for which you want to apply an ACL.

  2. Right-click the file, then select Properties.

  3. On the Properties dialog box, click the Oracle 9iFS Security tab.

  4. To apply an existing ACL, click the Use Existing ACL and select the ACL from the window.

  5. Click Use ACL. The ACL is ready to be associated with the file or folder.

  6. Click Apply or OK to associate the ACL with the file or folder.


Go to previous page Go to next page
Oracle
Copyright © 1999, 2002 Oracle Corporation.

All Rights Reserved.
Go To Table Of Contents
Contents
Go To Index
Index
