
An RTF template is used to generate the interview document. This RTF file is created in Microsoft Word using the BI Publisher Template Builder. The Template Builder is a tool that simplifies the development of RTF templates.
Note: If you cannot see the BI Publisher Ribbon in your Microsoft Word document after you open it from Policy Modeling, you need to install BI Publisher Desktop. For more information, see Download BI Publisher.
There are 4 steps in the process of developing a template for an interview document:
If you are familiar with developing BI Publisher templates and just need to know the format to use for the fields, refer to the BI Publisher code for Oracle Policy Modeling topic.
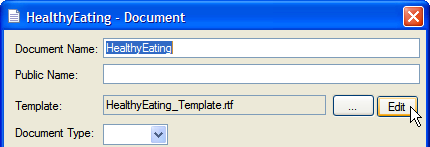
A default RTF template is created automatically when you add a new document to your screens file. This file, <project name>_Template.rtf, is located in the \include\templates\<locale> folder for the project.
Alternatively, you can reuse an existing RTF template file, but make sure that you select that file in the Template field in the Document editor in your screens file (it will then be automatically copied into the include\templates\<locale> folder).
The template file can be opened for editing in Word by clicking on the Edit button in the Document editor in the screens file in Oracle Policy Modeling:
Alternatively, you can open the template file from its location in the project under \include\templates\<locale> using Microsoft Word or Windows Explorer.
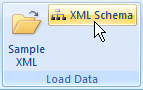
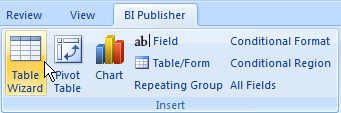
In order to add fields to your template you first need to load data into the BI Publisher Template Builder in Word. The simplest way to do this is to import the XML schema file (XSD) that you created when you added the document to your screens file.
NOTE: Sample data can also be loaded and used in the development of the template. You would only do this though if you needed to see the full list of fields that are generated. Typically, you will only want to include the text and/or the formatted value of the attributes in the session in your template in which case the XML schema, rather than the sample XML, is considerably more user-friendly. TIP: Even if you do want other field types in your template that are not included in the XML schema, you can use one of the fields for the attribute that is in the schema and customize it to be what you need (see below).
In addition to normal Word components, a template can include:
Fields in BI Publisher are used to display values and properties of attributes (global and entity-level), decision reports and conditional text.
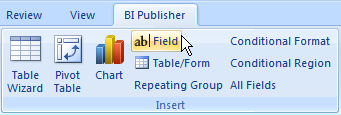
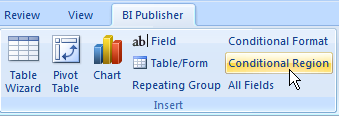
To insert a field into a template:
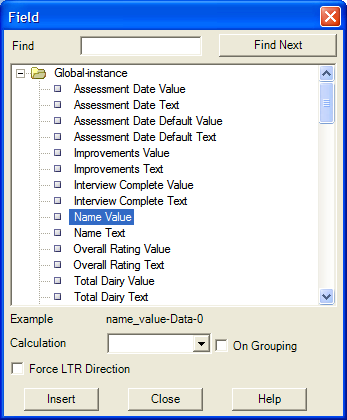

IMPORTANT NOTE: For attribute values (formatted for the project region) and attribute text this is all you need to do. For other field types (eg unformatted attribute values, attribute question text, attribute type, decision reports, conditional text etc) you need to customize a BI Publisher field (see below).
The BI Publisher code for all fields, other than attribute values (formatted) and attribute text, needs to be customized.

For the format required for other fields, see BI Publisher code for Oracle Policy Modeling.
TIP: The Healthy Eating example rulebase that is installed with Oracle Policy Modeling, contains a Raw Template Example RTF file that you can use to copy and paste the code from for various fields. You just need to replace the attribute id (ie public name) in the code, and update the display text as necessary.
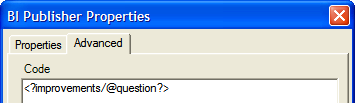
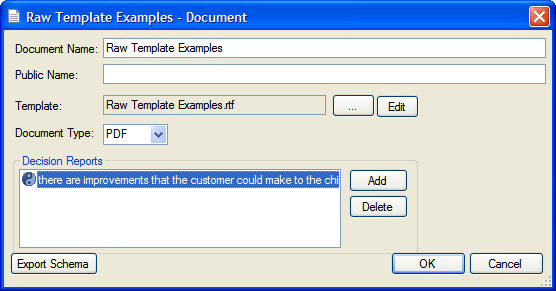
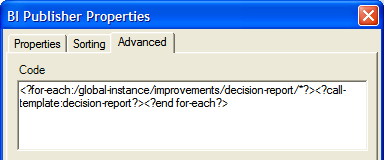
To insert a decision report for an attribute into your template there are 3 things you need to do:

You can specify that certain text is only shown when a particular condition is met. Both simple conditions and multiple conditions are supported in BI Publisher. Conditional text can be achieved by:
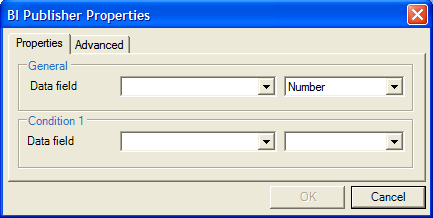
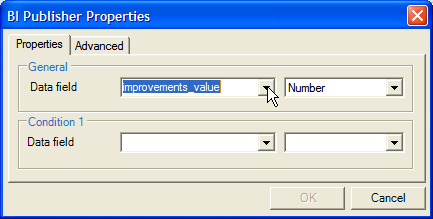
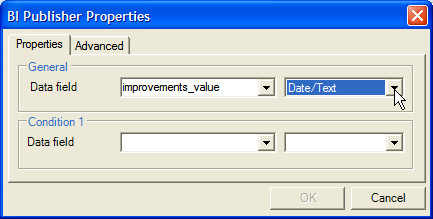
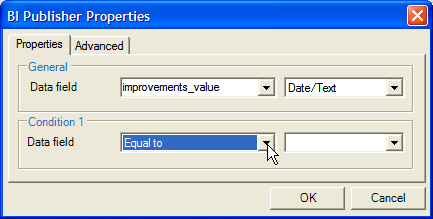
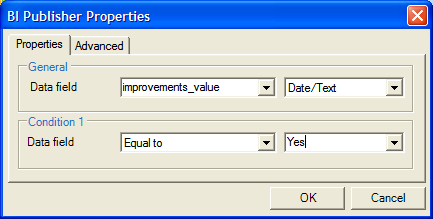
The Conditional Region dialog can be used when the condition is that an attribute EQUALS a value. It can also be used for greater/less than comparisons for number variables provided you select 'Number' from the drop-down list (see below).
To insert conditional text using the Conditional Region dialog:


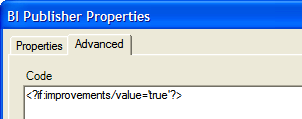
Alternatively, you can manually define your own conditional region by following the format described below.
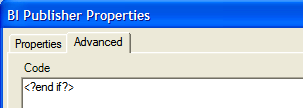
Simple conditions take the following format:
Multiple conditions take this format:
Note that the conditions in these elements use unformatted attribute values and need to follow a particular syntax (see examples BI Publisher code for Oracle Policy Modeling for more information).
To manually insert simple conditional text:


Further examples of conditional text, including ones with multiple conditions and conditional formatting, are given in BI Publisher code for Oracle Policy Modeling. The BI Publisher Users Guide also provides further information on conditional formatting.
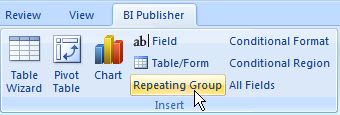
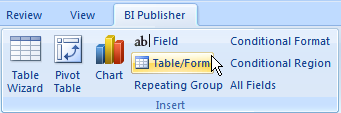
To insert entity-level attributes in your template, you can use the Repeating Group button on the BI Publisher menu:
See the Template Builder for Microsoft Word help file for more information on how to set up your entity attributes in this way.
Alternatively, you can add entity-level attribute values and properties by following the format described below.
Entity-level attribute values and properties can be added to template documents in the same way as global attribute values and properties, but the group needs to:
To insert an entity-level attribute:
Entity-level attributes can be displayed in several different ways.
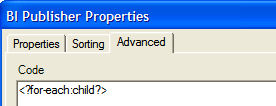
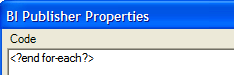
To have information grouped by entity, have the "for-each" field around the whole group of attribute values/properties in your template document. For example:
<?for-each:child?>
<?child_name_text?>
<?child_rating_overall_text?>
<?child_rating_overall/@question?> <?child_rating_overall_value?>
<?end for-each?>
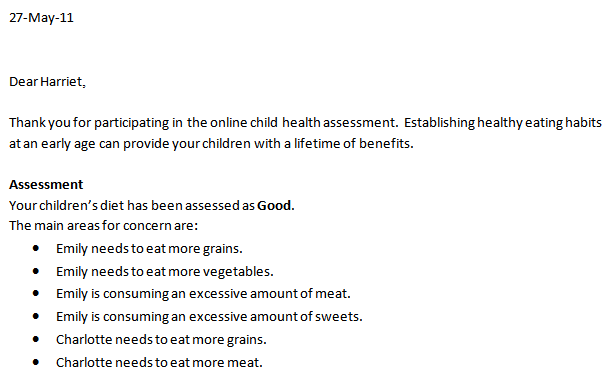
This would display as:

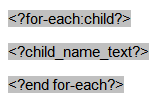
To have information grouped by attribute, have a "for-each" field around each individual attribute value/property in your template document. For instance:
<?for-each:child?> <?child_name_text?> <?end for-each?>
<?for-each:child?> <?child_rating_overall_text?> <?end for-each?>
<?for-each:child?> <?child_rating_overall/@question?> <?child_rating_overall_value?> <?end for-each?>
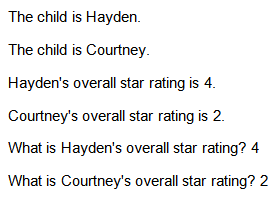
This would display as:
To display entity-level attributes in table form, the first cell in the row needs to start with the <?for-each:entity_id?> field, and the last cell in the same row needs to end with the <?end for-each?> field (with the entity-level attribute fields in between). For example, a table like this in your template document:

This would display as:

To display entity-level attributes in table form sorted alphabetically by entity name, follow the directions above but add an additional "sort" element to the opening "for-each" field:
<?sort:entity_name_id_value;'ascending';data-type='text'?>
For example,
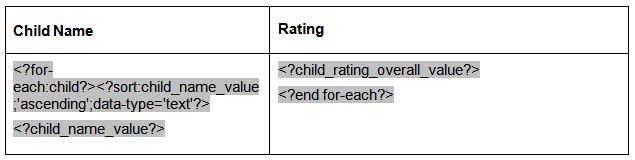
This would display as:

TIP: Sometimes having the full display text for the "for each" fields at the start and end of the rows can upset the formatting of your table. If so, replace the full display text with an abbreviation (eg "F" for the <?for-each:entity_id?> field, and "E" for the <?end for-each?> field ). See the Combined Form in the Social Services Screening rulebase that is installed with Oracle Policy Modeling for an example of this.
To have a table in your template you can either:
For more information on using the BI Publisher table formats, see the Template Builder for Microsoft Word help file.
To have a chart in your template you must create it using the Chart button on the BI Publisher menu (you can't use a native Microsoft Word chart).
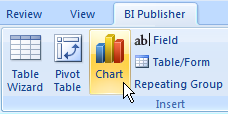
You then have the option of creating the chart yourself using the Builder, or, if you know the code for the chart that you want, adding the code directly to the Advanced tab.
For more information on inserting a chart using the chart builder, see the Template Builder for Microsoft Word help file.
An example of creating a pie chart by adding code to the Advanced tab is shown in the Raw Template Examples file in the Healthy Eating rulebase that is installed with Oracle Policy Modeling.
You can have a picture repeated in a document depending on the value of a particular attribute. To do this you need to specify BI Publisher code in the Format AutoShape | Alt Text field for the image in the template.
An example of displaying a number of star images to represent a child's diet rating is shown in the Raw Template Examples file in the Healthy Eating rulebase that is installed with Oracle Policy Modeling.
Using BI Publisher you can preview your RTF template using "real" data. To do this you generate some sample data, then load it into your template and then preview the output.
Sample data can be generated from an Oracle Web Determinations session. To do this:
NOTE: When the XML data is generated, every attribute with a public name regardless of whether it is known, unknown or uncertain is output. However, entity instances and change point values are only output if they actually exist in the session, so if you don’t have either of these you won’t see them in your sample XML.
After you have generated your sample data you need to load it into the BI Publisher Template Builder in Word.
After you have loaded your sample data you can preview the document in your choice of format.

If you are having problems with the display of any elements in your document, see the Troubleshooting guide for using BI Publisher with Oracle Policy Modeling.
See also: