Change how interview data is summarized and reviewed
Change how interview data is summarized and reviewed
The summary screen is the central task page for out-of-the-box Oracle Web Determinations applications. Essentially a simple list of labels, goals, document generation triggers and flows, the summary screen provides an interface to your rulebase and screens. The summary screen also provides access to additional session management tools, including session saving and clearing, data review screens, and decision reports for completed rulebase goals.
The data review screen in Oracle Web Determinations provides a list of all the questions answered during an interview. This allows the user to revisit any question in the interview.
Each project will normally have a single summary screen that appears at the start and at the end of the interview, and that can also be viewed during an interview.
Explain this further
At the start of an interview, the summary screen will typically:
provide an explanation of the purpose of the rulebase
allow the user to commence an interview of one or more rulebase goals
provide links to additional supporting documentation
At the end of an interview, the summary screen will typically:
display the outcome(s) of the assessment and provide links to the decision report for important goals and sub-goals
display any warning or message text
allow the user to generate documentation based on the information provided or inferred outcomes
allow the user to return to all or part of the interview
provide links to additional supporting documentation
At any point in the interview, returning to the summary screen will typically allow the user to:
review data already collected
clear the session and start again
save a copy of the assessment
close the assessment
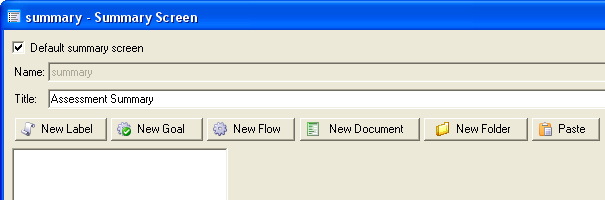
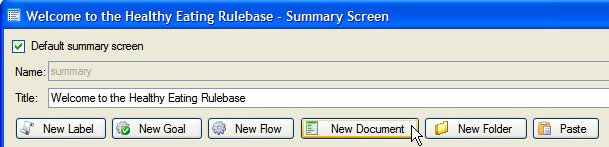
By default, the first screens file that is added to a project will contain an empty summary screen. If you need to manually add a new summary screen follow the steps below.
To create a new summary screen:
Right-click the *.xint filename, or another folder, in the screens view and select the NewSummary Screen menu option. The New Summary Screen dialog will be displayed:
For out-of-the-box Oracle Web Determinations users, you should only define a single summary screen for your project, and leave it named "summary", which is the default value for summary screens.
Click OK and save your screens file to keep the new screen.
You can add folders to your summary screen in Oracle Policy Modeling to sort your summary screen items into manageable units, and to allow summary screen items to be added for entities. You can also add visibility attributes to summary screen folders, to control the display of all elements within the folder. The folders themselves will not be displayed in Oracle Web Determinations – the summary screen will still be displayed as a flat list based on the order of all controls as if no folder structures existed. To add a new folder, click the New Folder button at the top of the summary screen dialog.
Add a label to the summary screen
Labels are used to provide headings, plain text and HTML paragraphs on the summary screen.
To add and edit a new label:
Open the summary screen editor dialog by double-clicking on the summary screen entry in the main list of screens for your screens file.
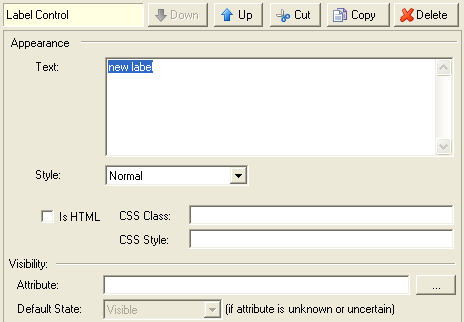
Click the New Label button at the top of the summary screen dialog. You can then edit the label control by selecting it in the list of summary screen items in the left hand pane. The details for the label control will appear on the right side of the screen edit dialog.
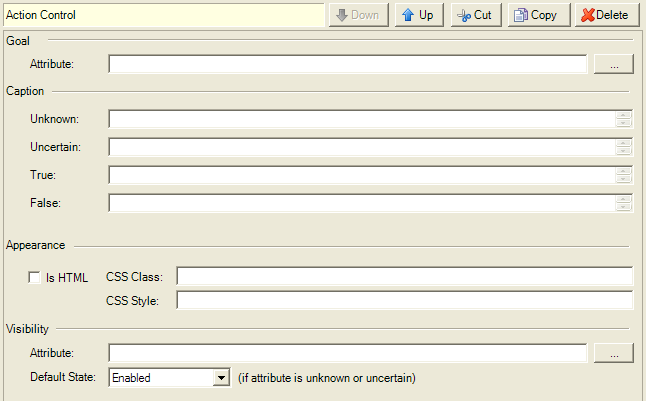
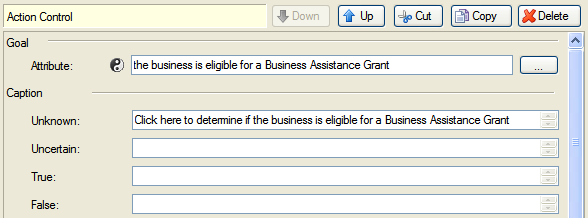
Goals are used to provide an entry point into an assessment or an entry point into a decision report. To add and edit a new goal:
Open the summary screen editor dialog by double-clicking on the summary screen entry in the main list of screens for your screens file.
Click the New Goal button at the top of the summary screen dialog. You can then edit the action control by selecting it in the list of summary screen items in the left hand pane. The details for the action control will appear on the right side of the screen edit dialog.
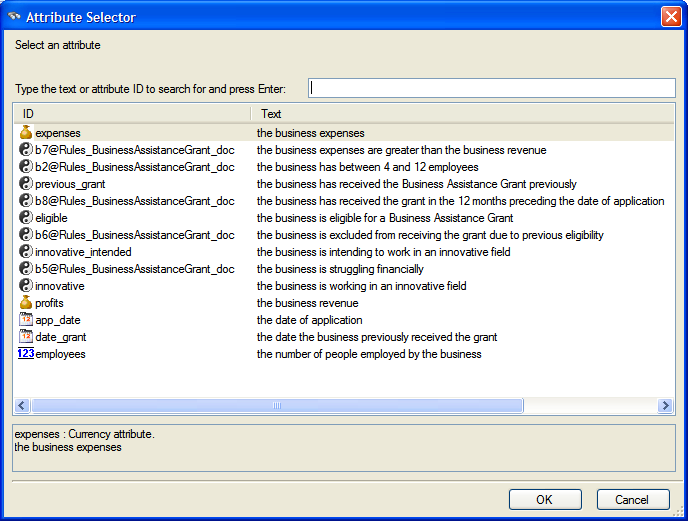
Click the browse button next to the Attribute text field. This will open the Attribute Selector dialog box.
Select the attribute you want as your goal attribute from the list of attributes. Click OK. In the Action Control pane, the attribute you selected now appears in the Attribute field.
Enter Captions to define the text that will be displayed when the goal attribute has uncertain, unknown, true and false values. (The Unknown caption text is defaulted for you based on the attribute name.)
Select the Is HTML checkbox if your label/control is HTML. See Change the appearance of text for more information on this setting.
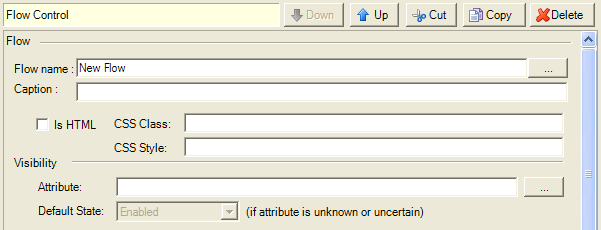
If an interview screen flow has been defined, it needs to be added to the summary screen so that it can be accessed in a Oracle Web Determinations investigation.
To add a screen flow to the summary screen:
Open your screens file and open your summary screen. Select the New Flow button at the top of the summary screen dialog. A Flow Control will be created.
Select the Browse button next to the Flow name text field and select your flow from the list of pre-existing flows in the Flow Browser dialog box. Click OK. In the Flow Control pane, the attribute you selected now appears in the Flow name field.
Modify the Caption if necessary. (By default this is set to the flow name.) This is the text that will appear for the link to the flow on the summary screen.
Select the Is HTML checkbox if your label/control is HTML. See Change the appearance of text for more information on this setting.
Labels, goals and screen flows can also be added to the summary screen that operate within an entity. To do this, entity-level items must be grouped within a summary screen folder which is associated with the entity.
To create a summary screen folder and associate it with an entity:
Open the summary screen editor dialog by double-clicking on the summary screen entry in the main list of screens for your screens file.
Click New Folder and give the new folder an appropriate name.
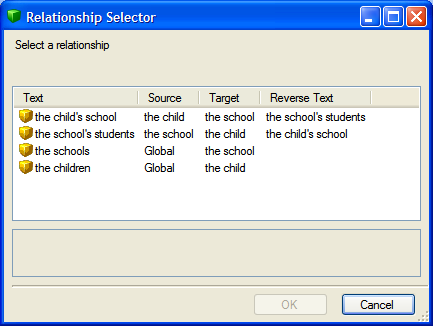
In the Summary Screen Folder properties window, click on the Browse button to the right of Relationship.
In the Relationship Selector, select the relationship in which the entity-level items will function on the summary screen (most often this will be the entity's containment relationship, but it need not be), and click OK. Note that the source entity for the selected relationship must be at the same entity level that the new summary screen folder is in. For instance, in our example the source entity for the relationship is the global entity, which is the same entity level as the base level of the summary screen, in which the new Children folder has been added.
The summary screen folder is now associated with the target entity for the relationship, and labels, goals or screen flows which operate at the level of that entity may now be added within the folder. Oracle Policy Modeling will now expect all goals or screen flows added within this folder to be within the entity, however labels may use text substitution using attribute values from the entity's parents (eg the source entity of the relationship you selected).
Note that summary screen folders with relationships may be nested, if this structure is reflected in the relevant entity relationships.
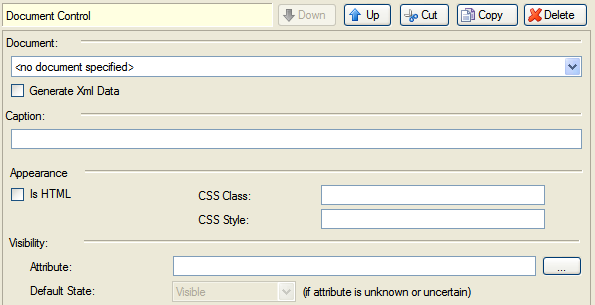
Add a document link to the summary screen
A document link needs to be added to the summary screen to allow the user to generate and view an interview document. (To do this you need to have already created the interview document that you want to link to. For more information on this, see Create, update or delete an interview document.)
To add and edit a document link:
Open the summary screen editor dialog by double-clicking on the summary screen entry in the main list of screens for your screens file.
Click the New Document button at the top of the summary screen dialog.
Select the document control in the list of summary screen items in the left hand pane. The details for the document control will appear on the right side of the screen edit dialog.
Select the document you want to link to from the Document drop down list. (This list contains all of the documents in the DocGen folder in the Screens file.)
Specify a Caption for the document control. This is the text which will be displayed on the summary screen as a link for the generated document.
Click OK.
Additional settings
In the Document Control window there are additional settings that you can specify for your document:
Setting
Description
Generate Xml Data
When checked, clicking the document link on the summary screen will generate a raw XML representation of the session that can be saved. This is useful not just for debugging purposes, but for importing into the BI Publisher tool in Word as sample data.
Is HTML
When selected, indicates that the caption contains HTML tags. These are used to change the appearance of the document link on the summary screen. See Change the appearance of text for more information on this setting.
CSS Class and CSS Style
Using these settings, the appearance of the document link can be customized using Cascading Style Sheet (CSS) classes and styles. See Change the appearance of a control for more information.
Change the order of screens on the data review screen
The data review screen is the screen that is displayed when you click the "Data Review" link in Oracle Web Determinations. The order that the screens are listed on the data review screen in Web Determinations is determined by the order of screens defined in the screen order in the screens file (regardless of whether a screen order or screen flow is being used to drive the interview).
So to change the order of screens on the data review screen:
First check that you have a screen order defined in your screens file. By default, the first screens file that is added to a project will contain a default screen order (labeled Data Review in the screens view). This screen order is automatically defined as being the order of the screens in the Question Screens folder. If you don't have a screen order defined, Oracle Web Determinations will simply display the screens in a randomly ordered list which can make it difficult to find the attribute/screen you are interested in from the data review screen. See Create a new screen order for more information.