Getting Started with JavaFX Scene Builder 1.1
7 Add the Toolbar
This chapter gives the steps to add a JavaFX Tool Bar UI control to the IssueTrackingLite application UI layout that you are building with JavaFX Scene Builder.
Use the following steps to add a toolbar to the top portion of the UI layout. It will contain an image file and three buttons.
-
In the Hierarchy panel, change the display setting by clicking the menu button on the top right corner and choosing Show Info, if it is not already chosen.
-
Select the row for the SplitPane (Horizontal Flow) element. You might have to resize the Hierarchy panel to see the full node ID of the Split Pane element.
-
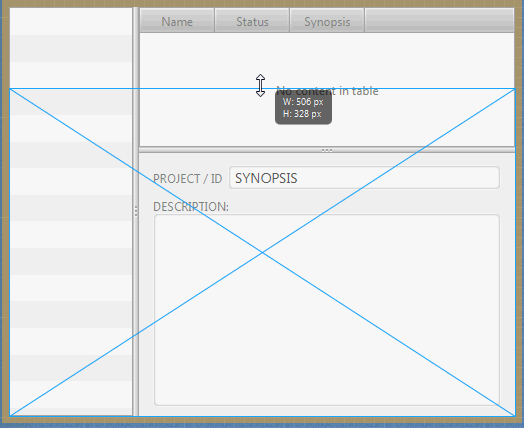
In the Content panel, grab the top middle handle of the split pane and drag it down to make room for a toolbar above the Content panel, as illustrated by Figure 7-1.
-
From the Menu bar, choose File, Import, and then Media. Select IssueTrackingLite.png from the folder <install-dir>/IssueTrackingLite/src/issuetrackinglite
-
Move the image to the top left corner of the toolbar area. Increase the height of the toolbar area if it is too small for the image being inserted.
-
Add three buttons to the toolbar.
-
From the Library panel, drag a Button element and drop it on the right side of the toolbar.
-
From the Menu bar, choose Edit and then Duplicate twice to add two more new buttons to the toolbar.
-
-
Select all three button controls by holding down the left mouse button and dragging a marquee over the buttons, as shown in Figure 7-2. When you release the left mouse button, all three buttons should be selected.
Figure 7-2 Marquee Selection of the Three Buttons

Description of "Figure 7-2 Marquee Selection of the Three Buttons"
-
From the Menu bar, choose Arrange, Wrap in, and then HBox. The buttons are arranged in a row with even spacing between them. Move the HBox so that it's right edge is closer to the right side of the Toolbar.
-
Define the values for the anchorLayout and spacing for the buttons.
-
In the Hierarchy panel, select the row for the HBox that was just added.
-
Click the Layout section of the Inspector panel and in the AnchorPane Constraints subsection, click the top and right dashed anchor lines.
-
Click the Layout section of the Inspector panel and in the Spacing text field, enter
15to replace the default value of5. Notice that the spacing between the buttons is increased.
-
-
Edit the button details.
-
Select the button on the right side of the toolbar. Click the Code section of the Inspector panel, and select deleteIssue from the fx:id property's drop-down list. In the Properties section of the Inspector panel, enter
Deletein the Text field. -
Double-click the middle button to get into edit mode. Enter
Savein the edit box. Click the Code section of the Inspector panel, and select saveIssue in the drop-down list for the fx:id property for the middle button. -
In the toolbar, double-click the leftmost button to get into edit mode and enter
New. Click the Code section of the Inspector panel, select newIssue in the drop-down list for the fx:id property for the New button.
-
-
Bind each button to an event handler that will perform an action when the button is clicked.
-
Select the New button. Click the Code section of the Inspector panel.
-
In the On Action field, select
#newIssueFiredfrom the drop-down list of event handlers available in the controller source file. The leading # symbol tells your application to look for thenewIssueFiredmethod in the controller source code. The method used must be public, return void, and takeActionEventas parameter. Each time the New button is clicked, the public methodnewIssueFired(ActionEvent):void, which is defined in the controller source code, will be executed. -
Select the Save button and in the On Action field, set the value to
#saveIssueFired. -
Select the
Deletebutton and in the On Action field, set the value to#deleteIssueFired.
-
-
Choose File and then Save from the Menu bar to save your work.
 Cindy is a technical writer in the JavaFX group.
She has written tutorials, online help, and technical articles for Java and JavaFX technologies.
  Yves is a member of the JavaFX Scene Builder development team. He enjoys creating tutorials to help users quickly learn and adopt developer tools, such as the JavaFX Scene Builder.

