Getting Started with JavaFX Scene Builder 1.1
9 Compile and Run the Application
This chapter steps you through using NetBeans IDE or the Apache Ant utility to compile and run the IssueTrackingLite application for which you build the FXML layout using JavaFX Scene Builder.
Use either of the sections below to see the IssueTrackingLite application in action.
Use NetBeans IDE
Use NetBeans IDE to build and run the NetBeans project in which you saved the IssueTracking.fxml file.
-
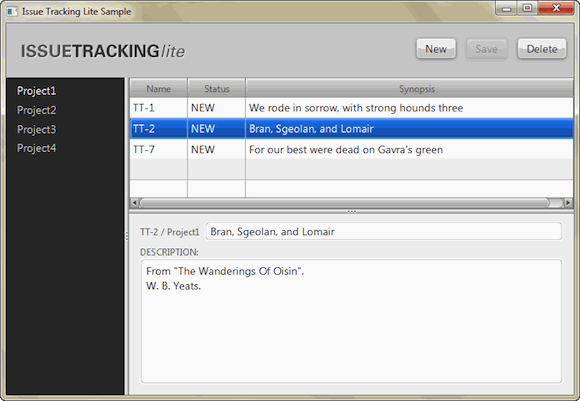
In the NetBeans IDE 7.4 window, right-click the IssueTrackingLite project node in the Projects window and select Run. NetBeans IDE compiles the project and if no errors are encountered, it displays an application similar to Figure 9-1. Click the image to enlarge it.
Figure 9-1 Completed UI for Issue Tracking Sample (Click image to enlarge.)

Description of "Figure 9-1 Completed UI for Issue Tracking Sample"
-
In the list view on the left, select Project1 and in the table view on the right, select the row with the TT-2 in the Name column. Data is displayed in the details section, as shown in Figure 9-1.
-
If you encounter any errors, look at the Output window and determine the possible causes of the errors. Some troubleshooting ideas are as follows:
-
Check that all of the fx:id values were entered correctly. The fx:id values in the FXML layout must match the values that the controller source classes expect.
-
Check that you entered the method name correctly in the Event binding section.
-
On the Mac OS X platform, check that you have properly configured a JavaFX 2.2.x enabled platform in your NetBeans IDE installation. At the present, the JavaFX-enabled platform is not automatically created for you on the Mac OS X platform.
-
Use the Apache Ant Utility
If you choose not to run the application in NetBeans IDE, use the Apache Ant utility (version 1.8 or later) to build and run the application on the command line. Enter a command similar to the one in Example 9-1. Note that the examples shown use JDK 7.
Example 9-1 Apache Ant Command to Run the Application
ant -Dplatforms.Default_JavaFX_Platform.home=<JAVA_HOME>
    -f <JavaFX_App_Name>/build.xml
    <TARGET>
In the above example, the main values for <TARGET> are clean, jar, and run. For example, to run the IssueTrackingLite application on the Windows platform, enter something similar to the command in Example 9-2. You can set <TARGET> with the value of -projecthelp to get a list of available targets.
Example 9-2 Using Apache Ant to Run IssueTrackingLite on a Windows Platform
ant -Dplatforms.Default_JavaFX_Platform.home="C:\Program Files\Java\jdk1.7.0_40" \
    -f IssueTrackingLite/build.xml run
To run the IssueTrackingLite application on a Mac OS X platform with Java SE 7 update 40 software installed, type the command shown in Example 9-3.
 Cindy is a technical writer in the JavaFX group.
She has written tutorials, online help, and technical articles for Java and JavaFX technologies.
  Yves is a member of the JavaFX Scene Builder development team. He enjoys creating tutorials to help users quickly learn and adopt developer tools, such as the JavaFX Scene Builder.