13 Managing Calendar Events
This chapter describes how to configure and manage events to expose personal Microsoft Exchange calendars in WebCenter Portal.
Always use Fusion Middleware Control or the WLST command-line tool to review and configure back-end services for WebCenter Portal and Portal Framework applications. Any configuration changes that you make, post deployment, are stored in the MDS metatdata store as customizations. See Section 1.3.5, "Oracle WebCenter Portal Configuration Considerations."
Note:
Configuration changes for events, through Fusion Middleware Control or using WLST, are not dynamic, so you must restart the managed server on which WebCenter Portal or your Portal Framework application is deployed for your changes to take effect. See Section 7.2, "Starting and Stopping Managed Servers for WebCenter Portal Application Deployments."This chapter includes the following topics:
Permissions:
To perform the tasks in this chapter, you must be granted the WebLogic ServerAdmin role through the Oracle WebLogic Server Administration Console and the Administrator role in the deployed application:
-
WebCenter Portal:
Administratorrole granted through Portal Builder Administration. -
Portal Framework application:
Administratorrole granted through the Administration Console.
For more information about roles and permissions, see Section 1.8, "Understanding Administrative Operations, Roles, and Tools."
13.1 About Events Connections
In WebCenter Portal, events provides portal calendars that you can use to schedule meetings, appointments, and any other type of team, project, or group occasion. Events also enables you to access your personal Microsoft Exchange calendar, where you can schedule events that are not related to a particular portal.
In Portal Framework applications, events provides access to the personal Microsoft Exchange calendars only.
Personal calendars are available through a Microsoft Exchange Server; therefore, a connection to that server is required. You can register the Microsoft Exchange Server connection through the Fusion Middleware Control Console or using WLST.
You must mark a connection as active for events to work. You can register additional Microsoft Exchange Server connections, but only one connection is active at a time.
To view personal events in WebCenter Portal, users must have an account on the Microsoft Exchange Server.
13.2 Configuration Roadmaps for Personal Events
Use the roadmaps in this section as a guide through the configuration process for providing access to personal events:
-
Roadmap - Configuring Personal Events for WebCenter Portal
The flow chart (Figure 13-1) and table (Table 13-1) in this section provide an overview of the prerequisites and tasks required for personal events to work in WebCenter Portal.
Figure 13-1 Configuring Personal Events for WebCenter Portal
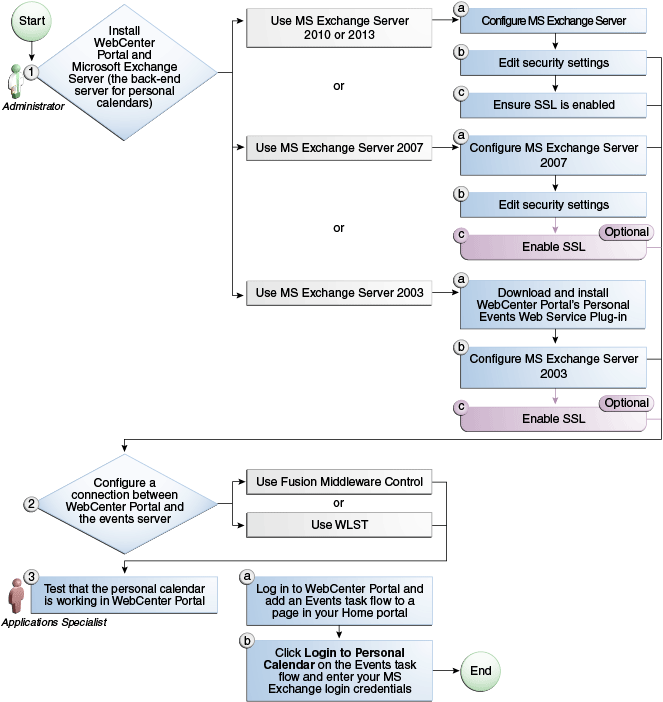
Description of ''Figure 13-1 Configuring Personal Events for WebCenter Portal''
Table 13-1 Configuring the Personal Events for WebCenter Portal
Actor Task Sub-task Notes Administrator
1. Install WebCenter Portal and Microsoft Exchange Server
MS Exchange Server is the back-end component for personal calendars
-
Install Microsoft Exchange Server 2013 (see Microsoft Exchange Server 2013 - Installation)
1.a Configure MS Exchange Server 2013 (see Microsoft Exchange Server 2013 - Configuration)
1.b Edit security settings (see Microsoft Exchange Server 2013 - Security Considerations)
1.c Ensure SSL is enabled (see Microsoft Exchange Server 2013 - Security Considerations)
-
Install Microsoft Exchange Server 2010 (see Microsoft Exchange Server 2010 - Installation)
1.a Configure MS Exchange Server 2010 (see Microsoft Exchange Server 2010 - Configuration)
1.b Edit security settings (see Microsoft Exchange Server 2010 - Security Considerations)
1.c Ensure SSL is enabled (see Microsoft Exchange Server 2010 - Security Considerations)
-
Install Microsoft Exchange Server 2007 (see Microsoft Exchange Server 2007 - Installation)
1.a Configure MS Exchange Server 2007 (see Microsoft Exchange Server 2007 - Configuration)
1.b Edit security settings (see Microsoft Exchange Server 2007 - Security Considerations)
1.c (Optional) Enable SSL (see Microsoft Exchange Server 2007 - Security Considerations)
-
Install Microsoft Exchange Server 2003 (see Microsoft Exchange Server 2003 - Installation)
1.a Download and install WebCenter Portal's Personal Events Web Service Plug-in (see Microsoft Exchange Server 2003 - Configuration)
1.b Configure MS Exchange Server 2003 (see Microsoft Exchange Server 2003 - Configuration)
1.c (Optional) Enable SSL (see Microsoft Exchange Server 2003 - Security Considerations)
2. Configure a connection between the application and the events server using one of the following tools:
-
Fusion Middleware Control (see Registering Events Servers Using Fusion Middleware Control)
-
WLST (see Registering Event Servers Using WLST)
End User
3. Test that the personal calendar is working in WebCenter Portal
3.a Log in to WebCenter Portal and add an Events task flow to a page in your Home portal
-
-
Roadmap - Configuring Personal Events for Portal Framework applications
The flow chart (Figure 13-2) and table (Table 13-2) in this section provide an overview of the prerequisites and tasks required to get personal events working in Portal Framework applications.
Figure 13-2 Configuring Personal Events for Portal Framework Applications
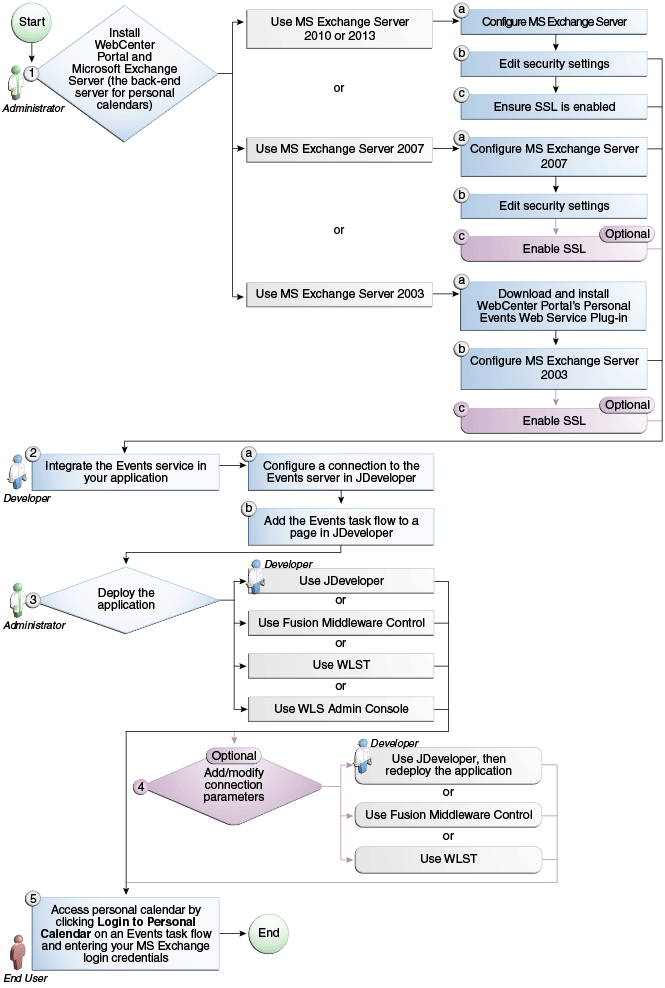
Description of ''Figure 13-2 Configuring Personal Events for Portal Framework Applications''
Table 13-2 Configuring Personal Events for Portal Framework Applications
Actor Task Sub-task Notes Administrator
1. Install WebCenter Portal and Microsoft Exchange Server
MS Exchange Server is the back-end component for personal calendars
Install Microsoft Exchange Server 2013 (see Microsoft Exchange Server 2013 - Installation)
1.a Configure MS Exchange Server 2013 (see Microsoft Exchange Server 2013 - Configuration)
1.b Edit security settings (see Microsoft Exchange Server 2013 - Security Considerations)
1.c Ensure SSL is enabled (see Microsoft Exchange Server 2013 - Security Considerations)
Install Microsoft Exchange Server 2010 (see Microsoft Exchange Server 2010 - Installation)
1.a Configure MS Exchange Server 2010 (see Microsoft Exchange Server 2010 - Configuration)
1.b Edit security settings (see Microsoft Exchange Server 2010 - Security Considerations)
1.c Ensure SSL is enabled (see Microsoft Exchange Server 2010 - Security Considerations)
Install Microsoft Exchange Server 2007 (see Microsoft Exchange Server 2007 - Installation)
1.a Configure MS Exchange Server 2007 (see Microsoft Exchange Server 2007 - Configuration)
1.b Edit security settings (see Microsoft Exchange Server 2007 - Security Considerations)
1.c (Optional) Enable SSL (see Microsoft Exchange Server 2007 - Security Considerations)
Install MS Exchange Server 2003 (see Microsoft Exchange Server 2003 - Installation)
1.a Download and install WebCenter Portal's Personal Events Web Service Plug-in (see Microsoft Exchange Server 2003 - Configuration)
1.b Configure MS Exchange Server 2003 (see Microsoft Exchange Server 2003 - Configuration)
1.c (Optional) Enable SSL (see Microsoft Exchange Server 2003 - Security Considerations)
Developer
2. Integrate Events in your application
2.a Configure a connection to the events server in JDeveloper
Developer/
Administrator
3. Deploy the application using one of the following tools:
-
JDeveloper (Developer)
-
Fusion Middleware Control (Administrator)
-
WLST (Administrator)
-
WLS Admin Console (Administrator)
Developer/
Administrator
4. Add/modify connection parameters using one of the following tools:
-
JDeveloper, then redeploy the application (Developer)
-
Fusion Middleware Control (Administrator)
-
WLST (Administrator)
End User
-
13.3 Events Prerequisites for Personal Events
This section includes the following subsections:
-
Section 13.3.1, "Microsoft Exchange Server 2013 Prerequisites"
-
Section 13.3.2, "Microsoft Exchange Server 2010 Prerequisites"
-
Section 13.3.3, "Microsoft Exchange Server 2007 Prerequisites"
-
Section 13.3.4, "Microsoft Exchange Server 2003 Prerequisites"
13.3.1 Microsoft Exchange Server 2013 Prerequisites
This section describes the Microsoft Exchange Server 2013 prerequisites when used as the server for personal events.
This section includes the following subsections:
-
Section 13.3.1.1, "Microsoft Exchange Server 2013 - Installation"
-
Section 13.3.1.2, "Microsoft Exchange Server 2013 - Configuration"
-
Section 13.3.1.3, "Microsoft Exchange Server 2013 - Security Considerations"
-
Section 13.3.1.4, "Microsoft Exchange Server 2013 - Limitations"
13.3.1.1 Microsoft Exchange Server 2013 - Installation
Refer to the Microsoft Exchange Server 2013 documentation for installation information.
13.3.1.2 Microsoft Exchange Server 2013 - Configuration
To use Microsoft Exchange Server 2013 as the server for personal events, you must edit the Microsoft Exchange Server 2013 web service WSDL to specify the location of the web service.
To specify the location of the Microsoft Exchange Server 2013 web service:
-
Open the WSDL file for the Microsoft Exchange Server web service.
For example:
C:\Program Files\Microsoft\Exchange Server\ClientAccess\exchweb\ews\Services.wsdl
-
Add a
servicesection that points to your Microsoft Exchange Server web service.For example:
<wsdl:definitions>
...
  <wsdl:service name="ExchangeServices">
    <wsdl:port name="ExchangeServicePort" binding="tns:ExchangeServiceBinding">
      <soap:address location="https://server.example.com/EWS/Exchange.asmx"/>
    </wsdl:port>
  </wsdl:service>
</wsdl:definitions>
13.3.1.3 Microsoft Exchange Server 2013 - Security Considerations
Events includes a Microsoft Exchange Server 2013 adapter that communicates with the Microsoft Exchange Server 2013 generic web service through a JAX-WS proxy. To set up the communication between the adapter and the web service, you must edit the Microsoft Exchange Server security settings. You must enable Basic authentication. Further, you must enable anonymous access to Services.wsdl, Messages.xsd, and Types.xsd so that JAX-WS can access them to create the service port before committing any web service call. This involves creating a virtual directory and enabling anonymous authentication and disabling Windows authentication.
To edit Microsoft Exchange Server security settings:
-
On Microsoft Exchange Server, open Internet Information Services (IIS) Manager.
-
Under Node computer_name > Sites > Default Web Site > EWS, double-click Authentication under IIS.
-
Right-click Basic Authentication and select Enable to enable Basic Authentication for the EWS application.
-
Under Sites, right-click Default Web Site and select Add Virtual Directory to create a virtual directory that will be used to provide anonymous access to
Services.wsdl,Messages.xsd, andTypes.xsd. -
In the Add Virtual Directory dialog, in the Alias field, specify the name of the virtual directory, for example
ExchWS. -
In the Physical Path field, specify the path to the virtual directory. For example (Figure 13-5):
C:\Program Files\Microsoft\Exchange Server\V14\ClientAccess\exchweb\ewsFigure 13-3 Creating a Virtual Directory
Description of ''Figure 13-3 Creating a Virtual Directory''
-
Click Connect as.
-
In the Connect As dialog, ensure Application user (pass-thorough authentication) is selected.
-
Click OK.
-
Under Default Web Site > ExchWS, double-click Authentication under IIS.
-
Right-click Anonymous Authentication and select Enable (Figure 13-6).
Figure 13-4 Enabling Anonymous Authentication
Description of ''Figure 13-4 Enabling Anonymous Authentication''
-
Right-click Anonymous Authentication and select Edit.
-
In the Edit Anonymous Authentication Credentials dialog, ensure Application pool identity is selected.
-
Right-click Windows Authentication and select Disable.
Events uses Basic Authentication to communicate with the Microsoft Exchange Server. To secure the communication, ensure that SSL is enabled. For more information, see:
You must also ensure that the SSLAlwaysNegoClientCert property is set to true in IIS. The SSLAlwaysNegoClientCert property controls SSL client connection negotiations.
For example, use the following command to set the SSLAlwaysNegoClientCert property:
CScript.exe adsutil.vbs SET w3svc/1/SSLAlwaysNegoClientCert true
For more information about the SSLAlwaysNegoClientCert property, see:
For information about setting the SSLAlwaysNegoClientCert property, see:
13.3.1.4 Microsoft Exchange Server 2013 - Limitations
There are currently no known limitations.
13.3.2 Microsoft Exchange Server 2010 Prerequisites
This section describes the Microsoft Exchange Server 2010 prerequisites when used as the server for personal events.
This section includes the following subsections:
-
Section 13.3.2.1, "Microsoft Exchange Server 2010 - Installation"
-
Section 13.3.2.2, "Microsoft Exchange Server 2010 - Configuration"
-
Section 13.3.2.3, "Microsoft Exchange Server 2010 - Security Considerations"
-
Section 13.3.2.4, "Microsoft Exchange Server 2010 - Limitations"
13.3.2.1 Microsoft Exchange Server 2010 - Installation
Refer to the Microsoft Exchange Server 2010 documentation for installation information.
13.3.2.2 Microsoft Exchange Server 2010 - Configuration
To use Microsoft Exchange Server 2010 as the server for personal events, you must edit the Microsoft Exchange Server 2010 web service WSDL to specify the location of the web service.
To specify the location of the Microsoft Exchange Server 2010 web service:
-
Open the WSDL file for the Microsoft Exchange Server web service.
For example:
C:\Program Files\Microsoft\Exchange Server\ClientAccess\exchweb\ews\Services.wsdl
-
Add a
servicesection that points to your Microsoft Exchange Server web service.For example:
<wsdl:definitions>
...
  <wsdl:service name="ExchangeServices">
    <wsdl:port name="ExchangeServicePort" binding="tns:ExchangeServiceBinding">
      <soap:address location="https://server.example.com/EWS/Exchange.asmx"/>
    </wsdl:port>
  </wsdl:service>
</wsdl:definitions>
13.3.2.3 Microsoft Exchange Server 2010 - Security Considerations
Events includes a Microsoft Exchange Server 2010 adapter that communicates with the Microsoft Exchange Server 2010 generic web service through a JAX-WS proxy. To set up the communication between the adapter and the web service, you must edit the Microsoft Exchange Server security settings. You must enable Basic authentication. Further, you must enable anonymous access to Services.wsdl, Messages.xsd, and Types.xsd so that JAX-WS can access them to create the service port before committing any web service call. This involves creating a virtual directory and enabling anonymous authentication and disabling Windows authentication.
To edit Microsoft Exchange Server security settings:
-
On Microsoft Exchange Server, open Internet Information Services (IIS) Manager.
-
Under Node computer_name > Sites >Default Web Site > EWS, double-click Authentication under IIS.
-
Right-click Basic Authentication and select Enable to enable Basic Authentication for the EWS application.
-
Under Sites, right-click Default Web Site and select Add Virtual Directory to create a virtual directory that will be used to provide anonymous access to
Services.wsdl,Messages.xsd, andTypes.xsd. -
In the Add Virtual Directory dialog, in the Alias field, specify the name of the virtual directory, for example
ExchWS. -
In the Physical Path field, specify the path to the virtual directory. For example (Figure 13-5):
C:\Program Files\Microsoft\Exchange Server\V14\ClientAccess\exchweb\ewsFigure 13-5 Creating a Virtual Directory
Description of ''Figure 13-5 Creating a Virtual Directory''
-
Click Connect as.
-
In the Connect As dialog, ensure Application user (pass-thorough authentication) is selected.
-
Click OK.
-
Under Default Web Site > ExchWS, double-click Authentication under IIS.
-
Right-click Anonymous Authentication and select Enable (Figure 13-6).
Figure 13-6 Enabling Anonymous Authentication
Description of ''Figure 13-6 Enabling Anonymous Authentication''
-
Right-click Anonymous Authentication and select Edit.
-
In the Edit Anonymous Authentication Credentials dialog, ensure Application pool identity is selected.
-
Right-click Windows Authentication and select Disable.
Events uses Basic Authentication to communicate with the Microsoft Exchange Server. To secure the communication, you must enable SSL. For more information, see:
You must also ensure that the SSLAlwaysNegoClientCert property is set to true in IIS. The SSLAlwaysNegoClientCert property controls SSL client connection negotiations.
For example, use the following command to set the SSLAlwaysNegoClientCert property:
CScript.exe adsutil.vbs SET w3svc/1/SSLAlwaysNegoClientCert true
For more information about the SSLAlwaysNegoClientCert property, see:
For information about setting the SSLAlwaysNegoClientCert property, see:
13.3.2.4 Microsoft Exchange Server 2010 - Limitations
There are currently no known limitations.
13.3.3 Microsoft Exchange Server 2007 Prerequisites
This section describes the Microsoft Exchange Server 2007 prerequisites when used as the server for personal events.
This section includes the following subsections:
-
Section 13.3.3.1, "Microsoft Exchange Server 2007 - Installation"
-
Section 13.3.3.2, "Microsoft Exchange Server 2007 - Configuration"
-
Section 13.3.3.3, "Microsoft Exchange Server 2007 - Security Considerations"
-
Section 13.3.3.4, "Microsoft Exchange Server 2007 - Limitations"
13.3.3.1 Microsoft Exchange Server 2007 - Installation
Refer to the Microsoft Exchange Server 2007 documentation for installation information.
13.3.3.2 Microsoft Exchange Server 2007 - Configuration
To use Microsoft Exchange Server 2007 as the server for personal events, you must edit the Microsoft Exchange Server 2007 web service WSDL to specify the location of the web service.
To specify the location of the Microsoft Exchange Server 2007 web service:
-
Open the WSDL file for the Microsoft Exchange Server web service.
For example:
C:\Program Files\Microsoft\Exchange Server\ClientAccess\exchweb\ews\Services.wsdl
-
Add a
servicesection that points to your Microsoft Exchange Server web service.For example:
<wsdl:definitions>
...
  <wsdl:service name="ExchangeServices">
    <wsdl:port name="ExchangeServicePort" binding="tns:ExchangeServiceBinding">
      <soap:address location="https://server.example.com/EWS/Exchange.asmx"/>
    </wsdl:port>
  </wsdl:service>
</wsdl:definitions>
13.3.3.3 Microsoft Exchange Server 2007 - Security Considerations
Events includes a Microsoft Exchange Server 2007 adapter that communicates with the Microsoft Exchange Server 2007 generic web service through a JAX-WS proxy. To set up the communication between the adapter and the web service, you must edit the Microsoft Exchange Server security settings.
To edit security settings:
-
On the Microsoft Exchange Server, open Internet Information Services (IIS) Manager.
-
Under Node computer_name > Web Sites >Default Web Site > EWS, click Properties.
-
On the Directory Security tab, in the Authentication and access control, click Edit.
-
Select Basic authentication.
-
Click OK.
You must enable anonymous access to
Services.wsdl,Messages.vsd, andTypes.vsdso that JAX-WS can access them to create the service port before committing any web service call. -
Right-click Services.wsdl and select Edit.
-
On the File Security tab, in the Authentication and access control, click Edit.
-
Select Enable anonymous access.
-
Click OK.
-
Repeat steps 6 through 9 for Messages.xsd and Types.xsd.
Events uses Basic Authentication to communicate with the Microsoft Exchange Server. To secure the communication, ensure that SSL is enabled. For more information, see:
You must also ensure that the SSLAlwaysNegoClientCert property is set to true in IIS. The SSLAlwaysNegoClientCert property controls SSL client connection negotiations.
For example, use the following command to set the SSLAlwaysNegoClientCert property:
CScript.exe adsutil.vbs SET w3svc/1/SSLAlwaysNegoClientCert true
For more information about the SSLAlwaysNegoClientCert property, see:
For information about setting the SSLAlwaysNegoClientCert property, see:
13.3.3.4 Microsoft Exchange Server 2007 - Limitations
There are currently no known limitations.
13.3.4 Microsoft Exchange Server 2003 Prerequisites
This section describes the Microsoft Exchange Server 2003 prerequisites when used as the server for personal events.
This section includes the following subsections:
-
Section 13.3.4.1, "Microsoft Exchange Server 2003 - Installation"
-
Section 13.3.4.2, "Microsoft Exchange Server 2003 - Configuration"
-
Section 13.3.4.3, "Microsoft Exchange Server 2003 - Security Considerations"
-
Section 13.3.4.4, "Microsoft Exchange Server 2003 - Limitations"
13.3.4.1 Microsoft Exchange Server 2003 - Installation
Refer to the Microsoft Exchange Server 2003 documentation for installation information.
13.3.4.2 Microsoft Exchange Server 2003 - Configuration
Microsoft Exchange Server 2003 does not provide a web service, so to use Microsoft Exchange Server 2003 as the server for events, you must install WebCenter Portal's Personal Events Web Service Plug-in on the IIS computer. The plug-in is available on the Oracle Fusion Middleware companion CD.
To install the Personal Events Web Service Plug-in:
-
Extract the contents of
ExchangeWebService.zipto a folder within the Internet Information Services (IIS) server.You can find the ZIP file in the following directory on the Oracle Fusion Middleware companion CD:
/Disk1/WebCenter/services/cal/NT/ExchangeWebService.zip
Note:
Make sure that the folder where you extract the file has the proper Read privileges. If necessary add Server Operators with additional Modify and Write privileges and Authenticated Users. -
Open IIS Manager.
-
Under server_name > Web Sites > Default Web Site, create a new virtual directory called
ExchangeWS(as the Alias). -
Point the new virtual directory to the folder to which you extracted the ZIP file.
-
Make sure the folder has Read and Run Scripts privileges.
-
Right-click the new virtual directory and choose Properties.
-
On the Virtual Directory tab, under Application settings, from the Execute permissions dropdown list, select Scripts and Executables.
-
Click Apply.
-
On the ASP.NET tab, ensure that the ASP.NET version is 2.0.XXXXX.
Note:
If ASP.NET is not available by default, then install the .NET 2.0 Framework from Microsoft. -
Click Edit Configuration.
-
In the ASP .NET Configuration Settings dialog, make sure the ExchangeServerURL has the correct value.
For example:
http://localhost:port/Exchange/User/calendar
Tip:
The ExchangeServerURL is case-sensitive.Change the port, if necessary, to reflect the IIS port number. By default, this is 80.
-
Apply the changes and close the dialog.
-
Create a folder called
C:\WSErrorLogs. -
Test the web service from the IIS server and the WebCenter Portal server by accessing the following URL in your browser:
http://host:port/ExchangeWS/PersonalEventsWebService.asmx
13.3.4.3 Microsoft Exchange Server 2003 - Security Considerations
Events uses Basic Authentication to communicate with the Microsoft Exchange Server. To secure the communication, you should enable SSL. For more information, see:
13.3.4.4 Microsoft Exchange Server 2003 - Limitations
There are currently no known limitations.
13.4 Registering Events Servers
You can register multiple events servers for WebCenter Portal, but only one is active at a single time.
To start using a new (active) connection you must restart the managed server on which the application is deployed.
This section includes the following subsections:
13.4.1 Registering Events Servers Using Fusion Middleware Control
To register an events server:
-
Log in to Fusion Middleware Control and navigate to the home page for WebCenter Portal.
For more information, see:
-
Do one of the following:
-
For WebCenter Portal - From the WebCenter Portal menu, select Settings > Service Configuration.
-
For Portal Framework applications - From the Application Deployment menu, select WebCenter Portal > Service Configuration.
-
-
On the WebCenter Portal Service Configuration page, select Personal Events.
-
To connect to a new events server instance, click Add.
The Add Personal Events Connection page appears (Figure 13-7).
Figure 13-7 Configuring Events Connections
Description of ''Figure 13-7 Configuring Events Connections''
-
Enter a unique name for this connection, specify the version of Microsoft Exchange Server, and indicate whether this connection is the active (or default) connection for WebCenter Portal (see Table 13-2).
Table 13-3 Personal Events Connection - Name
Field Description Connection Name
Enter a unique name for the connection. The name must be unique (across all connection types) within WebCenter Portal.
Connection Type
Select the Microsoft Exchange Server you want to connect to:
-
Microsoft Exchange Server 2003
-
Microsoft Exchange Server 2007
-
Microsoft Exchange Server 2010
-
Microsoft Exchange Server 2013
Active Connection
Select to use this connection for events in WebCenter Portal.
While you can register multiple events server connections, only one connection is used by events—the default (or active) connection.
-
-
Enter connection details for the events server (Table 13-4).
Table 13-4 Personal Events - Connection Details
Field Description Web Service URL
Enter the URL of the web service exposing the event application.
Use the format:
protocol://host:port/appWebServiceInterface/WSName
For example
http://myexchange.com:80/ExchangeWS/PersonalEventsWebService.asmx
http://myexchange.com:80/EWS/Services.wsdl
Associated External Application
Associate events with an external application. External application credential information is used to authenticate users against the Microsoft Exchange Server hosting events.
-
Click OK to save this connection.
-
To start using the new (active) connection you must restart the managed server on which WebCenter Portal is deployed.
For more information, see Section 7.2, "Starting and Stopping Managed Servers for WebCenter Portal Application Deployments."
13.4.2 Registering Event Servers Using WLST
Use the WLST command createPersonalEventConnection to create an events server connection. Use setPersonalEventConnection to alter an existing connection. For command syntax and examples, see the "createPersonalEventConnection" and "setPersonalEventConnection" sections in WebLogic Scripting Tool Command Reference.
An event server connection connects using an external application. Before creating an event server connection, you must create an external application by using the createExtAppConnection WLST command. For more information, see the "createExtAppConnection" section in WebLogic Scripting Tool Command Reference.
For example, the following command creates an external application and a personal event connection wired to the external application. Note that the Microsoft Exchange Server 2010 web service WSDL is accessed through the virtual directory named ExchWS.
createExtAppConnection(appName='webcenter', name='xApp_PE', url='https://server.example.com/owa', authMethod='BASIC')
createPersonalEventConnection(appName='webcenter', 'name=MSExchange-2010', webServiceUrl='http://server.example.com/ExchWS/Services.wsdl', adapterName='MSEx2010', appId='xApp_PE')
For information about how to run WLST commands, see Section 1.13.3.1, "Running Oracle WebLogic Scripting Tool (WLST) Commands."
Note:
To start using the new (active) connection you must restart the managed server on which WebCenter Portal is deployed. See the "Starting and Stopping Managed Servers Using WLST" section in the Administrator's Guide.13.5 Choosing the Active Events Server Connection
You can register multiple events server connections with WebCenter Portal, but only one connection is active at a time.
This section includes the following subsections:
-
Section 13.5.1, "Choosing the Active Events Server Using Fusion Middleware Control"
-
Section 13.5.2, "Choosing the Active Events Server Connection Using WLST"
13.5.1 Choosing the Active Events Server Using Fusion Middleware Control
To change the active connection:
-
Log in to Fusion Middleware Control and navigate to the home page for WebCenter Portal.
For more information, see:
-
Do one of the following:
-
For WebCenter Portal - From the WebCenter Portal menu, select Settings > Service Configuration.
-
For Portal Framework applications - From the Application Deployment menu, select WebCenter Portal > Service Configuration.
-
-
On the WebCenter Portal Services Configuration page, select Personal Events.
The Manage Personal Events Connections table indicates the current active connection, if any (Figure 13-8).
Figure 13-8 Active Connection for Personal Events
Description of ''Figure 13-8 Active Connection for Personal Events''
-
Select the connection you want to make the active (or default) connection, and then click Edit.
-
Select the Active Connection check box.
-
Click OK to update the connection.
-
To start using the new (active) connection you must restart the managed server on which WebCenter Portal is deployed.
For more information, see Section 7.2, "Starting and Stopping Managed Servers for WebCenter Portal Application Deployments."
13.5.2 Choosing the Active Events Server Connection Using WLST
Use the WLST command setPersonalEventConnection with default=true to activate an existing events server connection. For command syntax and examples, see the "setPersonalEventConnection" section in the WebLogic Scripting Tool Command Reference.
To subsequently disable an events connection, run the same WLST command with default=false. Connection details are retained but the connection is no longer named as an active connection.
For information on how to run WLST commands, see Section 1.13.3.1, "Running Oracle WebLogic Scripting Tool (WLST) Commands."
Note:
To start using the active connection you must restart the managed server on which WebCenter Portal or your Portal Framework application is deployed. For more information, see the "Starting and Stopping Managed Servers Using WLST" section in the Administrator's Guide.13.6 Modifying Events Server Connection Details
You can modify events server connection details at any time.
To start using the updated (active) connection you must restart the managed server on which WebCenter Portal is deployed.
This section includes the following subsections:
-
Section 13.6.1, "Modifying Events Server Connection Details Using Fusion Middleware Control"
-
Section 13.6.2, "Modifying Events Server Connection Details Using WLST"
13.6.1 Modifying Events Server Connection Details Using Fusion Middleware Control
To update connection details for an events server:
-
Log in to Fusion Middleware Control and navigate to the home page for WebCenter Portal. For more information, see:
-
Do one of the following:
-
For WebCenter Portal - From the WebCenter Portal menu, select Settings > Service Configuration.
-
For Portal Framework applications - From the Application Deployment menu, select WebCenter Portal > Service Configuration.
-
-
On the WebCenter Portal Service Configuration page, select Personal Events.
-
Select the connection name, and click Edit.
-
Edit connection details, as required.
For detailed parameter information, see Table 13-4
-
Click OK to save your changes.
-
To start using the updated (active) connection you must restart the managed server on which WebCenter Portal is deployed.
For more information, see Section 7.2, "Starting and Stopping Managed Servers for WebCenter Portal Application Deployments."
13.6.2 Modifying Events Server Connection Details Using WLST
Use the WLST command setPersonalEventConnection to edit an existing events server connection. For command syntax and examples, see the "setPersonalEventConnection" section in the WebLogic Scripting Tool Command Reference.
For information on how to run WLST commands, see Section 1.13.3.1, "Running Oracle WebLogic Scripting Tool (WLST) Commands."
Note:
To start using the updated (active) connection you must restart the managed server on which WebCenter Portal or your Portal Framework application is deployed. For more information, see the "Starting and Stopping Managed Servers Using WLST" section in the Administrator's Guide.13.7 Deleting Event Server Connections
You can delete events server connections at any time, but use caution when deleting the active connection. If you delete the active connection, users cannot create events in their personal calendar.
This section includes the following subsections:
-
Section 13.7.1, "Deleting Event Server Connections Using Fusion Middleware Control"
-
Section 13.7.2, "Deleting Event Server Connections Using WLST"
13.7.1 Deleting Event Server Connections Using Fusion Middleware Control
To delete an events server connection:
-
Log in to Fusion Middleware Control and navigate to the home page for WebCenter Portal.
For more information, see:
-
Do one of the following:
-
For WebCenter Portal - From the WebCenter Portal menu, select Settings > Service Configuration.
-
For Portal Framework applications - From the Application Deployment menu, select WebCenter Portal > Service Configuration.
-
-
From the list on the WebCenter Portal Service Configuration page, select Personal Events.
-
Select the connection name, and click Delete.
Note:
Before restarting the managed server, select another connection as active; otherwise, the service is disabled. -
To make this change you must restart the managed server on which WebCenter Portal is deployed.
For more information, see Section 7.2, "Starting and Stopping Managed Servers for WebCenter Portal Application Deployments."
13.7.2 Deleting Event Server Connections Using WLST
Use the WLST command deleteConnection to remove an events server connection. For command syntax and examples, see the "deleteConnection" section in the WebLogic Scripting Tool Command Reference.
For information on how to run WLST commands, see Section 1.13.3.1, "Running Oracle WebLogic Scripting Tool (WLST) Commands."
Note:
To effect this change you must restart the managed server on which WebCenter Portal or your Portal Framework application is deployed. For more information, see the "Starting and Stopping Managed Servers Using WLST" section in the Administrator's Guide.13.8 Testing Event Server Connections
To confirm the connection to the events server:
-
Add the Events task flow to a page in WebCenter Portal.
Tip:
In WebCenter Portal, add the task flow to a page in your Home portal. See the "Adding an Events Task Flow to a Page" section in Building Portals with Oracle WebCenter Portal. -
Click Personal Events, then click Login to Personal Calendar.
-
Enter your Microsoft Exchange Server login credentials.
The personal events from your Microsoft Exchange Server should display in the task flow.
13.9 Troubleshooting Issues with Events
If users cannot see their personal events, verify the following:
-
Is the Microsoft Exchange Server/IIS server accessible from the managed server on which WebCenter Portal is deployed? Can they ping each other?
-
Is the configuration correct on the Microsoft Exchange Server? For more information, see Section 13.3.3.2, "Microsoft Exchange Server 2007 - Configuration" or Section 13.3.4.2, "Microsoft Exchange Server 2003 - Configuration."
-
Is the events server connection correct in the managed server? For more information, see Section 13.4, "Registering Events Servers."
-
Did the user enter the correct user name and password for the account on the Microsoft Exchange Server? The user name is usually an email address.
-
Is the
SSLAlwaysNegoClientCerproperty set totrueif SSL is enabled for Microsoft Exchange Server? For information, refer to the security considerations specified in this chapter for your version of Exchange Server.