18 Managing Oracle Secure Enterprise Search in WebCenter Portal
This chapter describes how to configure Oracle Secure Enterprise Search (SES) release 11.2.2.2 to index and search most objects in both WebCenter Portal and Portal Framework applications.
This chapter includes the following topics:
-
Section 18.2, "Configuration Roadmaps for Oracle SES in WebCenter Portal"
-
Section 18.5, "Configuring Oracle SES to Search WebCenter Portal Applications"
-
Section 18.6, "Configuring Oracle SES to Search Portal Framework Applications"
Tip:
Oracle WebCenter Portal provides a script that can help configure Oracle SES for evaluation purposes. After you read and consider the configuration described in this chapter, see Appendix D, "Oracle Secure Enterprise Search Configuration for Evaluation" for another configuration option.Permissions:
To perform the tasks in this chapter, you must be granted the WebLogic ServerAdmin role through the Oracle WebLogic Server Administration Console and the Administrator role in the deployed application:
-
WebCenter Portal:
Administratorrole granted through Portal Builder Administration. -
Portal Framework application:
Administratorrole granted through the Administration Console.
For more information about roles and permissions, see Section 1.8, "Understanding Administrative Operations, Roles, and Tools."
18.1 About Search with Oracle SES
Oracle recommends Oracle SES for best search performance and scalability in production environments. Oracle does not recommend using WebCenter Portal's own live (delegated) search for production environments. Oracle SES is beneficial for the following reasons:
-
Oracle SES provides unified ranking results, with the most relevant items appearing first.
-
Oracle SES provides more thorough search. For example, when searching lists in WebCenter Portal, the live search only searches list names and descriptions, while Oracle SES also searches list column names and column contents.
-
Oracle SES allows search of other repositories outside of WebCenter Portal or your Portal Framework application.
-
Oracle SES supports the search REST APIs and data control for customizing your search interface.
Note:
The steps in this chapter are not required if you choose to use Oracle WebCenter Portal's live search adapter.Your search environment varies depending on the version of Oracle SES configured. For example:
-
If you configure your system with Oracle SES 11.2.2.2, then you can customize search in the administration settings for the application. Oracle SES 11.2.2.2 supports faceted search, filtered search in the search box, and document thumbnails, while earlier releases of Oracle SES and implementations with live (delegated) search do not. All customization with Oracle SES 11.2.2.2 is done on the Tools and Services - Search administration page, even though task flow parameters may display.
To access the Search administration page, on the Administration page (see Section 47.2, "Accessing the Portal Builder Administration Page"), select Tools and Services, then Search.
Note:
This task is performed by an administrator. Working with search at the portal level is an application specialist or portal moderator task, as described in the "Adding Search to a Portal" chapter in Building Portals with Oracle WebCenter Portal. -
If you configure your system with Oracle SES 11.1.2.*, then you can customize search using Search (Search - Non-Faceted Search) task flow parameters. Oracle SES 11.1.2.* supports saving searches and setting user preferences with search, while the 11.2.2.2 adapter and implementations with live (delegated) search do not.
Note:
This chapter describes how to configure WebCenter Portal with Oracle SES release 11.2.2.2. If you choose to use an earlier release of Oracle SES, see:http://docs.oracle.com/cd/E28280_01/webcenter.1111/e10148/jpsdg_search.htm#BABBDFDC
With WebCenter Portal applications, live (delegated) search is set as the default search platform; however, large-scale implementations should be configured to use Oracle SES for best performance. (Detailed configuration steps are in Section 18.5, "Configuring Oracle SES to Search WebCenter Portal Applications.")
With Portal Framework applications, Oracle SES is set as the default and preferred search platform. (Detailed configuration steps are in Section 18.6, "Configuring Oracle SES to Search Portal Framework Applications.")
You can configure Oracle SES to search the following resources:
-
Documents, including wikis and blogs
-
Announcements and discussions
-
Portals, lists, page metadata, and people
Note:
The crawler that indexes portals, lists, page metadata, and people is not supported in Portal Framework applications, so those resources are not searchable with Oracle SES in Portal Framework applications.When Oracle SES is configured to search WebCenter Portal or Portal Framework applications, other non-crawled resources (for example, notes and events) are not returned in search results.
Results from all sources are listed together, with the most relevant items appearing first. For example, when you run a search for a user name, most likely, you are looking for that person's contact information (that is, the exact user name in People Connections), not necessarily documents that the user wrote.
Three types of Oracle SES crawlers index WebCenter Portal resources:
-
Documents Crawler: This uses the Oracle SES Content Server source type to crawl documents, including wikis and blogs.
-
Discussions Crawler: This uses the Oracle SES Database source type to crawl discussions and announcements.
-
Spaces Crawler: (Not available in Portal Framework applications.) This uses the Oracle SES Oracle WebCenter source type to crawl certain objects, such as lists, page metadata, portals, and profiles.
Note:
Oracle SES crawlers collect data through connectors to back-end repositories. Each connector is configured in Oracle SES as a "crawl source." Each crawl source has a type that identifies the type of repository that holds the data, such as a relational database or an Oracle WebCenter Content Server repository.When you configure Oracle SES, all available Oracle SES crawlers should be enabled. It is not recommended to enable one Oracle SES crawler and not another. For example, when you configure Oracle SES to search Portal Framework applications, you cannot have it crawl documents but not discussions.
Use-case 1: All crawlable back ends are set up, and SES needs to be enabled/configured for the first time
18.2 Configuration Roadmaps for Oracle SES in WebCenter Portal
Use the roadmaps in this section as an administrator's guide through the configuration process:
-
Roadmap - Configuring Oracle SES
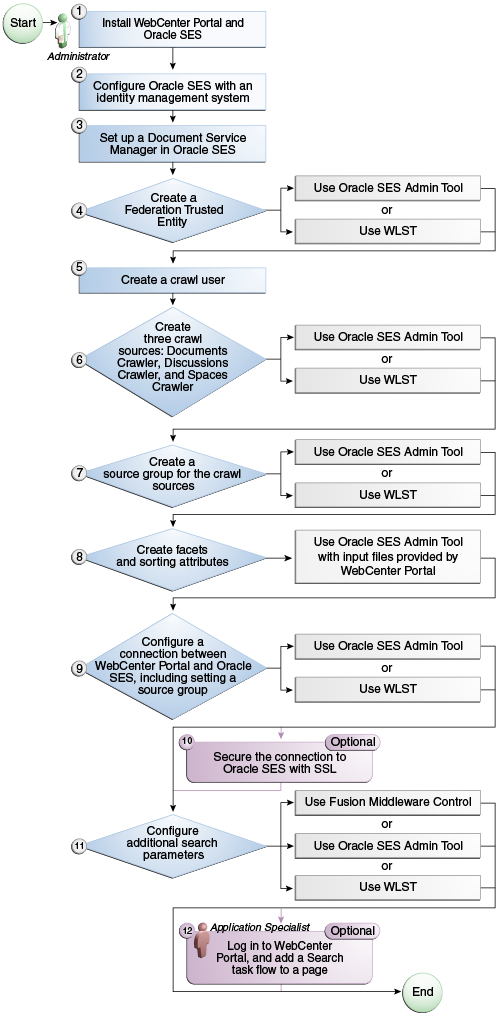
Figure 18-1 and Table 18-1 provide an overview of the prerequisites and tasks required to get Oracle SES working.
Table 18-1 Configuring Oracle SES
Actor Task Administrator
4. Create a Federation Trusted Entity using one of the following tools:
-
Oracle SES Admin Tool
-
WLST
6. Create three crawl sources: documents crawler, discussions crawler, and spaces crawler using one of the following tools:
-
Oracle SES Admin Tool
-
WLST
7. Create a source group for the crawl sources using one of the following tools:
-
Oracle SES Admin Tool
-
WLST
8. Create facets and sorting attributes
9. Configure a connection between WebCenter Portal and Oracle SES using one of the following tools:
-
Oracle SES Admin Tool
-
WLST
Note: This step must include running the
setSESVersionWLST command to enable the Tools and Services - Search administration page.10. (Optional) Secure the connection to Oracle SES with SSL
11. Configure additional search parameters using one of the following tools:
-
Fusion Middleware Control
-
Oracle SES Admin Tool
-
WLST
Application Specialist
12. (Optional) Add a search task flow to a portal
-
-
Roadmap - Configuring Oracle SES for Portal Framework Applications
Figure 18-2 and Table 18-2 provide an overview of the prerequisites and tasks required to get Oracle SES working in Portal Framework applications.
Figure 18-2 Configuring Oracle SES for Portal Framework Applications
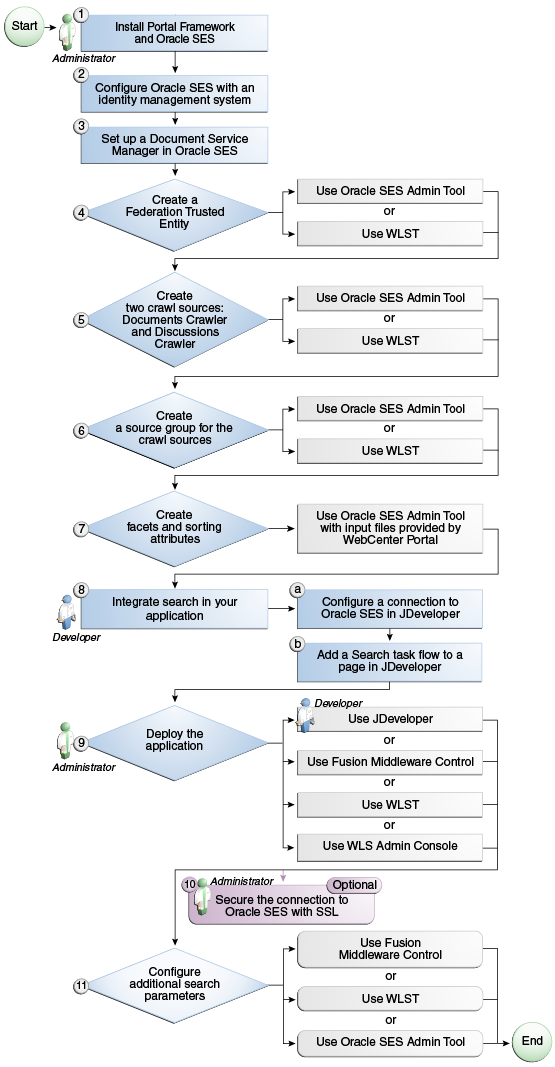
Description of ''Figure 18-2 Configuring Oracle SES for Portal Framework Applications''
Table 18-2 Configuring Oracle SES for Portal Framework Applications
Actor Task Sub-task Administrator
4. Create a Federation Trusted Entity using one of the following tools:
-
Oracle SES Admin Tool
-
WLST
5. Create two crawl sources: documents crawler and discussions crawler using one of the following tools:
-
Oracle SES Admin Tool
-
WLST
6. Create a source group for the crawl sources using one of the following tools:
-
Oracle SES Admin Tool
-
WLST
7. Create facets and sorting attributes
Developer
8. Integrate search in your Portal Framework application
8.a Configure a connection to Oracle SES in JDeveloper
Note: This step must include running the
setSESVersionWLST command to enable the Tools and Services - Search administration page.Developer or Administrator
9. Deploy the Portal Framework application using one of the following tools:
-
JDeveloper (Developer)
-
Fusion Middleware Control (Administrator)
-
WLST (Administrator)
-
WLS Admin Console (Administrator)
Administrator
10. (Optional) Secure the connection to Oracle SES with SSL
Administrator
11. Configure additional search parameters using one of the following tools:
-
Fusion Middleware Control
-
WLST
-
WLS Admin Console
-
18.3 Prerequisites for Using Oracle SES
This section includes the following topics:
18.3.1 Oracle SES - Installation
This chapter assumes that you are running the latest supported products: Oracle SES 11.2.2.2 and Oracle WebCenter Content Server 11.1.1.8.0.
Supported Oracle SES versions include 11.2.2.2, 11.1.2, and 11.1.2.2. Oracle recommends using Oracle SES release 11.2.2.2 for best performance and the latest search features.
Note:
This chapter describes how to configure WebCenter Portal with Oracle SES release 11.2.2.2. If you choose to use an earlier release of Oracle SES, see:http://docs.oracle.com/cd/E28280_01/webcenter.1111/e10148/jpsdg_search.htm#BABBDFDC
In addition to the Oracle SES installation, WebCenter Portal requires some post installation steps. For complete instructions, see the "Back-End Requirements for Search" section in Installation Guide for Oracle WebCenter Portal.
See Also:
It is important to verify that you have installed all required patches for Oracle SES. For the latest information on required patches, check the Release Notes.18.3.2 Oracle SES - Configuration
-
Oracle SES must be configured with an identity management system to validate and authenticate users. This is necessary for secure searches, so searches return only results that the user is allowed to view based on access privileges.
Because WebCenter Portal uses identity propagation when communicating with Oracle SES, WebCenter Portal's user base must match that in Oracle SES. One way to do this is by configuring WebCenter Portal and Oracle SES to the same identity management system, such as Oracle Internet Directory or Oracle Unified Directory.
Note:
For information on all supported identity management systems, see Section 30.2.3, "Default Identity and Policy Stores."Only one identity plug-in can be set up for each Oracle SES instance. All repositories (Oracle WebCenter Content Server, Oracle WebCenter Portal Discussions Server, and Oracle WebCenter Portal) must share the same user base as Oracle SES.
Oracle SES includes numerous identity plug-ins for identity management systems including Oracle Internet Directory (OID), Oracle Unified Directory (OUD), Oracle WebCenter Content Server, and Microsoft Active Directory. For more information, see the section "Setting Up Oracle WebCenter Sources" in the Oracle Secure Enterprise Search Administrator's Guide.
The following example sets up the identity plug-in for Oracle Internet Directory:
-
In the Oracle SES administration tool, navigate to the Global Settings - Identity Management Setup page, select Oracle Internet Directory from the available identity plug-ins, and click Activate.
-
Provide the following values:
Host name: The host name of the computer where Oracle Internet Directory is running
Port: The Oracle Internet Directory port number
Use SSL:
trueorfalseRealm: The Oracle Internet Directory realm (for example,
dc=us,dc=oracle,dc=com)User name: The Oracle Internet Directory admin user name (for example,
cn=orcladmin)Password: Admin user password
-
Click Submit.
The following example sets up the identity plug-in for Oracle Unified Directory (OUD):
-
In the Oracle SES administration tool, navigate to the Global Settings - Identity Management Setup page, select Sun Java System Directory Server from the available identity plug-ins, and click Activate.
-
Provide the following values:
Directory URL: The URL to the OUD instance (for example,
ldap://example.com:1234)Directory account name: The account name to use for authentication (for example,
cn=Directory Manager)Directory account password: The password for the account name
Directory subscriber: (for example,
dc=example,dc=com)Directory security protocol: none
Use user cache:
false -
Click Finish.
Note that WebCenter Portal must be configured to use the
IPlanetAuthenticatorprovider.
-
-
Each Oracle SES instance must have a trusted entity for allowing WebCenter Portal end users to be securely propagated at search time. (A trusted entity allows the WebCenter Portal to authenticate itself to Oracle SES and assert its users when making queries on Oracle SES.) This trusted entity can be any user that either exists on the identity management server behind Oracle SES or is created internally in Oracle SES.
You can do this either in WLST or in Oracle SES.
Note:
This trusted entity name and password is required later as theappUserandappPasswordproperties on the WLST commandcreateSESConnection.To do this with WLST, use the
createFederationTrustedEntitycommand (Example 18-1).Example 18-1 createFederationTrustedEntity Command
createFederationTrustedEntity(
appName='webcenter',
sesUrl='http://mySEShost.com:7777/search/api/admin/AdminService',
sesPassword='mySESAdminPassword', entityName='myTrustedEntityUser',
entityPassword='myTrustedEntityUserPassword', desc='Trusted entity for WebCenter
Portal', sesSchema='eqsys')
For command syntax and examples, see the "createFederationTrustedEntity" section in WebLogic Scripting Tool Command Reference.
To do this in Oracle SES, follow these steps.
-
In the Oracle SES administration tool, navigate to the Global Settings - Federation Trusted Entities page.
-
Enter a name for a trusted entity. This is the name that WebCenter Portal uses to authenticate itself to Oracle SES at search time (before it propagates the end user identity to Oracle SES).
To allow the entity to be authenticated through the active identity plug-in:
- Make sure that the entity name is the name of a user that exists in the identity management system.
- Leave the password field blank.
- Select the Use Identity Plug-in for authentication checkbox.
- Enter the authentication attribute value corresponding to the Authentication Attribute in your active identity plug-in.
To allow the entity to be authenticated through Oracle SES:
- Enter any user name (for example,
wcsearch) and password (for example,myPassword1).- Do not select the Use Identity Plug-in for authentication checkbox.
For more information, see the online help for the Federation Trusted Entities page in Oracle SES.
-
Note:
For reference, the following sample user names are used in this chapter:-
wcsearch: User of the Oracle SES Federation Trusted Entity -
mycrawladmin: Crawl admin user in WebCenter Portal and in the identity management system to crawl certain objects, such as lists, page metadata, portals, and profiles -
sescrawer(or admin user): Crawl admin user in Oracle WebCenter Content Server withsescrawlerrole(oradmin) role
18.3.3 Oracle SES - Security
Most enterprise deployments require that their HTTP connections be secure. SSL (secure socket layer) is an encryption protocol for securely transmitting private content on the internet. Oracle strongly recommends that you use an SSL-protected channel to transmit password and other secure data over networks.
For instructions, see Section 35.10, "Securing the Connection to Oracle SES with SSL."
18.4 Setting Up Oracle SES Connections
This section includes the following topics:
18.4.1 Testing the Connection to Oracle SES
Confirm the connection to Oracle SES by entering in a browser the URL for Oracle SES Web Services operations:
http://host:port/search/query/
If the URL address does not render in the browser, then either the host or port for the Oracle SES server is incorrect, or Oracle SES has not been started.
Note:
With Oracle SES 11.2.2.2, you must run thesetSESVersion WLST command to enable the Tools and Services - Search administration page. For more information, see Section 18.5.5, "Configuring Oracle SES Version Using WLST."18.4.2 Registering Oracle Secure Enterprise Search Servers
You can register multiple Oracle SES connections with a WebCenter Portal application (or your Portal Framework application) but only one of them is active at a time.
You can register Oracle SES connections using either Fusion Middleware Control or WLST. This section includes the following topics:
-
Section 18.4.2.1, "Registering Oracle SES Connections Using Fusion Middleware Control"
-
Section 18.4.2.2, "Registering Oracle SES Connections Using WLST"
18.4.2.1 Registering Oracle SES Connections Using Fusion Middleware Control
To register an Oracle SES instance:
-
Log in to Fusion Middleware Control and navigate to the home page for WebCenter Portal or your Portal Framework application. For more information, see:
-
Do one of the following:
-
For the WebCenter Portal application - From the WebCenter Portal menu, select Settings > Service Configuration.
-
For Portal Framework applications - From the Application Deployment menu, select WebCenter Portal > Service Configuration.
-
-
On the WebCenter Portal Service Configuration page, select Search.
-
To connect to a new Oracle SES instance, click Add (Figure 18-3).
Figure 18-3 Configuring Oracle Secure Search
Description of ''Figure 18-3 Configuring Oracle Secure Search''
-
On the Add Secure Enterprise Search Connection page, enter a unique name for this connection, and indicate whether this connection is the active (or default) connection for the application (Figure 18-4).
Figure 18-4 Add Secure Enterprise Search Connection
Description of ''Figure 18-4 Add Secure Enterprise Search Connection''
Table 18-3 describes the connection parameters.
Table 18-3 Oracle SES Connection - Name
Field Description Connection Name
Enter a unique name for the connection. The name must be unique (across all connection types) within the WebCenter Portal application (or your Portal Framework application).
Active Connection
Select to use the Oracle SES instance defined on this connection as your search platform for WebCenter Portal or your Portal Framework application.
While you can register multiple Oracle SES connections for an application, only one connection is used—the default (or active) connection.
-
Enter connection details for the Oracle SES instance (Table 18-4).
Table 18-4 Oracle Secure Enterprise Search - Connection Details
Field Description SOAP URL
Enter the Web Services URL that Oracle SES exposes to enable search requests.
Use the format:
http://host:port/search/query/OracleSearch
For example:
http://myHost:7777/search/query/OracleSearch
Federation Trusted Entity Name
Enter the user name of the Oracle SES Federation Trusted Entity created in Section 18.3.2, "Oracle SES - Configuration."
Tip: This user is configured in the Oracle SES administration tool, on the Global Settings - Federation Trusted Entities page.
The WebCenter Portal application (or your Portal Framework application) must authenticate itself as a trusted application to Oracle SES to perform searches on behalf of WebCenter Portal users.
Examples in this chapter use
wcsearchfor this value.Federation Trusted Entity Password
Enter the password for the Federation Trusted Entity.
-
Click OK to save this connection.
Note:
To start using the new (active) connection you must restart the managed server on which the application is deployed (by default, WC_Spaces). For more information, see Section 7.2, "Starting and Stopping Managed Servers for WebCenter Portal Application Deployments."18.4.2.2 Registering Oracle SES Connections Using WLST
-
Use the WLST command
createSESConnectionto create a connection to Oracle SES. For example:createSESConnection(appName='webcenter', name='mySesConnection', url='http://myhost.com:7777/search/query/OracleSearch', appUser='wcsearch', appPassword='myPassword1', default=true)where
appUseris the user name of the Oracle SES Federation Trusted Entity created in Section 18.3.2, "Oracle SES - Configuration."
For command syntax and examples, see the "createSESConnection" section in WebLogic Scripting Tool Command Reference.
To configure search to actively use a new Oracle SES connection, set default=true. For more information, see Section 18.4.3.2, "Choosing the Active Oracle SES Connection Using WLST."
For information on how to run WLST commands, see Section 1.13.3.1, "Running Oracle WebLogic Scripting Tool (WLST) Commands."
Note:
To start using the new (active) connection or settings, you must restart the managed server on which the application is deployed (by default, WC_Spaces). See the "Starting and Stopping Managed Servers Using WLST" section in Administrator's Guide.18.4.3 Choosing the Active Oracle SES Connection
You can register multiple Oracle SES connections with a WebCenter Portal application (or your Portal Framework application), but only one connection is active at a time.
Note:
These steps in this section are not necessary if you selected the active connection in Section 18.4.2, "Registering Oracle Secure Enterprise Search Servers."This section includes the following topics:
-
Section 18.4.3.1, "Choosing the Active Oracle SES Connection Using Fusion Middleware Control"
-
Section 18.4.3.2, "Choosing the Active Oracle SES Connection Using WLST"
18.4.3.1 Choosing the Active Oracle SES Connection Using Fusion Middleware Control
To change the active connection:
-
Log in to Fusion Middleware Control and navigate to the home page for WebCenter Portal or your Portal Framework application. For more information, see:
-
Do one of the following:
-
For the WebCenter Portal application - From the WebCenter Portal menu, select Settings > Service Configuration.
-
For Portal Framework applications - From the Application Deployment menu, select WebCenter Portal > Service Configuration.
-
-
On the WebCenter Portal Services Configuration page, select Search.
The Manage Secure Enterprise Search Connections table indicates the current active connection (if any).
-
Select the connection you want to make the active (or default) connection, and then click Edit (Figure 18-5).
-
Select the Active Connection checkbox (Figure 18-6).
-
Click OK to update the connection.


Note:
To start using the new (active) connection you must restart the managed server on which the application is deployed (by default,WC_Spaces). For more information, see Section 7.2, "Starting and Stopping Managed Servers for WebCenter Portal Application Deployments."18.4.3.2 Choosing the Active Oracle SES Connection Using WLST
Use the WLST command setSESConnection with default=true to activate an existing Oracle SES connection. For example:
setSESConnection(appName='app1',
                name='SESConn1',
                url='http://myhost.com:7777/search/query/OracleSearch',
                appUser='wpadmin',
                appPassword='password',
                default=1)
For full command syntax and examples, see the "setSESConnection" section in WebLogic Scripting Tool Command Reference.
To subsequently disable an Oracle SES connection, run the same WLST command with default=false. Connection details are retained but the connection is no longer named as an active connection.
For information on how to run WLST commands, see Section 1.13.3.1, "Running Oracle WebLogic Scripting Tool (WLST) Commands."
Note:
To start using the active connection you must restart the managed server on which the application is deployed (by default, WC_Spaces). For more information, see the "Starting and Stopping Managed Servers Using WLST" section in Administrator's Guide.18.4.4 Modifying Oracle SES Connection Details
You can modify Oracle SES connection details at any time.
To start using the updated (active) connection you must restart the managed server on which the WebCenter Portal application (or your Portal Framework application) is deployed.
Note:
The steps in this section are required only to modify the details configured in Section 18.4.2, "Registering Oracle Secure Enterprise Search Servers."This section includes the following topics:
-
Section 18.4.4.1, "Modifying Oracle SES Connection Details Using Fusion Middleware Control"
-
Section 18.4.4.2, "Modifying Oracle SES Connection Details Using WLST"
18.4.4.1 Modifying Oracle SES Connection Details Using Fusion Middleware Control
To update connection details for an Oracle SES instance:
-
Log in to Fusion Middleware Control and navigate to the home page for WebCenter Portal or your Portal Framework application. For more information, see:
-
Do one of the following:
-
For the WebCenter Portal application - From the WebCenter Portal menu, select Settings > Service Configuration.
-
For Portal Framework applications - From the Application Deployment menu, select WebCenter Portal > Service Configuration.
-
-
On the WebCenter Portal Service Configuration page, select Search.
-
Select the connection name, and click Edit.
-
Edit connection details, as required. For detailed parameter information, see Table 18-4.
-
Click OK to save your changes.
Note:
To start using the updated (active) connection you must restart the managed server on which the application is deployed (by default, WC_Spaces). For more information, see Section 7.2, "Starting and Stopping Managed Servers for WebCenter Portal Application Deployments."18.4.4.2 Modifying Oracle SES Connection Details Using WLST
Use the WLST command setSESConnection to alter an existing Oracle SES connection. For command syntax and examples, see the "setSESConnection" section in WebLogic Scripting Tool Command Reference.
Note:
To start using the updated (active) connection you must restart the managed server on which the application is deployed (by default, WC_Spaces). For more information, see the "Starting and Stopping Managed Servers Using WLST" section in Administrator's Guide.18.4.5 Deleting Oracle SES Connections
You can delete Oracle SES connections at any time but take care when deleting the active connection. If you delete the active connection, users are not able to search content on external repositories.
This section includes the following topics:
-
Section 18.4.5.1, "Deleting Oracle SES Connections Using Fusion Middleware Control"
-
Section 18.4.5.2, "Deleting Oracle SES Connections Using WLST"
18.4.5.1 Deleting Oracle SES Connections Using Fusion Middleware Control
To delete an Oracle SES server connection:
-
Log in to Fusion Middleware Control and navigate to the home page for WebCenter Portal or your Portal Framework application. For more information, see:
-
Do one of the following:
-
For the WebCenter Portal application - From the WebCenter Portal menu, select Settings > Service Configuration.
-
For Portal Framework applications - From the Application Deployment menu, select WebCenter Portal > Service Configuration.
-
-
From the Service Connection drop-down, select Search.
-
Select the connection name, and click Delete.
Note:
To effect this change you must restart the managed server on which the application is deployed (by default, WC_Spaces). For more information, see Section 7.2, "Starting and Stopping Managed Servers for WebCenter Portal Application Deployments."18.4.5.2 Deleting Oracle SES Connections Using WLST
Use the WLST command deleteConnection to remove an Oracle SES connection. For command syntax and examples, see the "deleteConnection" section in WebLogic Scripting Tool Command Reference.
For information on how to run WLST commands, see Section 1.13.3.1, "Running Oracle WebLogic Scripting Tool (WLST) Commands."
Note:
To effect this change you must restart the managed server on which the application is deployed (by default, WC_Spaces). For more information, see the "Starting and Stopping Managed Servers Using WLST" section in Administrator's Guide.18.5 Configuring Oracle SES to Search WebCenter Portal Applications
This section describes the steps necessary to set up Oracle SES for WebCenter Portal applications. It includes the following topics:
-
Section 18.5.1, "Setting Up WebCenter Portal for Oracle SES"
-
Section 18.5.2, "Setting Up Oracle WebCenter Content Server for Oracle SES"
-
Section 18.5.3, "Setting Up Oracle WebCenter Portal Discussion Server for Oracle SES"
-
Section 18.5.4, "Setting Up Oracle SES to Search WebCenter Portal"
Note:
For an overview of the tasks that must be performed to enable Oracle SES as the search engine, see Section 18.2, "Configuration Roadmaps for Oracle SES in WebCenter Portal." There may be various acceptable ways and orders to perform the required tasks.18.5.1 Setting Up WebCenter Portal for Oracle SES
This section describes how to configure WebCenter Portal to work with Oracle SES.
-
Create and configure the connection between WebCenter Portal and Oracle SES, and optionally specifying a source group.
-
To use Oracle SES to search portals, lists, or page metadata, you must first create a crawl admin user in WebCenter Portal and in your back-end identity management server (for example,
mycrawladmin). You must only create a crawl admin user once.Note:
See your identity management system documentation for information on creating users.The following example uses Oracle Directory Services Manager to create the
mycrawladminuser.-
On the Data Browser tab, navigate to the target
cnand click Create. This example navigates to "dc=com,dc=oracle,dc=us,cn=Users". In the Add Object Class dialog, select the appropriate object class, and click OK. (Figure 18-8).Figure 18-8 Oracle Directory Services Manager - Add Object Class
Description of ''Figure 18-8 Oracle Directory Services Manager - Add Object Class''
-
Find the distinguished name (DN) path, and click Select (Figure 18-9). This example selects "dc=com,dc=oracle,dc=us,cn=Users".
Figure 18-9 Oracle Directory Services Manager - Select DN Path
Description of ''Figure 18-9 Oracle Directory Services Manager - Select DN Path''
-
In the Create New Entry dialog, enter properties, and click Next (Figure 18-10).
Figure 18-10 Oracle Directory Services Manager - Create New Entry
Description of ''Figure 18-10 Oracle Directory Services Manager - Create New Entry''
-
When you see that the new entry was created successfully, click Finish. (Figure 18-11)
Figure 18-11 Oracle Directory Services Manager - Status
Description of ''Figure 18-11 Oracle Directory Services Manager - Status''
-
-
Grant the crawl application role to the crawl admin user created in Section 18.3.2, "Oracle SES - Configuration." For example:
grantAppRole(appStripe="webcenter",
             appRoleName="webcenter#-#defaultcrawl",
             principalClass="weblogic.security.principal.WLSUserImpl",
             principalName="mycrawladmin");
For command syntax and examples, see the "grantAppRole" section in WebLogic Scripting Tool Command Reference.
Note:
To effect WLST changes, you must restart the managed server on which the application is deployed (by default, WC_Spaces). For more information, see the "Starting and Stopping Managed Servers Using WLST" section in Administrator's Guide. -
Enable the Oracle SES crawlers in WebCenter Portal.
With the same WLST command, you can set crawler properties (that is, enable/disable the crawlers) and specify an interval between full crawls for the spaces crawler. By default, full crawls for the spaces crawler occur every seven days, but you can specify a different frequency. (Incremental crawls are initiated by the schedule set in Oracle SES.)
For example:
setSpacesCrawlProperties(appName='webcenter',
                         fullCrawlIntervalInHours=168,
                         spacesCrawlEnabled = true,
                         documentCrawlEnabled=true,
                         discussionsCrawlEnabled=true)
Notes:
ThespacesCrawlEnabled,documentCrawlEnabledanddiscussionsCrawlEnabledparameters all must be set totrueto enable Oracle SES.A clustered instance additionally requires the
serverparameter; for example,server="WC_Spaces1".The following example specifies that WebCenter Portal runs a full crawl through the spaces crawler every 8 days.
setSpacesCrawlProperties(appName='webcenter',
                        fullCrawlIntervalInHours=192)
You also can use WLST to return the current crawl settings for WebCenter Portal, such as the number of hours between full crawls (spaces crawler). For example, the following command returns the current crawl settings.
getSpacesCrawlProperties(appName='webcenter')

WebCenter Crawl Properties:
-----------------
fullCrawlIntervalInHours: 124
spacesCrawlEnabled:       true
documentCrawlEnabled:     true
discussionsCrawlEnabled:  true
-
Use Fusion Middleware Control or the
listDocumentsSpacesPropertiescommand to determine the unique name that the back-end Content Server is using to identify this WebCenter Portal application and the connection name for the primary Content Server that WebCenter Portal is using to store documents.For example:
listDocumentsSpacesProperties(appName='webcenter')
The response should looks something like the following:
The Documents Spaces container is "/WebCenter1109"
The Documents repository administrator is "sysadmin"
The Documents application name is "WC1109"
The Documents primary connection is "stxxl18-ucm11g"
Note:
Record the application name and the primary connection returned. These values are required later (in Section 18.5.4.2, "Setting Up Oracle SES to Search Documents") to set up Oracle SES to crawl documents.Note:
To effect WLST changes, you must restart the managed server on which the application is deployed (by default, WC_Spaces). For more information, see the "Starting and Stopping Managed Servers Using WLST" section in Administrator's Guide.
18.5.1.1 Configuring Search Parameters Using WLST
Use the WLST command setSearchConfig to modify search parameters.
Example 18-2 shows how to specify a data group (also known as source group) under which you search Oracle SES.
Example 18-2 Set a Source Group
setSearchSESConfig(appName='webcenter',
                   dataGroup='mySources')
where dataGroup is the source group you create in Section 18.5.4.6, "Additional Oracle SES Configuration."
Example 18-3 shows how to increase the number of search results displayed. Five is the default setting for the number of search results displayed in Oracle SES results, but result sets generally are larger than five.
Example 18-3 Increase Number of Search Results Displayed
setSearchConfig(appName='webcenter',
                numResultsMain=10)
Example 18-4 shows how to configure the maximum time that a service is allowed to execute a search (in ms). When a service times out largely depends on the system load. If you consistently get time out errors, adjust this parameter.
Example 18-4 Configure Maximum Time WebCenter Portal Waits for Search Results
setSearchConfig(appName='webcenter',
                executionTimeout=10000)
For command syntax and examples, see the "setSearchConfig" section in WebLogic Scripting Tool Command Reference.
18.5.1.2 Configuring Search Parameters and Crawlers Using Fusion Middleware Control
You can enable or disable Oracle SES and configure search settings using Fusion Middleware Control.
-
Log in to Fusion Middleware Control and navigate to the home page for your WebCenter Portal application. For more information, see Section 6.2, "Navigating to the Home Page for WebCenter Portal."
-
From the WebCenter Portal menu, select Settings > Application Configuration.
-
In the Search Crawlers section, select to use Oracle SES.
Optionally, you can specify how often WebCenter Portal content is crawled. By default, full crawls for the spaces crawler occur every seven days, but you can specify a different frequency. (Incremental crawls, for all three crawlers, are initiated by the schedule set in Oracle SES.)
Click Apply (Figure 18-12).
-
Figure 18-12 Application Settings for WebCenter Portal Search

Description of ''Figure 18-12 Application Settings for WebCenter Portal Search''
-
-
On the same page, configure Search Settings parameters as required, and then click Apply.
-
Oracle Secure Enterprise Search Data Group: Specify the Oracle SES source group in which to search. If no value is provided, then everything in the Oracle SES instance is searched.
-
Execution Timeout: Enter the maximum time that a service is allowed to execute a search (in ms).
-
Executor Preparation Timeout: Enter the maximum time that a service is allowed to initialize a search (in ms).
-
Results per Service - Saved Search Task Flows: Enter the number of search results displayed, per service, in a Saved Search task flow.
-
Results per Service - Search Page: Enter the number of search results displayed, per service, for searches submitted from the main search page. Users can click Show All if they want to see all the results.
-
Number of Saved Searches in Search Page: Enter the number of saved searches displayed in the Saved Search list (on the main search page).
You do not need to restart the managed server on which the WebCenter Portal application is deployed.
-
18.5.2 Setting Up Oracle WebCenter Content Server for Oracle SES
This section describes how to configure Oracle WebCenter Content Server to be crawlable by Oracle SES (in particular, the Content Server that WebCenter Portal uses for storing documents).
The following steps must be done from within the Content Server.
See Also:
Content Server online help for information on administering roles and users in Content Server-
Create a crawl user.
If you want users with the
adminrole to crawl, then use an admin user account as the crawl user.If you want non-admin users to crawl, then follow these steps:
-
Create the role
sescrawlerrole. -
Create the user
sescrawler, and assign it thesescrawlerrolerole. This user creates the Content Server source in Oracle SES. -
Add
sceCrawlerRole=sescrawlerroletoconfig.cfg(located inMW_HOME/user_projects/domains/yourdomain/ucm/cs/config).Alternatively, you can append the
sceCrawlerRole=sescrawlerroleline in the Content Server user interface (Administration - General Configuration - Additional Configuration Variables).
-
-
Restart the Content Server.
-
In the Content Server console, install the SESCrawlerExport component on the content server, if not done:
-
Log on to the Content Server as a system administrator. For example:
http://host:port/cs. -
From the Administration dropdown menu, select Admin Server (Figure 18-13).
Figure 18-13 Content Server Administration
Description of ''Figure 18-13 Content Server Administration''
-
Click the button with the instance name.
-
Click Component Manager from the menu list on the left pane (Figure 18-14).
Figure 18-14 Content Server Component Manager
Description of ''Figure 18-14 Content Server Component Manager''
-
Select SESCrawlerExport under Integration and click Update.
-
Enter configuration parameters. (You can change configuration parameters after installation.)
Disable security on authentication and authorization APIs provided by the SESCrawlerExport; that is, set Disable Secure APIs to
false. This lets security provided by the SESCrawlerExport be done internally instead of by the content server.Additionally, in clustered environments only, the feedLoc parameter must specify a location on the shared disk accessed by the nodes of the Content Server, and they each must reference it the same way; for example,
sharedDrive/dir1/dir2. Note that this is not the default location (relative path) provided. -
Restart the Content Server.
-
-
Take a snapshot of the Content Server repository.
-
Log on to the Content Server as a system administrator. For example:
http://host:port/cs. -
From the Administration dropdown menu, select SESCrawlerExport.
-
Select All sources, and click Take Snapshot (Figure 18-15).
It is important to take a snapshot before the first crawl or any subsequent full crawl of the source.
The snapshot generates
configFile.xmlat the location specified during component installation, and feeds are created at the subdirectory with the source name under feedLoc.
-
-
If the Content Server is configured for web rendition, then items in the Content Server are rendered in PDF format. The content item's native MIME type rendition is overwritten. For example, the MIME type of a Microsoft Office Word document is 'application/msword', but when the Content Server uses web rendition the MIME type becomes 'application/pdf'. A search query with the
Mimetypeparameter set to 'application/msword' does not return Word documents.If your Content Server is configured to use web rendition, then you must configure the Content Server metatdata list to include the
dFormatvalue, so that required MIME types are exported to Oracle SES. This is necessary to be able to narrow searches by MIME type.-
Back on the SESCrawlerExport Administration page, click Configure SESCrawlerExport (Figure 18-31).
-
By default, the Metadata List field is blank (Figure 18-17). Optionally, add to this field any custom metadata values you require (beginning with
x). For example, the following entry for Metadata List includes custom attributes:xCollectionID,xWCTags, xRegionDefinition
Figure 18-17 Content Server Metadata List
Description of ''Figure 18-17 Content Server Metadata List''
-
If you are using a version of Content Server earlier than 11.1.1.8, then you must add the
dFormatvalue to this Metadata List field. When the blank default value is changed, the default values are removed, and they must be added back. (Content Server 11.1.1.8 includes most values required for search, includingdFormat.)Therefore, if you are using a version of Content Server earlier than 11.1.1.8, you must manually enter the default value for Metadata List as follows (plus any custom metadata fields beginning with 'x'):
dFormat,dID,dDocName,dRevLabel,dDocType,dDocAccount,dSecurityGroup,
dOriginalName,dReleaseDate,dOutDate,dDocCreator,dDocLastModifier,dDocCreate
dDate,dDocFunction
-
-
Configure Thumbnail Options for faceted search.
Note:
Oracle SES 11.2.2.2 supports document thumbnails, while earlier releases of Oracle SES do not.On the Administration tab, select Configure Thumbnail Options to enable document thumbnails in search results. Leave the default settings as is, and click Update (Figure 18-18).
Figure 18-18 Configure Thumbnail Options
Description of ''Figure 18-18 Configure Thumbnail Options''
See Also:
TheDeployment Guide.pdf included with the product for detailed information on Content Server configuration18.5.3 Setting Up Oracle WebCenter Portal Discussion Server for Oracle SES
This section describes how to configure Oracle WebCenter Portal's Discussion Server to be crawlable by Oracle SES (in particular, the discussions server that WebCenter Portal uses for storing discussions and announcements).
Note:
These steps are not required if you have a new installation of WebCenter Portal (with an Oracle database) and Oracle WebCenter Portal's Discussion Server. It is only required if you are using upgraded (patched) instances.You can find database schema details for the corresponding data sources from your Oracle WebLogic Server console.
-
Run the Repository Creation Utility (RCU) to confirm that the discussions crawler WebCenter Portal component has been installed on the system.
-
Oracle and Microsoft SQL Server databases:
Verify that the Oracle WebCenter Portal's Discussion Server back end has been configured properly by noting that the
MyPrefix_DISCUSSIONSuser is installed in RCU.Then verify that the discussions crawler has been configured properly by noting that the
MyPrefix_DISCUSSIONS_CRAWLERuser is installed in RCU. -
IBM DB2 databases:
Verify that the Oracle WebCenter Portal's Discussion Server back end has been configured properly by noting that the
MyPrefix_DSuser is installed in RCU.Then verify that the discussions crawler has been configured properly by noting that the
MyPrefix_DCuser is installed in RCU.Note:
For IBM DB2 databases,MyPrefixis limited to five characters. IBM DB2 uses operating system users for authentication (that is, the database user is actually an operating system user). Because some operating systems have an eight character limit for user names, this requires an eight character user name.
If the discussions crawler component is not installed, then you must install it using RCU, selecting the same prefix that was used for the Oracle WebCenter Portal's Discussion Server component. Also, during the tablespace specification step in RCU, select
Prefix_IAS_DISCUSSIONSas the default tablespace. This installs the user for Oracle SES.For more information, see Chapter 42, "Deploying Portal Framework Applications."
-
-
For instances upgraded from WebCenter 11.1.1.1.0 only, run the following tool to upgrade the data in the Oracle WebCenter Portal's Discussion Server database schema, if you have not run the tool yet:
Note:
This step is necessary only if the instance is upgraded from WebCenter 11.1.1.1.0. For instances installed after WebCenter 11.1.1.1.0, this is not required.java -jar \ $MW_HOME/discussionserver/discussionserver-upgradeforses.jar \ <command_line_parameters>where
command_line_parametersare the following MDS schema details and discussions database schema details:-mds_jdbc_user user_id \ -mds_jdbc_password password \ -mds_jdbc_url url \ -discussions_jdbc_user user_id \ -discussions_jdbc_password password \ -discussions_jdbc_url url
where
mds_jdbc_user,mds_jdbc_password, andmds_jdbc_urlare the values to log in to the MDS schema, anddiscussions_jdbc_user,discussions_jdbc_password, anddiscussions_jdbc_urlare the values to log in to the discussions database schema.For example:
java -jar $MW_HOME/as11r1wc/discussionserver/discussionserver-upgradeforses.jar\
-mds_jdbc_user foo \
-mds_jdbc_password myPassword1 \
-mds_jdbc_url jdbc:oracle:thin:@host:port:SID \
-discussions_jdbc_user foo \
-discussions_jdbc_password myPassword1 \
-discussions_jdbc_url jdbc:oracle:thin:@host:port:SID
18.5.4 Setting Up Oracle SES to Search WebCenter Portal
The steps in this section must be performed in the Oracle SES administration tool.
The following steps are required:
-
Section 18.5.4.1, "Logging on to the Oracle SES Administration Tool"
-
Section 18.5.4.2, "Setting Up Oracle SES to Search Documents"
-
Section 18.5.4.3, "Setting Up Oracle SES to Search Discussions and Announcements"
-
Section 18.5.4.4, "Setting Up Oracle SES to Search Portals, Lists, People, and Page Metadata"
-
Section 18.5.4.7, "Configuring Oracle SES Facets and Sorting Attributes"
See Also:
Confirm that you have installed all required patches for Oracle SES. For the latest information on required patches, see the "Back-End Requirements for Search" section in Installation Guide for Oracle WebCenter Portal and the Release Notes.For detailed information about Oracle SES configuration, see the Oracle SES documentation included with the product. (This is listed in the WebCenter Portal product area on the Oracle Fusion Middleware documentation library.)
18.5.4.1 Logging on to the Oracle SES Administration Tool
Open the Oracle SES administration tool:
-
Open a browser and enter the URL provided after the Oracle SES installation. (This has the form
http://host:port/search/admin/index.jsp.) -
Log on with the Oracle SES admin user name and the password specified during installation.
-
For Oracle SES 11.2.2.2, the default admin user name is
searchsys; however, a different name may be specified during installation. -
For Oracle SES 11.1.*, the admin user name is
eqsys.
-
18.5.4.2 Setting Up Oracle SES to Search Documents
To search WebCenter Portal documents using Oracle SES, you must first set up a Document Service Manager (with a Document Service Instance and a Document Service Pipeline), and then create a Content Server source.
-
Configure the Document Service Manager (one time for each Oracle SES instance).
Note:
Document services are plug-ins involved in the processing of a document when it is being crawled. A document service allows WebCenter Portal to add indexable attributes for documents used in a WebCenter Portal application.Search attribute names must be unique; two attributes cannot have the same name. For example, if an attribute exists with a String data type, and another attribute is discovered by the crawler with the same name but a different data type, then the crawler ignores the second attribute. Before creating new attributes, make sure to check the list of Oracle SES attribute names and types in the Oracle SES documentation.
-
On the Global Settings - Document Services page, click Create. Select Create New Manager, click Next, and enter the following parameters:
Manager Class Name:
oracle.webcenter.search.crawl.ucm.ses.WcUcmDsManagerManager Jar File Name:
search-crawl-ucm.jarNote:
Thewebcenter_doc_pipeline_plugin.zipfile installsOracle_Home/search/lib/plugins/doc/search-crawl-ucm.jar.Click Next, and then click Finish (Figure 18-19).
Figure 18-19 Creating a Document Service Manager in Oracle SES

Description of ''Figure 18-19 Creating a Document Service Manager in Oracle SES''
-
Create the Document Service Instance.
Again, on the Global Settings - Document Services page, click Create. This time, select Select From Available Managers with Secure Enterprise Search WebCenter UCM Plugin, and click Next (Figure 18-20).
Enter the following parameters:
Instance Name: Enter any name here to be used while creating the document pipeline.
WebCenter Application Name: The unique name being used to identify this WebCenter Portal application in the back-end Content Server.
Connection Name: The name of the primary Content Server connection that WebCenter Portal is using to store documents.
WebCenter URL Prefix: The host and port where the WebCenter Portal application is deployed; for example:
http://myhost:8888.Note:
Use Fusion Middleware Control or thelistDocumentsSpacesPropertiescommand to determine the application name and connection name, as described in Section 18.5.1, "Setting Up WebCenter Portal for Oracle SES." -
Create the Document Service Pipeline. This invokes the document service instance. Again, on the Global Settings - Document Services page, under the Document Services Pipelines section, click Create (Figure 18-21).
Figure 18-21 Creating the Document Service Pipeline

Description of ''Figure 18-21 Creating the Document Service Pipeline''
-
On the Create Document Service Pipeline page, enter any custom name for this pipeline. The document service instance you created in the previous step should be listed under Available Services. Select that document service instance, and use the arrow button to move it under Used in pipeline.
-
-
Create the Content Server source for documents.
See Also:
Section 18.5.6, "Configuring Search Crawlers Using WLST" for an alternative way to create the Content Server source-
Go to Home > Sources.
-
From the Source Type dropdown list, select Content Server, and click Create (Figure 18-22).
Figure 18-22 Create Content Server Source
Description of ''Figure 18-22 Create Content Server Source''
-
Enter the following parameters:
Source Name:
unique_nameConfiguration URL:
Content_Server_SES_Crawler_Export_endpoint; for example,http://host:port/cs/idcplg?IdcService=SES_CRAWLER_DOWNLOAD_CONFIG&source=defaultNote:
Thesource=defaultparameter denotes the name of the source created in the configuration of the SES Crawler Export. The default one is created automatically and called "default."Authentication Type:
by SSO, then enter
NATIVE.If the Content Server is protected by Oracle SSO, then enter
ORASSO.User ID: The user to crawl the Content Server must have the
sceCrawlerRolerole defined. ThesceCrawlerRoleis a configuration parameter inSESCrawlerExport. Typically, administrators create a special role, assign it no privileges to view content, then create a user account that has this role.If you do not set up a specific
sceCrawlerRole, then admin credentials are required to crawl. Thesysadminuser ID works by default.If Authentication Type is
ORASSO, then enter a user ID (and password) of a user in the identity management server fronted by Oracle SSO. This user must have been granted the same permissions as sysadmin. If it is not possible to grant those permissions, then delete the "remote" user corresponding to this user in the Content Server, and create a "local" version of the user (same name) in the Content Server.Password: Password for this Content Server user.
Realm:
If Authentication Type is
NATIVE, then enterIdc Security /cs/idcplg, where/cs/is the context root you provided when you installing the Content Server.If Authentication Type is
ORASSO, then leave this parameter blank.Scratch Directory: Optional. Specify a directory on the system under which the Oracle SES instance resides.
Oracle SSO Login URL:
If Authentication Type is
ORASSO, then specify a value for Oracle SSO. For example:https://login.oracle.com/mysso/signon.jsp?site2pstoretoken=If Authentication Type is
NATIVE, then leave this field blank.Oracle SSO Action URL:
If Authentication Type is
ORASSO, then specify a value for Oracle SSO. For example:https://login.oracle.com/sso/authIf Authentication Type is
NATIVE, then leave this field blank.Click Next (Figure 18-23).
Figure 18-23 Content Server Source Parameters
Description of ''Figure 18-23 Content Server Source Parameters''
-
On the Create User-Defined Source: Step 2: Authorization page, enter the following parameters in the Authorization Manager section, if not entered by default:
Plug-in Class Name:
oracle.search.plugin.security.auth.stellent.StellentAuthManagerJar File Name:
oracleapplications/StellentCrawler.jarHTTP endpoint for authorization: for example,
http://host:port/cs/idcplgDisplay URL Prefix: for example,
http://host:port/csAuthentication Type:
NATIVEorORASSOAdministrator User: The user to crawl the Content Server must have the
sceCrawlerRolerole defined. ThesceCrawlerRoleis a configuration parameter inSESCrawlerExport. Typically, administrators create a special role, assign it no privileges to view content, then create a user account that has this role.If you do not set up a specificsceCrawlerRole, then admin credentials are required to crawl. Thesysadminuser ID works by default.If Authentication Type is
ORASSO, then enter a user ID (and password) of a user in the identity management server fronted by Oracle SSO. This user must have been granted the same permissions as sysadmin. If it is not possible to grant those permissions, then delete the "remote" user corresponding to this user in the Content Server, and create a "local" version of the user (same name) in the Content Server.Administrator Password: Password for crawl admin user
Authorization User ID Format: Authentication attribute used in the active identity plug-in. To find this value, go to the Global Settings - Identity Management Setup page in Oracle SES. Enter the value of the Authentication Attribute under the Active Plug-in (for example,
nicknameorusernameor something else). If you are using the Oracle E-Business Suite R12 identity plug-in, then leave the this parameter blank.Realm:
If Authentication Type is
NATIVE, then enterIdc Security /cs/idcplg, where/cs/is the context root you provided when you installing the Content Server.In Authentication Type is
ORASSO, then leave this field blank. -
Click Create & Customize (or edit a created source) to see other source parameters. On the Crawling Parameters tab, enter the following crawling parameter:
Document Service Pipeline. -
Click Enable and select the pipeline you created.
-
18.5.4.3 Setting Up Oracle SES to Search Discussions and Announcements
To search WebCenter Portal discussions and announcements using Oracle SES, you must first set up several Oracle SES Database sources: three for discussions and one for announcements. The three discussions sources are for forums, topics in forums, and replies in forums. These separate sources enable users to see search results for forums without also seeing results for all the messages and replies in it.
For example, the discussions sources could have the following:
-
source name
GS_Forumsand View ofFORUMCRAWLER_VW -
source name of
GS_Topicsand View ofTHREADCRAWLER_VW -
source name of
GS_Repliesand View ofMESSAGECRAWLER_VW
The announcements source could have the source name GS_Announcements and a View of ANNOUNCEMENTS_VW.
Note:
There are slightly different steps for Oracle, Microsoft SQL Server, and IBM DB2 databases.-
Configure the JDBC driver:
-
To crawl a Microsoft SQL Server or IBM DB2 database, download the appropriate JDBC driver jar files into the
ORACLE_HOME/search/lib/plugins/oracleapplicationsdirectory in Oracle SES.Note:
-
For Microsoft SQL Server: Copy the Microsoft JDBC driver files
sqljdbc.jarandsqljdbc4.jar. -
DB2: Copy the IBM driver files
db2jcc.jaranddb2jcc_license_cu.jar(obtainable from the IBM DB2 UDB client).
If the JDBC drivers for JRE 1.5 and JRE 1.6 are different, (for example:
sqljdbc.jarworks for JRE 1.5 andsqljdbc4.jarworks for JRE 1.6), then perform the following:- Download both the driver jars into the
ORACLE_HOME/search/lib/plugins/oracleapplicationsdirectory in Oracle SES.- Add an entry for the JRE 1.6 version (
sqljdbc4.jarfor SQLServer) of the driver jar to theCLASSPATHelement ofORACLE_HOME/search/config/searchctl.conf.- Restart the middle tier.
-
-
Update the
drivers.propertiesfile with the following information:DatabaseName:DriverClassName. -
Add the JRE 1.5 JDBC driver jar file name to the classpath in
META-INF/MANIFEST.MFofappsjdbc.jarandDBCrawler.jar.For example, change:
Class-Path: sqljdbc.jar rsscrawler.jar ../../pluginmessages.jar
to
Class-Path: db2jcc.jar sqljdbc.jar rsscrawler.jar ../../pluginmessages.jar
and change:
Class-Path: appsjdbc.jar
to
Class-Path: db2jcc.jar appsjdbc.jar
For a
keyattribute that is not namedKEY, change the JDBC driver information in thedrivers.propertiesfile to specify the key attribute name:database_name: driver_class_name, key_attribute_nameFor example, for a key attribute named
ID:oracle : oracle.jdbc.driver.OracleDriver, ID
In the crawling query, use
key_attribute_nameas the alias for the key value column name. In this example,IDis the alias forKEYVAL:SELECT keyval id, content, url, lastmodifieddate, lang FROM sales_only
Oracle and SQL Server databases: The following default drivers are used if none is specified in
drivers.properties:-
Oracle:
oracle.jdbc.driver.OracleDriver -
SQL Server:
com.microsoft.sqlserver.jdbc.SQLServerDriver
-
-
Required for IBM DB2 databases only:
-
Make sure that no crawlers are running that use the database crawler source. In the Oracle SES administration tool, check the crawler progress and status on the Home - Schedules page. (Click Refresh Status.)
-
Remake the
appsjdbc.jarfile and theDBCrawler.jarfile. Ensure that theMETA-INF/MANIFEST.MFwas updated correctly; otherwise, the crawler fails with the following error in the crawler log file:EQP-80406: Loading JDBC driver failed
-
Modify the
ORACLE_HOME/search/lib/plugins/oracleapplications/drivers.propertiesfile to include the following line:db2: com.ibm.db2.jcc.DB2Driver
-
Include the driver jar (
db2jcc.jar) to theCLASSPATHelement ofORACLE_HOME/search/config/searchctl.conf. For example:#CLASS PATH CLASSPATH=ORACLE_HOME/search/webapp/config:ORACLE_HOME/search/webapp/ SESAuthenticator.jar:ORACLE_HOME/search/lib/plugins/commons-plugins- stubs.jar :ORACLE_HOME /search/lib/plugins/oracleapplications/db2jcc.jar
-
Edit
JVM_OPTIONSin the$ORACLE_HOME/search/config/searchctl.conffile to add the system property"-Doracle.home=ORACLE_HOME/search". For example:JVM_OPTIONS= -Djava.awt.headless=true -Dweblogic.RootDirectory=ORACLE_HOME/search/base_domain -Doracle.home=ORACLE_HOME/search
-
Copy the
$ORACLE_HOME/search/lib/plugins/oracleapplications/pluginmessages.jarfile to the$ORACLE_HOME/search/libdirectory. -
Create the database source. Make sure to enter the correct authorization query and confirm that the attribute name used in Grant Security Attributes matches the one used in the authorization query; otherwise, users do not get any results when searching for documents.
-
-
Create the Discussions sources or the Announcements source.
See Also:
Section 18.5.6, "Configuring Search Crawlers Using WLST" for an alternative way to create these sources-
In Oracle SES, go to Home > Sources.
-
From the Source Type dropdown list, select Database, and click Create (Figure 18-24).
-
Enter the following parameters:
Source Name:
unique_name; for example,GS_Forumsto crawl discussion forums (orGS_Announcementsto crawl announcements)Database Connection String: Enter one of the following
- Oracle database: Enter one of the following
jdbc:oracle:thin:@host:port:sidjdbc:oracle:thin@host:port/serviceId- IBM DB2 database: Enter
jdbc:db2://host:port/database_name- Microsoft SQL Server database: Enter
jdbc:sqlserver://host_or_IP_address:port;database_nameUser ID: Enter one of the following
- Oracle database: The user
MyPrefix_DISCUSSIONS_CRAWLERcreated during Oracle WebCenter Portal's Discussions Server installation- Microsoft SQL Server database: The user
MyPrefix_DISCUSSIONS_CRAWLERcreated during Oracle WebCenter Portal's Discussions Server installation- IBM DB2 database: The user
MyPrefix_DCcreated during Oracle WebCenter Portal's Discussions Server installation (whereMyPrefixis five characters)Password: Password for this user
Query: Enter one of the following queries:
SELECT * FROM FORUMCRAWLER_VW
SELECT * FROM THREADCRAWLER_VW
SELECT * FROM MESSAGECRAWLER_VW
SELECT * FROM ANNOUNCECRAWLER_VW
Use
FORUMCRAWLER_VWfor the source crawling discussion forums.Use
THREADCRAWLER_VWfor the source crawling topics in discussion forums.Use
MESSAGECRAWLER_VWfor the source crawling replies in discussion forums.Use
ANNOUNCECRAWLER_VWfor the source crawling announcements.URL Prefix: The URL prefix for the WebCenter Portal application, including host, port, and application name. For example,
http://host:port/webcenter.Grant Security Attributes:
WCSECATTRNote:
Previous releases of Content Server usedFORUMIDfor Grant Security Attributes. -
Click Next.
-
On the Create User-Defined Source: Step 2: Authorization page, enter the following parameters (if not prepopulated) in the Authorization Manager section:
Plug-in Class Name:
oracle.search.plugin.security.auth.db.DBAuthManagerJar File Name:
oracleapplications/DBCrawler.jarAuthorization Database Connection String: Enter one of the following:
- Oracle database: Enter one of the following:
jdbc:oracle:thin:@host:port:sidjdbc:oracle:thin@host:port/serviceId- IBM DB2 database: Enter
jdbc:db2://host:port/database_name- Microsoft SQL Server database: Enter
jdbc:sqlserver://host_or_IP_address:port;database_nameUser ID: Enter one of the following:
- Oracle database: Enter the user
MyPrefix_DISCUSSIONS_CRAWLER- Microsoft SQL Server database: Enter the user
MyPrefix_DISCUSSIONS_CRAWLER- IBM DB2 database: Enter the user
MyPrefix_DC(whereMyPrefixis five characters)Password: This user password
Single Record Query:
falseAuthorization Query: Enter the following (on one line):
SELECT DISTINCT forumID as WCSECATTR
FROM AUTHCRAWLER_FORUM_VW
WHERE username = LOWER(?) UNION SELECT DISTINCT -1 as WCSECATTR
FROM AUTHCRAWLER_FORUM_VW
Note:
Previous releases of Content Server used the following authorization query:SELECT forumID FROM AUTHCRAWLER_FORUM_VW WHERE (username = ? or userID=-1) UNION SELECT f.forumID FROM jiveForum f, AUTHCRAWLER_CATEGORY_VW c WHERE f.categoryID = c.categoryID AND (c.username = ? or userID=-1)
Authorization User ID Format: Authentication attribute used in the active identity plug-in. To find this value, go to the Global Settings - Identity Management Setup page in Oracle SES. Enter the value of the Authentication Attribute under the Active Plug-in (for example,
nicknameorusernameor something else).If you are using the Oracle E-Business Suite R12 identity plug-in, then leave the this parameter blank.
-
Click Create to complete the source creation.
-
18.5.4.4 Setting Up Oracle SES to Search Portals, Lists, People, and Page Metadata
This section describes how to create the Oracle WebCenter source.
See Also:
Section 18.5.6, "Configuring Search Crawlers Using WLST" for an alternative way to create the Oracle WebCenter source-
Go to the Home > Sources page.
-
From the Source Type dropdown list, select the Oracle WebCenter source type, and click Create (Figure 18-25).
Figure 18-25 Create Oracle WebCenter Source
Description of ''Figure 18-25 Create Oracle WebCenter Source''
-
Enter the following source parameters:
Note:
If WebCenter Portal is fronted with an Oracle HTTP Server, then the Configuration URL used in this step requires the following inmod_wl_ohs.conffile.In a non-clustered environment:
<Location /rsscrawl>
SetHandler weblogic-handler
WebLogicHost host_name
WeblogicPort port
</Location>

<Location /sesUserAuth>
SetHandler weblogic-handler
WebLogicHost host_name
WeblogicPort port
</Location>
In a clustered environment:
<Location /rsscrawl>
WebLogicCluster host_name1:port,host_name2:port
SetHandler weblogic-handler
</Location>

<Location /sesUserAuth>
WebLogicCluster host_name1:port,host_name2:port
SetHandler weblogic-handler
</Location>
where
host_name1andhost_name2are the cluster nodes, andportis the listening port number of the managed server on which the WebCenter Portal application is deployed.See Also:
Section 33.2.3.1, "Installing and Configuring OAM 11g" for detailed information about using WebCenter Portal with Oracle Access ManagerSource Name:
unique_nameConfiguration URL:
host:port_of_WebCenterPortal/rsscrawl; for example,http://myhost:8888/rsscrawlAuthentication Type:
BASICUser ID: Crawl admin user you registered in Section 18.3.2, "Oracle SES - Configuration"; for example,
mycrawladminPassword: Password for the crawl admin user
Realm:
jazn.comOracle SSO Login URL: Leave this field blank.
Oracle SSO Action URL: Leave this field blank.
Scratch Directory: Optional. Specify a directory on the system under which the Oracle SES instance resides.
Number of connection attempts: Maximum number of connection attempts to access data feed or upload status feed.
Click Next (Figure 18-26).
Figure 18-26 Oracle WebCenter Source Parameters

Description of ''Figure 18-26 Oracle WebCenter Source Parameters''
-
On the Create User-Defined Source: Step 2: Authorization page, the Plug-in Class Name and Authorization Endpoint are prepopulated on the page. The Plug-in Class name should be
oracle.webcenter.search.auth.plugin.WebCenterAuthManager.Enter the following plug-in parameters:
Jar File Name:
webcenter/WebCenterCrawler.jarRealm:
jazn.comUser ID: Crawl admin user you registered Section 18.3.2, "Oracle SES - Configuration"; for example,
mycrawladminPassword: Password for the crawl admin user
Authorization User ID Format: Authentication attribute used in the active identity plug-in. To find this value, go to the Global Settings - Identity Management Setup page in Oracle SES. Enter the value of the Authentication Attribute under the Active Plug-in (for example,
nicknameorusernameor something else). If you are using the Oracle E-Business Suite R12 identity plug-in, then leave the this parameter blank. -
Click Create to complete the source creation.
18.5.4.5 Excluding Components from the Spaces Crawler
The spaces crawler collects data for searching the following components:
-
oracle.webcenter.peopleconnections.profile(people) -
oracle.webcenter.community(portals) -
oracle.webcenter.page(page metadata) -
oracle.webcenter.list(lists)
Use the URL parameter ?excludedServiceIds to disable search for any of these components. That is, in the Oracle SES administration tool, on the Home - Sources page for the Oracle WebCenter source, the ?excludedServiceIds in the Configuration URL parameter should equal to the comma-delimited list of service IDs to exclude.
Example 18-5 Disable Crawling of People Connections Profiles
http://host:port/rsscrawl?excludedServiceIds=oracle.webcenter.peopleconnections.profile
18.5.4.6 Additional Oracle SES Configuration
This section describes the required steps in the Oracle SES administration tool.
-
Create a source group that includes the names of the Content Server, Discussions, Announcements, and WebCenter Portal sources you created.
-
Go to the Search - Source Groups page, and click Create.
-
Enter the same source group name entered in Section 18.5.1, "Setting Up WebCenter Portal for Oracle SES."
-
From the Select Source Type dropdown list, select each source type (Database, Content Server, Oracle WebCenter), and then from the Available Sources listed for each source type, move the source you created for that source type into the Assigned Sources list.
-
Click Finish.
-
-
Optionally configure the security filter lifespan. This refreshes the authorization policies for users in the system. It is best to have a short lifespan when user policies change frequently. (This chapter uses Oracle Internet Directory identity plug-in as the example.)
For example, on the Global Settings - Query Configuration page, under Secure Search Configuration, enter
0for Security Filter Lifespan (minutes).Valid values for the security filter lifespan are between 0 minutes (no cache) and 526500 minutes (cache for one year).
-
To index everything, you must force a full crawl for each source; that is, you must change the existing incremental crawl schedule for each source to first process ALL documents.
This step is very important, in that searching does not work unless the content is first indexed completely.
Note:
You can set the schedule for the spaces crawler with the fullCrawlIntervalInHours parameter in WLST or the Full Crawl Interval parameter in Fusion Middleware Control.Go to the Home - Schedules page, select the source schedule, and click Edit to force a full crawl.
After each source has been crawled, go back to the same page and change the crawl policy back to incremental (index documents that have changed since the previous crawl). Also, in the Frequency section of the page, select a non-manual type for running incremental crawl (for example, weekly or daily).
Note:
Before the first crawl of the Content Server, remember to go to the Content Server Administration page, select SES Crawler Export, and take a snapshot. For more information, see Section 18.5.2, "Setting Up Oracle WebCenter Content Server for Oracle SES."
18.5.4.7 Configuring Oracle SES Facets and Sorting Attributes
Facets are Oracle SES objects that let users refine searches by navigating indexed data without running a new search. You must first define facets (using the provided files) in Oracle SES. Facets defined in Oracle SES are picked up in WebCenter Portal though the Tools and Services - Search administration page.
Reminder:
Oracle SES 11.2.2.2 supports faceted search with WebCenter Portal, but earlier releases of Oracle SES search do not.WebCenter Portal provides the following input files to the Oracle SES Admin API command line interface:
-
facet.xml: This configures facets in Oracle SES. -
searchAttrSortable.xml: This defines attributes for absolute sort.
Locate these files in oracle.webcenter.framework/ses/webcenter_portal_ses_admin.zip. Unzip this file, and follow the instructions in the readme.txt file.
Running these two files from Oracle SES creates the following facets:
-
Author -
Last Modified Date -
Mimetype -
Tags -
Scope GUID(This appears as the Portal facet. This value is converted to the portal display name in the search results page.) -
Service ID(This facet does not appear in the user interface. All enabled tools and services display in the search results page.)
Notes:
Thefacet.xml and searchAttrSortable.xml scripts are mandatory. Creating facets in Oracle SES alone is not sufficient for search in WebCenter Portal.
Additionally, the Scope GUID and the Service ID facets are mandatory. Facet names are case-sensitive. You must have these exact facet names.
After you run these files, you can view facets in the Oracle SES administration tool on the Global Settings - Facets page (Figure 18-27).
To create a new facet, on the Global Settings - Facets page, click Create. Enter a name for the facet and the search attribute from which the facet value should be generated. For String facet types, you must also enter the path delimiter. This is a single character used for demarcation for displaying the facet tree hierarchy for the selected facet tree node on the query page, for example, "tools/power tool/drills", where "/" is the path delimiter. You can set it to blank if the facet tree is one-level deep; that is, its nodes do not have child nodes.
Click Create and Customize to create a facet and configure its nodes on the Edit Facet page. You can configure facet nodes for a facet of Date type or Number type. For example, for the Last Modified Date facet, you can create nodes like Last Year, Last Month, Today, Between two specific days, and so on.
The Node Configuration tab displays a facet hierarchy in tree format as well as in XML format, where you can add, edit, and delete child nodes for the selected facet node. After editing the facet nodes, click Apply to save the changes.
Note:
Do not modify or delete theScope GUID or Service ID facets.Changes you make in Oracle SES are picked up in WebCenter Portal when the application specialist goes to the Tools and Services - Search administration page. WebCenter Portal does not detect changes to facets until this Search administration page is opened. WebCenter Portal remembers the facets selected for use by each portal.
18.5.5 Configuring Oracle SES Version Using WLST
You must run the setSESVersion WLST command to obtain and store version information for the Oracle SES instance associated with your default connection. This command enables faceted search and the Tools and Services - Search administration page, which is necessary for customizing search settings with Oracle SES 11.2.2.2. To confirm that the Oracle SES version is set correctly, run the listSESVersion WLST command.
Example 18-8 shows these commands. For full command syntax and examples, see the "setSESVersion" and "listSESVersion" sections in WebLogic Scripting Tool Command Reference.
Example 18-8 Enable Facet Query and the Tools and Services Search Admin Page
setSESVersion(appName='webcenter',
 sesUrl='http://myhost.com:5720/search/api/admin/AdminService',
 sesSchema='searchsys', sesPassword='password'
 listSESVersion(appName='webcenter',
 sesUrl='http://myhost.com:5720/search/api/admin/AdminService')
18.5.6 Configuring Search Crawlers Using WLST
You can use WLST commands to create crawlers and to start, stop and delete crawler schedules. These commands let you crawl new data in Oracle SES or delete old crawlers if the configuration data changes.
The following examples show some of these commands. For more information, see the "Search - Oracle SES Search Crawlers" section in WebLogic Scripting Tool Command Reference.
Example 18-9 Create a Spaces Crawler in WLST
createSpacesCrawler(
appName='webcenter', host='myWebcenterHost', port='myWebcenterPort',
sesUrl='http://mySEShost.com:7777/search/api/admin/AdminService',
sesPassword='mySESAdminPassword', crawlUser='webcenter-crawl-user',
crawlPassword='webcenter-crawl-user-pw', scratchDir='/tmp',
authUserIdFormat='authentication-id-format', crawlingMode='ACCEPT_ALL',
recrawlPolicy='PROCESS_ALL', freqType='MANUAL', startHour=1,
hoursBetweenLaunches=1, startDayOfWeek='MONDAY', startDayOfMonth=1,
daysBetweenLaunches=1, weeksBetweenLaunches=1, monthsBetweenLaunches=1,
sesSchema='eqsys')
Example 18-10 Create a Documents Crawler in WLST
createDocumentsCrawler(
appName='webcenter', host='myWebcenterHost', port='myWebcenterPort',
sesUrl='http://mySEShost.com:7777/search/api/admin/AdminService',
sesPassword='mySESAdminPassword',
configUrl='http://myContentServerHost:myContentServerPort/cs/idcplg?IdcService=SES_CRAWLER_DOWNLOAD_CONFIG&source=default',
user='ContentServer_crawl_user', password='ContentServerCrawlPassword',
scratchDir='/tmp', httpEndpoint='http://myContentServerHost:myContentServerPort/cs/idcplg',
displayUrl='http://myContentServerHost:myContentServerPort/cs', realm='Idc Security /cs/idcplg',
authUserIdFormat='authentication-id-format', pipelineName='Document-pipeline',
crawlingMode='ACCEPT_ALL', recrawlPolicy='PROCESS_CHANGED', freqType='MANUAL',
startHour=1, hoursBetweenLaunches=1, startDayOfWeek='MONDAY', startDayOfMonth=1,
daysBetweenLaunches=1, weeksBetweenLaunches=1, monthsBetweenLaunches=1,
sesSchema='eqsys')
Example 18-11 Create a Discussions Crawler in WLST
createDiscussionsCrawler(
appName='webcenter', host='myWebcenterHost', port='myWebcenterPort',
sesUrl='http://mySEShost.com:7777/search/api/admin/AdminService',
sesPassword='mySESAdminPassword',
dbConnString='jdbc:oracle:thin:@database-host:database-port:database-sid',
user='Jive-crawler-schema', password='Jive-crawler-schema-pw',
authUserIdFormat='authentication-id-format', crawlingMode='ACCEPT_ALL',
recrawlPolicy='PROCESS_ALL', freqType='MANUAL', startHour=1,
hoursBetweenLaunches=1, startDayOfWeek='MONDAY', startDayOfMonth=1,
daysBetweenLaunches=1, weeksBetweenLaunches=1, monthsBetweenLaunches=1,
sesSchema='eqsys')
Notes:
-
For
authentication-id-format, use 'nickname' if the Identity Management plug-in on Oracle SES is set to Oracle Internet Directory; otherwise, use the value of the Authentication Attribute parameter on the Identity Management plug-in on Oracle SES. -
For
database-host, use Oracle WebCenter Portal's Discussion Server database host name -
For
Jive-crawler-schema, use the Discussions server crawler schema name. Determine the prefix from RCU, and usercu-prefix_DISCUSSION_CRAWLER. -
For
sesSchema, the default value issearchsys, which is the default admin user name for Oracle SES 11.2.2.2; however, a different name may have been specified during installation. If you are using Oracle SES 11.1.*, then set this parameter toeqsys. -
To effect WLST changes, you must restart the managed server on which the application is deployed (by default, WC_Spaces). For more information, see the "Starting and Stopping Managed Servers Using WLST" section in Administrator's Guide.
18.5.7 Tips for Crawling Page Metadata
To crawl page metadata in a Portal Framework application, follow these guidelines:
-
In page templates, render pages as links using go links (
af:goLink) instead of command links (af:commandLink). -
Disable iterative development in JDeveloper during crawling. Iterative development lets you make changes to your application while it is running and immediately see the effect of those changes by refreshing the page in your browser. The iterative development feature works by disabling certain optimization features.
Iterative development is enabled by default. To turn it off:
-
In JDeveloper, from the Application menu, select Application Properties.
-
Along the left side of the Application Properties dialog, expand the Run node.
-
Select WebCenter Portal.
-
Deselect Enable Iterative Development.
-
Click OK.
-
18.6 Configuring Oracle SES to Search Portal Framework Applications
With WebCenter Portal Framework applications, Oracle SES is set as the default and preferred search platform. Configuring Oracle SES to search Portal Framework applications requires similar steps, but Portal Framework applications do not support the spaces crawler.
This section describes the steps to set up Oracle SES to search Portal Framework applications:
-
Section 18.6.1, "Setting Up Oracle WebCenter Content Server for Oracle SES"
-
Section 18.6.2, "Setting Up Oracle WebCenter Portal's Discussion Server for Oracle SES"
-
Section 18.6.3, "Setting Up Oracle SES to Search WebCenter Portal Framework"
-
Section 18.6.4, "Setting Up WebCenter Portal Framework Applications for Oracle SES"
Note:
For an overview of the tasks that must be performed to enable Oracle SES as the search engine in Portal Framework applications, see Section 18.2, "Configuration Roadmaps for Oracle SES in WebCenter Portal." There may be various acceptable ways and orders to perform the required tasks.18.6.1 Setting Up Oracle WebCenter Content Server for Oracle SES
This section describes how to configure Oracle WebCenter Content Server to be crawlable by Oracle SES (in particular, the Content Server that your Portal Framework application uses for storing documents).
The following steps must be done from within the Content Server.
See Also:
Content Server online help for information on administering roles and users in Content Server-
Create a crawl user.
If you want users with the
adminrole to crawl, then use an admin user account as the crawl user.If you want non-admin users to crawl, then follow these steps:
-
Create the role
sescrawlerrole. -
Create the user
sescrawler, and assign it thesescrawlerrolerole. This user creates the Content Server source in Oracle SES. -
Add
sceCrawlerRole=sescrawlerroletoconfig.cfg(located inMW_HOME/user_projects/domains/yourdomain/ucm/cs/config).Alternatively, you can append the
sceCrawlerRole=sescrawlerroleline in the WebCenter Content Server user interface (Administration - General Configuration - Additional Configuration Variables).
-
-
Restart the Content Server.
-
In the Content Server console, install the SESCrawlerExport component on the content server, if not done:
-
Log on to the Content Server as a system administrator. For example:
http://host:port/cs. -
From the Administration dropdown menu, select Admin Server (Figure 18-28).
Figure 18-28 Content Server Administration
Description of ''Figure 18-28 Content Server Administration''
-
Click the button with the instance name.
-
Click Component Manager from the menu list on the left pane (Figure 18-29).
Figure 18-29 WebCenter Content Server Component Manager
Description of ''Figure 18-29 WebCenter Content Server Component Manager''
-
Select SESCrawlerExport under Integration and click Update.
-
Enter configuration parameters. (You can change configuration parameters after installation.)
Disable security on authentication and authorization APIs provided by the SESCrawlerExport; that is, set Disable Secure APIs to
false. This lets security provided by the SESCrawlerExport be done internally instead of by the Content Server.Additionally, in clustered environments only, the feedLoc parameter must specify a location on the shared disk accessed by the nodes of the Content Server, and they each must reference it the same way; for example,
sharedDrive/dir1/dir2. Note that this is not the default location (relative path) provided. -
Restart the Content Server.
-
-
Take a snapshot of the Content Server repository.
-
Log on to the Content Server as a system administrator. For example:
http://host:port/cs. -
From the Administration dropdown menu, select SESCrawlerExport.
-
Select All sources, and click Take Snapshot (Figure 18-30).
It is important to take a snapshot before the first crawl or any subsequent full crawl of the source.
The snapshot generates
configFile.xmlat the location specified during component installation, and feeds are created at the subdirectory with the source name under feedLoc.
-
-
If the Content Server is configured for web rendition, then items in the Content Server are rendered in PDF format. The content item's native MIME type rendition is overwritten. For example, the MIME type of a Microsoft Office Word document is 'application/msword', but when the Content Server uses web rendition the MIME type becomes 'application/pdf'. A search query with the
Mimetypeparameter set to 'application/msword' does not return Word documents.If your Content Server is configured to use web rendition, then you must configure the Content Server metatdata list to include the
dFormatvalue, so that required MIME types are exported to Oracle SES. This is necessary to be able to narrow searches by MIME type.-
Back on the SESCrawlerExport Administration page, click Configure SESCrawlerExport (Figure 18-31).
-
By default, the Metadata List field is blank (Figure 18-32). Optionally, add to this field any custom metadata values you require (beginning with
x). For example, the following entry for Metadata List includes custom attributes:xCollectionID,xWCTags,xRegionDefinition
Figure 18-32 Content Server Metadata List
Description of ''Figure 18-32 Content Server Metadata List''
-
If you are using a version of Content Server earlier than 11.1.1.8, then you must add the
dFormatvalue to this Metadata List field. When the blank default value is changed, the default values are removed, and they must be added back. (Content Server 11.1.1.8 includes most values required for search, includingdFormat.)Therefore, if you are using a version of Content Server earlier than 11.1.1.8, you must manually enter the default value for Metadata List as follows (plus any custom metadata fields beginning with 'x'):
dFormat,dID,dDocName,dRevLabel,dDocType,dDocAccount,dSecurityGroup,
dOriginalName,dReleaseDate,dOutDate,dDocCreator,dDocLastModifier,dDocCreate
dDate,dDocFunction
-
-
Configure Thumbnail Options for faceted search.
Note:
Oracle SES 11.2.2.2 supports document thumbnails, while earlier releases of Oracle SES do not.On the Administration tab, select Configure Thumbnail Options to enable document thumbnails in search results. Leave the default settings as is, and click Update (Figure 18-33).
Figure 18-33 Configure Thumbnail Options
Description of ''Figure 18-33 Configure Thumbnail Options''
See Also:
TheDeployment Guide.pdf included with the product for detailed information on Content Server configuration18.6.2 Setting Up Oracle WebCenter Portal's Discussion Server for Oracle SES
This section describes how to configure Oracle WebCenter Portal's Discussion Server to be crawlable by Oracle SES (in particular, the discussions server that your Portal Framework application uses for storing discussions and announcements).
Note:
These steps are not required if you have a new installation of WebCenter Portal (with an Oracle database) and Oracle WebCenter Portal's Discussion Server. They are only required if you are using upgraded (patched) instances.You can find database schema details for the corresponding data sources from your Oracle WebLogic Server console.
-
Run the Repository Creation Utility (RCU) to confirm that the discussions crawler WebCenter Portal component has been installed on the system.
-
Oracle databases:
Verify that the Oracle WebCenter Portal's Discussion Server back end has been configured properly by noting that the
MyPrefix_DISCUSSIONSuser is installed in RCU.Then verify that the discussions crawler has been configured properly by noting that the
MyPrefix_DISCUSSIONS_CRAWLERuser is installed in RCU. -
Microsoft SQL Server databases:
Verify that the Oracle WebCenter Portal's Discussion Server back end has been configured properly by noting that the
MyPrefix_DISCUSSIONSuser is installed in RCU.Then verify that the discussions crawler has been configured properly by noting that the
MyPrefix_DISCUSSIONS_CRAWLERuser is installed in RCU. -
IBM DB2 databases:
Verify that the Oracle WebCenter Portal's Discussion Server back end has been configured properly by noting that the
MyPrefix_DSuser is installed in RCU.Then verify that the discussions crawler has been configured properly by noting that the
MyPrefix_DCuser is installed in RCU.Note:
For IBM DB2 databases,MyPrefixis limited to five characters. IBM DB2 uses operating system users for authentication (that is, the database user is actually an operating system user). Because some operating systems have an eight character limit for user names, this requires an eight character user name.
If the discussions crawler component is not installed, then you must install it using RCU, selecting the same prefix that was used for the Oracle WebCenter Portal's Discussion Server component. Also, during the tablespace specification step in RCU, select
Prefix_IAS_DISCUSSIONSas the default tablespace. This installs the user for Oracle SES.For more information, see Chapter 42, "Deploying Portal Framework Applications."
-
-
For instances upgraded from WebCenter 11.1.1.1.0, run the following tool to upgrade the data in the Oracle WebCenter Portal's Discussion Server database schema, if you have not run the tool yet:
Note:
This step is necessary only if the instance is upgraded from WebCenter Portal 11.1.1.1.0. For instances installed after WebCenter Portal 11.1.1.1.0, this is not required.java -jar \ $MW_HOME/discussionserver/discussionserver-upgradeforses.jar \ <command_line_parameters>where
command_line_parametersare the following MDS schema details and discussions database schema details:-mds_jdbc_user user_id \ -mds_jdbc_password password \ -mds_jdbc_url url \ -discussions_jdbc_user user_id \ -discussions_jdbc_password password \ -discussions_jdbc_url url
where
mds_jdbc_user,mds_jdbc_password, andmds_jdbc_urlare the values to log in to the MDS schema, anddiscussions_jdbc_user,discussions_jdbc_password, anddiscussions_jdbc_urlare the values to log in to the discussions database schema.For example:
java -jar $MW_HOME/as11r1wc/discussionserver/discussionserver-upgradeforses.jar\
-mds_jdbc_user foo \
-mds_jdbc_password myPassword1 \
-mds_jdbc_url jdbc:oracle:thin:@host:port:SID \
-discussions_jdbc_user foo \
-discussions_jdbc_password myPassword1 \
-discussions_jdbc_url jdbc:oracle:thin:@host:port:SID
18.6.3 Setting Up Oracle SES to Search WebCenter Portal Framework
The steps in this section must be performed in the Oracle SES administration tool.
The following steps are required:
-
Section 18.6.3.1, "Logging on to the Oracle SES Administration Tool"
-
Section 18.6.3.2, "Setting Up Oracle SES to Search Documents"
-
Section 18.6.3.3, "Setting Up Oracle SES to Search Discussions and Announcements"
-
Section 18.6.3.4, "Configuring Oracle SES Facets and Sorting Attributes"
See Also:
Confirm that you have installed all required patches for Oracle SES. For the latest information on required patches, see the "Back-End Requirements for Search" section in Installation Guide for Oracle WebCenter Portal and the Release Notes.For detailed information about Oracle SES configuration, see the Oracle SES documentation included with the product. (This is listed in the WebCenter Portal product area on the Oracle Fusion Middleware documentation library.)
18.6.3.1 Logging on to the Oracle SES Administration Tool
Open the Oracle SES administration tool:
-
Open a browser and enter the URL provided after the Oracle SES installation. (This has the form
http://host:port/search/admin/index.jsp.) -
Log on with the Oracle SES admin user name
eqsysand the password specified during installation.-
For Oracle SES 11.2.2.2, the default admin user name is
searchsys; however, a different name may be specified during installation. -
For Oracle SES 11.1.*, the admin user name is
eqsys.
-
18.6.3.2 Setting Up Oracle SES to Search Documents
To search documents using Oracle SES, you must first set up a Document Service Manager (with a Document Service Instance and a Document Service Pipeline), and then create a Content Server source.
-
Configure the Document Service Manager (one time for each Oracle SES instance).
Note:
Document services are plug-ins involved in the processing of a document when it is being crawled. A document service allows your Portal Framework application to add indexable attributes for documents used in the application.-
On the Global Settings - Document Services page, click Create. Select Create New Manager, click Next, and enter the following parameters:
Manager Class Name:
oracle.webcenter.search.crawl.ucm.ses.WcUcmDsManagerManager Jar File Name:
search-crawl-ucm.jarNote:
Thewebcenter_doc_pipeline_plugin.zipfile installsOracle_Home/search/lib/plugins/doc/search-crawl-ucm.jar.Click Next, and then click Finish (Figure 18-34).
Figure 18-34 Creating a Document Service Manager in Oracle SES
Description of ''Figure 18-34 Creating a Document Service Manager in Oracle SES''
-
Create the Document Service Instance.
Again, on the Global Settings - Document Services page, click Create. This time, select Select From Available Managers with Secure Enterprise Search WebCenter UCM Plugin, and click Next (Figure 18-35).
Enter the following parameters:
Instance Name: Enter any name here to be used while creating the document pipeline.
WebCenter Application Name: This must be left blank.
Connection Name: The Content Server connection name in your Portal Framework application.
WebCenter URL Prefix: The host and port where the application is deployed, plus the context root; for example:
http://myhost:8888/myPortalApp, wheremyPortalAppis the context root of the application.Note:
Use Fusion Middleware Control or thelistDocumentsSpacesPropertiescommand to determine the application name and connection name, as described in Section 18.5.1, "Setting Up WebCenter Portal for Oracle SES." -
Create the Document Service Pipeline. This invokes the document service instance.
Again, on the Global Settings - Document Services page, under the Document Services Pipelines section, click Create (Figure 18-36).
Figure 18-36 Creating the Document Service Pipeline
Description of ''Figure 18-36 Creating the Document Service Pipeline''
-
On the Create Document Service Pipeline page, enter any custom name for this pipeline. The document service instance you created in the previous step should be listed under Available Services. Select that document service instance, and use the arrow button to move it under Used in pipeline.
-
-
Create the Content Server source for documents.
-
Go to Home > Sources.
-
From the Source Type dropdown list, select Content Server, and click Create (Figure 18-37).
Figure 18-37 Create Content Server Source
Description of ''Figure 18-37 Create Content Server Source''
-
Enter the following parameters:
Source Name:
unique_nameConfiguration URL:
Content_Server_SES_Crawler_Export_endpoint; for example,http://host:port/cs/idcplg?IdcService=SES_CRAWLER_DOWNLOAD_CONFIG&source=defaultNote:
Thesource=defaultparameter denotes the name of the source created in the configuration of the SES Crawler Export. The default one is created automatically and called "default."Authentication Type:
If the Content Server is not protected by SSO, then enter
NATIVE.If the Content Server is protected by Oracle SSO, then enter
ORASSO.User ID: The user to crawl the Content Server must have the
sceCrawlerRolerole defined. ThesceCrawlerRoleis a configuration parameter inSESCrawlerExport. Typically, administrators create a special role, assign it no privileges to view content, then create a user account that has this role.If you do not set up a specific
sceCrawlerRole, then admin credentials are required to crawl. Thesysadminuser ID works by default.If Authentication Type is
ORASSO, then enter a user ID (and password) of a user in the identity management server fronted by Oracle SSO. This user must have been granted the same permissions as sysadmin. If it is not possible to grant those permissions, then delete the "remote" user corresponding to this user in the Content Server, and create a "local" version of the user (same name) in the Content Server.Password: Password for this Content Server user.
Realm:
If Authentication Type is
NATIVE, then enterIdc Security /cs/idcplg, where/cs/is the context root you provided when you installing the Content Server.If Authentication Type is
ORASSO, then leave this parameter blank.Scratch Directory: Optional. Specify a directory on the system under which the Oracle SES instance resides.
Oracle SSO Login URL:
If Authentication Type is
ORASSO, then specify a value for Oracle SSO. For example:https://login.oracle.com/mysso/signon.jsp?site2pstoretoken=If Authentication Type is
NATIVE, then leave this field blank.Oracle SSO Action URL:
If Authentication Type is
ORASSO, then specify a value for Oracle SSO. For example:https://login.oracle.com/sso/authIf Authentication Type is
NATIVE, then leave this field blank.Click Next (Figure 18-38).
Figure 18-38 Content Server Source Parameters
Description of ''Figure 18-38 Content Server Source Parameters''
-
On the Create User-Defined Source: Step 2: Authorization page, enter the following parameters in the Authorization Manager section, if not entered by default:
Plug-in Class Name:
oracle.search.plugin.security.auth.stellent.StellentAuthManagerJar File Name:
oracleapplications/StellentCrawler.jarHTTP endpoint for authorization: for example,
http://host:port/cs/idcplgDisplay URL Prefix: for example,
http://host:port/csAuthentication Type:
NATIVEorORASSOAdministrator User: The user to crawl the Content Server must have the
sceCrawlerRolerole defined. ThesceCrawlerRoleis a configuration parameter inSESCrawlerExport. Typically, administrators create a special role, assign it no privileges to view content, then create a user account that has this role.If you do not set up a specificsceCrawlerRole, then admin credentials are required to crawl. Thesysadminuser ID works by default.If Authentication Type is
ORASSO, then enter a user ID (and password) of a user in the identity management server fronted by Oracle SSO. This user must have been granted the same permissions as sysadmin. If it is not possible to grant those permissions, then delete the "remote" user corresponding to this user in the Content Server, and create a "local" version of the user (same name) in the Content Server.Administrator Password: Password for crawl admin user
Authorization User ID Format: Authentication attribute used in the active identity plug-in. To find this value, go to the Global Settings - Identity Management Setup page in Oracle SES. Enter the value of the Authentication Attribute under the Active Plug-in (for example,
nicknameorusernameor something else). If you are using the Oracle E-Business Suite R12 identity plug-in, then leave the this parameter blank.Realm:
If Authentication Type is
NATIVE, then enter "Idc Security /cs/idcplg", where/cs/is the context root you provided when you installing the Content Server.In Authentication Type is
ORASSO, then leave this field blank. -
Click Create & Customize (or edit a created source) to see other source parameters. On the Crawling Parameters tab, enter the following crawling parameter:
Document Service Pipeline. -
Click Enable and select the pipeline you created.
-
18.6.3.3 Setting Up Oracle SES to Search Discussions and Announcements
To search discussions and announcements using Oracle SES, you must first set up several Oracle SES Database sources: three for discussions and one for announcements. The three discussions sources are for forums, topics in forums, and replies in forums. These separate sources enable users to see search results for forums without also seeing results for all the messages and replies in it.
For example, the discussions sources could have the following:
-
source name
GS_Forumsand View ofFORUMCRAWLER_VW -
source name of
GS_Topicsand View ofTHREADCRAWLER_VW -
source name of
GS_Repliesand View ofMESSAGECRAWLER_VW
The announcements source could have the source name GS_Announcements and a View of ANNOUNCEMENTS_VW.
Note:
There are slightly different steps for Oracle, Microsoft SQL Server, and IBM DB2 databases.-
Configure the JDBC driver:
-
To crawl a Microsoft SQL Server or IBM DB2 database, download the appropriate JDBC driver jar files into the
ORACLE_HOME/search/lib/plugins/oracleapplicationsdirectory in Oracle SES.Note:
-
For Microsoft SQL Server: Copy the Microsoft JDBC driver files
sqljdbc.jarandsqljdbc4.jar. -
For IMB DB2: Copy the IBM driver files
db2jcc.jaranddb2jcc_license_cu.jar(obtainable from the IBM DB2 UDB client).
If the JDBC drivers for JRE 1.5 and JRE 1.6 are different (for example:
sqljdbc.jarworks for JRE 1.5 andsqljdbc4.jarworks for JRE 1.6), then perform the following:- Download both the driver jars into the
ORACLE_HOME/search/lib/plugins/oracleapplicationsdirectory in Oracle SES.- Add an entry for the JRE 1.6 version (
sqljdbc4.jarfor SQLServer) of the driver jar to theCLASSPATHelement ofORACLE_HOME/search/config/searchctl.conf.- Restart the middle tier.
-
-
Update the
drivers.propertiesfile with the following information:DatabaseName:DriverClassName. -
Add the JRE 1.5 JDBC driver jar file name to the classpath in
META-INF/MANIFEST.MFofappsjdbc.jarandDBCrawler.jar.For example, change:
Class-Path: sqljdbc.jar rsscrawler.jar ../../pluginmessages.jar
to
Class-Path: db2jcc.jar sqljdbc.jar rsscrawler.jar ../../pluginmessages.jar
and change:
Class-Path: appsjdbc.jar
to
Class-Path: db2jcc.jar appsjdbc.jar
For a
keyattribute that is not namedKEY, change the JDBC driver information in thedrivers.propertiesfile to specify the key attribute name:database_name: driver_class_name, key_attribute_nameFor example, for a key attribute named
ID:oracle : oracle.jdbc.driver.OracleDriver, ID
In the crawling query, use
key_attribute_nameas the alias for the key value column name. In this example,IDis the alias forKEYVAL:SELECT keyval id, content, url, lastmodifieddate, lang FROM sales_only
Oracle and SQL Server databases: The following default drivers are used if none is specified in
drivers.properties:-
Oracle:
oracle.jdbc.driver.OracleDriver -
SQL Server:
com.microsoft.sqlserver.jdbc.SQLServerDriver
-
-
Required for IBM DB2 databases only:
-
Make sure that no crawlers are running that use the database crawler source. In the Oracle SES administration tool, check the crawler progress and status on the Home - Schedules page. (Click Refresh Status.)
-
Remake the
appsjdbc.jarfile and theDBCrawler.jarfile. Ensure that theMETA-INF/MANIFEST.MFwas updated correctly; otherwise, the crawler fails with the following error in the crawler log file:EQP-80406: Loading JDBC driver failed
-
Modify the
ORACLE_HOME/search/lib/plugins/oracleapplications/drivers.propertiesfile to include the following line:db2: com.ibm.db2.jcc.DB2Driver
-
Include the driver jar (
db2jcc.jar) to theCLASSPATHelement ofORACLE_HOME/search/config/searchctl.conf. For example:#CLASS PATH CLASSPATH=ORACLE_HOME/search/webapp/config:ORACLE_HOME/search/webapp/ SESAuthenticator.jar:ORACLE_HOME/search/lib/plugins/commons-plugins- stubs.jar :ORACLE_HOME /search/lib/plugins/oracleapplications/db2jcc.jar
-
Edit
JVM_OPTIONSin the$ORACLE_HOME/search/config/searchctl.conffile to add the system property"-Doracle.home=ORACLE_HOME/search". For example:JVM_OPTIONS= -Djava.awt.headless=true -Dweblogic.RootDirectory=ORACLE_HOME/search/base_domain -Doracle.home=ORACLE_HOME/search
-
Copy the
$ORACLE_HOME/search/lib/plugins/oracleapplications/pluginmessages.jarfile to the$ORACLE_HOME/search/libdirectory. -
Create the database source. Make sure to enter the correct authorization query and confirm that the attribute name used in Grant Security Attributes matches the one used in the authorization query; otherwise, users do not get any results when searching for documents.
-
-
Create the Discussions sources or the Announcements source.
-
In Oracle SES, go to Home > Sources.
-
From the Source Type dropdown list, select Database, and click Create (Figure 18-39).
-
Enter the following parameters:
Source Name:
unique_name; for example,GS_Forumsto crawl discussion forums (orGS_Announcementsto crawl announcements)Database Connection String: Enter one of the following
- Oracle databases: Enter one of the following
jdbc:oracle:thin:@host:port:sidjdbc:oracle:thin@host:port/serviceId- IBM DB2 databases: Enter
jdbc:db2://host:port/database_name- Microsoft SQL Server databases: Enter
jdbc:sqlserver://host_or_IP_address:port;database_nameUser ID: Enter one of the following:
- Oracle databases: The user
MyPrefix_DISCUSSIONS_CRAWLERcreated during Oracle WebCenter Portal's Discussion Server installation- Microsoft SQL Server databases: The user
MyPrefix_DISCUSSIONS_CRAWLERcreated during Oracle WebCenter Portal's Discussion Server installation- IBM DB2 databases: The user
MyPrefix_DCcreated during Oracle WebCenter Portal's Discussion Server installation (whereMyPrefixis five characters)Password: Password for this user
Query: Enter one of the following queries:
SELECT * FROM FORUMCRAWLER_VW
SELECT * FROM THREADCRAWLER_VW
SELECT * FROM MESSAGECRAWLER_VW
SELECT * FROM ANNOUNCECRAWLER_VW
Use
FORUMCRAWLER_VWfor the source crawling discussion forums.Use
THREADCRAWLER_VWfor the source crawling topics in discussion forums.Use
MESSAGECRAWLER_VWfor the source crawling replies in discussion forums.Use
ANNOUNCECRAWLER_VWfor the source crawling announcements.URL Prefix: The URL prefix for the Portal Framework application, including host, port, and application name. For example,
http://host:port/myPortalApp.Grant Security Attributes:
WCSECATTRNote:
Previous releases of Content Server usedFORUMIDfor Grant Security Attributes. -
Click Next.
-
On the Create User-Defined Source: Step 2: Authorization page, enter the following parameters (if not prepopulated) in the Authorization Manager section:
Plug-in Class Name:
oracle.search.plugin.security.auth.db.DBAuthManagerJar File Name:
oracleapplications/DBCrawler.jarAuthorization Database Connection String: Enter one of the following:
- Oracle databases: Enter one of the following:
jdbc:oracle:thin:@host:port:sidjdbc:oracle:thin@host:port/serviceId- IBM DB2 databases: Enter
jdbc:db2://host:port/database_name- Microsoft SQL Server databases: Enter
jdbc:sqlserver://host_or_IP_address:port;database_nameUser ID: Enter one of the following:
- Oracle databases: Enter the user
MyPrefix_DISCUSSIONS_CRAWLER- Microsoft SQL Server databases: Enter the user
MyPrefix_DISCUSSIONS_CRAWLER- IBM DB2 databases: Enter the user
MyPrefix_DC(whereMyPrefixis five characters)Password: This user password
Single Record Query:
falseAuthorization Query: Enter the following (on one line):
SELECT DISTINCT forumID as WCSECATTR
FROM AUTHCRAWLER_FORUM_VW
WHERE username = LOWER(?) UNION SELECT DISTINCT -1 as WCSECATTR
FROM AUTHCRAWLER_FORUM_VW
Note:
Previous releases of Content Server used the following authorization query:SELECT forumID FROM AUTHCRAWLER_FORUM_VW WHERE (username = ? or userID=-1) UNION SELECT f.forumID FROM jiveForum f, AUTHCRAWLER_CATEGORY_VW c WHERE f.categoryID = c.categoryID AND (c.username = ? or userID=-1)
Authorization User ID Format: Authentication attribute used in the active identity plug-in. To find this value, go to the Global Settings - Identity Management Setup page in Oracle SES. Enter the value of the Authentication Attribute under the Active Plug-in (for example,
nicknameorusernameor something else).If you are using the Oracle E-Business Suite R12 identity plug-in, then leave the this parameter blank.
-
Click Create to complete the source creation.
-
18.6.3.4 Configuring Oracle SES Facets and Sorting Attributes
Facets are Oracle SES objects that let users refine searches by navigating indexed data without running a new search. You must first define facets (using the provided files) in Oracle SES. Facets defined in Oracle SES are picked up in the Portal Framework though the Tools and Services - Search administration page.
Reminder:
Oracle SES 11.2.2.2 supports faceted search with this release of WebCenter Portal. Earlier releases do not.WebCenter Portal provides the following input files to the Oracle SES Admin API command line interface:
-
facet.xml: This configures facets in Oracle SES. -
searchAttrSortable.xml: This defines attributes for absolute sort.
Locate these files in oracle.webcenter.framework/ses/webcenter_portal_ses_admin.zip. Unzip this file, and follow the instructions in the readme.txt file.
Running these two files from Oracle SES creates the following facets:
-
Author -
Last Modified Date -
Mimetype -
Tags -
Scope GUID(This appears as the Portal facet. This value is converted to the portal display name on the search results page.) -
Service ID(This facet does not appear in the user interface. All enabled tools and services display on the search results page.)
Notes:
Thefacet.xml and searchAttrSortable.xml scripts are mandatory. Creating facets in Oracle SES alone is not sufficient for search in your Portal Framework application.
Additionally, the Scope GUID and the Service ID facets are mandatory. Facet names are case-sensitive. You must have these exact facet names.
After you run these files, you view facets in the Oracle SES administration tool on the Global Settings - Facets page (Figure 18-40).
To create a new facet, on the Global Settings - Facets page, click Create. Enter a name for the facet and the search attribute from which the facet value should be generated. For String facet types, you must also enter the path delimiter. This is a single character used for demarcation for displaying the facet tree hierarchy for the selected facet tree node on the query page, for example, "tools/power tool/drills", where "/" is the path delimiter. You can set it to blank if the facet tree is one-level deep; that is, its nodes do not have child nodes.
Click Create and Customize to create a facet and configure its nodes on the Edit Facet page. You can configure facet nodes for a facet of Date type or Number type. For example, for the Last Modified Date facet, you can create nodes like Last Year, Last Month, Today, Between two specific days, and so on.
The Node Configuration tab displays a facet hierarchy in tree format as well as in XML format, where you can add, edit, and delete child nodes for the selected facet node. After editing the facet nodes, click Apply to save the changes.
Note:
Do not modify or delete theScope GUID or Service ID facets.Changes you make in Oracle SES are picked up in your Portal Framework application when the application specialist goes to the Tools and Services - Search administration page. The Portal Framework application does not detect changes to facets until this Search administration page is opened. WebCenter Portal remembers the facets selected for use by each portal.
18.6.3.5 Additional Oracle SES Configuration
This section describes the required steps in the Oracle SES administration tool.
-
Create a source group that includes the names of the Content Server, Discussions, Announcements, and WebCenter sources you created.
-
Go to the Search - Source Groups page, and click Create.
-
Enter the same source group name entered in Section 18.6.4, "Setting Up WebCenter Portal Framework Applications for Oracle SES."
-
From the Select Source Type dropdown list, select each source type (Database, Content Server, Oracle WebCenter), and then from the Available Sources listed for each source type, move the source you created for that source type into the Assigned Sources list.
-
Click Finish.
-
-
Optionally configure the security filter lifespan. This refreshes the authorization policies for users in the system. It is best to have a short lifespan when user policies change frequently. (This chapter uses Oracle Internet Directory identity plug-in as the example.)
For example, on the Global Settings - Query Configuration page, under Secure Search Configuration, enter
0for Security Filter Lifespan (minutes).Valid values for the security filter lifespan are between 0 minutes (no cache) and 526500 minutes (cache for one year).
-
To index everything, you must force a full crawl for each source; that is, you must change the existing incremental crawl schedule for each source to first process ALL documents.
This step is very important, in that searching does not work unless the content is first indexed completely.
Go to the Home - Schedules page, select the source schedule, and click Edit to force a full crawl.
After each source has been crawled, go back to the same page and change the crawl policy back to incremental (index documents that have changed since the previous crawl). Also, in the Frequency section of the page, select a non-manual type for running incremental crawl (for example, weekly or daily).
Note:
Before the first crawl of the Content Server, remember to go to the Content Server Administration page, select SES Crawler Export, and take a snapshot. For more information, see Section 18.6.1, "Setting Up Oracle WebCenter Content Server for Oracle SES."
18.6.4 Setting Up WebCenter Portal Framework Applications for Oracle SES
This section describes how to configure WebCenter Portal Framework applications to work with Oracle SES.
Make sure that you have created and configured the connection between your Portal Framework application and Oracle SES, specifying the Federation Trusted Entity, and optionally specifying a source group.
The Oracle SES crawlers are enabled by default in Portal Framework applications.
See Also:
"Setting Up Connections for Search" in Developing Portals with Oracle WebCenter Portal and Oracle JDeveloper18.6.4.1 Configuring Portal Framework Applications After Deployment
After a Portal Framework application has been deployed to a managed server, you can configure it using WLST or Fusion Middleware Control. This section contains the following topics:
-
Section 18.6.4.1.1, "Modifying Search Parameters Using WLST"
-
Section 18.6.4.1.2, "Configuring Oracle SES Version Using WLST"
-
Section 18.6.4.1.3, "Configuring Search Crawlers Using WLST"
-
Section 18.6.4.1.4, "Configuring Search Parameters and Crawlers Using Fusion Middleware Control"
18.6.4.1.1 Modifying Search Parameters Using WLST
Use the WLST command setSearchConfig to modify search parameters post deployment.
Example 18-12 shows how to specify a data group (also known as source group) under which you search Oracle SES.
Example 18-12 Set a Source Group
setSearchSESConfig(appName='myPortalApp',
                   dataGroup='mySources')
where dataGroup is the source group you create in Section 18.6.3.5, "Additional Oracle SES Configuration."
Example 18-13 shows how to increase the number of search results displayed. Five is the default setting for the number of search results displayed in Oracle SES results, but result sets generally are larger than five.
Example 18-13 Increase Number of Search Results Displayed
setSearchConfig(appName='myPortalApp',
                numResultsMain=10)
Example 18-14 shows how to configure the maximum time that a tool/service is allowed to execute a search (in ms). When a service times out largely depends on the system load. If you consistently get time out errors, then you can adjust this parameter.
Example 18-14 Configure Maximum Time WebCenter Waits for Search Results
setSearchConfig(appName='myPortalApp',
                executionTimeout=10000)
For command syntax and examples, see the "setSearchConfig" section in WebLogic Scripting Tool Command Reference.
18.6.4.1.2 Configuring Oracle SES Version Using WLST
You must run the setSESVersion WLST command to obtain and store version information for the Oracle SES instance associated with your default connection. This command enables faceted search and the Tools and Services - Search administration page, which is necessary for customizing search settings with Oracle SES 11.2.2.2.
If the Portal Framework application is deployed to JDeveloper's integrated server, then you must run the setSESVersion WLST command after starting the application. Version data is not persisted across each instance of the integrated server. Also, you must run the setSESVersion command before accessing the site of the Portal Framework application. For example:
-
Start the integrated server and the Portal Framework application.
-
Run the
setSESVersioncommand. -
Access the site.
To confirm that the Oracle SES version is set correctly, run the listSESVersion WLST command.
Example 18-15 shows these commands. For full command syntax and examples, see the "setSESVersion" and "listSESVersion" sections in WebLogic Scripting Tool Command Reference.
Example 18-15 Enable Facet Query and the Tools and Services Search Admin Page
setSESVersion(appName='myPortalApp',
 sesUrl='http://myhost.com:5720/search/api/admin/AdminService',
 sesSchema='searchsys', sesPassword='password'
 listSESVersion(appName='myPortalApp',
 sesUrl='http://myhost.com:5720/search/api/admin/AdminService')
18.6.4.1.3 Configuring Search Crawlers Using WLST
You can use WLST commands to create crawlers and to start, stop and delete crawler schedules post deployment. These commands let you crawl new data in Oracle SES or delete old crawlers if the configuration data changes.
Example 18-16 and Example 18-17 show some of these commands. For more information, see the "Search - Oracle SES Search Crawlers" section in WebLogic Scripting Tool Command Reference.
Example 18-16 Create a Documents Crawler in WLST
createDocumentsCrawler(
appName='myPortalApp', host='myWebcenterHost', port='myWebcenterPort',
sesUrl='http://mySEShost.com:7777/search/api/admin/AdminService',
sesPassword='mySESAdminPassword',
configUrl='http://myContentServerHost:myContentServerPort/cs/idcplg?IdcService=SES_CRAWLER_DOWNLOAD_CONFIG&source=default',
user='ContentServer_crawl_user', password='ContentServerCrawlPassword',
scratchDir='/tmp', httpEndpoint='http://myContentServerHost:myContentServerPort/cs/idcplg',
displayUrl='http://myContentServerHost:myContentServerPort/cs', realm='Idc Security /cs/idcplg',
authUserIdFormat='authentication-id-format', pipelineName='Document-pipeline',
crawlingMode='ACCEPT_ALL', recrawlPolicy='PROCESS_CHANGED', freqType='MANUAL',
startHour=1, hoursBetweenLaunches=1, startDayOfWeek='MONDAY', startDayOfMonth=1,
daysBetweenLaunches=1, weeksBetweenLaunches=1, monthsBetweenLaunches=1,
sesSchema='eqsys')
Example 18-17 Create a Discussions Crawler in WLST
createDiscussionsCrawler(
appName='myPortalApp', host='myWebcenterHost', port='myWebcenterPort',
sesUrl='http://mySEShost.com:7777/search/api/admin/AdminService',
sesPassword='mySESAdminPassword',
dbConnString='jdbc:oracle:thin:@database-host:database-port:database-sid',
user='Jive-crawler-schema', password='Jive-crawler-schema-pw',
authUserIdFormat='authentication-id-format', crawlingMode='ACCEPT_ALL',
recrawlPolicy='PROCESS_ALL', freqType='MANUAL', startHour=1,
hoursBetweenLaunches=1, startDayOfWeek='MONDAY', startDayOfMonth=1,
daysBetweenLaunches=1, weeksBetweenLaunches=1, monthsBetweenLaunches=1,
sesSchema='eqsys')
Notes:
-
For
authentication-id-format, use 'nickname' if the Identity Management plug-in on Oracle SES is set to Oracle Internet Directory; otherwise, use the value of the Authentication Attribute parameter on the Identity Management plug-in on Oracle SES. -
For
database-host, use Oracle WebCenter Portal's Discussion Server database host name -
For
Jive-crawler-schema, use the Discussions server crawler schema name. Determine the prefix from RCU, and usercu-prefix_DISCUSSION_CRAWLER. -
For
sesSchema, the default value issearchsys, which is the default admin user name for Oracle SES 11.2.2.2; however, a different name may have been specified during installation. If you are using Oracle SES 11.1.*, then set this parameter toeqsys. -
To effect WLST changes, you must restart the managed server on which the application is deployed (by default, WC_Spaces). For more information, see the "Starting and Stopping Managed Servers Using WLST" section in Administrator's Guide.
18.6.4.1.4 Configuring Search Parameters and Crawlers Using Fusion Middleware Control
You can enable or disable Oracle SES and configure search settings using Fusion Middleware Control.
-
Log in to Fusion Middleware Control and navigate to the home page for your Portal Framework application. For more information, see Section 6.3, "Navigating to the Home Page for Portal Framework Applications."
-
From the WebCenter Portal menu, select Settings > Application Configuration.
-
In the Search Crawlers section, select to use Oracle SES, and click Apply (Figure 18-41).
-
Configure Search Settings as required, and click Apply (Figure 18-41).
Figure 18-41 Application Settings for Oracle Search
Description of ''Figure 18-41 Application Settings for Oracle Search''
-
Oracle Secure Enterprise Search Data Group: Specify the Oracle SES source group in which to search. If no value is provided, then everything in the Oracle SES instance is searched.
-
Execution Timeout: Enter the maximum time that a tool/service is allowed to execute a search (in ms).
-
Executor Preparation Timeout: Enter the maximum time that a tool/service is allowed to initialize a search (in ms).
-
Results per Service - Saved Search Task Flows: Enter the number of search results displayed, per tool/service, in a Saved Search task flow.
-
Results per Service - Search Page: Enter the number of search results displayed, per tool/service, for searches submitted from the main search page. Users can click Show All if they want to see all the results.
-
Number of Saved Searches in Search Page: Enter the number of saved searches displayed in the Saved Search list (on the main search page).
You do not need to restart the managed server on which the Portal Framework application is deployed.
-
18.7 Troubleshooting Issues with Oracle SES
This section provides troubleshooting tips on administering Oracle SES. It includes the following topics:
-
Section 18.7.3, "Cannot Grant View Permissions to WebCenter Portal"
-
Section 18.7.4, "Restricting Oracle SES Results by Source Group or Source Type"
-
Section 18.7.5, "Search Results Do Not Include Secured Resources"
-
Section 18.7.7, "Search Results Do Not Include Discussions and Announcements"
-
Section 18.7.8, "Search Results Do Not Include Recently Added Resources"
-
Section 18.7.9, "Search Results Do Not Reflect Authorization Changes"
-
Section 18.7.10, "Search Results Do Not Include Resources Available to Wide Audience"
18.7.1 No Search Results Found
No search results are found.
Check the following:
18.7.1.1 Oracle SES Connection
Confirm that you can access the Oracle SES SOAP URL and that connection properties to Oracle SES are correct.
For more information, see Section 18.4.1, "Testing the Connection to Oracle SES."
18.7.1.2 Documents and Discussions Connections
Confirm that connections exist in WebCenter Portal to the Content Server and the discussions server.
The Oracle SES log shows if a WebCenter Portal component is excluded from the search. Locate the search log file on the Oracle SES instance and check the log file for totalSearchTime.
When nothing is excluded (that is, Oracle SES is enabled for all WebCenter Portal components), the line looks similar to the following:
req=Search userName=vicki totalSearchTime=1150ms userQuery=0712>
When Oracle SES is not enabled for Documents, Discussions, and Announcements, the lines look similar to the following:
req=Search userName=vicki totalSearchTime=1133ms userQuery=0712
-wc_serviceId:oracle.webcenter.doclib
-wc_serviceId:oracle.webcenter.collab.forum
-wc_serviceId:oracle.webcenter.collab.announcement>
18.7.1.3 WebCenter Portal Crawl Configuration
Use Fusion Middleware Control or WLST to confirm that Oracle SES is enabled in WebCenter Portal, as described in Section 18.5.1, "Setting Up WebCenter Portal for Oracle SES."
18.7.1.4 Oracle SES Configuration
-
Confirm that you have installed all required patches for Oracle SES. For the latest information on required patches, see the "Back-End Requirements for Search" section in Installation Guide for Oracle WebCenter Portal and the Release Notes.
-
Confirm that Oracle SES is configured with an identity management system to validate and authenticate users. Also confirm that WebCenter Portal and Oracle SES use the same identity management system, such as Oracle Internet Directory. All repositories you are using (such as WebCenter Portal, WebCenter Content Server, and Oracle WebCenter Portal's Discussion Server) must share the same user base as Oracle SES.
Additionally, each Oracle SES instance must have a trusted entity for allowing WebCenter Portal end users to be securely propagated at search time. For more information, see Section 18.3.2, "Oracle SES - Configuration."
To test the Oracle SES is connection with a federated trusted entity user, see Section 18.4.1, "Testing the Connection to Oracle SES."
18.7.1.5 User Authentication
Confirm that the user exists (that is, confirm that the user can log on) in WebCenter Portal identity plug-ins, Oracle SES, and all configured data repositories, such as the Content Server and the discussions server.
An Oracle SES proxy login error in the WebCenter Portal diagnostic log looks similar to the following:
Received status "failed" during proxy login with application entity "weblogic" to
Oracle SES at [http://host:port/search/query/OracleSearch], as search user
"vicki". Defaulting to public.
18.7.1.6 Oracle SES Crawling
Confirm that Oracle SES crawled successfully in all sources.
-
In the Oracle SES administration tool, go to the Home - Schedules tab. Click the Log File icon to display the log file for the source. To obtain the location of the full log, click the Status link. The Crawler Progress Summary and Log Files by Source section displays the full path to the log file.
-
If Oracle SES fails to log in to the Content Server crawl endpoint due to an authentication error, then the following errors are logged:
EQP-60303: Exiting saxthread due to errors

EQP-80330: Unrecognized QName <http://schemas.xmlsoap.org/soap/envelope/>:Envelope oracle.search.sdk.crawler.PluginException
-
For the Oracle WebCenter source, verify if the rsscrawl servlet is unavailable. For example:
FATAL main EQP-80309: Exception while opening a stream to the URI: https://example.com:port/rsscrawl?command=GetControl
-
For the Content Server source, verify if the password is invalid. For example:
-1 Admin credentials passed in were not valid - Rejecting request.
-
Monitor the crawl process in the Oracle SES administration tool with a combination of the following:
-
Check the crawler progress and status on the Home - Schedules page. (Click Refresh Status.) From the Status page, you can view statistics of the crawl.
-
Monitor your crawler statistics on the Home - Schedules - Crawler Progress Summary page and the Home - Statistics page.
-
Monitor your search statistics on the Home - General page and the Home - Statistics page.
See Oracle Secure Enterprise Search Administrator's Guide for tips to tune crawl performance.
-
-
Additionally, examine snapshots and datafeeds on the Content Server instance, and examine the Oracle WebCenter Portal's Discussions Server database.
18.7.1.7 Oracle SES Authorization
-
In the Oracle SES administration tool, go to the Home - Sources tab.
-
Click the Edit icon for each source to see source configuration tabs.
-
Click the Authorization tab to confirm the authorization connection string, user name, password, and authorization user ID format.
-
Examine the Oracle SES log file (described in a previous step). Look for phrases including a URL value. For example, the URIHandler initialized for the URI:
http://host:8888/sesUserAuth?userId=someone
For detailed information on the Oracle SES administration tool, see the Oracle SES documentation included with the product. (This is listed in the WebCenter Portal product area on the Oracle Fusion Middleware documentation library.)
18.7.2 Search Failure Errors
Search failure messages may appear inconsistently after a search. For example, when connecting to database jdbc:oracle:thin:@host:1521/sid, user: PREFIX_DISCUSSIONS_CRAWLER:
Search failure: time out error
Search failure: problem preparing search executor
Search failure: problem with execution
Wait a moment, and try the search again. These messages appear when the service times out, which largely depends on the system load. If the time out error persists, adjust the executionTimeout parameter in the setSearchConfig command.
For command syntax and examples, see the "setSearchConfig" section in WebLogic Scripting Tool Command Reference.
18.7.3 Cannot Grant View Permissions to WebCenter Portal
You get the following error when granting "view" permissions, as described in Section 18.5.1, "Setting Up WebCenter Portal for Oracle SES."
Command FAILED, Reason: javax.naming.directory.AttributeInUseException: [LDAP: e
rror code 20 - uniquemember attribute has duplicate value.]; remaining name 'orc
lguid=F0CC506017B711DFBFFED9EA6A94EAEC,cn=Permissions,cn=JAAS Policy,cn=webcente
r,cn=wc_domain,cn=JPSContext,cn=jpsroot_webcenter_dadvmc0057'
This error appears if the permission is granted. Ignore the error.
18.7.4 Restricting Oracle SES Results by Source Group or Source Type
You want to restrict search results by source group or source type.
In the Oracle SES administration tool, navigate to the Home - Sources - Customize Federated Source - Search Restrictions page to set search restrictions.Alternatively, use filters, where each filter is a restriction on search result.
For detailed information about using Oracle SES, see the Oracle SES documentation on the Oracle Fusion Middleware documentation library (in the WebCenter Portal product area).
18.7.5 Search Results Do Not Include Secured Resources
Search results do not include secured resources. One cause is that the proxy login of WebCenter Portal users failed in Oracle SES. An Oracle SES proxy login error in the WebCenter Portal diagnostic log looks similar to the following:
Received status "failed" during proxy login with application entity "weblogic" to
Oracle SES at http://host:port/search/query/OracleSearch, as search user "vicki".
Defaulting to public.
Confirm that Oracle SES is configured with an identity management system to validate and authenticate users.
Also confirm that WebCenter Portal and Oracle SES use the same identity management system, such as Oracle Internet Directory. All repositories (such as WebCenter Portal, WebCenter Content Server, and Oracle WebCenter Portal Discussions Server) must share the same user base as Oracle SES.
Additionally, each Oracle SES instance must have a trusted entity for allowing WebCenter Portal end users to be securely propagated at search time.
Search results do not include secured resources. Another cause is that authorization endpoints are not configured correctly. Locate the search log file on the Oracle SES instance. Look for phrases including the URL value. For example:
EQP-80309: Exception while opening a stream to the URI:
http://<host>:<port>/sesUserAuth?userId=<end-user-name>

QueryFilterPlugin returned null or empty array value for security attribute
"WCSECATTR". Values required for all security attributes.
-
In the Oracle SES administration tool, go to the Home - Sources tab.
-
Click the Edit icon for the source to see source configuration tabs.
-
Click the Authorization tab to confirm the authorization connection string, user name, password, and authorization user ID format.
Search results do not include secured resources. Yet another cause is that authorization endpoints are not returning authorization data.
Locate the search log file on the Oracle SES instance. Look for phrases including a URL value. For example, the URIHandler initialized for the URI:
http://host:8888/sesUserAuth?userId=someone
Reduce the number of crawl sources.
18.7.6 Search Results Do Not Include Documents
Search results do not include documents. Crawling of Content Server documents fails.
-
In the Oracle SES administration tool, go to the Home - Schedules tab.
-
Click the Log File icon to display the log file for the source. To obtain the location of the full log, click the Status link.
-
The Crawler Progress Summary and Log Files by Source section display the full path to the log file. If Oracle SES fails to log in to the Content Server crawl endpoint due to an authentication error, then the following errors are logged:
EQP-60303: Exiting saxthread due to errors,
EQP-80330: Unrecognized QName
<http://schemas.xmlsoap.org/soap/envelope/>:Envelope
oracle.search.sdk.crawler.PluginException
-
Update the configuration parameters of the Content Server crawl source.
18.7.7 Search Results Do Not Include Discussions and Announcements
In the crawl source, the Single Record Query parameter is set to true on the Authorization tab.
Set the Single Record Query parameter to false.
The identity management system uses mixed case user name, but Oracle WebCenter Portal's Discussions Server (Jive) database uses all lowercase user name. The authorization query for the crawl source must apply the LOWER() function to user name parameters.
Confirm that the authorization query looks like the following statement:
SELECT forumID as WCSECATTR FROM AUTHCRAWLER_FORUM_VW WHERE (username) = LOWER(?)
UNION SELECT DISTINCT -1 as WCSECATTR FROM AUTHCRAWLER_FORUM_VW
Note:
It is not recommended to convert the actual user name column to lowercase in the query; for example,WHERE LOWER(username) = LOWER(?). Adding a function to a possibly indexed column could affect performance.18.7.8 Search Results Do Not Include Recently Added Resources
A new resource was created recently, but search results do not include the new resource.
New resources must be crawled and indexed before they can be returned in search results. Crawl schedules are run periodically to index new content. If new resources are created often, then increase the frequency of the crawl schedule. If new resources need to be crawled immediately, then start that crawl schedule manually.
18.7.9 Search Results Do Not Reflect Authorization Changes
Some resources are accessible to more users due to authorization changes in WebCenter Portal. For example, resources in a portal are now accessible to all authenticated users. The affected users cannot search for those resources.
Authorization data is cached in Oracle SES. The cache is invalidated according to the Security Filter Lifespan global setting in Oracle SES. The default value is 1 day or 1440 minutes. Adjust the value according to the general frequency of changes to authorization data.
18.7.10 Search Results Do Not Include Resources Available to Wide Audience
A portal is publicly accessible, but unauthenticated users cannot see portal resources in search results.
By default, view access of resources is granted to portal members only, even if the portal is accessible to the public. View access of resources must be granted to non-members explicitly. Go to the portal settings page, select the Role tab and the intended role, and check view access to resources.