9 Creating and Managing Personal Pages
This chapter describes how to create, secure, edit, copy, and delete your own personal pages, which are available in the Home portal to you and to other users to whom you grant access.
This chapter includes the following topics:
-
Section 9.7, "Showing or Hiding Pages in Your View of the Home Portal"
-
Section 9.9, "Customizing Your View of a Page in the Home Portal"
-
Section 9.10, "Resetting All of Your User Customizations from a Personal Page"
Permissions:
To perform the tasks in this chapter, you need the application-level permissionPages: Create, Edit, and Delete Pages. Users with this permission can create and manage their personal pages in the Home portal.9.1 About Personal Pages
Note:
The system administrator may choose to prohibit the creation of personal pages in the Home portal, allowing only the display of business role pages and system pages, over which you have less control.With appropriate permissions, you can create, secure, edit, copy, and delete your own personal pages in the Home portal, and populate them with components and content such as Message Board, Events, Discussions, portlets, and documents.
By default, personal pages can be seen in the Home portal only by the user who created them, but users can also allow other users to see their personal pages (see Section 9.6, "Setting Security for a Personal Page"). While individuals are primarily responsible for managing the content of their personal pages, a system administrator has the authority to administer all personal pages in WebCenter Portal administration, as described in the "Managing Personal Pages" chapter in Administering Oracle WebCenter Portal.
Personal pages are functionally similar to portal pages, but their purpose is different: personal pages are for an individual user's use in the Home portal, whereas portal pages are created by a portal moderator for use by all members of a portal. For more information about the different types of pages in WebCenter Portal, see Section 1.2.3, "What Are Pages?"
9.2 Opening a Page in the Home Portal
In the Home portal, you have access to your personal pages, system pages, and other pages to which you have been granted access.
The way that you access pages in the Home portal depends on the page template that is defined for the Home portal, the controls that the application specialist has made available, and the navigation model in use. In all configurations, however, you can open pages using a pretty URL.
To open a page in the Home portal:
-
Click the page name in the Home portal navigation, such as tabs along the top.
-
Enter the following URL in your browser:
http://host:port/webcenter/portal/profile/userName/page/pageName
-
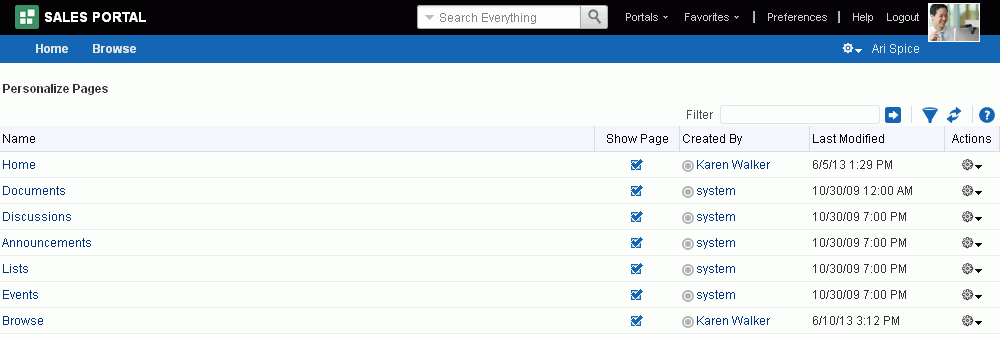
Open the Personalize Pages page, and click the name of the page you want to open (Figure 9-1).
Tip:
The way you access this page depends on the page template in use. For example, you may access it through an Actions menu.
menu.Figure 9-1 Personalize Pages: Opening a Page
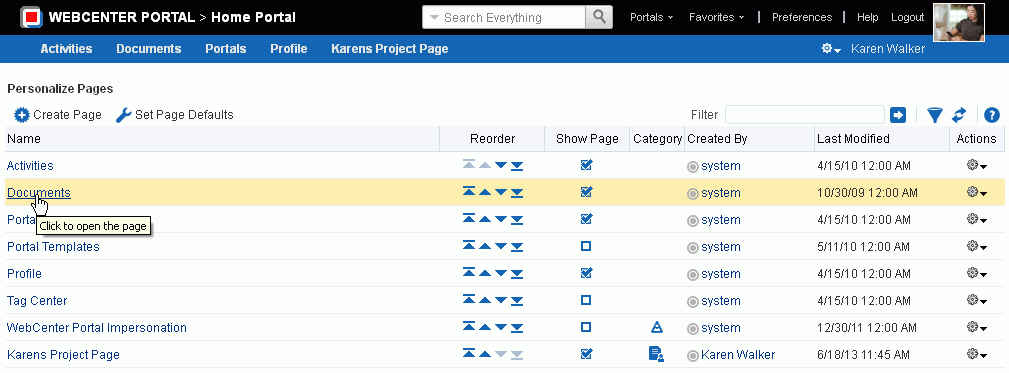
Description of ''Figure 9-1 Personalize Pages: Opening a Page''
9.3 Creating a Personal Page in the Home Portal
After setting page creation defaults, you can create a personal page in the Home portal:
9.3.1 Setting Page Creation Defaults for Personal Pages
If your system administrator has made the option available, you can set page creation defaults to reduce the number of steps required to create a personal page in the Home portal. That is, you can specify the page style that is selected by default when you open the Create Page dialog. You can also select to bypass the Create Page dialog, which enforces the default page style.
The settings you establish for yourself override any page-creation settings set by the system administrator.
To set personal page creation defaults:
-
In the Home portal (see Section 8.2, "Accessing the Home Portal"), open the Personalize Pages page.
Tip:
The way you access this page depends on the page template in use. For example, you may access it through an Actions menu.
menu. -
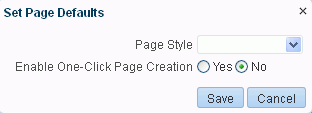
On the Personalize Pages page, click Set Page Defaults to open the Set Page Defaults dialog (Figure 9-2).
-
To set page creation defaults:
-
Select a page layout from the Page Style dropdown list.
For detailed information about the seeded page styles, click the Help icon. Note, however, that your system administrator may provide additional custom page styles or restrict page styles to a shorter list.
-
Select an option next to Enable One-Click Page Creation:
Yes—Bypass the Create Page dialog, and create all of your personal pages using the specified Page Style. This enforces a common look and feel across your personal pages.
Tip:
When you bypass the Create Page dialog, your result is a page with a generic name. For information about renaming pages, see Section 9.12, "Renaming a Personal Page."No—Display the Create Page dialog, with the specified Page Style selected as the default in the Create Page dialog for all of your personal pages. You can select a different style for your new personal pages.
-
-
Click Save to save your changes and exit the dialog.
9.3.2 Creating a Personal Page
Depending on how your portal navigation is implemented and the page template design in use, there may be several ways to create a personal page in your view on the Home portal.
To create a personal page in the Home portal:
-
In the Home portal (see Section 8.2, "Accessing the Home Portal"), click Create Page.
Tip:
The location of the Create Page link depends on the page template in use. For example, in a side navigation template, you may access it through an Actions menu. You can also find it on the Personalize Pages page.WebCenter Portal will either:
-
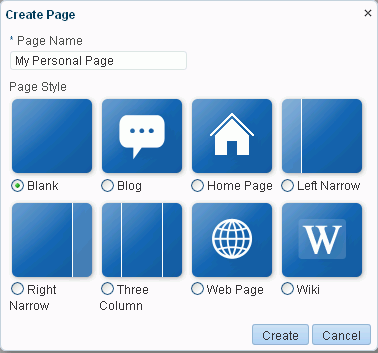
Open the Create Page dialog (Figure 9-3).
-
Immediately create a new page with a default style, if specified in the Set Page Defaults dialog (see Section 9.3.1, "Setting Page Creation Defaults for Personal Pages").
Note:
Your system administrator can control the options that appear in the Create Page dialog. So, your view may differ from that depicted in Figure 9-3. Additionally, the system administrator can set an attribute on a custom page style that determines whether a newly created page that is based on that style opens in page edit mode or page view mode. -
-
If the Create Page dialog opens, provide a name for the page.
There are no restrictions on the characters you can use in page names. You cannot give a page the same name as an existing page or certain system pages (
Activities,Documents,Tag Center,Analytics,WebCenter Portal Impersonation). However, the names of the following system pages are allowable as personal page names:Portals,Portal Templates,Profile.Note about wiki page names:
While there are restrictions on naming files (including wiki documents), there are no naming restrictions for page names. Thus, while any of the following characters can be used to name a wiki page, the page title will include the character(s) but the associated wiki document will replace the illegal character with_.? # & \ / * " | < > : ^
For example, if you create a wiki page named "
What's In a Name?", the page will have this title, but the associated wiki document will be named _What's In a Name__. -
Select a page style to define the page structure.
For detailed information about the seeded page styles, click the Help icon. Note, however, that your system administrator may provide additional custom page styles or restrict page styles to a shorter list.
-
Click Create.
The new page opens in page edit mode (Composer), where you can add content.
See Also:
For information about editing personal pages in the Home portal, see Section 9.5, "Editing a Personal Page."
9.4 Managing Your Personal Pages
To manage a personal page, or a page you have permission to manage:
-
In the Home portal (see Section 8.2, "Accessing the Home Portal"Section 8.2, "Accessing the Home Portal"), open the Personalize Pages page (Figure 9-4).
Tip:
The way you access this page depends on the page template in use. For example, you may access it through an Actions menu.
menu. -
On the Personalize Pages page, select a page, then choose any of the actions available to you on the Actions menu for the page (Figure 9-5):
Figure 9-5 Personalize Pages: Page Actions Menu
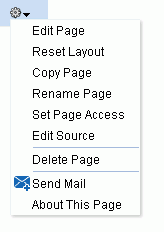
Description of ''Figure 9-5 Personalize Pages: Page Actions Menu''
-
Edit Page. Open a page that you own or have privileges to edit in the page editor, Composer. See Section 9.5, "Editing a Personal Page."
-
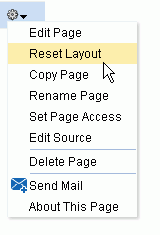
Reset Layout. Remove all of your user customizations from a selected page. This action removes such personal changes as rearrangement, resizing, or collapsing of components in only your view of the page. See Section 9.10, "Resetting All of Your User Customizations from a Personal Page."
-
Copy Page. Make a personal copy of a page. See Section 9.11, "Copying a Personal Page."
-
Rename Page. Rename a page that you own or have privileges to manage. See Section 9.12, "Renaming a Personal Page."
-
Set Page Access. Add or remove access to a page by user name or role. See Section 9.6, "Setting Security for a Personal Page."
-
Delete Page. Delete a page that you own or have privileges to manage. See Section 9.15, "Deleting a Personal Page."
-
Send Mail. Send a link to a page that you own or have privileges to manage. See Section 9.13, "Sending Mail with a Link to a Personal Page."
-
About This Page. View information about a page. See Section 9.14, "Viewing Information About a Personal Page."
-
9.5 Editing a Personal Page
When you edit a personal page, you can add or remove content, set properties on content and on the page itself, and perform additional customizations that affect the view of everyone who has access to the page.
To edit a personal page:
-
In the Home portal (see Section 8.2, "Accessing the Home Portal"), open the page in edit mode.
Note:
Depending on how the Home portal is designed, you can enter page edit mode from a page Actions menu or an Actions menu next to a page on the Personalize Pages page. Or, the page template used for the page may provide an Edit Page link. -
Edit the page as desired.
See Also:
Editing a personal page is no different than editing a page in a portal. This is an advanced task, described in the "Editing a Page" section in Building Portals with Oracle WebCenter Portal. -
Click the Save icon to save your changes.
9.6 Setting Security for a Personal Page
By default, the personal pages you create in the Home portal are accessible only to you and the system administrator. You can set page access settings to allow other users to view and work with your personal pages and to remove that access.
When you grant access to one of your personal pages to another user, the other user must deliberately show the page in their view of the Home portal. The user must take this step for each session because shared pages are not automatically shown on login.
See Also:
For information about how to show a hidden page, see Section 9.7, "Showing or Hiding Pages in Your View of the Home Portal."You may want to open a personal page to many users, but limit the exposure of a particular page component to a specific user, a user group, or to users who are assigned a specific application role. This is an advanced task requiring the use of EL expressions, described in the "Setting Security on a Page Component" section in Building Portals with Oracle WebCenter Portal.
You can grant or revoke access to your personal pages as described in the following sections:
-
Section 9.6.1, "Accessing Personal Page Security Using the Page Properties Dialog"
-
Section 9.6.2, "Accessing Personal Page Security Using the Set Page Access Dialog"
9.6.1 Accessing Personal Page Security Using the Page Properties Dialog
To access security settings for a personal page using the Page Properties dialog:
-
In the Home portal (see Section 8.2, "Accessing the Home Portal"), open the page in edit mode.
Note:
Depending on how the Home portal is designed, you can enter page edit mode from a page Actions menu or an Actions menu next to a page on the Personalize Pages page. Or, the page template used for the page may provide an Edit Page link. -
Click the Page Properties icon (Figure 9-6).
Figure 9-6 Page Properties Button in Page Edit Mode
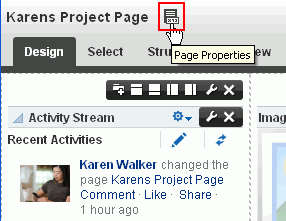
Description of ''Figure 9-6 Page Properties Button in Page Edit Mode''
-
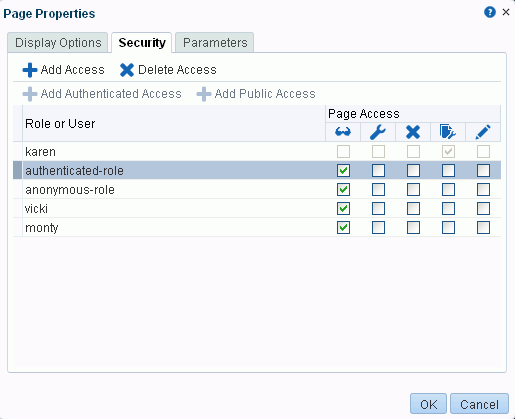
In the Page Properties dialog, click the Security tab (Figure 9-7).
Figure 9-7 Personal Page: Security Tab in Page Properties Dialog
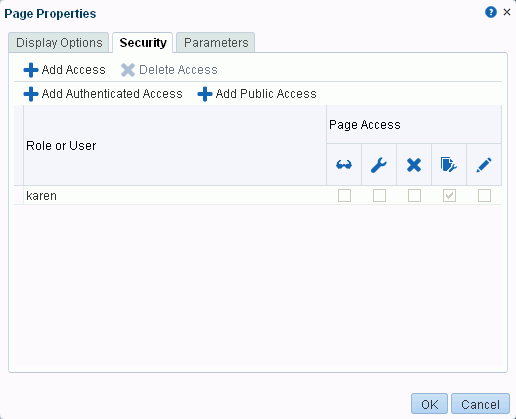
Description of ''Figure 9-7 Personal Page: Security Tab in Page Properties Dialog''
-
Follow the general steps for setting page access in Section 9.6.3, "Setting Personal Page Security."
9.6.2 Accessing Personal Page Security Using the Set Page Access Dialog
To access security settings for a personal page using the Set Page Access dialog:
-
In the Home portal (see Section 8.2, "Accessing the Home Portal"), open the Personalize Pages page.
Tip:
The way you access this page depends on the page template in use. For example, you may access it through an Actions menu.
menu. -
On the Personalize Pages page, click the Actions icon for the page, and choose Set Page Access to open the Set Page Access dialog (Figure 9-8).
Figure 9-8 Set Page Access Dialog: Personal Page
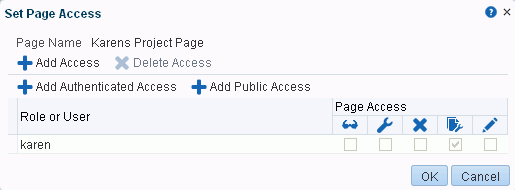
Description of ''Figure 9-8 Set Page Access Dialog: Personal Page''
-
Follow the general steps for setting page access in Section 9.6.3, "Setting Personal Page Security."
9.6.3 Setting Personal Page Security
To set security on your personal page in either the Page Properties dialog or the Set Page Access dialog:
-
To grant page access permissions to all authenticated users (that is, to users who are logged in to WebCenter Portal), click Add Authenticated Access.
The role
authenticated-roleis added under Role or User with default View access to the page. -
To grant page access permissions to all public users (that is, users who have not logged in to WebCenter Portal) click Add Public Access.
The role
anonymous-roleis added under Role or User with default View access to the page (Figure 9-9).Figure 9-9 Authenticated and Public User Read Access to a Page
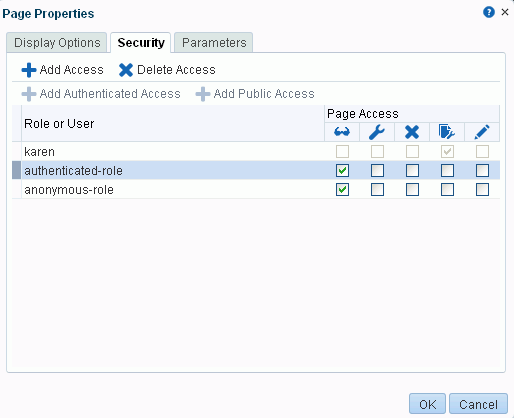
Description of ''Figure 9-9 Authenticated and Public User Read Access to a Page''
-
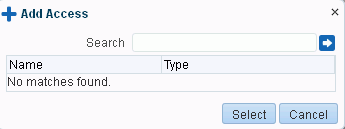
To grant page access permissions to selected users and roles, click Add Access to open the Add Access dialog (Figure 9-10).
-
In the Search field, enter a search term or the name of the user or role for whom you want to enable access, and click the Search icon. For tips on searching for a user in the identity store, see the "Searching for a User or Group in the Identity Store" section in Building Portals with Oracle WebCenter Portal.
-
Select a user or role by clicking in its row.
Note:
When you select a user name, the permissions you set are granted to that specific user. When you select a group or application role, the permissions you set are granted to all users who are members of that group or who are assigned that role.To make multiple selections:
-
Ctrl+click to select multiple rows.
-
Shift+click to select a range of rows.
-
-
Click Select to close the Add Access dialog, and populate the Role or User list with the selected users, group, or roles (Figure 9-11).
-
In the Set Page Access dialog, set the Page Access permissions as desired for each user or role (Table 9-1).
Table 9-1 Page Access Privileges in the Set Page Access Dialog
Page Access Role or User Permissions  View Page
Access the page for viewing, but cannot perform any other actions on the page. Other permissions do not implicitly include this privilege
 Edit Page
Edit the page using the page editor, Composer. This includes adding, rearranging, and deleting content; renaming the page; and changing page properties. This permission additionally requires the View Page permission.
 Delete Page
Delete the page. This permission additionally requires the View Page permission.
 Perform All Page Actions
Perform all actions on the page.
 Personalize Page
Adjust a user's own view of a page. This includes rearranging page content, collapsing and restoring page content, and removing page content. This permission additionally requires the View Page permission.
Tip:
By default, all authenticated users and user roles that you add are granted page view access. The other access privileges must be explicitly granted. -
To prevent access to the page, select the user or role from which to revoke page access, and click Delete Access.
-
Click OK to save your changes.
9.7 Showing or Hiding Pages in Your View of the Home Portal
By default, the Home portal exposes your personal pages and selected system pages as tabs. You may want to hide some pages, or expose system pages that are hidden by default, such as the Portal Templates page.
To show or hide pages in your view of the Home portal:
-
In the Home portal (see Section 8.2, "Accessing the Home Portal"), open the Personalize Pages page.
Tip:
The way you access this page depends on the page template in use. For example, you may access it through an Actions menu.
menu. -
On the Personalize Pages page, select or deselect the Show Page check box for the pages you want to show or hide (Figure 9-12).
Note:
If you deselect the Show Page check box for the current page, the Personalize Pages page closes and the current page is hidden.Within the Home portal, one page must always be shown; therefore, you cannot hide all pages.
Figure 9-12 Personalize Pages: Show Page
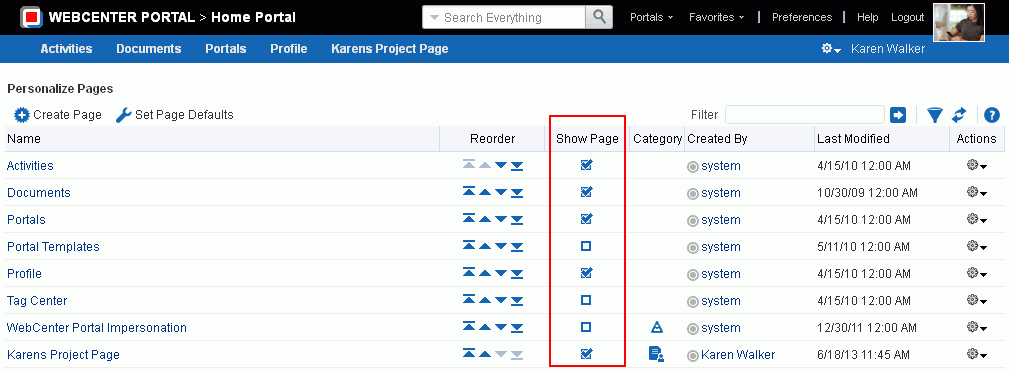
Description of ''Figure 9-12 Personalize Pages: Show Page''
9.8 Rearranging Page Order in the Home Portal
On the Personalize Pages page, you can change the order in which pages are listed or arranged in your view the Home portal. This affects the order of the tabs exposed in the Home portal.
To rearrange page order in the Home portal:
-
In the Home portal (see Section 8.2, "Accessing the Home Portal"), open the Personalize Pages page.
Tip:
The way you access this page depends on the page template in use. For example, you may access it through an Actions menu.
menu. -
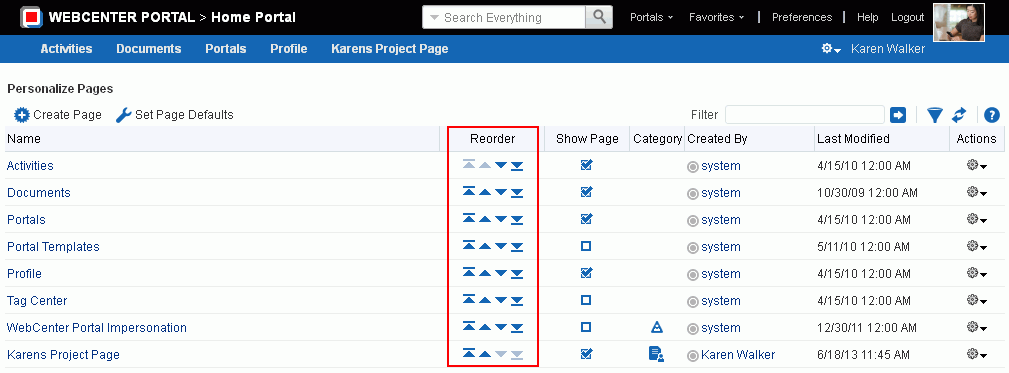
Use the icons in the Reorder column to rearrange page order (Figure 9-13).
Note:
You can also reorder pages by dragging and dropping the page names
9.9 Customizing Your View of a Page in the Home Portal
You can change your view of a given page in the Home portal in many ways, including rearranging your view of page content, hiding components, changing your page layout, and so on. All of these options are user customizations, which affect only your view. The views of all other users who have access to the page remain unchanged.
This section describes the user customizations you can perform on a page:
9.9.1 About User Customizations on a Page
You can customize the way pages appear in many ways without opening the page editor (Composer). For example, you can reposition, remove, resize, and collapse components, all within just your view of a page.
User customizations are yours and yours alone. That is, the changes you make through the procedures described in the following sections affect only your view of the page. No other users are affected by your changes.
Note:
When you revise a component in page view mode while another user deletes the same component in page edit mode, an error page opens. Simply navigate back to the original page. The deleted component does not appear, and you can continue working on other components.Whether you can customize a page depends on permissions granted to you or your application role and on how user customizations are configured. You can tell if you have such permission by the presence or absence of the controls discussed in this section. If you do not see these controls, contact your system administrator to ask for a higher-level of access or for a configuration change.
9.9.2 Rearranging Page Content
Use drag-and-drop to rearrange the position of a component on a page. Components moved by drag-and-drop can be moved into any open position on a page.
To rearrange components by dragging and dropping on a page:
-
Click and hold the header of the component you want rearrange, drag it to its target position, and drop it onto the page.
A shadow indicates where the component is placed when you drop it (Figure 9-14).
Figure 9-14 Dragging an Issues List Above an Events Viewer
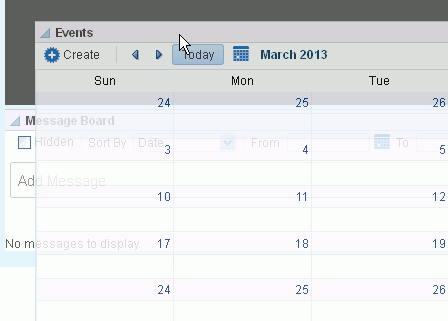
Description of ''Figure 9-14 Dragging an Issues List Above an Events Viewer''
9.9.3 Removing Components from Your View of a Page
If you find that a component, such as a document viewer or portlet, is not useful to you and the component displays a Remove icon, you can remove it from your view of the page.
Keep in mind that you can restore a removed component only by editing the page and adding a new component instance.
To remove a component from your view of a page:
-
Click the Remove icon on the component header (see Figure 9-15).
The component is removed from your view of the page.
9.9.4 Resizing Components
The border and header surrounding a component is also known as chrome. Chrome can clarify the boundaries of the component and provide an access point for component actions, such as those on the Actions menu and those embedded in the chrome itself. In the latter case, the chrome may include a Resize handle that you can use to increase or decrease the height of the component (Figure 9-16).
Figure 9-16 Resize Handle on a Component
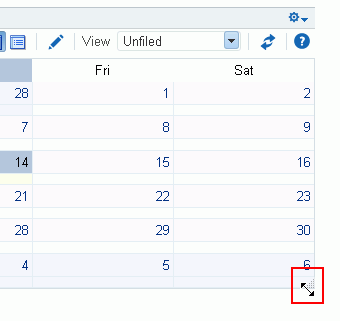
Description of ''Figure 9-16 Resize Handle on a Component''
Note:
The position of the resize handle differs for bidirectionally displayed components. Those components displayed in a right-to-left orientation display the resize handle on the left side.To use this feature, click and hold the Resize handle and drag it up to decrease the height of the component or down to increase the height of the component.
9.9.5 Collapsing and Expanding Components
With one click, you can collapse some components so that they roll up like a window shade, useful for removing the visual noise of an unused component from your application view. Collapse is available when a component shows a header. With another click, you can expand a collapsed component.
To collapse and expand components on a page:
-
Click the Collapse icon on the component header to roll the component up like a window shade (Figure 9-17).
Figure 9-17 Collapse/Expand Icon on a Component
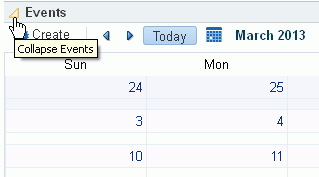
Description of ''Figure 9-17 Collapse/Expand Icon on a Component''
-
Click the Expand icon on the component header to restore the full component to view (Figure 9-18).
9.10 Resetting All of Your User Customizations from a Personal Page
You can change your view of a page in many ways, including rearranging your view of page content, hiding components, and changing your page layout, as described in Section 9.9, "Customizing Your View of a Page in the Home Portal."
To reset all of your personal customizations of a page in the Home portal:
-
In the Home portal (see Section 8.2, "Accessing the Home Portal"), open the Personalize Pages page.
Tip:
The way you access this page depends on the page template in use. For example, you may access it through an Actions menu.
menu. -
On the Personalize Pages page, click the Actions icon for the page, and choose Reset Layout (Figure 9-19) to open the Reset Layout dialog.
-
To confirm your intent to remove all of your user customizations from the page, click Reset.
9.11 Copying a Personal Page
When you copy a page, all content from the original page is also copied. The copy opens in page edit mode (Composer) so that you can start immediately making adjustments to the copy.
Note that a copy does not also include the original page's access settings. You must set access on the copy as a new page (see Section 9.6, "Setting Security for a Personal Page").
To copy a personal page:
-
In the Home portal (see Section 8.2, "Accessing the Home Portal"), open the Personalize Pages page.
Tip:
The way you access this page depends on the page template in use. For example, you may access it through an Actions menu.
menu. -
On the Personalize Pages page, click the Actions icon for the page, and choose Copy Page to open the Copy Page dialog.
-
Enter a name for the page copy in the Page Name field, and click OK.
The copied page opens in page edit mode (Composer).
-
Edit the copy as desired than click the Save icon to exit Composer.
9.12 Renaming a Personal Page
When you rename a page, any pretty URLs that use the old name will be broken. Also note that system pages, such as the Announcements, Lists, and Events pages, cannot be renamed.
To copy a personal page, or a page you have permission to manage:
-
In the Home portal (see Section 8.2, "Accessing the Home Portal"), open the Personalize Pages page.
Tip:
The way you access this page depends on the page template in use. For example, you may access it through an Actions menu.
menu. -
On the Personalize Pages page, click the Actions icon for the page, and choose Rename Page to open the Rename Page dialog.
-
Enter a new name for the page, and click the Save icon.
9.13 Sending Mail with a Link to a Personal Page
If you own or have manage permissions on a page in the Home portal, you can send other users a link to the page.
To send mail to other users populated with a link to a personal page:
-
In the Home portal (see Section 8.2, "Accessing the Home Portal"), open the Personalize Pages page.
Tip:
The way you access this page depends on the page template in use. For example, you may access it through an Actions menu.
menu. -
On the Personalize Pages page, click the Actions icon for the page, and choose Send Mail to open your mail application compose window, showing a URL link to the page.
9.14 Viewing Information About a Personal Page
To view information about a personal page:
-
In the Home portal (see Section 8.2, "Accessing the Home Portal"), open the Personalize Pages page.
Tip:
The way you access this page depends on the page template in use. For example, you may access it through an Actions menu.
menu. -
On the Personalize Pages page, click the Actions icon for the page, and choose About This Page to open the Page Information dialog, which shows Name, Created By, Date Created, Last Modified, and Direct URL.
9.15 Deleting a Personal Page
To delete a personal page:
-
In the Home portal (see Section 8.2, "Accessing the Home Portal"), open the Personalize Pages page.
Tip:
The way you access this page depends on the page template in use. For example, you may access it through an Actions menu.
menu. -
On the Personalize Pages page, click the Actions icon for the page, and choose Delete Page to display the Delete Page dialog.
-
In the Delete Page confirmation dialog, click Delete.
