10 Exploring Portals
This chapter describes what a portal is and how to perform the tasks available to any knowledge worker in an existing portal.
This chapter includes the following topics:
-
Section 10.3, "Interacting with Portals Before Logging In (Public User)"
-
Section 10.5, "Sending Mail to Portal Members or Moderators"
-
Section 10.7, "Viewing Portals Similar to the Current Portal"
Permissions:
To perform the tasks in this chapter, you need the application-level permissions granted by default to the applicationAuthenticated-User role, and the portal-level permissions granted by default to the portal Participant role.10.1 About Portals
A portal provides a dedicated and readily accessible area for relevant tools, pages, and content and supports the inclusion of specified members, each of whom have defined roles associated with permissions in the portal. As you explore, you will learn more about the portals available to you, their purpose, and how to manage your role in a portal. Your experience in a particular portal depends on the purpose of the portal and your membership role.
Many features and tools to facilitate teamwork are built into the portal framework, instantly allowing portal members to share documents, discuss issues, schedule meetings, exchange messages, create lists, and much more.
10.2 What Does a Portal Look Like?
A newly created portal may look similar to Figure 10-1 (side navigation) or Figure 10-2 (top tabbed navigation). It is important to realize, however, that your system administrator or the portal moderator has most likely created and applied a custom page template to expose or hide tabs, features, and display a unique look and feel for your organization. A new portal that you create may look nothing like these examples.
Figure 10-1 Home Page of a New Portal Using a Side Navigation Page Template
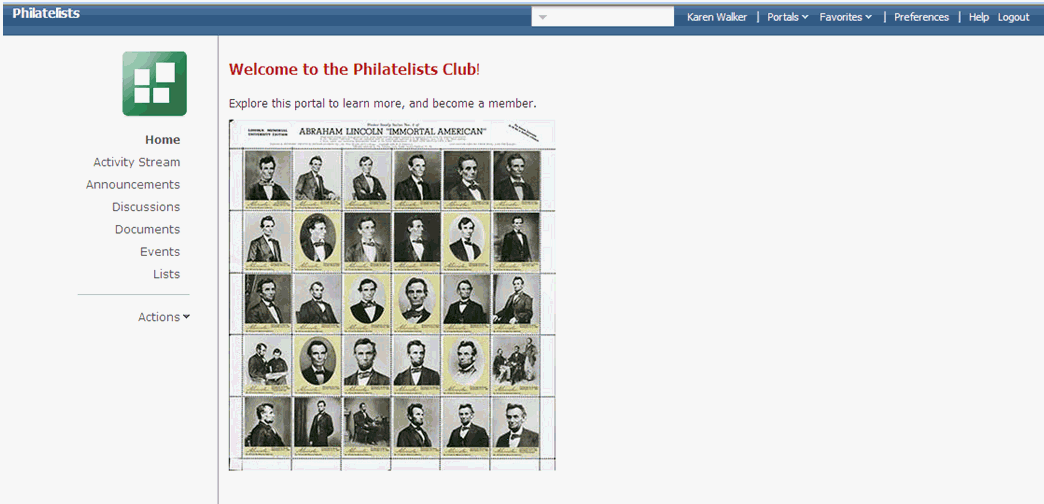
Description of ''Figure 10-1 Home Page of a New Portal Using a Side Navigation Page Template''
Figure 10-2 Home Page of a New Portal Using a Top Navigation Page Template
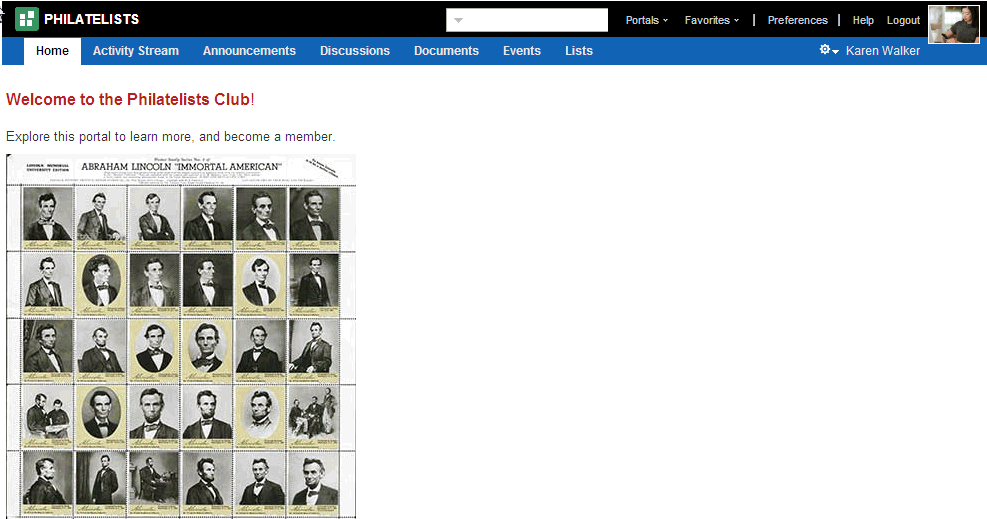
Description of ''Figure 10-2 Home Page of a New Portal Using a Top Navigation Page Template''
Each page in a portal provides access to related information. In the example portal under development above, the Home page welcome potential new member to the Philatelists club, the Documents page lists folders and files associated with the Philatelists club, the Discussions page provides a view of ongoing discussions with discussion forum management features, and so on. The portal moderator (or any portal member with the Portals-Manage Configuration permission) uses the pages available through the portal administration settings to build and manage the portal, expanding and customizing it as needs change and grow.
10.3 Interacting with Portals Before Logging In (Public User)
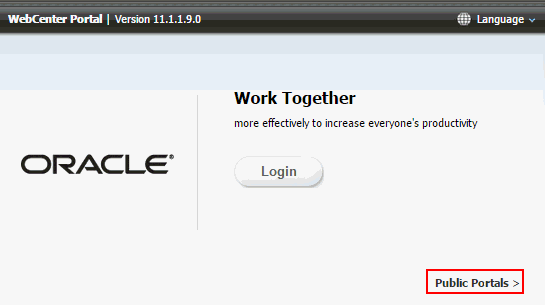
Public portals are available to anyone with Internet access, without logging in to WebCenter Portal, allowing a portal to be shared with non-members and people outside of the WebCenter Portal community.
Public users who are not registered WebCenter Portal users can access public portals in two ways:
-
Directly, using the portal URL provided to them.
-
From the WebCenter Portal Welcome page, if their installation is configured to display this page, exposing a link to public portals (Figure 10-3).
Figure 10-3 Public Portals Link on Welcome Page
Description of ''Figure 10-3 Public Portals Link on Welcome Page''
When a portal is made public, public users can view pages, lists, events, links and notes. To view Announcements, discussions, and documents, the portal moderator must explicitly grant these permissions. The public permissions granted by the portal moderator override the public permissions set by the system administrator at the application level.
10.4 Viewing and Accessing Available Portals
You can participate in multiple portals and manage your portal memberships on the Portals page in the Home portal.
To view and access the portals that are available to you:
-
Open the Portals page (Figure 10-4) in either of the following ways:
-
In the Home portal, click the Portals tab.
-
From the Portals menu, select Browse Portals.
-
-
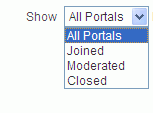
On the Portals page, from the Show list, select:
-
All Portals (Figure 10-5) to show all portals that are available to you, both public and private. Portals defined as hidden when created are not shown.
-
Joined to display portals of which you are a member.
-
Moderated to display portals for which you have moderator privileges.
-
Closed to display portals available to you that have been closed by the portal moderator. The content of a closed portal remains accessible and searchable to those who still want to reference it and portal members can continue working in the portal either by selecting Closed Portals as described here, or by direct URL (
http://host:port/webcenter/portal/portalName).
-
-
To list one or more specific portals, enter a full or partial search term in the Filter field, then click the Filter icon to refresh the list with all portals for which a match is found in the Display Name, Description, or Search Keywords (specified when the portal was created or on the Overview page in the administration settings for the portal).
-
To clear the current search string and display all portals, click the Clear Filter icon.
-
To refresh the list of portals, first ensure that any prior search is cleared (click the Clear Filter icon), then click the Refresh icon.
-
To go to the Home page of a portal, click the portal name or icon.
-
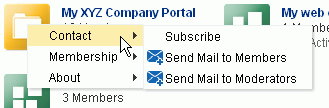
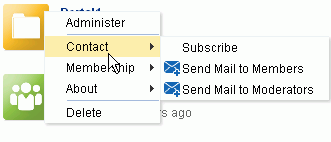
To display a menu of actions available on the portal, right-click a portal icon or name to explore the actions that are available to you, depending on your permissions in the portal (Figure 10-6, Figure 10-7, and Figure 10-8):
Figure 10-6 Portal Actions Menu for Non-Member
Description of ''Figure 10-6 Portal Actions Menu for Non-Member''
Figure 10-7 Portal Actions Menu for Portal Viewer or Participant
Description of ''Figure 10-7 Portal Actions Menu for Portal Viewer or Participant''
Figure 10-8 Portal Actions Menu for Portal Moderator or Member with Manage Configuration Permission
Description of ''Figure 10-8 Portal Actions Menu for Portal Moderator or Member with Manage Configuration Permission''
Note:
Portal administration selections (Administer and Delete) are shown only if you are the portal moderator or haveManage Configurationpermission in the portal.Select the available actions, depending on your permissions in the portal:
-
Administer to open the portal administration settings pages, available only if you are the portal moderator or have
Manage Configurationpermission in the portal. See the "Administering a Portal" chapter in Building Portals with Oracle WebCenter Portal. -
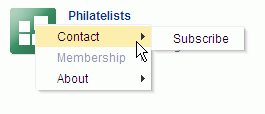
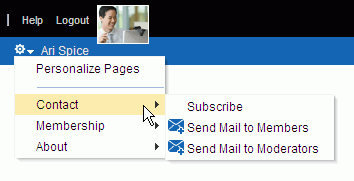
Contact menu:
-
Subscribe to open the Subscribe dialog, where you can select notification messages that you want to receive whenever the listed actions occur within the scope of the portal. See Section 22.3.2, "Setting Portal-Level Subscriptions."
-
Send Mail to Members and Send Mail to Moderators. See Section 10.5, "Sending Mail to Portal Members or Moderators."
-
-
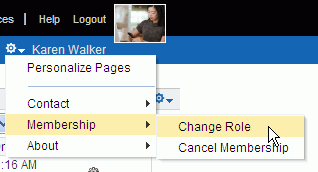
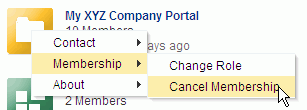
Membership menu:
-
Change Role to change your role in the portal. See Section 10.13, "Changing Your Role in a Portal."
-
Cancel Membership to cancel your membership in the portal. See Section 10.14, "Cancelling Your Portal Membership."
-
-
About menu:
-
Portal to view information about the portal. See Section 10.6, "Viewing Information About a Portal."
-
Similar Portals to view other portals similar to the current portal. A portal is considered similar to another portal if the same people perform similar actions in it, especially if they edit the content. For more information, see Section 10.7, "Viewing Portals Similar to the Current Portal."
-
Share Link to share the URL link to the portal with others. See Section 10.8, "Publishing the Link to a Portal."
-
-
Delete to delete the portal, available only if you are the portal moderator or have
Manage Configurationpermission in the portal.
-

10.5 Sending Mail to Portal Members or Moderators
Note:
The Send Mail menu actions are available only if the profiles of one or more portal members or moderators specify a mail address, and you are a portal member.You can send mail to the members or the moderators of a portal using the default mail distribution list for the portal. Advanced users can customize the mail distribution lists for a portal, as described in the "Configuring the Mail Distribution List for a Portal" section in Building Portals with Oracle WebCenter Portal.
Note:
To use the task pane available through the Microsoft Office shared document management functionality (while editing a Microsoft Word, Excel, or PowerPoint file in a portal) to send mail to members of a portal, see Section 21.3.4.12, "Sending a Message."You can send mail to portal members or moderators in either of the following ways:
-
From the Portals menu, select Browse Portals to display the Portals page in the Home portal. Locate the portal to which the members or moderators belong, then right-click the portal icon or name, and select Contact, then Send Mail to Members or Send Mail to Moderators (Figure 10-9).
Figure 10-9 Portal Actions Menu for Portal Viewer or Participant
Description of ''Figure 10-9 Portal Actions Menu for Portal Viewer or Participant''
-
When viewing a portal, click the Actions menu, and select Contact, then Send Mail to Members or Send Mail to Moderators.
Note:
The location of the Actions menu is dependent on the page template in use. For example, it may be an icon in the menu bar in a top navigation template.Figure 10-10 Portal Actions Menu: Viewing Portal
Description of ''Figure 10-10 Portal Actions Menu: Viewing Portal''
Your mail application opens, where you can compose and send mail to all members or moderators of the portal.
10.6 Viewing Information About a Portal
To view information about a portal:
-
Open the About Portal dialog in any of the following ways:
-
From the Portals menu, select Browse Portals to display the Portals page in the Home portal. Locate the portal for which you want to view information, then right-click the portal icon or name, and select About, then Portal (Figure 10-11).
Figure 10-11 Portal Actions Menu for Portal Viewer or Participant
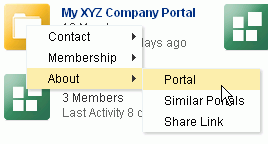
Description of ''Figure 10-11 Portal Actions Menu for Portal Viewer or Participant''
-
From the Portals menu, select Portal Builder to display the Portals page in Portal Builder. Select the portal for which you want to view information, then click the Actions icon in the toolbar and select About Portal.
Figure 10-12 Portal Actions Menu: Portal Builder
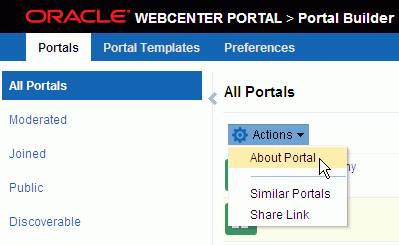
Description of ''Figure 10-12 Portal Actions Menu: Portal Builder''
-
When viewing a portal, click the Actions menu, and select About, then Portal.
Note:
The location of the Actions menu is dependent on the page template in use. For example, it may be an icon in the menu bar in a top navigation template.Figure 10-13 Portal Actions Menu: Viewing Portal
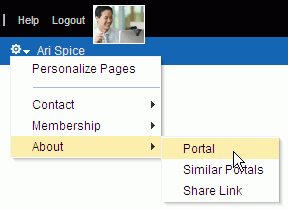
Description of ''Figure 10-13 Portal Actions Menu: Viewing Portal''
-
-
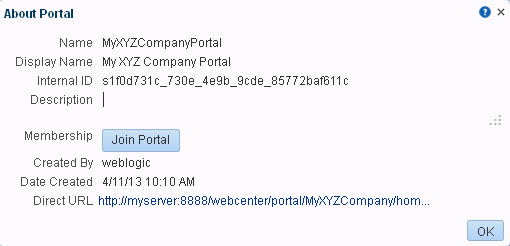
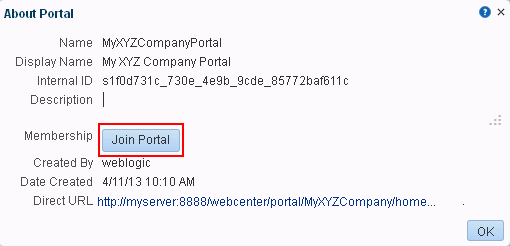
Explore the information in the About Portal dialog (Figure 10-14):
-
Name: Internal name of the portal displayed in the portal URL.
-
Display Name: Display name of the portal. This name displays at the top of the portal and other places where portals are available for selection, such as the Portals page.
-
Internal ID: ID of the portal, which other applications may use to reference this portal.
-
Description: A description of the portal, specified when creating the portal or in the portal administration settings.
-
Membership: Your role in the portal. If you are not a member of this portal and the portal allows self-service membership, a Join Portal button displays here. See Section 10.10, "Joining a Portal."
-
Created By: User name of the portal creator.
-
Date Created: Date and time that the portal was created.
-
Direct URL: URL that provides direct access to the portal.
-
10.7 Viewing Portals Similar to the Current Portal
A portal is considered similar to another portal if the same people perform similar actions in it, especially if they edit the content.
To view a list of portals similar to the current portal:
-
Open the Similar Portals dialog in any of the following ways:
-
From the Portals menu, select Browse Portals to display the Portals page in the Home portal. Locate the portal for which you want to view information, then right-click the portal icon or name, and select About, then Similar Portals (Figure 10-15).
Figure 10-15 Portal Actions Menu for Portal Viewer or Participant
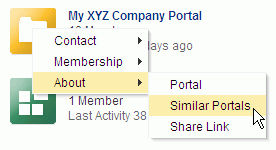
Description of ''Figure 10-15 Portal Actions Menu for Portal Viewer or Participant''
-
From the Portals menu, select Portal Builder to display the Portals page in Portal Builder. Select the portal for which you want to view information, then click the Actions icon in the toolbar and select Similar Portals.
Figure 10-16 Portal Actions Menu: Portal Builder
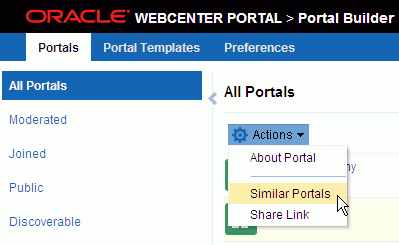
Description of ''Figure 10-16 Portal Actions Menu: Portal Builder''
-
When viewing a portal, click the Actions menu, and select About, then Similar Portals.
Note:
The location of the Actions menu is dependent on the page template in use. For example, it may be an icon in the menu bar in a top navigation template.Figure 10-17 Portal Actions Menu: Viewing Portal
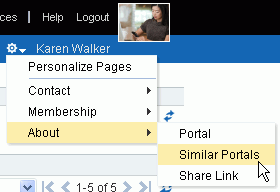
Description of ''Figure 10-17 Portal Actions Menu: Viewing Portal''
-
-
In the Similar Portals dialog, select a portal to open, or click the Display Options (pencil) icon (Figure 10-18) to modify the criteria for similar portals.
Figure 10-18 Similar Portals Display Options Dialog
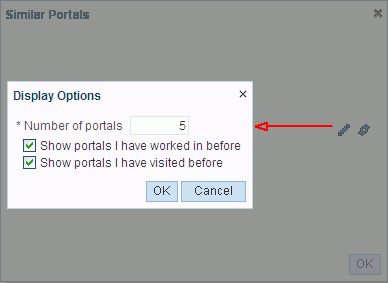
Description of ''Figure 10-18 Similar Portals Display Options Dialog''
-
In the Display Options dialog (Figure 10-18), enter the number of portals to display and the display criteria, then click OK.
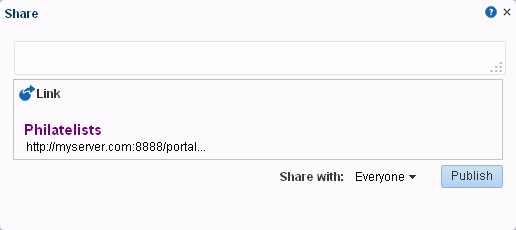
10.8 Publishing the Link to a Portal
If you want to share a portal with others, you can publish a link to the portal that will appear in activity streams of other users. With appropriate permissions, users can directly access a portal by clicking the link that specifies the portal display name.
To publish the direct link to a portal:
-
Open the Share Link dialog in any of the following ways:
-
From the Portals menu, select Browse Portals to display the Portals page in the Home portal. Locate the portal for which you want to publish the link, then right-click the portal icon or name, and select About, then Share Link (Figure 10-19).
Figure 10-19 Portal Actions Menu for Portal Viewer or Participant

Description of ''Figure 10-19 Portal Actions Menu for Portal Viewer or Participant''
-
From the Portals menu, select Portal Builder to display the Portals page in Portal Builder. Select the portal for which you want to view information, then click the Actions icon in the toolbar and select Share Link.
Figure 10-20 Portal Actions Menu: Portal Builder
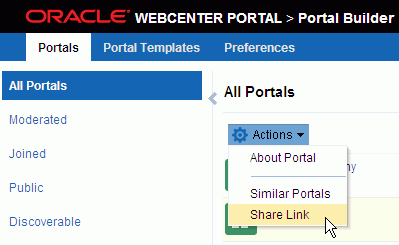
Description of ''Figure 10-20 Portal Actions Menu: Portal Builder''
-
When viewing a portal, click the Actions menu, and select About, then Share Link.
Note:
The location of the Actions menu is dependent on the page template in use. For example, it may be an icon in the menu bar in a top navigation template.Figure 10-21 Portal Actions Menu: Viewing Portal
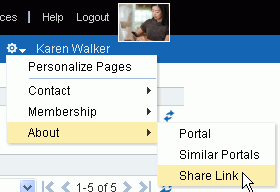
Description of ''Figure 10-21 Portal Actions Menu: Viewing Portal''
-
-
In the Share dialog (Figure 10-22), optionally enter a comment to appear with the link.
-
In the Share with list, select who you want to share the link with:
-
Everyone to share the link with all members of the current portal in their activity streams. This is useful to notify members of updates to the portal.
-
Portals to open the Select a Portal dialog, where you can select a portal to share the link in the activity streams of all members of the selected portal. This is useful for sharing information with members of other portals who may be interested in your portal.
-
-
Click Publish.
10.9 Searching for a Portal
To search for a portal by a string in the portal name, description, or keywords:
-
On the Portals page (see Section 10.4, "Viewing and Accessing Available Portals"), enter a search string in the Filter field.
-
Click the Filter icon (Figure 10-23).
The Portals page displays portals where the search string is found in the portal name, description, or keywords.
-
To clear the current search string and display all portals, click the Clear Filter icon (Figure 10-24).
10.10 Joining a Portal
To become a member of a portal, you may be registered with WebCenter Portal, or you may be a public user. If a portal allows self-service membership, you can request membership to the portal. Or, you may receive an invitation to join a portal.
This section includes the following subsections:
-
Section 10.10.1, "Joining a Portal (Registered WebCenter Portal User)"
-
Section 10.10.2, "Joining a Portal (Unregistered WebCenter Portal User)"
10.10.1 Joining a Portal (Registered WebCenter Portal User)
To become a member of a portal, you can join the portal. If a portal is configured to allow self-service membership, you can request membership to the portal. Or, you may receive an invitation to join a portal.
Some membership requests require approval from the portal moderator so you may not gain access immediately. You will receive a Worklist notification when your membership is approved.
To join a portal:
-
On the Portals page (see Section 10.4, "Viewing and Accessing Available Portals"), from the Show menu, select All Portals.
-
To join a portal, you may have several options available to you, depending on the page template in use. For example, you may be able to simply click a portal to open the Request Membership dialog.
A generally available method to join a portal is through the About Portal dialog (see Section 10.6, "Viewing Information About a Portal").
-
In the About Portal dialog, next to Membership, click Join Portal (Figure 10-25).
Figure 10-25 About Portal Dialog (for non-member)
Description of ''Figure 10-25 About Portal Dialog (for non-member)''
Note:
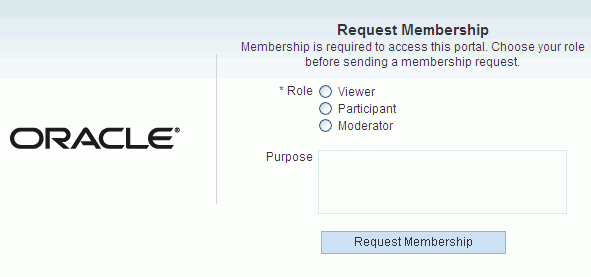
Join Portal is shown only if the portal allows self-service membership, as described in the "Managing Self-Service Membership for a Portal" section in Building Portals with Oracle WebCenter Portal. If Join Portal is not shown, contact the portal moderator directly to request membership.A portal membership request page similar to Figure 10-26 opens, showing the default Request Membership page. Because the portal moderator may customize this page, the page and roles you see may be different to the example shown here.
Figure 10-26 Requesting Portal Membership
Description of ''Figure 10-26 Requesting Portal Membership''
-
Select the type of Role you require in this portal.
Note:
Out-of-the-box portal roles includeViewer,Participant, andModerator, but a subset of these or other custom roles names may display, depending on what roles the portal moderator has defined for the portal. -
(Optional) In the Purpose field, enter an explanation of why you need access to the portal with the role you have requested.
-
Click Request Membership.
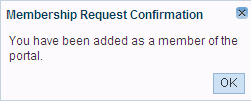
You may see a confirmation message similar to Figure 10-27, depending on whether or not the selected role requires moderator approval.
Figure 10-27 Confirmation Message (No Approval Required)
Description of ''Figure 10-27 Confirmation Message (No Approval Required)''
-
Click OK.
-
On the Portals page, click the Refresh icon to confirm your new membership status.
Note:
If membership requests require approval, you do not gain access immediately. Check back later or monitor your Worklist—you will receive notification as soon as your membership is approved.
10.10.2 Joining a Portal (Unregistered WebCenter Portal User)
If you are not a registered WebCenter Portal user, you can still view public portals, but you cannot join a portal unless you receive a mail message from the portal moderator inviting you to join a portal. If you want to join a portal, you must become a registered WebCenter Portal user.
Some membership requests require approval from the portal moderator so you may not gain access immediately. You will receive a Worklist notification when your membership is approved.
-
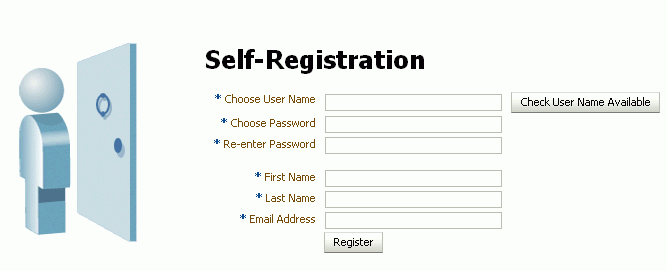
In the mail message you receive inviting you to join a portal, click the Register Yourself link included in the invitation mail to open the Self-Registration page, similar to Figure 10-28. Because the portal moderator may customize this page, the page you see may be different to the example shown here.
Note:
The Self-Registration page displays only if the portal allows self-service membership, as described in the "Managing Self-Service Membership for a Portal" section in Building Portals with Oracle WebCenter Portal.Figure 10-28 Registering with WebCenter Portal
Description of ''Figure 10-28 Registering with WebCenter Portal''
-
Choose a suitable User Name. The user name restrictions depend on the underlying identity store that is configured with WebCenter Portal.
Click Check User Name Available to determine whether a WebCenter Portal user is registered with that name. Click OK to dismiss the confirmation message and, if necessary, enter a different name.
-
Enter a suitable Password, and then Re-enter Password for verification. The password restrictions depend on the underlying identity store that is configured with WebCenter Portal.
-
Enter your First Name and Last Name, and an Email Address.
-
Click Register.
Once your User Name and Password are registered with WebCenter Portal, the portal to which you were invited opens.
10.11 Searching in a Portal
WebCenter Portal includes the Search field at the top of the application for global (application-wide) searches. To perform searches limited to a single portal, an application specialist or portal moderator must create a new resource catalog, add the Search task flow (component) from the library to the catalog, and then assign this catalog to the portal. The Search task flow is not available in the default resource catalog.
10.12 Working with Pages in a Portal
As a portal member, you will most likely be given access to pages in the portal. The portal moderator can grant you permissions to view, create, edit, and rename pages in the portal. Other portal members can grant you permissions to access the pages that they own. Pages that you create are for your own use only, unless you specifically share them with other users.
You can work with pages in a portal as described in the following sections:
-
Section 10.12.1, "Showing or Hiding Pages in Your View of a Portal"
-
Section 10.12.3, "Customizing Your View of a Page in a Portal"
-
Section 10.12.4, "Resetting All of Your User Customizations on a Page in a Portal"
-
Section 10.12.5, "Exposing a Portal Page in Your View of the Home Portal"
-
Section 10.12.6, "Sending Mail with a Link to a Page in a Portal"
-
Section 10.12.7, "Creating, Editing, and Managing a Page in a Portal"
10.12.1 Showing or Hiding Pages in Your View of a Portal
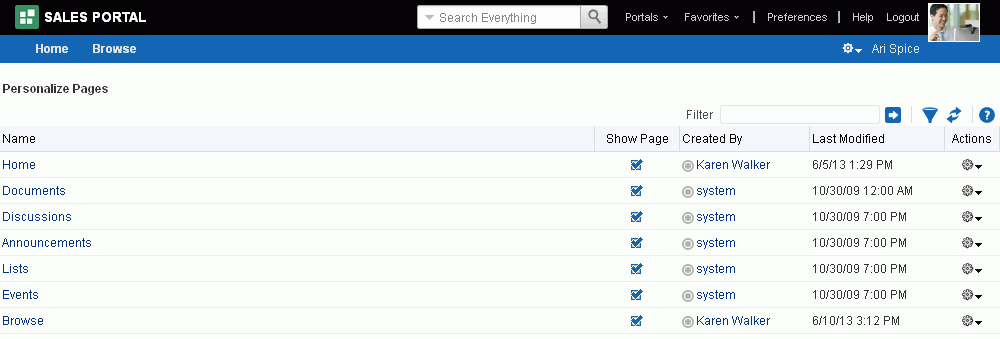
By default, a portal exposes the pages that are part of the portal navigation. You may want to personalize your view of the portal to hide some pages, or expose system pages that are hidden by default, such as a page for a tool that is enabled in the portal, such as Announcements or Lists.
To show or hide pages in your view of a portal:
-
Open the Personalize Pages page.
Tip:
The way you access this page depends on the page template in use. For example, you may access it through an Actions menu.
menu. -
On the Personalize Pages page, select or deselect the Show Page check box for the pages you want to show or hide (Figure 10-29).
Note:
If you deselect the Show Page check box for the current page, the Personalize Pages page closes and the current page is hidden.Within the Home portal, one page must always be shown; therefore, you cannot use this method to hide all pages.
Figure 10-29 Personalize Pages for a Portal: Showing or Hiding a Page
Description of ''Figure 10-29 Personalize Pages for a Portal: Showing or Hiding a Page''
10.12.2 Opening a Page in a Portal
In a portal, members have access to system pages and member-created pages. The content on a portal page is typically targeted to a particular audience or objective.
The way that you access the pages of a portal depends on the page template that is defined for the portal, the controls that the portal moderator has made available, and the navigation model in use. In all configurations, however, you can open pages using a pretty URL.
You can open a page in a portal in any of the following ways:
-
Click the page name in the portal navigation.
-
Enter the following URL in your browser:
http://host:port/webcenter/portal/portalName/page/pageName -
Open the Personalize Pages page, and click the name of the page you want to open.
Tip:
The way you access this page depends on the page template in use. For example, you may access it through an Actions menu.
10.12.3 Customizing Your View of a Page in a Portal
You can change your view of a given page in a portal in many ways, including rearranging your view of page content, hiding components, and resizing components. All of these options are user customizations, that is, they affect only your view. All other portal members' views remain unchanged.
This section describes the user customizations you can perform on a page:
10.12.3.1 About User Customizations on a Page
You can customize the way pages appear in many ways without opening the page editor (Composer). For example, you can reposition, remove, resize, and collapse components, all within just your view of a page.
User customizations are yours and yours alone. That is, the changes you make through the procedures described in the following sections affect only your view of the page. No other users are affected by your changes.
Note:
When you revise a component in page view mode while another user deletes the same component in page edit mode, an error page opens. Simply navigate back to the original page. The deleted component does not appear, and you can continue working on other components.Whether you can customize a page depends on permissions granted to you or your application role and on how user customizations are configured. You can tell if you have such permission by the presence or absence of the controls discussed in this section. If you do not see these controls, contact the portal moderator to ask for a higher-level of access or for a configuration change.
10.12.3.2 Rearranging Page Content
Use drag-and-drop to rearrange the position of a component on a page. Components moved by drag-and-drop can be moved into any open position on a page.
To rearrange components by dragging and dropping on a page:
-
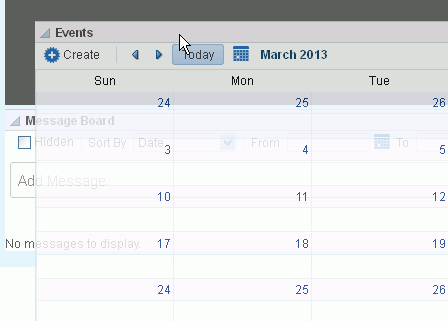
Click and hold the header of the component you want rearrange, drag it to its target position, and drop it onto the page.
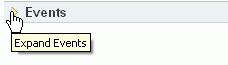
A shadow indicates where the component is placed when you drop it (Figure 10-30).
Figure 10-30 Dragging an Events Calendar Above a Message Board
Description of ''Figure 10-30 Dragging an Events Calendar Above a Message Board ''
10.12.3.3 Removing Components from Your View of a Page
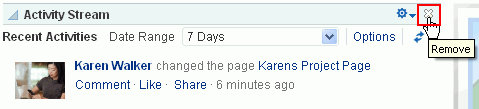
If you find that a component is not useful to you and the component displays a Remove icon, you can remove it from your view of the page.
Keep in mind that you can restore a removed component only by editing the page and adding a new component instance.
To remove a component from your view of a page:
-
Click the Remove icon on the component header (see Figure 10-31).
The component is removed from your view of the page.
10.12.3.4 Resizing Components
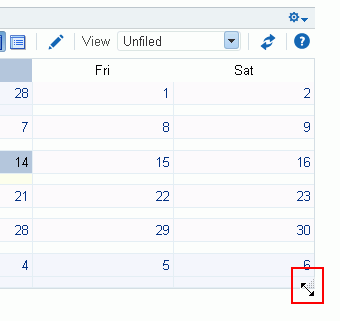
The border and header surrounding a component is also known as chrome. Chrome can clarify the boundaries of the component and provide an access point for component actions, such as those on the Actions menu and those embedded in the chrome itself. In the latter case, the chrome may include a Resize handle that you can use to increase or decrease the height of the component (Figure 10-32).
Figure 10-32 Resize Handle on a Component
Description of ''Figure 10-32 Resize Handle on a Component''
Note:
The position of the resize handle differs for bidirectionally displayed components. Those components displayed in a right-to-left orientation display the resize handle on the left side.To use this feature, click and hold the Resize handle and drag it up to decrease the height of the component or down to increase the height of the component.
10.12.3.5 Collapsing and Expanding Components
With one click, you can collapse some components so that they roll up like a window shade, useful for removing the visual noise of an unused component from your application view. Collapse is available when a component shows a header. With another click, you can expand a collapsed component.
Collapsing is useful for removing the visual noise of an unused component from your application view. Collapse is available when a component shows a header.
To collapse and expand components on a page:
-
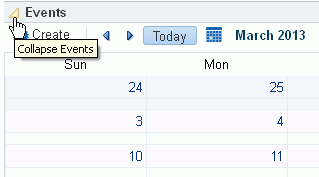
Click the Collapse icon on the component header to roll the component up like a window shade (Figure 10-33).
Figure 10-33 Collapse/Expand Icon on a Component
Description of ''Figure 10-33 Collapse/Expand Icon on a Component''
-
Click the Expand icon on the component header to restore the full component to view (Figure 10-34).
10.12.4 Resetting All of Your User Customizations on a Page in a Portal
You can change your personal view of a given page in a portal in many ways, including rearranging your view of page content, hiding components, and resizing components, as described in Section 10.12.3, "Customizing Your View of a Page in a Portal."
To reset all of your personal customizations on a portal page:
-
In the portal, display the Personalize Pages page.
Tip:
The way you access this page depends on the page template in use. For example, you may access it through an Actions menu. -
On the Personalize Pages page, click the Actions icon for the page, and select Reset Layout to open the Reset Layout dialog.
-
To confirm your intent to remove all of your user customization from the page, click Reset.
10.12.5 Exposing a Portal Page in Your View of the Home Portal
You can make a portal page available for viewing and revising from your view of the Home portal according to your permissions on the page. The portal name is prepended to the page name, so the Sales Results page in the portal Finance becomes Finance - Sales Results in your view of the Home portal.
If you delete such a page from your view of the Home portal, it remains in its original portal. In other words, deleting it simply removes it from your view of the Home portal; it does not actually delete the page. If the page is deleted from its parent portal, it is unavailable in your view of the Home portal. To clear it from your view, you must refresh the page list in the Home portal's Personalize Pages page.
To add a portal page to the list of pages in the Home portal, visible only to you in your personalized view of the Home portal:
-
In the portal, open the Personalize Pages page.
Tip:
The way you access this page depends on the page template in use. For example, you may access it through an Actions menu. -
On the Personalize Pages page, click the Actions icon for the page, and select Add to Home Portal.
When you add a portal page to your view of the Home portal, the page scope remains that of the portal.
10.12.6 Sending Mail with a Link to a Page in a Portal
If you own or have manage permissions on a page, you can send other portal members a link to the page.
To send mail to other portal members populated with a link to a page:
-
In the portal, display the Personalize Pages page.
Tip:
The way you access this page depends on the page template in use. For example, you may access it through an Actions menu. -
On the Personalize Pages page, click the Actions icon for the page, and select Send Mail to open your mail application compose window, showing a URL link to the page.
10.12.7 Creating, Editing, and Managing a Page in a Portal
Creating, editing, and managing pages in a portal are advanced tasks, described in the "Working with Portal Pages" chapters in Building Portals with Oracle WebCenter Portal".
10.13 Changing Your Role in a Portal
If you are unable to perform all the actions that you would like in a portal, you can request a change to your membership role. For example, you might want to participate in an interesting discussion thread or raise a new issue but in your current role you are only allowed to view ongoing discussions.
Role change requests may or may not require approval, depending on how the portal moderator has defined membership changes for a particular role, as described in the "Managing Self-Service Membership for a Portal" section in Building Portals with Oracle WebCenter Portal. You will receive a Worklist notification when your new role is approved.
To change your portal role:
-
Open the Change Membership dialog in either of the following ways:
-
From the Portals menu, select Browse Portals to display the Portals page in the Home portal. Locate the portal in which you want to change your membership role, then right-click the portal icon or name, and select Membership, then Change Role (Figure 10-35).
Figure 10-35 Portal Actions Menu for Portal Viewer or Participant

Description of ''Figure 10-35 Portal Actions Menu for Portal Viewer or Participant''
-
When viewing a portal, click the Actions menu, and select Membership, then Change Role.
Note:
The location of the Actions menu is dependent on the page template in use. For example, it may be an icon in the menu bar in a top navigation template.Figure 10-36 Portal Actions Menu: Viewing Portal
Description of ''Figure 10-36 Portal Actions Menu: Viewing Portal''
-
-
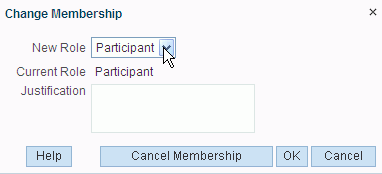
In the Change Membership dialog (Figure 10-37), select your preferred role from the New Role list.
Note:
The New Role list is active only if the portal moderator has allowed self-service membership changes. If New Role selections are disabled, contact the portal moderator directly to request a member role change.If you wish to cancel your membership in the portal, click Cancel Membership.
The portal moderator controls the list of roles displayed here, as described in the "Managing Self-Service Membership for a Portal" section in Building Portals with Oracle WebCenter Portal. Out-of-the-box portal roles include
Viewer,Participant, andModeratorbut a subset of these or other custom roles may display. -
Click OK.
A confirmation message displays whether or not the selected role change requires approval.
-
Click OK to acknowledge the confirmation message.
-
On the Portals page, click the Refresh icon to confirm your membership status has changed for the portal.
Note:
Your new role is not effective immediately when membership change requests require approval. Check back later or monitor your Worklist; your new role will be effective as soon as the portal moderator approves it.
10.14 Cancelling Your Portal Membership
When you no longer want or need membership in a portal, you can cancel your membership.
Some cancellation requests require approval from the portal moderator so you may not be removed from the portal immediately. You will receive a Worklist notification when your membership is removed.
Once you have successfully cancelled your membership in a portal, it will no longer be shown on the Portals page when you select Joined from the Show menu.
To cancel your membership in a portal:
-
Open the Cancel Membership dialog in either of the following ways:
-
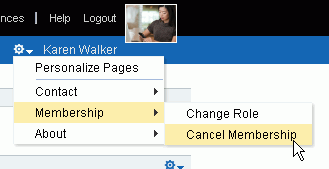
From the Portals menu, select Browse Portals to display the Portals page in the Home portal. Locate the portal in which you want to change your membership role, then right-click the portal icon or name, and select Membership, then Cancel Membership (Figure 10-38).
Figure 10-38 Portal Actions Menu for Portal Viewer or Participant
Description of ''Figure 10-38 Portal Actions Menu for Portal Viewer or Participant''
-
When viewing a portal, click the Actions menu, and select Membership, then Change Role.
Note:
The location of the Actions menu is dependent on the page template in use. For example, it may be an icon in the menu bar in a top navigation template.Figure 10-39 Portal Actions Menu: Viewing Portal
Description of ''Figure 10-39 Portal Actions Menu: Viewing Portal''
-
-
Click OK to acknowledge the confirmation message.
-
From the Portals menu, select Browse Portals. In the portal browser, select Joined from the Show menu, then click the Refresh icon to confirm that the portal no longer displays.
Note:
If a cancellation request requires approval, you are not removed from the portal immediately. Check back later or monitor your worklist; you will receive notification when your unsubscribe request is approved or rejected by the portal moderator.