3 Searching for Information
This chapter describes how to use the search features in WebCenter Portal.
This chapter includes the following topics:
Permissions:
The tasks described in this chapter are available to any WebCenter Portal user with access to a page that contains search.3.1 About Searching in WebCenter Portal
WebCenter Portal provides global (application-wide) search. By default, the search field is at the top-right of the WebCenter Portal. Information is searched by name and content. A search looks for your search terms in every searchable object enabled in the WebCenter Portal, returning only the results you are authorized to view. For example, if you are not a member of the Finance portal, then any search results from that portal do not display.
In addition to WebCenter Portal's search, the Documents tool provides its own search engine for file searches. This saves time and increases the relevancy of results by narrowing the scope of a search to files. The Documents tool searches within a specific portal's document library. For more information, see Section 19.26, "Searching for Documents."
Notes:
System administrators and portal moderators can customize the search user interface, so your screen shots may look different. They can configure the scope of searches to specific portals, tools/services, and document types; they can add or hide attributes provided with search results; and they can change the size of the search box.Global search does not search portal assets, such as portal templates, page templates, resource catalogs, and navigation models. If you need to search portal assets (as opposed to user-specific data, such as documents and portals), use the Filter field on their respective application pages.
3.1.1 Running Various Search Environments
WebCenter Portal provides two ways of searching:
-
Oracle Secure Enterprise Search (SES) adapter
-
Oracle WebCenter Portal live (delegated) search
For best performance and scalability, most system administrators configure large-scale implementations to use Oracle SES.
Oracle SES provides unified ranking results for the following assets:
-
Documents, including wikis and blogs
-
Announcements and discussions
-
Portals, lists, page metadata, and people
For example, when you run a search for a user name, most likely, you are looking for that persons's contact information (that is, the exact user name in your organization), not necessarily documents that the user wrote. The unified ranking in Oracle SES enables you to see the most relevant results.
Additionally, with Oracle SES as the search engine, you can use the wildcard character [*] in the middle or end of a term for wildcard matching. For example, when you search for keywords like wiki or page, Oracle SES does not return the wiki page MyWikiPage in search results. However, My* or My*Page does return MyWikiPage.
3.2 Searching with Oracle SES 11.2.2.2
This section describes your search experience if your application has been configured with Oracle SES 11.2.2.2.
Notes:
Your search environment varies depending on how your system administrator configured search. For example:-
Oracle SES 11.2.2.2 supports faceted search, filtered search in the search box, and document thumbnails, while earlier releases of Oracle SES and implementations with live (delegated) search do not. See Section 3.2, "Searching with Oracle SES 11.2.2.2."
-
Oracle SES 11.1.2.* supports saving searches and setting user preferences with search, while the 11.2.2.2 adapter and implementations with live (delegated) search do not. See Section 3.3, "Searching with Oracle SES 11.1.2.*."
Your system administrator can tell you which search environment you have running. The way you access search depends on how the portal is designed. The application specialist might also provide you with a pretty URL to access the page.
This section contains the following topics:
3.2.1 Running a Global Search
To perform a global search:
-
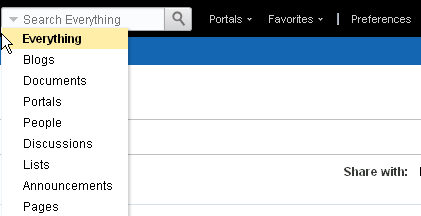
Locate the global search field, and enter a search term. For example, Figure 3-1 shows the search field at the top right of WebCenter Portal.
-
Press Enter or click the Search icon (Figure 3-2) next to the global search field.
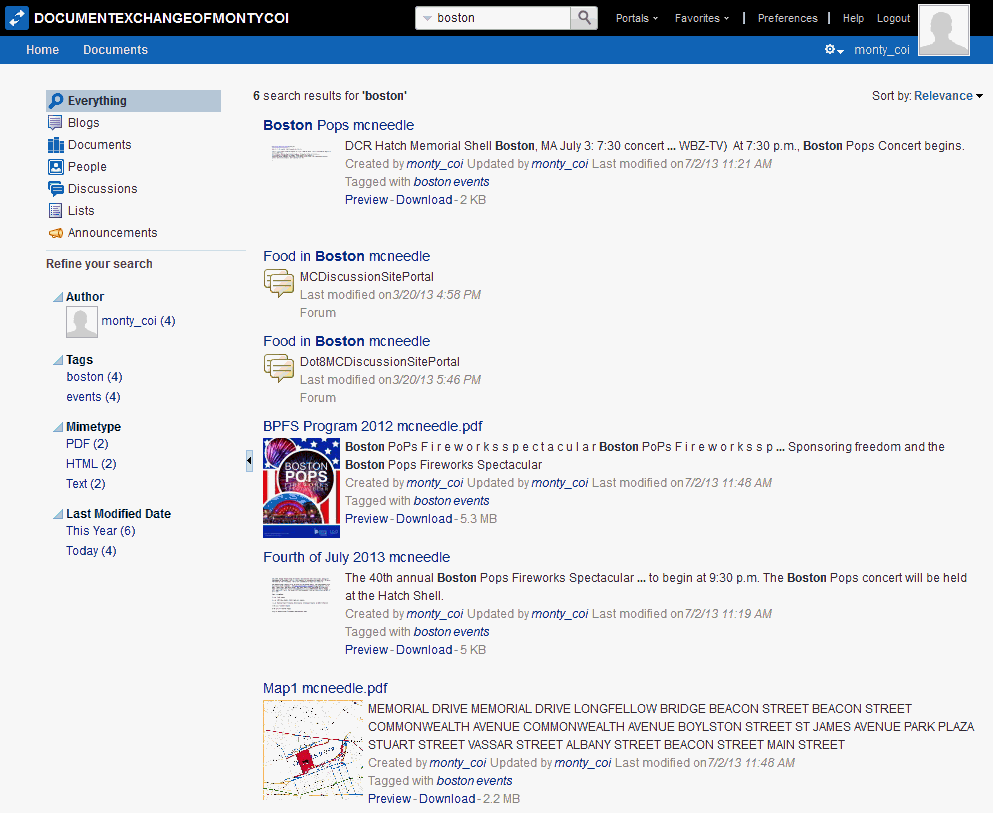
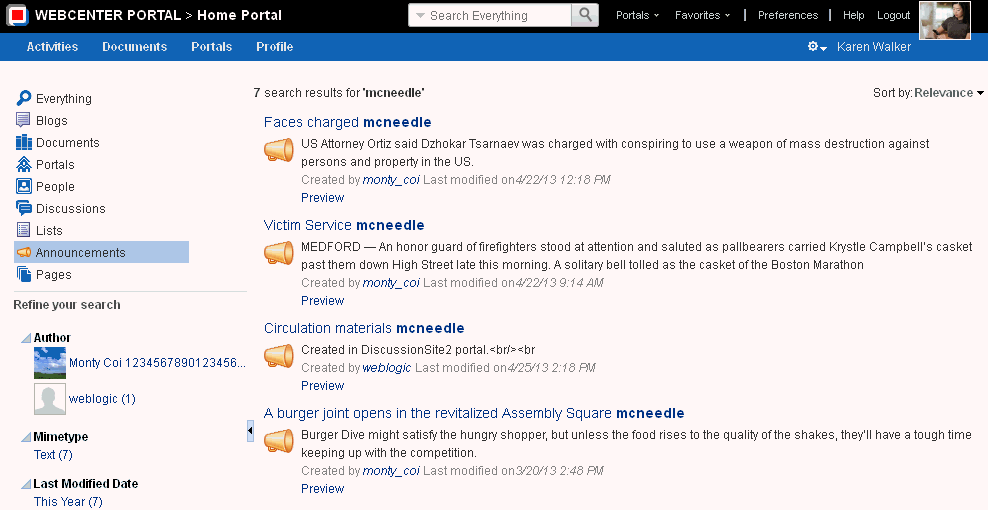
Results display in the search results page. Figure 3-3 is a result list showing all (Everything) results.
Note:
Thumbnails for documents appear in place of icons when thumbnail creation is enabled in WebCenter Content and when single sign-on is configured on both WebCenter Portal and WebCenter Content. -
Click a link to open a result.
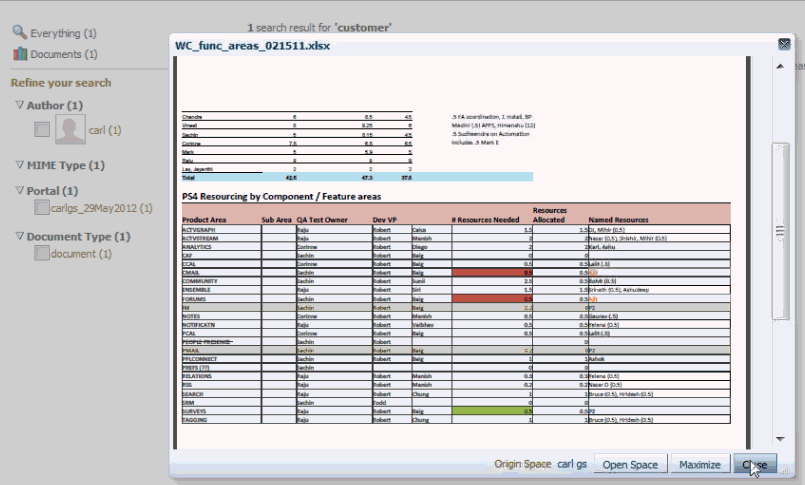
You can click the Preview button, as hightlighted in Figure 3-4, to see a preview of the result before opening it.
Figure 3-5 shows an example of a result preview.

3.2.2 Running Faceted Searches to Narrow Results
You can use facets to navigate indexed data without running a new search. Some search terms can provide massive results, but faceted navigation within search lets you clarify exactly what you are looking for, or even discover something new.
Note:
Oracle SES 11.2.2.2 supports facets. Earlier releases of Oracle SES supported refiners. Facets and refiners are similar in that you use them to narrow down search results. A system configured with Oracle SES 11.2.2.2 (using facets) looks similar to a system configured with Oracle SES 11.1.2.* (using refiners). However, facets count the full corpus and have better response time than refiners.For example, Figure 3-6 shows a search filtered to show only announcements created by the weblogic user. You can add more facets, for example clicking This Year under the Last Modified Date facet, to continue narrowing this search.
The following facets are included by default, although your system administrator may configure different facets:
-
Author
-
Last Modified Date
-
Mimetype
-
Tags
-
Portal
Click the Remove Filter icon (highlighted in Figure 3-6) to remove each facet and return to a complete result list.
3.2.3 Running Filtered Searches to Narrow Results
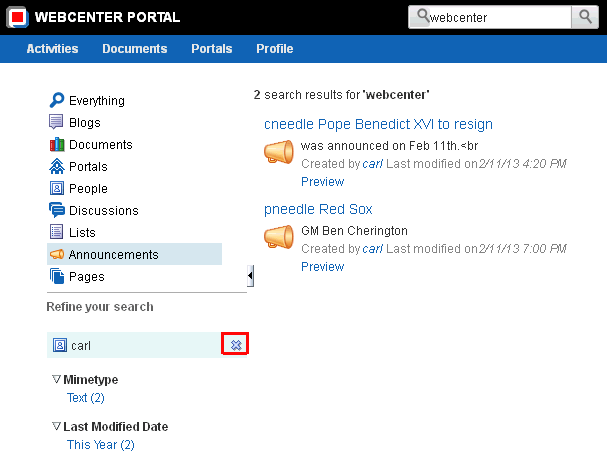
You can narrow your results using the filter list in the global search box (Figure 3-7).
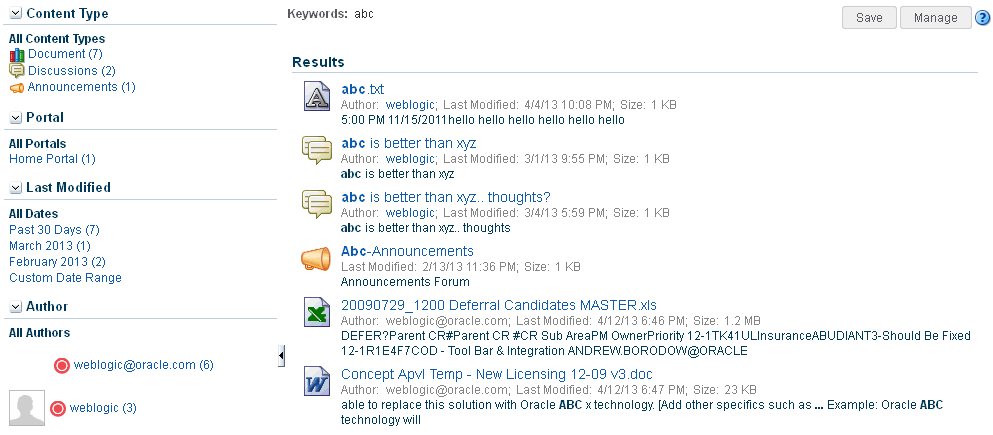
Or, you can filter results the same way using the facets on the left side of search results. For example, Figure 3-8 shows only announcements in the result list.
Figure 3-8 Search Results Filtered to Show Only Announcements
Description of ''Figure 3-8 Search Results Filtered to Show Only Announcements''
3.2.4 Running Sorted Searches to Narrow Results
You can narrow your results using the Sort by drop-down list to the right of page (Figure 3-9).
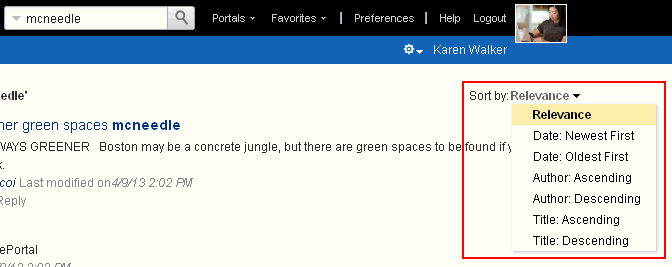
By default, searches are sorted with the most relevant results first, with the following sorting options available:
-
Date: Newest First
-
Date: Oldest First
-
Author: Ascending
-
Author: Descending
-
Title: Ascending
-
Title: Descending
3.3 Searching with Oracle SES 11.1.2.*
This section describes your search experience if WebCenter Portal has been configured with Oracle SES 11.1.2.*.
Notes:
Your search environment varies depending on how your system administrator configured search. For example:-
Oracle SES 11.2.2.2 supports faceted search, filtered search in the search box, and document thumbnails, while earlier releases of Oracle SES and implementations with live (delegated) search do not. See Section 3.2, "Searching with Oracle SES 11.2.2.2."
-
Oracle SES 11.1.2.* supports saving searches and setting user preferences with search, while the 11.2.2.2 adapter and implementations with live (delegated) search do not. See Section 3.3, "Searching with Oracle SES 11.1.2.*."
Your system administrator can tell you which search environment you have running.
If your organization customized the search user interface, your screen shots may look different.
This section contains the following topics:
3.3.1 Running a Global Search
To perform a global search:
-
Locate the global search field and enter a search term.
For example, Figure 3-10 shows the search field at the top right of WebCenter Portal.
-
Press Enter or click the Search icon next to the global search field (Figure 3-11).
Results display in the search results page (Figure 3-12).
-
Click a link to open a result.
When Oracle SES 11.1.2.* is configured, users can individually configure how their search results are displayed. Specifically, each user can control which tools and services are included in their search and the order in which they are listed in the results. Set this in the Preferences dialog (for information see Section 3.3.4, "Setting Individual Preferences for Search Results").
3.3.2 Using Refiners to Narrow Search Results
You can narrow your results in the Refine Search section to produce a smaller set of results. For example, to see all documents that one particular person posted, rather than scrolling through pages of results to find them, you can simply click that person's name or profile picture, and the results are filtered to show only results from that person.
-
With the Oracle SES 11.1.2.2 adapter, you can narrow the search by Author (uploader/modifier), Last Modified date, Content Type, Portal, and Tags.
-
With WebCenter Portal's live search adapters, you can narrow the search only by Author (uploader/last modifier) or Last Modified date.
Notes:
Oracle SES results for Author include all user names that have modified a document/wiki/blog, while live results for Author include only the name of the person who last modified a document/wiki/blog.Some WebCenter Portal components, like tagged items and favorites, do not supply refiners for search, and do not appear in refined searches.
To refine the display of search results:
-
Perform a global search as described in Section 3.3.1, "Running a Global Search."
The search results display on the search results page.
-
To refine the display of search results by date, choose a time-range limitation from the Last Modified box.
For example, click Since Yesterday to view results posted since the previous day, or click Past 7 Days to view results posted in the past week. The number next to each time range indicates the search's best guess at how many search results fall within the specified range.
Some date selections, such as years or months, provide additional refinement options when you choose them. For example, when you refine a search by all results occurring within 2007, your refined results display and additional refinements appear in the Last Modified box.
Click Custom Date Range and enter a date in the field provided (optionally, with an end date also), or click the Select Date icon and choose a date from a date picker (Figure 3-13).
Figure 3-13 Date Picker for Custom Date Range
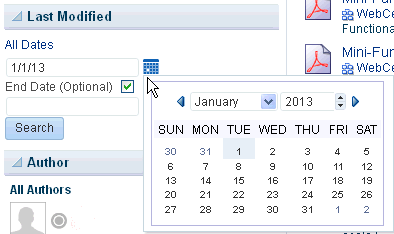
Description of ''Figure 3-13 Date Picker for Custom Date Range''
-
To refine the display of search results to a person who authored/uploaded/modified it, choose someone listed under Author (Figure 3-14).
Figure 3-14 Authors on the Search Results Page

Description of ''Figure 3-14 Authors on the Search Results Page''
For example, click pat to view all results contributed by the user Pat.
The number next to each user name indicates the search's best guess at how many search results are associated with the specified user.
Click More... or Less... to see more or less authors listed in the Author area.
-
When a refinement is selected, it appears above the Results list with a Delete icon, enabling you to remove the refinements you have applied to search results (Figure 3-15).
Figure 3-15 Delete Icon to Remove Refinement of Search Results

Description of ''Figure 3-15 Delete Icon to Remove Refinement of Search Results''
Click the Delete icon to remove that particular search results refinement and broaden the list of displayed results.
3.3.3 Saving Searches
After you have performed a search, you can save it so that you can run it again later without having to reenter the search terms. You can also share the saved search with portals.
Note:
You can save searches only if you are logged in to an application connected to Oracle SES 11.1.2.* (not Oracle SES 11.2.2.2).This section includes the following topics:
3.3.3.1 Saving a Search
Saved searches are useful for the searches you run frequently. They assist in keeping you current as new information is added to the search pool.
To save a search:
-
Perform a global search as described in Section 3.3.1, "Running a Global Search."
The search results display on the Search results page.
-
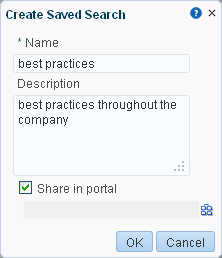
Click Save below the search field (Figure 3-16).
The Create Saved Search dialog opens (Figure 3-17).
-
In the Name field, enter a meaningful name for the search.
The value you enter in the Name field is the value that appears on the dropdown list of saved searches.
The search that was in the Search field is saved, no matter what name you give it. For example, if the search term was admin, but you enter jcr in the Name field. The saved search searches for the term admin and not jcr.
-
Optionally, in the Description field, enter a description of the search.
-
Select the Share in portal check box to enable other members of the portal to see this search on the portal's dropdown list of saved searches. Only one portal can be specified.
-
Click the Select Portal icon to select the portal in which to share the saved search.
-
Click OK to save the search.
3.3.3.2 Running a Saved Search
You can save searches for a quick and easy way to do repeat searches. The saved searches to which you have access depends on the location.
-
Go to the Home portal (see Section 8.2, "Accessing the Home Portal"). After you have saved searches, there is a dropdown list for Saved Searches in the Home portal.
-
Go to any page containing the All Saved Searches component (Figure 3-18).
In a portal, All Saved Searches lists all your saved searches for the portal and all shared saved searches for the portal (made both by yourself and other users). It does not list your global saved searches or saved searches made against other portals.
In the Home portal, All Saved Searches lists all your global saved searches.
-
Go to any page where the saved search was placed.
The Saved Search list shows the results of the particular search.

To run a saved search:
-
Log in and find the saved search:
-
Locate the page containing the All Saved Searches component.
-
Locate the page containing the saved search. In this case, the search results are immediately visible.
-
-
From the All Saved Searches component or the Saved Search panel in the Home portal, click the link for the saved search you want to run.
Tip:
The description is rendered as a tooltip when you move your cursor over the name of the saved search. -
View the results on the dynamically-generated Search Results page.
3.3.3.3 Sharing a Saved Search
You can share a saved search if you think the results of a search might be useful for other portal members.
To share a saved search:
-
Go to the portal where the search was performed and saved.
-
Click Manage (Figure 3-19).
-
The Manage Saved Searches window opens. In the Saved Searches drop-down list, select the saved search you want to share.
-
Select the Share in portal check box, and click the Select portal icon to select the portals in which you want to share this saved search.
The saved search is now available for other members of the portal to run. The search is listed in the Saved Searches list for all portal members and in the All Saved Searches list, if one exists.
-
Click Apply, then OK.
3.3.3.4 Customizing a Saved Search
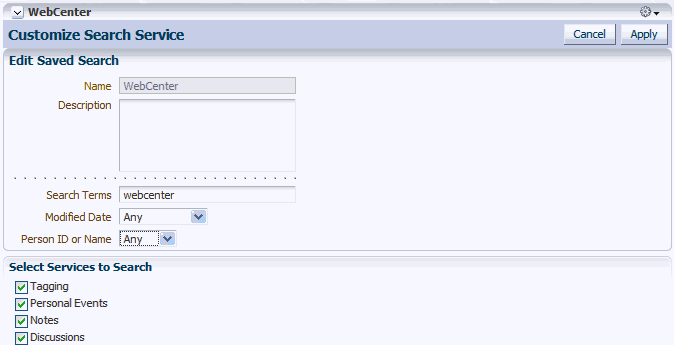
After you have added a saved search to a page, you can customize it.
Click the Personalize icon (Figure 3-20) to make changes to the saved search.
In the Customizing Saved Searches dialog, you can to change the search terms, add refiners, or choose the tools and services to search (Figure 3-21).
Figure 3-21 Customizing Saved Searches Dialog
Description of ''Figure 3-21 Customizing Saved Searches Dialog''
3.3.3.5 Deleting a Saved Search
To delete a saved search:
-
Click Manage (Figure 3-22).
-
The Manage Saved Searches window opens. In the Saved Searches drop-down list, select the saved search you want to delete.
-
Click the Delete button, then Apply and OK.
3.3.4 Setting Individual Preferences for Search Results
In addition to the customizations the system administrator can make to the way search results are displayed, individual users also can customize the way they see their results. Specifically, each user can control which tools and services are included in their search and the order in which they are listed in the results.
Note:
When Oracle SES 11.2.2.2 is configured, these search preferences are not reflected in search results. Oracle SES 11.2.2.2 settings are configured by the system administrator on the Search administration page only.When you search content, you may find that the results from one tool or service are more relevant to you than results from other tools. You may find it useful to be able to exclude some tools from a search and specify the order in which the results from selected tools are listed.
Use search preferences to choose the tools to search and specify the display order for search results. This section contains the following topics:
-
Section 3.3.4.1, "Selecting the Tools and Services to Search"
-
Section 3.3.4.2, "Specifying a Display Order for Search Results"
See Also:
Section 19.26, "Searching for Documents"3.3.4.1 Selecting the Tools and Services to Search
Your WebCenter Portal application specialist makes tools and services available to WebCenter Portal. By default, all enabled services are selected to be searched. You can disable any service from which you do not want to see search results. For example, if you frequently search for a particular type of technology, including your personal contacts in the search is probably not useful.
To specify which tools and services should be searched:
-
Click the Preferences link at the top of WebCenter Portal.
-
Click Search to open the Search Preferences pane (Figure 3-23).
-
To add a tool or service to a search, choose one or more services on the Available Services list and click the Move selected items to list icon to move them to the Selected Services list.
To remove a tool or services from search, choose one or more services on the Selected Services list and click the Remove selected items from list icon to move them to the Available Services list.
Note:
When Oracle SES is configured in WebCenter Portal, Oracle SES cannot be deselected, and components that do not support searching with Oracle SES (such as Notes) are not listed. -
Click OK to save your changes and exit the Preferences dialog.
Alternatively, click Apply to save your changes without exiting.
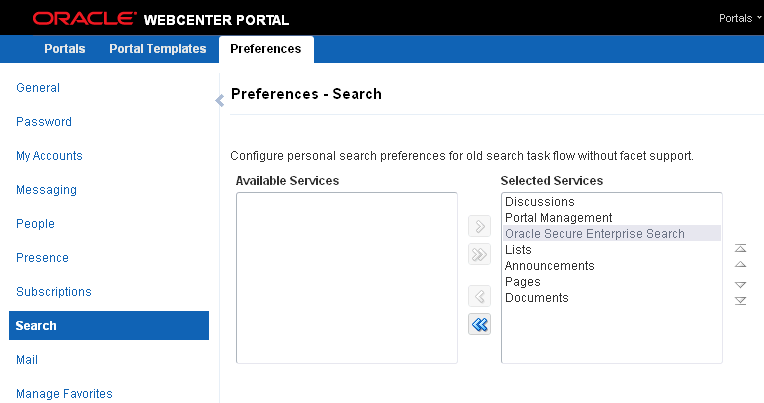
The selections you make in the Selected Services list are included in future searches. The services on the Available Services list are not searched.
3.3.4.2 Specifying a Display Order for Search Results
You may find that some tools and services provide more relevant search results than others. For example, you may find that search results from Documents prove more useful than Lists. Preferences provide controls for specifying the order in which tools and services are listed in search results.
To specify a display order for search results:
-
Click the Preferences link at the top of WebCenter Portal.
-
Click Search to open the Search Preferences panel (Figure 3-24).
-
Choose one or more tool or service on the Selected Services list and click the Move icons to the right of the list to move your selections higher or lower on the list.
The order you specify here determines the order they are listed in search results.
-
Click OK to save your changes and exit the Preferences dialog.
Alternatively, click Apply to save your changes without exiting.
3.4 Limitations with Search
Note the following limitations with searching in WebCenter Portal:
-
The user profile fields searched depend on the security settings configured on the Preferences - People - Profile page. A user who has not logged in can search by values in the fields set to
Everyone. An authenticated user can search by values in the fields set toAuthenticatedUsersand Everyone. A user who has a connection to the user of the profile can search by values in the fields set toUser'sConnections,AuthenticatedUsers, and Everyone. The user of the profile can search by values in the fields of all sections. -
WebCenter Portal's live search adapter does not support wildcard searching.
-
WebCenter Portal's live search adapter does not recognize the following special characters:
! # $ % ^ & ( ) + = [ ] { } | ; ' \ " , < > / ? ` ~ - *For example, when you search for the keyword Q2&Total, WebCenter Portal returns search results for Q2Total. A wiki page named Q2&Total is not found. If you require exact term searches (such as
United Arab Emiratesas opposed toUnited + Arab + Emirates), then you must use Oracle SES (since quotation marks are not recognized). -
When searching lists, WebCenter Portal live search only searches list names and descriptions. Use Oracle SES for more thorough search: It also searches list column names and contents.
-
Users can the Previous and Next links to view any additional results (Figure 3-25). Oracle SES results show an estimated number of search results. However, live search results do not include an estimated number of results. Links may appear even if no additional results are available (Figure 3-25).
Figure 3-25 Estimated Number of Search Results

Description of ''Figure 3-25 Estimated Number of Search Results''